


 Loading...
System Administration
Guide
User Guide
XE3022EN0-2
ME3612E4-1
© 2008 by Fuji Xerox Co., Ltd. All rights reserved.
Copyright protection claimed includes all forms and matters of copyrighted material and information now allowed by statutory or judicial law or hereinafter granted, including without limitations, material generated from the software programs which are displayed on the screen, such as icons, screen displays, looks etc.
Xerox® and all Xerox products mentioned in this publication are trademarks of Xerox Corporation. Product names and trademarks of other companies are hereby acknowledged.
The information in this document is correct at the time of publication. Xerox reserves the right at any time to change the information without notice. Changes and technical updates will be added in subsequent editions of the documentation. For the latest information go to www.xerox.com.
Products Subject To Ordinary Export Regulations
An export of this product is strictly limited in accordance with Laws concerning Foreign Exchange and Foreign Trade of Japan and/or the export control regulations of the United States. You must obtain, if you wish to export this product, any appropriate export license from the Japanese Government or its agency and/or re-export approval from the U.S. Government or its agency.
Products Subject To Supplementary Export Regulations
An export of this product is strictly limited in accordance with Laws concerning Foreign Exchange and Foreign Trade of Japan and/or the export control regulations of the United States. You must obtain, if you know the product is to be used, or was used for development, manufacturing or use of any mass destructive weapons including nuclear weapon, chemical weapon or biological weapon because of a dealing document such as legal contract or information from the importer, any appropriate export license from the Japanese Government or its agency and/or re-export approval from the U.S. Government or its agency.

Table of Contents
1 Before Using the Machine ................................................................... |
13 |
|
|
Xerox Welcome Center ......................................................................... |
13 |
|
Serial Number ................................................................................... |
13 |
|
Language Displayed on the Touch Screen ........................................... |
14 |
|
Conventions .......................................................................................... |
14 |
|
Related Information Sources ................................................................. |
16 |
2 Paper and Other Media ........................................................................ |
17 |
|
|
Loading Paper ....................................................................................... |
17 |
|
Preparing Paper for Loading ............................................................. |
17 |
|
Trays 1 & 2/Two Tray Module (Trays 3 & 4) ..................................... |
17 |
|
High Capacity Tandem Tray (Trays 3 & 4) ....................................... |
18 |
|
Bypass Tray (Tray 5) ........................................................................ |
19 |
|
High Capacity Feeder (Tray 6) ......................................................... |
20 |
|
Envelope Tray ................................................................................... |
22 |
|
Auto Tray Switching .............................................................................. |
22 |
|
Storing and Handling Paper .................................................................. |
23 |
|
Supported Paper Sizes and Types ........................................................ |
23 |
|
Supported Paper Sizes ..................................................................... |
23 |
|
Supported Paper Types .................................................................... |
26 |
3 |
Maintenance.......................................................................................... |
29 |
|
Ordering Supplies .................................................................................. |
29 |
|
Cleaning the Machine ............................................................................ |
29 |
|
Control Panel and Touch Screen ...................................................... |
29 |
|
Document Glass and Document Feeder Glass ................................ |
29 |
|
Document Feeder Rollers ................................................................. |
30 |
|
Replacing the Drum Cartridge ............................................................... |
30 |
|
Removing the Old Drum Cartridge ................................................... |
30 |
|
Inserting the New Drum Cartridge .................................................... |
31 |
|
Replacing the Toner Cartridge .............................................................. |
32 |
|
Removing the Old Toner Cartridge .................................................. |
33 |
|
Inserting the New Toner Cartridge .................................................... |
33 |
|
Loading Staples in the Integrated Office Finisher (Optional) ................. |
33 |
|
Loading Staples in the Office Finisher LX (Optional) ............................ |
35 |
|
Loading the Booklet Staples in the Office Finisher LX (Optional) ......... |
36 |
|
Emptying the Hole Punch Waste Container (Optional) ......................... |
37 |
4 |
Job Status ............................................................................................. |
39 |
|
Job Status ............................................................................................. |
39 |
3

|
Active Jobs ............................................................................................ |
40 |
|
Completed Jobs .................................................................................... |
41 |
|
Secure Print Jobs & More ..................................................................... |
42 |
|
Charge Print ..................................................................................... |
43 |
|
Private Charge Print ......................................................................... |
44 |
|
Secure Print ...................................................................................... |
44 |
|
Sample Set ....................................................................................... |
45 |
|
Delayed Print .................................................................................... |
46 |
|
Public Mailbox .................................................................................. |
46 |
|
Undelivered Faxes ............................................................................ |
47 |
5 |
Machine Status..................................................................................... |
49 |
|
Machine Information .............................................................................. |
49 |
|
General Information .......................................................................... |
50 |
|
Paper Tray Status ............................................................................. |
50 |
|
Print Mode ........................................................................................ |
51 |
|
Overwrite Hard Disk ......................................................................... |
52 |
|
Print Reports ..................................................................................... |
52 |
|
Automatically Printed Reports/Lists .................................................. |
57 |
|
Fax Receiving Mode ......................................................................... |
58 |
|
Faults .................................................................................................... |
58 |
|
Supplies ................................................................................................ |
58 |
|
Billing Information .................................................................................. |
59 |
|
Billing Information ............................................................................. |
59 |
|
User Account Billing Information ...................................................... |
59 |
|
Tools ..................................................................................................... |
60 |
|
System Settings ................................................................................ |
60 |
|
Setup ................................................................................................ |
60 |
|
Accounting ........................................................................................ |
61 |
|
Authentication/Security Settings ....................................................... |
61 |
6 |
Setups ................................................................................................... |
63 |
|
Setting Procedure ................................................................................. |
63 |
|
1. Enter the System Administration Mode ........................................ |
63 |
|
2. Configure a Feature ...................................................................... |
64 |
|
3. Exit the System Administration Mode ........................................... |
64 |
|
Main Menu on the [Tools] Screen ......................................................... |
65 |
|
System Settings .................................................................................... |
65 |
|
Common Service Settings ................................................................ |
65 |
|
Machine Clock/Timers ................................................................. |
66 |
|
Audio Tones ................................................................................. |
67 |
|
Screen/Button Settings ................................................................ |
68 |
|
Paper Tray Settings ..................................................................... |
70 |
|
Image Quality ............................................................................... |
72 |
|
Reports ........................................................................................ |
72 |
|
Maintenance ................................................................................ |
74 |
4

Watermark ................................................................................... |
76 |
Other Settings .............................................................................. |
77 |
Copy Service Settings ...................................................................... |
84 |
Copy Tab ..................................................................................... |
84 |
Copy Defaults .............................................................................. |
84 |
Copy Control ................................................................................ |
88 |
Original Size Defaults .................................................................. |
89 |
Reduce/Enlarge Presets .............................................................. |
89 |
Connectivity & Network Setup .......................................................... |
90 |
Port Settings ................................................................................ |
90 |
Protocol Settings .......................................................................... |
92 |
Machine’s E-mail Address/Host Name ........................................ |
93 |
Proxy Server Settings .................................................................. |
94 |
Outgoing/Incoming E-mail Settings .............................................. |
95 |
Remote Authentication Server Settings ....................................... |
96 |
Security Settings .......................................................................... |
97 |
Other Settings ............................................................................ |
100 |
Print Service Settings ..................................................................... |
100 |
Allocate Memory ........................................................................ |
101 |
Other Settings ............................................................................ |
103 |
Scan Service Settings ..................................................................... |
105 |
Scan Defaults ............................................................................. |
105 |
Scan to PC Defaults ................................................................... |
107 |
Original Size Defaults ................................................................ |
107 |
Output Size Defaults .................................................................. |
108 |
Reduce/Enlarge Presets ............................................................ |
108 |
Other Settings ............................................................................ |
109 |
Fax Service Settings ....................................................................... |
110 |
Screen Defaults ......................................................................... |
110 |
Fax Defaults ............................................................................... |
110 |
Fax Control ................................................................................ |
111 |
Fax Received Options ................................................................ |
115 |
Reduce/Enlarge Presets ............................................................ |
115 |
Original Size Defaults ................................................................ |
116 |
Local Terminal Information ........................................................ |
116 |
Internet Fax Control ................................................................... |
117 |
E-mail/Internet Fax Service Settings .............................................. |
118 |
E-mail Control ............................................................................ |
119 |
Mailbox/Stored Document Settings ................................................ |
121 |
Mailbox Service Settings ............................................................ |
121 |
Stored Document Settings ......................................................... |
122 |
Job Flow Service Settings .............................................................. |
123 |
Setup ................................................................................................... |
123 |
Create Mailbox ................................................................................ |
124 |
[Link Job Flow Sheet to Mailbox] Screen ................................... |
125 |
Stored Programming ....................................................................... |
125 |
Registering Operations with a Job Number ............................... |
125 |
5

Create Job Flow Sheet ................................................................... |
126 |
[Create Job Flow Sheet] Screen ................................................ |
127 |
[Create Job Flow Sheet] Screen ................................................ |
127 |
Create Job Flow Sheet Keyword .................................................... |
129 |
Add Address Book Entry ................................................................ |
129 |
Create Fax Group Recipients ......................................................... |
132 |
Add Fax Comment .......................................................................... |
133 |
Paper Tray Attributes ...................................................................... |
133 |
Accounting .......................................................................................... |
133 |
Create/View User Accounts ............................................................ |
134 |
View Accounts ................................................................................ |
136 |
Reset User Accounts ...................................................................... |
136 |
System Administrator’s Meter (Copy Jobs) .................................... |
137 |
Accounting Type ............................................................................. |
137 |
Accounting Login Screen Settings .................................................. |
138 |
Fax Billing Data .............................................................................. |
138 |
Charge Rate per Unit ................................................................. |
139 |
Auto Reset of User Billing Information ............................................ |
139 |
Copy Activity Report ....................................................................... |
139 |
Authentication/Security Settings ......................................................... |
139 |
System Administrator Settings ....................................................... |
140 |
System Administrator’s Login ID ................................................ |
140 |
System Administrator’s Passcode ............................................. |
140 |
Authentication ................................................................................. |
140 |
Login Type ................................................................................. |
141 |
Access Control ........................................................................... |
141 |
Create/View User Accounts ....................................................... |
142 |
Reset User Accounts ................................................................. |
142 |
Create Authorization Groups ..................................................... |
142 |
User Details Setup ..................................................................... |
143 |
System Administrator Maximum Login Attempts ....................... |
144 |
Passcode Policy ........................................................................ |
144 |
Charge / Private Print Settings .................................................. |
144 |
Allow User to Disable Active Settings ............................................. |
145 |
Job Status Default .......................................................................... |
145 |
Active Jobs View ........................................................................ |
146 |
Completed Jobs View ................................................................ |
146 |
Overwrite Hard Disk ....................................................................... |
146 |
Number of Overwrites ................................................................ |
147 |
Scheduled Image Overwrite ...................................................... |
147 |
7 CentreWare Internet Services ........................................................... |
149 |
Information Checklist ........................................................................... |
149 |
CentreWare Internet Services Environments ...................................... |
150 |
CentreWare Internet Services Installation ........................................... |
150 |
Installation Procedure ..................................................................... |
150 |
Network Communication Setup ...................................................... |
150 |
6

Test Access .................................................................................... |
152 |
Selecting Transport Protocols ............................................................. |
153 |
Screen Layout ..................................................................................... |
153 |
Services ............................................................................................... |
154 |
Default User ID and Passcode ....................................................... |
156 |
Status .................................................................................................. |
156 |
General ........................................................................................... |
156 |
Trays ............................................................................................... |
156 |
Consumables .................................................................................. |
157 |
Jobs ..................................................................................................... |
158 |
Active Jobs ..................................................................................... |
158 |
Job History List ............................................................................... |
158 |
Error History .................................................................................... |
160 |
Print ..................................................................................................... |
160 |
Job Submission .............................................................................. |
160 |
Scan .................................................................................................... |
162 |
Job Templates ................................................................................ |
162 |
Mailbox ........................................................................................... |
170 |
Job Flow Sheets ............................................................................. |
173 |
Properties ............................................................................................ |
178 |
Properties Features ........................................................................ |
179 |
Support ................................................................................................ |
230 |
8 Printer Environment Settings............................................................ |
233 |
Windows TCP/IP ................................................................................. |
233 |
Quick Network Setup (DHCP) ........................................................ |
233 |
Quick Network Setup (Static IP) ..................................................... |
234 |
NetWare .............................................................................................. |
236 |
Information Checklist ...................................................................... |
236 |
NetWare Environments ................................................................... |
236 |
NetWare Installation ....................................................................... |
237 |
UNIX TCP/IP ....................................................................................... |
240 |
Information Checklist ...................................................................... |
240 |
UNIX TCP/IP Environments ............................................................ |
241 |
UNIX TCP/IP Installation ................................................................ |
241 |
Printing ............................................................................................ |
248 |
Printer Status .................................................................................. |
251 |
-C Option ........................................................................................ |
253 |
EtherTalk ............................................................................................. |
257 |
Information Checklist ...................................................................... |
257 |
EtherTalk Environments ................................................................. |
257 |
EtherTalk Installation ...................................................................... |
258 |
Microsoft Networking ........................................................................... |
259 |
Information Checklist ...................................................................... |
259 |
SMB Environments ......................................................................... |
260 |
7

|
SMB Installation .............................................................................. |
260 |
|
TCP/IP (LPD or Port9100) .................................................................. |
263 |
|
Information Checklist ...................................................................... |
263 |
|
TCP/IP (LPD or Port9100) Environments ....................................... |
264 |
|
TCP/IP (LPD or Port9100) Installation ............................................ |
264 |
|
USB Port ............................................................................................. |
267 |
|
Information Checklist ...................................................................... |
267 |
|
USB Port Environment ................................................................... |
268 |
|
USB Port Installation ...................................................................... |
268 |
|
IPP (Internet Printing Protocol) ........................................................... |
270 |
|
Information Checklist ...................................................................... |
270 |
|
IPP Environment ............................................................................. |
270 |
|
IPP Installation ................................................................................ |
271 |
|
Computer Setup ............................................................................. |
273 |
|
Test Print ........................................................................................ |
273 |
9 |
E-mail Environment Settings ............................................................ |
275 |
|
E-mail Overview .................................................................................. |
275 |
|
Information Checklist ........................................................................... |
276 |
|
E-mail Environments ........................................................................... |
277 |
|
E-mail Installation ................................................................................ |
277 |
|
Installation Procedure ..................................................................... |
277 |
|
Network Communication Setup ...................................................... |
278 |
|
Test Mail ......................................................................................... |
280 |
10 |
Scanner Environment Settings......................................................... |
283 |
|
Scanning Overview ............................................................................. |
283 |
|
Scanning with the machine ............................................................. |
283 |
|
Scanning Process ........................................................................... |
284 |
|
Scan to E-mail Setup .......................................................................... |
284 |
|
Prerequisites for Scan to E-mail Setup ........................................... |
284 |
|
Procedure for Scan to E-mail Setup ............................................... |
285 |
|
Scan to E-mail Troubleshooting ..................................................... |
286 |
|
Scan to Mailbox Setup ........................................................................ |
286 |
|
Prerequisites for Scan to Mailbox Setup ........................................ |
286 |
|
Procedure for Scan to Mailbox Setup through |
|
|
CentreWare Internet Services ........................................................ |
287 |
|
Procedure for Scan to Mailbox Setup through the Control Panel ... |
288 |
|
Computer Setup ............................................................................. |
288 |
|
Network Scanning Setup ..................................................................... |
288 |
|
Prerequisites for Network Scanning Setup ..................................... |
288 |
|
Procedure for Network Scanning Setup ......................................... |
289 |
|
Computer Setup ............................................................................. |
289 |
|
Scan to Home Setup ........................................................................... |
289 |
|
Prerequisites for Scan to Home Setup ........................................... |
290 |
|
Procedures for Scan to Home Setup .............................................. |
290 |
8

|
Scan to PC Setup (FTP) ...................................................................... |
291 |
|
Prerequisites for Scan to PC Setup (FTP) ...................................... |
291 |
|
Procedure for Scan to PC Setup (FTP) .......................................... |
292 |
|
Scan to PC Setup (SMB) ..................................................................... |
292 |
|
Prerequisites for Scan to PC Setup (SMB) ..................................... |
292 |
|
Procedure for Scan to PC Setup (SMB) ......................................... |
293 |
|
Job Flow Service Setup ....................................................................... |
293 |
11 |
Internet Fax ......................................................................................... |
295 |
|
Internet Fax Overview ......................................................................... |
295 |
|
Information Checklist ...................................................................... |
295 |
|
Internet Fax Environments .................................................................. |
296 |
|
Internet Fax Installation ....................................................................... |
296 |
|
Installation Procedure ..................................................................... |
296 |
|
Network Communication Setup ...................................................... |
297 |
|
Test Internet Fax ............................................................................. |
299 |
12 |
Server Fax ........................................................................................... |
301 |
|
Server Fax Overview ........................................................................... |
301 |
|
Server Fax Environments .................................................................... |
301 |
|
Server Fax Installation ......................................................................... |
302 |
|
Installation Procedure ..................................................................... |
302 |
|
Fax Server Installation and Configuration ....................................... |
302 |
|
Machine Configuration .................................................................... |
303 |
|
Test Server Fax Transmission ........................................................ |
304 |
13 |
Security - Encryption/Digital Signature............................................ |
305 |
|
Types of Encryption/Digital Signature Services Available ................... |
305 |
|
Configuration of HTTPS (SSL/TLS) Communication Encryption ........ |
306 |
|
Installation Overview ....................................................................... |
306 |
|
Configuring Certificates with CentreWare Internet Services ........... |
307 |
|
Configuration of E-mail Encryption/Digital Signature .......................... |
308 |
|
Installation Overview ....................................................................... |
308 |
|
Configuring S/MIME Certificates with |
|
|
CentreWare Internet Services ........................................................ |
308 |
|
Configuration of Scan File Signatures (PDF/XPS Documents) ........... |
311 |
|
Installation Overview ....................................................................... |
311 |
|
Configuring Scan File certificates with |
|
|
CentreWare Internet Services ........................................................ |
311 |
|
Configuration of IPsec ......................................................................... |
313 |
14 Authentication and Account Administration ................................... |
315 |
|
|
Overview of Authentication .................................................................. |
315 |
|
Users Controlled by Authentication ................................................ |
315 |
|
Types of Authentication .................................................................. |
316 |
|
Functions Controlled by Authentication .......................................... |
317 |
9

Authentication for Job Flow Sheets and Mailboxes ............................ |
318 |
Job Flow Sheet Types .................................................................... |
319 |
Types of Mailboxes ......................................................................... |
322 |
Linking Job Flow Sheets to Mailboxes ........................................... |
326 |
Overview of Account Administration ................................................... |
328 |
Types of Account Administration .................................................... |
328 |
Management Features and Services ............................................. |
328 |
Xerox Standard Accounting ................................................................ |
334 |
Overview ......................................................................................... |
334 |
Installation Checklist ....................................................................... |
334 |
Enabling Xerox Standard Accounting (from Internet Services) ...... |
335 |
Creating a Group Account .............................................................. |
335 |
Creating a User Account and Setting Usage Limits ....................... |
335 |
Maximum Usage Limits and Resetting Individual Usage Limits ..... |
336 |
Using XSA at the machine .............................................................. |
336 |
Resetting Usage Data .................................................................... |
337 |
Printing a Usage Report ................................................................. |
337 |
Enabling XSA in your Print Drivers ................................................. |
337 |
Backing Up XSA data and settings and Cloning to another device 337 |
|
802.1x Authentication .......................................................................... |
338 |
Local Machine Authentication Setup ................................................... |
339 |
Remote Authentication Setup ............................................................. |
340 |
Configuring Remote Authentication for Kerberos (Windows 2000) 341 |
|
Configuring Remote Authentication for Kerberos (Solaris) ............. |
341 |
Configuring Remote Authentication for SMB .................................. |
342 |
Configuring Remote Authentication for LDAP ................................ |
342 |
Network Authentication Setup ............................................................. |
344 |
Xerox Secure Access Setup ............................................................... |
345 |
Configuring Xerox Secure Access to Work with |
|
Remote Authentication ................................................................... |
346 |
Enabling Specific Xerox Secure Access Settings ........................... |
346 |
15 Problem Solving................................................................................. |
349 |
Fault Clearance Procedure ................................................................. |
349 |
Paper Jams ......................................................................................... |
350 |
Paper Jams in Cover A ................................................................... |
353 |
Paper Jams in Cover B ................................................................... |
354 |
Paper Jams in Cover C .................................................................. |
355 |
Paper Jams in Cover E ................................................................... |
355 |
Paper Jams in Trays 1 and 2, Trays 3 and 4 (Optional), and |
|
the Envelope Tray (Optional) .......................................................... |
356 |
Paper Jams in the High Capacity Tandem Tray (Optional) ............ |
356 |
Paper Jams in Tray 5 (Bypass) ...................................................... |
357 |
Paper Jams in the Duplex Module Cover D (Optional) ................... |
357 |
Paper Jams in the High Capacity Feeder (Optional) ...................... |
357 |
Paper Jams in the Integrated Office Finisher (Optional) ................ |
359 |
10
|
Paper Jams in the Office Finisher LX (Optional) ............................ |
359 |
|
Document Jams .................................................................................. |
361 |
|
Stapler Faults ...................................................................................... |
362 |
|
Staple Jams in the Integrated Office Finisher (Optional) ................ |
363 |
|
Staple Jams in the Office Finisher LX (Optional) ............................ |
364 |
|
Common Problems .............................................................................. |
366 |
|
Network-related Problems ................................................................... |
370 |
|
Problem Solving Procedure ............................................................ |
370 |
|
SMB ................................................................................................ |
370 |
|
NetWare .......................................................................................... |
374 |
|
UNIX ............................................................................................... |
377 |
|
TCP/IP ............................................................................................ |
379 |
|
EtherTalk ........................................................................................ |
381 |
|
Bonjour ........................................................................................... |
382 |
|
CentreWare Internet Services ........................................................ |
383 |
|
Scanning Services .......................................................................... |
384 |
|
E-mail Services ............................................................................... |
386 |
|
Internet/Intranet Connection ........................................................... |
387 |
|
IPv6 Addresses ............................................................................... |
389 |
|
Fault Codes ......................................................................................... |
390 |
|
Screen Messages ........................................................................... |
428 |
|
Xerox Welcome Center ....................................................................... |
429 |
16 |
Appendix ............................................................................................. |
431 |
|
Specifications ...................................................................................... |
431 |
|
Machine Specifications ................................................................... |
431 |
|
Paper Supply .................................................................................. |
433 |
|
Paper Output .................................................................................. |
434 |
|
Electrical Specifications .................................................................. |
435 |
|
Specifications for the Fax Service .................................................. |
436 |
|
Emulation Parameters ......................................................................... |
437 |
|
PCL Emulation ................................................................................ |
437 |
|
PDF Direct Printing ......................................................................... |
440 |
|
Machine Software Upgrade ................................................................. |
440 |
|
Xerox Extensible Interface Platform (XEIP) ........................................ |
441 |
|
Configuring XEIP ............................................................................ |
442 |
17 |
Index .................................................................................................... |
445 |
11

12
1 Before Using the Machine
Welcome to the Xerox family of WorkCentre products.
This System Administration Guide provides detailed information, technical specifications and procedures for using the integral features of the machine.
Xerox Welcome Center
If you need assistance during or after product installation, visit the Xerox website for on-line solutions and support.
http://www.xerox.com/support
If you require further assistance, contact our experts at the Xerox Welcome Center. A telephone number for the local representative may have been provided when the product was installed. For convenience and future reference, please record the telephone number in the space below.
Welcome Center or local representative telephone number:
# |
|
|
|
Xerox US Welcome Center: |
1-800-821-2797 |
||
Xerox Canada Welcome Center: |
1-800-93-XEROX (1-800-939-3769) |
||
Serial Number
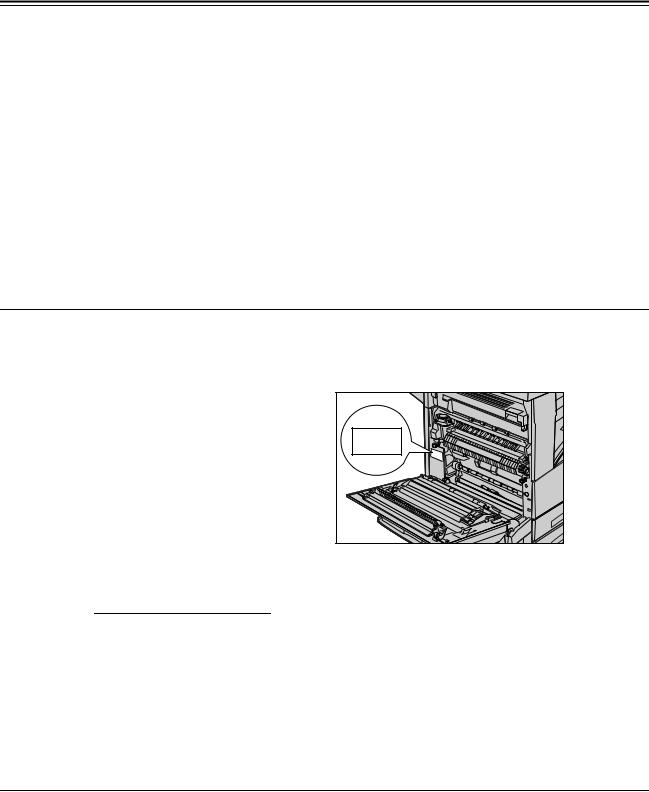
When you call the Welcome Center you will need to provide the serial number which is located on the left side of the machine behind Cover A, as shown in the diagram.
For your convenience, record the serial number in the space below.
Serial Number:
Keep a record of any error messages. This information helps us solve problems faster.
13
1 Before Using the Machine
Language Displayed on the Touch Screen
The language of the touch screen can be changed in the following two ways:
•To change the language for temporary use, press the <Language> button on the control panel, and then select the required language.
NOTE: The language returns to the default language after rebooting the machine.
•To change the default language, enter the System Administration mode, press the <Machine Status> button, and then select [Tools] > [System Settings] > [Common Service Settings] > [Screen/Button Settings] > [Default Language]. On the [Default Language] screen, select the required language as the default language. For more information, refer to the Setups chapter on page 63.
Conventions
This section describes the conventions used throughout this System Administration Guide. In this guide, you will find that some terms are used interchangeably:
•Paper is synonymous with media.
•Document is synonymous with original.
•Xerox WorkCentre 5222/5225/5225A/5230/5230A is synonymous with the machine.
Orientation
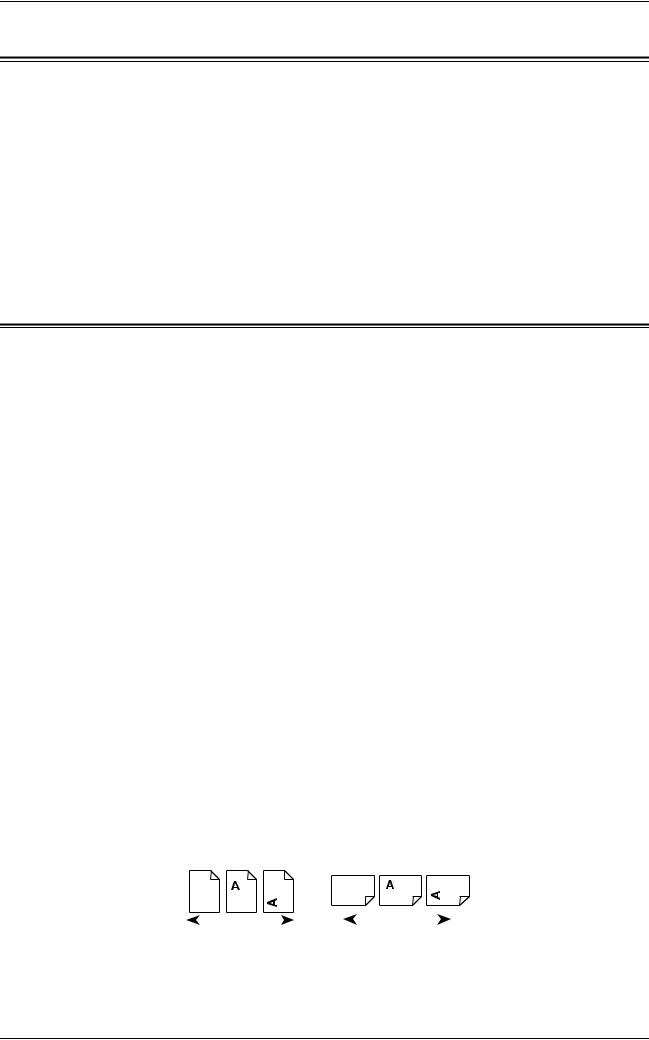
Orientation is used to mean the direction of images on the page. When the image is upright, the paper (or other media) can be either long edge feed or short edge feed.
Long Edge Feed (LEF)
When loading documents long edge feed into the document feeder, load with one of the long edges facing into the document feeder, with the short edges facing the front and back of the document feeder. When loading paper long edge feed into a paper tray, place the paper with one of the long edges toward the left-hand side and one of the short edges toward the front of the tray.
Short Edge Feed (SEF)
When loading documents short edge feed into the document feeder, load with one of the short edges facing into the document feeder, with the long edges facing the front and back of the document feeder. When loading paper short edge feed into a paper tray, place the paper with one of the short edges toward the left-hand side and one of the long edges toward the front of the tray.
LEF Orientation |
|
SEF Orientation |
||||
|
|
|
|
|
|
|
|
|
|
|
|
|
|
|
|
|
|
|
|
|
Paper feed direction |
Paper feed direction |
14

Conventions
Text in [Square Brackets]
Indicates the names of the screens, tabs, buttons, features, and option categories. Square brackets are also used when referring to file and folder names on a PC.
For example:
•Select [Original Type] on the [Image Quality] screen.
•Select [Save].
Text in <Angle Brackets>
Indicates the names of the hard buttons, numeric or symbol buttons, lights on the control panel, or symbols on the power switch label.
For example:
•Press the <Machine Status> button to display the [Machine Information] screen.
•Press the <C> button on the control panel to clear the suspended job.
Italic Typeface
Italic typeface is used to indicate references to other sections and chapters. For example:
•For more information, refer to “Loading Paper” on page 17.
•Job Status – page 39.
Warnings
Warnings are statements that alert you to the possibility of personal harm. For example:
WARNING: Do not use aerosol cleaners. Aerosol cleaners can be explosive or flammable when used on electromechanical equipment.
Before cleaning this product, unplug the product from the electrical outlet. Always use materials specifically designated for this product. The use of other materials may result in poor performance and create a hazardous situation.
Always unplug this equipment from the electrical outlet before cleaning.
Notes
Notes are statements that provide additional information. For example:
NOTE: If the document feeder is not installed, this feature is not available.
15

1 Before Using the Machine
Related Information Sources
The following sources of information are available for the machine.
User Guide
This guide is intended for general users and describes how to use the features of the machine, such as copy, scan, and fax.
System Administration Guide
This guide is intended for the System Administrator and provides information such as the supported paper and media, troubleshooting tips, how to configure network and security settings, and how to replace consumables.
Quick Network Setup Guide
This guide is intended for the System Administrator and provides TCP/IP setup procedures.
Quick Use Guide
This guide is intended for general users and describes how to use some useful features on the machine and how to replace toner and drum cartridges.
Quick Scan Features Setup Guide
This guide is intended for the System Administrator and describes how to configure scanning services.
NOTE: Please note that the screens shown in these guides apply to a fully configured machine and therefore may not exactly represent the configuration being used.
16
2 Paper and Other Media
The machine is designed to use various paper types and other media. This chapter provides information on loading paper and other types of media into the machine.
Loading Paper
The machine can be equipped with various paper trays. Depending on the machine configuration, up to six paper trays are available including the Envelope Tray. This section provides information on how to load paper into each type of tray.
NOTE: Make sure the side and rear paper guides on the trays are properly positioned to match the size of paper loaded. If there is a gap between the paper stack and the guides, paper may not be fed into the machine properly, or paper jams may occur.
For information on the paper sizes and media types for each tray, refer to Supported Paper Sizes and Types on page 23.
For information on the acceptable range of paper sizes and capacity for each tray, refer to Paper Supply in the Appendix chapter on page 433.
Preparing Paper for Loading
Before loading paper into the paper trays, fan the edges. This procedure separates any sheets of paper that are stuck together and reduces the possibility of paper jams.
NOTE: To avoid paper jams and misfeeds, do not remove paper from its packaging until required.
Trays 1 & 2/Two Tray Module (Trays 3 & 4)
Trays 1 to 4 can be loaded with standard and non-standard sized paper. NOTE: If the machine is processing a job, do not open the active paper tray.
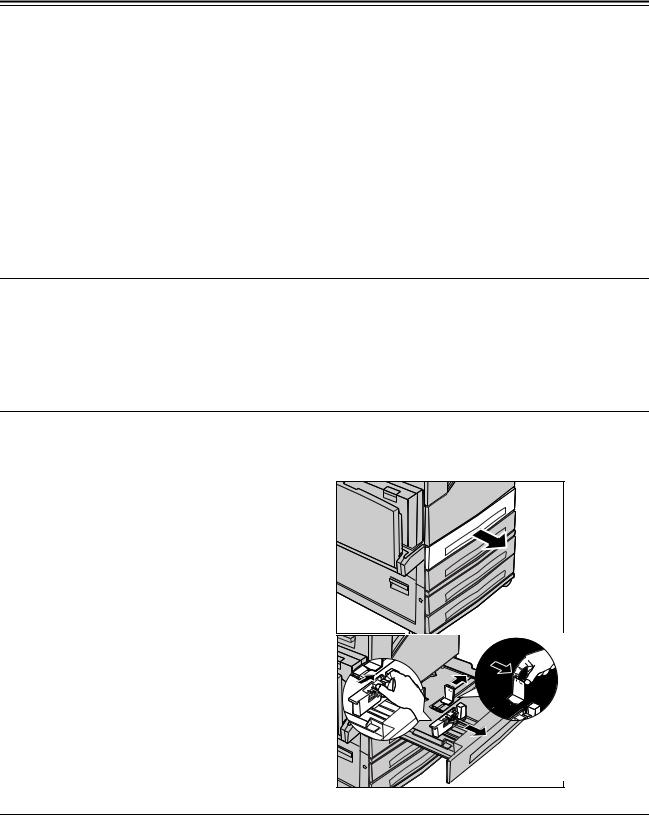
1. Pull out the paper tray towards you.
NOTE: To avoid jams and misfeeds, do not load paper on top of any remaining paper in the tray. Remove the paper, and reload it on top of the new stock loaded.
2. If required, move the paper tray guides further out to load the new stock.
To adjust the side and rear guides, pinch the guide lever on each guide and slide the guides to their new position. To secure the guides in position, release the levers.
17
2 Paper and Other Media
NOTE: When changing the size or type of stock in the tray, refer to Paper Tray Settings in the Setups chapter on page 70.
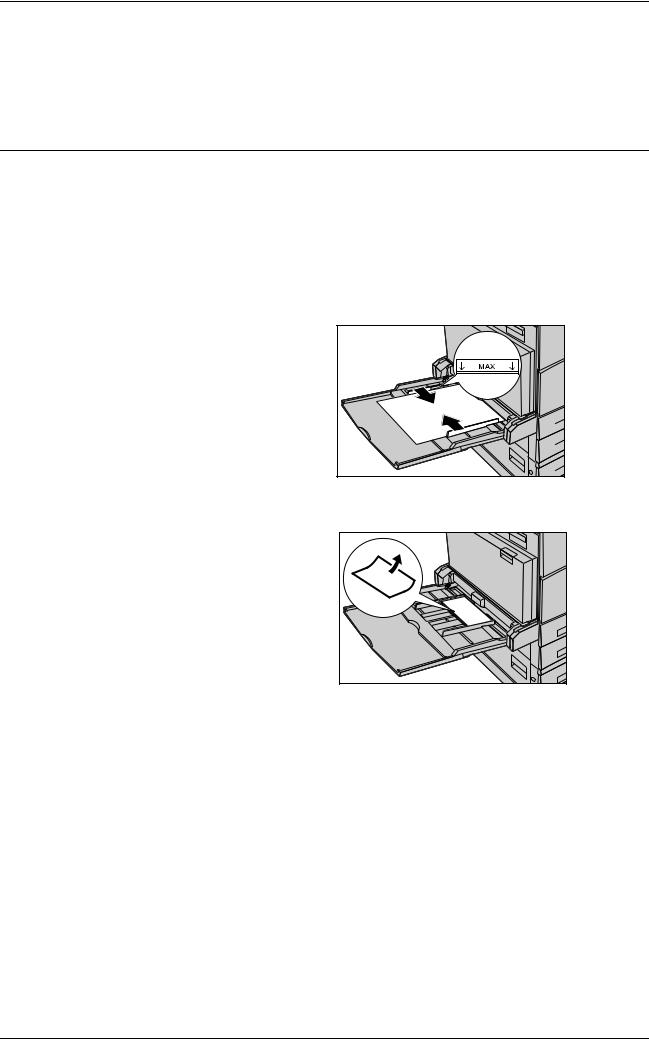
3. Load the paper neatly and tightly  against the left-hand side of the
  tray.
tray.
NOTE: Do not load paper above the maximum fill line.
NOTE: When making single/double sided copies on perforated paper,
load the paper to feed the opposite side of the perforated edge first.
Feeding the perforated edge first may cause paper jams.
4. If the paper guides have been moved, slide the guides to just
touch the edge of the paper.
NOTE: When loading standard size paper, set the guides onto the notches on the tray to match the paper size. The machine recognizes 
8K/16K paper as standard sizes even though the paper trays have no notches for these sizes.
5. |
Close the paper tray. |
|
|
NOTE: Paper can be loaded either |
|
|
|
short edge feed or long edge feed. |
|
|
|
6. |
Set the machine to detect the |
|
|
|
paper size automatically, or |
Long edge feed |
Short edge feed |
|
manually specify the required |
(LEF) |
(SEF) |
|
size. For more information, |
|
|
refer to Paper Size in the Setups chapter on page 70.
NOTE: Paper sizes detected by the machine vary depending on the system settings. For more information, refer to Paper Size Settings in the Setups chapter on page 78.
High Capacity Tandem Tray (Trays 3 & 4)
The High Capacity Tandem Tray (Trays 3 and 4) allows you to load up to 2,000 sheets of paper.
NOTE: You cannot load custom size paper into the High Capacity Tandem Tray.
1.Pull out Tray 3 or 4.
The elevator in the tray lowers.
2. Place the paper stock tightly against the left rear corner of the tray.
NOTE: Do not load paper above the maximum fill line.
18
Loading Paper
NOTE: Always load paper into the tray in the orientation shown in the diagram.
3. Close the tray.
The elevator rises and positions the paper for use.
Bypass Tray (Tray 5)
Tray 5 (Bypass) allows you to use a variety of paper types. Tray 5 (Bypass) is located on the left-hand side of the machine. A tray extension is provided to accommodate larger sized paper. After loading paper stock in Tray 5 (Bypass), make sure that the Tray 5 (Bypass) settings on the touch screen match the paper size and type of stock loaded. If they do not match, reprogramming is required. For more information on programming of Tray 5 (Bypass), refer to the Copy chapter in the User Guide.
NOTE: To avoid paper jams, make sure that the paper size and paper type settings are identical to the paper stock loaded.
1. Load the paper neatly into Tray
5 (Bypass), making sure that the paper stock is in the center of the tray.
NOTE: Do not load paper above the maximum fill line.
NOTE: When making single/double sided copies on perforated paper,
load the paper to feed the opposite side of the perforated edge first. Feeding the perforated edge first might cause paper jams.
NOTE: If, when making copies or prints on thick-stock paper, the paper will not feed into the machine, apply a curl to the paper as shown in the illustration above. Note however, that excessively bending or folding the paper might cause paper jams.
NOTE: When loading envelopes, make sure the flaps are closed and
that the envelopes are oriented on the tray so that the edge with the flaps will enter the machine first. However, when loading C5-size envelopes, set them long edge feed so that the edge with the flaps will face toward you.
2.Slide the side guides towards the paper until they are just touching the edge of the stock.
19

2 Paper and Other Media
High Capacity Feeder (Tray 6)
The High Capacity Feeder (Tray 6) allows you to load up to 2,000 sheets of paper. NOTE: You cannot load custom size paper into the High Capacity Feeder.
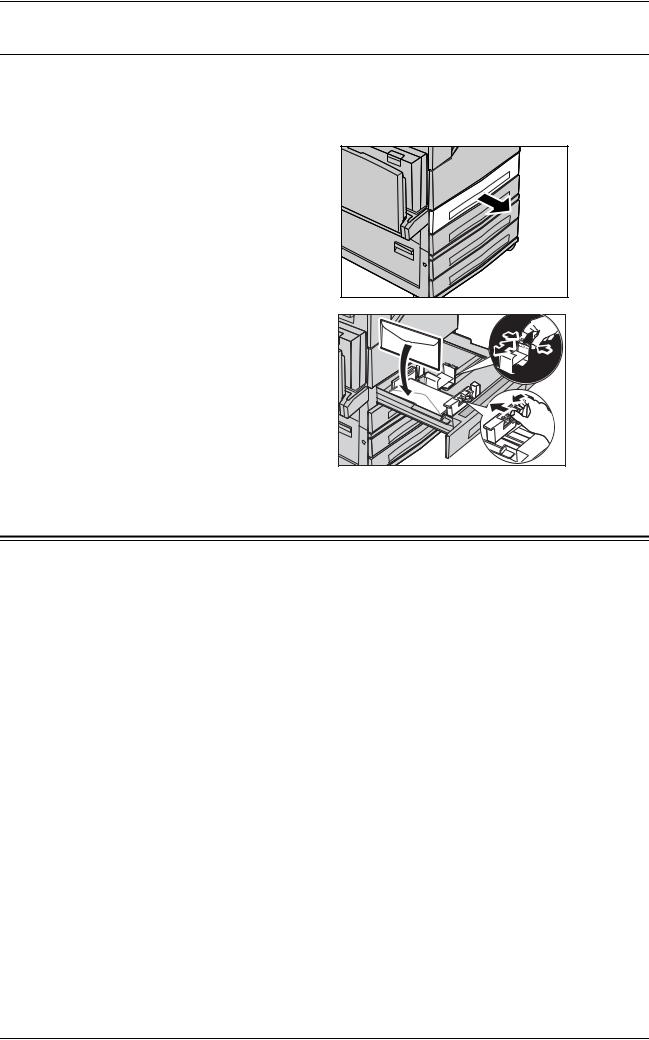
1. Pull out Tray 6.
2. Remove the screw from the guide at the back of the tray, and remove the guide from the tray.
3.Insert the projections on the
bottom of the guide into the paper size holes on the tray (1). Insert the projection on the tray into the paper size hole on the guide (2), and then tighten the screw removed in step 1.
4. Remove the screw from the guide at the front of the tray, and remove the guide from the tray.
5.Insert the projections on the
bottom of the guide into the paper size holes on the tray (1). Insert the projection on the tray into the paper size hole on the guide (2), and then tighten the screw removed in step 4.
20
Loading Paper
6. Pull up the end-guide lever along the slot (1), adjust the position of the lever to the size of the paper (2), and then push the lever back into its position
(3).
NOTE: Do not use the slot at the left of the 8.5” slot on the end guide.
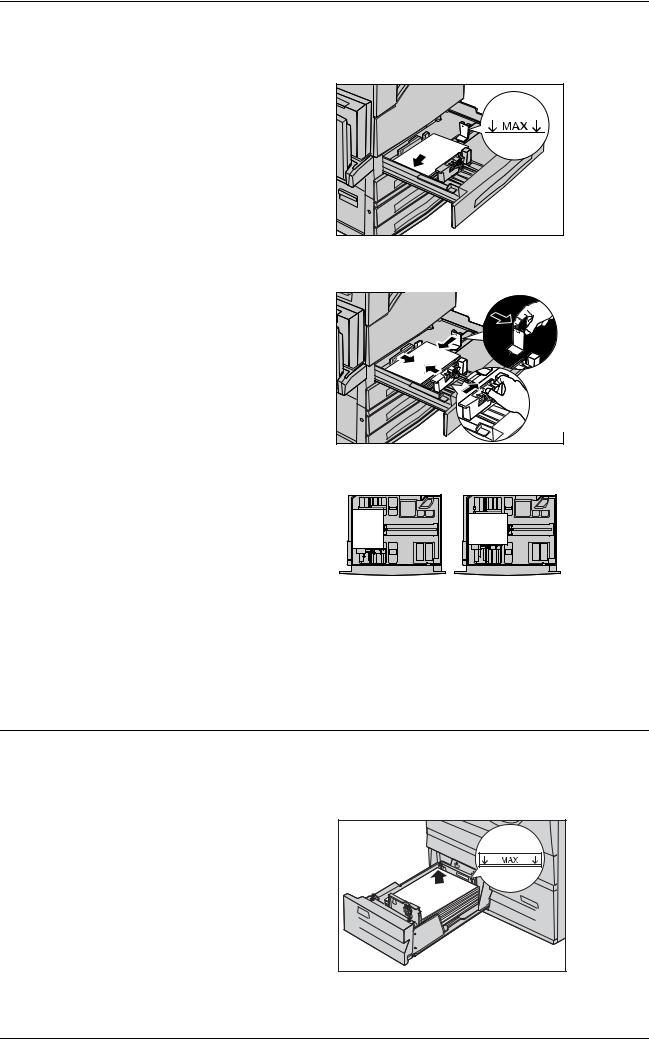
7. Open the end guide, and place the paper stack tightly against the right edge of the tray.
NOTE: Do not load paper above the maximum fill line.
8. Close the end guide.
9. Push the tray in gently until it stops.
21
2 Paper and Other Media
Envelope Tray
The Envelope Tray allows you to stack up to 43 mm of envelopes.
NOTE: Insert the Envelope Tray in the slot for Tray 1 only. Inserting the Envelope Tray in any other slot will damage it.
1. Pull out the Envelope Tray.
2. Load the envelopes in the Envelope Tray with the side to be printed face up and the edge with the flap against the left edge of the tray.
3. Adjust the paper guides to the size of the envelopes.
Auto Tray Switching
The machine automatically switches from one tray to another under the following conditions.
•When an active tray runs out of paper during printing.
•When the paper size of the selected tray differs from that detected upon document scanning.
•When the selected tray is open upon paper feeding.
•When the selected tray malfunctions upon paper feeding.
NOTE: Tray 5 (Bypass) is not subject to Auto Tray Switching.
NOTE: The paper tray and paper type priority settings can be programmed in the System Administration mode. For more information, refer to Paper Tray Priority in the Setups chapter on page 71 and Paper Size Settings in the Setups chapter on
page 78.
When not in use, the paper trays can be opened and loaded with paper while the machine is running. However, do not open an active paper tray. This will cause the machine to stop the job that is being processed.
22

Storing and Handling Paper
Storing and Handling Paper
Always use high quality, xerographic grade paper in the machine. Damaged, curled, or damp paper can cause jams and image quality problems. Follow these simple rules to store paper.
•Store paper in dry conditions, away from extreme heat or cold, such as radiators or open windows.
•Store paper flat on a shelf or pallet above floor level.
•Leave the paper wrapped and boxed until ready to be used.
•Re-wrap partly used packages of paper.
NOTE: Do not store paper in the paper trays.
Supported Paper Sizes and Types
This section lists the sizes and types of paper that can be used with the machine.
Supported Paper Sizes
The following table lists the paper sizes supported by each paper tray, output tray, and the duplex module.
NOTE: For the capacity of each tray, refer to Appendix on page 431.
Standard Sizes
NOTE: The standard sizes of paper that can be detected vary depending on the paper size table specified by the System Administrator. For information on setting the paper size table, refer to Paper Size Settings in the Setups chapter on page 78.
Paper Trays - Standard Sizes
|
|
|
|
Tray 1, 2 |
Tray 3, 4 |
|
Tray 6 |
|
|
|
|
|
|
/ |
(High |
|
|
||
|
Dimensions |
LEF/ |
Tray 5 |
(High |
Envelope |
||||
Paper Size |
Tray 3, 4 |
Capacity |
|||||||
(mm) |
SEF |
(Bypass) |
Capacity |
Tray |
|||||
|
(Two Tray |
Tandem |
|||||||
|
|
|
|
|
Feeder) |
|
|||
|
|
|
|
Module) |
Tray) |
|
|
||
|
|
|
|
|
|
|
|||
|
|
|
|
|
|
|
|
|
|
|
|
|
|
|
|
|
|
|
|
A6 |
105.0 |
148.0 |
LEF |
|
|
O |
|
|
|
|
|
|
|
|
|
|
|
|
|
A5 |
148.0 |
210.0 |
SEF |
|
|
O |
|
|
|
|
|
|
|
|
|
|
|
|
|
|
|
|
LEF |
|
|
O |
|
|
|
|
|
|
|
|
|
|
|
|
|
A4 |
210.0 |
297.0 |
SEF |
O |
|
O |
|
|
|
|
|
|
|
|
|
|
|
|
|
|
|
|
LEF |
O |
O |
O |
O |
|
|
|
|
|
|
|
|
|
|
|
|
A3 |
297.0 |
420.0 |
SEF |
O |
|
O |
|
|
|
|
|
|
|
|
|
|
|
|
|
B6 |
128.5 |
182.0 |
SEF |
|
|
O |
|
|
|
|
|
|
|
|
|
|
|
|
|
B5 |
182.0 |
257.0 |
SEF |
O |
|
O |
|
|
|
|
|
|
|
|
|
|
|
|
|
|
|
|
LEF |
|
|
O |
|
|
|
|
|
|
|
|
|
|
|
|
|
B4 |
257.0 |
364.0 |
SEF |
O |
|
O |
|
|
|
|
|
|
|
|
|
|
|
|
|
5.5 × 8.5” |
139.7 |
215.9 |
SEF |
O |
|
O |
|
|
|
|
|
|
|
|
|
|
|
|
|
|
|
|
LEF |
|
|
O |
|
|
|
|
|
|
|
|
|
|
|
|
|
23

2 Paper and Other Media
|
|
|
|
Tray 1, 2 |
Tray 3, 4 |
|
Tray 6 |
|
|
|
Dimensions |
LEF/ |
/ |
(High |
|
|
|||
|
Tray 5 |
(High |
Envelope |
||||||
Paper Size |
Tray 3, 4 |
Capacity |
|||||||
(mm) |
SEF |
(Bypass) |
Capacity |
Tray |
|||||
|
(Two Tray |
Tandem |
|||||||
|
|
|
|
|
Feeder) |
|
|||
|
|
|
|
Module) |
Tray) |
|
|
||
|
|
|
|
|
|
|
|||
|
|
|
|
|
|
|
|
|
|
|
|
|
|
|
|
|
|
|
|
7.25 × 10.5” |
184.2 |
266.7 |
SEF |
|
|
O |
|
|
|
|
|
|
|
|
|
|
|
|
|
|
|
|
LEF |
O |
O |
O |
O |
|
|
|
|
|
|
|
|
|
|
|
|
8.5 × 11” |
215.9 |
279.4 |
SEF |
O |
|
O |
|
|
|
|
|
|
|
|
|
|
|
|
|
|
|
|
LEF |
O |
O |
O |
O |
|
|
|
|
|
|
|
|
|
|
|
|
8.5 × 13” |
215.9 |
330.2 |
SEF |
O |
|
O |
|
|
|
|
|
|
|
|
|
|
|
|
|
8.5 × 14” |
215.9 |
355.6 |
SEF |
O |
|
O |
|
|
|
|
|
|
|
|
|
|
|
|
|
11 × 17” |
297.4 |
431.8 |
SEF |
O |
|
O |
|
|
|
|
|
|
|
|
|
|
|
|
|
16K (Taiwan) |
194.0 |
267.0 |
SEF |
|
|
O |
|
|
|
|
|
|
|
|
|
|
|
|
|
|
|
|
LEF |
|
|
O |
|
|
|
|
|
|
|
|
|
|
|
|
|
8K (Taiwan) |
267.0 |
388.0 |
SEF |
|
|
O |
|
|
|
|
|
|
|
|
|
|
|
|
|
16K (China) |
195.0 |
270 |
SEF |
|
|
O |
|
|
|
|
|
|
|
|
|
|
|
|
|
|
|
|
LEF |
|
|
O |
|
|
|
|
|
|
|
|
|
|
|
|
|
8K (China) |
270.0 |
390.0 |
SEF |
|
|
O |
|
|
|
|
|
|
|
|
|
|
|
|
|
Postcard |
100.0 |
148.0 |
LEF |
|
|
O |
|
|
|
|
|
|
|
|
|
|
|
|
|
Prepaid |
200.0 |
148.0 |
SEF |
|
|
O |
|
|
|
Postcard |
|
|
|
|
|
|
|
|
|
|
|
|
|
|
|
|
|
|
|
4 x 6” |
101.6 |
152.4 |
LEF |
|
|
O |
|
|
|
|
|
|
|
|
|
|
|
|
|
European 3 |
120.0 |
235.0 |
LEF |
|
|
O |
|
|
|
(Chouyoukei |
|
|
|
|
|
|
|
|
|
3) Envelope |
|
|
|
|
|
|
|
|
|
|
|
|
|
|
|
|
|
|
|
Commercial |
104.8 |
241.3 |
LEF |
|
|
O |
|
O |
|
10 Envelope |
|
|
|
|
|
|
|
|
|
|
|
|
|
|
|
|
|
|
|
Monarch |
98.4 |
190.5 |
LEF |
|
|
O |
|
O |
|
Envelope |
|
|
|
|
|
|
|
|
|
|
|
|
|
|
|
|
|
|
|
DL Envelope |
110.0 |
220.0 |
LEF |
|
|
O |
|
O |
|
|
|
|
|
|
|
|
|
|
|
C4 Envelope |
229.0 |
324.0 |
SEF |
|
|
O |
|
|
|
|
|
|
|
|
|
|
|
|
|
C5 Envelope |
162.0 |
229.0 |
LEF |
|
|
O |
|
O |
|
|
|
|
|
|
|
|
|
|
|
O : Available blank : Not available
24

Supported Paper Sizes and Types
Output Trays/Duplex Module - Standard Sizes
Paper Size |
Dimensions |
LEF/ |
Center |
Left Side |
Integrated |
Office |
Duplex |
|||
Office |
Finisher |
|||||||||
(mm) |
SEF |
Tray |
Tray |
Module |
||||||
|
|
Finisher |
LX |
|||||||
|
|
|
|
|
|
|
|
|||
|
|
|
|
|
|
|
|
|
|
|
|
|
|
|
|
|
|
|
|
|
|
A6 |
|
105.0 |
148.0 |
LEF |
O |
O |
O |
|
|
|
|
|
|
|
|
|
|
|
|
|
|
A5 |
|
148.0 |
210.0 |
SEF |
O |
O |
O |
|
O |
|
|
|
|
|
|
|
|
|
|
|
|
|
|
|
|
LEF |
O |
O |
O |
|
O |
|
|
|
|
|
|
|
|
|
|
|
|
A4 |
|
210.0 |
297.0 |
SEF |
O |
O |
O |
O |
O |
|
|
|
|
|
|
|
|
|
|
|
|
|
|
|
|
LEF |
O |
O |
O |
O |
O |
|
|
|
|
|
|
|
|
|
|
|
|
A3 |
|
297.0 |
420.0 |
SEF |
O |
O |
O |
O |
O |
|
|
|
|
|
|
|
|
|
|
|
|
B6 |
|
128.5 |
182.0 |
SEF |
O |
O |
O |
|
|
|
|
|
|
|
|
|
|
|
|
|
|
B5 |
|
182.0 |
257.0 |
SEF |
O |
O |
O |
|
O |
|
|
|
|
|
|
|
|
|
|
|
|
|
|
|
|
LEF |
O |
O |
O |
O |
O |
|
|
|
|
|
|
|
|
|
|
|
|
B4 |
|
257.0 |
364.0 |
SEF |
O |
O |
O |
O |
O |
|
|
|
|
|
|
|
|
|
|
|
|
5.5 × 8.5” |
|
139.7 |
215.9 |
SEF |
O |
O |
O |
|
O |
|
|
|
|
|
|
|
|
|
|
|
|
|
|
|
|
LEF |
O |
O |
O |
|
O |
|
|
|
|
|
|
|
|
|
|
||
7.25 × 10.5” |
184.2 |
266.7 |
SEF |
O |
O |
O |
|
O |
||
|
|
|
|
|
|
|
|
|
|
|
|
|
|
|
LEF |
O |
O |
O |
O |
O |
|
|
|
|
|
|
|
|
|
|
|
|
8.5 × 11” |
|
215.9 |
279.4 |
SEF |
O |
O |
O |
O |
O |
|
|
|
|
|
|
|
|
|
|
|
|
|
|
|
|
LEF |
O |
O |
O |
O |
O |
|
|
|
|
|
|
|
|
|
|
|
|
8.5 × 13” |
|
215.9 |
330.2 |
SEF |
O |
O |
O |
O |
O |
|
|
|
|
|
|
|
|
|
|
|
|
8.5 × 14” |
|
215.9 |
355.6 |
SEF |
O |
O |
O |
O |
O |
|
|
|
|
|
|
|
|
|
|
|
|
11 × 17” |
|
297.4 |
431.8 |
SEF |
O |
O |
O |
O |
O |
|
|
|
|
|
|
|
|
|
|
||
16K (Taiwan) |
194.0 |
267.0 |
SEF |
O |
O |
O |
|
O |
||
|
|
|
|
|
|
|
|
|
|
|
|
|
|
|
LEF |
O |
O |
O |
O |
O |
|
|
|
|
|
|
|
|
|
|
||
8K (Taiwan) |
267.0 |
388.0 |
SEF |
O |
O |
O |
O |
O |
||
|
|
|
|
|
|
|
|
|
||
16K (China) |
195.0 |
270 |
SEF |
O |
O |
O |
|
O |
||
|
|
|
|
|
|
|
|
|
|
|
|
|
|
|
LEF |
O |
O |
O |
O |
O |
|
|
|
|
|
|
|
|
|
|
||
8K (China) |
270.0 |
390.0 |
SEF |
O |
O |
O |
O |
O |
||
|
|
|
|
|
|
|
|
|
|
|
Postcard |
|
100.0 |
148.0 |
LEF |
O |
O |
O |
|
|
|
|
|
|
|
|
|
|
|
|
|
|
Prepaid |
|
200.0 |
148.0 |
SEF |
O |
O |
O |
|
|
|
Postcard |
|
|
|
|
|
|
|
|
|
|
|
|
|
|
|
|
|
|
|
|
|
4 x 6” |
|
101.6 |
152.4 |
LEF |
O |
O |
O |
|
|
|
|
|
|
|
|
|
|
|
|
||
European 3 |
120.0 |
235.0 |
LEF |
O |
O |
O |
|
|
||
(Chouyoukei |
|
|
|
|
|
|
|
|
||
3) Envelope |
|
|
|
|
|
|
|
|
||
|
|
|
|
|
|
|
|
|
||
Commercial |
104.8 |
241.3 |
LEF |
O |
O |
O |
|
|
||
10 Envelope |
|
|
|
|
|
|
|
|
||
|
|
|
|
|
|
|
|
|
|
|
Monarch |
|
98.4 |
190.5 |
LEF |
O |
O |
O |
|
|
|
Envelope |
|
|
|
|
|
|
|
|
|
|
|
|
|
|
|
|
|
|
|
||
DL Envelope |
110.0 |
220.0 |
LEF |
O |
O |
O |
|
|
||
|
|
|
|
|
|
|
|
|
||
C4 Envelope |
229.0 |
324.0 |
SEF |
O |
O |
O |
|
|
||
|
|
|
|
|
|
|
|
|
||
C5 Envelope |
162.0 |
229.0 |
LEF |
O |
O |
O |
|
|
||
|
|
|
|
|
|
|
|
|
|
|
O |
: Available |
|
|
|
|
|
|
|||
blank |
: Not available |
|
|
|
|
|
|
|||
25

2 Paper and Other Media
Paper Trays - Non-standard Sizes
|
|
|
Tray 1, 2 |
|
|
|
|
|
|
|
|
|
Paper |
/ |
|
Tray 3, 4 |
|
Tray 5 |
|
Tray 6 |
|
||
|
|
Tray 3, 4 |
(High Capacity |
|
|
(High Capacity |
Envelope Tray |
||||
|
Size |
|
|
(Bypass) |
|
||||||
|
|
(Two Tray |
Tandem Tray) |
|
|
Feeder) |
|
||||
|
|
|
|
|
|
|
|||||
|
|
|
Modules) |
|
|
|
|
|
|
|
|
|
|
|
|
|
|
|
|
|
|
|
|
|
|
|
|
|
|
|
|
|
|
|
|
|
Width |
|
139.7-297.0 mm |
|
|
88.9-297.0 mm |
|
|
|
148.7-241.0 mm |
|
|
|
|
5.5-11.8” |
Not Available |
|
3.6-11.8” |
|
Not Available |
|
5.9-9.6" |
|
|
|
|
|
|
|
|
|
|
|
||
|
Length |
|
182.0-431.8 mm |
|
98.4-431.8 mm |
|
|
98.4-162.0 mm |
|||
|
|
|
|
|
|
|
|||||
|
|
|
7.2-17.2” |
|
|
3.9-17.2” |
|
|
|
3.9-6.4” |
|
|
|
|
|
|
|
|
|
|
|
|
|
Output Trays/Duplex Module - Non-standard Sizes |
|
|
|
|
|||||||
|
|
|
|
|
|
|
|
|
|
|
|
|
Paper |
|
Center Tray |
|
Left Side Tray |
|
Integrated |
|
Office Finisher |
|
Duplex Module |
|
Size |
|
|
|
Office Finisher |
|
LX |
|
|||
|
|
|
|
|
|
|
|
|
|||
|
|
|
|
|
|
|
|
|
|
||
|
|
|
|
|
|
|
|
|
|
||
|
Width |
|
88.9-297.0 mm |
|
88.9-297.0 mm |
88.9-297.0 mm |
210.0-297.0 mm |
|
139.7-297.0 mm |
||
|
|
|
3.6-11.9” |
|
3.6-11.9” |
3.6-11.9” |
8.4-11.9” |
|
3.5-11.9” |
||
|
|
|
|
|
|
|
|
|
|
||
|
Length |
|
98.4-431.8 mm |
|
98.4-432.0 mm |
98.4-431.8mm |
182.0-431.8 mm |
|
182.0-431.8 mm |
||
|
|
|
3.9-17.2” |
|
3.9-17.3” |
3.9-17.2” |
7.3-17.2” |
|
5.1-17.2” |
||
|
|
|
|
|
|
|
|
|
|
|
|
Supported Paper Types
The following table lists the paper types supported by each paper tray, duplex module, and the finisher.
Paper Trays
|
|
|
Tray 2, |
|
|
|
|
|
|
|
Tray 3, 4 |
|
Tray 6 |
|
|
Paper Type |
Weight g/m2 |
Tray 1 |
(Two Tray |
Tray 5 |
(High |
Envelope |
|
Module/ |
(Bypass) |
Capacity |
Tray |
||||
|
|
|
|||||
|
|
|
High Capacity |
|
Feeder) |
|
|
|
|
|
Tandem Tray) |
|
|
|
|
|
|
|
|
|
|
|
|
|
|
|
|
|
|
|
|
Plain |
|
O |
O |
O |
O |
|
|
|
|
|
|
|
|
|
|
Plain Reload*1 |
|
O |
O |
O |
O |
|
|
Recycled |
|
O |
O |
O |
O |
|
|
|
|
|
|
|
|
|
|
Custom Paper |
|
O |
O |
O |
O |
|
|
1 - 5 |
60-105 |
|
|
|
|
|
|
|
|
|
|
|
|
|
|
Hole Punched |
|
O |
O |
O |
O |
|
|
|
|
|
|
|
|
|
|
Letterhead |
|
O |
O |
O |
O |
|
|
|
|
|
|
|
|
|
|
Pre-Printed |
|
O |
O |
O |
O |
|
|
|
|
|
|
|
|
|
|
Other |
|
O |
O |
O |
O |
|
|
|
|
|
|
|
|
|
|
Lightweight |
56-63 |
O |
O |
O |
O |
|
|
|
|
|
|
|
|
|
|
Heavyweight |
106-169 |
|
O |
O |
O |
|
|
|
|
|
|
|
|
|
|
Extra |
170-215 |
|
O |
O |
O |
|
|
Heavyweight |
|
|
|
|
|
||
|
|
|
|
|
|
||
|
|
|
|
|
|
|
|
Bond Paper |
170-215 |
|
O |
O |
O |
|
|
|
|
|
|
|
|
||
|
|
|
|
|
|
|
|
Envelope |
170-215 |
|
|
O |
|
O |
|
|
|
|
|
|
|
||
|
|
|
|
|
|
|
26

Supported Paper Sizes and Types
|
|
|
Tray 2, |
|
|
|
|
|
|
|
Tray 3, 4 |
|
Tray 6 |
|
|
Paper Type |
Weight g/m2 |
Tray 1 |
(Two Tray |
Tray 5 |
(High |
Envelope |
|
Module/ |
(Bypass) |
Capacity |
Tray |
||||
|
|
|
|||||
|
|
|
High Capacity |
|
Feeder) |
|
|
|
|
|
Tandem Tray) |
|
|
|
|
|
|
|
|
|
|
|
|
|
|
|
|
|
|
|
|
Labels |
– |
O |
O |
O |
O |
|
|
|
|
|
|
|
|
|
|
Transparency |
– |
O |
O |
O |
O |
|
|
|
|
|
|
|
|
|
O : Available blank : Not available
*1: Plain Reload refers to paper already printed on one side.
NOTE: When printing onto postcards or envelopes, Extra Heavyweight should be selected, and the size should be specified.
NOTE: Depending on the heavyweight paper used, the paper cannot be loaded Short Edge Feed. In that case, load the paper Long Edge Feed.
NOTE: Depending on the type of paper used and the operating environment, the paper may not be fed into the machine properly, or print quality may be negatively affected.
Output Trays/Duplex Module
|
|
Weight g/m2 |
|
Left Side |
Integrated |
Office |
Duplex |
|
Paper Type |
Center Tray |
Office |
||||||
Tray |
Finisher LX |
Module |
||||||
|
|
|
|
Finisher |
||||
|
|
|
|
|
|
|
||
|
|
|
|
|
|
|
|
|
|
|
|
|
|
|
|
|
|
Plain |
|
|
O |
O |
O |
O |
O |
|
|
|
|
|
|
|
|
||
Plain Reload*1 |
|
O |
O |
O |
O |
|
||
Recycled |
|
|
O |
O |
O |
O |
O |
|
|
|
|
|
|
|
|
||
Custom Paper |
|
O |
O |
O |
O |
O |
||
1 - 5 |
|
60-105 |
|
|
|
|
|
|
|
|
|
|
|
|
|
||
Hole Punched |
|
O |
O |
O |
O |
O |
||
|
|
|
|
|
|
|
||
Letterhead |
|
O |
O |
O |
O |
O |
||
|
|
|
|
|
|
|
||
Pre-Printed |
|
O |
O |
O |
O |
O |
||
|
|
|
|
|
|
|
|
|
Other |
|
|
O |
O |
O |
O |
O |
|
|
|
|
|
|
|
|
||
Lightweight |
56-63 |
O |
O |
O |
O |
O |
||
|
|
|
|
|
|
|
||
Heavyweight |
106-169 |
O |
O |
O |
O |
|
||
|
|
|
|
|
|
|
|
|
Extra |
|
170-215 |
O |
O |
O |
O |
|
|
Heavyweight |
|
|
|
|
|
|||
|
|
|
|
|
|
|||
|
|
|
|
|
|
|
||
Bond Paper |
170-215 |
O |
O |
O |
O |
|
||
|
|
|
|
|
|
|
|
|
Envelope |
|
170-215 |
O |
O |
O |
|
|
|
|
|
|
|
|
|
|
|
|
Labels |
|
– |
O |
O |
O |
|
|
|
|
|
|
|
|
|
|
||
Transparency |
– |
O |
O |
O |
|
|
||
|
|
|
|
|
|
|
|
|
O |
: Available |
|
|
|
|
|
||
blank |
: Not available |
|
|
|
|
|
||
*1: Plain Reload refers to paper already printed on one side.
27

2 Paper and Other Media
28
3 Maintenance
This chapter describes the maintenance tasks that are required periodically to maintain the machine in proper working order.
Ordering Supplies
A variety of supplies are available for the machine, including machine-specific consumables such as a toner cartridge, a drum cartridge, staple cartridges and refills. General-use supplies are also available, such as glass cleaners, cleaning solvents, paper and media products.
To obtain supplies, contact the local Xerox Sales Representative, giving the company name, the product number and the machine’s serial number.
Use the space below to record the telephone number.
Supplies Telephone Number:
NOTE: If you do not use the consumables recommended by Xerox, the performance of the machine may not be at its optimum level. Use only the consumables recommended by Xerox.
Cleaning the Machine
This section describes how to clean the machine to help maintain high performance.
WARNING: Do not use aerosol cleaners. Aerosol cleaners can be explosive or flammable when used on electromechanical equipment.
Before cleaning this product, unplug the product from the electrical outlet. Always use materials specifically designated for this product. The use of other materials may result in poor performance and create a hazardous situation.
Always unplug this equipment from the electrical outlet before cleaning.
Control Panel and Touch Screen
Clean the exterior of the machine, touch screen, and control panel on a regular basis to keep them free from dust, dirt, and fingerprint smudges. Wipe the exterior surfaces with a soft, firmly wrung cloth moistened with water. Do not use cleaning agents other than water or neutral detergent. Wipe off any excess water with a dry cloth.
Document Glass and Document Feeder Glass
Clean the document cover and document glass monthly to prevent streaks, smears, and other marks from appearing on copies or prints. If the optional document feeder is installed, also clean the film and document feeder glass.
29
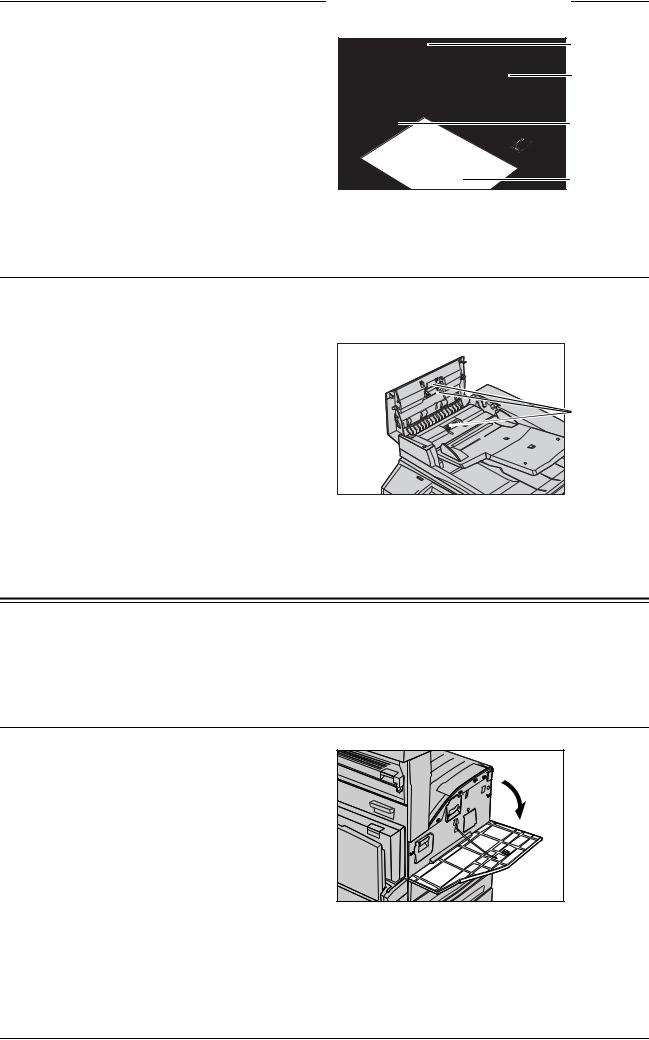
3 Maintenance
1. Wipe the document cover and document glass with a soft cloth
moistened with water or Xerox-
approved cleaner to remove any marks, and then wipe with a
soft, dry cloth.
2. If the document feeder is installed, wipe the document
feeder glass and the film on the
cover with a soft cloth moistened with water or Xerox-approved cleaner to remove any marks, and then wipe with a soft, dry cloth.
Document Feeder Rollers
If the machine is installed with a document feeder, clean the feeder rollers monthly to prevent streaks appearing on the output and to prevent document feeder paper jams.
1.Open the document feeder cover.
2.Wipe the document feeder rollers while turning them with a soft cloth moistened with water to remove any dirt.
3.Close the cover.
Document feeder |
rollers |
Replacing the Drum Cartridge
The drum cartridge is a customer replaceable unit. The machine will display a warning message before the drum reaches the end of its life. When the message is displayed, order a replacement cartridge to ensure continuous operation.
Removing the Old Drum Cartridge
1. Make sure that the machine is not operating, and open the front cover.
30
Loading...