


 Loading...
Xerox CopyCentre C35, CopyCentre C45, CopyCentre C55, WorkCentre M35, WorkCentre M45 Quick Reference Guide
...
Quick Reference Guide
604P12740

Quick Reference Guide
604P12753
MAXIMIZE YOUR PRODUCTIVITY...
...by taking advantage of all the capabilities of your device. A Training and Information CD was supplied with your product. The CD provides animated tutorials and interactive screens. When installed on your network it will always be available to everyone, or load it on your hard drive for easy access.
Prepared by:
The Document Company Xerox
GKLS European Operations
Bessemer Road
Welwyn Garden City
Hertfordshire
AL7 1HE
ENGLAND
©2003 by Xerox Corporation. All rights reserved.
Copyright protection claimed includes all forms and matters of copyrighted material and information now allowed by statutory or judicial law or hereinafter granted, including without limitations, material generated from the software programs which are displayed on the screen, such as icons, screen displays, looks etc.
Xerox®, The Document Company®, the digital X® and all Xerox products mentioned in this publication are trademarks of Xerox Corporation. Product names and trademarks of other companies are hereby acknowledged.
The information in this document is correct at the time of publication. Xerox reserves the right at any time to change the information without notice. Changes and technical updates will be added in subsequent editions of the documentation. For the latest information go to www.xerox.com.
Contents
1 Welcome................................................................................. |
1-1 |
Introduction ................................................................................................ |
1-2 |
Additional Resources ................................................................................ |
1-3 |
System Administration CD (CD1)................................................................. |
1-3 |
Training and Information CD (CD2) ............................................................. |
1-3 |
Utilities CD (CD3)......................................................................................... |
1-3 |
Conventions ............................................................................................... |
1-4 |
Overview of Features at the Machine....................................................... |
1-6 |
Overview of Features at the Workstation ................................................ |
1-8 |
Safety .......................................................................................................... |
1-9 |
Introduction .................................................................................................. |
1-9 |
Safety Notes................................................................................................. |
1-9 |
Environmental Compliance..................................................................... |
1-11 |
ENERGY STAR ......................................................................................... |
1-11 |
Environmental ChoiceM ............................................................................. |
1-11 |
Regulatory Information............................................................................ |
1-12 |
FCC Part 15 ............................................................................................... |
1-12 |
ICES-003.................................................................................................... |
1-12 |
US Regulatory Information for the Fax Kit option....................................... |
1-12 |
Canadian Regulatory Information for the Fax Kit option ............................ |
1-14 |
Illegal Copying.......................................................................................... |
1-15 |
2 Product Overview .................................................................. |
2-1 |
Introduction ................................................................................................ |
2-2 |
CopyCentre C35/C45/C55 .......................................................................... |
2-3 |
WorkCentre M35/M45/M55......................................................................... |
2-5 |
WorkCentre Pro 35/45/55........................................................................... |
2-7 |
3 Getting Started....................................................................... |
3-1 |
Control Panel Overview............................................................................. |
3-2 |
Power On or Off.......................................................................................... |
3-3 |
Quick Reference Guide |
Page i |
Loading Paper ............................................................................................ |
3-4 |
Making Copies............................................................................................ |
3-5 |
Sending an Embedded Fax ....................................................................... |
3-6 |
Sending a Server Fax ................................................................................ |
3-7 |
Sending an Internet Fax ............................................................................ |
3-8 |
Scanning a Document to a File................................................................. |
3-9 |
Sending an E-mail.................................................................................... |
3-10 |
Printing from a PC ................................................................................... |
3-11 |
Printing with Internet Services ............................................................... |
3-12 |
Logging On / Logging Off ....................................................................... |
3-13 |
Customizing your Machine ..................................................................... |
3-14 |
Further Assistance .................................................................................. |
3-15 |
4 Copy ....................................................................................... |
4-1 |
Copy ............................................................................................................ |
4-2 |
Basic Copying ............................................................................................ |
4-3 |
Output .......................................................................................................... |
4-4 |
2-Sided......................................................................................................... |
4-5 |
Reduce/Enlarge ........................................................................................... |
4-7 |
Paper Supply ............................................................................................... |
4-8 |
Image Adjustment.................................................................................... |
4-10 |
Image Quality............................................................................................. |
4-11 |
More Image Quality.................................................................................... |
4-12 |
Bound Originals ......................................................................................... |
4-13 |
Edge Erase ................................................................................................ |
4-14 |
Original Input.............................................................................................. |
4-15 |
Image Shift................................................................................................. |
4-16 |
Output Format .......................................................................................... |
4-17 |
Transparencies .......................................................................................... |
4-18 |
Booklet Creation ........................................................................................ |
4-19 |
Multi-Up...................................................................................................... |
4-20 |
Invert Image ............................................................................................... |
4-21 |
Covers........................................................................................................ |
4-22 |
Inserts ........................................................................................................ |
4-24 |
Job Assembly........................................................................................... |
4-26 |
Build Job .................................................................................................... |
4-26 |
Sample Set ................................................................................................ |
4-28 |
Stored Programming.................................................................................. |
4-29 |
Page ii |
Quick Reference Guide |
5 Fax........................................................................................... |
5-1 |
Fax ............................................................................................................... |
5-2 |
Basic Faxing - Embedded Fax .................................................................. |
5-3 |
Dialing Options............................................................................................. |
5-4 |
Resolution .................................................................................................... |
5-6 |
Sides Scanned ............................................................................................. |
5-7 |
Image Adjustment ...................................................................................... |
5-8 |
Image Quality ............................................................................................... |
5-9 |
Original Input.............................................................................................. |
5-10 |
Bound Originals.......................................................................................... |
5-11 |
Added Fax Features................................................................................. |
5-12 |
Fax Sending Features................................................................................ |
5-12 |
Fax Reports................................................................................................ |
5-18 |
Mailboxes ................................................................................................... |
5-19 |
Comment Setup ......................................................................................... |
5-20 |
Advanced Fax Features ............................................................................. |
5-20 |
Dial Directory Setup ................................................................................... |
5-23 |
Basic Faxing - Server Fax ....................................................................... |
5-24 |
Dialing Options........................................................................................... |
5-25 |
Resolution .................................................................................................. |
5-26 |
Sides Scanned ........................................................................................... |
5-27 |
More Fax Features ................................................................................... |
5-28 |
Image Quality ............................................................................................. |
5-29 |
More Image Quality.................................................................................... |
5-30 |
Original Input.............................................................................................. |
5-31 |
Delayed Send............................................................................................. |
5-32 |
Authentication Mode................................................................................ |
5-33 |
6 Internet Fax ............................................................................ |
6-1 |
Internet Fax................................................................................................. |
6-2 |
Send:............................................................................................................ |
6-3 |
Address List ................................................................................................. |
6-3 |
Entering an E-mail Address for Internet Fax ................................................ |
6-4 |
Image Adjustment ...................................................................................... |
6-6 |
Image Quality ............................................................................................... |
6-7 |
More Image Quality...................................................................................... |
6-8 |
Sides Scanned ............................................................................................. |
6-9 |
Resolution .................................................................................................. |
6-10 |
Original Input.............................................................................................. |
6-11 |
Output Format .......................................................................................... |
6-12 |
Document Format ...................................................................................... |
6-13 |
Acknowledgment Report ............................................................................ |
6-14 |
Quick Reference Guide |
Page iii |
|
Reply To..................................................................................................... |
6-14 |
|
Message Body ........................................................................................... |
6-15 |
|
Authentication Mode ............................................................................... |
6-16 |
7 |
Network Scanning................................................................. |
7-1 |
|
Scan ............................................................................................................ |
7-2 |
|
Scanning Resources.................................................................................... |
7-2 |
|
Network Scanning...................................................................................... |
7-3 |
|
Repositories ................................................................................................. |
7-4 |
|
Template Overview ...................................................................................... |
7-4 |
|
Template Destinations ................................................................................. |
7-5 |
|
Destination Details ....................................................................................... |
7-6 |
|
Image Adjustment...................................................................................... |
7-7 |
|
Image Quality............................................................................................... |
7-8 |
|
More Image Quality...................................................................................... |
7-9 |
|
Sides Scanned........................................................................................... |
7-10 |
|
Edge Erase ................................................................................................ |
7-11 |
|
Original Input.............................................................................................. |
7-12 |
|
Resolution .................................................................................................. |
7-13 |
|
Output Format .......................................................................................... |
7-14 |
|
Document Name ........................................................................................ |
7-14 |
|
If File Already Exists .................................................................................. |
7-15 |
|
Document Format ...................................................................................... |
7-16 |
|
Document Management Fields .................................................................. |
7-17 |
|
Add File Destination................................................................................... |
7-17 |
|
Refresh Destinations ............................................................................... |
7-18 |
|
Authentication Mode ............................................................................... |
7-19 |
8 |
E-mail ..................................................................................... |
8-1 |
|
E-mail .......................................................................................................... |
8-2 |
|
Send:............................................................................................................ |
8-3 |
|
Address List ................................................................................................. |
8-4 |
|
Entering an E-mail Address ......................................................................... |
8-4 |
|
Image Adjustment...................................................................................... |
8-6 |
|
Image Quality............................................................................................... |
8-7 |
|
More Image Quality...................................................................................... |
8-8 |
|
Sides Scanned............................................................................................. |
8-9 |
|
Edge Erase ................................................................................................ |
8-10 |
|
Original Input.............................................................................................. |
8-11 |
|
Resolution .................................................................................................. |
8-12 |
|
Output Format .......................................................................................... |
8-13 |
|
Document Format ...................................................................................... |
8-14 |
Page iv |
Quick Reference Guide |
Reply To..................................................................................................... |
8-15 |
Message Body ........................................................................................... |
8-15 |
Authentication Mode................................................................................ |
8-16 |
9 Print......................................................................................... |
9-1 |
Introduction to Print................................................................................... |
9-2 |
Print Driver Features.................................................................................. |
9-3 |
Control Options ............................................................................................ |
9-3 |
Print Drivers................................................................................................ |
9-4 |
Paper/Output................................................................................................ |
9-4 |
Advanced ..................................................................................................... |
9-5 |
Image Options.............................................................................................. |
9-5 |
Layout/Watermark........................................................................................ |
9-6 |
10 Maintenance ......................................................................... |
10-1 |
Customer Replaceable Units .................................................................. |
10-2 |
Cleaning the Machine .............................................................................. |
10-3 |
Further Assistance................................................................................... |
10-4 |
11 Troubleshooting .................................................................. |
11-1 |
General...................................................................................................... |
11-2 |
Fault Clearance ........................................................................................ |
11-3 |
Paper jams ................................................................................................. |
11-3 |
Document jams .......................................................................................... |
11-3 |
Xerox Welcome and Support Center...................................................... |
11-4 |
Locating the serial number......................................................................... |
11-4 |
Troubleshooting Tips .............................................................................. |
11-5 |
Power ......................................................................................................... |
11-5 |
Document Handler ..................................................................................... |
11-5 |
Paper Handling .......................................................................................... |
11-6 |
Finisher ...................................................................................................... |
11-7 |
Output Quality ............................................................................................ |
11-8 |
Fault Messages will not clear ................................................................... |
11-10 |
12 Index ..................................................................................... |
12-1 |
Quick Reference Guide |
Page v |
Page vi |
Quick Reference Guide |
1 Welcome
¾ Introduction..................................................... |
1-2 |
¾ Additional Resources ..................................... |
1-3 |
¾ Conventions ................................................... |
1-4 |
¾ Overview of Features at the Machine............. |
1-6 |
¾ Overview of Features at the Workstation ....... |
1-8 |
¾ Safety ............................................................. |
1-9 |
¾ Environmental Compliance ........................... |
1-11 |
¾ Regulatory Information ................................. |
1-12 |
¾ Illegal Copying.............................................. |
1-15 |
Welcome
Quick Reference Guide |
Page 1-1 |
Introduction
Welcome to your new Xerox machine.
This Quick Reference Guide provides you with an overview of the features and options that may be available on your machine. To help you familiarize yourself with your new machine please refer to:
Chapter 2 Product Overview Chapter 3 Getting Started
Further chapters within this guide offer additional information on the features and options available.
For additional assistance at the machine press the Help button. If your machine is connected to the network, use the CentreWare Help system or click on the Help button in the Print Driver.
NOTE: The graphic representations of the touch screen displayed throughout this Quick Reference Guide are based on a fully configured WorkCentre Pro. The appearance of the touch screens may differ slightly on other configurations. However, feature descriptions and functionality as described remain the same.
Page 1-2 |
Quick Reference Guide |
Additional Resources
System Administration CD (CD1)
Contained in the CD Pack delivered with your machine, the System Administration CD (CD1) offers detailed information on configuring your machine for network printing and installing any of the optional features.
The System Administration CD (CD1) is intended for System/Machine Administrators.
Welcome
Training and Information CD (CD2)
For detailed information on any of the features or functions available on your machine, please refer to the Training and Information CD (CD2), contained in the CD Pack delivered with your machine.
The Training and Information CD is intended for all users, including Machine Administrators. It contains comprehensive information about your new product including interactive how-to’s and tutorials. To ensure maximum productivity is gained from your machine, please copy the program contained on the CD onto your network so that all users have access.
Utilities CD (CD3)
Contained in the CD pack the Utilities CD (CD3) contains a utility for upgrading new versions of software on the machine.
This CD is not required during installation.
Quick Reference Guide |
Page 1-3 |
Conventions
Throughout this Guide, you will find that some terms are used interchangeably:
¾Paper is synonymous with media.
¾Document is synonymous with original.
¾Page is synonymous with sheet.
¾CopyCentre/WorkCentre/WorkCentre Pro is synonymous with the machine.
The following pages offer further information about the conventions used within this Guide.
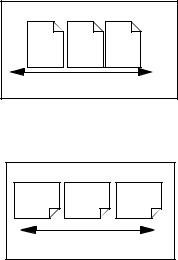
Long Edge
Feed (LEF) /
Portrait
Orientation
Orientation refers to the direction of images on the page. When the image is upright, the paper (or other media) can be one of two ways:
When observed from the front of the machine, paper or originals with the long edges to the left and right of the paper tray or document handler.
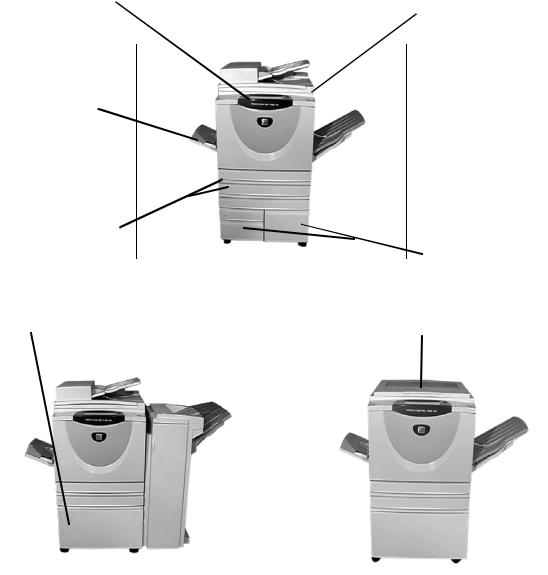
Short Edge
Feed (SEF) /
Landscape
LEF Orientation |
A |
A |
Paper feed direction |
When observed from the front of the machine, paper or originals with the short edges to the left and right of the paper tray or document handler.
SEF Orientation |
A |
A |
Paper feed direction |
Italic typeface
The Italic typeface is used to emphasise a word or phrase. In addition, references to other publications are displayed in Italic typeface. For example:
-For more information refer to the System Administration CD (CD1), contained in the CD Pack delivered with your machine.
Page 1-4 |
Quick Reference Guide |

Bracket text typeface:
The [Bracket Text] typeface is used to emphasise the selection of a feature mode or button. For example:
¾ Select [Machine Details].
Welcome
Notes
Notes are statements that provide additional information. For example:
NOTE: Originals must be loaded in the Document Handler when using this feature.
Hints
Hints help users to perform a task. For example:
HINT: This option is useful for saving toner (dry ink) consumption for images with a dark background and white text.
Specification note
Offers more in-depth specification information relating to the machine. For example:
Tray 2 holds 500 sheets of 20lb, substance 20 paper. Weight ranges from 16 - 53lb, substance 16 - 53. Sizes range from 8.5” x 5.5” SEF to 11” x 17” SEF.
Cautions
Cautions are statements that suggest mechanical damage as a result of an action. For example:
CAUTION: Use of controls or adjustments or performance of procedures other than those specified herein may result in hazardous radiation exposure.
Warnings
Warnings are statements that alert users to the possibility of personal injury. For example:
WARNING: This product must be connected to a protective earthing circuit.
Quick Reference Guide |
Page 1-5 |
Overview of Features at the Machine
Using the powerful features available on your machine you can:
Scan Once and Print Many
When making copies your machine only has to scan a document once regardless of the number of copies needed. This reduces the risk of jams and damage to originals.
Perform Different Tasks Simultaneously
Your machine performs different tasks simultaneously. A job can be added to the job queue by scanning it, even while the machine is printing another job.
Make Copies Look Like Originals
Your machine allows the reproduction of high quality images, especially photographs, graphics, text, or a combination. Compare your output to that from other copiers and see the difference.
Customize Image Size and Placement
You can manipulate the appearance of the image on the output stock.
-Shift the image to create margins for binding.
-Automatically reduce, enlarge, or center your images.
-Print multiple reduced images on a single page.
Use Digital Features to Simplify your Work Process
Use the Build Job feature to divide a copy or embedded fax job into different segments and apply different settings to each of the segments. This allows you to:
-Combine originals from the Document Glass and the Document Handler into a single job.
-Create a single job, using different programming features for each original.
-Feed more than the maximum number of originals through the Document Handler without reprogramming.
Use the Transparency feature to produce transparencies with transparency separators in one step.
Use the Booklet Creation feature to automatically sequence and reduce or enlarge the images when making booklets.
Use the Covers feature to automatically add covers to your documents.
Page 1-6 |
Quick Reference Guide |
Use the Mixed Size Originals feature to copy mixed size originals simultaneously. Produces copies on uniform size paper or mixed size paper.
Be Environmentally Friendly
This product complies with a variety of international standards for environmental protection and is compatible with most recycled paper.
Welcome
Scan Documents to Create Electronic Files (Optional)
This feature, available on the WorkCentre Pro configuration, allows you to create electronic files from your originals which can be:
-Filed on the server.
-Routed over the network to your desktop.
-Distributed through an e-mail system.
-Automatically placed into a Document Management Application.
-Converted into an electronic digital document which can be edited, managed, shared and distributed, using a wide variety of software applications.
Fax Documents (Optional)
The optional Embedded Fax service is a walk up feature that enables you to transmit and receive hard copy faxes using a telephone network.
The optional Server Fax service is a walk up feature available only on the WorkCentre Pro configuration. When enabled you will be able to scan your documents and send them to any type of fax machine that is connected to a telephone network, via your fax server.
NOTE: Both Embedded and Server Fax can be installed on the WorkCentre Pro at the same time, however only one service can be enabled for use.
The optional Internet Fax service, available only on the WorkCentre Pro configuration, allows users to transmit and receive documents as an e-mail attachment. This type of fax travels over the internet or intranet.
Quick Reference Guide |
Page 1-7 |
Overview of Features at the Workstation
If your machine is connected to a network you can use the following features. Contact your System Administrator to get connected.
CentreWare Print Drivers
The Print Driver extends the productivity power of your machine to your desktop. Options include:
•1-sided or 2-sided
•Stapled sets if you have a Finisher
•Resolutions up to 1800x1800 dpi
•Add standard or customized watermarks
•Secure Printing (print your confidential document after you get to the printer)
CentreWare Tools
The CentreWare software suite also offers optional User Management Tools and Network Scanning tools.
CentreWare Internet Services
A ‘built in’ web Home Page which allows print-ready files to be sent via the World Wide Web. This feature is accessed via Internet Services.
Page 1-8 |
Quick Reference Guide |

Safety
Introduction
Your Xerox product and supplies have been designed and tested to meet strict safety requirements. These include safety agency approval and compliance to established environmental standards. Please read the following instructions carefully before operating the product and refer to them as needed to ensure the continued safe operation of your product.
The safety testing and performance of this product have been verified using Xerox materials only.
Follow all warnings and instructions marked on, or supplied with the product. This WARNING Mark alerts users to the possibility of personal injury.
This WARNING Mark alerts users to heated surfaces.
Welcome
Safety Notes
WARNING: This product must be connected to a protective earthing circuit.
This product is equipped with a 3-wire type plug, provided with a protective earthing pin. This plug will fit only into an earthed power outlet. This is a safety feature. To avoid risk of electric shock, contact your electrician to replace the receptacle if you are unable to insert the plug into the outlet. Never use an earthed adapter plug to connect the product to a power source receptacle that lacks an earth connection terminal.
This product should be operated from the type of power source indicated on the marking label. If you are not sure of the type of power available, consult your local power company.
Disconnect Device for this product is the power cord. To remove all electrical power to the product, disconnect the power cord from the power receptacle.
Do not put your hands into the fuser area, located just inside the exit tray area, as you may be burned.
Do not use pressurized air-spray cleaning aids on or in this equipment. Some pressurized air-spray containers contain explosive mixtures and are not suitable for use in electrical applications. Use of such cleaners can result in a risk of explosion and fire.
If you need additional safety information concerning the product or Xerox supplied materials you may call the following number:
+44 (0) 1707 353434
Quick Reference Guide |
Page 1-9 |
Laser Safety
This product complies with safety standards and is certified as a Class 1 Laser product under the US Department of Health and Human Services (DHSS) Radiation Performance Standard according to the Radiation Control for Health and Safety Act of 1968. This product does not emit hazardous laser radiation.
CAUTION: Use of controls or adjustments or performance of procedures other than those specified herein may result in hazardous exposure of laser light.
Since radiation emitted inside this product is completely confined within the protective housing and external covers, the laser beam cannot escape from the machine during any phase of the user operation.
The Center for Devices and Radiological Health (CDRH) of the US Food and Drug Administration implemented regulations for laser products on August 1 1976. These regulations apply to laser products marketed in the United States.The label on the machine indicates compliance with CDRH regulations and must be attached to laser products marketed in the United States.
This product contains laser warning labels. These labels are intended for use by Xerox Service Representatives and are placed on or near panels or shields that require special tools for removal. Do not remove any of the panels. There are no operator serviceable areas inside these covers.
Safety Standards
This Xerox product is safety certified by Underwriters Laboratories Incorporated. Standard UL1950/CSA 22.2 No.950 3rd EDITION.
Page 1-10 |
Quick Reference Guide |

Environmental Compliance
ENERGY STAR
As an ENERGY STAR partner, Xerox Corporation has determined that this product meets the ENERGY STAR guidelines for energy efficiency. ENERGY STAR and the ENERGY STAR mark are registered U.S. marks.
Products that carry the ENERGY STAR label are designed to be energy efficient and help protect the environment.
Your machine will be delivered with the timer for switching to Low Power Mode from the last copy/print out, set at 15 minutes. The time to switch to power save (auto off/ sleep) mode is set at 60 minutes from the last copy/print out. A more detailed description of these modes, together with instructions on changing the default times to suit your work pattern, can be found in Tutorials, Machine Administration, Change Default Settings, Set (Power Save) Duration Times of the Training and Information CD (CD2).
Welcome
Environmental ChoiceM
Terra Choice Environmental Services, Inc., of Canada has verified that this Xerox product conforms to all applicable Environmental ChoiceM EcoLogoM requirements for minimized impact to the environment.
Quick Reference Guide |
Page 1-11 |
Regulatory Information
FCC Part 15
This equipment has been tested and found to comply with the limits for a Class A digital device, pursuant to Part 15 of the FCC Rules. These limits are designed to provide reasonable protection against harmful interference when the equipment is operated in a commercial environment. This equipment generates, uses and can radiate radio frequency energy and, if not installed and used in accordance with the instruction manual, may cause harmful interference to radio communications. Operation of this equipment in a residential area is likely to cause harmful interference in which case the user will be required to correct the interferences at their own expense.
Changes or modifications to this equipment not specifically approved by the Xerox Corporation may void the user’s authority to operate this equipment.
WARNING:Shielded cables must be used with this equipment to maintain compliance with FCC regulations.
ICES-003
This Class A digital apparatus complies with Canadian ICES-003.
Cet appareil numérique de la classe A est conforme à la norme NMB-003 du Canada.
US Regulatory Information for the Fax Kit option
Fax Send Header Requirements: The Telephone Consumer Protection Act of 1991 makes it unlawful for any person to use a computer or other electronic device, including FAX machines, to send any message unless such message clearly contains in a margin at the top or bottom of each transmitted page or on the first page of the transmission, the date and time it is sent and an identification of the business or other entity, or other individual sending the message and the telephone number of the sending machine or such business, other entity, or individual. (The telephone number provided may not be a 900 number or any other number for which charges exceed local or long-distance transmission charges.) The country location, telephone number identifying the machine, the header text information (business name), the send and receive behavior and dial type must be entered when installing the Embedded Fax kit option. Refer to the System Administration CD (CD1) for further information on installing Embedded Fax and the Training and Information CD (CD2) for information about the Transmit Header Print feature.
Page 1-12 |
Quick Reference Guide |
Data Coupler Information: This equipment complies with Part 68 of the FCC rules and the requirements adopted by the Administrative Council for Terminal Attachments (ACTA). A label is fixed to the safety cover of the fax kit that contains, among other information, a product identifier in the format US:AAAEQ##TXXXX. If requested, this number must be provided to the telephone company.
A FCC compliant telephone cord and modular plug is provided with this equipment. It is designed to be connected to the telephone network or premises wiring using a compatible modular jack that is Part 68 compliant.
You may safely connect the machine to the following standard modular jack: USOC RJ-11C using the compliant telephone line cord (with modular plugs) provided with the installation kit. See installation instructions for details.
To order the correct service from the local telephone company please quote the codes listed below: Facility Interface Code (FIC), Service Order Code (SOC), USOC Jack code and Ringer Equivalence Number (REN).
FIC |
SOCUSOC Jack |
REN |
02LS2 |
9.0FRJ-11C |
0.3 |
WARNING:Ask your local telephone company for the modular jack type installed on your line. Connecting this machine to an unauthorized jack can damage telephone company equipment. You, not Xerox, assume all responsibility and/or liability for any damage caused by the connection of this machine to an unauthorized jack.
Welcome
The REN is used to determine the number of devices that may be connected to a telephone line. Excessive RENs on a telephone line may result in the devices not ringing in response to an incoming call. In most but not all areas, the sum of RENs should not exceed five (5.0). To be certain of the number of devices that may be connected to a line, as determined by the total RENs, contact the local telephone company. The REN for this product is part of the product identifier that has the format US:AAAEQ##TXXXX. The digits represented by ## are the REN without a decimal point (e.g., 02 is a REN of 0.2).
If this Xerox equipment causes harm to the telephone network, the telephone company will notify you in advance that temporary discontinuance of service may be required. But if advance notice isn't practical, the telephone company will notify the customer as soon as possible. Also, you will be advised of your right to file a complaint with the FCC if you believe it is necessary.
The telephone company may make changes in its facilities, equipment, operations or procedures that could affect the operation of the equipment. If this happens the telephone company will provide advance notice in order for you to make necessary modifications to maintain uninterrupted service.
Quick Reference Guide |
Page 1-13 |
If trouble is experienced with this Xerox equipment, for repair or warranty information, please contact the Xerox Welcome Center telephone number 800-821-2797. If the equipment is causing harm to the telephone network, the telephone company may request that you disconnect the equipment until the problem is resolved.
Repairs to the machine should be made only by a Xerox representative or an authorized Xerox service agency. This applies at any time during or after the service warranty period. If unauthorized repair is performed, the remainder of the warranty period is null and void.
This equipment must not be used on party lines. Connection to party line service is subject to state tariffs. Contact the state public utility commission, public service commission or corporation commission for information.
If your office has specially wired alarm equipment connected to the telephone line, ensure the installation of this Xerox equipment does not disable your alarm equipment. If you have questions about what will disable alarm equipment, consult your telephone company or a qualified installer.
Canadian Regulatory Information for the Fax Kit option
This product meets the applicable Industry Canada technical specifications. 'The Ringer Equivalence Number (REN) is an indication of the maximum number of devices allowed to be connected to a telephone interface. The termination on an interface may consist of any combination of devices subject only to the requirement that the sum of the RENs of all the devices does not exceed five. The Canadian REN value of this equipment is 0.3.
Repairs to certified equipment should be made by an authorized Canadian maintenance facility designated by the supplier. Any repairs or alterations made by the user to this equipment, or equipment malfunctions, may give the telecommunications company cause to request the user to disconnect the equipment.
Users should ensure for their own protection the electrical ground connections of the power utility, telephone lines and internal metallic water pipe system, if present, are connected together. This precaution may be particularly important in rural areas.
CAUTION: Users should not attempt to make such connections themselves, but should contact the appropriate electric inspection authority or electrician, as appropriate.
Page 1-14 |
Quick Reference Guide |
Illegal Copying
Congress, by statute, has forbidden the copying of the following subjects under certain circumstances. Penalties of fine or imprisonment may be imposed on those guilty of making such copies.
¾ Obligations or Securities of the United States Government, such as: Certificates of Indebtedness
Coupons from Bonds Silver Certificates United States Bonds Federal Reserve Notes Certificates of Deposit National Bank currency
Federal Reserve Bank Notes Gold Certificates
Treasure Notes
Fractional Notes Paper money
Bonds and obligations of certain agencies of the government, such as FHA
Bonds (US Savings Bonds may be photographed only for publicity purposes in connection with the campaign for the sale of such bonds.)
Internal Revenue Stamps (If it is necessary to copy a legal document on which there is a cancelled revenue stamp, this may be done provided the reproduction of the document is performed for lawful purposes.)
Postage Stamps, canceled or uncanceled (For philatelic purposes, postage stamps may be photographed provided the reproduction is black and white and less than 3/4 or more than
1 1/2 times the linear dimensions of the original.) Postal Money Orders
Bills, checks, or drafts for money drawn by or on authorized officers of the United States
Stamps and other representatives of value, of whatever denomination, which may be or have been issued under any Act of Congress
¾Adjusted compensation Certificates for veterans of the World Wars
¾Obligations or Securities of any foreign government, bank, or corporation
Welcome
Quick Reference Guide |
Page 1-15 |
¾Copyrighted material (unless permission of the copyright owner has been obtained or the copying falls within the “fair use” or library reproduction provisions of the copyright law). Further information of these provisions may be obtained from the Copyright Office, Library of Congress, Washington, DC 20559 (circular R21)
¾Certificates of Citizenship or Naturalization. (Foreign naturalization certificates may be photographed.)
¾Passports (Foreign passports may be photographed.)
¾Immigration papers
¾Draft Registration cards
¾Selective Service Induction papers which bear any of the following information: Registrant’s earnings or income
Registrant’s dependency status Registrant’s court record Registrant’s previous military service
Registrant’s physical or mental condition
NOTE: Exception: US Army and Navy discharge certificates may be photographed.
¾Badges, identification cards, passes or insignias carried by military or Naval personnel, or by members of the various Federal Departments and Bureaus, such as the FBI and Treasury (unless the photograph is ordered by the head of such Department or Bureau)
WARNING:Copying of the following is also prohibited in certain states: automobile licences, driver’s licenses, and automobile Certificates of Title.
This list is not all-inclusive. In case of doubt, consult your attorney.
Page 1-16 |
Quick Reference Guide |
2 Product Overview
¾ Introduction ..................................................... |
2-2 |
¾ CopyCentre C35/C45/C55.............................. |
2-3 |
¾ WorkCentre M35/M45/M55............................. |
2-5 |
¾ WorkCentre Pro 35/45/55 ............................... |
2-7 |
Quick Reference Guide |
Page 2-1 |
Introduction
Your new machine is not simply a conventional copier, it is a digital device capable of copying, faxing, printing and scanning, dependent on your configuration. There are three machine configurations which are available at a speed of 35, 45 or 55 copies/prints a minute.
All three configurations are fully upgradable so as to meet any future requirements you may have. Please contact your local Xerox representative for further information.
¾CopyCentre C35/C45/C55 - A stand-alone copier which offers the copying functionality available on conventional copiers, combined with the added feature capabilities of the digital copier technology.
¾WorkCentre M35/M45/M55 - A multi-functional digital copier and printer.
¾WorkCentre Pro 35/45/55 - An advanced multi-functional device offering a high specification of features and functions.
For further assistance in identifying your machine and the additional options available please refer to the following pages.
NOTE: All features and functions described within this Quick Reference Guide relate to a fully configured WorkCentre Pro 35/45/55 and may not be available to your machine. If you require further information on any of the optional components, or information on any of the other machine configurations please contact your local Xerox representative.
Page 2-2 |
Quick Reference Guide |
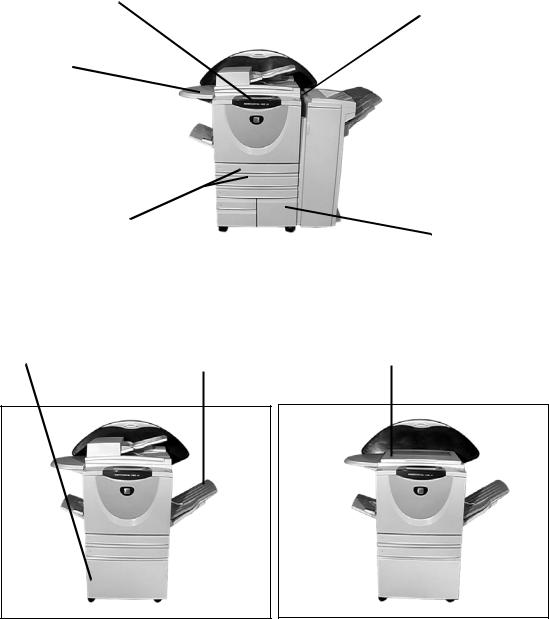
CopyCentre C35/C45/C55
Control Panel |
Document Handler |
Document Glass |
||
(Touch Screen and |
|
|
(under the Document |
|
Numeric Keypad) |
|
|
Handler) |
|
|
|
|
|
|
|
|
|
|
|
Bypass Tray |
|
|
(Folds up when |
|
Offsetting |
not in use) |
|
Catch Tray |
Paper Trays 1 & 2 |
|
High Capacity |
|
Feeder |
|
|
|
|
|
|
(Paper Trays 3 & 4) |
|
Stand |
Finisher |
Document Glass Cover |
|
||
|
|
|
|
|
|
|
|
|
|
|
|
|
|
|
|
|
|
|
|
|
|
|
|
|
|
|
|
|
|
|
|
|
|
|
Product Overview
Quick Reference Guide |
Page 2-3 |
Document
Handler
Document
Glass Cover
High Capacity
Feeder
Offset Catch
Tray
Finisher
2 Hole Punch
and 3 Hole
Punch
Foreign
Interface
Device
Fax Line 1
Fax Line 2
256MB Electronic PreCollation (EPC) Memory
The following options are available for the CopyCentre.
Feeds single or double sided documents. Fitted instead of the Document Cover.
Fitted instead of the Document Handler.
Holds Paper Trays 3 and 4. Both Trays have a larger capacity than Trays 1 and 2, therefore reducing the number of times you need to replace paper in the machine.
Delivers output either face up or face down, collated or uncollated. Each set or stack will be offset from the previous to enable easy separation. Fitted instead of the Finisher.
Delivers output to the Top Tray when no finishing option is selected, or to the Stacker to collate, stack, staple and hole punch your output. In addition a walk-up off-line stapler is also available. Fitted instead of the Offset Catch Tray.
Your finisher is delivered with either a 2 Hole Punch or a 3 Hole Punch kit, depending on the selection made when the Finisher was ordered. The Hole Punch kits can also be purchased separately to provide more options if required.
Enables the attachment of a third party access and accounting device, such as a card or coin operator.
Provides a single telephone line connection.
Provides a second telephone line. Once installed enables your machine to send and receive faxes at the same time.
Additional temporary storage area for scanned information.
Page 2-4 |
Quick Reference Guide |
WorkCentre M35/M45/M55
Control Panel |
|
Document Handler |
Document Glass |
||||||
|
|
|
|
|
|||||
(Touch Screen and |
|
|
|
|
|
|
(under the Document |
||
|
|
|
|
|
|
||||
Numeric Keypad) |
|
|
|
|
|
|
Handler) |
||
Shelf |
|
|
|
|
|
|
|
|
|
|
|
|
|
|
|
|
|
||
Bypass Tray |
|
|
|
|
|
|
|
Finisher |
|
|
|
|
|
|
|
|
|
||
|
|
|
|
|
|
|
|
|
|
(Folds up when |
|
|
|
|
|
|
|
|
|
not in use) |
|
|
|
|
|
|
|
|
|
|
|
|
|
|
|
|
|
High Capacity |
|
Paper Trays 1 & 2 |
|
|
|
|
|
|
Feeder |
||
|
|
|
|
|
|
(Paper Trays 3 & 4) |
|||
|
|
|
|
|
|
|
|
||
|
|
|
|
|
|
|
|
|
|
Product Overview
Stand |
Offsetting |
Document Glass Cover |
Catch Tray |
Quick Reference Guide |
Page 2-5 |
Loading...