


P.O. Box 2309
Bellingham, WA 98227
DOVETAIL JIG
D2796 OPERATING MANUAL
COPYRIGHT © BY WOODSTOCK INTERNATIONAL, INC. TX 4-085-998
WARNING: NO PORTION OF THIS MANUAL MAY BE REPRODUCED IN ANY SHAPE
OR FORM WITHOUT THE WRITTEN APPROVAL OF WOODSTOCK INTERNATIONAL, INC.
REPRINTED APRIL 2001, PRINTED IN CHINA


TABLE OF CONTENTS |
|
INTRODUCTION ............................................................................................................................................ |
2 |
COMMENTARY.............................................................................................................................................. |
2 |
SAFETY RULES FOR ALL TOOLS ............................................................................................................ |
3 |
UNPACKING.................................................................................................................................................... |
4 |
ASSEMBLY....................................................................................................................................................... |
4 |
HAND LEVERS ...................................................................................................................................... |
4 |
MOUNTING ............................................................................................................................................ |
4 |
CAPACITIES .................................................................................................................................................. |
5 |
PREPARATION .............................................................................................................................................. |
6 |
ADJUSTMENT LOCATIONS ...................................................................................................................... |
7 |
CLAMP ADJUSTING .................................................................................................................................... |
8 |
SIDE STOP SET UP ........................................................................................................................................ |
8 |
TEMPLATE ADJUSTMENT ...................................................................................................................... |
10 |
FENCE ADJUSTMENT................................................................................................................................ |
12 |
FENCE ADJUSTMENT TABLE ................................................................................................................ |
13 |
OPERATIONS................................................................................................................................................ |
14 |
HALF-BLIND JOINTS.......................................................................................................................... |
14 |
RABBETED DRAWER FRONTS ........................................................................................................ |
16 |
TROUBLESHOOTING ................................................................................................................................ |
17 |
TEAR OUT ............................................................................................................................................ |
17 |
EXCESSIVE FIT.................................................................................................................................... |
17 |
INCOMPLETE FIT................................................................................................................................ |
17 |
OFFSET EDGES.................................................................................................................................... |
18 |
FIT TOO TIGHT OR TOO LOOSE...................................................................................................... |
18 |
UNEVEN FIT ........................................................................................................................................ |
19 |
WARRANTY................................................................................................................................................... |
20 |
CLOSURE....................................................................................................................................................... |
20 |
PARTS DIAGRAM...................................................................................................................................... |
21 |
PARTS LIST.................................................................................................................................................... |
22 |
TOOL DATA................................................................................................................................................... |
22 |
COPYRIGHT © BY WOODSTOCK INTERNATIONAL, INC. TX 4-085-998
WARNING: NO PORTION OF THIS MANUAL MAY BE REPRODUCED IN ANY SHAPE OR FORM WITHOUT THE WRITTEN APPROVAL OF WOODSTOCK INTERNATIONAL, INC.
REVISED APRIL 2001, PRINTED IN TAIWAN
Woodstock Intl., Inc. D2796 |
- 1 - |
SAFETY INTRODUCTION
OPERATIONS ADJUSTMENTS ASSEMBLY
PARTS

INTRODUCTION
INTRODUCTION COMMENTARY
Woodstock International, Inc. is proud to offer the Model D2796 12" Dovetail Jig. Suitable for production work or small scale dovetail joinery, the Model D2796 enables you to simultaneously cut 5/8" half-blind dovetails and pins with a router, 7/16" guide bushing, and 1/2", 14° dovetail bit. The dovetail jig handles stock up to 11/4" thick and 12" wide and mounts easily to your bench top. Heavy, stamped steel construction provides excellent rigidity and strength, while the horizontal and vertical cam action clamps securely hold your wood in place. Two optional templates are available for making 1⁄2" and 3⁄4" half-blind dovetails and pins.
Woodstock is committed to offering top quality products and supporting them through customer service and technical documentation. The manual you are reading represents our latest effort to produce the best documentation possible. If you have any criticisms or comments you feel we should consider for our next printing, please write us at the address below.
Manager, Technical Documentation
Woodstock International, Inc.
P.O. Box 2309
Bellingham, WA 98227
If you have any parts problems or requests, please contact the dealer where the Model D2796 Dovetail Jig was purchased or call Woodstock International at 1- 800-840-8420 between 8am and 5pm Pacific Standard Time, Monday through Friday.
To operate this or any tool safely and efficiently, it is essential to become as familiar with its characteristics as possible. Take as much time as necessary to become acquainted with the Model D2796 Dovetail Jig. The time you invest before you use it will be time well spent. Also, read and follow all of the safety procedures noted in this manual. If you do not understand any of the operations or safety guidelines discussed in this manual, please get answers to all your questions before attempting to use this jig. The specifications, drawings, and photographs illustrated in this manual represent the Model D2796 as supplied when the manual was prepared. However, owing to Woodstock’s policy of continuous improvement, changes to the Model D2796 may occur at any time with no obligation on the part of Woodstock. Should you receive a manual update, please keep it with the manual for future reference.
The information in this manual has been obtained from sources we believe to be as reliable and up-to-date as possible. We have included some important safety measures which we believe to be essential to this tool’s safe operation. While most safety measures are generally universal, Woodstock reminds you that each work environment is different and safety rules should be considered as they apply to your situation.
We also believe additional sources of information are important to realize the full potential of this tool. Trade journals, woodworking magazines, and your local library are good places to find such information.
The Model D2796 was designed for making precise dovetails. It must never be modified and/or used for any other purpose. Modifications or improper use of this tool will void all warranties and may cause serious personal injury. If you are confused about any aspect of the jig, DO NOT use it until you have resolved any questions you might have.
- 2 - |
Woodstock Intl., Inc. D2796 |

SAFETY RULES FOR ALL TOOLS
1.KNOW YOUR POWER TOOL. Read the 12. USE SAFETY GLASSES AND EAR PRO-
owner’s manual carefully. Learn the tool’s appli- |
TECTION. Also use a DUST MASK if the cut- |
cations and limitations, as well as its particular |
ting operation is dusty. |
hazards. |
|
|
13. DO NOT OVERREACH. Keep proper footing |
2.KEEP ALL GUARDS IN PLACE and in working order.
3.GROUND ALL TOOLS. If an adapter is used to accommodate a two-prong receptacle, the adapter plug must be attached to a known ground. Never remove the grounding prong.
4.REMOVE ADJUSTING KEYS AND WRENCHES. Make it a habit to check that keys and adjusting wrenches are removed from the machine before turning it on.
5.KEEP WORK AREA CLEAN. Cluttered areas and benches invite accidents.
and balance at all times.
14.MAINTAIN TOOLS IN TOP CONDITION.
Keep tools sharp and clean for best and safest performance. Follow instructions for lubricating and changing accessories.
15.DISCONNECT TOOLS FROM POWER before servicing and when changing accessories, such as blades, bits, and cutters.
16.AVOID ACCIDENTAL STARTING. Make sure the switch is in the “OFF” position before plugging in the cord.
6.AVOID DANGEROUS ENVIRONMENTS. Do not use power tools in damp or wet locations or expose them to rain. Keep your work area well lighted.
7.KEEP CHILDREN AND VISITORS AWAY.
All children and visitors should be kept a safe distance away from your work area.
8.MAKE WORKSHOP CHILD-PROOF with padlocks, master switches, or by removing starter keys.
17.CHECK DAMAGED PARTS. Do not operate the machine until you are certain it is in perfect running condition.
18.NEVER LEAVE THE TOOL RUNNING UNATTENDED - TURN POWER OFF. Do not leave the tool until it comes to a full stop.
19.DO NOT OPERATE THE TOOL IF USING DRUGS, ALCOHOL, OR MEDICATION.
20.DO NOT WORK IN HASTE or operate machine if you are mentally or physically fatigued.
9.DO NOT FORCE TOOL. Tools work better and 21. IF THERE IS SOMETHING YOU DO NOT
more safely when they are allowed to work at their own speed.
10.WEAR PROPER APPAREL. Do not wear loose clothing, gloves, neckties, or jewelry that might get caught in moving parts. Non-slip footwear should be worn. Wear a hat or other protective head wear if your hair is long.
11.NEVER STAND OR LEAN ON TOOL.
KNOW OR UNDERSTAND, DO NOT OPERATE MACHINE! Ask for help first. Confusion can be dangerous.
22.BAD HABITS ARE DANGEROUS. Review all safety procedures often.
23.IF AT ANY TIME YOU ARE EXPERIENCING DIFFICULTIES performing the intended operation, stop using the machine! Then contact our service department or ask a qualified expert how the operation should be performed.
SAFETY
Woodstock Intl., Inc. D2796 |
- 3 - |
ASSEMBLY
UNPACKING
Remove the items packed in the carton. It may be a good idea to save the carton and packing material in case they might be needed in the future. Upon removal of all items from the package, you should have:
1.Dovetail Jig
2.Hand Levers (2)
3.Manual
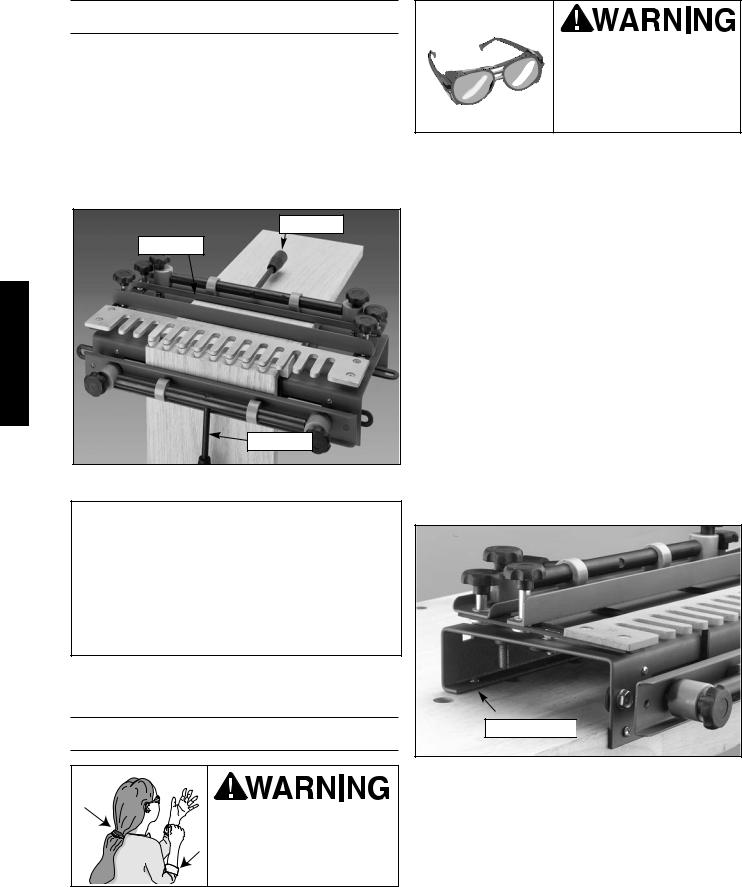
Hand Lever
Dovetail Jig
Hand Lever
Figure 1 shows the dovetail jig with handles.
Wear safety glasses during the entire assembly process. Failure to comply may result in serious personal injury.
HAND LEVERS
The jig is shipped fully assembled except for the two hand levers.
1.Screw the threaded end of each hand lever into the clamping rods located on the top and front of the dovetail jig as shown in Figure 1. Tighten until secure.
BENCH MOUNTING
1.Place the jig on your bench top so the front lap rests against the front of the bench top.
2.Locate the mounting holes in the rear and front of the jig. Scribe the hole locations and determine whether to use nuts and bolts, or screws. Drill the appropriate size holes.
NOTICE
Save all containers and packing materials until you are satisfied that your Model D2796 has arrived in good condition. Freight company adjusters will want to inspect those materials in the event that a freight claim must be made.
ASSEMBLY
Keep loose clothing rolled up and out of the way of machinery and keep hair pulled back.
Mounting Screws 

Figure 2 Jig secured to a benchtop.
3.Secure the jig to your bench top. See Figure 2.
Hint: If you do not wish to permanently devote bench space to the dovetail jig, mount the jig to a piece of 3/4" plywood that can be clamped to your bench top.
- 4 - |
Woodstock Intl., Inc. D2796 |
CAPACITIES
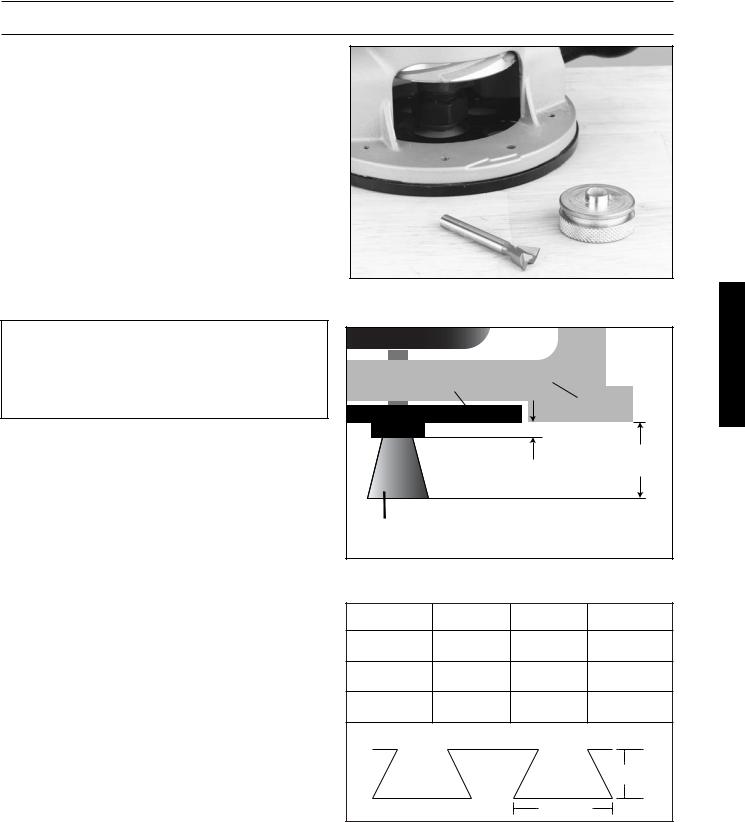
The Model D2796 is designed to produce 5⁄8" half-blind dovetail joints with a router, 7/16" O.D. guide bushing (Figure 3), and a 14°, 1/2" dovetail router bit. Two optional templates are available for making 1⁄2" and 3⁄4" half-blind dovetails and pins. Half-blind dovetails are very strong and are commonly used in fine drawer construction. The term “half-blind” refers to the fact that the pins and tails can only be seen from the side.
1.The Model D2796 is capable of handling material up to 11/4" thick and up to 12" wide.
2.It is designed to be used with 1/4" shank, 1/2", 14° dovetail bits only. The bit should protrude exactly 9/16" below the router base. See Figure 4.
NOTICE
The guide bushing must be purchased separately for your specific router.
3.The maximum router base size that can be used with this jig is 7" in diameter.
4.The guide bushing should protrude 1/8" to 3/16" below the base of the router and have a 7/16" outside diameter (O.D.).
Figure 5 shows the pin widths produced by different sized templates. Your jig comes with a 1/2" template. Other templates are available from your local Woodstock dealer.
Figure 3. Supplies needed for using the jig.
Guide Bushing |
Router Base |
ASSEMBLY |
|
||
|
|
|
|
1/8" to 3/16" |
9/16" |
|
|
|
Dovetail Bit |
|
|
Figure 4. Depth of router bit cut is 5⁄8" below router base.
Template Size |
Bit Size |
Bushing Size |
Pin Width |
7/16" |
1/2" |
7/16" |
1/2" |
1/2" |
1/2" |
7/16" |
5/8" |
9/16" |
1/2" |
7/16" |
3/4" |
|
Tail |
Pin |
Pin Depth |
|
|
Pin Width |
|
Figure 5 gives a description of dovetail pins.
Woodstock Intl., Inc. D2796 |
- 5 - |
ASSEMBLY
PREPARATION
It is important to plan your work before starting!
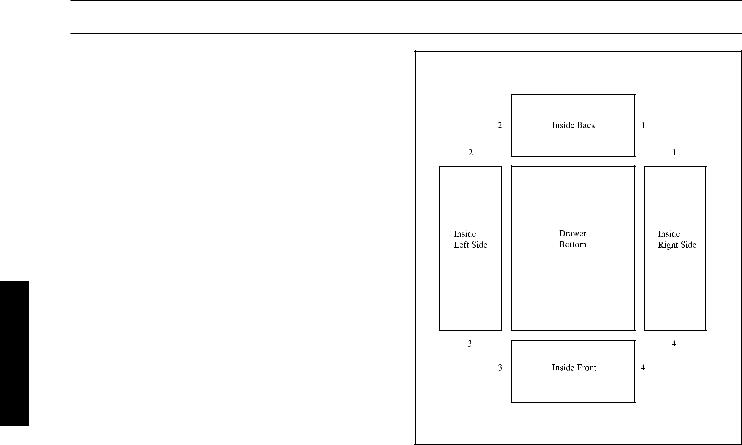
If joining multiple pieces for a drawer or series of drawers, it is best to label the pieces as front, back and sides and which face will be inside or outside. It is also best to label the ends so it is clear which end mates with another. Labeling will save setup time and avoid costly mistakes in the long run.
A typical drawer has a 3/4" thick front with sides made of 1/2" material. Your drawer fronts and backs must be at least 5/8" thick to fully accommodate the length of the dovetails without compromising strength.
After all the pieces have been cut to size and checked to ensure squareness, set them on a bench in the order that they will be fitted together. Lay each piece down so the inside faces up. Label each piece on the inside as shown in Figure 6.
When planning the dimensions of your dovetail joints, it is important to consider how the tails and pins will be aligned across the joint. You want to avoid having very
thin partial tails on either side of the joint. Follow these Figure 6 shows the pieces laid out for labeling. guidelines and you will be assured of having at least 1⁄2
width tails and pins on each side of the joint.
•1⁄2" template; stock width should be 1" increments
•7⁄16" template; stock width should be 7⁄8" increments
•9⁄16" template; stock width should be 11⁄8" increments
- 6 - |
Woodstock Intl., Inc. D2796 |
 Loading...