


I M P O R T A N T N O T I C E
PLEASE DO NOT RETURN TO STORE. If you have any problems with this unit, contact Consumer Relations for service PHONE: 1-800-275-8273.
Please read operating instructions before using this product.
Please keep original box and packing materials in the event that service is required.
W.P. APPLIANCES, INC.
Toll Free (800) 275-8273 Email address: wpappliances@ss2000.com Website: www.wolfgangpuck-kitchenware.com
Model BIBC1025 Printed in China REV 1.0
W O L F G A N G PUCK
Immersion
Blender/
Chopper
Manual
All trademarks, service marks and trade names (collectively the “Marks”) are proprietary to Wolfgang Puck World Wide.

Important Safeguards
When using electrical appliances, basic safety precautions should always be followed, including the following:
1Read all instructions carefully.
2To protect against risk of electrical shock, do not put motor base, cord or plug of the appliance in water or other liquid.
3Close supervision is necessary when any appliance is used by or near children.
4Turn unit off and unplug from outlet when not in use, before putting on or taking off parts, and before cleaning. To disconnect, turn unit off, grasp plug, and pull from the wall. Never yank on cord.
5Avoid contact with moving parts. Keep hands, hair, clothing as well as utensils, away from the cutting blade during operation to prevent injury and/or damage to the chopper. A spatula may be used but only when the unit is not running.
6Blades are sharp; handle carefully.
7Do not operate any appliance with a damaged cord or plug or after the appliance malfunctions or is dropped or damaged in any manner. Return the appliance to an authorized service facility for examination, repair, or electrical or mechanical adjustment.
8The use of attachments not recommended or sold by the appliance manufacturer may cause fire, electric shock, or injury.
9Do not use outdoors.
10Do not let cord hang over edge of table or counter or touch hot surfaces, including the stove.
11Mixing flammable non-food substances can be harmful.
12When mixing liquids, especially hot liquids, use a tall container, or make small quantities at a time to reduce spillage.
13Do not use this appliance for other than intended use.
14Do not operate in the presence of explosive and/or flammable fumes.
15This appliance is intended for HOUSEHOLD USE ONLY.
Save These Instructions
This appliance has a polarized plug (one blade is wider than the other).
As a safety feature, this plug will fit in a polarized outlet only one way. If the plug does not fit fully in the outlet, reverse the plug. If it still does not fit, contact a qualified electrician. Do not attempt to defeat this safety feature.
Before Your First Use
Carefully unpack the blender and accessories, and remove all packaging materials. Wash the chopper bowl, chopping blade, blade attachments, and hand blender attachment in warm, soapy water to remove any dust that may have accumulated during packaging. Do not immerse the bowl cover, motor base, cord or plug in water. Wipe the motor base and bowl cover with a damp cloth.
CAUTION: The attachment blades are very sharp. Use care when handling.
1 |
2 |

Wolfgang Puck, owner of the famous Spago restaurants and
one of the most influential chef-restauranteurs in America, is credited with reviving California’s rich culinary heritage. His cooking innovations, a result of blending fresh California
ingredients with his classical French techniques, are enjoyed by world leaders, stars and fellow chefs alike. He established other trend-setting restaurants like Postrio in San Francisco, Chinois on Main in Santa Monica, Granita,
Vert and Trattoria del Lupo. Home chefs can also share Mr. Puck’s talents through his cookbooks and, of course, through his appliances!
Table of Contents
Important Safeguards |
1 |
|
|
|
|
Before Your First Use |
2 |
|
|
|
|
About Wolfgang Puck |
3 |
|
|
|
|
Know Your Immersion Blender |
5 |
|
|
|
|
Hand Blender Attachment |
6 |
|
|
|
|
Suggested Uses |
7 |
|
|
|
|
Food Chopper Attachment |
8 |
|
|
|
|
Helpful Hints |
9 |
|
|
|
|
Care and Cleaning |
10 |
|
|
|
|
Recipes |
11 |
|
|
|
|
Recipe Notes |
25 |
|
|
|
|
Limited Warranty |
26 |
|
|
|
|
Contact Information |
back |
|
|
|
|
3
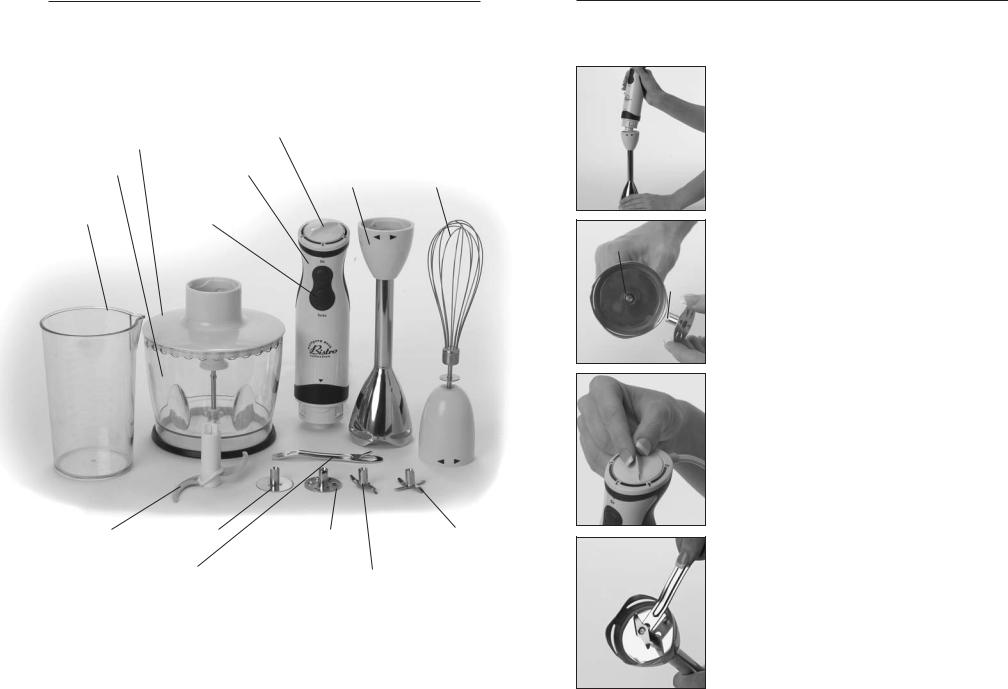
Know Your
Immersion Blender/Chopper
Chopper bowl |
Speed Selector • |
|
|
and Lid • |
|
|
|
Bowl cover • |
Motor Base • |
Blending |
Wire |
|
|
Rod • |
Whisk • |
Mixing |
On / Turbo |
|
|
Beaker • |
Buttons • |
|
|
Chopping Blade • |
Aerator Disc • |
Blending Disc • |
Grinding Blade • |
(for chopping bowl only) |
|
|
|
Attachment removal tool • |
Multipurpose Blade • |
|
|
Assembly and Use
of Hand Blender Attachment
figure 1
figure 2
Shaft Pin
Blade
Groove
figure 3
figure 4
1Ensure the motor base is unplugged. Attach hand blender rod to motor base by holding the motor base with the arrows slightly to the right of the arrows on the blending rod. Turn the motor base counter clockwise while holding the blending rod firmly. (see figure 1)
2Place one of the small metal attachments in the shaft of the mixing rod. Make sure that the pin located on the shaft fits into the groove of the attachment. Press down until attachment locks in place. (see figure 2)
Caution: Blades are sharp. Handle with care.
3Place food in suitable container for mixing (beaker, bowl, pan). For best results, solid foods should be no larger than 1/2" cubes.
4Plug into 120-volt 60 Hz AC only outlet.
5Immerse the hand blending rod into your ingredients. Turn the speed selector to “1” first. Press the ON/OFF switch to begin blending; then gradually increase speed, as needed. (see figure 3) Slowly move the rod up, down and sideways through the food . Note: Never
lift the hand blender attachment out of your ingredients while the unit is running to avoid splatter of your food.
6At any time during the blending process, you can press the Pulse button to increase the blender to its maximum speed
7Do not operate the motor continuously for more than one minute when using the blender.
8When you are finished, simply release the ON/OFF switch, unplug the motor base, twist the hand blending rod to remove.
9To remove blades from the blender rod, use your blade removal tool as shown in figure 4. Slide the opening of the tool underneath the blade and press down.
5 |
6 |
Suggested Uses
To change the metal attachment blade, remove the attachment already inserted on the shaft of the mixing rod with the tool provided. Use the side of the tool with the semi-circular slot to remove the attachment. Place the slot around the shaft, underneath the attachment, and lift up to remove.
Caution: Blades are sharp. Handle with care.
Attachment |
Functions |
Speed |
Aerator disc |
Beat cream, whip egg whites, |
Minimum |
|
puddings, sauces, frostings and other |
|
|
airy, foamy mixtures. When using, move |
|
|
blending rod up and down to draw air |
|
|
in. Use a tall, narrow container for best |
|
|
results when foaming milk, making |
|
|
cream and whipping egg whites. |
|
Blending disc
Grinding blade
Multipurpose blade
Mix and stir shakes, drinks, omelet batters, sauces and emulsions. Use for pancake batter, gravies and dressings.
Cut, chop, and crush raw or cooked meat and hard vegetables.Grind cooked meat for use in recipes such as casseroles or chicken salad.
Chop, crush, and mash vegetables, and fruit for baby food, soups and sauces.
Medium to Maximum
Maximum
Medium to Maximum
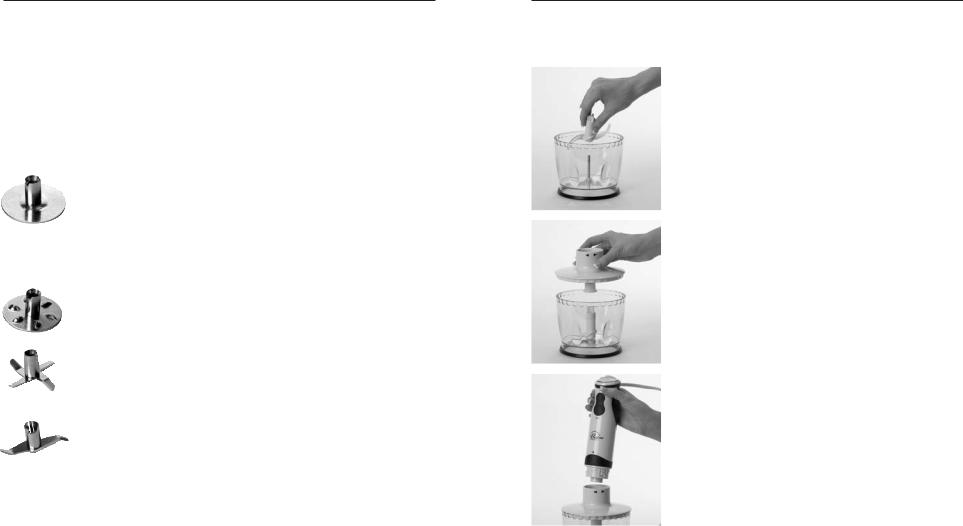
Assembly and Use
of Food Chopper Attachment
figure 1 |
1 |
Ensure the motor base is unplugged. |
|
|
|
|
2 |
Assemble chopper bowl by first placing the |
|
|
chopping blade onto the blade shaft in the |
|
|
chopper bowl. (see figure 1) Then place food in |
|
|
bowl. For best results, solid foods should be no |
|
|
larger than 1/2" cubes. |
|
3 |
Place the chopper bowl lid on top of the |
|
|
chopper bowl. (see figure 2) |
|
4 |
Attach motor base to top of bowl cover by |
|
||
|
|
turning clockwise. |
figure 2 |
|
|
|
|
|
|
5 |
Plug into 120-volt 60 Hz AC only outlet. |
|
6 |
Attach the motor base to the chopping bowl |
|
|
as follows: Hold the cover firmly with one hand, |
|
|
while holding the motor base with the arrows |
|
|
slightly to the right of the arrows on the bowl |
|
|
lid. Turn the motor base counter clockwise. |
|
|
(see figure 3) |
|
7 |
Always use slight downward pressure when |
|
||
|
|
operating the motor base, while the other hand |
figure 3 |
|
|
|
is placed firmly on the bowl cover. Always |
|
|
|
|
|
|
ensure your speed selector is on “5” when |
|
|
chopping. Use a pulse action when chopping by |
|
|
pressing and releasing ON/OFF switch. |
|
8 |
Do not operate the motor continuously for |
|
|
more than 15 seconds when using chopper |
|
|
attachment, otherwise food will be too |
|
|
finely chopped. |
|
9 |
When you are finished, simply release the |
|
|
ON/OFF switch, unplug the motor base, and |
|
|
then unscrew the chopper bowl. |
7 |
8 |
 Loading...