


PROFESSIONAL DOUBLE
WAFFLE MAKER
WMK Series
For your safety and continued enjoyment of this product, always read the instruction book carefully before using.
CONTENTS
Important Safeguards . . . . . . . . . . . . . . 1 Special Features. . . . . . . . . . . . . . . . 5 Instructions for Use. . . . . . . . . . . . . . . 6 Tips. . . . . . . . . . . . . . . . . . . . . . 8 Toppings and Recipes. . . . . . . . . . . . . . 9 Cleaning and Maintenance . . . . . . . . . . . . 17
IMPORTANT SAFEGUARDS
When using electrical appliances, basic safety precautions should always be followed, including the following:
1.READ ALL INSTRUCTIONS.
2.Do not touch hot surfaces. Use handles and knobs.
3.To protect against fire, electrical shock, and injury to persons, DO NOT IMMERSE CORD, PLUG, OR UNIT in water or other liquids.
4.Close supervision is necessary when any appliance is used by or near children.
5.Unplug from outlet when not in use and before cleaning. Allow to cool before putting on or taking off parts, and before cleaning appliance.
6.Do not operate any appliance with a damaged cord or plug or after the appliance malfunctions or has been damaged in any manner. Return appliance to the nearest Waring® Authorized Service Facility for examination, repair, or adjustment.
7.The use of accessory attachments not recommended by Waring may result in fire, electrical shock, or injury to persons.
8.Do not use outdoors, or use for other than intended use.
9.Do not let power cord hang over edge of table or counter, or touch hot surfaces.
2
10.Do not place on or near a hot gas or electric burner, or in a heated oven.
11.Unplug the unit when finished baking waffles.
12.Always begin by plugging appliance into wall outlet. To disconnect, turn control to setting #1, then remove plug from wall outlet.
13.WARNING: TO REDUCE THE RISK OF FIRE OR ELECTRIC SHOCK, REPAIR SHOULD BE DONE ONLY BY AUTHORIZED PERSONNEL.
DO NOT REMOVE THE BASE PANEL.
NO USER-SERVICEABLE PARTS ARE INSIDE.
SAVE THESE INSTRUCTIONS FOR HOUSEHOLD USE ONLY
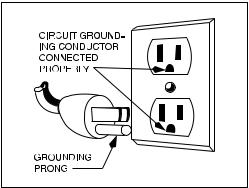
Grounding Instructions
For your protection,
the Waring Pro® Professional Waffle Maker is supplied with
a molded 3-prong grounding-type plug
and should be used in combination with a properly connected
grounding-type outlet as shown in the figure.
SPECIAL CORD SET INSTRUCTIONS
A short power-supply cord is provided to reduce the risks resulting from becoming entangled in or tripping over a longer cord. Longer extension cords are available and may be used if care is exercised in their use.
If a long extension cord is used, the marked electrical rating of the extension cord should be at least as great as the electrical rating of the appliance, and the longer
3
cord should be arranged so that it will not drape over the countertop or tabletop where it can be pulled on by children or animals, or tripped over. The extension cord
should be a grounding 3-wire cord.
Before first use
1.Before using your Waring Pro® Professional Belgian Waffle Maker for the first time, remove any dust from shipping by wiping the plates with a damp cloth. Remove all protective paper and wrapping.
2.NOTE: The first time you use your waffle maker, it may have a slight odor and may smoke a bit. This is normal and common to heating appliances.
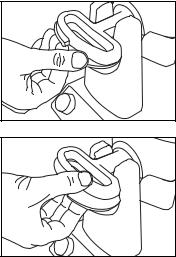
IMPORTANT NOTICE!
TO FACILITATE OPENING AND CLOSING
THE DOUBLE WAFFLE MAKER,
PLEASE FOLLOW THE INSTRUCTIONS BELOW.
TO OPEN: Place thumb on top of lip of lower handle and index finger under lip of upper handle. Push open.
TO CLOSE: Place thumb on top handle and fingers under bottom handle and pull together
until shut.
NOTE: Please note that top and bottom grid covers may separate slightly during use. This is normal.
Should this occur, do not close handles to rotate until unit beeps, indicating that the baking cycle is completed.
To reduce grid separation and overflow during cooking, you may want to reduce the quantity of batter.
4

SPECIAL FEATURES
1.Deep 1" Waffle Grids
2.Browning Control Adjustment
Adjustable for different batters and personal preference.
3.Indicator Lights
3a – Red indicator light indicates waffle maker is in On position.
3b – Two green LEDs: one for upper and one for lower waffle grid covers will illuminate when each waffle is done – three audio beep tones will sound.
4.Indicator Beeps
– Six beeps indicate unit is ready to bake.
When the waffle maker is first plugged |
3b |
|
into electrical outlet and turned to the |
|
|
On position, it will beep six times, |
|
|
indicating it has reached baking |
|
|
temperature. |
|
|
Please note: This will only |
1 |
|
occur for the first waffle |
|
|
|
|
|
of each baking session. |
|
|
– Three beeps indicate |
|
|
waffle is |
|
|
5. Measuring |
|
|
5
2
3a |
3b |
|
NOTE: This Waring Pro® Professional Belgian Waffle Maker has been treated with a special nonstick coating. Before the first use, we suggest you season the waffle grids by brushing with cooking oil. Wipe with a paper towel or pastry brush.
5
INSTRUCTIONS FOR USE
MAKING ONE WAFFLE
1.Plug cord into 120V AC wall outlet.
2.Press top of the rocker switch to turn unit on (rocker switch will light, indicating that the unit has power).
3.Turn browning control knob to the desired setting.
4.The waffle maker will now begin the preheating process. This should take approximately six minutes. When the waffle maker is ready for baking, the green indicator light located on each
of the upper and lower waffle grid covers will light, and the waffle maker will sound six beeps. (This is for first waffle of each baking session.)
NOTE: When baking two waffles at the same time, the wafflemaker will beep 3 times to indicate when each waffle is ready. The green indicator light located on the waffle grid cover will also be illuminated.
5.Preheat your Waring® Pro Belgian Waffle Maker on setting #4 or preferred setting (green indicator lights located on waffle grid cover will be illuminated when preheated).
6.For best results, do not open waffle maker during cooking process. Doing so will offset the timing mechanism.
7.Using the recipes provided, fill the measuring cup to the top. Pour batter evenly into the center of the waffle grids. Use a heatproof spatula to spread the batter evenly over the grids.
8.Close top cover and rotate the waffle grids 180°.
9.The green Ready indicator will turn off.
10.When the waffle is baked to the set darkness, the unit will beep three times and the green indicator light will illuminate.
11.Rotate waffle grid with the lit indicator light to the top position.
12.Raise top cover and remove the baked waffle.
13.Repeat if making additional waffles.
6
 Loading...