


91-005435-020-000
IMPORTANT SAFETY INSTRUCTIONS
When using your telephone equipment, basic safety precautions should always be followed to reduce the risk of fire, electric shock and injury, including the following:
1. Read and understand all instructions.
2. Follow all warnings and instructions marked on the product.
3. Unplug this product from the wall outlet before cleaning. Do not use liquid cleaners or aerosol cleaners. Use a damp cloth for cleaning.
4. Do not use this product near water (for example, near a bath tub, kitchen sink, or swimming pool).
5. Do not place this product on an unstable cart, stand, or table. The product may fall, causing serious damage to the product.
6. Slots and openings in the cabinet and the back or bottom are provided for ventilation. To protect it from overheating, these openings must not be blocked by placing the product on the bed, sofa, rug, or other similar surface. This product should never be placed near or over a radiator or heat register. This product should not be placed in a built-in- installation where proper ventilation is not provided.
7. This product should be operated only from the type of power source indicated on the marking label. If you are not sure of the type of power supply to your home, consult your dealer or local power company.
8. Do not allow anything to rest on the power cord. Do not locate this product where the cord will be abused by persons walking on it.
9. Never push objects of any kind into this product through cabinet slots, as they may touch dangerous voltage points or short out parts that could result in a risk of fire or electric shock. Never spill liquid of any kind on the product.
10.To reduce the risk of electric shock, do not disassemble this product. If service or repair work is required, contact VTech Customer Service at 1-800-595-9511. Opening or removing cabinet parts other than specified access doors may expose you to dangerous voltages or other risks. Incorrect reassembling can cause electric shock when the appliance is subsequently used.
11.Do not overload wall outlets and extension cords as this can result in the risk of fire or electric shock.
12.Unplug this product from the wall outlet:
a)When the power supply cord or plug is damaged or frayed.
b)If liquid has been spilled into the product.
c)If the product has been exposed to rain or water.
d)If the product does not operate normally by following the operating instructions. Adjust only those controls that are covered by the operating instructions, because improper adjustment of other controls may result in damage and will often require extensive work to restore the product to normal operation.
e)If the product has been dropped and the cabinet has been damaged.
f)If the product exhibits a distinct change in performance.
13.Avoid using a telephone (other than a cordless type) during an electrical storm. There may be a remote risk of electric shock from lightning.
14. Do not use the telephone to report a gas leak in the vicinity of the leak.
SAVE THESE INSTRUCTIONS
2
INTRODUCTION
Parts Check List: |
To purchase replacement battery |
||
1. |
Handset |
packs, call VTECH Communications |
|
2. |
Base Unit |
at 1-800-595-9511. In Canada, call |
|
3. |
Telephone Line Cord |
||
VTECH Electronics at 1-800-267- |
|||
4. |
Battery Pack |
||
7377. |
|||
5. |
AC Adapter |
||
|
|||
1
INSTALLING/REPLACING THE BATTERY PACK
1. Slide the battery cover off by gently pressing on the recessed area with a downward motion.
2. Unplug and remove the old battery pack. Don't put the old battery pack in a trash compactor or a fire - it could burst.
3. With the red and black wires at the bottom of the pack, angle the top of the battery into the compartment, under the two “claws”. Next, press the lower end of the battery pack down, so it is held in place by the lower claw. Now, plug the connector into the socket, located below the battery. Slip the battery wires into the wire guide, located below and to the left of the socket.
4. Replace the battery cover by sliding it into place.
5.The new battery pack must be charged before using your telephone. Place the handset in the cradle of the base unit to allow it to charge for 16 hours. Maximum battery life between charges is more than 3.75 hours of
continuous talk time or 3.75 days of standby.
CAUTION: To reduce the risk of fire or injury, read and follow these instructions:
1.Use only VTECH battery pack supplied, or equivalent..
2.Do not open or mutilate the battery. Released electrolyte is corrosive and may cause damage to the eyes or skin. It may be toxic if swallowed.
3.Exercise care in handling batteries in order not to short the battery with conducting materials such as rings, bracelets, and keys. The battery or conductor may overheat and cause burns.
4.Do not dispose of the battery in a fire. The cell may explode.
The RBRC™ Seal
The RBRC® Seal on the nickel-cadmium battery indicates that VTech Communications, Inc. is voluntarily participating in an industry program to collect and recycle these batteries at the end of their useful lives, when taken out of service within the United States and Canada.
The RBRC® program provides a convenient alternative to placing used nickelcadmium batteries into the trash or municipal waste, which may be illegal in your area.
VTech’s participation with RBRC® makes it easy for you to drop off the spent battery at local retailers participating in the RBRC® program or at authorized
VTech product service centers. Please call 1-800-8-BATTERY™ for information on Ni-Cd battery recycling and disposal bans / restrictions in your area. VTech’s
involvement in this program is part of its commitment to protecting our environment and conserving natural resources.
RBRC ® is a registered trademark of Rechargeable Battery Recycling Corporation.
3
GETTING STARTED
Setting Up Your VT9114
1.Choose an area near an electrical outlet and a telephone wall jack.
2.Plug the AC power adapter into an electrical outlet and the AC connector to the power jack on the bottom of the Base Unit. Insert the cord in the channel guide.
CAUTION: Use only the AC adapter shipped with your VT9114. It is specifically designed for this product.
NOTE: Connect power to the Base Unit before placing the handset in the cradle.
3.CHARGE THE HANDSET BATTERY PACK BEFORE USE. The batteries recharge automatically whenever the Handset is in the Base Unit cradle. The batteries must be charged for 16 hours before using your phone for the first time.
4.Connect the telephone line cord. Insert one end of the telephone line cord into the phone jack on the bottom of the Base Unit. Plug the other end into a telephone wall jack. Make sure the plugs snap securely into place. Insert the cord in the channel guide.
5.CHECK FOR A DIAL TONE. After the battery pack is charged, pick up the Handset and press the ON key. The IN USE LED on the Base and ON LED on the Handset should light up, and you should hear a dial tone. If not, see
IN CASE OF DIFFICULTY.
CAUTION:
1.Never install telephone wiring during a lightning storm.
2.Never install telephone jacks in wet locations unless the jack is specifically designed for wet locations.
3.Never touch uninsulated telephone wires or terminals unless the telephone line has been disconnected at the network interface.
4.Use caution when installing or modifying telephone lines.
HANDSET FEATURES
ON LED
•The ON LED lights when the Handset is on an active call.
•It flashes in cadence with an incoming ring.
•It flashes quickly during Programming mode.
•It flashes slowly when the battery
pack is low.
ON/ FLASH KEY
•Press the ON key to make a call.
•If you are currently on a call, and you hear a call waiting tone, press ON to switch to the second call. Press ON again to return to
the original call.
VOLUME CONTROL
•Adjust the volume of what you hear through the Handset.
•While on a call, press the  or
or
 key to adjust the listening volume. The Handset will emit a double beep when the maximum or minimum volume level has
been reached.
OFF KEY
•Press the OFF key to exit all modes of operation.
REDIAL / PAUSE KEY
•When you hear the dial tone, press REDIAL to call the last number dialed on your phone.
•It can also be used to store the last number dialed into the speed dial memory. See Storing a
Redial Number into Speed Dial for details.
•You can store pauses into your speed dial numbers. See Storing
Pauses in Memory for details.
CHAN KEY
•Pressing the CHAN key when the Handset is in use will activate a channel change to the next free channel.
•This is used if you are experiencing noise or interference on the current
channel.
MEM/PROG KEY
•Press the MEM key to enter
MEMORY mode.
•The sequence for dialing out a speed dial number in memory is: ON, MEM, Number Button (0-9).
•Press MEM/PROG to enter programming mode. See
Programming Speed Dial
Numbers for more details.
TONE/ * KEY
•In PULSE dialing mode, this key is used to switch to Temporary TONE dialing mode.
4 |
5 |
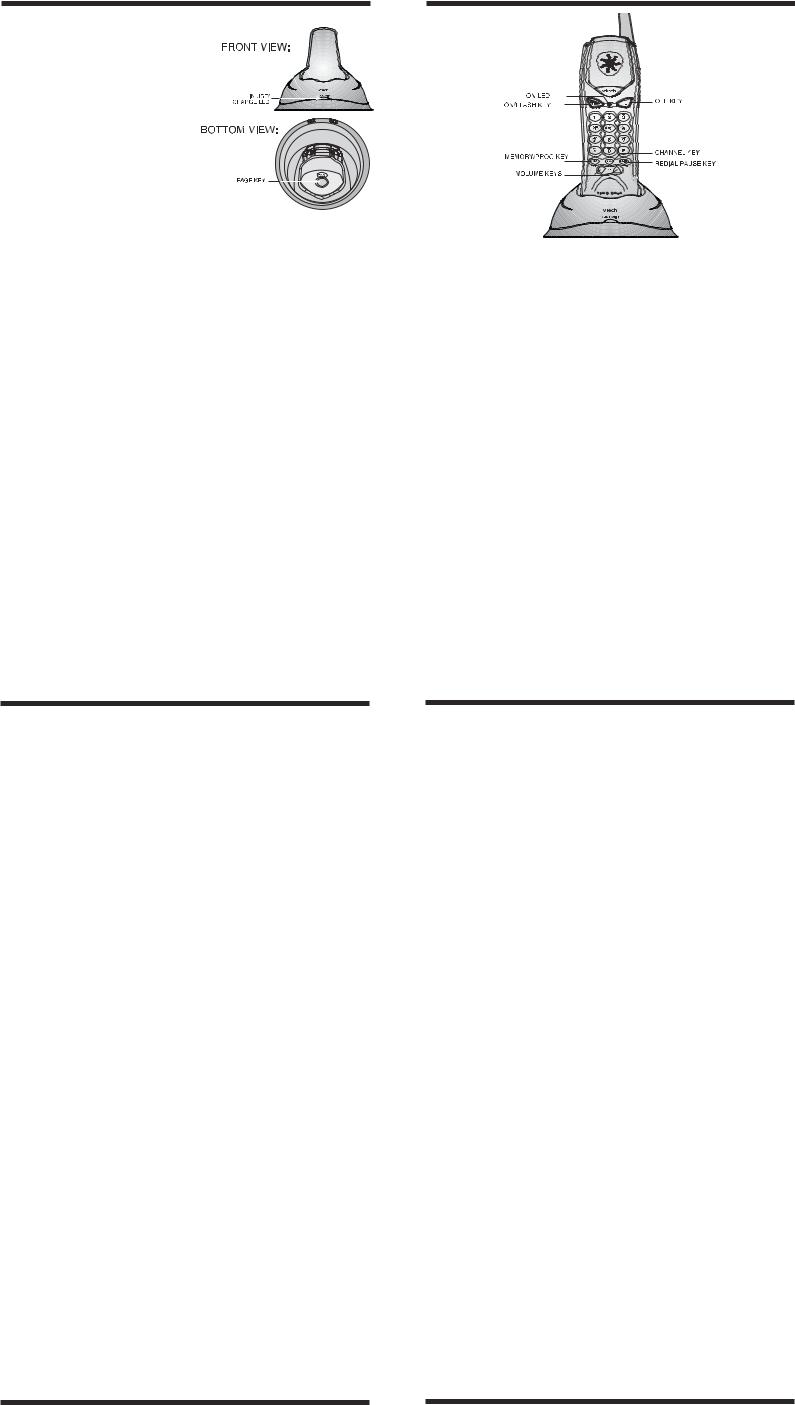
BASE UNIT FEATURES
IN USE/CHARGING LED
•The LED illuminates steadily when the Handset is in the Base cradle to indicate that the Handset battery is being charged.
•The LED illuminates whenever the Handset is being used.
•This LED also flashes with the
cadence of the incoming ring.
PAGE KEY
•Press the PAGE key to page the Handset.
•Press it second time to cancel a page.
•The Base will ring the Handset for 1 minute before ending the page automatically.
•The Handset can also cancel the page by pressing the OFF key.
6
OPERATING INSTRUCTIONS
Making Calls
Pick up the Handset and press ON. When you hear a dial tone, dial the number. The ON LED will illuminate while the Handset is in use.
If you make a mistake when dialing, press OFF to hang up, then press ON to get the dial tone again.
You must always press ON before you can dial a call on the Handset.
Answering Calls
When an incoming call is ringing, the IN USE LED on the Base and ON LED on the Handset will flash.
To answer a call when the Handset is in the Base, just pick up the Handset.
To answer a call when the Handset is away from the Base, just press any key on the Handset (except OFF). This is very useful in a dark environment; you do not have to fumble around looking for the ON key to answer the call.
Disconnecting
To end a call, either place the Handset back in the Base, or press OFF on the Handset.
Changing Channels
If you notice interference when using your Handset, press CHAN to switch to a clear channel. This function is
only available when you are on a call.
•
TONE/PULSE Setting
If you have touch tone service on phone line. Press MEM/PROG, * , *, MEM to switch to TONE dialing. If you have rotary service, press MEM/ PROG, * , # , MEM to switch to
PULSE.
NOTE: Your VT9114 is preset at the factory for TONE dialing.
7
OPERATING INSTRUCTIONS
Temporary Tone
If you have a rotary (dial-pulse) telephone service, (TONE/PULSE setting is set to PULSE), this feature allows you to enter special codes and tones to operate answering machines, use electronic banking services, calling cards, or other special services.
First, dial the call normally. Then activate the Temporary Tone feature by pressing TONE (the * key). You can then press the numbers or symbols you need, and your phone will send the proper signals.
To end the call, press OFF or place the Handset back in the Base. The phone will automatically go back to rotary (dial-pulse) service.
Programming The Ringer Type
The Handset ringer is capable of four different types of ringing tones. The following sections detail how to change the different tones and to turn off a ringer on the Handset.
To program, the Handset must be
OFF.
To select a different ringer type do the following:
•Press MEM/PROG.
•Press the # key.
•Press a key 1, 2, 3, 4 to select a ringer type.
•Press the MEM key to confirm.
Turning Off The Ringer
To turn off the ringer on the Handset, do the following:
•Press MEM/PROG.
•Press the # key
•Press 5 to turn off the ringer
•Press the MEM key to confirm
•To turn the ringer on again, see
Programming the Ringer Type.
Checking The Ringer
To check the ringer which is currently programmed, do the following:
•Press MEM/PROG.
•Press the # key
•Press 0
•Press the MEM key to confirm
Memory Dialing
The VT9114 can store up to 10 different phone numbers that you can dial just by pressing ON, MEM and one of the number keys (0-9).
Note: if the dialing method is pulse, the digit <#> will be ignored, and the digit <*> will initial temporary DTMF dialing.
Programming Speed Dial Numbers
The Handset must be OFF.
1.Press MEM/PROG. The ON LED will blink to indicate that you are in the programming mode.
2.Press the number of the memory location you wish to store the number in (0-9).
3.Using the dial pad, dial the number you want to store. The number can be up to 16 digits long. The number can be entered manually or by using REDIAL.
4.Press MEM to store the phone number to the key you selected.
The phone now exits programming mode and emits a happy tone.
8
OPERATING INSTRUCTIONS
Speed Number Dialing
1.Press ON to get a dial tone.
2.Press MEM and the memory location number key (0-9).
For example, to dial the number you assigned to key '8', you would press
ON, MEM, 8.
To Change or Replace a Speed Dial Number
To change or replace a stored number in speed dial memory simply enter the new number and store it in the memory location you wish to change.
For example, to change the number stored in memory position 7 to 5551111, you would press MEM/PROG,
7, 555-1111, MEM.
Storing Pauses in Memory
To insert a pause in a phone number, press REDIAL/PAUSE. The pause is 2 seconds in length. For longer pauses, press REDIAL/PAUSE two or more times. Each additional press indicates an additional 2 second pause.
If your phone is connected to a PBX you can store the PBX access number and a pause before the phone number. For example, to store
9-PAUSE-555-1234 in memory location 8 do the following:
1.Press MEM/PROG
2.Press 8
3.Press 9
4.Press REDIAL / PAUSE
5.Dial 555-1234
6.Press MEM
Using REDIAL
To redial the last number you called, press ON then press REDIAL. The phone will automatically dial the number.
Storing a Redial Number into
Speed Dial
To store the last number you dialed as a Speed Dial number, press MEM/ PROG, a location number (0-9),
REDIAL, MEM.
The Page Feature
From the Base Unit, press PAGE to signal the person at the Handset. To end the page at the base, press PAGE again. To end the page at the Handset, press OFF.
If the Handset is in use (off-hook) when PAGE is pressed on the Base Unit, the Handset will emit one page alert. If the Handset is not in use (on hook), the page alert will continue for approximately 60 seconds.
This feature is useful in locating a misplaced Handset.
9
IN CASE OF DIFFICULTY
If you have difficulty operating your phone, the suggestions below should solve the problem. If you still have difficulty after trying these suggestions,
In the US Call:
VTECH Communications at
1-800-595-9511. In Canada Call:
VTECH Electronics at 1-800-267-7377.
THE PHONE DOESN'T WORK AT ALL.
•Make sure the power cord is plugged in.
•Make sure the telephone line cord is plugged firmly into the Base Unit and the telephone wall jack.
•Make sure the batteries are properly charged. If the Handset makes two beeps, the batteries need charging. If the IN USE LED on the Base and ON LED on the Handset do not light when you press ON, you must charge the batteries.
•If you recently installed a new battery pack, make sure it is installed correctly.
NO DIAL TONE.
•First check all the suggestions above.
•If you still don't hear a dial tone, disconnect the Base Unit from the telephone jack and connect a different phone. If there is no dial tone on that phone either, the problem is in your wiring or local service. Call your local telephone company.
YOU GET NOISE, STATIC, OR A WEAK SIGNAL EVEN WHEN
YOU'RE NEAR THE BASE UNIT.
Household appliances plugged into the same circuit as the Base Unit can sometimes cause interference. Try moving the appliance or the Base Unit to another outlet.
YOU GET NOISE, STATIC, OR A WEAK SIGNAL WHEN YOU'RE AWAY FROM THE BASE UNIT.
•You may be out of range. Either move closer to the Base, or relocate the Base Unit.
•The layout of your home may be limiting the range. Try moving the
Base Unit to the second or third floor, or to some other location.
THE HANDSET DOES NOT RING WHEN YOU RECEIVE A CALL.
•Ensure that the ringer is turned on.
•Make sure the telephone line cord is plugged firmly into the Base Unit and the telephone jack. Make sure the power cord is plugged in.
•You may be too far from the Base Unit.
•You may have too many extension phones on your telephone line to allow all of them
to ring. Try unplugging some of the other phones.
YOUR CALLER FADES IN AND
OUT.
You may be nearly out of range. Move closer, or relocate the Base.
IN CASE OF DIFFICULTY
YOU HEAR OTHER CALLS WHILE USING YOUR PHONE.
•Replace the Handset in the Base cradle, wait a few moments and try again.
•Disconnect your Base Unit from the telephone jack, and plug in a regular telephone. If you still hear other calls, the problem is probably in your wiring or local service. Call your local telephone
company.
YOU HEAR NOISE IN THE HANDSET, AND NONE OF THE KEYS OR BUTTONS WORK.
•Make sure the power cord is plugged in.
•Your Base Unit and Handset may not be operating on the same channel or security code. Place the Handset in the cradle for a few moments to reload the security code and reset the
channel.
COMMON CURE FOR
ELECTRONIC EQUIPMENT
Electronics, like people, can sometimes get confused. If the unit does not seem to be responding normally, then try putting the Handset in the cradle to re-initialize the unit. If it still does not seem to respond, perform the following steps (in the order listed):
1.Disconnect the power to the Base.
2.Disconnect the Handset battery pack.
3.Wait a few minutes.
4.Connect power to the Base.
5.Reconnect the Handset battery.
6.Place the Handset in the Base Unit cradle. If the Handset has not been recently charged, allow 8 hours before use.
10 |
11 |
 Loading...