


Smart Start®
Sunny Skies™ Learning Lapt  p
p
USER’S MANUAL
Dear Parent:
At VTech® we know that a child has the ability to do great things. That’s why all of our electronic learning products are uniquely designed to develop a child’s mind and allow them to learn to the best of their ability. Whether it’s introducing numbers and letters, identifying colors and shapes, or stimulating senses with lights
and music, all VTech® infant and toddler learning products encourage your child’s natural growth and discovery skills.
When it comes to providing electronic learning products that
enlighten, entertain and develop minds, at VTech® we see the potential in every child.
1

INTRODUCTION
Thank you for purchasing the VTECH® Sunny Skies™ Learning Laptop learning toy! We at VTECH® are committed to providing the best possible products to entertain and educate your child. Should you have any questions or concerns, please call our Consumer Services Department at 1-800-521-2010 in the U.S. or 1-800-267-7377 in Canada.
The VTECH® Sunny Skies™ Learning Laptop is the great start to a bright future for toddlers. The friendly sun character engages toddlers in the educational activities while the buttons and dials develop their motor skills. Toddlers will shine as they learn about letters, numbers, colors, shapes and different types of weather. Toddlers will glow with excitement every time they play with the VTECH® Sunny Skies™ Learning Laptop.
LED LIGHTS
LED LIGHTS
SLIDING STAR
TRIANGLE BUTTON |
CIRCLE BUTTON |
1-2-3 TURNING |
SQUARE BUTTON |
|
|
WHEEL |
ON/OFF/ACTIVITY |
|
|
|
SELECTOR SWITCH |
PICK-PACK BIRD |
ROLLER |
|
|
TURNING BEE DIAL |
SLIDING BAR |
|
|
|
SPEAKER |
2
INCLUDED IN THIS PACKAGE
-One VTECH® Sunny Skies™ Learning Laptop learning toy.
-One instruction manual.
WARNING: All packing materials, such as tape, plastic sheets, wire ties and tags are not part of this toy, and should be discarded for your child’s safety.
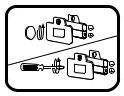
BATTERY INSTALLATION
1.Make sure the unit is turned OFF.
2. Locate the battery cover on the bottom of the unit. Use a coin or screwdriver to loosen the screw.
3. Install 2 new “AA” (UM-3/LR6) batteries following the diagram inside the battery box. (The use of new alkaline batteries is recommended for maximum performance.)
4.Replace the battery cover and tighten the screw to secure the battery cover.
BATTERY NOTICE
•Install batteries correctly observing the polarity (+, -) signs to avoid leakage.
•Do not mix old and new batteries.
•Do not use batteries of different types.
•Remove exhausted or new batteries from the equipment when the unit will not be used for an extended period of time.
•Do not dispose of batteries in fire.
•Do not attempt to recharge ordinary batteries.
•The supply terminals are not to be short-circuited.
WE DO NOT RECOMMEND THE USE OF RECHARGEABLE BATTERIES.
3
 Loading...