


User’s Manual
w w w .. v t e c h p h o n e s .. c o m
Models: ia5874/
ia5876/ia5877

Table of Contents
GETTING STARTED . . . . . . . . . . . . . . . . . . . 4
Before You Begin . . . . . . . . . . . . . . . . . . |
. . |
. |
4 |
Parts Check List: . . . . . . . . . . . . . . . . . |
. |
. |
4 |
Installation . . . . . . . . . . . . . . . . . . . . . |
. . |
. |
5 |
Choose Location . . . . . . . . . . . . . . . . . . . 5 |
|||
Install Handset Battery . . . . . . . . . . . . . . |
. |
. |
5 |
Connect Power and Telephone Line Cords . . . . . . |
6 |
||
Wall Mounting . . . . . . . . . . . . . . . . . . . . . |
7 |
||
Desk/Table Installation . . . . . . . . . . . . . . . . 7 |
|||
Charge the Handset Battery . . . . . . . . . . . |
. |
. |
8 |
Set Language Mode . . . . . . . . . . . . . . . |
. |
. |
8 |
Check for Dial Tone . . . . . . . . . . . . . . . |
. . |
. |
8 |
Set the Dial Mode . . . . . . . . . . . . . . . . |
. . |
. |
8 |
Set Handset Date and Time . . . . . . . . . . . |
. . |
. |
9 |
Handset Ringer Style/Battery Save . . . . . . . |
. . |
. |
9 |
If you subscribe to DSL service: . . . . . . . . . |
. |
. 10 |
|
Belt clip (optional).. . . . . . . . . . . . . . . . . |
. |
. 10 |
|
BASIC OPERATION . . . . . . . . . . . . . . . . . . 11 |
|||
Telephone Operation . . . . . . . . . . . . . . . . . . 11 |
|||
Handset Operation . . . . . . . . . . . . . . . . . . 11 |
|||
Base Operation . . . . . . . . . . . . . . . . . . . . 12 |
|||
Temporary Tone Dialing . . . . . . . . . . . . . |
. |
. 12 |
|
Message Waiting . . . . . . . . . . . . . . . . . . . 12 |
|||
Clear Message Waiting Alert . . . . . . . . . . . |
. |
. 13 |
|
Call Transfer . . . . . . . . . . . . . . . . . . . |
. |
. 13 |
|
Headset Jack . . . . . . . . . . . . . . . . . . . . . 14 |
|||
Operating Range . . . . . . . . . . . . . . . . . . . 14 |
|||
Display Screen Messages . . . . . . . . . . . . |
. |
. 15 |
|
Speed Dialing . . . . . . . . . . . . . . . . . . . . . . 16 |
|||
Store a Number/Name in Speed Dial . . . . . . . |
. |
. 16 |
|
Edit a Number/Name Stored in Speed Dial . . . |
. |
. .17 |
Delete a Number/Name Stored in Speed Dial . |
. . |
. 18 |
Dial a Speed Dial Number . . . . . . . . . . . |
. . |
. 18 |
Reassign Locations in Speed Dial . . . . . . . |
. . |
. 18 |
Telephone Directory . . . . . . . . . . . . . . . . . . 19 |
||
Store a Number/Name in the Directory . . . . . |
. . |
. 19 |
Edit a Number/Name Stored in the Directory . . |
. . |
. 19 |
Delete a Number/Name Stored in the Directory |
. . |
. 20 |
Move a Number/Name to the Speed Dial Memory . . 21
Dial a Number from the Directory . . . . . . |
. . . . .21 |
|
Caller ID . . . . . . . . . . . . . . . . . . . . . . . . . 22 |
||
About Call History (Caller ID) . . . . . . . . |
. . . . . 23 |
|
Review Call History . . . . . . . . . . . . . . . . . . 23 |
||
Delete Records from Call History . . . . . . |
. . . . |
. 24 |
Dial a Displayed Number . . . . . . . . . . |
. . . . |
. 24 |
Store a Call History Record in the Directory |
. . . . |
. 24 |
Display Screen Messages . . . . . . . . . |
. . . . |
. 25 |
Answering System Operation At the Base . . |
. . . . |
. 26 |
Audible Indicators . . . . . . . . . . . . . . |
. . . . |
.26 |
Setting the clock . . . . . . . . . . . . . . . . . . . .26 About Announcements . . . . . . . . . . . . . . . . 26 Record Your Announcement . . . . . . . . . . . . . 27 To review your announcement at any time: . . . . . .27 To delete your announcement: . . . . . . . . . . . . 27 Setting up your answering system . . . . . . . . . . 28 Feature summary . . . . . . . . . . . . . . . . . . . 28 Listen to, Save & Delete Messages . . . . . . . . . .29 Call Screening/Intercept . . . . . . . . . . . . . . . .30 Record a Memo . . . . . . . . . . . . . . . . . . . .30 Window display . . . . . . . . . . . . . . . . . . . . 31
www.vtechphones.com |
TABLE OF CONTENTS |

Answering System Operation - Remote Access .. .. |
.. |
.. |
32 |
Connect with the Answering System . . . . . . . |
. |
|
. 32 |
Voice Menu . . . . . . . . . . . . . . . . . . . . . . 32 |
|||
Remote Access Commands . . . . . . . . . . . |
. |
|
. 32 |
Batteries . . . . . . . . . . . . . . . . . . . . . . |
. |
. |
34 |
Battery Care and Maintenance . . . . . . . . . . |
. |
|
. 34 |
Replacing the Handset Battery . . . . . . . . . . |
. |
|
. 34 |
ADDITIONAL INFORMATION . . . . . . . . . . . |
. . |
|
.35 |
Troubleshooting . . . . . . . . . . . . . . . . . . . . . 35 Maintenance . . . . . . . . . . . . . . . . . . . . . . 42 Warranty Statement . . . . . . . . . . . . . . . . . . . 42 Important Safety Instructions . . . . . . . . . . . . . . 44
FCC, ACTA and IC Regulations . . . . . . . . . . . . |
45 |
The RBRC® Seal . . . . . . . . . . . . . . . . . . . . |
46 |
Technical Specifications . . . . . . . . . . . . . . . . 47 |
|
Index . . . . . . . . . . . . . . . . . . . . . . . . . . |
48 |
TABLE OF CONTENTS |
www.vtechphones.com |

NEED HELP?
This book has all the feature operation and troubleshooting you need to install and operate your new VTech phone.. Please take the time to review thoroughly to ensure proper installation and the benefit of this VTech innovative and feature rich product.. You can also visit our website at www..vtechphones..com for support, shopping, and everything new at VTech..
In Canada, please visit www..vtechcanada..com..
VTech toll free 1-800-595-9511 In Canada dial 1-800-267-7377

• Important!
B e f o r e u s i n g this telephone, you must read
Important Safety Instructions on page 44..
Before You Begin
Enhanced 5.8GHz Technology - Dual band transmission combines the best of 5..8GHz and 900MHz technologies, providing enhanced performance over standard cordless telephones..
Parts Check List:
1.Base Unit
2.Handsets (3)
3.Charger Power Adaptors (2)
4.Chargers (2)
5.Telephone Line Cord
6.Desk/Wall Mount Bracket
7.Belt Clips (3)
8.Base Power Adaptor
9..Batteries (3)
10..User’s Manual
To purchase replacement batteries, visit us on the web at www..vtechphones..com or call VTech Communications, Inc.. at 1- 800-595-9511.. In Canada, contact VTech Telecommunications Canada Ltd.. at www..vtechcanada.. com or 1-800-267-7377..
Charger Power
Adaptors (2)
Base Unit |
Handsets (3) |
Chargers (2) |
Desk/Wall Mount Bracket |
Belt Clips (3) |
Telephone Line Cord
Base Power Adaptor |
Batteries (3) |
User’s Manual |
|
|
GETTING STARTED |
www.vtechphones.com |

Installation
Choose Location
For maximum performance of your cordless telephone system:
1.Choose a central location for your base unit..
2..Install your base unit and extension handsets away from electronic equipment, such as personal computers, television sets and microwave ovens..
3..In locations where there are multiple cordless telephones, separate base units as much as possible..
4..Install your telephone equipment away from heat sources and sunlight..
5.Avoid excessive moisture, dust or extreme cold..
1
2 
Install Handset Battery
a)Remove battery compartment cover by pressing on the indentation and sliding downwards..
b)Align the two holes in the plug with the socket pins, then snap the plug into place..
c)Place the battery in the compartment with the wires tucked inside..
d)Replace cover by sliding it up into place..
e) Place the handset in its base when not in use to ensure maximum daily performance..
• U s e o n l y t h e provided VTech b a t t e r y , o r equivalent..
www.vtechphones.com |
GETTING STARTED |
Started Getting

•Install the base unit awayfromelectronic equipment such a s p e r s o n a l computers, television sets or microwave ovens.. Avoid excessive heat, cold, dust or moisture..
•Connect the power and telephone line cords to the underside of the base as illustrated..
• P l u g t h e |
A C |
adapter into |
an |
electrical outlet.. If |
|
the battery has not been previously charged,
place the handset in the base, and allow it to charge for 16 hours(orovernight).. Connect
the telephone line cord to the wall jack..
Installation
Connect Power and Telephone Line Cords
Standard electrical outlet
GETTING STARTED |
www.vtechphones.com |
Modular telephone jack
Connect the power cord.. After charging the battery for at least 16 hours, connect the telephone line cord..
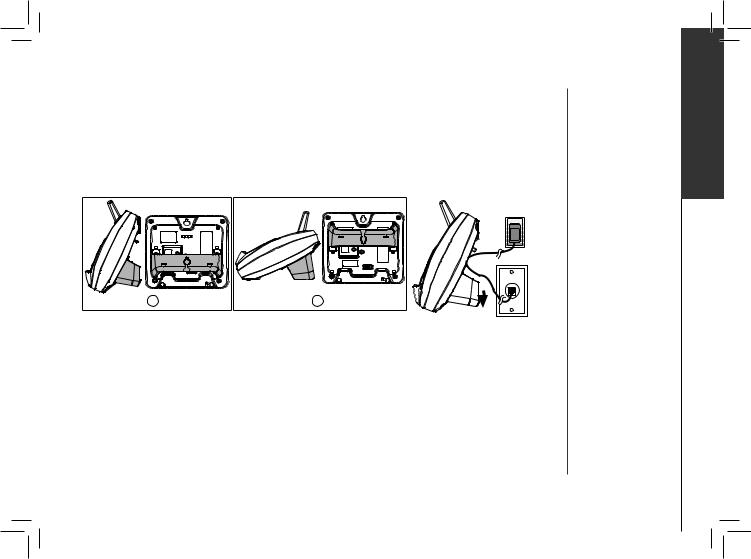
Installation
Wall Mounting
Your phone base unit is designed to mount on a standard telephone wall plate.. Wall mounting is optional.. See position one below for instructions..
Desk/Table Installation
To place your base unit on a desk or table, insert the desk/wall bracket as instructed below and shown in position one or two, depending on your preference of how you’d like the base unit to be angled..
|
|
Position One
To mount your phone on a wall, or to place it on a table or desk, refer to the diagrams illustrating position one..
•First insert the lower portion of the bracket into the grooves in the base, then snap the upper portion into place..
•Mount the base on the wall by positioning the base unit so the mounting studs will fit into the holes on the base and wall mount bracket.. Slide the base unit down on the mounting studs until it locks into place..
Position Two
This position is an alternate way to install your phone on a table or desk.. Position two allows a different viewing angle to your handset and base unit.. Refer to the position two diagrams above..
•Insert the upper portion of the bracket into the grooves in the base..
•Snap the lower portion into place..
www.vtechphones.com |
GETTING STARTED |
Started Getting

•If the phone will not be used for a long period of time, remove the battery to prevent possible leakage..
•If you have any trouble installing y o u r p h o n e , please refer to the
Troubleshooting
s e c t i o n n e a r the end of this manual..
Installation
Charge the Handset Battery
Place the handset in the base or charger.. NEEDS CHARGING will appear on the handset.. Charge the battery for at least 16 hours the first time.
Set Language Mode
•Press PROG, then press ▲or ▼until LANGUAGE is displayed.. Press SELECT.
•The current setting blinks.. Press ▲or ▼ until the screen displays the correct language (English, Spanish or French)..
•Press SELECT to save your selection..
Check for Dial Tone
After the batteries are charged, pick up the handset and press PHONE; you should hear a dial tone.. If you do not, refer to the TROUBLESHOOTING section in the back of this user’s manual..
Set the Dial Mode
If you have touch tone service, the phone is ready to use as soon as the battery is charged.. If you have pulse (rotary) service, you’ll need to change the dial mode..
•Press PROG.
•Press ▲or ▼or until the screen displays DIAL MODE: and the current setting..
•Press SELECT. The current setting blinks..
•Press ▲or ▼to select TONE or PULSE.
•Press SELECT to save..
GETTING STARTED |
www.vtechphones.com |

Installation
Set Handset Date and Time
If you subscribe to caller ID service, the date and time will be set automatically with the first incoming call.. If you do not have caller ID service, you can set the date and time manually:
•Press PROG, then press or
or until DATE/TIME is displayed.. Press SELECT.
•The month is flashing. Press or
or until the screen displays the correct month.. Press SELECT..
•The day is flashing. Press or
or until the screen displays the correct day.. Press SELECT.
•The hour is flashing. Press or
or until the screen displays the correct hour.. Press SELECT.
• The minute is flashing. Press or
or until the screen displays the correct minute.. Press SELECT.
•AM or PM is flashing. Press or
or to choose between AM or PM. Press SELECT
Handset Ringer Style/Battery Save
You can select from four different handset ringer styles, or turn the ringer off and extend the battery life..
1.. With the handset in idle (off) mode, press PROG..
2.Press  or
or until the screen displays RINGER: and current setting..
3.Press SELECT.. The current setting blinks, and you will hear a sample of the ring..
4..Press  or
or to select RINGER: 1, 2, 3, 4 or OFF.. You will hear a sample of each ring tone..
5..Press SELECT to choose the displayed ringer setting..
•In the event of a power outage, or if yourphone’spower cord is unplugged, the time setting will be lost..
www.vtechphones.com |
GETTING STARTED |
Started Getting
Installation
If you subscribe to DSL service:
If you hear noise during conversations and/or your caller ID features aren’t functioning properly, install a noise filter to the telephone line between the base unit and the telephone line jack. Contact your DSL provider to obtain a noise filter.
|
Telephone |
Noise filter (For |
||||||||
|
DSL users) |
|||||||||
|
line cord |
|||||||||
|
|
|
|
|
|
|
||||
|
|
|
|
|
|
|
|
|
|
|
|
|
|
|
|
|
|
|
|
|
|
|
|
|
|
|
|
|
|
|
|
|
To single telephone jack (RJ11C)
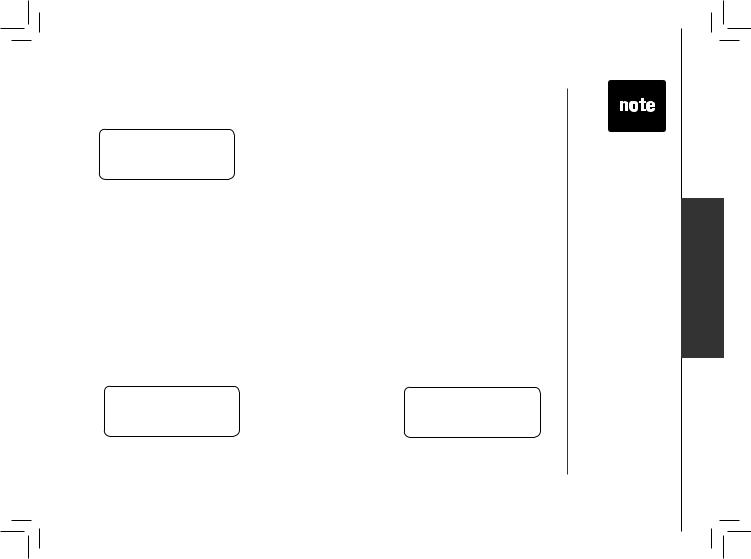
Belt clip (optional)
|
To attach |
To remove |
10 GETTING STARTED |
www.vtechphones.com |
|
Telephone Operation
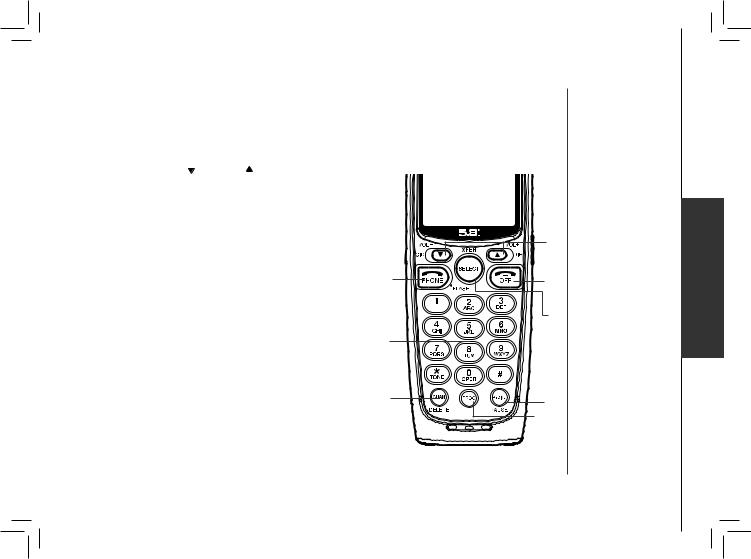
Handset Operation
1.Make a Call
Press PHONE, then dial the
number..
-OR-
Dial the number (use to backspace and make
corrections), then press PHONE to call..
2.Flash/Call Waiting
During a call, press to receive an incoming
call, if call waiting is activated..
3.Channel
Press CHAN to switch to a clear channel while on a call..
4.Delete
When viewing the call log, press to delete the current record displayed.. While handset is in idle mode, press and hold to delete all records in the call log..
5.Answer a Call
Press any key to answer a call (except OFF)..
6.. /CID and
  /DIR
/DIR
 /CID
/CID
•While on a call, press to decrease the volume.. A double beep will sound when you reach the lowest setting..
•While phone is not in use, press to display caller ID information..
• While entering names or numbers into memory, press to delete last character entered..
/DIR
•While on a call, press to increase the volume.. A double beep will sound when you reach the highest setting..
•While phone is not in use, press to display directory entries..
•While entering names or numbers, press to add a space.
7.Select
Press to display menu, or to select highlighted item from menu..
8.Off
During a call, press to hang up.. While using menus, press to cancel an operation, back up, or exit the menu display
9.Redial/Pause
Press to view redial memory.. While entering numbers, press and hold to insert a dialing pause..
10.Program
With the handset in idle (on-hook), press to enter programming mode..
1,2
5
3,4
www.vtechphones.com
6
8
7
9
 10
10
BASIC OPERATION 11
Operation Basic
Telephone Operation
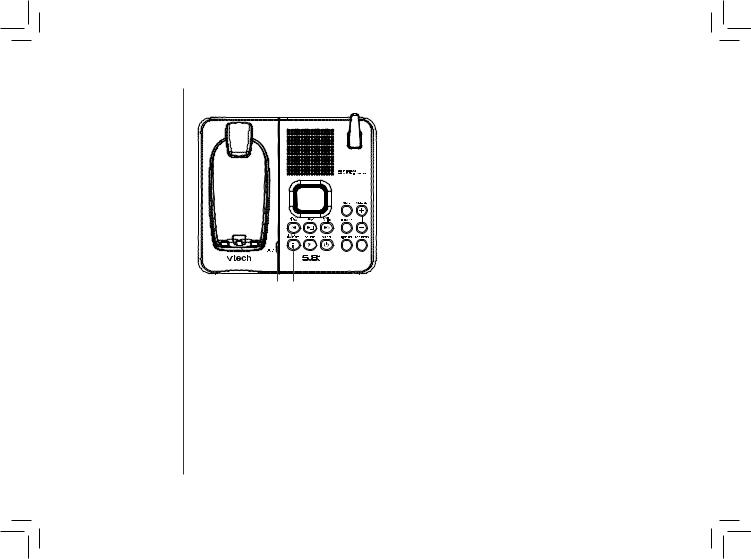
Base Operation
11. CHARGE/IN USE
• Flashes in unison with an incoming call’s ringing..
• Flashes slowly when the handset is in use, or the answering system is answering a call..
• Glows steadily when the handset is charging..
12. LOCATE HANDSET
Press to page the handset for up to 60 seconds.. Press again,
press OFF on handset or place handset in base to cancel the page..
11 12
Temporary Tone Dialing
If you have pulse (rotary) service, you can change from dial pulse to touch tone dialing during a call by pressing * TONE.. This is useful if you need to send touch tone signals for access to telephone banking or long distance services..
1..Dial the number..
2..Press * TONE. Buttons pressed after this send touch tone signals..
3..After you hang up, the phone automatically returns to pulse service..
Message Waiting
Your phone is designed to work with most local and regional telephone service provider’s voice messaging systems to provide an alert on handset when new messages come in.. Voice messaging is a subscription service, available through most service providers for a monthly fee.. Contact your local telephone company for more information..
12 BASIC OPERATION |
www.vtechphones.com |
Telephone Operation
When you have a message waiting, the handset will display:
MESSAGE WAITING
5/01 5:40PM
Clear Message Waiting Alert
If after you review your message(s) your message waiting alert does not go off, you may manually turn it off by:
1..Press PROG on the handset..
2..Press  or
or until screen displays MESSAGE WAITING..
3..Press SELECT, the screen display: CLEAR? YES
4..Press  or
or to change from YES to NO..
5..Press SELECT, you’ll hear a confirmation tone.
Call Transfer
An external call can be forwarded from one handset (HS1) to any other system handset (HS2 or HS3) by following these steps:
1.. While on a call, press select on HS1 to forward the call to HS2..
HS1 will show: |
HS2 or HS3 will ring and show: |
CALL TRANSFERRED |
TRANSFERRED CALL |
2.. Press PHONE on HS2 or HS3 to answer the forwarded call.. HS1 will return to the idle mode..
•Only one handset can be on a call at a time.. For example, if HS1 is on a call and
HS2 or HS3 presses the PHONE button,
CAN’T CONNECT will display..
•If the HS2 or HS3 cannot be found, HS1 will generate a sad tone and continue the call automatically.. Before HS2 or HS3
answers, HS1 can press PHONE to cancel the forward function and continue the external call..
•If HS2 orHS3 doesn’t respond within 30 seconds, HS1 will
start ringing until PHONE is pressed
t o p i c k u p t h e returned call.. If it is not answered within another 30 seconds, the external call will end automatically..
www.vtechphones.com |
BASIC OPERATION 13 |
Operation Basic

•To purchase a headset, visit us on the web at www.. vtechphones..com or call VTech Customer Service at 1-800-595-9511..
In Canada, contact VTechTelecommunications Canada Ltd.. at www..vtechcanada..com or 1- 800-267-7377..
Telephone Operation
Headset Jack
You can use this telephone handsfree when you install any VTech 2..5 mm headset, purchased separately..
Plug the headset into the jack located on the right side of the handset (under the small rubber flap). Do not force the connection, but make sure the plug fits securely..
Operating Range
This cordless telephone operates within the maximum power allowed by the Federal
Communications Commission (FCC).. Even so, this handset and base can communicate over only a certain distance - which can vary with the locations of the base and handset, the weather, and the construction of your home or office.
If you receive a call while you are out of range, the handset might not ring or if it does ring, the call might not connect when you press PHONE. Move closer to the base, then press PHONE to answer the call..
If you move out of range during a phone conversation, you might hear noise or interference.. To improve reception, move closer to the base..
If you move out of range without pressing OFF, your phone will be left off the hook.. To hang up properly,
walk back into range, periodically pressing OFF.
14 BASIC OPERATION |
www.vtechphones.com |

Telephone Operation |
|
|
|
|
|
|
|
|
|
|
|
|
|
|
|
|
|
|
|
|
|
|
|
|
|
|
|
|
|
|
|
|
|
|
|
|
|
|
|
|
|
|
|
|
|
|
|
|
|
|
|
|
|
|
|
|
|
|
|
Display Screen Messages |
|
|
|
|
|
|
|
|
|
Screen Displays: |
When: |
|
|
|
|
|
|
|
|
** RINGING ** |
There is a call coming in.. |
|
|
|
|
|
|
|
|
|
|
|
|
|
|
|
|
|
|
CONNECTING... |
The handset is waiting for dial tone.. |
|
|
|
|
|
|
|
|
|
|
|
|
|
|
|
|
|
|
PHONE ON |
The handset is in use.. |
|
|
|
|
|
|
|
|
|
|
|
|
|
|
|
|
||
|
|
|
|
Basic |
|
|
|
||
** PAGING ** |
The base is paging the handset.. |
|
|
|
|
|
|||
|
|
|
|
|
|
|
|||
BATTERY LOW |
The battery needs to be recharged.. |
|
|
|
|
|
|||
|
|
|
|
Operation |
|
|
|
||
|
2.. Displays when base power is off and |
|
|
|
|
|
|||
SCANNING... |
The handset is changing to another of the |
|
|
|
|
|
|
|
|
|
30 channels available.. |
|
|
|
|
|
|
|
|
|
1.. Displays when one handset is on a call |
|
|
|
|
|
|
|
|
|
and the other handset presses PHONE.. |
|
|
|
|
|
|
|
|
CAN’T CONNECT |
PHONE is pressed.. You’ll also hear a sad |
|
|
|
|
|
|
|
|
|
tone.. |
|
|
|
|
|
|
|
|
|
3.. Displays when an out-of-range dial fails to |
|
|
|
|
|
|
|
|
|
connect.. |
|
|
|
|
|
|
|
|
RINGER OFF |
The handset ringer is turned off.. |
|
|
|
|
|
|
|
|
|
|
|
|
|
|
|
|
|
|
MESSAGE WAITING |
Displays when you have been alerted by the |
|
|
|
|
|
|
|
|
telephone company that you have received |
|
|
|
|
|
|
|
|
|
|
new voice mail.. |
|
|
|
|
|
|
|
|
|
|
|
|
|
|
|
|
|
|
|
www.vtechphones.com |
BASIC OPERATION 15 |
|
|
|
|
|
|
|
|
|
|
|
|
|
|
|
|
|
|
|
|
|
|
|
|
|
|
|
|
|
|
|
|
|
|
|
|
|
|
|
|
|
|
|
|
|
|
|
 Loading...