


Precautions
Location
Using the unit in the following locations
can result in a malfunction.
•In direct sunlight
•Locations of extreme temperature or humidity
•Excessively dusty or dirty locations
•Locations of excessive vibration
•Close to magnetic fields
Power supply
Please connect the designated AC adapter to an AC outlet of the correct voltage. Do not connect it to an AC outlet of voltage other than that for which your unit is intended.
Interference with other electrical devices
Radios and televisions placed nearby may experience reception interference. Operate this unit at a suitable distance from radios and televisions.
|
Handling |
|
To avoid breakage, do not apply exces- |
2 |
sive force to the switches or controls. |
|
Care
If the exterior becomes dirty, wipe it with a clean, dry cloth. Do not use liquid cleaners such as benzene or thinner, or cleaning compounds or flammable polishes.
Keep this manual
After reading this manual, please keep it for later reference.
Keeping foreign matter out of your equipment
Never set any container with liquid in it near this equipment. If liquid gets into the equipment, it could cause a breakdown, fire, or electrical shock.
Be careful not to let metal objects get into the equipment. If something does slip into the equipment, unplug the AC adapter from the wall outlet. Then contact your nearest VOX dealer or the store where the equipment was purchased.
THE FCC REGULATION WARNING (for USA)
This equipment has been tested and found to comply with the limits for a Class B digital device, pursuant to Part 15 of the FCC Rules. These limits are designed to provide reasonable protection against harmful interference in a residential installation. This equipment generates, uses, and can radiate radio frequency energy and, if not installed and used in accordance with the instructions, may cause harmful interference to radio communications. However, there is no guarantee that interference will not occur in a particular installation. If this equipment does cause harmful interference to radio or television reception, which can be determined by turning the equipment off and on, the user is encouraged to try to correct the interference by one or more of the following measures:
Reorient or relocate the receiving antenna.
Increase the separation between the equipment and receiver.
Connect the equipment into an outlet on a circuit different from that to which the receiver is connected. Consult the dealer or an experienced radio/TV technician for help.
Unauthorized changes or modification to this system can void the user’s authority to operate this equipment.
Notice regarding disposal (EU only)
When this “crossed-out wheeled bin” symbol is displayed on the product, owner’s manual, battery, or battery package, it signifies that when you wish to dispose of this product, manual, package or battery you must do so in an approved manner. Do not discard this product, manual, package or battery along with ordinary household waste. Disposing in the correct manner will prevent harm to human health and potential damage to the environment. Since the correct method of disposal will depend on the applicable laws and regulations in your locality, please contact your local administrative body for details. If the battery contains heavy metals in excess of the regulated amount, a chemical symbol is displayed below the
“crossed-out wheeled bin” symbol on the battery or battery package.
*All other product and conpany names are trademarks or registerd trademarks of their respective holders. |
3 |

A few words from Joe Satriani…
“I love effects pedals. They help me be creative. They push my guitar playing into new musical directions. They help me reach new heights in live performance.
Distortion, Overdrive, Echo, Delay, Wah-Wah, Chorus, Flange, Envelope Filters and Octave generators—the more the merrier! Effects pedals are not only fun to play with; they have become necessary tools for the active musician at all levels.
For decades I wished that some day I would be able to contribute to the design of my own pedal line. I would team up with an iconic, legendary company known worldwide for their unique musical innovations that became industry standards.
Working with their engineers, I could finally tweak a delay pedal just the way I like it. I could get the best of modern and vintage delays in one pedal and dial in the right amount of delay, feedback and EQ to make my guitar sit in the mix exactly where I need it.
The Vox Joe Satriani series of effects pedals is now a reality.”
Joe Satriani
4

Controls
1 |
8 |
2 |
9 |
10 |
|
3 |
11 |
4 |
12 |
5 |
|
6 |
|
7 |
13 |
Note: Always turn off your guitar amplifier before you connect your guitar cables, power supply cables, or change the battery in your Time Machine, to avoid damaging your amp.
1.AC adapter jack: This allows for connection to an optional 9V DC power supply (not included).
2.Level: This knob controls the overall level of the delay effect. Turn this knob clockwise to increase the mix of the delay effect with the guitar signal. Turn this knob counter-clockwise to decrease the mix and reduce the amount of delay
effect. |
5 |
3.Output: This is the 1/4" output. Plug a second guitar cable between this and your amp, or between this and the next pedal in your chain. Use this output when running the Time Machine in mono.
4.Delay Range: This four-position knob selects the delay range, from four ranges—125ms, 250ms, 500ms, and 1000ms. This control enables you to very precisely set the delay time on this pedal. After you set the desired delay range, use the Time knob to “fine tune” the delay time within the selected range. Delay ranges are as follows:
TIME knob Range
125ms: 0ms–125ms
250ms: 125ms–250ms
500ms: 250ms–500ms
1000ms: 500ms–1000ms
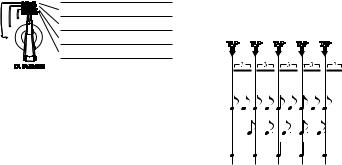
When the time parameter is set by using the tap tempo switch, this knob indicates the rate of the note as follows: (The time set by the Tap Tempo switch is 1/4.)
6
125ms: 1/12 


250ms: 1/8
500ms: 3/16 
1000ms: 1/4
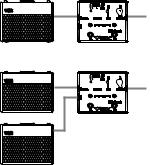
5.DRY: This 1/4" output is for use when running the Time Machine in stereo. After connecting a 1/4" cable to the OUT output, run a second cable from the DRY output to a second sound source, such as another guitar amplifier. This will enable lush, stereo delay effects. Your guitar’s dry signal will pass through this output without passing through any A/D D/A conversion, while your delayed signal will pass through the effected OUT output.
6.“ON” LED: This LED illuminates when Time Machine is turned on.
OUT 

 IN
IN
DELAY OUT
+ DRY OUT (no AD/DA convertion)
OUT 

 IN
IN
DRY
Note: If this LED begins to dim, light unstably or if your pedal makes any unusual noise, your bat-
tery is almost empty. If this happens, please replace the battery. When the battery is completely empty, you will hear no sound from the pedal.
7.ON: This switch turns the Time Machine on and off.
7
8.Hi-Fi/Lo-Fi Switch: This switch is designed to Joe’s exacting specifications. When Hi-Fi is selected, the delay effects are full-range with no EQ. When Lo-Fi is selected, a high-pass filter and low-pass filter EQ is engaged. This rolls off the high frequencies cuts the low frequencies. These frequency points are selected based on Joe's years of live and studio performance as the best EQ points to allow a delayed guitar tone to sit in the mix.
9.Time: This knob controls the amount of delay time within the value previously selected with the Delay Range knob. Turn this knob clockwise to increase the delay time within this range. Turn this knob counter-clockwise to decrease the delay time within this range.
For extreme psychedelic effects, rotate the time knob back and forth while playing!
10.Feedback: This knob selects the Feedback, or the number of times the delay effect repeats the original signal. The Feedback control on the Time Machine can produce just one repeat all the way up to infinite repeats—and everything in between! For extreme sound effects, set the Feedback to infinite (rotate the Feedback knob fully clockwise), play a chord or a riff and then rotate the Time knob slowly back and forth!
11.Input: This is the 1/4" input. Plug your guitar into this. Connecting a guitar cable to the "INPUT" jack will turn on the power automatically. For extended battery life, always unplug your guitar cable from the input when not in use.
8
12.Tap LED: This LED flashes to indicate the selected delay time. It also indicates which delay mode is in operation by changing color. Green indicates Modern mode and Red indicates Vintage mode.
13.Tap & Modern/Vintage: This multi-function switch enables you to tap the delay time into the pedal and also enables you to switch between two unique delay sounds—Modern and Vintage.
Tap: The tap tempo switch on the Time Machine allows access to delays as long as 5800ms! Just tap to the rhythm of the song and the delay will repeat in time with the music.
Note: The Tap Tempo foot switch overrides the normal operation of the Delay Range and Time knobs.
Modern/Vintage: To switch from the default Modern delay sound to the Vintage delay, hold the Tap switch for one second. The LED will change color to indicate when you have switched delay sounds. Green is Modern. Red is Vintage. The Modern delay sound is a full-range, crystal clean delay sound suitable for virtually any style of music. The Vintage delay adds a subtle modulation effect and a saturation circuit to simulate the characteristics of vintage tape delays. To switch back to the Modern delay, hold the Tap switch again for one second.
Battery compartment: This is where you can access the 9V battery.
9

“Changing the battery”
1.Open the battery case on the bottom of the pedal and remove the 9V battery (6LF22/ 6LR61).
2.Remove the battery snap from the 9V battery.
3.Install a new battery onto the snap and put the battery back into the case.
4.Close the battery case.
Note: Remove the 9V battery from the pedal when not using it for long time periods.
10
The Time Machine Story & Special Features
The Time Machine is a multi-function delay designed to the exact specifications of world-renowned guitar icon Joe Satriani. Joe wanted a delay that would offer the best of modern delays combined with the warmth, musicality and character of the best vintage delay pedals. He also wanted to incorporate his favorite EQ points that he uses to sculpt delay effects on stage and in the studio to make the guitar sit perfectly in the mix. The result is the Time Machine.
11
Special features of the Time Machine:
• Dual mode delay.
The Time Machine is like having two delays in one—Modern and Vintage. Both delays are quickly accessible via footswitch. The Modern delay is a full-range, crystal clean delay suitable for virtually any style of music. The Vintage delay adds a subtle modulation effect and a saturation circuit to simulate the characteristics of vintage tape delays.
• Analog-Style Saturation circuit.
Based on the tone and response of a sought-after vintage delay unit, this asymmetrical saturation circuit gives the Vintage mode its classic warmth.
• Hi-Fi and Lo-Fi switch.
This is another very useful feature designed exactly to Joe’s specifications. In Hi-Fi mode, no EQ is applied, and the delay sounds are produced purely as they were originally voiced. In Lo-Fi mode, high pass and low pass filter EQ is applied to the delay signal, in both Modern and Vintage mode. These EQ points are the exact settings Joe uses in the studio and on stage to create huge guitar tones with delay that sit perfectly in the mix. Think of this switch as your instant access to a professional mixing engineer!
• Tap Tempo
Tap your desired delay time into the Time Machine with the Tap foot switch. The Tap switch also doubles as a mode select switch to allow you to change between Modern and Vintage delays.
12
• Nearly six seconds of delay time!
The Time Machine lives up to its name. In addition to offering extremely precise control over delay times up to 1000ms using the Delay Range and Time knobs, the Tap switch enables delay times up to 5800ms!
• Stereo Output.
The Time Machine has two 1/4" outputs for full stereo operation. This means you can run the Time Machine into two different sound sources (such as two different amplifiers) for huge, stadium-ready delay tone. It’s also great in the studio.
• Chicken Head Knobs.
There were a lot of practical reasons Joe chose these knobs over something more modern looking. For one, they just look cool! Joe and the VOX team also agreed that it was essential to give you the most precision possible in exploring and documenting your own favorite sound settings. Joe chose white so you can see them in dark places, like on stage or in your basement.
13

Specifications
Jacks: |
1x INPUT, 1x OUTPUT, 1x DRY OUT, 1x DC9V |
|
Input impedance: |
1M-ohms |
|
Output impedance: |
1k-ohms |
|
Power supply: |
9V alkaline battery (6LF22/6LR61) or AC adapter |
|
|
(sold separately) |
|
Current consumption: |
60 mA |
|
Battery life: |
approximately 6 hours |
|
Dimensions (W x D x H): |
143 x 121 x 58 (mm) / 5.63 x 4.76 x 2.28 (inches) |
|
Weight: |
600 g /1.32 lbs. (without battery) |
|
Included items: |
9V alkaline battery (6LR61) |
|
Option (sold separately): |
9V AC adapter ( |
) |
* Specifications and appearance are subject to change without notice for improvement.
14
15
Précautions
Emplacement
L’utilisation de cet instrument dans les endroits suivants peut en entraîner le mauvais fonctionnement.
•En plein soleil
•Endroits très chauds ou très humides
•Endroits sales ou fort poussiéreux
•Endroits soumis à de fortes vibrations
•A proximité de champs magnétiques
Alimentation
Branchez l’adaptateur secteur fourni à une prise secteur de tension appropriée. Evitez de brancher l’adaptateur à une prise de courant dont la tension ne correspond pas à celle pour laquelle l’appareil est conçu.
Interférences avec d’autres appareils électriques
Les postes de radio et de télévision situés à proximité peuvent par conséquent souffrir d’interférences à la réception. Veuillez dès lors faire fonctionner cet appareil à une distance raisonnable de postes de radio et de
16 télévision.
Maniement
Pour éviter de les endommager, manipulez les commandes et les boutons de cet instrument avec soin.
Entretien
Lorsque l’instrument se salit, nettoyez-le avec un chiffon propre et sec. Ne vous servez pas d’agents de nettoyage liquides tels que du benzène ou du diluant, voire des produits inflammables.
Conservez ce manuel
Après avoir lu ce manuel, veuillez le conserver soigneusement pour toute référence ultérieure.
Evitez toute intrusion d’objets ou de liquide
Ne placez jamais de récipient contenant du liquide près de l’instrument. Si le liquide se renverse ou coule, il risque de provoquer des dommages, un court-circuit ou une électrocution. Veillez à ne pas laisser tomber des objets métalliques dans le boîtier (trombones, par ex.). Si cela se produit, débranchez l’alimentation de la prise de courant et contactez votre revendeur VOX le plus proche ou la surface où vous avez acheté l’instrument.
Note concernant les dispositions (Seulement EU)
Quand un symbole avec une poubelle barrée d’une croix apparait sur le produit, le mode d’emploi, les piles ou le pack de piles, cela signifie que ce produit, manuel ou piles doit être déposé chez un représentant compétent, et non pas dans une poubelle ou toute autre déchetterie conventionnelle. Disposer de cette manière, de prévenir les dommages pour la santé humaine et les dommages potentiels pour l'environnement. La bonne méthode d'élimination dépendra des lois et règlements applicables dans votre localité, s’il vous plaît, contactez votre organisme administratif pour plus de détails. Si la pile contient des métaux lourds au-delà du seuil réglementé, un symbole chimique est affiché en dessous du symbole de la poubelle barrée d’une croix sur la pile ou le pack de piles.
REMARQUE IMPORTANTE POUR LES CLIENTS
Ce produit a été fabriqué suivant des spécifications sévères et des besoins en tension applicables dans le pays où ce produit doit être utilisé. Si vous avez acheté ce produit via l’internet, par vente par correspondance ou/et vente par téléphone, vous devez vérifier que ce produit est bien utilisable dans le pays où vous résidez.
ATTENTION: L’utilisation de ce produit dans un pays autre que celui pour lequel il a été conçu peut être dangereuse et annulera la garantie du fabricant ou du distributeur. Conservez bien votre récépissé qui est la preuve de votre achat, faute de quoi votre produit ne risque de ne plus être couvert par la garantie du fabricant ou du distributeur.
* Tous les noms de produits et de sociétés sont des marques commerciales ou déposées de leur
détenteur respectif.
17
Quelques mots de Joe Satriani…
“J’adore les pédales d’effets. Elles stimulent ma créativité. Elles entraînent mon jeu de guitare dans de nouvelles voies musicales. Elles m’aident à me dépasser sur scène.
Distorsion, overdrive, écho, delay, wah-wah, chorus, flanger, filtres d’enveloppe et générateurs d’octave—plus de fous on est, plus on s’amuse! Les pédales d’effet permettent non seulement de prendre son pied mais elles sont surtout devenues incontournables pour tout musicien qui se respecte.
Cela fait des années que je rêve de collaborer à la conception de ma propre série de pédales. Je voulais m’associer à une marque de légende, connue dans le monde entier pour ses innovations devenues des normes industrielles.
En collaborant avec ses ingénieurs, j’ai enfin pu façonner une pédale de delay exactement comme je le voulais. Cela m’a permis de rassembler la crème des delays modernes et vintage dans une seule pédale et de millimétrer le delay, la réinjection et l’égalisation pour que ma guitare s’intègre parfaitement dans le mixage.
La série de pédales d’effets Vox Joe Satriani est devenue réalité”.
Joe Satriani
18

Commandes
1 |
8 |
2 |
9 |
10 |
|
3 |
11 |
4 |
12 |
5 |
|
6 |
|
7 |
13 |
Remarque: Coupez toujours votre ampli de guitare avant de brancher vos câbles de guitare et d’alimentation ou de changer la pile de votre Time Machine pour éviter d’endommager l’ampli.
1.Prise pour adaptateur secteur: Vous pouvez y brancher un adaptateur 9V DC disponible en option (non fourni).
2.LEVEL: Cette commande détermine le niveau global de l’effet. Tournez cette commande vers la droite pour augmenter le signal d’effet. Tournez-la vers la gauche pour diminuer l’effet.
19
 Loading...