


940
Table of contents
 Loading...
1993 Volvo 940
940 Owner's Manual
VOLVO
940
1 9 9 3
This manual deals with the operation and care of your Volvo.
Welcome to the world-wide family of Volvo owners. We trust that you will enjoy many years of safe
driving in your Volvo, an automobile designed with your safety and comfort in mind. To help ensure
your satisfaction with this vehicle, we encourage you to familiarize yourself with the equipment
descriptions, operating instructions and maintenance requirements/recommendations in this manual. We
also urge you and your passengers to wear seat belts at all times in this (or any other) automobile. And,
of course, please do not operate a vehicle if you may be affected by alcohol, medication or any
impairment that could hinder your ability to drive.
Your Volvo is designed to meet all applicable safety and emission standards, as evidenced by the
certification labels attached to the driver's door opening and on the left wheel housing in the engine
compartment. for further information please contact your dealer.
Contents
Instruments and controls ... 1
Body and interior ... 2
file:///K|/ownersdocs/1993/1993_940/93940_1.html (1 of 2)12/30/2006 9:44:17 AM

1993 Volvo 940
Occupant safety, Reporting safety defects ... 3
Starting and driving ... 4
Wheels and tires ... 5
In case of emergency ... 6
Car care ... 7
Service and routine maintenance ... 8
Specifications ... 9
Important
You should also be familiar with the information in the first three chapters of this book.
Information contained in the balance of the manual is extremely useful and should be studied after
operating the vehicle for the first time.
The manual is structured so that it can be used for reference. It should thus be kept in the car for ready
access.
Do not export your Volvo to another country before investigating the country's applicable safety and
exhaust emission requirements. In some cases it may be difficult or impossible to comply with these
requirements. Modifications to the emission control system(s) may render your Volvo not certifiable for
legal operation in the U.S., Canada or other countries.
Notice:
Your Volvo is designed to meet all applicable safety and emission standards, as evidenced by the
certification labels attached to the door opening sheet metal and on the left wheel housing in the engine
compartment. for further information regarding these regulations, please contact your dealer.
All information, illustrations and specifications contained in this manual are based on the latest product
information available at the time of publication. Volvo reserves the right to make model changes at any
time, or to change specifications or design, without notice and without incurring obligation.
©Volvo Cars of North America, Inc.
Contents | Top of Page
file:///K|/ownersdocs/1993/1993_940/93940_1.html (2 of 2)12/30/2006 9:44:17 AM
1993 Volvo 940
Instruments, switches and controls
Instruments, switches and controls
pg. 1:1 Instruments, switches and controls
IMPORTANT!
Your car is equipped with a Shiftlock-Keylock system.
SHIFTLOCK:
When your car is parked, the gear selector is locked in the (P)ark position. To release the selector from this position, turn the
ignition key to position II (or start the engine), depress the brake pedal, press the button on the front side of the gear selector
and move the selector from (P)ark.
If it is necessary to manually override the Shiftlock system, see page 6:18 for instructions.
KEYLOCK:
This means that when you switch off the ignition, the gear selector must be in the (P)ark position before the starting
(ignition) key can be removed from the ignition switch.
The pages in this section provide detailed descriptions of the vehicle's instruments and controls.
Note that vehicles may be equipped differently, depending on special legal requirements, etc.
file:///K|/ownersdocs/1993/1993_940/93940_1_1.html (1 of 6)12/30/2006 9:44:18 AM
1993 Volvo 940
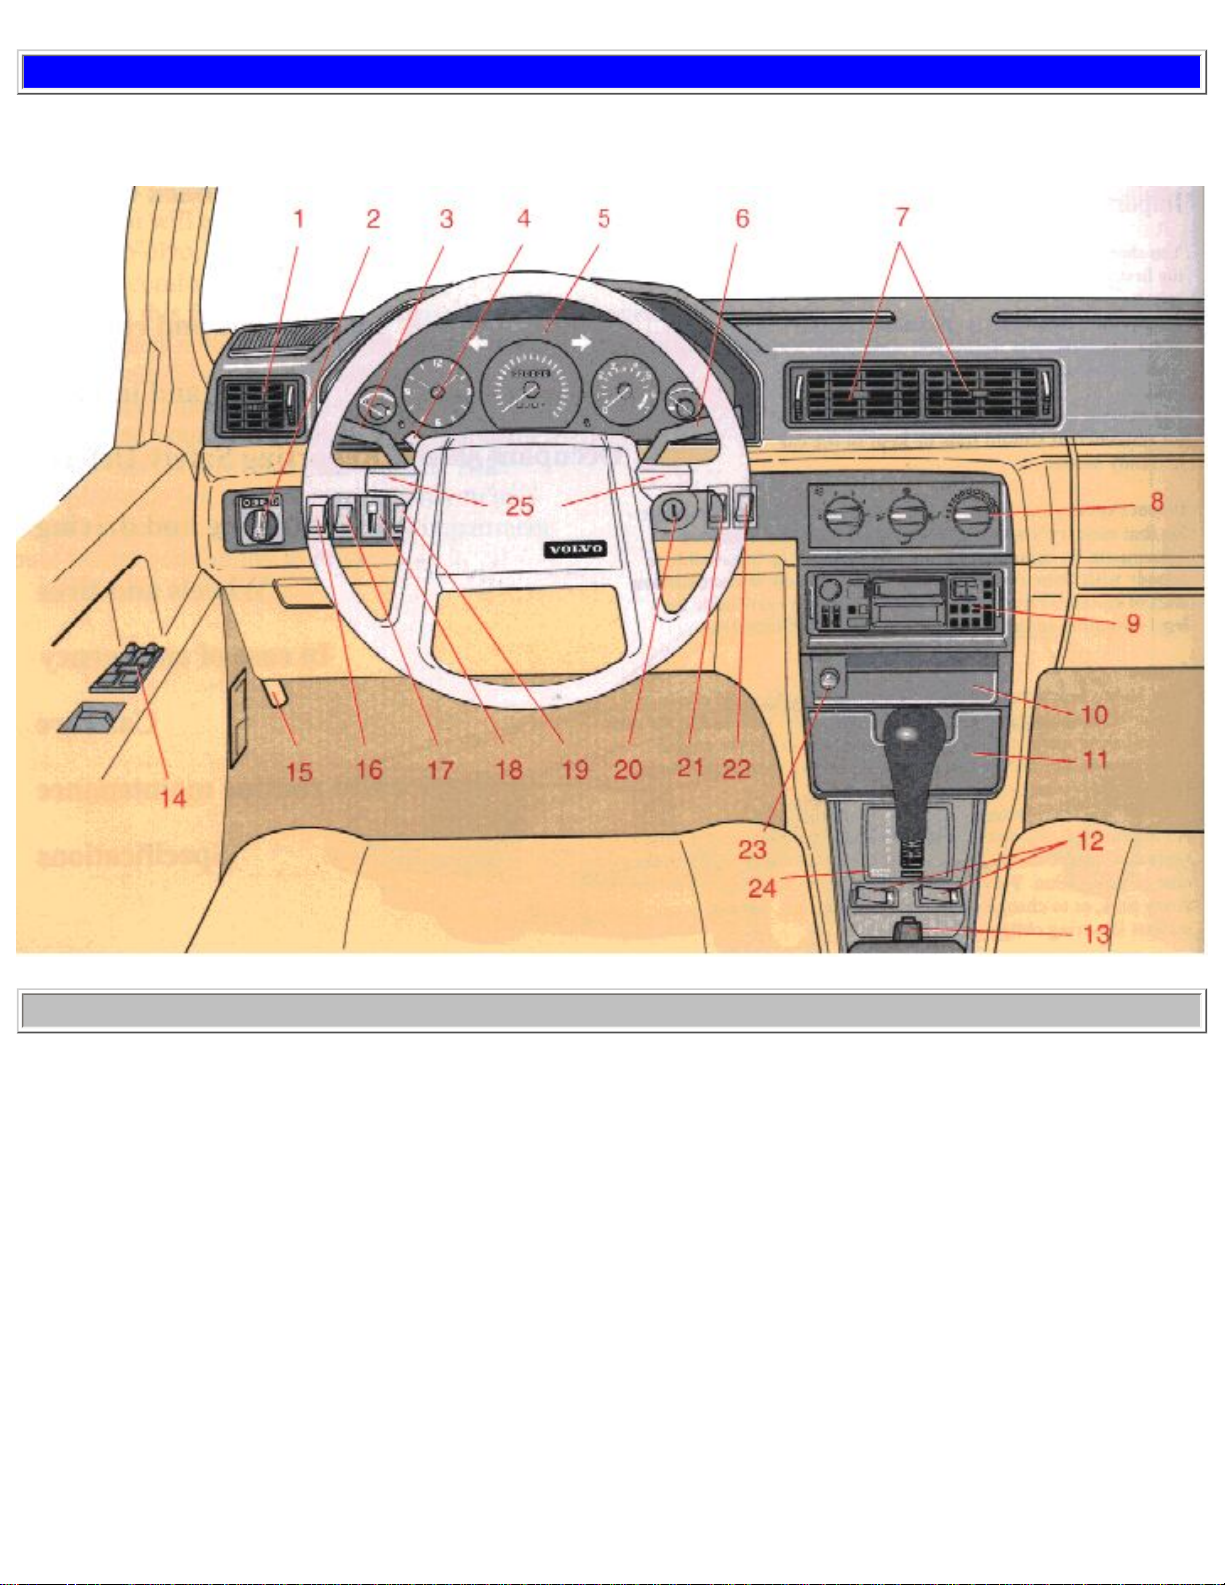
1:11
1 Air louver
1:6
2 Headlights, parking lights
1:6, 1:10
3 Turn signals, Cruise Control
1:6
4 Hazard warning lights
1:2
5 Instruments
1:7
6 Wiper/washer
1:11
7 Air louvers
1:11
8 Heating and air conditioning
1:17
9 Audio system
- 10 Space for additional equipment
1:16
11 Ash tray
1:14
12 Electrically-heated front seats
1:16
13 Parking brake
2:5
14 Power door mirrors
1:15
Electrically operated windows
2:9
15 Hood release handle
1:8
16 fog lights
- 17 Space for additional equipment
1:8
18 Instrument illumination
1:8
19 Power antenna
1:7
20 Starting (ignition) switch/steering wheel lock
1:9
21 Heated rear window/side door mirrors
1:9
22 Electrically operated sun roof (option)
1:16
23 Cigarette lighter
6:18
24 Shiftlock override button
- 25 Horn
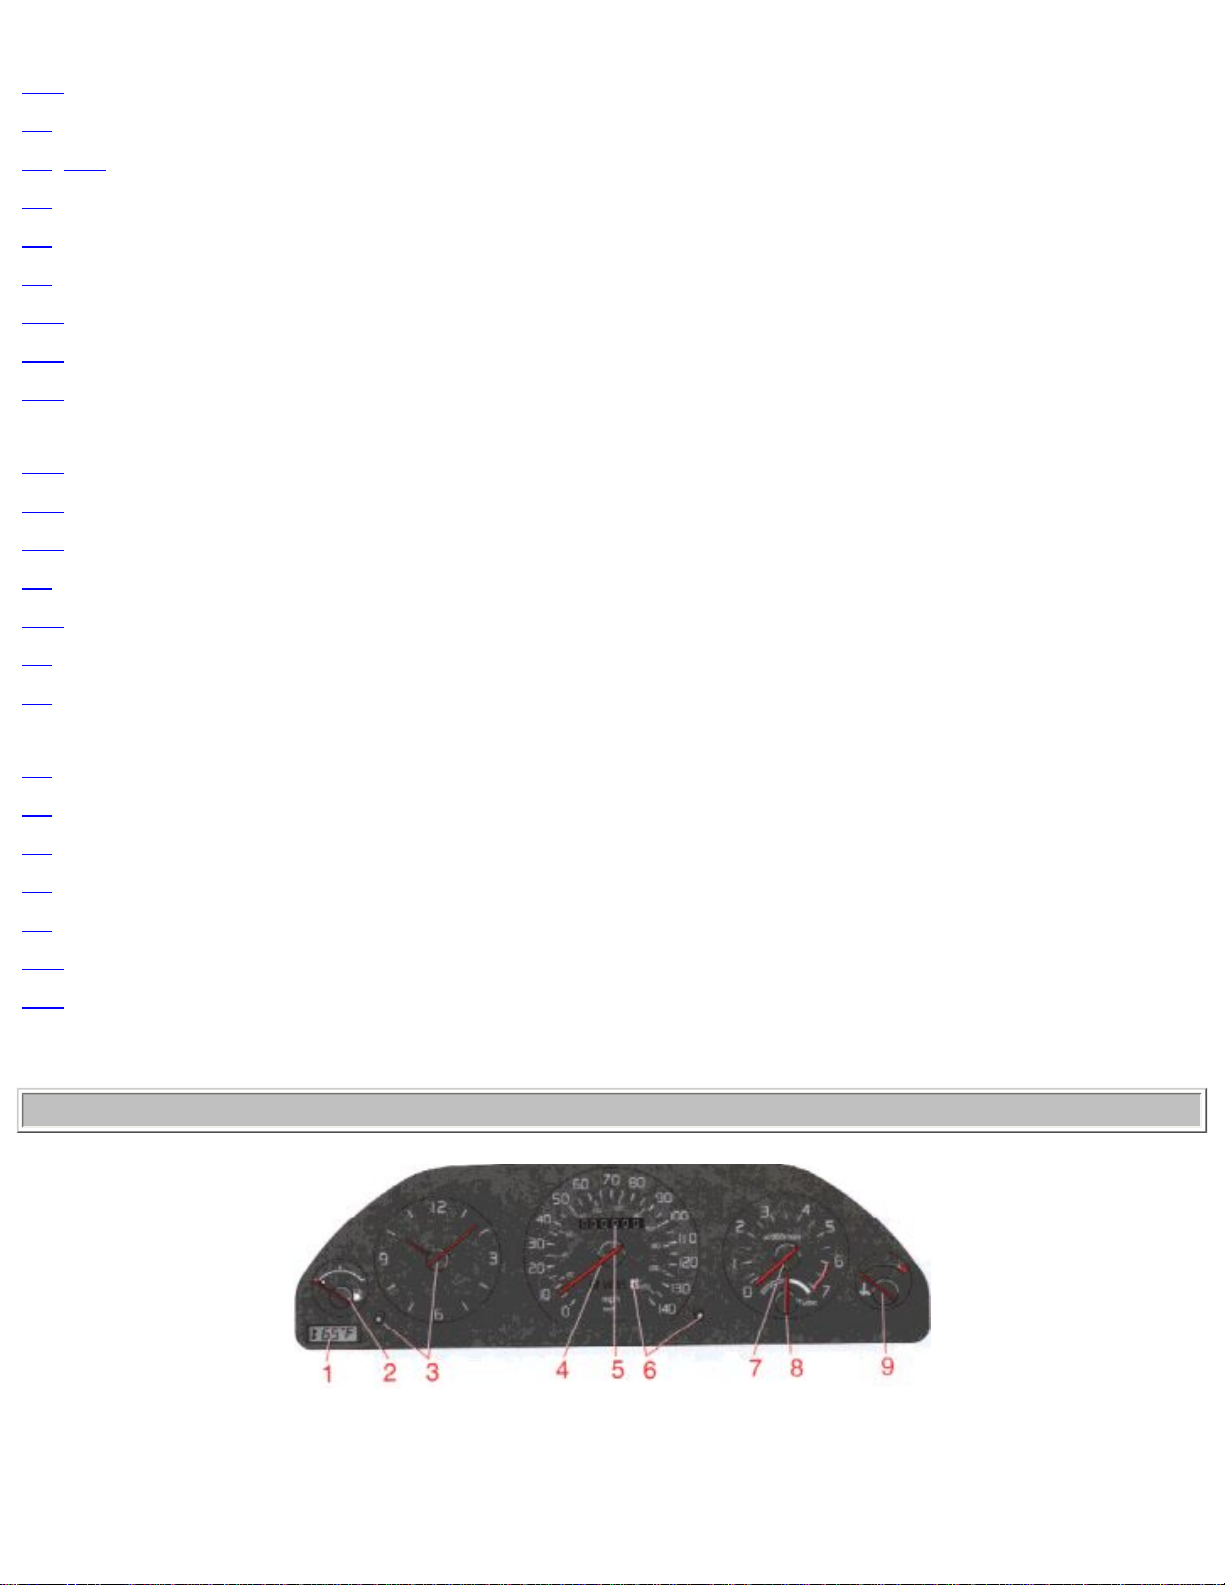
pg. 1:2 Instruments
1 Ambient temperature indicator (certain models)
Indicates the temperature slightly above the surface of the road. An amber warning lamp lights up when the temperature is in
file:///K|/ownersdocs/1993/1993_940/93940_1_1.html (2 of 6)12/30/2006 9:44:18 AM

1993 Volvo 940
the range of 23-36° F (-5 - + 2° C). At low speeds or when the car is not moving, the temperature readings may be slightly
higher than the actual ambient temperature due to heat generated by the engine.
2 Fuel gauge
The total fuel tank capacity is approx. 19.8 US gals (75 liters). When the warning light comes on, there are approximately 1.6
US gals. (6 liters) of fuel remaining in the tank. See "Refueling" for further information.
3 Quartz crystal clock/clock set button
Press the button and turn to set the clock.
4 Speedometer
5 Odometer
6 Trip odometer/reset button
Used for measuring shorter distances. The last digit indicates 1/10 mile/kilometer. A black number on a white background =
original speedometer. A red number on a white background = replacement speedometer.
7 Tachometer
Reads thousands of engine rpm. Engine should not be operated in red range.
9 Boost pressure gauge
( Turbo-engine cars only )
The boost pressure gauge is divided into sections. Black section: The engine acts as a normally-aspirated engine. Best fuel
economy is achieved while driving in this range. White section : The turbocharger provides boost pressure.
8 Temperature gauge
The pointer should be approximately midway on the gauge face when driving. If the pointer approaches the red range
repeatedly, check coolant level and fan belt tension. Do not drive the car with the pointer in the red range. See sections
"Coolant" and Drive belts".
Warning! Allow engine to cool before adding
coolant.
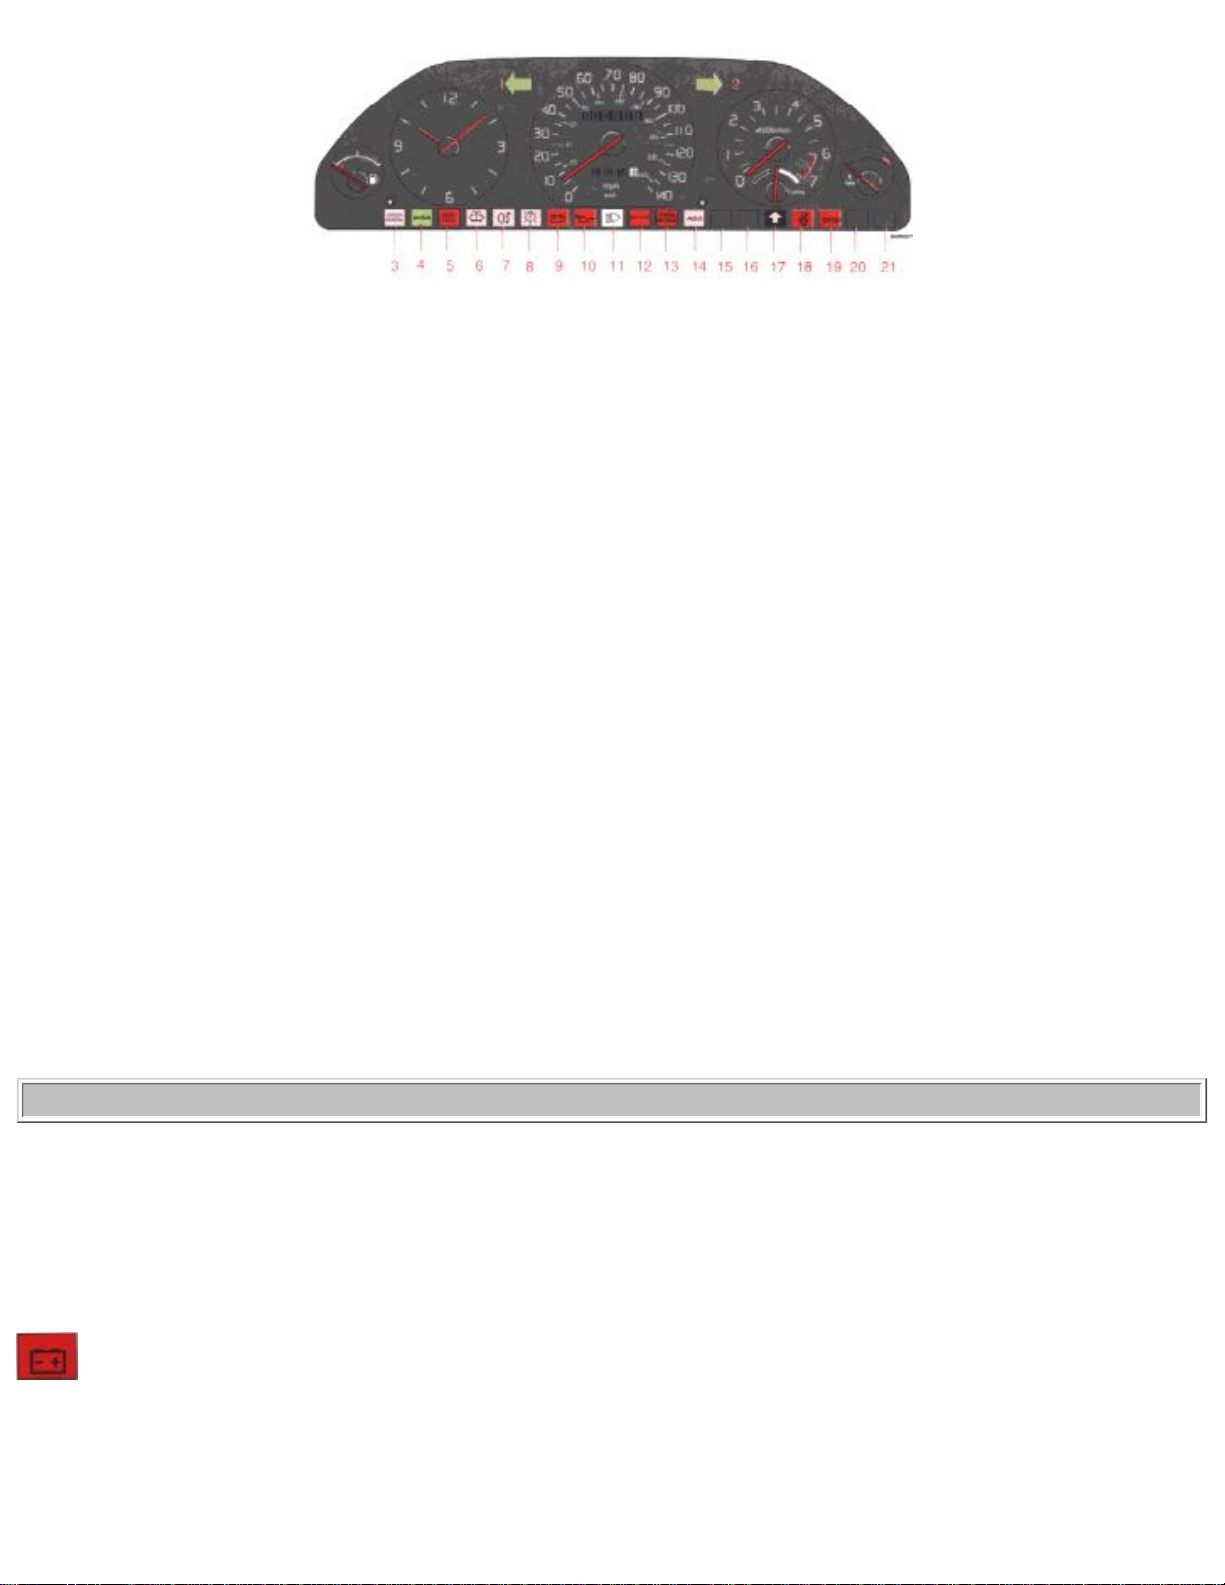
pg. 1:3 Indicator and warning lights
file:///K|/ownersdocs/1993/1993_940/93940_1_1.html (3 of 6)12/30/2006 9:44:18 AM
1993 Volvo 940
1 Turn signal, left
2 Turn signal , right
3 Malfunction indicator lamp
4 Direction indicator, trailer
5 Service reminder indicator
6 Low washer fluid level
If the lamp glows continuously
when the engine is running,
there is only about 1/2 - 1 US qts.
remaining in the washer fluid
reservoir.
7 Rear fog lamp
8 Bulb failure
9 Generator not charging
10 Low engine oil pressure
11 High beams
12 Brake failure
13 Parking brake applied
14 ABS-system, see p. 1:5
15 (Not in use)
16 (Not in use)
17 4th gear engaged
18 Fasten seat belts
19 SRS
20 (Not in use)
21 (Not in use)
pg. 1:4 Warning lights
The warning lights described on pages 1:4 and 1:5 should never stay on when driving
When the ignition key is turned on, and before the engine starts, all of the warning lights should be on to test the function of
the bulbs. Should a light not go off after the engine has started, the system indicated should be inspected. However, the
parking brake reminder light will not go off until the parking brake is fully released.
Generator warning light
If the light comes on while the engine is running, check the tension of the generator drive belt as soon as possible.
file:///K|/ownersdocs/1993/1993_940/93940_1_1.html (4 of 6)12/30/2006 9:44:18 AM
1993 Volvo 940
NOTE: This warning lights is illuminated if the generator is not charging. However, parking brake, brake failure and bulb
failure warning lights will be illuminated at the same time due to the design of the system.
Malfunction indicator lamp
If the lamp comes on (or stays on after the vehicle has started), the engine diagnostic system has detected a possible fault in
the emission control system. Although driveability may not be affected, see an authorized Volvo retailer as soon as possible
for inspection.
Oil pressure warning light
If the light comes on while driving, the oil pressure is too low. Stop the car and then stop the engine immediately and check
the engine oil level. See the section titled "Engine oil". If the light stays on after restart, have the car towed to the nearest
authorized Volvo retailer. After hard driving, the light may come on occasionally when the engine is idling. This is normal,
provided it goes off when the engine speed is increased.
Parking brake reminder light
This light will be on when the parking brake (hand brake) is applied. The parking brake lever is situated between the front
seats. Canadian models are equipped with this warning light:
Brake fluid warning light
If the light comes on while driving or braking, this indicates that the brake fluid level is too low.
Stop immediately, open the hood and check the brake fluid level in the reservoir (see section "Engine compartment" for
reservoir position)!
Canadian models are equipped with this warning light:
WARNING!
If the level is below the MIN mark in either section of the reservoir: DO NOT DRIVE. Tow the car to a Volvo retailer and
have the brake system checked and any leakage repaired.
pg. 1:5 Indicator lights
Service reminder indicator
This light will come on at 10,000 mile (16,000 km) intervals. It is a reminder to the driver that the 10,000 mile (16,000 km)
service interval has been exceeded. The light will stay on 2 minutes after the start until reset by the servicing dealer.
* Turbo models: 5,000 miles (8,000 km)
Anti-lock Brake System (ABS)
file:///K|/ownersdocs/1993/1993_940/93940_1_1.html (5 of 6)12/30/2006 9:44:18 AM

1993 Volvo 940
If the warning lamp lights up there is a malfunction of the ABS system (the standard braking system will however function).
The vehicle should be driven to a Volvo retailer for inspection.
See page 4:20 for additional information.
Canadian models are equipped with this warning light:
Supplemental Restraint System (SRS)
If the light comes on (or stays on after the vehicle has started), the SRS diagnostic system has detected a fault. Drive to an
authorized Volvo retailer for an inspection of the system. (See section "SRS" for further information.)
Bulb failure warning light
The light will come on if any of the following bulbs are defective:
one of the low beam headlights
one of the tail lights
one of the brake lights when the brake pedal is depressed.
Check the fuse and bulb.
See sections titled "Replacing bulbs" and "Fuses".
Should the warning light come on after a defective outside bulb has been replaced, the corresponding bulb on the other side
of the car should also be replaced.
Contents | Top of Page
file:///K|/ownersdocs/1993/1993_940/93940_1_1.html (6 of 6)12/30/2006 9:44:18 AM
1993 Volvo 940
pg. 1:11 Heating and air conditioning
Heating and air conditioning
Your Volvo is equipped with a heating system combined with air conditioning.
Depending on which function you select, warm or cool/cold air is distributed to the different parts of the
passenger compartment.
The air conditioning system in your car contains a CFC-refrigerant - R134a. This is an environmentally
friendly substance having minimal effect on the earth's ozone layer.
The system contains 2.1 lbs (0.95 kg) R134a.
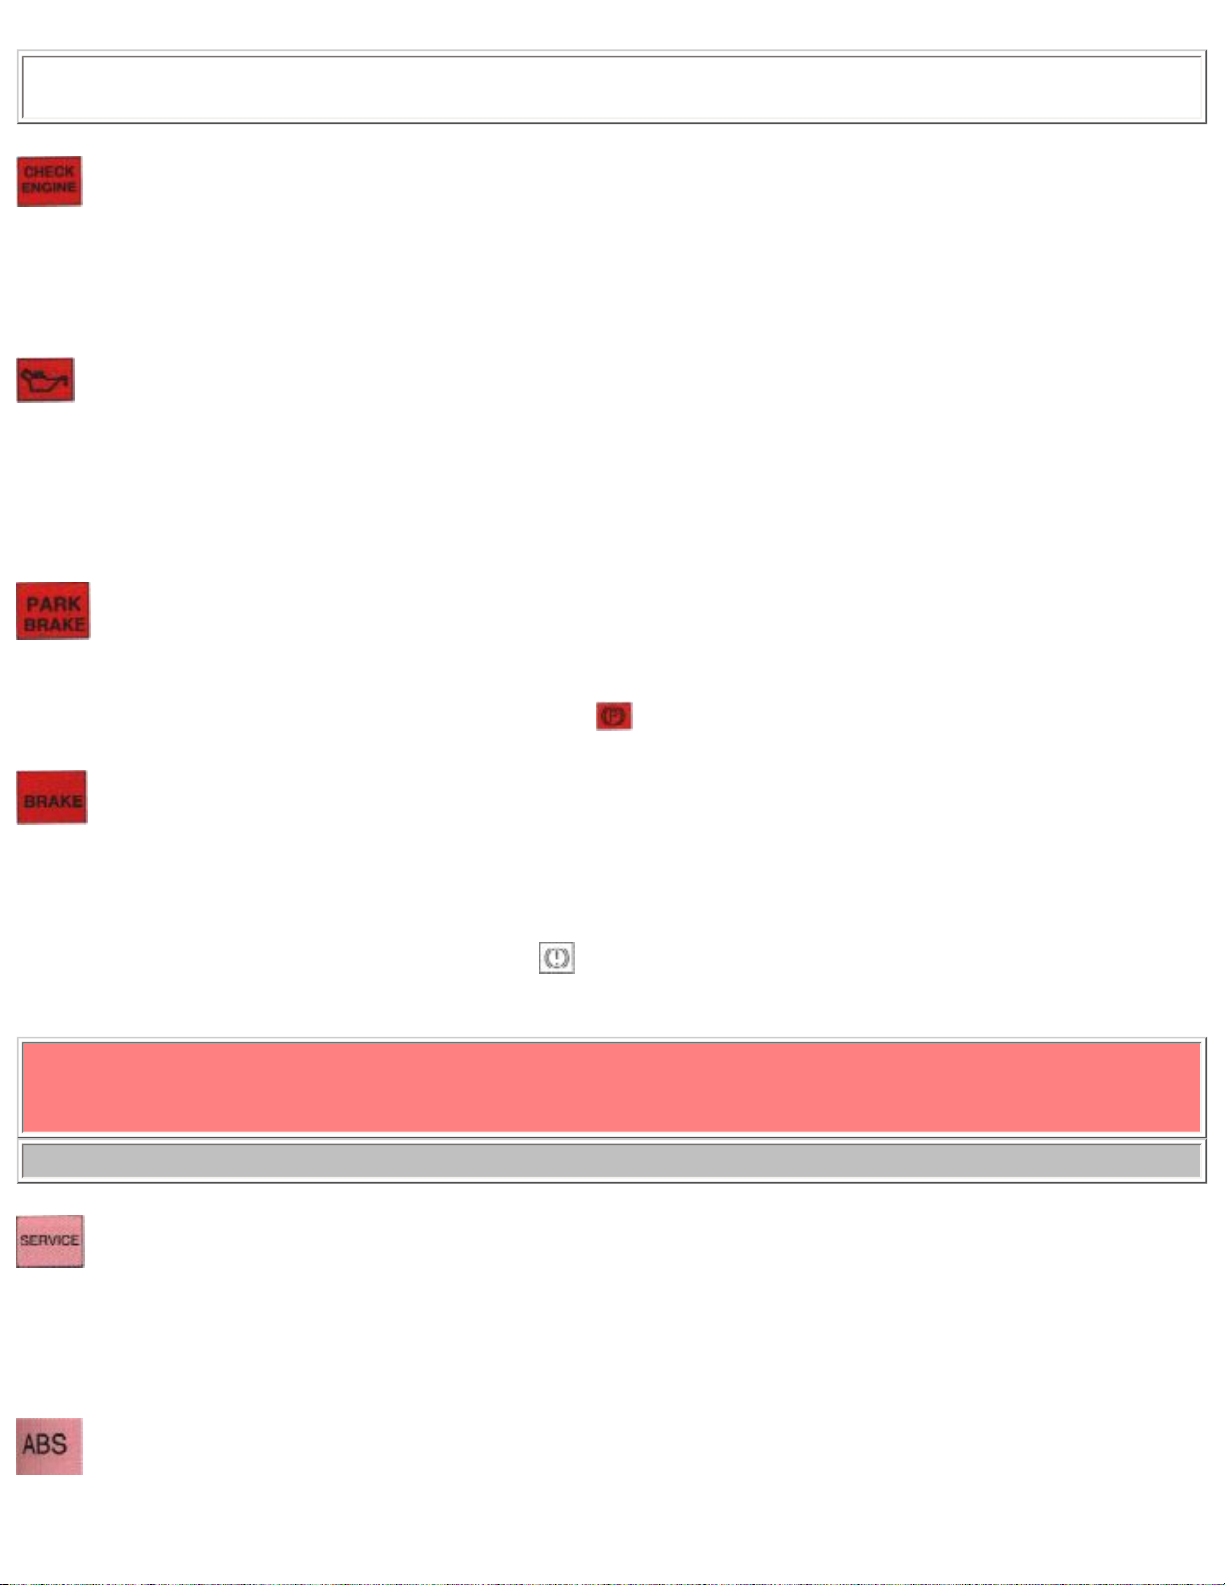
Air louvers (dash)
A Open
B Closed
C Directing air flow horizontally
file:///K|/ownersdocs/1993/1993_940/93940_1_11.html (1 of 8)12/30/2006 9:44:18 AM
1993 Volvo 940
D Directing air flow vertically
A certain amount of air will always enter through the dash air louvers as long as they are open,
independently of the position of the air distribution control.
Close the dash air louvers to obtain maximum air flow to floor or windshield.
pg. 1:12 Heating and air conditioning
Heating and ventilation with air conditioning
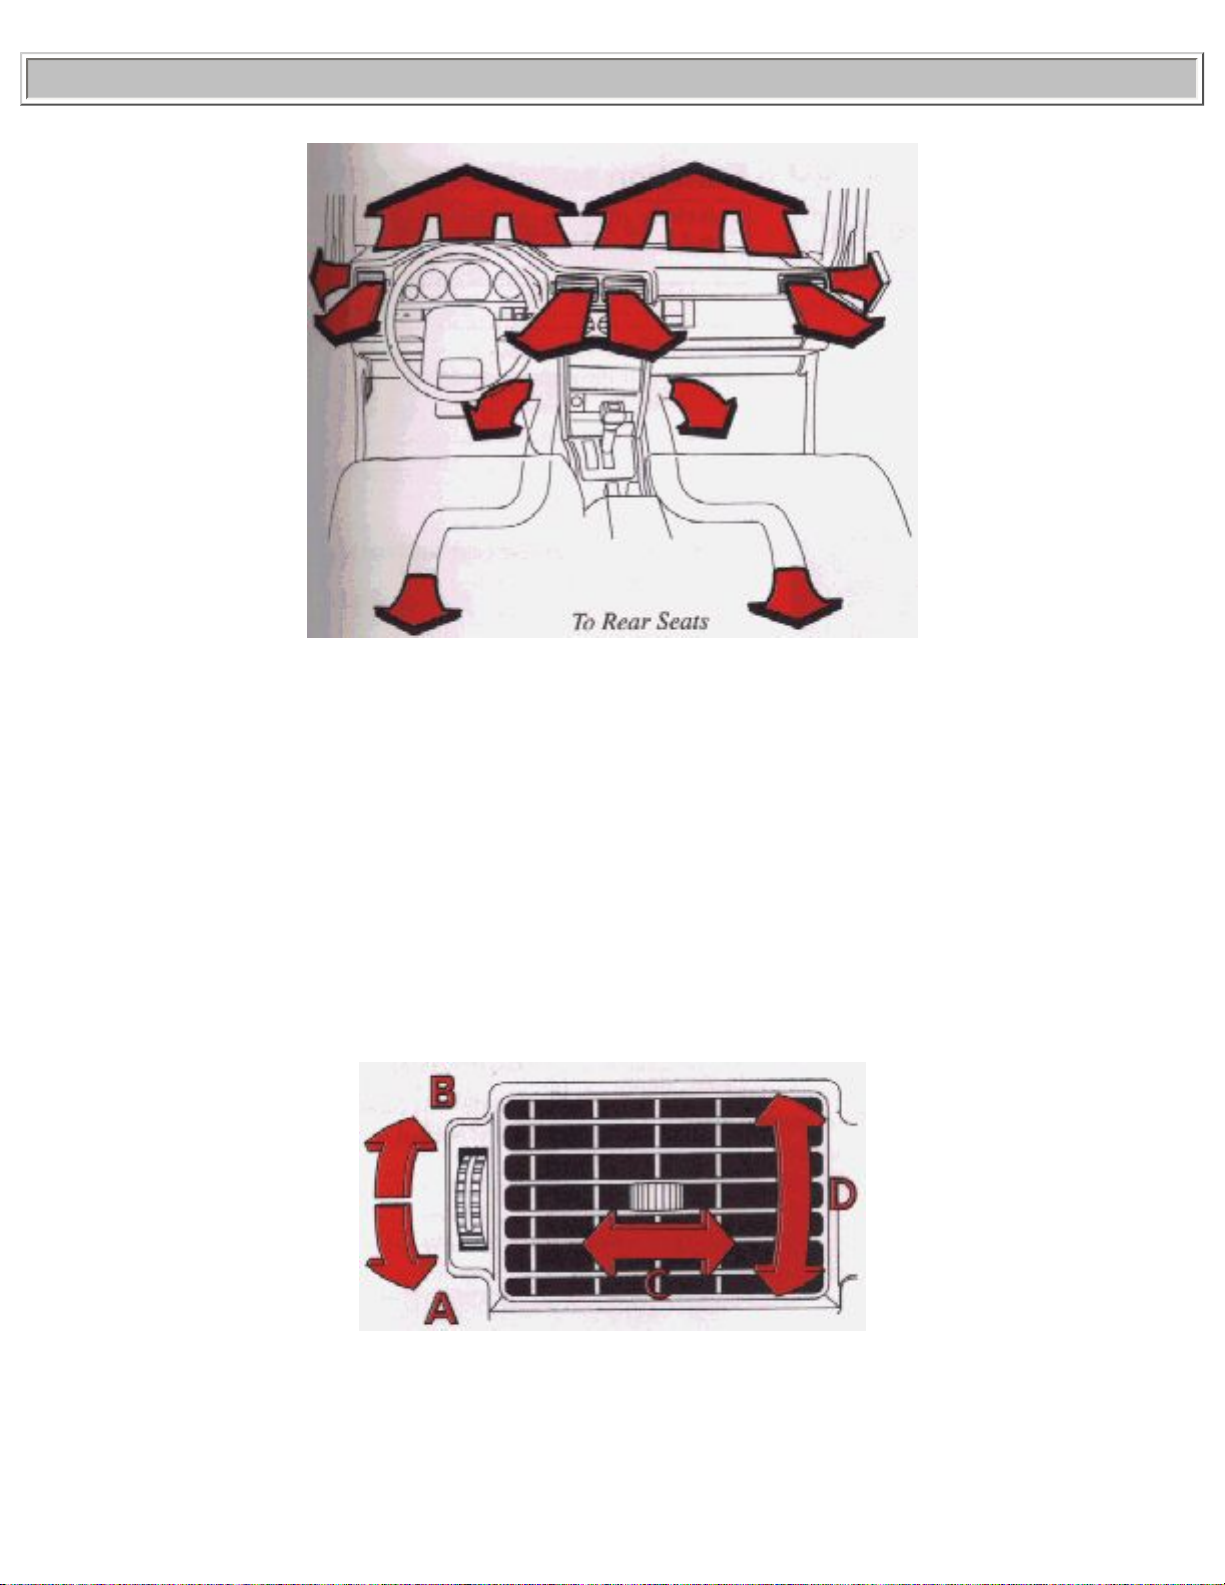
Blower
0 = off
5 = max speed
Function selector
Set desired function
Temperature dial
Set desired temperature
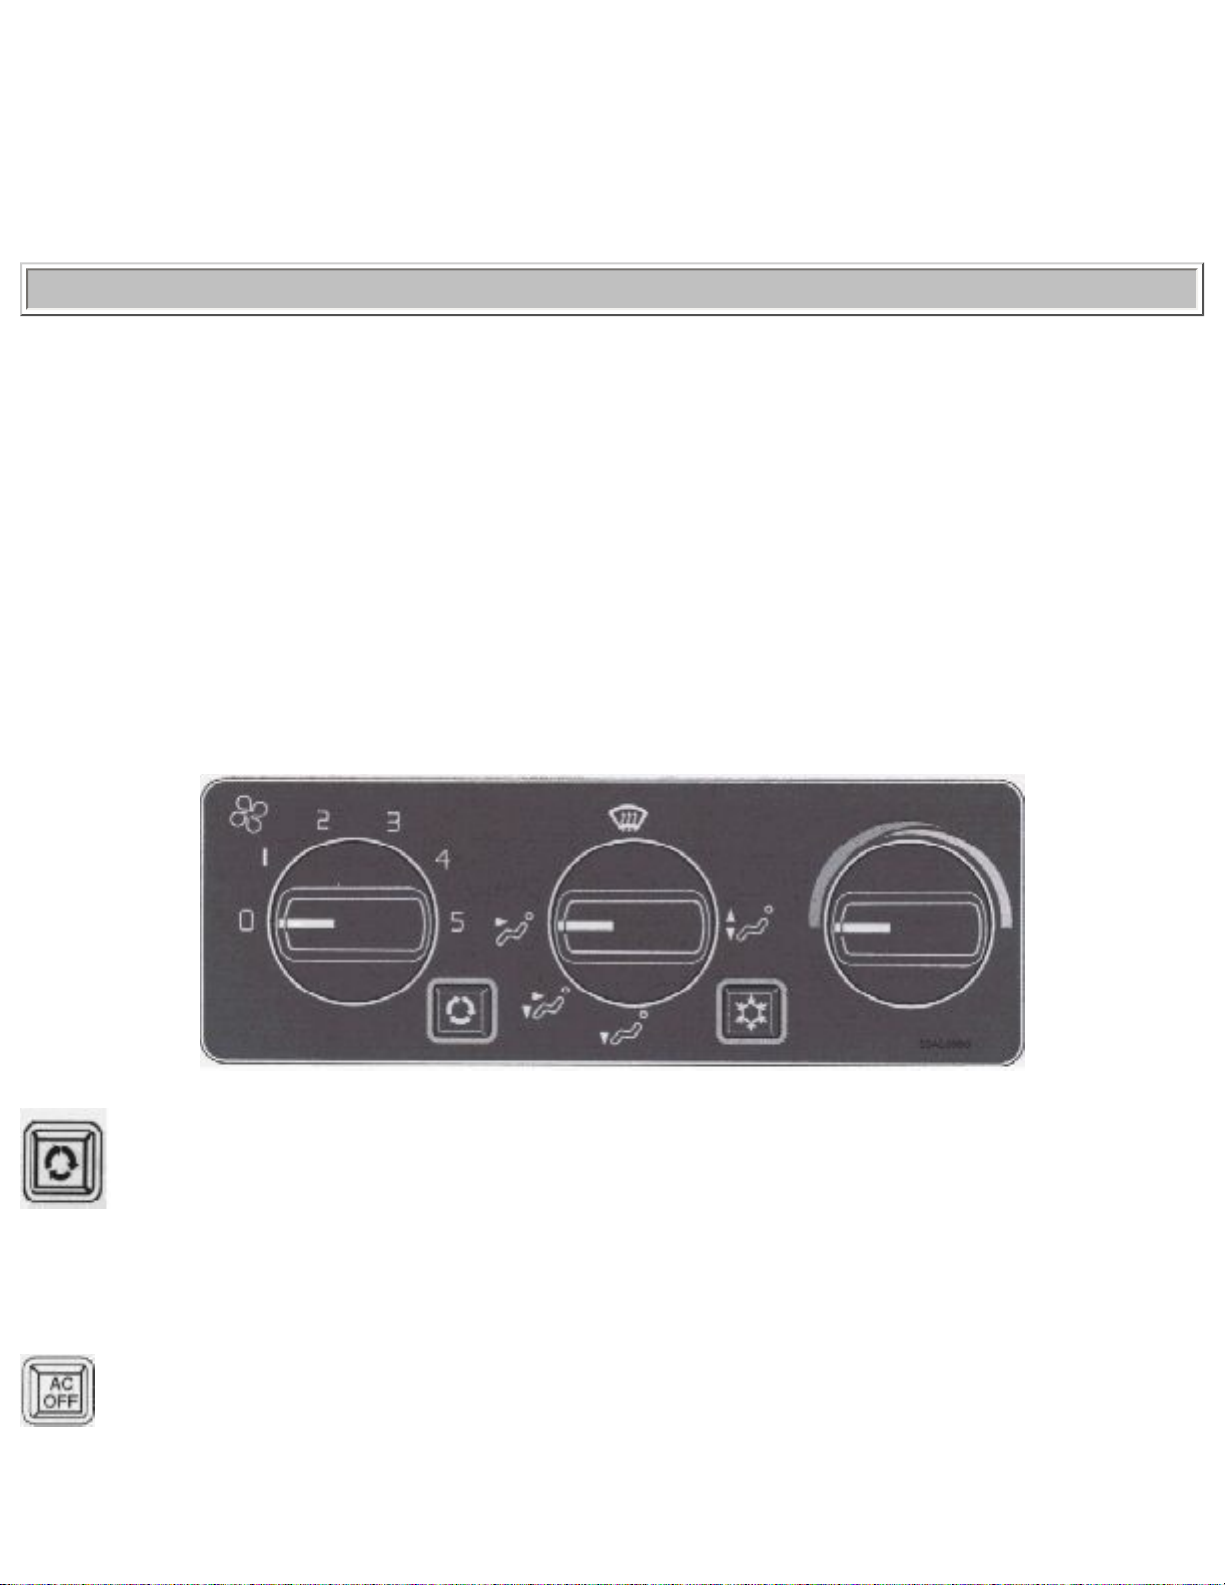
Air in the passenger compartment recirculates with this button depressed.
Will not function in defrost setting.
Light is on when the button is depressed and the headlights or parking lights are on.
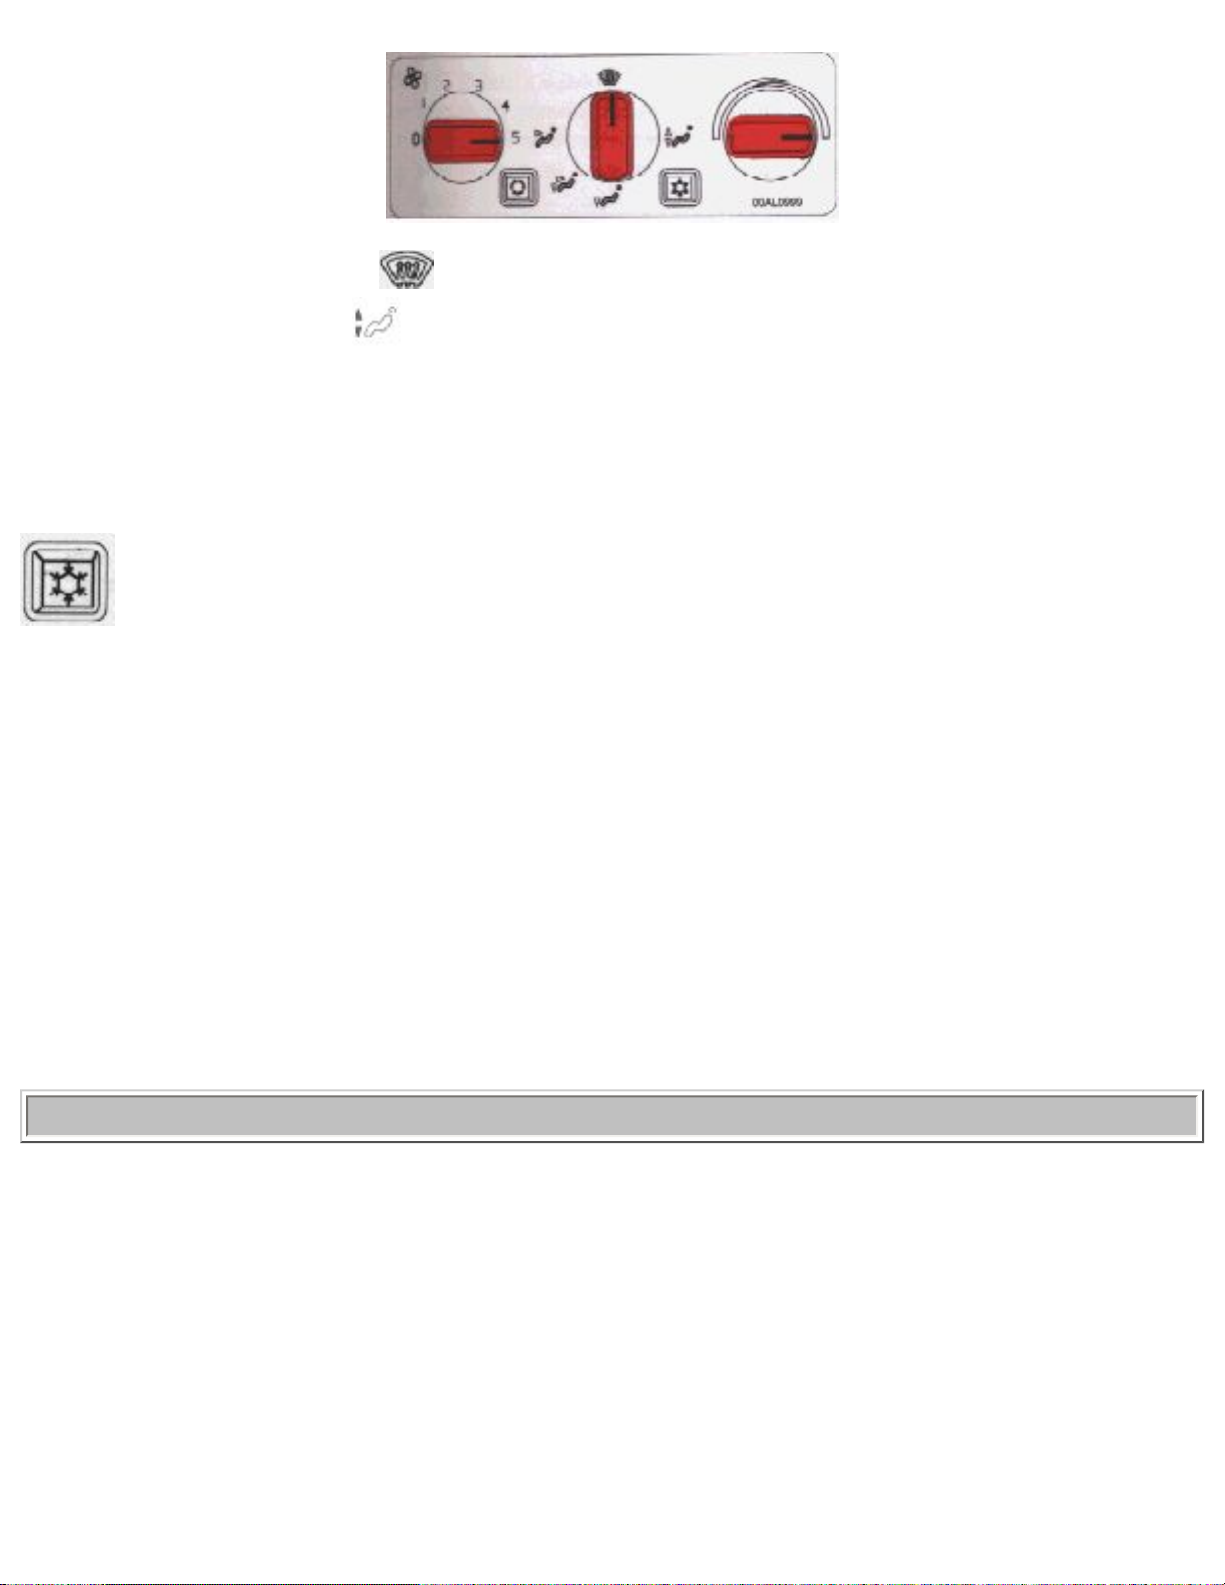
The air conditioning system is OFF when this button is depressed .
The light is on when the button is depressed and the headlights or parking brake are on * .
file:///K|/ownersdocs/1993/1993_940/93940_1_11.html (2 of 8)12/30/2006 9:44:18 AM

1993 Volvo 940
* When the function selector is in the mode, the air conditioning system is ON regardless of button
position.
Function selector
Air through panel vents
Defrost. Air to windshield and side windows.
Air to floor, windshield and side windows.
Air through floor vents.
● Bi-level. Air through floor and panel vents.
pg. 1:13 Heating and air conditioning (cont.)
Maximum heating:
Close the center panel vents. When the passenger compartment has become sufficiently warm, set the
blower control to position 2 and adjust the temperature.
Maximum cooling:
Open the vents. The A/C button should not be depressed. Adjust the temperature with the temperature
dial.
To demist / Defrost the windows
file:///K|/ownersdocs/1993/1993_940/93940_1_11.html (3 of 8)12/30/2006 9:44:18 AM
1993 Volvo 940
Set the function dial to position
. When the windows have cleared set the blower control to position
2 and the function selector to
. Always keep the air intake grille at the base of the windshield free
of snow.
Operating tips
The air conditioning system functions only at temperatures above 45°F (7°C).
The air conditioning will only function if the blower is set to position 1 or higher.
Choose this position if the outside air is contaminated with exhaust gases, smoke, etc or to heat/
cool the car quickly. In this position, very little air is drawn into the passenger compartment from the
outside. Do not leave the system in this mode for more than 10-15 minutes since the air inside the car
will become stale. The temperature can be controlled with the temperature dial.
Remember: If the panel vents are open, a certain amount of air will always flow through, regardless of
the position the function dial is in. To increase the flow of air to either the floor or the windows, close
the panel vents. The outer vents can be opened to avoid mist on the side windows.
The air conditioning system will function best if it is used regularly.
Water under the vehicle in hot weather can be the result of condensation from the air conditioning
system.
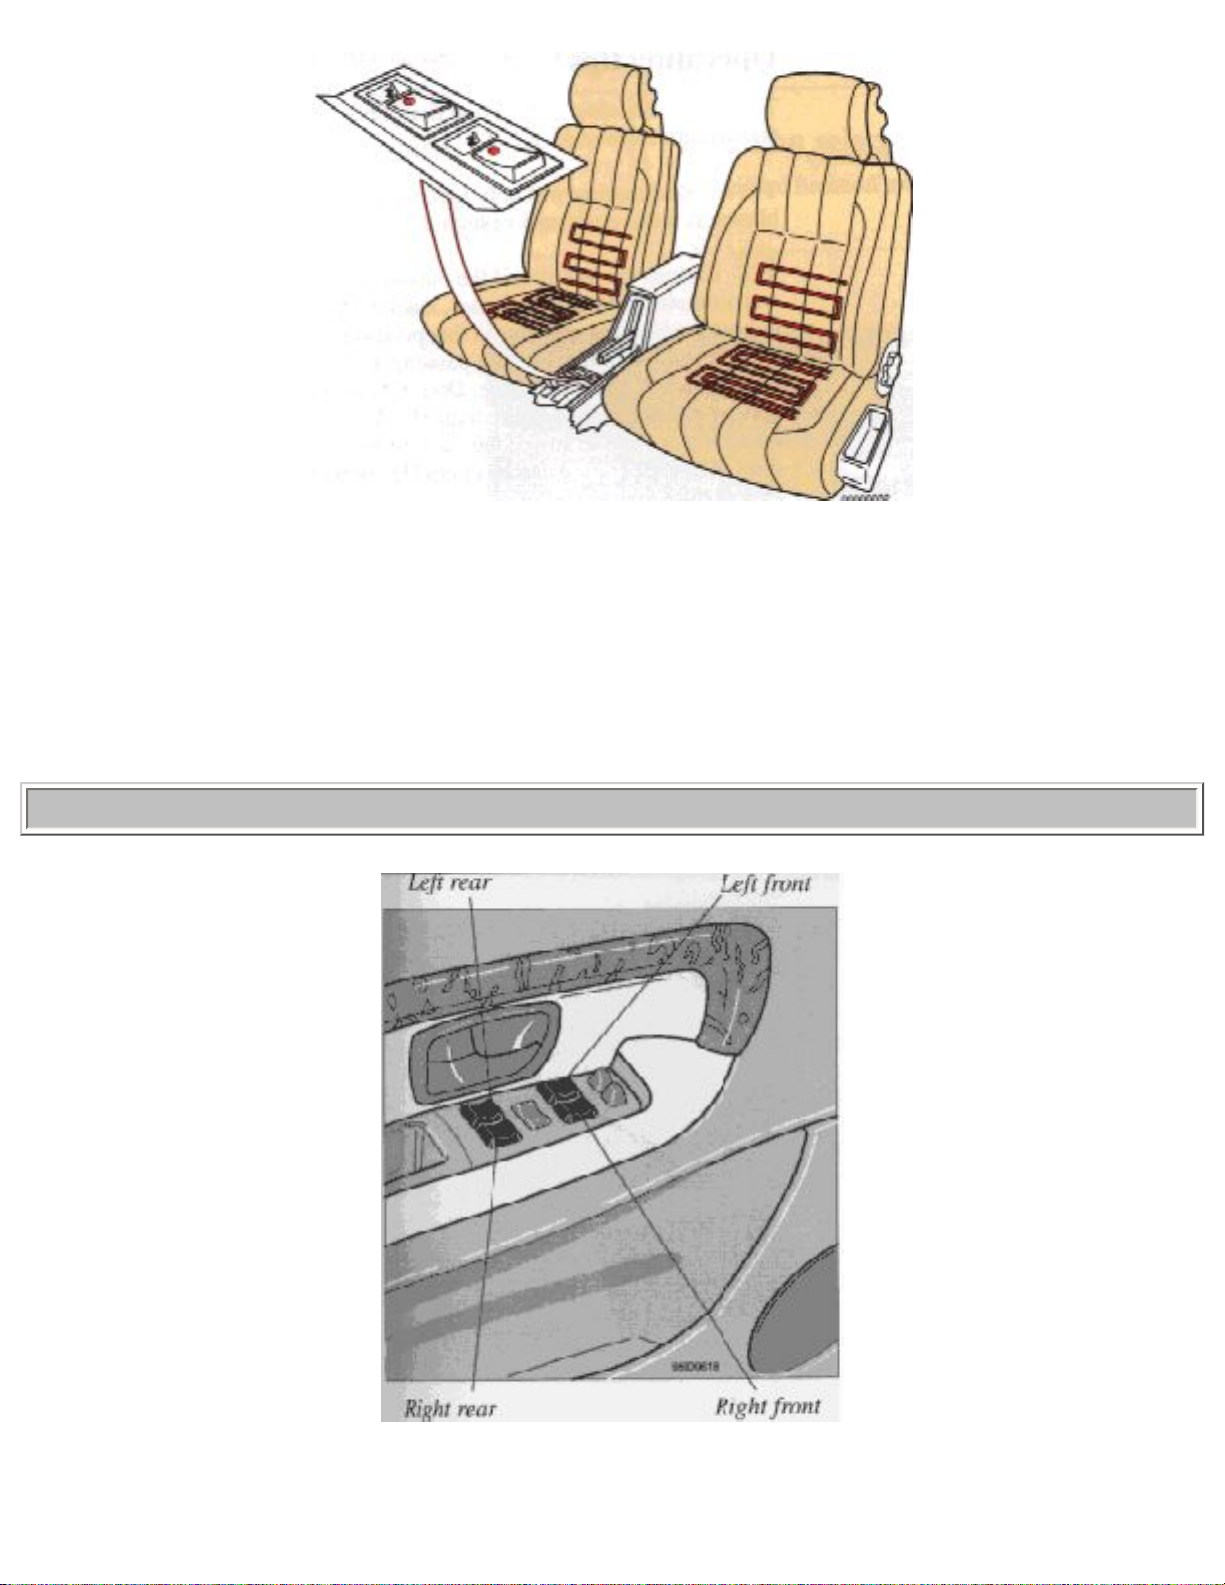
pg. 1:14 Heated front seats
file:///K|/ownersdocs/1993/1993_940/93940_1_11.html (4 of 8)12/30/2006 9:44:18 AM
1993 Volvo 940
Heated front seats
The front seats are equipped with electrically-heated backrests and seat cushions. Switched on and off as
required. When switched on, the seats are automatically heated and when the optimum temperature is
reached, the heating automatically switches off .
While driving, the passenger seat heating should be switched off when the seat is not occupied.
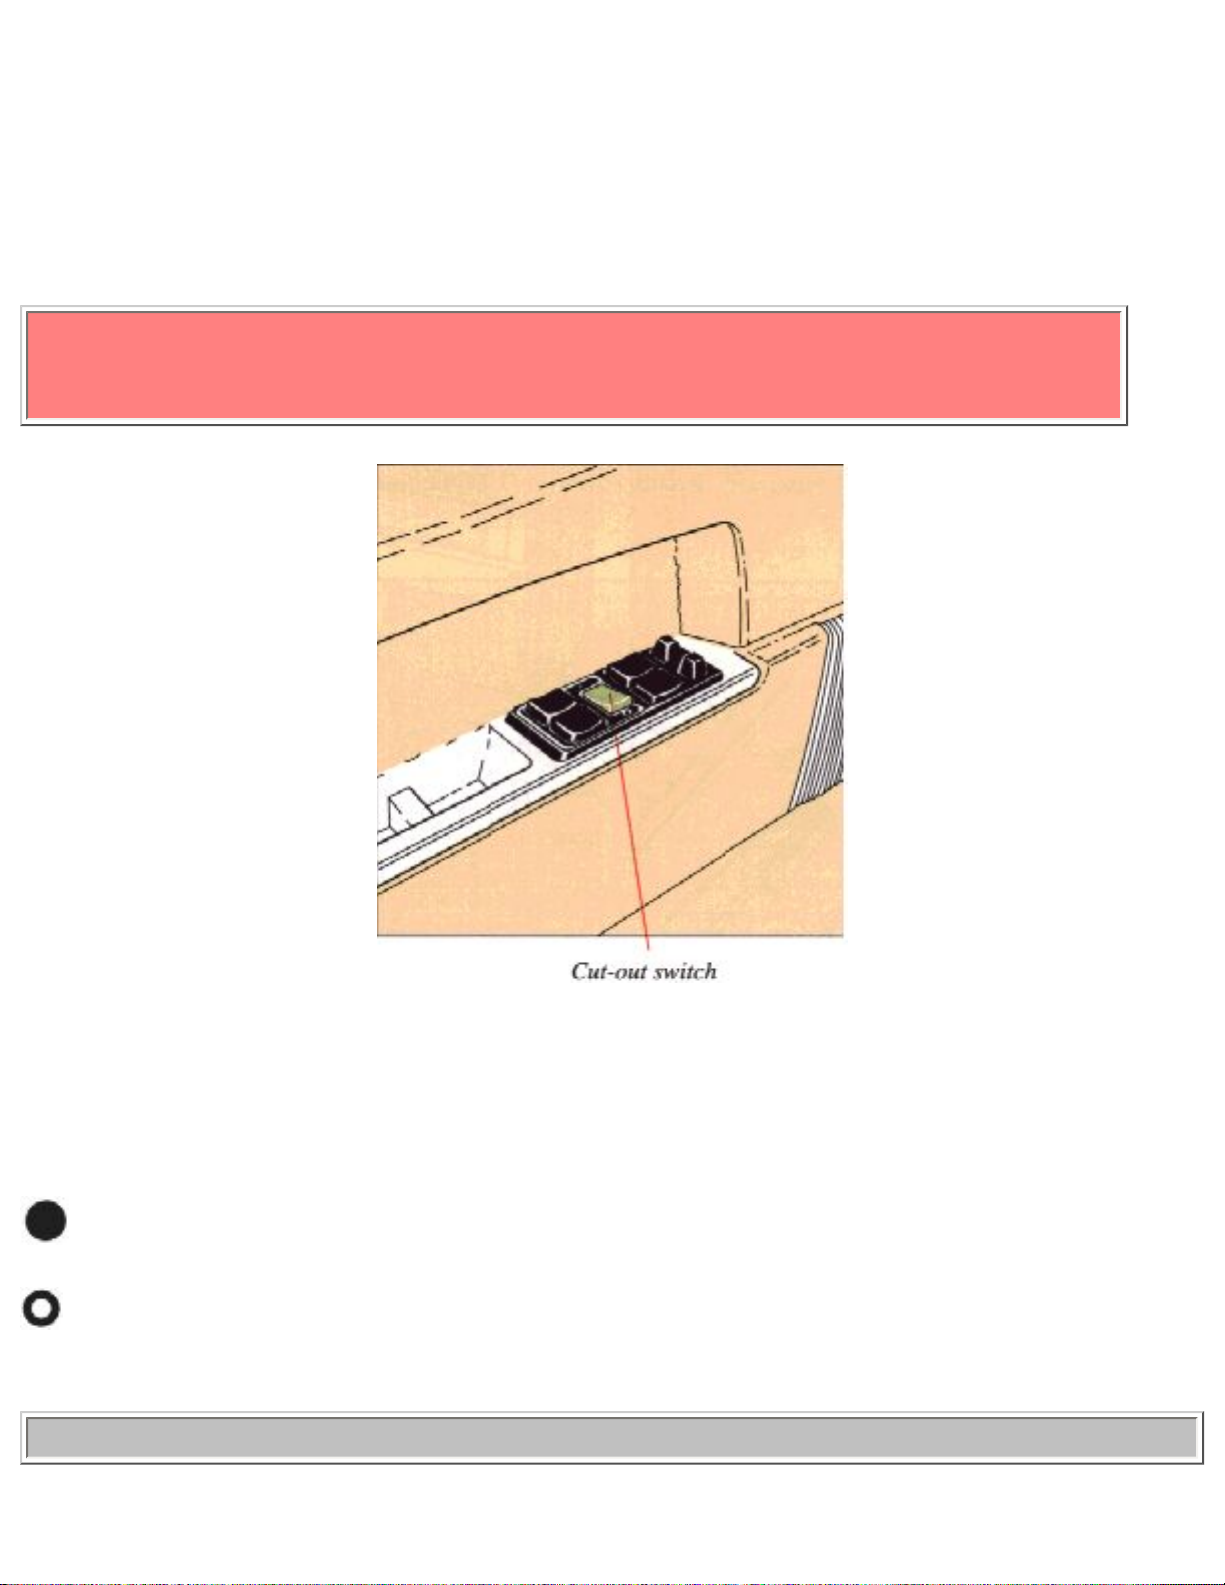
pg. 1:15 Electrically operated windows
Electrically-operated windows
file:///K|/ownersdocs/1993/1993_940/93940_1_11.html (5 of 8)12/30/2006 9:44:18 AM
1993 Volvo 940
The electrically operated windows are controlled by switches from the driver's armrest as shown in the
above illustration.
The starting (ignition) switches must be ON (position II) for the electrically operated windows to
function. The window is lowered if the rear part of the switch is pressed and raised if the front part of the
switch is pressed.
WARNING! Remove the starting (ignition) key when children are left unattended in the
vehicle.
Make sure that children's hands are clear before raising the windows.
Cut-out switch for electrically-operated rear-door windows
If the car is equipped with rear door windows, this function can be disabled by a switch located on the
driver's door armrest. This switch is positioned 90° in relation to the other switches.
The rear door windows can be raised or lowered with the respective door switch as well as the
switch on the driver's door.
The rear door windows cannot be raised or lowered with the respective door switch but instead only
with the corresponding switch on the driver's door.
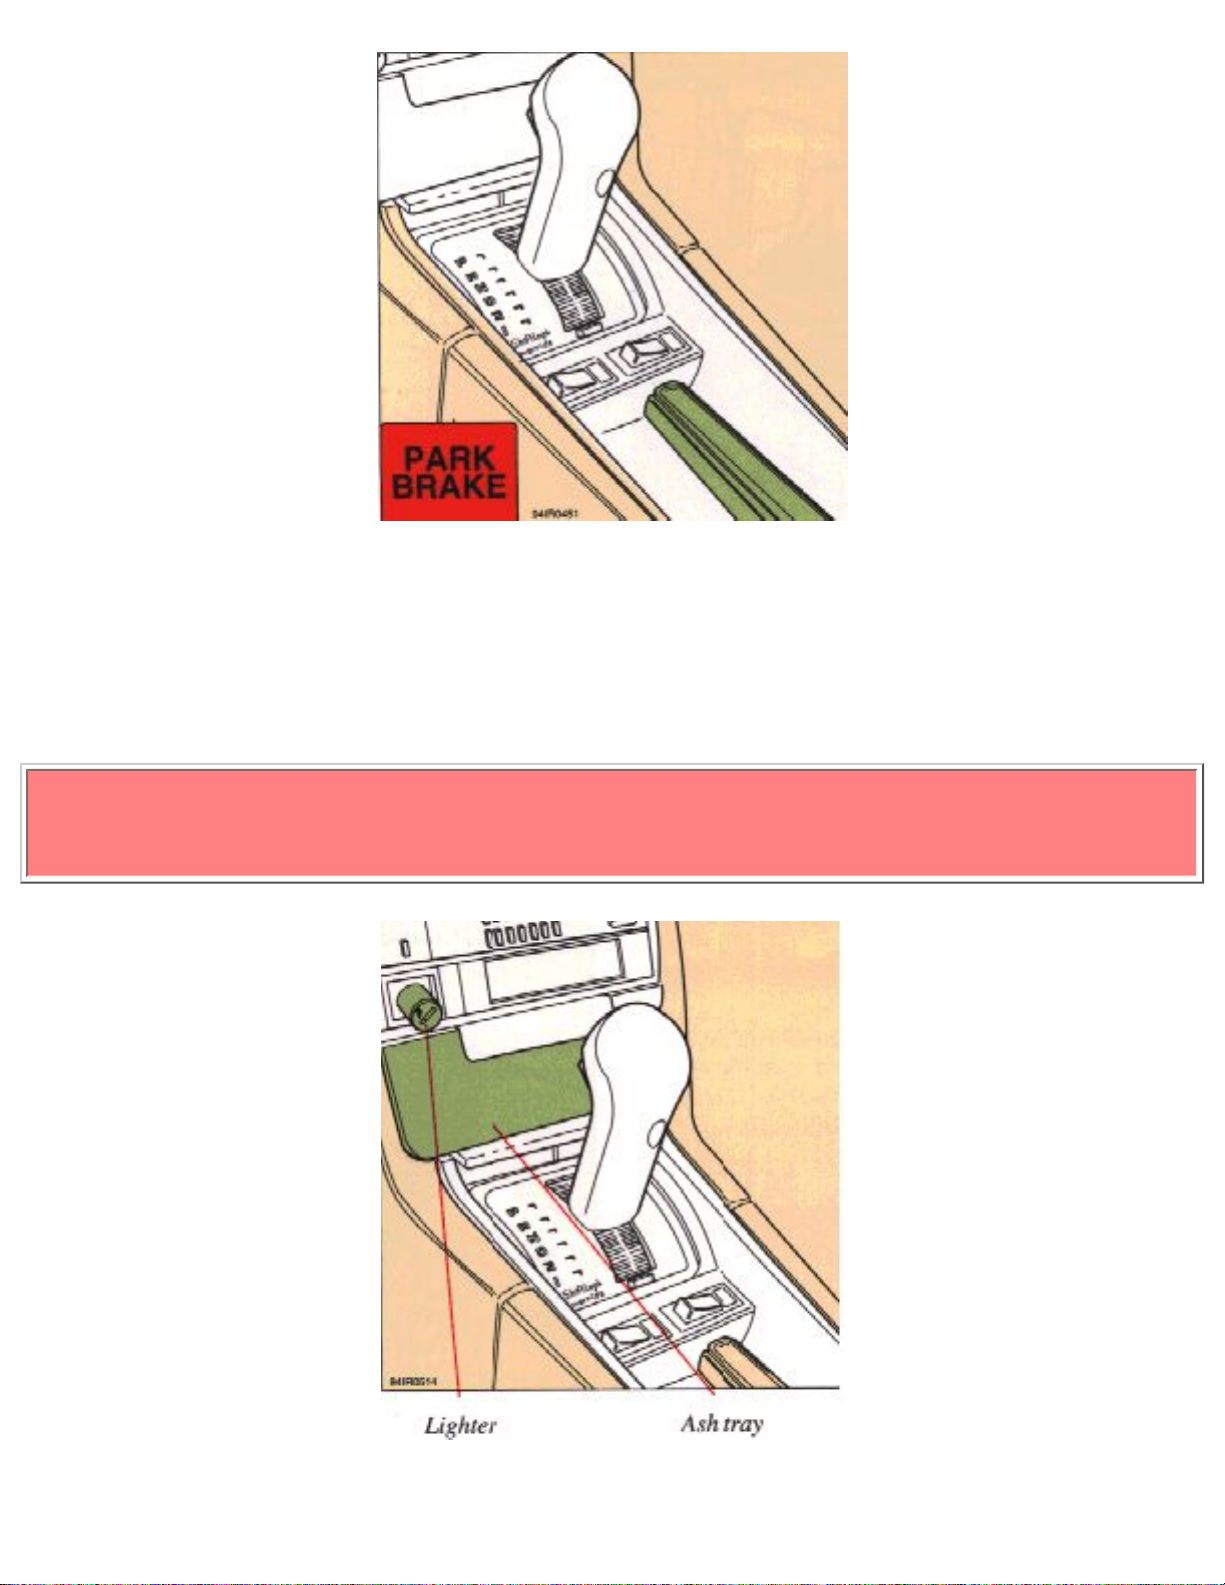
pg. 1:16 Parking brake, Cigarette lighter, Ash trays
file:///K|/ownersdocs/1993/1993_940/93940_1_11.html (6 of 8)12/30/2006 9:44:18 AM
1993 Volvo 940
Parking brake (hand brake)
The lever is situated between the front seats. The brake is applied to the rear wheels. In order to obtain
the best possible performance of the parking brake, see section titled "Brake System".
WARNING!
Always use the parking brake (hand brake) when parking. On hills, also turn the front wheels toward
the curb.
Cigarette lighter
file:///K|/ownersdocs/1993/1993_940/93940_1_11.html (7 of 8)12/30/2006 9:44:18 AM
1993 Volvo 940
To operate, depress the knob fully. When the knob automatically releases, the cigarette lighter is ready
for use.
The starting (ignition) switch must be switched on (position I or II) for the cigarette lighter to function.
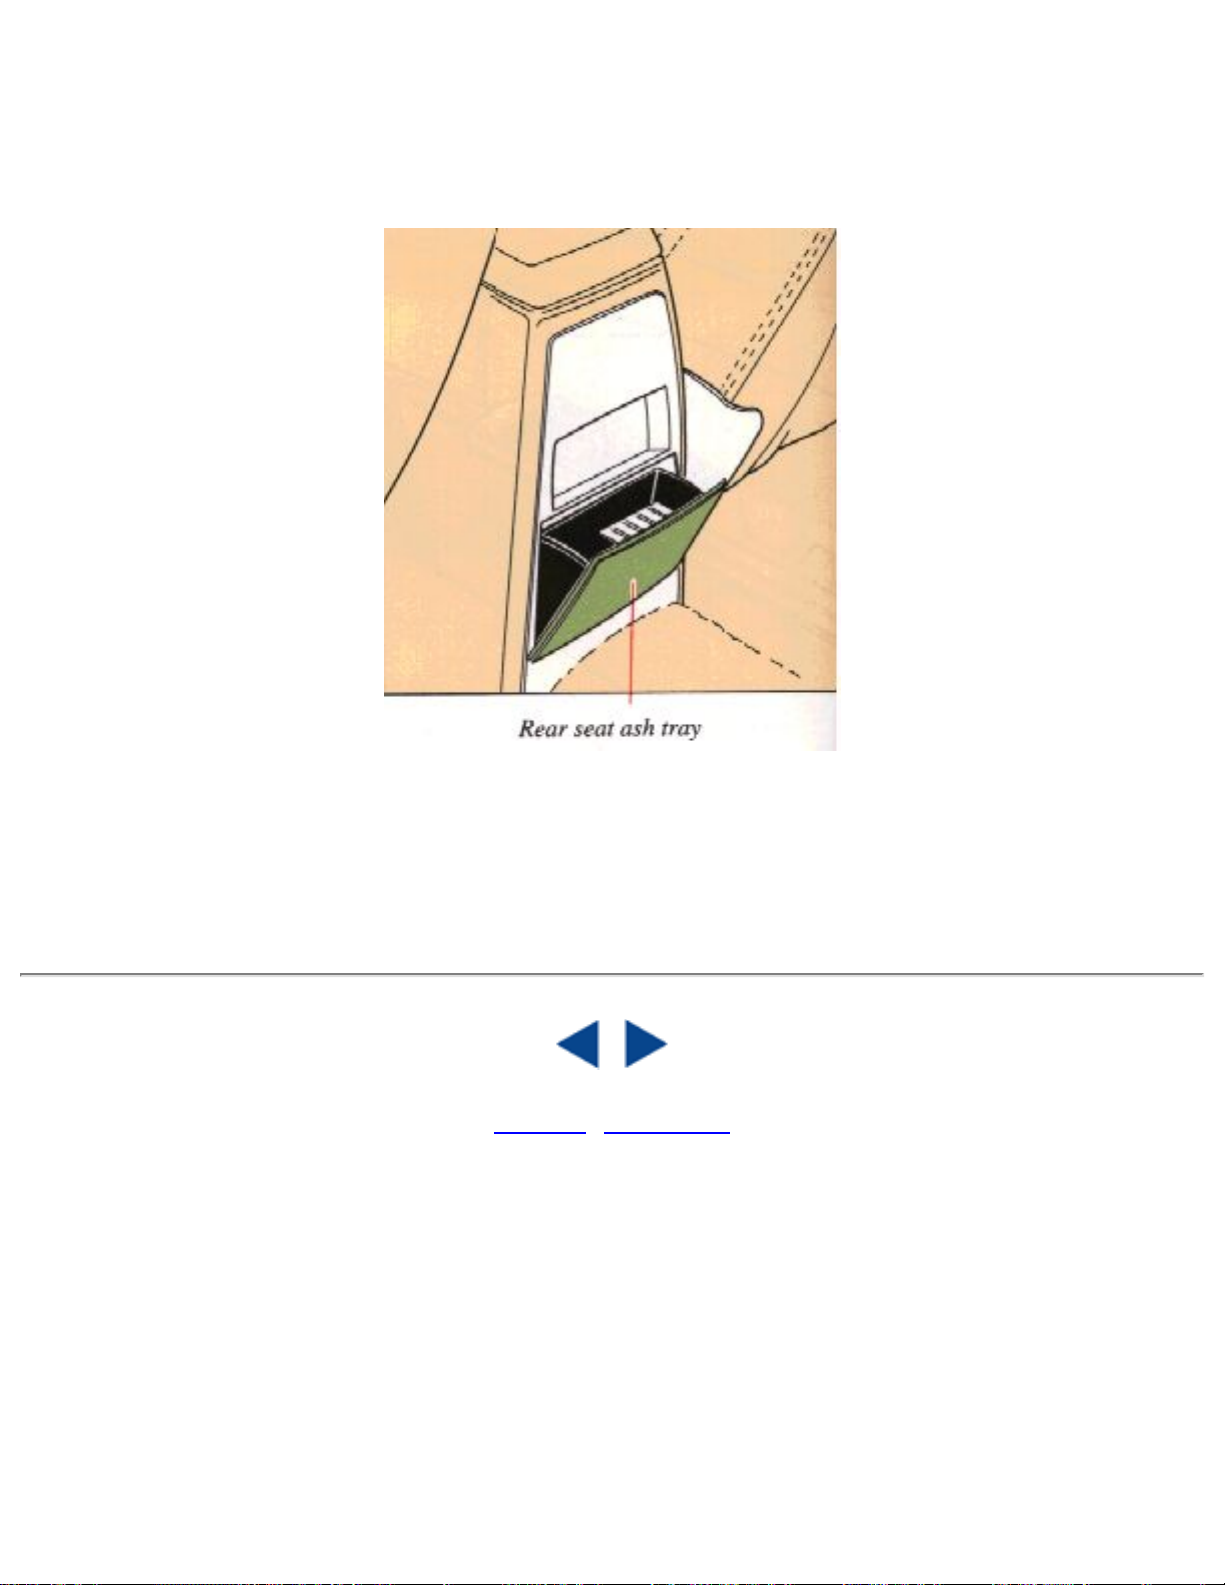
Ash trays
To remove the ash trays depress the center spring and remove.
Contents | Top of Page
file:///K|/ownersdocs/1993/1993_940/93940_1_11.html (8 of 8)12/30/2006 9:44:18 AM

1993 Volvo 940
pg. 1:17 Audio system CR-915, general description
The following 21 pages describe the use of your CR-814 cassette radio and CD remote control. See page
1:44 for specifications. See page 1:33 for information on the CR-718 cassette radio.
1.
● ON/OFF
● Volume
● Balance left-right (push)
2. Loudness selector
3. Bass control
4. Treble control
5. Fader front/rear
6. Waveband selector
7.
● Frequency tuning
● Pause/Mute (press)
● CD - Track no. selector
8. Scanning
9.
● Autostore
● CD - Random play
10.
● Prest buttons
● CD - Disk no. selector
11. Display
12. DNR selector
13.
● CD mode selector
● Anti-theft indicator
file:///K|/ownersdocs/1993/1993_940/93940_1_17.html (1 of 12)12/30/2006 9:44:19 AM
1993 Volvo 940
14. Cassette slot
15. Tape direction (REV)
16.
● Lockable fast winding (ff-rev)
("Seek" function in radio mode)
● CD - Disk no. selector (ff=up)
● CD - Disk no. selector (rew=down)
17. DOLBY B selector
18.
● Next selector
● CD - Track no. selector (up)
19. Tuner recall
20. Cassette eject
CD =applicable only when set is in
CD mode and connected to a CD changer
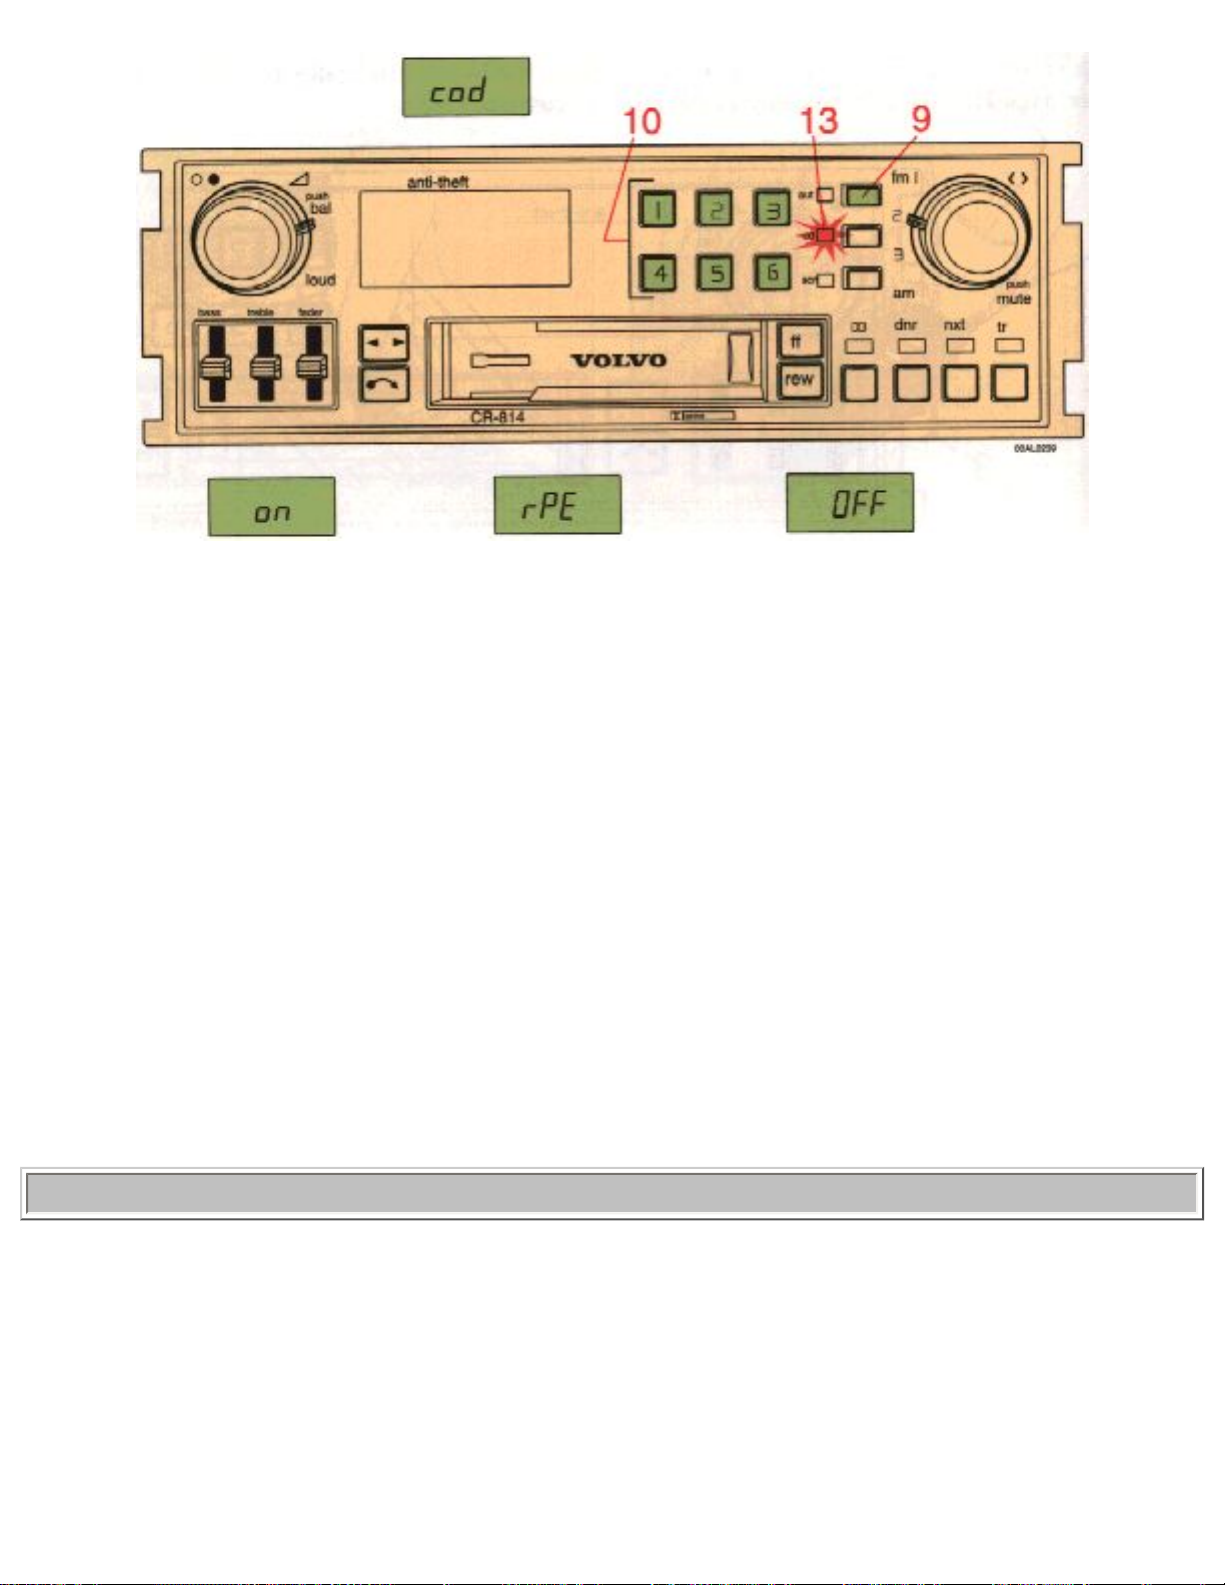
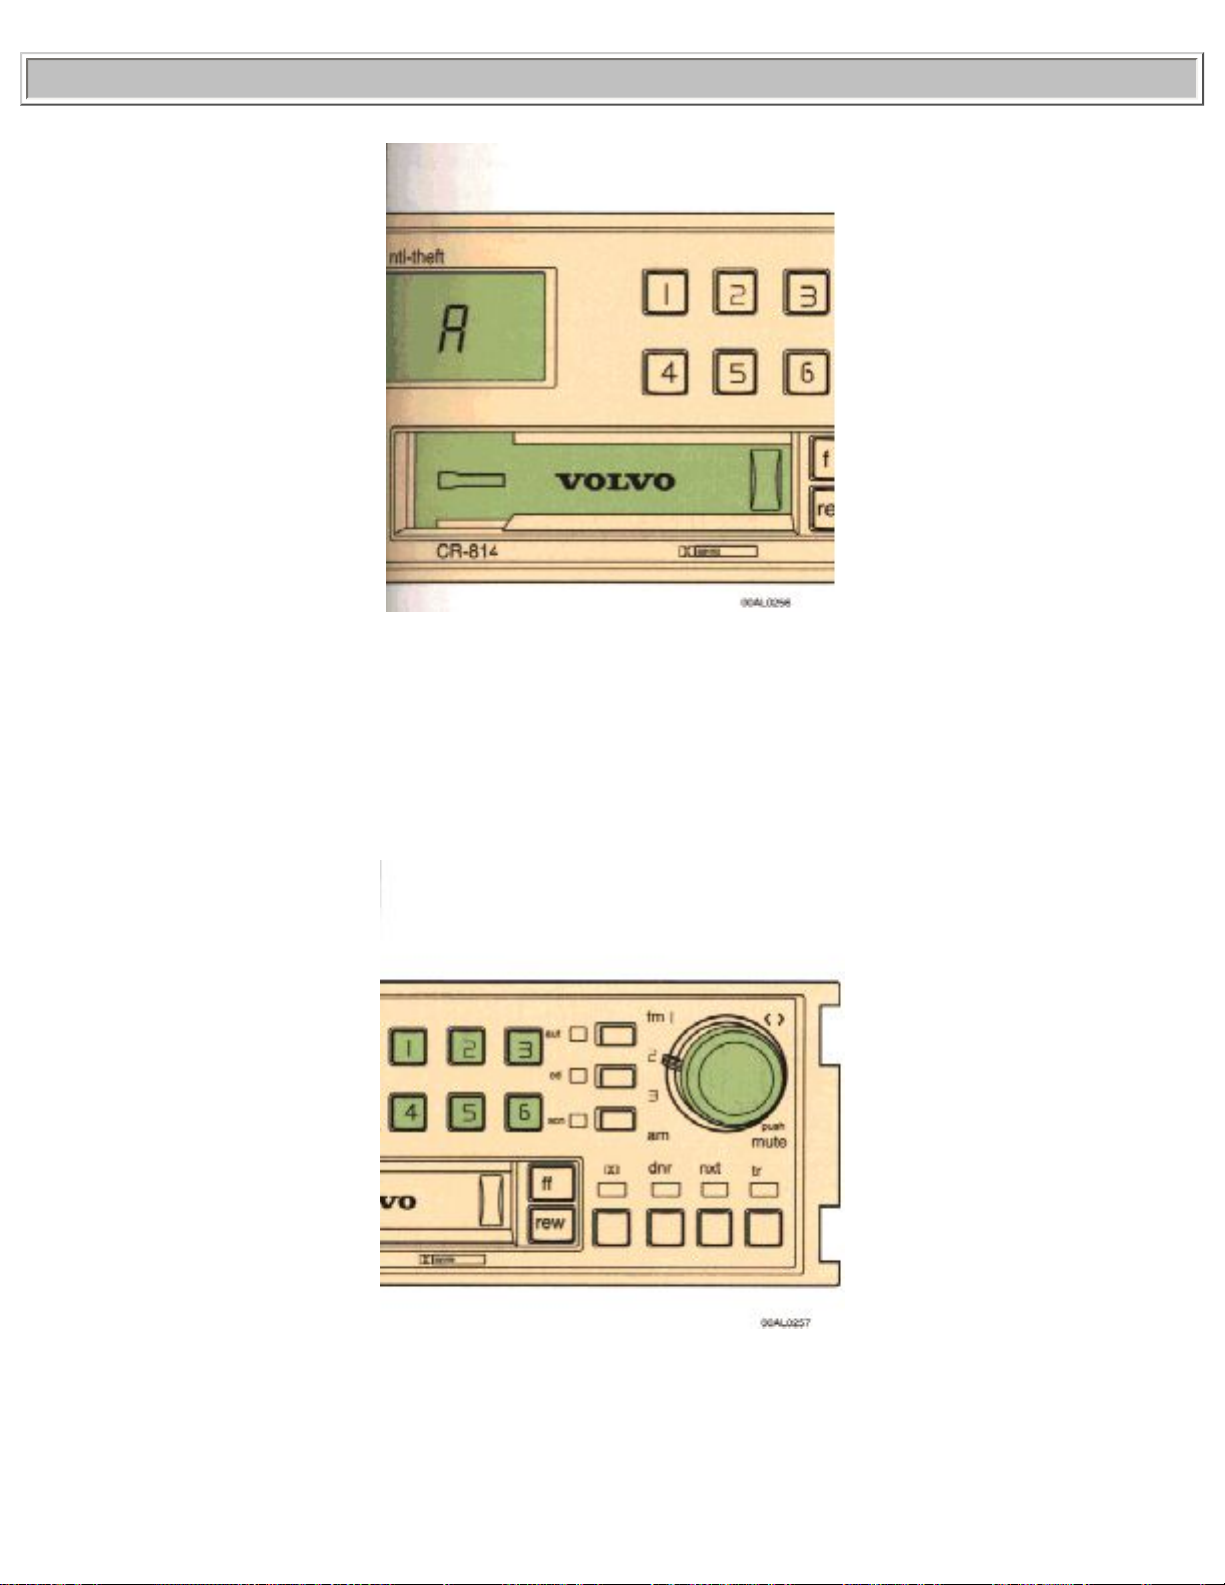
pg. 1:18 Anti-theft code
The radio features anti-theft circuitry. While the unit is powered but the ignition is OFF (key removed),
the "CD" indicator lamp (13) flashes to indicate the anti-theft system. If the set is removed from the
vehicle or if the battery power is disconnected, a special code must be entered to enable operation of the
set.
Refer to the radio code card supplied with your vehicle or ask your dealer for the correct code or askyour
dealer for the correct code .
file:///K|/ownersdocs/1993/1993_940/93940_1_17.html (2 of 12)12/30/2006 9:44:19 AM
1993 Volvo 940
To enter the code
When the set has been disconnected from power the set displays "cod" after being switched on. the "cd"
indicator lamp (13) flashes. Enter the 6-digit code using the preset buttons (10). Please note that only 4
digits will be seen in the display. Press the "aut" button (9). Do not press "aut" until you have entered the
correct code. If the correct code is entered "on" is displayed and the set is now ready for use. If you enter
an incorrect code you must enter the correct code from the beginning again.
Incorrect code
If an incorrect code is entered "rpE" is displayed. Enter the correct code.
Once you have attempted to enter an incorrect code three times the set will lock and remains locked for
1 hour.
"OFF" is displayed.
The unit must be connected and turned on during this time.
Enter the code again once this time has elapsed.
pg. 1:19 Radio
file:///K|/ownersdocs/1993/1993_940/93940_1_17.html (3 of 12)12/30/2006 9:44:19 AM

1993 Volvo 940
On/off switch and volume control
Turn the button clockwise to switch on and to increase the volume.
Waveband selector
The desired waveband is set by turning the inner knob. The set waveband and frequency is displayed.
NOTE! There are three FM positions and one AM position which make it possible to store 3 x 6 FM
stations and 6 AM stations.
file:///K|/ownersdocs/1993/1993_940/93940_1_17.html (4 of 12)12/30/2006 9:44:19 AM
1993 Volvo 940
Manual tuning
Turn the outer knob counter-clockwise to tune to lower frequencies and clockwise to tune to higher
frequencies. The tuned frequency is displayed.
pg. 1:20 Radio
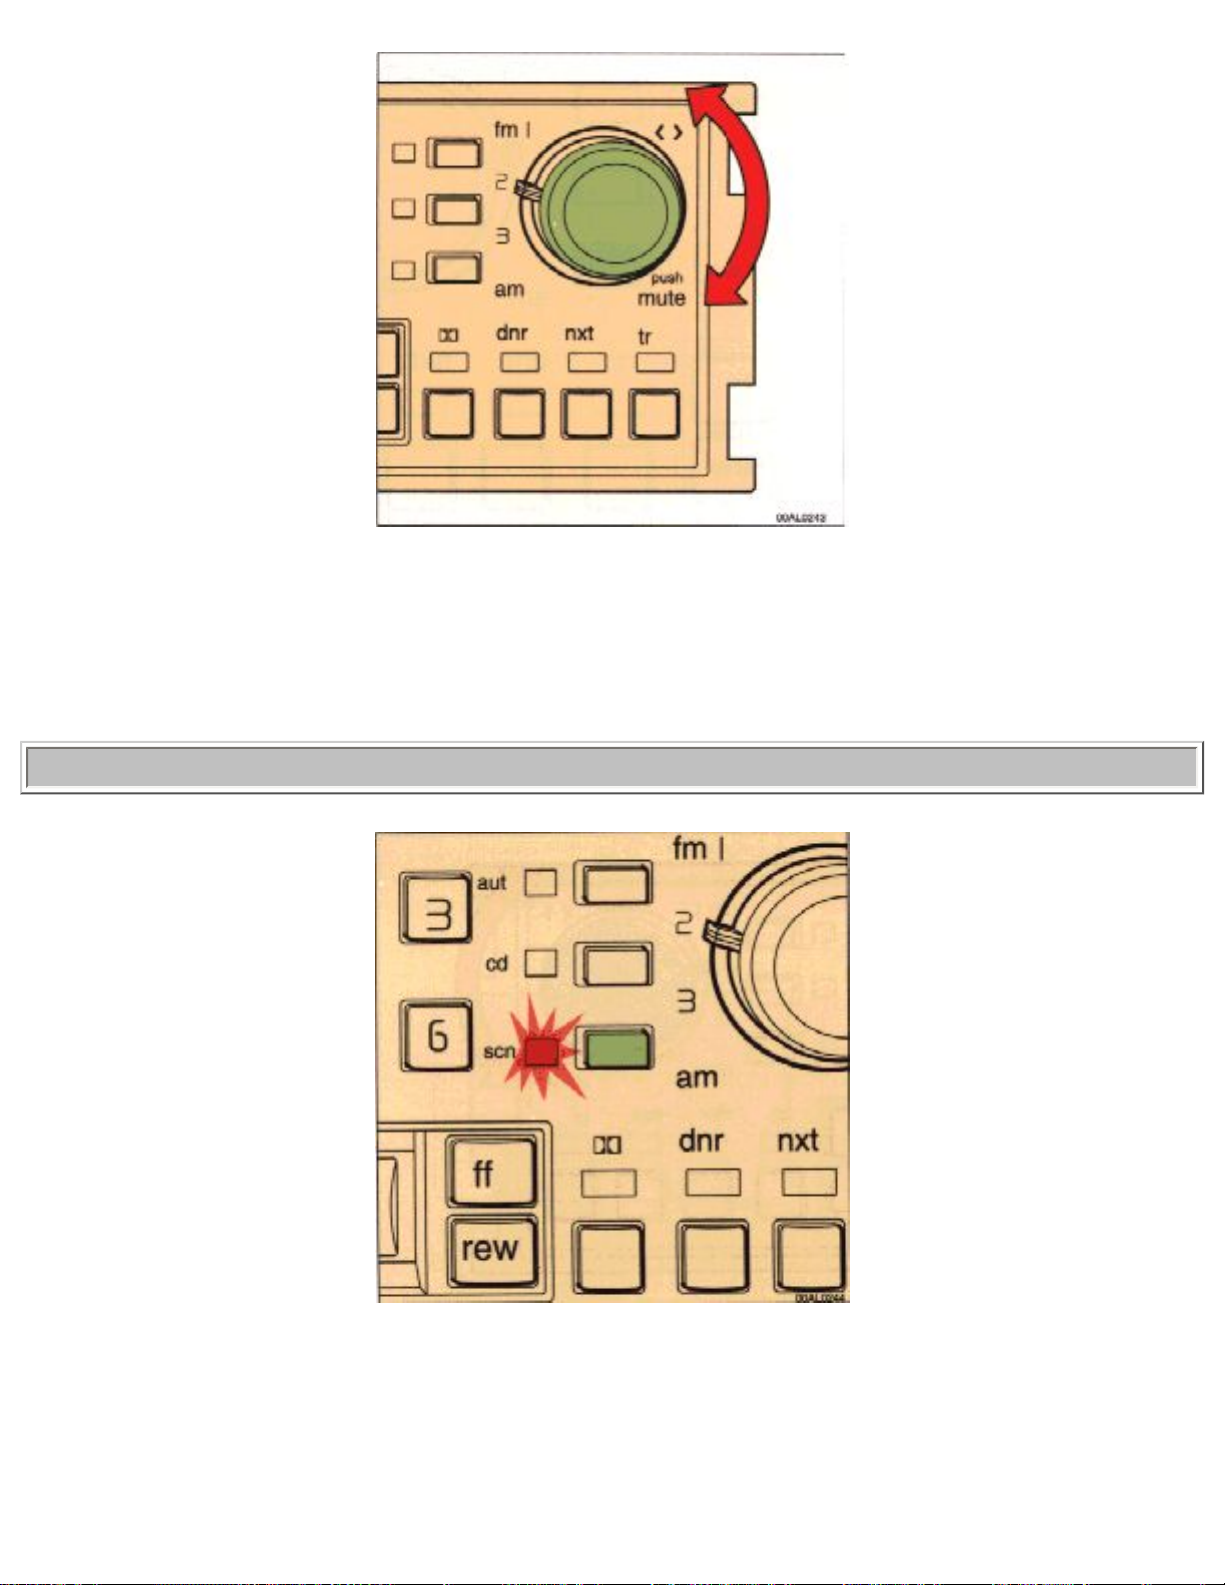
Scan tuning
Depress the "scn" button. The radio scans the entire waveband and stops at every audible station for 8
seconds. Scanning is then resumed. If you want to retain the station press the "scn" button a second time
within the 8 seconds.
file:///K|/ownersdocs/1993/1993_940/93940_1_17.html (5 of 12)12/30/2006 9:44:19 AM
1993 Volvo 940
Seek tuning
Depress the "ff" button to seek for higher frequencies and "rew" to seek for lower frequencies. The radio
seeks the next audible station and stops there. If you wish to continue the seek tuning press the "ff" or
"rew" button once more.
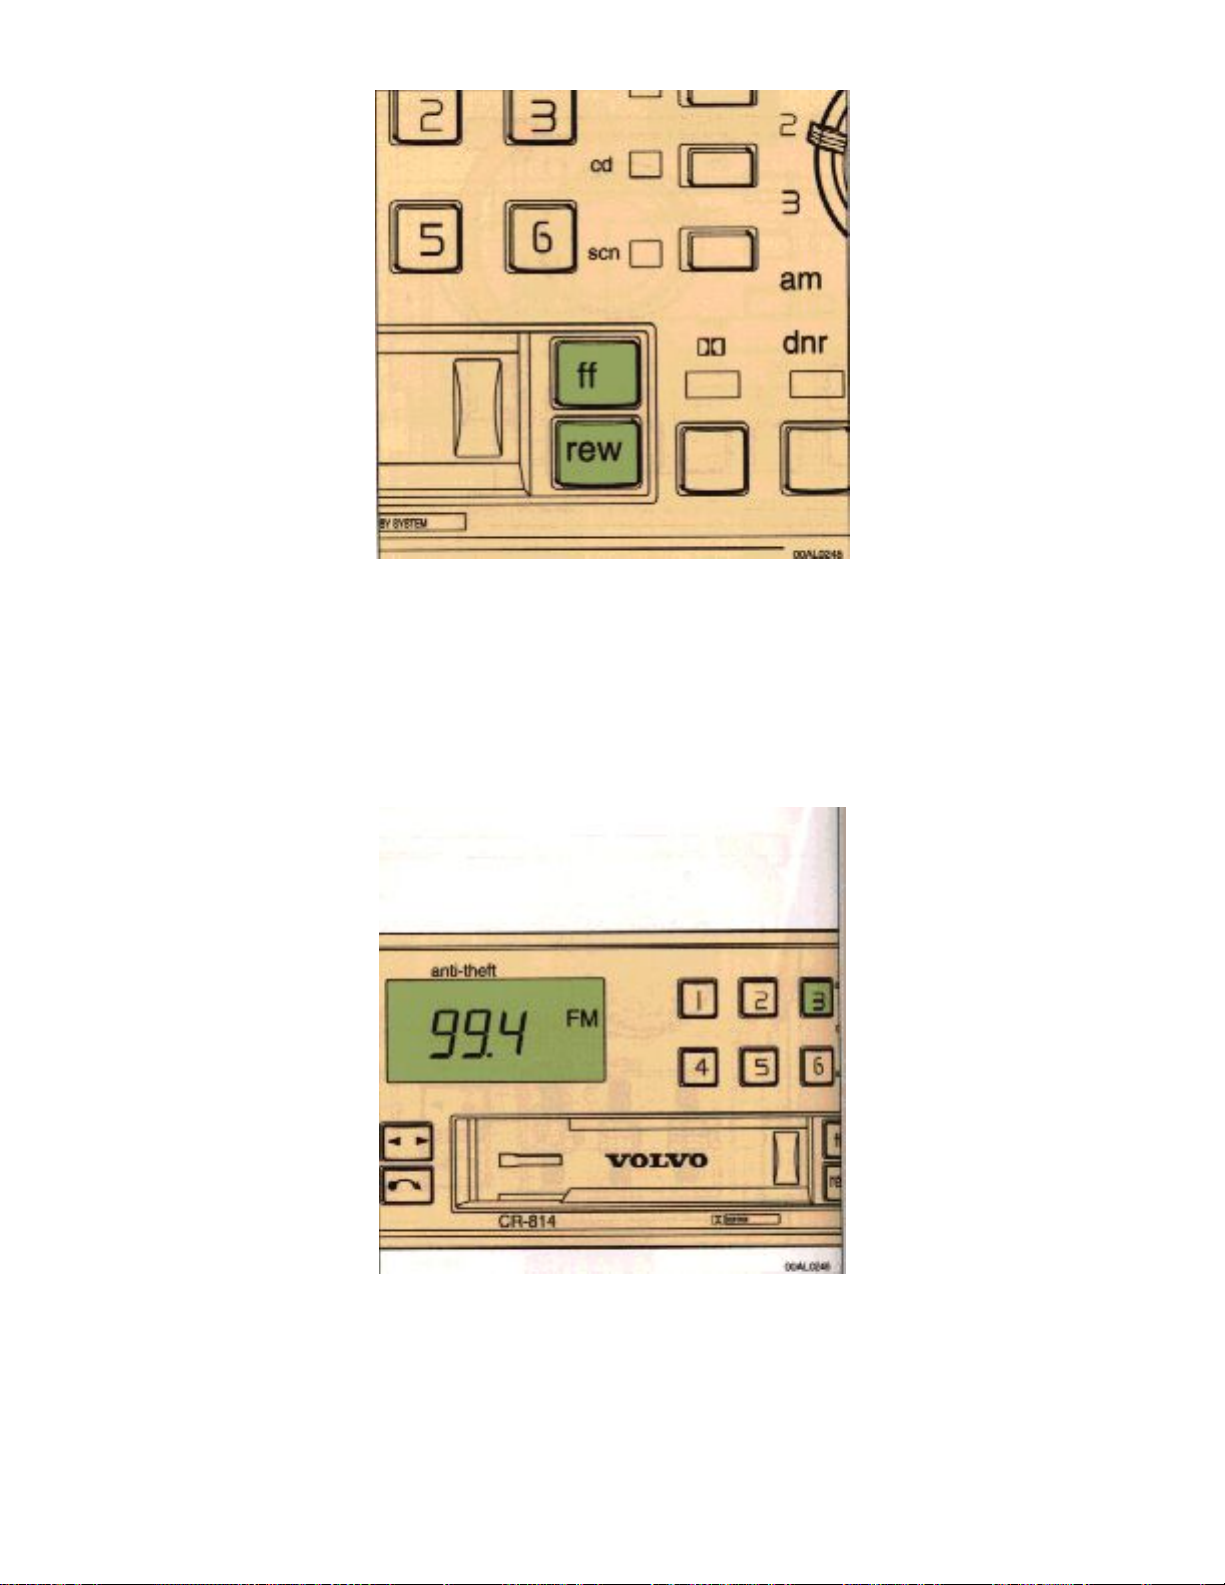
Preset programming
1. Tune to the desired frequency.
2. Depress and hold a preset button. The audio will cut out. Keep the button depressed until the audio
comes on again (approx 2 seconds).
3. The frequency is now stored on this preset button.
file:///K|/ownersdocs/1993/1993_940/93940_1_17.html (6 of 12)12/30/2006 9:44:19 AM
1993 Volvo 940
pg. 1:21 Radio (cont.)
Preset buttons
Depress the preset button to tune in to the programmed frequency. The set frequency is displayed.
Automatic programming
(Autostore )
(Automatically seeks and stores up to 6 strong AM or FM stations)
file:///K|/ownersdocs/1993/1993_940/93940_1_17.html (7 of 12)12/30/2006 9:44:19 AM

1993 Volvo 940
This feature works on both wavebands, but if you change waveband and use the autostore function on
this new waveband, the autostored stations on the previous waveband will be cancelled. The antenna
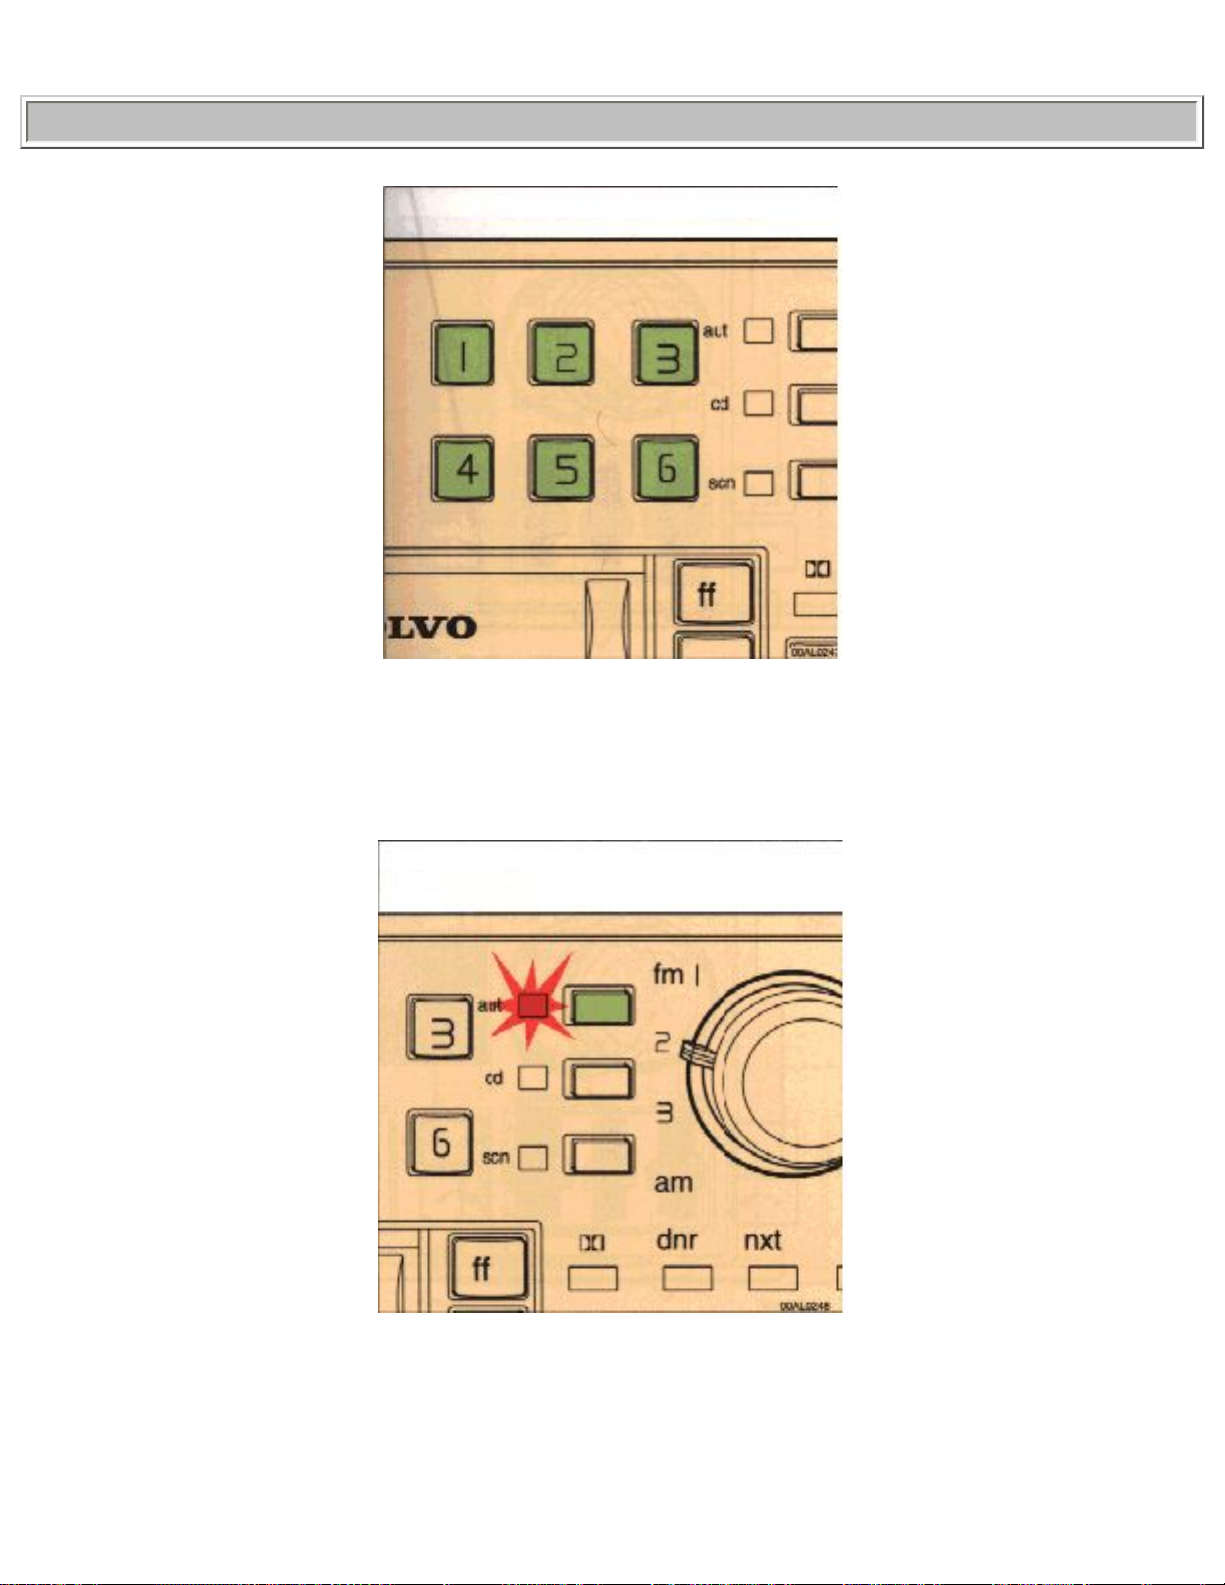
must be fully extended when using this function.
1. Depress and hold the "aut"button for at least 1 second. The indicator lamp is lit. A number of strong
stations (maximum six) on the chosen waveband are now automatically stored in the memory. The
lowest frequency is heard. If there are no audible stations, "no" is displayed.
2. Press the "aut" button to obtain another autostored station. A new station will be selected each time
the "aut" button is pressed.
pg. 1:22 Radio (cont.)
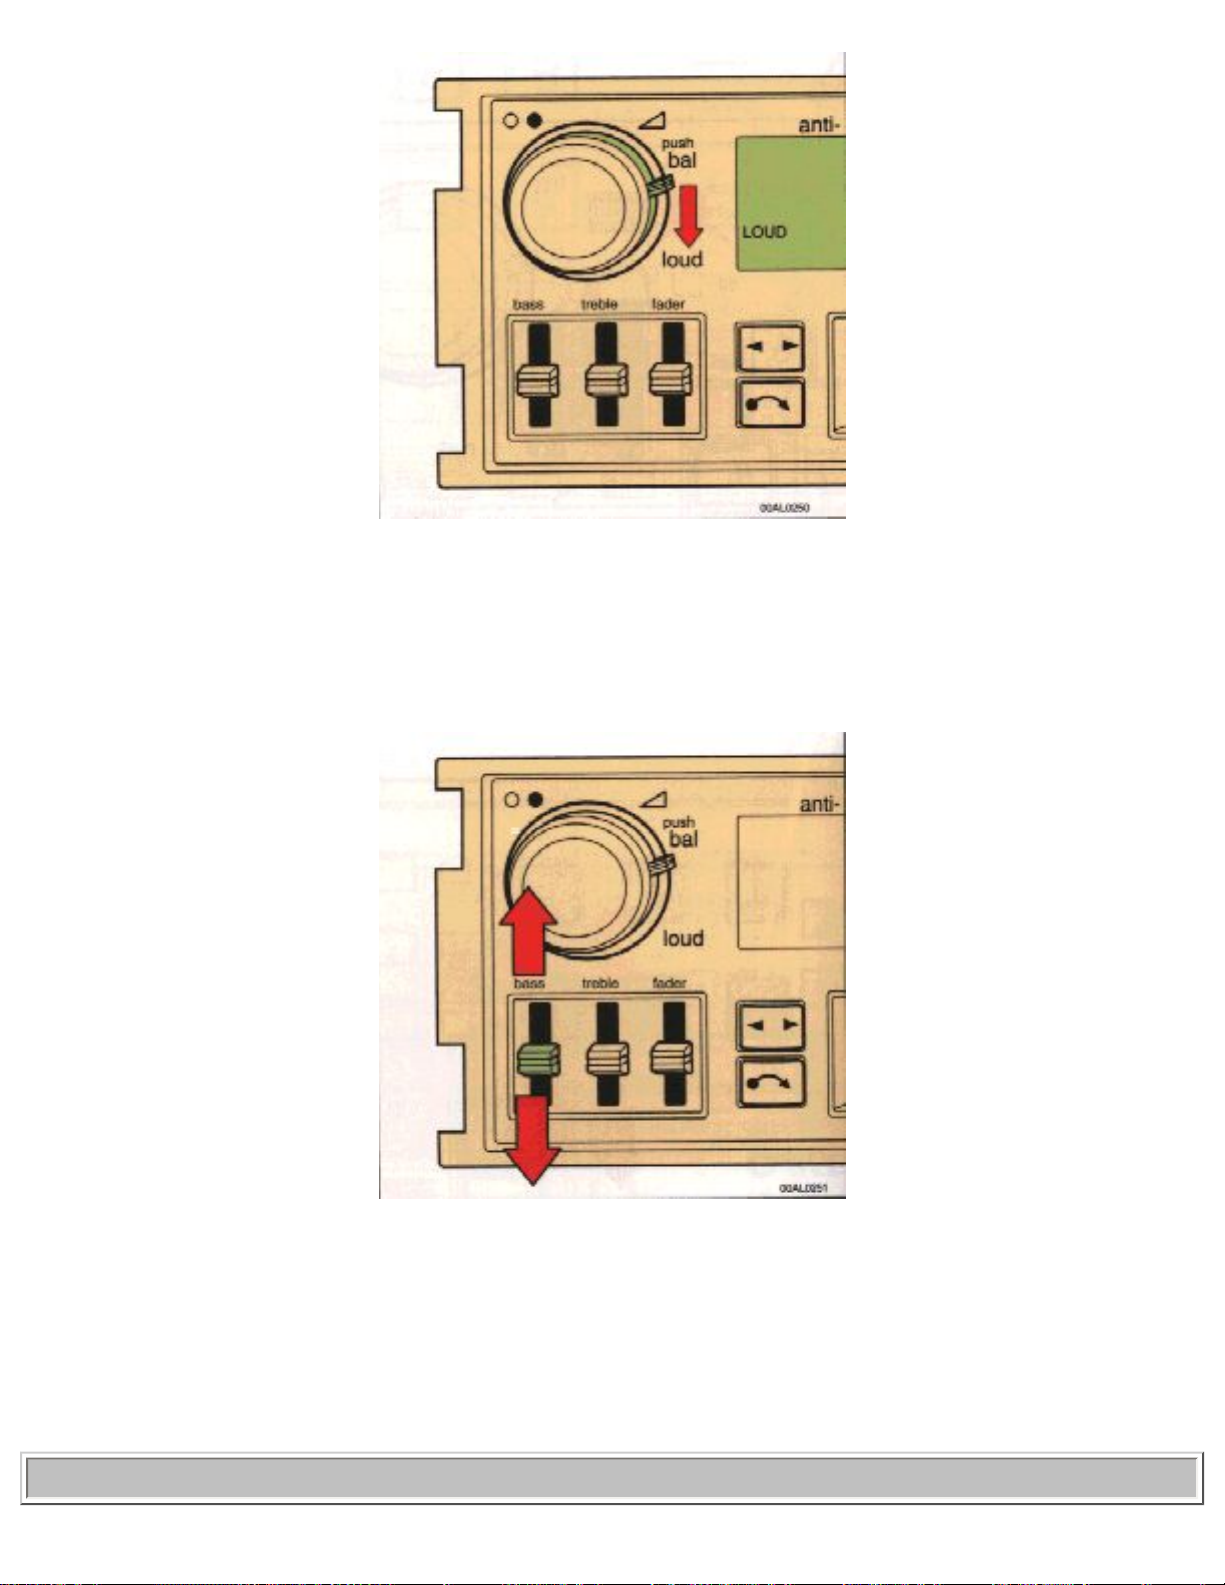
Balance control
Depress the control knob and turn clockwise/counter-clockwise to adjust right/left speaker balance. A
"detent" indicates the "equalized" left/right balance position.
file:///K|/ownersdocs/1993/1993_940/93940_1_17.html (8 of 12)12/30/2006 9:44:19 AM
1993 Volvo 940
LOUDNESS selector
When "Loudness" is engaged, bass and treble are enhanced at low volumes.
"LOUD" is displayed when this function is engaged.
Bass control
Adjust the bass by sliding the control up or down.
(Up to increase, down to decrease. The "detent" indicates "equalized" bass.)
pg. 1:23 Radio (cont.)
file:///K|/ownersdocs/1993/1993_940/93940_1_17.html (9 of 12)12/30/2006 9:44:19 AM
1993 Volvo 940
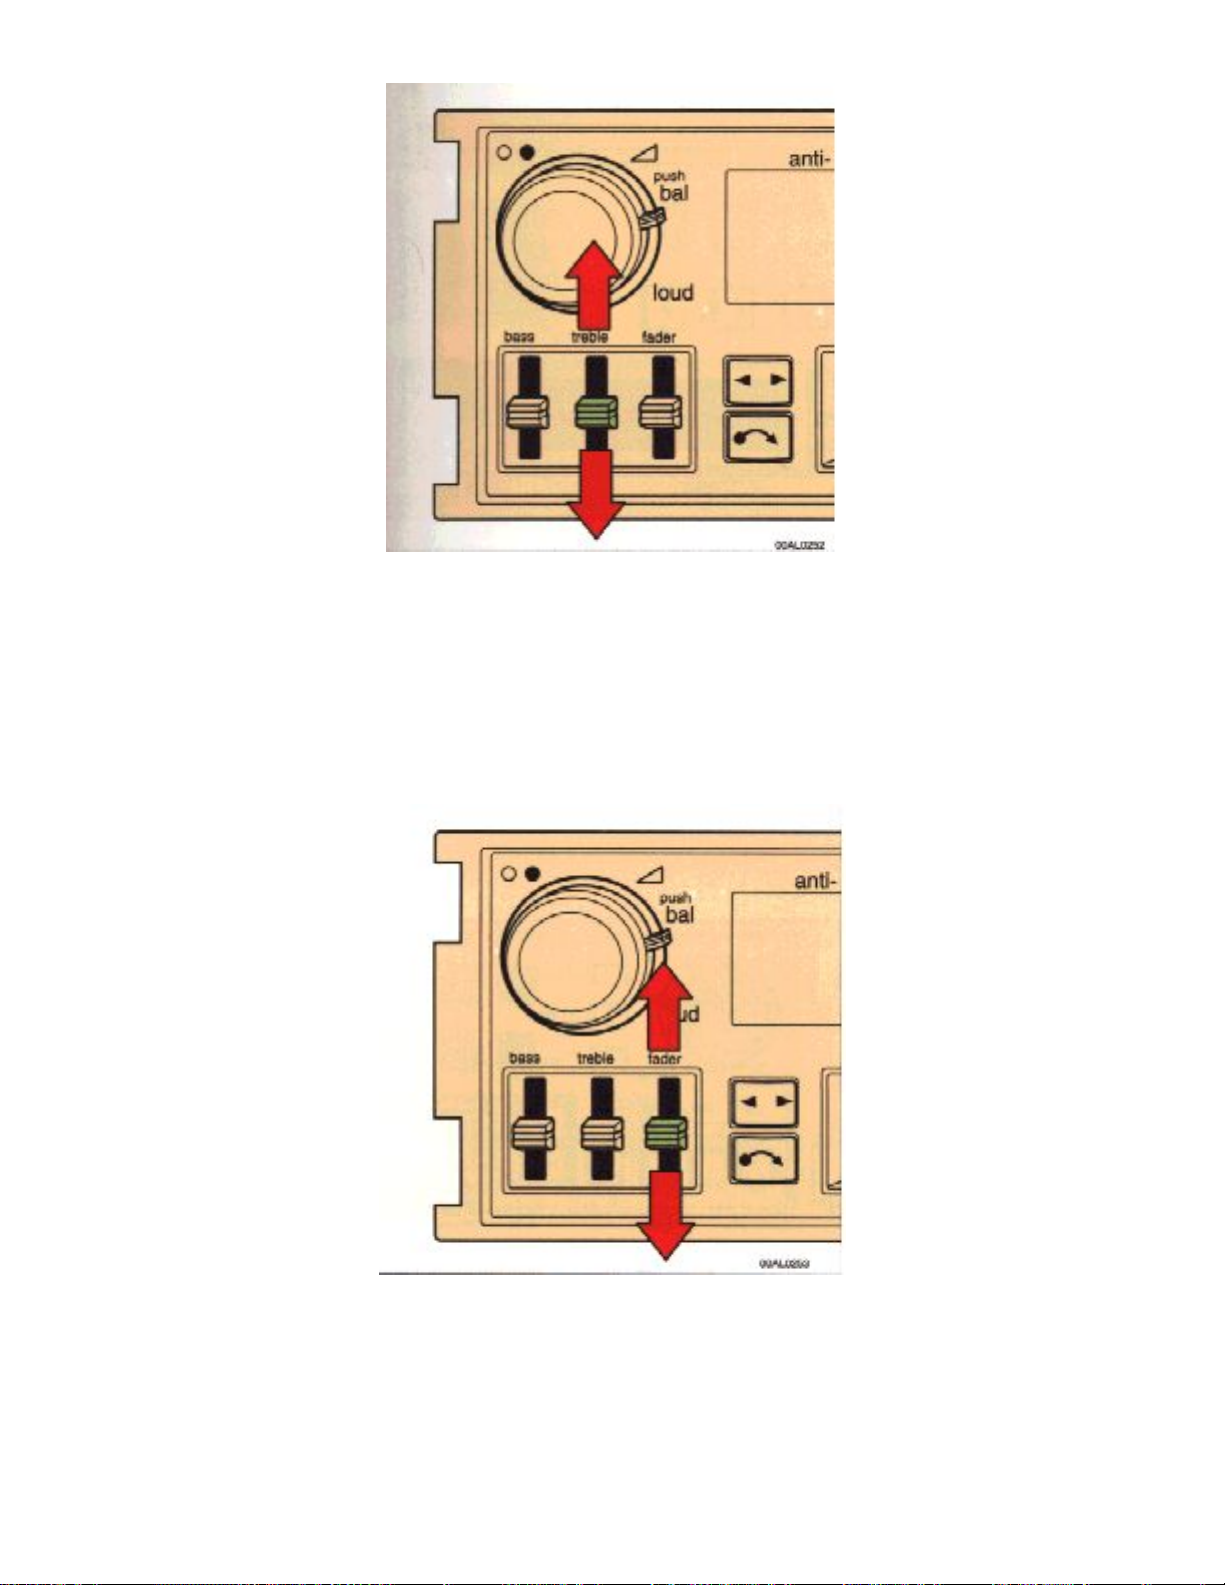
Treble control
Adjust the treble by sliding the control up or down.
(Up to increase, down to decrease. The "detent" indicates "equalized" treble.)
Fader control
Adjust front/rear speaker balance by sliding the control up or down.
(Up to direct more sound to the front speakers, down to direct more sound to the rear speakers. The
file:///K|/ownersdocs/1993/1993_940/93940_1_17.html (10 of 12)12/30/2006 9:44:19 AM
1993 Volvo 940
"detent" indicates "equalized" front/rear balance position.)
Mute function
Press the tuning knob to temporarily mute the sound. "PAU" is displayed.
pg. 1:24 Radio (cont.)
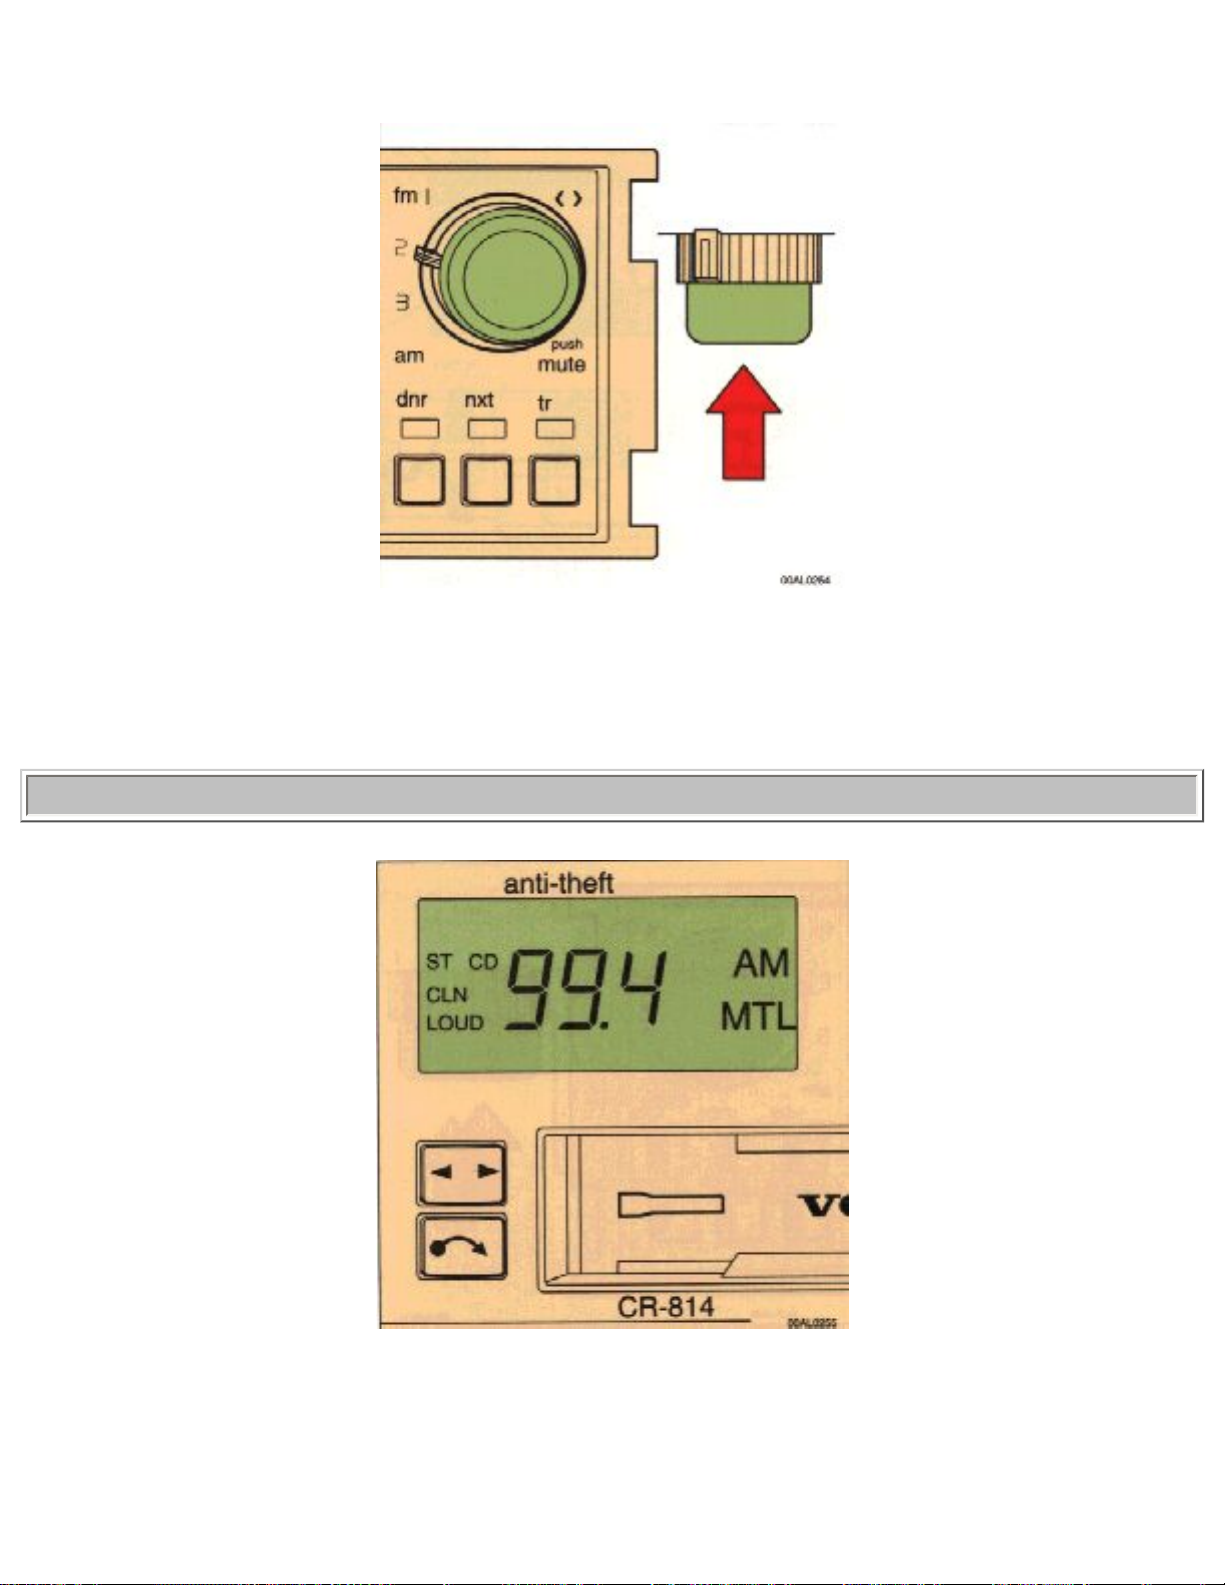
Display
The display shows the set waveband (AM, FM) radio frequency, ST (stereo) LOUD (loudness), tape
direction, compact disc number and track number when these functions are engaged.
file:///K|/ownersdocs/1993/1993_940/93940_1_17.html (11 of 12)12/30/2006 9:44:19 AM

1993 Volvo 940
Contents | Top of Page
file:///K|/ownersdocs/1993/1993_940/93940_1_17.html (12 of 12)12/30/2006 9:44:19 AM
1993 Volvo 940
pg. 1:25 Cassette deck
Cassette insert
Insert the cassette with the open side to the left and with the A side upwards. The unit automatically
loads the cassette, the radio is disconnected and the tape starts playing. A or B is displayed, indicating
which side of the tape is being played.
To re-enter Radio mode
There are three alternative ways to re-enter radio mode:
file:///K|/ownersdocs/1993/1993_940/93940_1_25.html (1 of 13)12/30/2006 9:44:20 AM
1993 Volvo 940
● turn the manual tuning knob
● push the "aut" button
● push any preset button. The cassette remains in place and is not ejected.
To re-enter Tape mode
If the tape player has been disconnected, but the cassette has not been ejected, the tape mode can be re-
entered by pressing the
button.
pg. 1:26 Cassette deck (cont.)
file:///K|/ownersdocs/1993/1993_940/93940_1_25.html (2 of 13)12/30/2006 9:44:20 AM
Loading...