


VIZIO VSB210WS User Manual
Dear VIZIO Customer,
Congratulations on your new VIZIO High Definition Sound Bar System purchase. Thank you for your support. For maximum benefit, please read these instructions before making any adjustments, and retain them for future reference. We hope you will experience many years of enjoyment from your new VIZIO HD Sound Bar System.
For assistance, please call (877) 668-8462 or visit us at www.vizio.com
To purchase or inquire about accessories and installation services for your VIZIO HD Sound Bar System, please visit our website at www.vizio.com or call toll free at (888) 849-4623.
We recommend you register your VIZIO HD Sound Bar System at our website www.VIZIO.com or fill in your registration card and mail it in. For peace of mind and to protect your investment beyond the standard warranty, VIZIO offers extended warranty service plans. These plans give additional coverage during the standard warranty period. Visit our website or call us to purchase a plan.
Write down the serial number located on the back of your HD Sound Bar
System.
__ __ __ __ __ __ __ __ __ __ __ __ __
Purchase Date _____________________
VIZIO is a registered trademark of VIZIO, Inc. dba V, Inc.
HDMI logo and “High Definition Multimedia Interface” are registered trademarks of HDMI Licensing LLC.
Manufactured under license from Dolby Laboratories.
Dolby and the double-D symbol are trademarks of Dolby Laboratories.
 and
and  are trademarks of SRS Labs, Inc.
TruSurround HD and TruVolume technologies are incorporated under license from SRS Labs, Inc.
THE TRADEMARKS SHOWN HEREIN ARE THE PROPERTY OF THEIR RESPECTIVE OWNERS; IMAGES USED ARE FOR ILLUSTRATION PURPOSES ONLY. BRAVO, VIZIO AND THE V LOGO AND WHERE VISION MEETS VALUE AND OTHER VIZIO TRADEMARKS ARE THE INTELLECTUAL PROPERTY OF VIZIO INC. PRODUCT SPECIFICATIONS ARE SUBJECT TO CHANGE WITHOUT NOTICE OR OBLIGATION. © 2008 VIZIO INC. ALL RIGHTS RESERVED.
Version 1/19/2009 |
1 |
|
www.VIZIO.com |
VIZIO VSB210WS User Manual
Important Safety Instructions
The HD Sound Bar System is designed and manufactured to operate within defined design limits, and misuse may result in electric shock or fire. To prevent the HD Sound Bar System from being damaged, the following rules should be observed for its installation, use, and maintenance. Please Read the following safety instructions before operating the HD Sound Bar System. Keep these instructions in a safe place for future reference.
•To reduce the risk of electric shock or component damage, switch off the power before connecting other components to the HD Sound Bar System.
•Unplug the power cord before cleaning the HD Sound Bar System. A damp cloth is sufficient for cleaning. Do not use a liquid or a spray cleaner on the HD Sound Bar System. Do not use abrasive cleaners.
•Always use the accessories recommended by the manufacturer to insure compatibility.
•When moving the HD Sound Bar System from an area of low temperature to an area of high temperature, condensation may form in the housing. Wait before turning on the HD Sound Bar System to avoid causing fire, electric shock, or component damage.
•A distance of at least 3 feet should be maintained between the HD Sound Bar System and any heat source, such as a radiator, heater, oven, amplifier etc. Do not install the HD Sound Bar System close to smoke. Operating the HD Sound Bar System close to smoke or moisture may cause fire or electric shock.
•Slots and openings in the back and bottom of the cabinet are provided for ventilation. To ensure reliable operation of the HD Sound Bar System and to protect it from overheating, be sure these openings are not blocked or covered. Do not place the HD Sound Bar System in a bookcase or cabinet unless proper ventilation is provided.
•Never push any object into the slots and openings on the HD Sound Bar System enclosure. Do not place any objects on the top of the HD Sound Bar System. Doing so could short circuit parts causing a fire or electric shock. Never spill liquids on the HD Sound Bar System.
•The HD Sound Bar System should be operated only from the type of power source indicated on the label on the AC/DC Adapters. If you are not sure of the type of power supplied to your home, consult your dealer or local power company.
•Only power of the marked voltage can be used for your HD Sound Bar System. Any other voltage than the specified voltage may cause fire or electric shock
•The power cord must be replaced when using different voltage than the voltage specified. For more information, contact your dealer.
•The HD Sound Bar System AC/DC Adapters are equipped with a three-pronged grounded plug (a plug with a third grounding pin). This plug will fit only into a grounded power outlet. This is a safety feature. If your outlet does not accommodate the three-pronged, have an electrician install the correct outlet, or use an adapter to ground the HD Sound Bar System safely.
•Do not defeat the safety purpose of the grounded plug.
•When connected to a power outlet, power is always flowing into the HD Sound Bar System. To totally disconnect power, unplug the power cord.
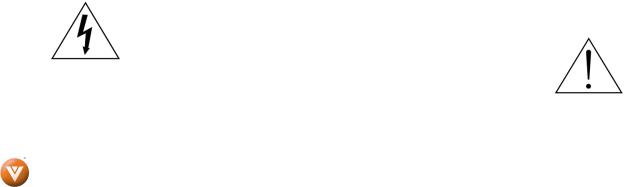
•The lightning flash with arrowhead symbol within an equilateral triangle is intended to alert the user to the presence of un-isolated, dangerous voltage within the inside of the HD Sound Bar System that
may be of sufficient magnitude to constitute a risk of electric shock to persons.
•The exclamation point within an equilateral triangle is intended to alert the user to the presence of important operating and servicing instructions in the literature accompanying your HD Sound Bar System.
•Do not overload power strips and extension cords. Overloading can result in fire or electric shock.
•The wall socket should be located near the HD Sound Bar System and be easily accessible.
2
www.VIZIO.com

VIZIO VSB210WS User Manual
•Do not touch the power cord during lightning. To avoid electric shock, avoid handling the power cord during electrical storms.
•Unplug the HD Sound Bar System during a lightning storm or when it will not be used for long periods of time. This will protect the HD Sound Bar System from damage due to power surges.
•Do not attempt to repair or service HD Sound Bar System yourself. Opening or removing the front cover may expose you to high voltages, electric shock, and other hazards. If repair is required, contact your dealer and refer all servicing to qualified service personnel.
•Keep the HD Sound Bar System away from moisture. Do not expose the HD Sound Bar System to rain or moisture. If water penetrates into the HD Sound Bar System, unplug the power cord and contact your dealer. Continuous use in this case may result in fire or electric shock.
•Do not use the HD Sound Bar System if any abnormality occurs. If any smoke or odor becomes apparent, unplug the power cord and contact your dealer immediately. Do not try to repair the HD Sound Bar System yourself.
•Avoid using dropped or damaged appliances. If the HD Sound Bar System is dropped and the housing is damaged, the internal components may function abnormally. Unplug the power cord immediately and contact your dealer for repair. Continued use of the HD Sound Bar System may cause fire or electric shock.
•Do not install the HD Sound Bar System in an area with heavy dust or high humidity. Operating the HD Sound Bar System in environments with heavy dust or high humidity may cause fire or electric shock.
•Ensure that the power cord and any other cables are unplugged before moving the HD Sound Bar System.
•When unplugging the HD Sound Bar System, hold the power plug, not the cord. Pulling on the power cord may damage the wires inside the cord and cause fire or electric shock. When the HD Sound Bar System will not be used for an extended period of time, unplug the power cord.
•To reduce risk of electric shock, do not touch the connector with wet hands.
•Insert the battery in accordance with instructions. Incorrect polarity may cause the battery to leak which can damage the remote control or injure the operator.
•If any of the following occurs, contact the dealer:
oThe power cord fails or frays.
oLiquid sprays or any object drops into your HD Sound Bar System.
oHD Sound Bar System is exposed to rain or other moisture.
oHD Sound Bar System is dropped or damaged in any way.
oThe performance of the HD Sound Bar System changes substantially.
Version 1/19/2009 |
3 |
|
www.VIZIO.com |
VIZIO VSB210WS User Manual
Opening the Package
IMPORTANT: Save the carton and packing material for future shipping.
Package Contents
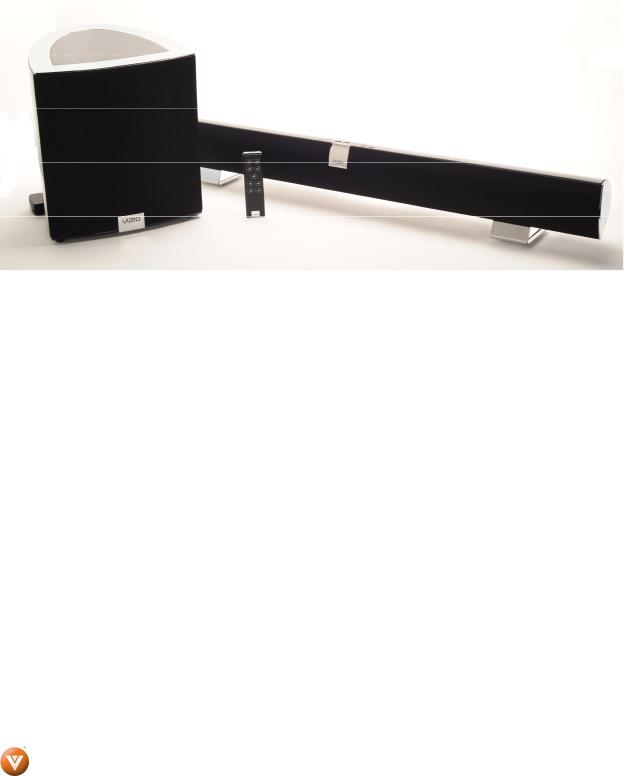
VIZIO High Definition Sound Bar and Wireless Subwoofer 2x AC/DC Power Adapter
2x Power Cord
Remote Control and Battery
2x Stand/Mount Base (Pre-installed)
2x Stand/Mount screws (Pre-installed)
1X RCA Stereo Cable This manual
4
www.VIZIO.com

|
VIZIO VSB210WS User Manual |
Table of Contents |
|
Important Safety Instructions ................................................................................................................................ |
2 |
Chapter 1 Installation................................................................................................................................................... |
6 |
Chapter 2 Basic Controls and Connections .............................................................................................................. |
7 |
Rear Panel Connections ......................................................................................................................................... |
7 |
Top Panel Buttons................................................................................................................................................... |
8 |
HD Sound Bar System Remote Control ................................................................................................................ |
9 |
Programming a Universal Remote to operate the HD Sound Bar System……………………………………...……….9 |
|
Installing the Battery in the Remote Control ............................................................................................................ |
10 |
Remote Control Range............................................................................................................................................ |
10 |
VIZIO Remote Control Precautions ......................................................................................................................... |
10 |
Chapter 3 Connecting Equipment ............................................................................................................................ |
11 |
Connecting a TV .................................................................................................................................................... |
11 |
Connecting a Cable or Satellite Box.................................................................................................................... |
12 |
Connecting a CD or DVD Player .......................................................................................................................... |
13 |
Connecting an MP3 Player ................................................................................................................................... |
14 |
Connecting a VCR or Video Camera.................................................................................................................... |
14 |
Connecting an external Receiver/Amp................................................................................................................ |
15 |
Connecting a Computer........................................................................................................................................ |
16 |
Chapter 4 Setting Up.................................................................................................................................................. |
17 |
Chapter 5 Operation................................................................................................................................................... |
18 |
SRS TruVolume™................................................................................................................................................... |
18 |
SRS TruSurround HD™ .......................................................................................................................................... |
19 |
Audio Adjustments .................................................................................................................................................. |
20 |
Chapter 6 Error Detection / Corrective Action......................................................................................................... |
21 |
Chapter 7 Maintenance and Troubleshooting ......................................................................................................... |
22 |
Maintenance .......................................................................................................................................................... |
22 |
Troubleshooting Guide......................................................................................................................................... |
23 |
Telephone & Technical Support........................................................................................................................... |
23 |
Compliance ............................................................................................................................................................ |
25 |
FCC Class B Radio Interference Statement ........................................................................................................ |
25 |
Chapter 8 Miscellaneous Information ...................................................................................................................... |
26 |
Specifications ........................................................................................................................................................ |
26 |
Version 1/19/2009 |
5 |
|
www.VIZIO.com |
VIZIO VSB210WS User Manual
Chapter 1 Installation
Preparing the HD Sound Bar System for Wall Mounting
The VIZIO HD Sound Bar System can either be kept on the stand base or mounted on the wall for viewing. If you choose to mount the TV on the wall, please follow the instructions below for removing the stand.
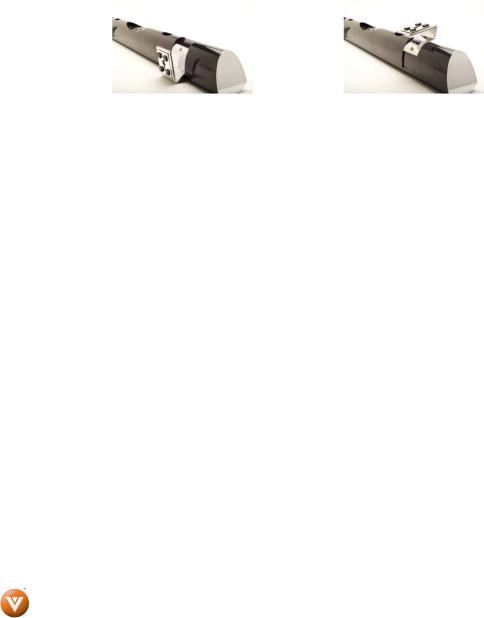
The two feet provided with the HD Sound Bar System can be used as brackets if it is to be wall mounted. Using a screwdriver, remove the stands from their original configuration as shown in Fig. 1, and re-attach to the HD Sound Bar System in the configuration shown in Fig. 2.
Use M5 (Metric) or #10 (English) screws for keyhole to mount.
Figure 1 |
Figure 2 |
NOTE: It is recommended that Power and Audio cables be connected to the HD Sound Bar System before placing it on the wall.
.
6
www.VIZIO.com

Chapter 2 Basic Controls and Connections
Rear Panel Connections
Sound Bar
1.DC IN – Plug the connector from the AC/DC Power Adapter here.
2.OPTICAL AUDIO IN – SPDIF Optical connector for connection from a device such as a home theatre system, Amplifier, Receiver, Set Top Box or DVD Player.
3.ANALOG AUDIO IN 1 – (ANALOG L/R) Connect the analog audio from a device such as a TV, Home Theatre System, Amplifier, Receiver, Set Top Box or DVD Player.
4.ANALOG AUDIO IN 2 – (ANALOG L/R) Connect the analog audio from an additional device such as a TV, Home Theatre System, Amplifier, Receiver, Set Top Box or DVD Player.
Subwoofer
1.Link Button – Refer to Chapter 3 – Setting up
2.DC IN – Plug the connector from the AC/DC Power Adapter here
Version 1/19/2009 |
7 |
|
www.VIZIO.com |
VIZIO VSB210WS User Manual
Top Panel Buttons
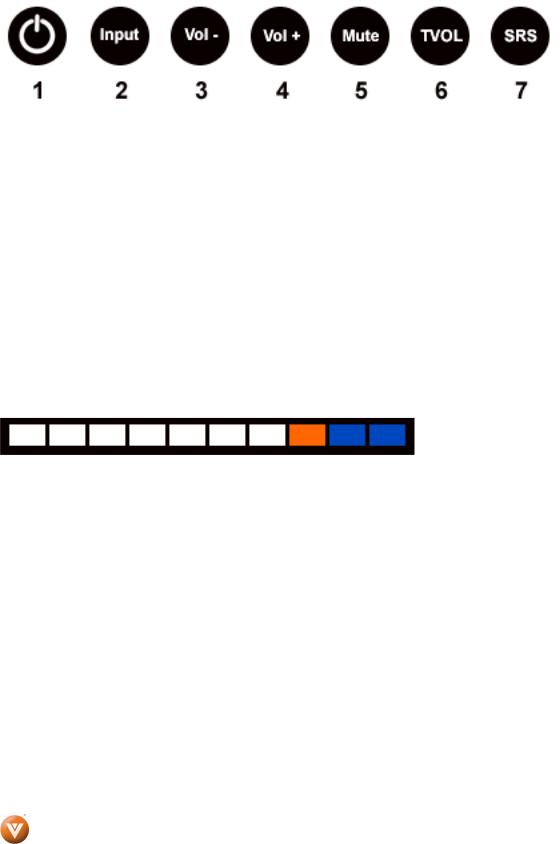
1.Power – Use this button to turn HD Sound Bar System ON or OFF.
2.Input – Use this button to select the input desired. Repeated pressing will cycle through Analog Input 1, Analog Input 2 or Optical In. This button doubles as a Link button when used during the pairing procedure. Holding the button for more than 3 seconds activates the pairing mode for the wireless link. Once pairing is requested, the device will attempt for up to 30 seconds and then end the pairing mode. Please refer to Page 17 for additional information.
3.Vol - – Pressing this button will decrease the volume level.
4.Vol+ – Pressing this button will increase the volume level.
5.Mute – Pressing this button will either mute or un-mute the Sound Bar/Subwoofer system.
6.TVOL– Pressing this button will set the sound system to have control over the level of the audio output, preventing commercials on regular programming to become louder than the volume of the program being viewed. Pressing this button will toggle SRS TruVolume ON and OFF
7.SRS (TSHD) – Pressing this button will toggle SRS TruSurround HD ON and OFF.
Front LED Array
The LED Array is located at the lower right side of the Sound Bar.
There are a total of 10 LEDs. The first 7 white LEDs are volume indicators. Each LED has three brightness levels for a total of 21 volume settings. When you adjust the subwoofer level relative to the bar, the LEDs blink.
Displayed as a bar graph representing the system volume, increasing from the left across the display. The display is constantly on when active.
Displayed as a bar graph representing the subwoofer volume, increasing from the left across the display. The display flashes quickly 50% of the time when displaying this information.
LED 5, 6 and 7 (from left) function as Input indicators. When the Input button is pressed, these three LED’s light up, with the status of the currently selected input LED flashing. The LED’s will turn off after 5 seconds. Pressing the Input button on the top of the Sound Bar or the remote will step through the inputs. LED 5 is Analog Input 1, LED 6 is Analog Input 2 and LED 7 is Optical Input.
The next LED is the link indicator. It is orange. When the bar and sub are linked the light is solid. It blinks during the pairing process.
The next LED is for SRS TruVolume. Glows blue when on. The last LED is for SRS TSHD. Glows blue when on.
After an adjustment or change in SRS settings is made, the LED’s turn off after 5 seconds. Press any button on the remote and the LEDs turn on to show status.
When the bar is muted, the volume LEDs blink at the current volume setting.
8
www.VIZIO.com
REMOTE CONTROL SENSOR – The Remote Sensor is located at the lower right side of the Sound Bar. This is the window through which all of the remote control signals pass to the sensor. Point the remote control directly at this window for the best response to the remote signal.
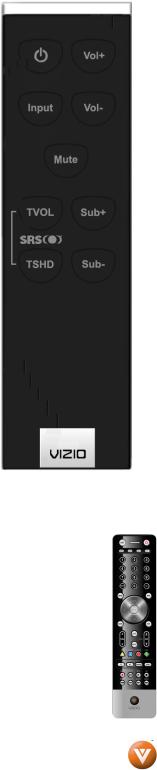
HD Sound Bar System Remote Control
The VIZIO Remote Control supplied is designed to be used exclusively with this product. The remote button functions are described below:
1.Power – Use this button to turn HD Sound Bar System ON or OFF.
2.Input – Use this button to select the input desired. Repeated pressing will cycle through Input 1, Input 2 or Optical In.
3.Vol+ – Pressing this button will increase the volume level. Hold for one-half second to continuously increase volume.
4.Vol - – Pressing this button will decrease the volume level. Hold for one-half second to continuously decrease volume.
5.Mute – Pressing this button will either mute or un-mute the Sound Bar/Subwoofer system.
6.TVOL– Pressing this button will set the sound system to have control over the level of the audio output, preventing commercials on regular programming to become louder than the volume of the program being viewed. Pressing this button will toggle SRS TruVolume ON and OFF.
7.TSHD – Pressing this button will toggle SRS TruSurround HD ON and OFF.
8.Sub+ – Pressing this button will increase the volume output of the Subwoofer relative to the overall system volume.
9.Sub- – Pressing this button will decrease the volume output of the Subwoofer relative to the overall system volume.
Programming a Universal Remote to operate the
HD Sound Bar System
If you own a VIZIO TV with a Universal Remote that uses a 5-digit programming code, you may program a device button with code 31517. This will map the Universal Remote button to operate the HD Sound
Bar System as follows: |
Pictured at right is the VIZIO VUR8P Universal Learning remote. |
Vizio Remote key |
HD Sound Bar System |
Power |
Power |
Input |
Input |
Volume Up |
Volume Up |
Volume Down |
Volume Down |
Mute |
Mute |
Channel Up |
Sub Volume Up |
Channel Down |
Sub Volume Down |
Menu |
SRS TruSurround |
INFO |
SRS TruVolume |
Version 1/19/2009 |
9 |
|
www.VIZIO.com |
VIZIO VSB210WS User Manual
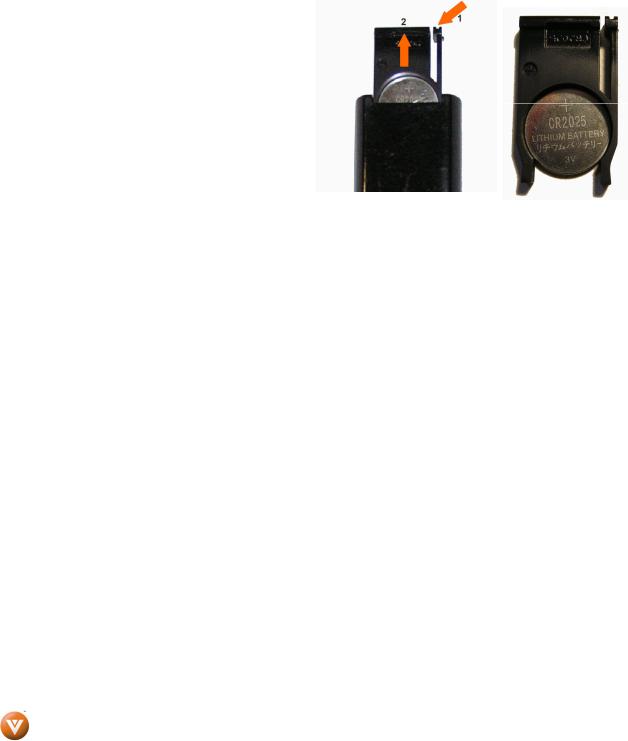
Installing the Battery in the Remote Control
Turn the remote control over. Press inward to release the lock (1), and at the same time, slide the battery holder out of the remote with your fingernail (2).
Insert the supplied CR2025 Lithium Button Battery into the remote control. Make sure that you match the
(+) symbol on the battery with the (+) symbol on the battery holder. Re-insert the battery cover in the same orientation.
Precautionary Tips for Inserting the Batteries:
Only use the specified battery.
Inserting the battery incorrectly may also result in damage to the remote control.
Dispose of the battery in accordance with local laws and regulations.
Keep the battery away from children and pets.
Remote Control Range
Point the remote control at the remote control sensor to transmit the commands. Do not place any obstacles between the remote control and the receiver window.
The effective range of the remote control is approximately 30 feet (10 meters) from the front of the receiver window, 30°to the left and right, 20°up and down.
VIZIO Remote Control Precautions
The remote control should be kept dry and away from heat sources. Avoid humidity.
If the HD Sound Bar System responds erratically to the remote control or does not respond at all, check the battery. If the battery is low or exhausted, replace it with a fresh battery.
When not using the remote control for a long period of time, remove the batteries. Do not take the battery apart, heat it, or throw it into a fire.
Do not subject the remote control to undue physical stress, such as striking or dropping it.
Do not attempt to clean the remote control with a volatile solvent. Wipe it with a clean, damp cloth.
Cleaning the Housing and Remote Control
If the housing or remote control is seriously contaminated, use a soft cloth moistened with diluted neutral cleaner to clean the display. Wring water out of the cloth before cleaning to prevent water from penetrating into the housing. Wipe with a dry cloth after cleaning.
10
www.VIZIO.com
 Loading...