


DVR510N Digital Camcorder
Owner’s Manual
© 2009 Sakar International, Inc. All rights reserved.
Windows and the Windows logo are registered trademarks of Microsoft Corporation. All other trademarks are the property of their respective companies.
Table of Contents |
|
Introduction ................................................................................................................................................ |
2 |
Key Features.............................................................................................................................................. |
2 |
What your camcorder includes................................................................................................................... |
3 |
Computer System Requirement for Windows XP ...................................................................................... |
3 |
Computer System Requirement for Windows Vista ................................................................................... |
4 |
Computer System Requirements for Macintosh ........................................................................................ |
4 |
A Quick Look at Your Digital Video Camcorder.......................................................................................... |
4 |
Prepare Your Digital Camcorder for Use.................................................................................................... |
7 |
Software Installation: Quickflix Companion and Video Express................................................................. |
9 |
Software Installation ................................................................................................................................... |
9 |
Software installation from the CD-ROM ..................................................................................................... |
9 |
Software installation from the CD Image found in the camcorder’s built-in memory................................ |
14 |
Starting Your Digital Camcorder ............................................................................................................... |
15 |
TV out function ......................................................................................................................................... |
23 |
Transfer Files manually ............................................................................................................................ |
25 |
Transferring Videos to your PC using the software.................................................................................. |
25 |
Everything you need to get the most of your media and MORE .............................................................. |
32 |
Video Express application........................................................................................................................ |
35 |
Auto Detect feature .................................................................................................................................. |
41 |
Maintenance of Your Digital Camcorder................................................................................................... |
42 |
Technical Support..................................................................................................................................... |
42 |
Sakar Warranty Card................................................................................................................................ |
42 |
Technical Specifications ........................................................................................................................... |
44 |
Troubleshooting........................................................................................................................................ |
45 |
1

Introduction
Thanks for purchasing the DVR510N Digital Video Camcorder. Not only can you shoot top quality videos but the internal Nand Flash memory enables you to also use it as a Removable drive that can store any file formats. This camcorder is unique in that the software application is included in the built-in memory of the camcorder. So you can install the software and download the videos to any compatible computer to create and edit your own movies anywhere in the world, even of you do not have the CD-ROM. Please read this manual carefully before using.
Key Features
¾Digital Video resolution640x480pixels (VGA), 320x240pixels (QVGA).
¾1.8’’ LCD screen
¾8X Digital Zoom
¾Infrared Night Vision function
¾Internal Nand Flash 2GB
¾TV out function
¾Supports external SD memory card up to 8GB
¾Video Express software is a tool for producing custom movies and slide shows using your own video clips and sound tracks.
2

What your camcorder includes
¾Digital Camcorder
¾Owner Manual
¾TV cable
¾Strap
¾Built-in USB
¾Quickflix Companion software CD
Computer System Requirement for Windows XP
To be able to download photos and videos to your PC you will need the following minimum configuration: y Pentium 4 Processor (or above), 2.6 GHZ., with Windows XP Service Pack 2
y 512 MB RAM, 200MB free disk space.
yAvailable USB Interface
yCD-ROM Driver
yRecommended screen resolution 1024 X 768 pixels or higher.
y16-bit color or higher display adaptor.
yWindows Media Player 9 (or above) as default media player
3

Computer System Requirement for Windows Vista
To be able to download photos or videos to your PC you will need the following minimum configuration:
yWindows Vista
y800MHz processor and 512 MB of system memory
y20GB hard driver with at least 15GB of available space
ySupport for Super VGA graphics
yAvailable USB Interface
yCD-ROM Driver
Computer System Requirements for Macintosh
yPower Macintosh G3 500 MHz or higher
yMac OS X version 10.2.6 or later
y128 MB or more available system RAM (256 MB recommended), 150 MB free disk space
y800 x 600 or higher-resolution monitor displaying millions of colors
Note: The Quickflix Companion software as well as the Video Express software are not compatible on Macintosh computers. You may however use the camcorder as a regular MSDC USB removable device.
A Quick Look at Your Digital Video Camcorder
4

Icons on your LCD screen
5

Battery power level
 Full battery power
 Medium battery power
  Low battery power
Modes
Playback |
Video |
|
Digital Zoom |
 Infrared Night Vision (3 LED on)
 Infrared Night Vision (6 LED on)
6
Prepare Your Digital Camcorder for Use
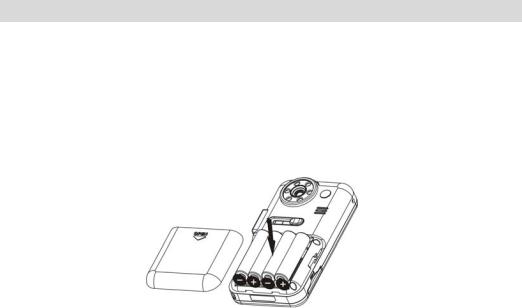
Battery Installation
Your Digital Video Camcorder requires 4 AAA batteries (alkaline batteries are recommended).
Note: Your Digital Video Camcorder has a 2GB Nand Flash memory, and therefore the data in your internal memory won’t be lost if your player is powered off or when the batteries need to be replaced.
Insert the batteries into your Digital Video Camcorder as directed below:
1.Slide the battery cover down then lift to open the cover.
2.Insert the batteries with the correct polarity (positive pole/negative pole) as appears in the battery compartment.
3.Replace and slide the battery cover down to close.
Note:
1.Do not mix old and new batteries.
2.Do not mix alkaline, standard (carbon-zinc), or rechargeable (nickel-cadmium metal hydride) batteries.
7
3.The icon  will flash on your LCD screen when the battery power is insufficient and you need to change new batteries.
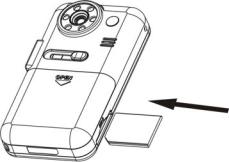
SD card installation
Your Digital Camcorder has a memory card slot that enables you to insert any SD compatible memory card up to 8GB. Adding a memory card will allow you to increase the capacity of your Digital Video Camcorder. After you insert an SD memory card, all the videos you shoot will automatically be stored to the SD memory card.
Please follow these steps:
1.Locate the memory card slot on the side of your Digital Video Camcorder.
2.Insert the memory card correctly as directed on the side of the camcorder at the opening of the slot.
3.Press the memory card until you hear a “Click” sound. The memory card inserted properly will be flush with the surface of your camcorder.
8
Note: After you insert an SD memory card, the  icon will appear on the LCD, indicating that your SD memory card has been installed successfully, and the videos you shoot will be stored on the card.
Software Installation: Quickflix Companion and Video Express
Software Installation
There are 2 ways for you to install the software on your computer.
1.From the CD-ROM provided in the packaging
2.From the CDImage found on the third drive on the in-built memory of the camcorder.
Software installation from the CD-ROM
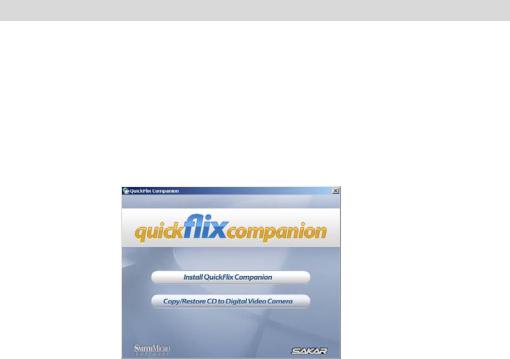
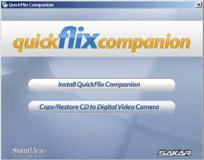
1. Insert the CD into your CD-Rom drive. Make sure that your camcorder is not connected to the computer. The following menu screen will automatically appear.
9
2. Click the “Install Quickflix Companion” button to continue.
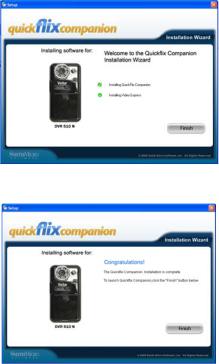
3.The Welcome to the Quickflix Companion Installation Wizard Setup screen will appear. Click the “Begin” button to begin the software setup and installation process.
10
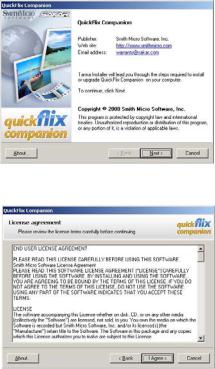
4.The Setup wizard will start to install the Quickflix Companion application on your computer. Click “Next” to continue.
11
5. Please review the license terms and click the “I Agree” button to continue.
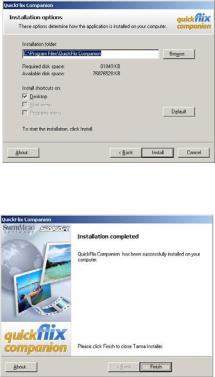
6.In the Installation options you can choose where to install this application. However, it is recommended to let the Quickflix Companion installer create the folder to where the program will be installed. Click “Install” and follow the instructions.
12
6.Click “Finish” to let the Quickflix Companion installer finish the installation program.
7.The Setup will now begin to silently install the Video Express software. This might take a few second to install depending on the operating system you are running.
13
Congratulations!! You have successfully installed the Quickflix Companion and Video Express software on your PC. Click the “Finish” button to open the Quickflix Companion application.
Software installation from the CD Image found in the camcorder’s built-in memory
1.Push out the built-in USB connector on the side of the camcorder.
2.Connect the USB connector to a USB port on your computer.
3.The camcorder will automatically power on
4.Wait for the computer to recognize the camcorder
5.The autorun install screen will appear. Click the “Install Quickflix Companion” button
6.Follow all the steps as described above in the ‘Software installation from the CD-ROM” section. Clicking the “Begin” button will begin to install the Quickflix Companion on any compatible
computer wherever you are without the need to install a CD in the CD-ROM drive.
14
 Loading...