


Viking VEDO530, VESO5302TAR, VESO5302TSS, VESO530, VEDO5302TSS User Manual
...Viking Use & Care Manual
Viking Range Corporation
111 Front Street
Greenwood, Mississippi 38930 USA (662) 455-1200
For product information
call 1-888-VIKING1 (845-4641) or visit the Viking Web Site at vikingrange.com
Professional Custom Built-In Electric
Touch Control Single and Double Ovens
F20813A EN |
(072911) |
Congratulations
Your purchase of this product attests to the importance you place upon the quality and performance of the major appliances you use. With minimal care, as outlined in this guide, this product is designed to provide you with years of dependable service. Please take the few minutes necessary to learn the proper and efficient use and care of this quality product.
Some key features of this appliance include:
•14 different cooking modes to make even your most challenging baking projects a success.
•Split baking and broiling elements, reducing your preheating time and heating your food more evenly.
•An extra-large reversing fan, allowing you to cook even large quantities of food more quickly and evenly.
•Four convection modes, offering greater air circulation to shorten cooking times and cook foods more evenly.
•Dual broiling elements, producing intense radiant heat for faster broiling and a larger coverage area.
•Three broiling modes, including a special low-broil mode for delicate broiling and top-browning.
•A profiled, hidden bake element for easier cleaning.
•Six adjustable rack positions with the largest usable baking space available in this class.
Your complete satisfaction is our ultimate goal. If you have any questions or comments about this product, please contact the dealer from whom you purchased this product, or contact our consumer support center at 1-888-VIKING1.
We appreciate your choosing a Viking Range Corporation product and hope that you will again select our products for your other major appliance needs. For more information about the complete selection of Viking products, contact your dealer or go to vikingrange.com.
Warnings
 WARNING
If the information in this manual is not followed exactly, a fire or explosion may result causing property damage, personal injury or death.
 WARNING
NEVER use this appliance as a space heater to heat or warm the room. Doing so may result in carbon monoxide poisoning and overheating of the oven.
 WARNING
Do not use commercial oven cleaners inside the oven. Use of these cleaners can produce hazardous fumes or can damage the porcelain finishes.
 WARNING
NEVER cover any slots, holes or passages in the oven bottom or cover an entire rack with materials such as aluminum foil. Doing so blocks air flow through the oven and may cause carbon monoxide poisoning. Aluminum foil linings may also trap heat, causing a fire hazard.
 WARNING
To avoid sickness and food waste when using automatic time baking:
•Do not use foods that will spoil while waiting for cooking to start, such as dishes with milk or eggs, cream soups, custards, fish, pork, poultry, or foods with stuffing.
•Any food that has to wait for cooking to start should be very cold or frozen before it is placed in the oven.
•Do not use foods containing baking powder or yeast when automatic time baking. They will not rise properly.
•Do not allow food to remain in the oven for more than two hours after the end of the cooking cycle.
 WARNING
To avoid sickness and food waste, do not allow defrosted food to remain in the oven for more than two hours.
2 |
3 |

Table of Contents
Getting Started
ImportantSafetyInstrutions ________________________ 6
Product Controls
Oven ControlPanel________________________________ 8
Built-In Electric Oven Features______________________ 10
Touch Pad Functions_______________________________ 11
Programming Modes
Clocks and Timers
Setting the Clock _____________________________ 16
Setting the Timer _____________________________ 17
Cook Time and Stop Time ____________________ 18
Oven Settings
Brightness ____________________________________ 20
DegreeFormat(Fahrenheitor Celsius) _________ 20
Tones ________________________________________ 21
Tone Volume _________________________________ 23
Timeouts ____________________________________ 23
Clock Format(12-houror 24-hour) _____________ 24
Sabbath Mode _______________________________ 25
Showroom Mode ___________________________25
Lock and Unlock ______________________________ 26
Interior Oven Lights___________________________ 26
Recipe Function ___________________________________ 27
Warming Modes __________________________________ 29
Bake Modes ______________________________________ 30
Broil Modes ______________________________________ 33
Roast Modes ______________________________________ 35
Meat Probe _______________________________________ 37
Table of Contents
Cooking Tips
Rack Positions ______________________________________ 39
Preheat ____________________________________________ 40
Pan Placement Tips _________________________________ 42
Baking Tips ________________________________________ 42
Multiple Rack Baking _______________________________ 43
Conventional Baking Chart __________________________ 44
Convection Baking Chart____________________________ 45
Solving Baking Problems ____________________________ 46
Broiling Tips ________________________________________ 47
Broiling Chart ______________________________________ 48
Roasting Tips _______________________________________ 49
Conventional Roasting Chart ________________________ 50
Convection Roasting Chart __________________________ 51
Product Care
Cleaning and Maintenance __________________________ 52
Self-Clean Cycle _______________________________ 54
Replacing Light _____________________________________ 56
Trouble Shooting ___________________________________ 57
Error Handling______________________________________ 57
Service Information _________________________________ 58
Warranty ___________________________________________ 59
4 |
5 |

Getting Started
Important Safety Instructions
•Use this appliance only for its intended use as described in this manual. Never use your appliance for warming or heating the room. This is based on safety considerations.
•Your unit should be installed by a qualified technician. The appliance must be installed and electrically grounded according to local codes.
•Do not attempt to repair or replace any part of this appliance unless specifically recommended in this manual. All servicing should be referred to a qualified technician. Warranty service must be performed by an authorized service agency.
•Children should not be left alone in the kitchen while the oven is in use. They should never be allowed to sit or stand on any part of the appliance.
CAUTION: Do not store items of interest to children over the unit. Children climbing to reach items could be seriously injured. They should never be allowed to sit or stand on any part of the appliance.
•GREASE - Grease is flammable and should be handled carefully. Do not use water on grease fires. Flaming grease can be extinguished with baking soda or, if available, a multipurpose dry chemical or foam-type extinguisher. Let fat cool before attempting to handle it. Do not allow grease to collect around the oven or in vents. Wipe up spillovers immediately.
•Loose-fitting or hanging garments should never be worn while using the appliance. Do not drape towels or materials on oven door handles. These items could ignite and cause burns.
•Use only dry potholders. Moist or damp potholders on
hot surfaces may result in burns from steam. Do not let potholder touch hot surface areas. Do not use a towel or other bulky cloth.
•Keep area clean and free from combustible materials, gasoline, and other flammable liquids. Never use your oven as a storage space. Combustible items (paper, plastic, etc.) may ignite, and metallic items may become hot and cause burns.
Important Safety Instructions
•Do not heat unopened food containers; build-up of pressure may cause the container to explode and result in injury.
•Always position oven racks in desired location while oven is cool. If rack must be moved while oven is hot, do not let potholder contact hot heating element in oven.
•Use care when opening oven door. Let hot air or steam escape before removing or replacing food. Hot air or steam can cause burns to hands, face and/or eyes.
•Keep oven vents unobstructed. The oven vent is located at the front of the oven and vents into the room.
•Do not clean door gasket. It is essential for a good tight seal. Care should be taken not to rub, damage, or move the gasket.
•No commercial oven cleaner or oven liner protective coating such as aluminum foil should be used in or around any part of the oven. Improper oven liners may result in a risk of electric shock or fire. Keep oven free from grease buildup.
•Before self-cleaning the oven, remove broiler pan, broiler grid, oven racks, and other utensils. Do not use your oven to clean other parts. A fan noise should be heard during the cleaning cycle. If not, call service before self-cleaning again.
•DO NOT TOUCH HEATING ELEMENTS OR INTERIOR SURFACES OF OVEN. Heating elements may be hot even though they are dark in color. Interior surfaces of an oven become hot enough to cause burns. During and after use, do not touch or let clothing or other flammable materials contact heating elements or interior surfaces of oven until they have had sufficient time to cool. Other surfaces of the oven may become hot enough to cause burns, such as the oven vent opening, the surface near the vent opening, and the oven door window.
Started Getting
6 |
7 |
Product Controls
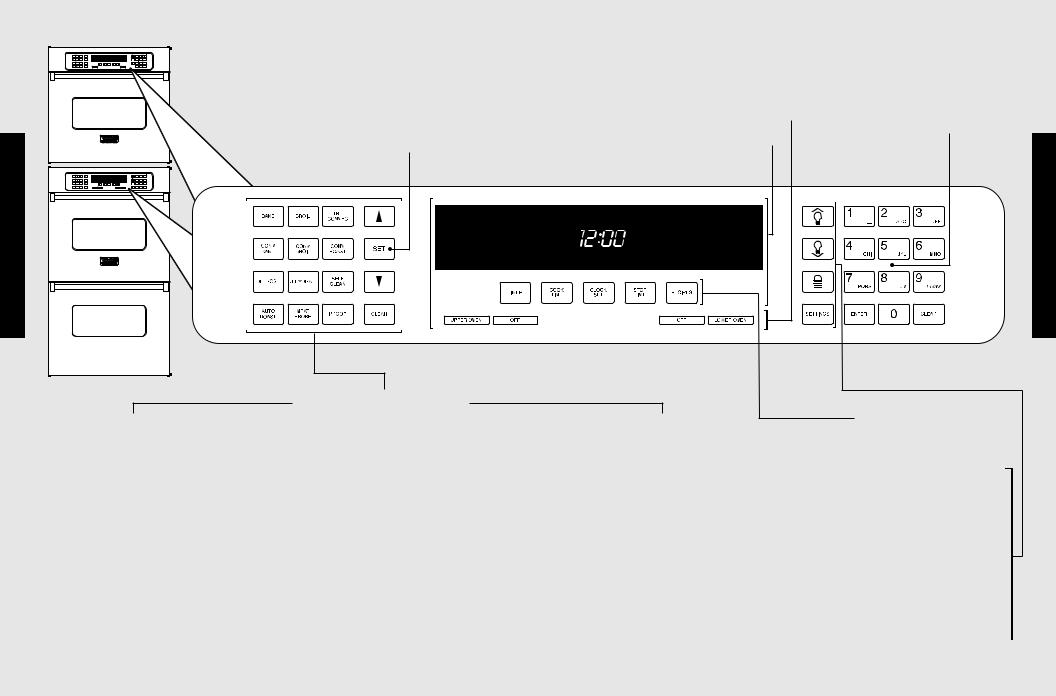
Oven Control Panel
Oven Function and
Temperature Controls
Each oven function has a separate setting. (See descriptions)
The SET controlup and down arrows can be used to set any temperature from 150°F (65.6°C) to 550°F (287.8°C).
Oven Control Panel
Electronic Timing Center |
|
Oven Selector |
|
Electronic Keypad |
|
The Electronic Timing Center is |
|
Controls |
|
Entry |
|
used to program and control all |
|
The Oven Selector Controls |
|
The Electronic Keypad |
|
timing functions. |
|
are used to turn the upper or |
|
Entry is used to program |
|
IMPORTANT–The time-of-day |
|
lower oven on and off. |
|
and control all oven |
|
|
|
|
|
functions. |
|
must be set before any other |
|
|
|
|
|
|
|
|
|
|
|
program can be used. |
|
|
|
|
|
|
|
|
|
|
|
|
|
|
|
|
|
Controls Product
Bake
Conventional, single-rackbaking (breads, cakes, cookies,pastry, pies, entrees, vegetables)
Convection Bake
Multi-rack baking for heavier or frozen foods (e.g., frozenpies, pizzas,entrees, vegetables)
Defrost
Natural defrostingof food using fan without heat
Auto Roast*
Automatic searingof the outside of meats; simplifies roasting
Oven Selector Options
Broil
Threeconventional broil settings for cuts of flat pieces of meat or meat 1-2 inches thick
Convection Broil
Faster than regular broiling with less smoke generation for thicker meats
Dehydrate
Using the convection fan over a period of time, water is removed from food by evaporation
Meat Probe*
Automatically turns the oven off when the internal temperatureof the meat being roasted is reached
TruConvecTM
Multi-rack baking for breads, cakes, cookies (up to 6 racks of cookies at once)
Convection Roast
Roasting whole turkeys, whole chickens, hams, etc.
Self-Clean
A self-cleaning cycle using high heat to burn off soils and deposits
Proof*
Creates an optimal environment for the rising of yeast in many kinds of dough
Recipes*
Accesses, programs, and saves cooking cycles from favorite recipes
Oven Light Controls
Controls the interior lights in the upper and lower ovens
Oven Lock
Childproofing feature preventing the controls from being activated when the oven is not in use
Settings
Accesses custom features such as display brightness, Sabbath/Showroom modes, and tones
*Note: Professional Series Premiere model control panel and features are shown.
8 |
9 |

Built-In Electric Oven Features |
Touch Pad Functions |
Oven Control Panel
|
Oven Function |
|
|
|
and Temperature |
Electronic Key |
|
|
Controls |
Pad Entry |
|
|
Model/Serial |
Broil Element |
|
|
Number Plate |
|
|
|
(under control |
Interior |
|
|
panel) |
||
|
Oven Light |
||
|
|
||
Controls |
Meat Probe Jack |
Oven Racks |
|
TruConvec™ |
(3/upper oven; |
||
3/lower oven) |
|||
Element |
|||
|
|||
(behind baffle) |
|
||
Product |
|
||
|
Bake Element |
||
Interior Oven Light |
|
||
|
|
||
|
|
Lower Oven |
Professional Series Premiere double oven is shown above.
Meat Probe (available on Premiere models)
Cable Probe
Handles
Plug
Temperature Control
Both ovens share the temperature control. To use this feature, select the upper or lower oven, and then set the desired temperature. The controls can be set at any temperature from 150° F (65.6° C) to 550° F (287.8° C).
Electronic Keypad Entry
Both ovens share the electronic keypad entry. The alphanumeric keys can be used to program and control all oven functions.
Oven Function Selector Control
Both ovens offer 14 separate cooking modes from which you can choose the one that best meets your cooking needs.
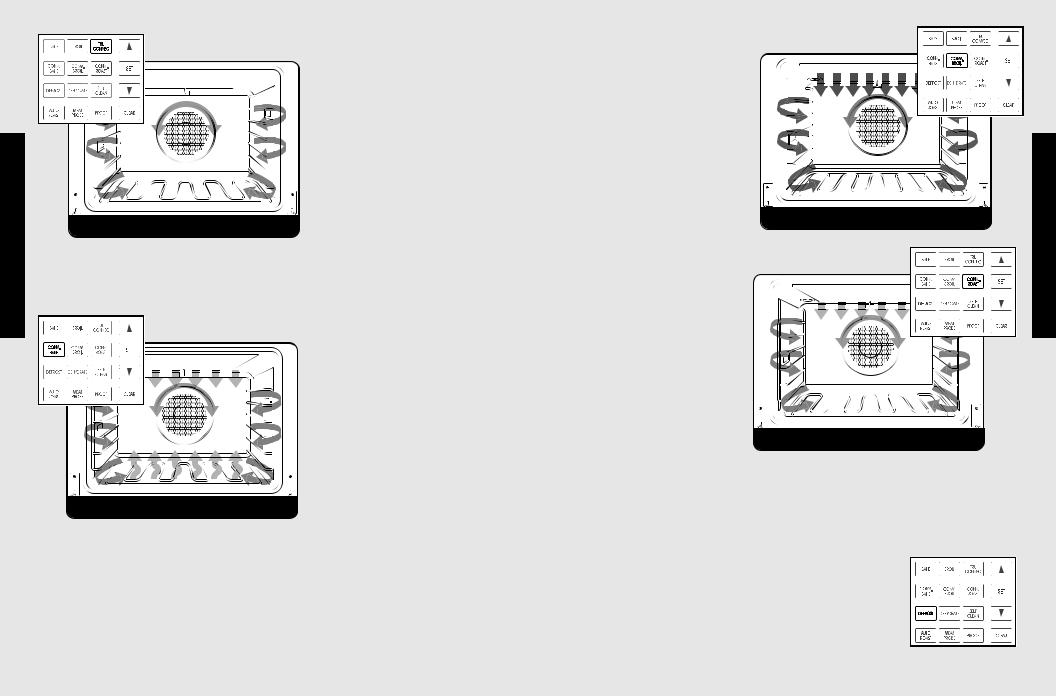
Bake
When using this function, fullpower heat is radiated from the bake element in the bottom of the oven cavity, while supplemental heat is radiated from the broil element. This function is recommended for single-rack baking. Use this setting for
baking, |
roasting, and |
|
casseroles. |
|
|
|
Bake |
|
Broil
This function is a dry-heat |
|
|
|
|
|
|
|
|
|
|
|
|
|
|
|
||||
cooking method, using direct |
|
|
|
|
|
|
|
|
|
|
|
|
|
|
|
||||
or radiant heat on three |
|
|
|
|
|
|
|
|
|
|
|
|
|
|
|
||||
different |
settings: |
low, |
|
|
|
|
|
|
|
|
|
|
|
|
|
|
|
||
medium |
and |
high. |
The |
|
|
|
|
|
|
|
|
|
|
|
|
|
|
|
|
distance between the foods |
|
|
|
|
|
|
|
|
|
|
|
|
|
|
|
||||
and |
the |
broil |
elements |
|
|
|
|
|
|
|
|
|
|
|
|
|
|
|
|
determines broiling speed. |
|
|
|
|
|
|
|
|
|
|
|
|
|
|
|
||||
This function is recommended |
|
|
|
|
|
|
|
|
|
|
|
|
|
|
|
||||
for small, individualized cuts, |
|
|
|
|
|
|
|
|
|
|
|
|
|
|
|
||||
such |
as steaks, |
chops |
and |
|
|
|
|
|
|
|
|
|
|
|
|
|
|
|
|
|
|
|
|
|
|
|
Broil |
||||||||||||
patties. |
|
|
|
|
|
|
|
|
|
|
|
|
|
|
|
|
|
|
|
Controls Product
10 |
11 |
Product Controls
Touch Pad Functions
TruConvec™
With this function, only the rear element operates at full power.
Thereis no direct heat from the
bottom or top elements, and
the motorized fan in the rear of
the oven circulates for even
heating. Use this setting for foods that require gentle cooking, such as pastries,
soufflés, yeast breads, quick breads, and cakes. This setting produces breads, cookies, and other baked goods with an
even texture and golden crusts. No special bakeware is required. Use this function for single-rackbaking,multiple-rackbaking,roasting,and preparation of complete meals. This setting is also recommended when preparing large quantities of baked goods at one time.
Convection Bake
With this function, the bottom
element operates at full power,
and the top broil element
operates at supplemental
power.The motorized fan in the
rear of the oven circulates
heated air, providing a more
even heat distribution. This
even circulation of air equalizes the temperature throughout the oven cavity and eliminates the hot and cold spots found in
conventional ovens. A major benefit of convection baking is the ability to prepare food in larger quantitiesusing multipleracks.When roasting using this setting, cool air is quicklyreplaced,searingmeatson the outsideand retaining more juices and natural flavor on the inside with less shrinkage. With this heating method, foods can be baked and roasted at the same time with minimal taste transfer,even when differentdishes are involved, such as cakes, fish, or meat. The hot air system is especiallyeconomicalwhen thawing frozen food. Use this setting for baking and roasting.
Touch Pad Functions
Convection Broil
Using this function, the top element operates at full power.This function is exactly the same as regular broiling with the additional benefit of air circulation by the motorized fan in the rear of the oven. Smoke is reduced since the airflow also reduces peak temperatures on the food. Use this setting for broiling thick cuts of meat.
Convection Roast
With this function, the convection element runs in conjunction with the inner and outer broil elements. The reversible convection fan runs at a higher speed in each direction, allowing the moisture to be sealed inside large cuts of meat, such as roasts. This saves time when compared with single fan convection roast modes. Use this setting for whole turkeys, whole chickens, and roasts.
convection broil
convection roast
NOTE: Because this function uses a high-speed convection fan for optimum cooking performance, some noise may be noticed from this high fan speed. This is normal.
Defrost
With the temperature control off, a motorized fan in the rear of the oven circulates air. This fan accelerates natural defrosting of the food without heat.
NOTE: To avoid sickness and food waste, do not allow defrosted food to remain in the oven for more than two hours.
Controls Product
12 |
13 |
Product Controls
Touch Pad Functions
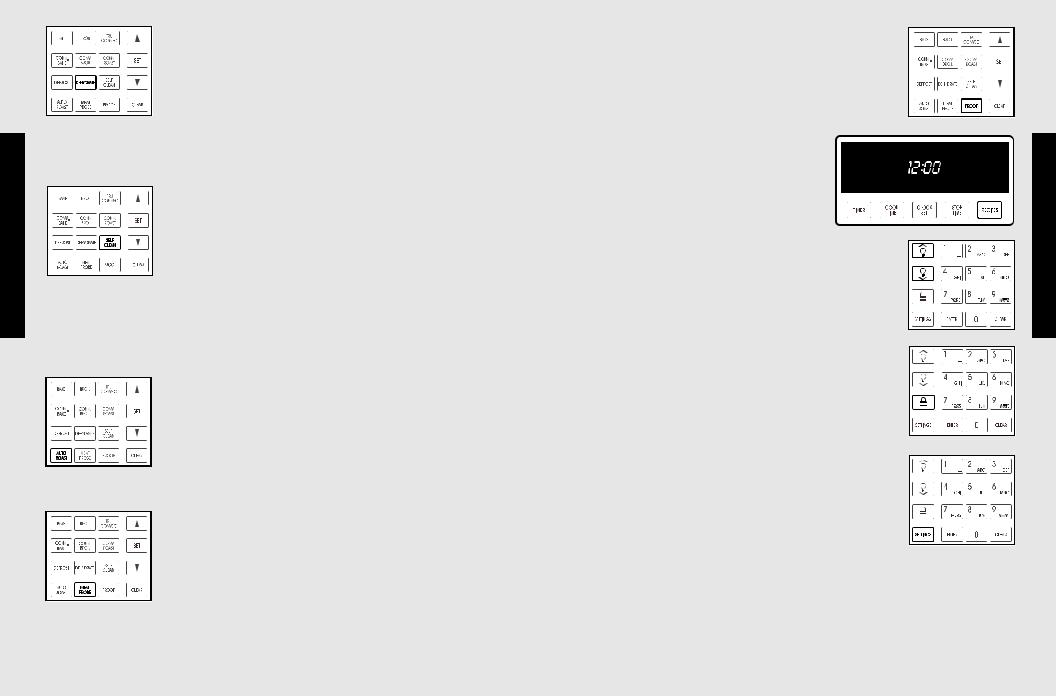
Dehydrate
With this function, a motorizedfan in the rear of the oven circulates warm air. Over a period of time, the water is removed from the food by evaporation. Removal of water inhibits growth of microorganismsand retardsthe activity of enzymes. It is important to remember that dehydration does not improve quality; only fresh, top-quality foods should be dehydratedin your oven.
Self-Clean
The self-cleaning cycle is designed to eliminate the need for scrubbing and scouring food baked onto the oven interior. During this cycle,the oven uses high temperatures to burn off soils and deposits. An integral smoke eliminator reduces odors associatedwith the soil burn-off. A powder ash residue is left in the bottom of the oven after completion of the self-clean cycle. When the oven has cooled, remove any ash from oven surfaces with a damp sponge or cloth.
Auto Roast*
This function further simplifies roasting by automatically searing the outside of meats, raising the pre-set temperature by 100° F for a short time to sear the outside of the meat. The temperaturethen returns to the pre-set temperature in the standardconvection roast mode.
Meat Probe*
The probe temperaturefunction is used to automatically turn the oven off when the internal temperature of meat being cooked is reached.
Touch Pad Functions
Proof*
This function uses a low temperature to create an optimal environment for the yeast to rise in many types of dough.
Recipes*
This setting accesses, programs, and saves cooking cycles from favorite recipes.
Interior Oven Light Controls
The upper and lower ovens have interior oven lights controlled by the right touch pad. Push the light button to turn the interior oven lights on and off.
Oven Lock
This child protection function prevents the oven controls from being activated when the oven is not in use.
Settings
Use this function to access, program, and customize special features of your oven. Special features include tones, timeouts, display brightness, and the Sabbath mode.
*Note: The AUTO-ROAST, PROOF, RECIPE and PROBE functions are included on the Premiere models.
Controls Product
14 |
15 |
Programming Modes
Clocks and Timers
Electronic Timing Center
The Electronic Timing Centeris used to program and control
all timing functions on your Viking appliance.
It has four display and programming modes that are activated by the four push buttons. Both the Timerand the Cook Time/Stop Time Modes can be used to time cooking periods. These featurescan even be used at the same time when both ovens are in use. For example, you can time-bakea casserolein the upper oven using the Cook Time/Stop Time Mode, while broiling in the lower oven using the Timer. One oven can also be cleaned while timing foods in the other oven using the timer.
Timer Alarm
•At the end of a program,the alarm will consistof three beeps, followed by two beeps every 10 secondsuntil the “CLEAR” button is pressed.
•Whenever a valid functionkey is pressedor when a control function startsautomaticaly, one beep will sound.
•When an invalid functionkey is pressed,two beeps will sound.
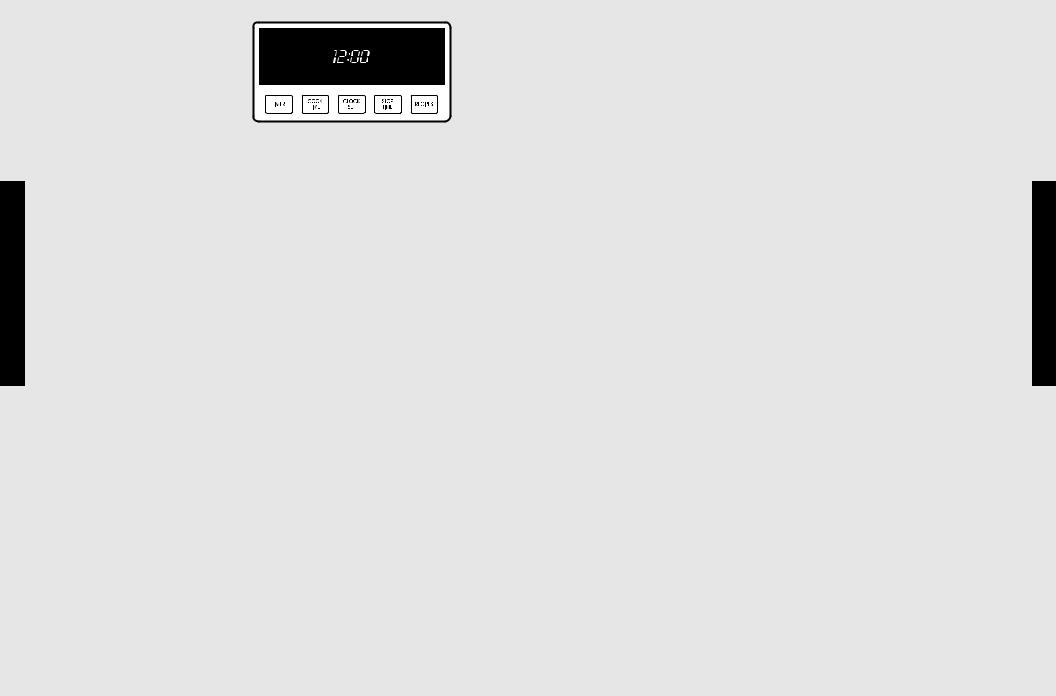
Setting the Clock
The time-of-daymust be set before any other program can be used. When your oven is first connectedto the power in your home, the timer display will show 12:00.
ToProgram the Time-Of-Day:
1.Press either the “UPPER OVEN” or “LOWEROVEN” button.
2.Press the “CLOCK SET” button.The clock will begin to flash. The word “CLOCK” will be lit on the display.
3.Type in the correcttime on the electronic number keypad.
4.Press the “CLOCK SET” buttonagain. The clock is now set.
Alternate Method:
1.Press either the “UPPER OVEN” or “LOWEROVEN” button.
2.Pressthe “CLOCK SET” button.The clock will begin to flash. The word “CLOCK” will be lit on the display.
Clocks and Timers
3. Use the up and down arrows to change the current time.
|
Press and Release |
Press and Hold |
|
|
|
|
|
▲ |
Time increases by |
Time increases by |
|
one minute |
10 minutes |
||
|
|||
|
|
|
|
▼ |
Time decreases by |
Time decreases by |
|
one minute |
10 minutes |
||
|
|||
|
|
|
4.Press the “SET” button on the temperature control or the “CLOCK SET” button on the electronic timing center. The clock is now set.
Note: The time-of-day cannot be changed while there is a Bake Hours or Start Time cycle programmed into the timer.
Setting the Timer
The timer is designed for accurate timing and is ideal for baking delicate items such as biscuits, cookies, and popovers, and for precise broiling. The timer can be used for timing up to 12 hours. When setting the timer,the time displayed will decrease in 1 minute increments. When the timer counts down to 1 minute, the timer alarm will give one short beep and the display will change to seconds. When the timer reaches 0:00, the alarm will give one long beep.
To Set the Timer:
1.Press the “TIMER” button. The timer will display “0:00” and the word “TIMER.”
2.Type in the desired duration time on the electronic number keypad.
3.The timer will start automatically. (To cancel the entry,press the “CLEAR” button on the left side of the control panel before
the count down begins and the time is still flashing.) 4. The timer is now set.
Alternate Method:
1.Press the “TIMER” button. The timer will display “0:00” and the word “TIMER” will be lit on the display.
Modes Programming
16 |
17 |

Programming Modes
Clocks and Timers
2. Use the up and down arrowsto set the timer.
|
Press and Release |
Press and Hold |
|
|
|
|
|
▲ |
Time increases by |
Time increases by |
|
one minute |
10 minutes |
||
|
|||
|
|
|
|
▼ |
Time decreases by |
Time decreases by |
|
one minute |
10 minutes |
||
|
|||
|
|
|
3.Press“SET” or “TIMER” to programthe timer.(Tocancel the entry,pressthe “CLEAR” buttonon the left side of the control panel.)
4.The timer is now set.
Cook Time and Stop Time
With the Viking oven, you can choose what times you need to start and stop cookingyour food. The Cook Time and Stop Time functions allow you to programyour preferences.
Here’show it works:
It is 2:00 PM and you would like to have your dinnerready at 6:00 PM. By programming your oven with a two-hourcook time and a 6:00 PM stop time, your oven will delay cookinguntil 3:50 PM. At 3:50, the oven will begin preheating.At 4:00 PM, the oven will begin its two-hourcook time.
Cook Time and Stop Time Facts:
Both ovens can be set individuallyfor Cook Time and Stop Time functions.
ToSet Cook Time:
1.Select UPPER OVEN or LOWER OVEN.
2.Select an oven functionand temperaturebeforesetting Cook Time and Stop Time functions.
3.Press “COOK TIME” and the display will flash “0:00” and “COOK TIME” will be lit below.
4.Use numeric keyboardto enter the amount of time needed for cooking.
5.After the time is entered,the display will show “COOK TIME” under the timer field.(Tocancelthe entry,pressthe “CLEAR” button on the left side of the controlpanel.)
Clocks and Timers
6.Press “SET” or “ENTER” if the cook time is correct. Cook time is set.
NOTE: To cancel cook time during its cycle, press “COOK TIME” and then press the “CLEAR” button on the left side of the oven control. Cooking will continue if the oven is on.
To Set Stop Time:
1.Set Cook Time, following the steps provided in the previous section.
2.Press “STOP TIME” and “STOP TIME” will be lit on the display.
3.Use numeric keyboard to enter the time you want to stop for cooking.
4.After the time is entered, the display will flash the time. (To cancel stop time, press the “CLEAR” button on the left side of the control panel.)
5.Press “SET” or “STOP TIME” if the stop time is correct. Stop time is set and will begin when the oven is preheated.
NOTE: Display will show Cook Time and Stop Time. If you have entered a time incorrectly, you will hear a long beep and the display will not change.
NOTE: To cancel stop time during its cycle, press “STOP TIME” and then press the “CLEAR” button on the left side of the oven control. Cooking will continue if the oven is on.
When Stop Time has been reached:
1.Your oven will sound three beeps, and “HOLD” will appear on the display.
•The oven will stay at 150º F in hold mode for two hours.
•After two hours, the oven will sound four long beeps and shut off.
2.Press “OFF” to turn off the oven manually.
Modes Programming
18 |
19 |
 Loading...