


Congratulations!
Congratulations on purchasing Universal Remote Control’s WR7 7-Component Pre--Programmed and Learning remote control. You now have the power to control your entire home entertainment system with one easy--to--use remote. The WR7can be used with thousands of audio/video components because of the extensive library of codes that have already been programmed into the remote. So... get ready to sit back, relax, and simplify your home entertainment experience.
This Owner’s Manual is designed to assist you in programming your WR7 remote to work with your components by guiding you through an easy step- by-step process. Everything you need to know about programming the WR7 is contained in this Manual.
WR7 Owner’s Manual© 2008 Universal Remote
Control, Inc.
This document is protected by the copyright laws of the United States and internationally by the Berne Convention. No part of this manual may be reproduced in any form without the express written consent of Universal Remote Control, Inc. Although reasonable care has been taken to assure the accuracy of the information herein contained, Universal Remote Control, Inc. is not responsible for operational, technical or editorial errors or omissions. The specifications and information in this manual may be subject to change without notice. MacroPower™ and SimpleSound™ are trademarks of Universal Remote Control, Inc. Entertainment Made Simple® is a registered trademark of Universal Remote Control, Inc. All other brand or product names are trademarks or registered trademarks of their respective owners.
The Pioneer in Control Technology
500 Mamaroneck Avenue, Harrison, NY 10528 Phone: (914) 835-4484 Fax: (914) 835-4532
Page 2
Table of Contents
Getting Started - Overview
• Control up to 7 Components |
......5 |
• Activating Component Buttons ....5 |
|
• Learning Capability................... |
5 |
• AUX Function............................ |
6 |
• Light Button............................... |
6 |
• Battery Installation..................... |
6 |
• Low Battery Warning................. |
6 |
• Couch Mode ............................ |
6 |
Special Advanced Features |
|
• MacroPower™ & Other |
|
Macros .................................... |
7 |
• “My Favorites” - Favorite |
|
Channels.................................. |
7 |
• SimpleSound™ & Other |
|
“Punch Throughs” ...................... |
7 |
Keypad Layout & Button |
|
Functions ........................ |
8 |
Programming WR7 Using |
|
Pre-Programmed Codes..... |
9 |
• Quick Set-Up Method............ |
9-10 |
• Three-Digit Code Entry |
|
Method ............................. |
11-13 |
• Auto-Search Method ........... |
14-15 |
Programming WR7 Using |
|
the Learning Method ..16-18 |
|
AUX Function: Programming |
|
a 7th Component............ |
19 |
Finding a Component’s |
|
Set-Up Code Number ..19-20 |
|
Page 3
Programming Special |
|
Advanced Features |
|
• MacroPower™ Total System |
|
On/Off .............................. |
21-22 |
• “My Favorites” – Favorite |
|
Channels............................ |
23-24 |
• SimpleSound™ Total System |
|
Volume Control.................... |
25-26 |
• Channel Control |
|
“Punch Through”....................... |
27 |
• Transport Control |
|
“Punch Through”....................... |
28 |
• OSD (On-Screen Display) |
|
Control “Punch Through”............ |
29 |
Erasing Commands - |
|
Overview...................... |
30 |
• Erasing a Single Learned |
|
Command ............................... |
30 |
• Erasing All Learned Commands |
|
from One Component............... |
31 |
• Erasing MacroPower & Other |
|
Macro Commands ................... |
32 |
• Erasing SimpleSound & Other |
|
“Punch Through” Commands...... |
33 |
• Factory Reset ........................... |
34 |
Pre-Programmed Code |
|
Tables .......................... |
35 |
• AUDIO .................................. |
36 |
• CD ........................................ |
37 |
• VCR/DVR............................... |
38 |
• AUX ...................................... |
39 |
• TV .................................... |
40-41 |
• DVD ...................................... |
42 |
• CABLE/SAT ............................ |
43 |
FAQs ............................ |
44 |
Warranty ...................... |
45 |
Specifications ................ |
45 |
Page 4 |
|
Getting Started -
Overview
Control up to 7 Components
The WR7 remote control is designed to control up to seven different Audio/Video components and operate virtually all brands of AUDIO, TV, DVD, VCR/DVR, CD, SAT/CABLE and AUX (Light, Music Server, etc.) components.
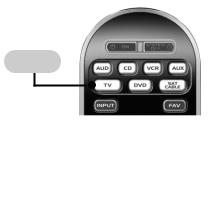
Activating Component Buttons
Once you have programmed the WR7 for all of your components, all you need to do is press a component button and all the buttons on the WR7 will work with that component. For example, when you press the TV component button, all the buttons on your WR7 will operate your TV. If you press the DVD component button, all the buttons on the WR7 will operate your DVD.
Each time you press any of the buttons on the remote, the LED light in the component button will light up to indicate which component you are controlling.
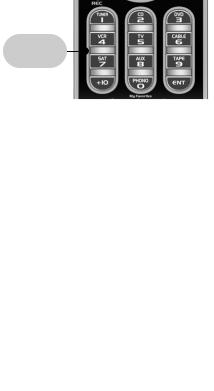
TV BUTTON
Capability
the ability to “learn” functions remote controls of other even if they are not in the
database.
Page 5
AUX Function
The AUX (Auxillary) button is designed to operate a 7th audio/video component that you may have in your system… such as a TIVO, a second VCR or DVD, or an additional audio component.
Light Button
The WR7 features a fully backlit keypad for ease of use in low light or darkened viewing conditions. Press the LIGHT button to backlight all the keypad buttons. Press again to turn off (or simply wait 10 seconds for automatic shut-off).
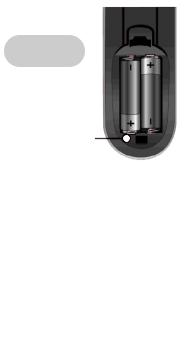
Battery Installation
Press the tab and remove the cover of the battery compartment located in the back of your remote. Insert the two AA Alkaline batteries (included in the package) making sure to match the positive (+) and negative (- ) symbols as shown in the diagram. Place the cover back over the battery compartment.
INSERT BATTERIES
CORRECTLY
|
|
|
|
|
|
|
|
|
|
|
|
|
low and need to be |
||
|
LED will quickly |
||
|
you press the |
||
|
. |
|
|
The |
to automatically turn |
||
|
pressed for more than |
||
30 |
battery power |
||
|
should the remote acci- |
||
|
the couch cushions. |
||
Page 6
Special Advanced
Features
The WR7 also offers the following special advanced features that can offer you many time-saving conveniences:
MacroPower™ & Other Macro
Buttons
MacroPower is a unique feature that enables you to turn all your components ON or OFF, all at the same time, simply with the press of one button. The WR7 has 13 Macro buttons that are designed to store up to 20 commands in each button. Pressing any one of the Macro buttons will send out the series of commands that are stored in that button.
“My Favorites”
(Favorite Channels)
This is one of the most desirable features of the WR7 remote control. Once it’s set up, you can select one of four favorite channels with the press of one button – without the need to type in a channel number. So, whether it’s CNN or the Food Network, your favorite viewing spot is just one click away.
SimpleSound™ & Other “Punch
Throughs”
SimpleSound Volume Control is a dynamic feature that gives you total volume control over all the components in your system, even those that do not have their own built--in volume control, such as TIVO, DVD and VCR... saving you the hassle and inconvenience of constantly needing to switch between component modes on the remote. As an example, in order to increase the volume while watching a DVD, you would typically have to pick up the TV remote control to increase the volume. With the WR7, you do not even have to press the TV component button. Once you program SimpleSound in your DVD mode, you will automatically have TV volume control in DVD mode.
SimpleSound is what is called a “Punch Through” feature and is not limited to volume control. It can also be applied to Channel Control, Transport Control, and OSD Control.
Page 7
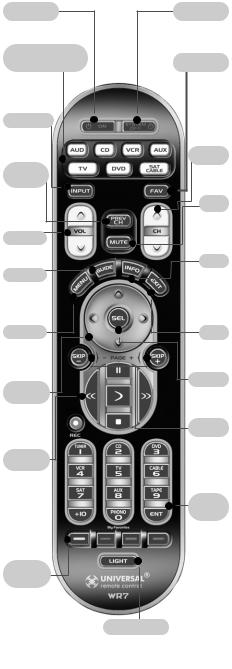
Keypad Layout &
Button Functions
ON
Allows you to turn the selected component on and off.
AUD, CD, VCR, AUX, TV, DVD,SAT/CABLE
Used to select the component you want to operate and signals remote control activity.
INPUT
PREVIOUS
CHANNEL
VOLUME
GUIDE
MENU
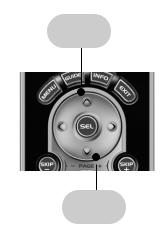
CURSOR NAVI-
GATION PAD
Used for programming steps and onscreen navigation and highlighting.
TRANSPORT
CONTROLS
Perform standard VCR and DVD functions when in VCR and DVD mode, or VOD (Video-On- Demand) and DVR (Digital Video Recorder) functions when in Cable mode.
MY
FAVORITES
|
SYSTEM OFF |
Designed |
Power On/Off |
commands |
up to seven com- |
ponents with one button press.
FAVORITE
Designed to send Power On/Off commands for up to seven comone
button press.
CHANNEL
Selects the next higher or lower channel.
MUTE
Silences the Audio. Press to activate. Press
sound level.
INFO
Displays information program
highlighted in the Program Guide (see GUIDE).
Exits screen
SELECT
Selects highlighted screen options.
SKIP-/+
Skip forward or backward a whole day in the Program Guide.
NUMBER
PAD
alpha to Audio that can
LIGHT BUTTON respective
Press |
. |
Press |
10 |
|
. |
Page 8
Programming WR7 using Pre-Programmed Codes
There are three ways you can program your WR7 using the component brand codes that are pre-programmed into the remote.
•Quick Set-Up Method
•Three-Digit Code Entry Method
•Auto--Search Method
The Quick Set-Up Method is a unique new feature that enables the fastest and easiest set-up by using one-digit codes for up to 10 major brands for each component. The Three-digit Code Entry Method allows you to set-up the WR7 using 3-digit codes for component brand names. It is also a fast and easy way to program the remote. The Auto-Search Method scans through all the brands in the remote control, one at a time. It should be used when either the Quick Set-Up or Three-Digit Code Entry Methods do not work.
* * *
Quick Set-Up Method
STEP 1: Manually or using your old remote, turn on the component you want to program—for example, to program your TV, turn on your TV set.
STEP 2: Point the WR7 toward the component that you want to program (in this case the TV set) and press and hold the component button (in this case the TV button).
While holding down the component button, begin to press numeric keys, one number at a time, starting from 1, continuing to 2, 3…0 until the component (in this case the TV) turns off.
Page 9
STEP 3: Release the component button to save the code. The component LED light will blink three times to confirm that the code has been stored.
Repeat the above steps for other components.
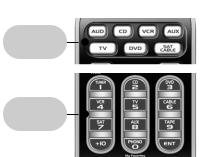
COMPONENT
BUTTONS
NUMBER
PAD
Page 10
Three-Digit Code Entry Method
STEP 1: Find the 3-digit code numbers assigned to your brand from the lists in the back of this manual. The codes are listed by component category (i.e., TV, VCR, DVD, etc.), then by brand name. For instance, if you would like to locate a code for a Sony television, first locate the TV category and then look for the Sony brand.
STEP 2: Once you have located the 3- digit codes for each of the components that you wish to operate with your WR7, write them ALL down on a piece of paper. It’s important that you write down all the codes listed for your brand because only one code is going to work with your component.
STEP 3: Manually or using your old remote, turn on the component you want to program—for example, to program your TV turn on your TV set.
STEP 4: On the WR7, press the Component button that you want to program (in this case the button that says TV) and the SELECT [SEL] button at the same time. Hold down both buttons for two seconds until the TV Component LED light turns on. This signals that you are in programming mode.
COMPONENT
BUTTONS
SELECT
BUTTON
Page 11
IMPORTANT: You have 30 seconds to perform the next step while you are in programming mode. If you do not press a button within 30 seconds, the component LED light will turn off. The remote will exit the programming mode and you will have to start over.
STEP 5: Point the WR7 toward the component (in this example the TV) and punch in the first 3-digit code that you wrote down for that specific component. Use the Number buttons 0~9 on the remote to punch in the code. The TV LED light will blink each time a number is pressed.
NUMBER
BUTTONS
number you just punched number, the component you
will turn off. If it did the next code number
until it does turn off.
you’ve entered the code component has turned off,
[ON] button on the WR7 the component back on.
and CHANNEL butand STOP buttons for VCR and sure they all work. For exam-
Sony TV turned off with 147, but the volume controls
. In this case, try the listed for that component.
using the next code number a perfect match.
Page 12
STEP 7: Once you’ve entered a correct code, you must save it. Press the component button you just programmed (in this case TV) one more time to save the code number.
The component LED light will blink three times to confirm that the code was successfully stored. Now when you press the TV component button, all of the buttons will work with your TV.
Program the remaining components by repeating steps 3 through 7.
IMPORTANT: If you have tried all the setup codes in the list and the component still did not turn off after Step 5, either the AutoSearch Method (page 14) or the Learning Method (page 16) will help you program.
Page 13
Auto-Search Method
The Auto-Search Method is a way you can scan through all of the codes in the table to find the right code for your component.
STEP 1: Manually or using your old remote, turn on the component you want to pro- gram—for example, to program your TV, turn on your TV set.
STEP 2: On the WR7, press the Component button that you want to program (in this case the button that says TV) and the SELECT [SEL] button at the same time. Hold down both buttons for two seconds until the TV Component button light turns on. This signals that you are in programming mode.
IMPORTANT: You have 30 seconds to perform the next step while you are in programming mode. If you do not press a button within 30 seconds, the component LED light will turn off. The remote will exit the programming mode and you will have to start over.
UP
ARROW
DOWN
ARROW
Page 14

STEP 3: Point the WR7 remote control toward the component and press the UP [ ] arrow (or DOWN [ ] arrow) button once. Each time the UP or DOWN arrow button is pressed, the code will count up (or down) one code number and send a Power OFF signal. When the correct code is sent out, the component will turn off.
STEP 4: Once you have found the right code number and the component has turned off, press the POWER [ON] button on the WR7 remote to turn the component back on.
Next test the VOLUME and CHANNEL buttons (or PLAY and STOP buttons for VCR and DVD) to make sure they all work. If any of the buttons do not work properly, you need to find a new code. Continue pressing the UP (or DOWN) arrow button until you find a new code that turns off the component and makes the VOLUME or PLAY buttons respond correctly.
STEP 5: Once you have found the right code, you must save it. Press the component button you just programmed (in this case TV) one more time to save the code number. The component LED light will blink three times to confirm that the code was successfully stored. Now when you press the TV component button, all of the buttons will work with your TV.
NOTE: Use this method for those components you cannot program with either the Quick SetUp or 3-digit Code Entry Methods.
IMPORTANT: If you cannot find the right code after 5 minutes of trying the Auto-Search Method, try the Learning Method (page 16).
PLEASE DO NOT RETURN
THIS PRODUCT TO THE STORE
PLEASE CONTACT OUR TECHNICAL
SUPPORT CENTER.
IF YOU NEED ASSISTANCE E-MAIL techsupport@UniversalRemote.com
or dial 1-800-901-0800
(9:00AM - 6:00PM EST)
Page 15
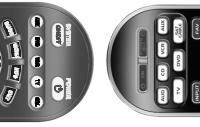
Programming WR7 using the Learning Method
STEP 1: Line up the WR7 to the remote control you want to “learn” from, head--to--head as shown below. Start with both remotes’ IR windows touching (or nearly touching).
STEP 2: On the WR7, press the Component button that you want to program (in this case the button that says TV) and the ENTER [ENT] button at the same time. Hold down both buttons for two seconds until the TV Component button light turns on. This signals that you are in programming mode.
IMPORTANT: You have 30 seconds to perform the next step while you are in programming mode. If you do not press a button within 30 seconds, the component LED light will turn off. The remote will exit the programming mode and you will have to start over.
STEP 3: Press any button on the WR7 that you want to teach a command to. For example, if you want to teach the [MUTE] button on the WR7 the TV Mute command from the other remote, first press the [MUTE] button on the WR7 and the TV component button LED light will blink once indicating that the WR7 is ready to learn the command.
Page 16
 Loading...