


WDECT3315
WDECT3315+1
Series Owner’s Manual
OWNER’S MANUAL


installation & safety
Choosing the best location for your phone.
When choosing a location for your phone there are a number of appliances the phone should not be near, and areas you should avoid.
AVOID - Television sets and other electronic appliances
CHOOSE -
a central location
AVOID -
Moisture
AVOID -
Microwave ovens
AVOID - moisture
Don’t - overload the power outlet.
AVOID -
Computers
AVOID -
other cordless telephones
Note: Ringing will not be impaired by adding extra cordless handsets.
For detailed installing method, please refer Set-Up Guide.
CHARGE - the new phone for 15 - 20 hrs.
AVOID -
multi power boards.
AVOID - connecting
more than
3
phones as ringing may be impaired
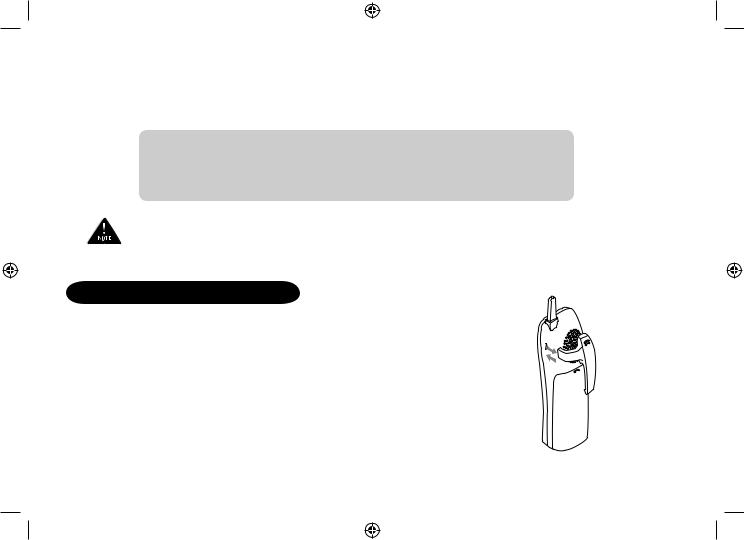
•This symbol indicates important operating
and servicing instructions.
•The earcap of this telephone may attract and retain small metallic objects.
[ i ]

Contents
installation & safety |
i |
Contents |
ii |
getting started |
1 |
Controls and Functions |
1 |
Welcome |
2 |
Features |
3 |
Terminology |
3 |
Mounting the Base Unit on a Wall |
4 |
Battery Maintenance |
5 |
Installing the Beltclip |
6 |
Headset Installation |
7 |
Display and Icons |
7 |
About the Menu Options |
8 |
Setting up the Menu |
11 |
Basics |
18 |
Making and Receiving Calls |
18 |
Keypad Lock |
19 |
Placing a Call on Hold |
19 |
Redialing a Call |
20 |
Adjusting the Handset Ringer, |
|
Earpiece and Speaker Volume |
21 |
Mute Microphone |
22 |
Tone Dialing Switch-Over (Australia Only) |
22 |
Traveling Out-of-Range |
22 |
Clarity Booster |
23 |
Privacy Mode |
23 |
Find Handset |
24 |
Flash and Call Waiting |
24 |
Using One Touch Voice Mail Access |
25 |
Phonebook |
26 |
Phonebook |
26 |
[ ii ]
Storing Phone Numbers, Names, |
|
Distinctive Rings, and Speed Dial |
26 |
Steps for Entering Names and Special Characters 28
Viewing the Phonebook |
30 |
Making Calls Using the Phonebook |
31 |
Speed Dialing |
31 |
Editing or Erasing a Stored Name, |
|
Phone Number, Distinctive Ring, and Speed Dial 32 |
|
Chain Dialing |
33 |
Caller ID |
34 |
Caller ID |
34 |
Viewing the Caller ID List |
35 |
Deleting a Caller ID Message |
36 |
Using the Caller ID Message List |
37 |
Expanding your phone |
38 |
Expanding your Phone |
38 |
Register the Handset |
39 |
Using Two Way Communication between the |
|
Handsets Anywhere without the Base (Directlink) |
40 |
Room Monitor |
40 |
3-Way Conferencing |
41 |
Intercom/Call Transfer Feature |
41 |
Replacing the Base |
42 |
Additional Information |
43 |
Changing the Digital Security Code |
43 |
Note on Power Sources |
44 |
Troubleshooting |
45 |
INDEX |
47 |
Warranty |
48 |
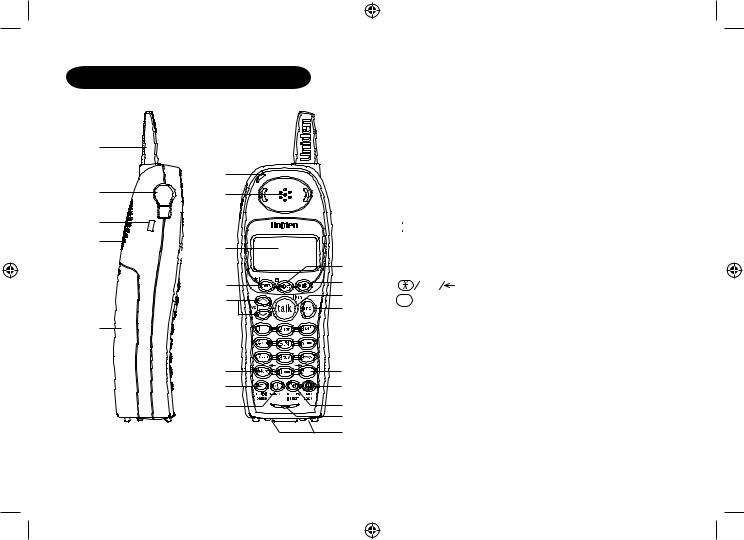
Controls and Functions
1
6
2 |
7 |
3
4
8
9
10
5
11
12
13
1.Handset Antenna
2.Headset Jack Cover
3.Beltclip Hole
4.Hands-Free Speaker
5.Handset Battery Compartment
6.New Message LED
7.Handset Earpiece
8.LCD Display
9. /del Key
10. /vol/
/vol/ /
/ Key
Key
a.ringer volume control
b.scroll keys for display
14 |
|
screen |
|
|
15 |
11. |
tone |
Key |
|
16 |
||||
|
|
|
1712.  redial/pause Key
13. speaker Key
14.
 Key
Key
15. Key
Key
1816. 


 Key
Key
1917.  Key
Key
2018. 

 Key
Key
2119.  phonebook Key
2220.  /transfer/int’com Key
21.Handset Microphone
22.Handset Charging Contacts
STARTED GETTING
[ ]
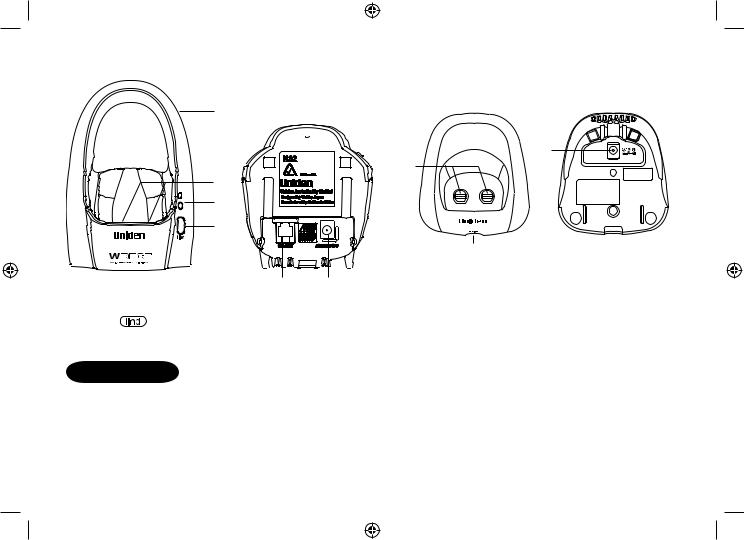
Main Base |
CHARGER BASE |
|
for WDECT3315+1 only |
23
31
29
24 25
26
|
|
|
|
|
30 |
23. |
Base Antenna |
27 |
28 |
29. |
Charging Contacts |
30. |
charge LED |
||||
24. |
Base Charging Contacts |
|
|
31. DC IN 9V Jack |
|
25. |
charge LED |
|
|
||
|
|
|
|
||
26. |
Key |
|
|
|
|
27. |
TEL LINE Jack |
|
|
|
|
28. |
DC IN 9V Jack |
|
|
|
|
Welcome
Congratulations on your purchase of the Uniden Multi-Handset Cordless System telephone. This unit is different from conventional cordless telephones. When the base unit is connected to AC power and a telephone line, it can support up to 4 handsets. Using extra handsets, you can establish a 3-way conference call (2 handsets and an outside line), while two other handsets are making an intercom call. You can now place a fully featured cordless handset anywhere in your home or office where AC power is available to connect the handset chargers.
Note: The illustrations in this manual are intended as a guide and may differ from actual unit.
[ ]

features
Great features of this cordless phone include:
•Designed and Engineered in Japan
•Wide Band Digital Technology
•Multi (4) Handset Capable
•Digital Duplex Speakerphone on Handset
Advanced Alpha Display Caller ID Features:
•Alpha Memory Dialing
•POP ID - Caller Name Identification*
•20 Individual Caller Tone Allocation*
•100 Caller ID * Memories with Phonebook
•3 Line Backlit Full Dot Matrix LCD Display with Clock
•Maxi-Sound - Extra Loud Handset Volume Control
•Intercom/Announce Call Transfer
•Handset Conferencing (2 Handsets + Outside Call)
•Two-Way Communication between Handsets Anywhere without the Base
•And More!
*Caller ID, POP ID and Individual Caller Tone Allocation (Distinctive Ring) features work only if you subscribe to the service provided by your local telephone company. There is usually a fee for this service.
# Range may vary depending on environmental and/or topographical conditions.
Terminology
Throughout this manual, terms such as Standby and Talk Mode are used. Below is the terminology explanation.
Standby Mode - The handset is not in use, is off the cradle, and 


 or
or  speaker has not been pressed. A dial tone is not present.
Talk Mode - The handset is not in the cradle and 


 or
or  speaker has been pressed enabling a dial tone. “Talk” appears on the display.
DirectLink - Two way communication between the handsets anywhere without the base.
[ ]
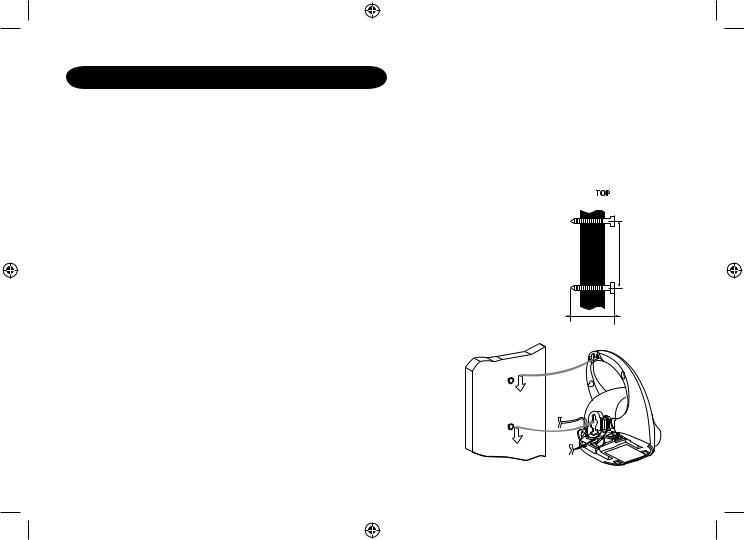
Mounting the base unit on a wall
You can mount your base directly to the wall. Before doing this, consider the following:
•Avoid electrical cables, pipes, or other items behind the mounting location that could cause a hazard when inserting screws into the wall.
•Mount your phone within distance of a working phone jack.
•Make sure the wall material is capable of supporting the weight of the base and handset.
•Use screws with anchoring devices suitable for the wall material where the base unit will be placed.
1)Insert two mounting screws into the wall (with their appropriate anchoring device), 85mm apart. Allow about 3mm between the wall and screwheads for mounting the phone.
2)Plug the AC adapter into the DC IN 9V jack on the telephone and then into a Standard AC wall outlet.
3)Plug the telephone cord into the TEL LINE jack on the telephone and then into the telephone socket on the wall.
 3mm
3mm
85mm
35mm |
4)Align the mounting slots on the base with the mounting posts on the wall.
5)Then push in and down until the phone is firmly seated.
This phone also can be mounted on any standard telephone wall plate (for Australia).
[ ]
battery maintenance
Battery use time (per charge)
Fully charged
•Up to 7 hours continuous use.
•Up to 10 days when the handset is in the standby mode (up to 15 hours when in DirectLink mode) Recharge your phone on a regular basis by returning the handset to the charger after each phone call.
Low battery alert
When the batteries are very low and need to be charged, the phone is programmed to eliminate functions in order to save power.
The batteries need to be charged when:
- The empty battery icon |
|
appears. |
|
|
|
|
|
||
- “Low Battery” appears in the display. |
Low Battery |
|
||
If the phone is in the standby mode, none of keys will operate. If you are on |
a |
|||
call, complete your conversation as quickly as possible, and return the |
|
|
||
handset to the cradle. |
|
|
|
|
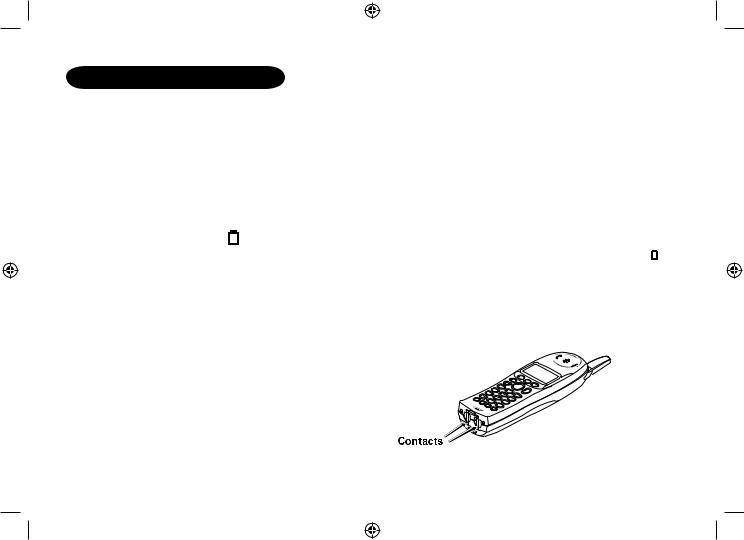
Cleaning the battery charging contacts
To maintain a good charge, it is important to clean the charging contacts on the handset once a month. Use a dry cloth or pencil eraser to clean.
[ ]
Battery replacement and handling
When the operating time becomes short, even after a battery is recharged, please replace the battery. With normal usage, your battery should last about one year. Please contact your place of purchase or the Uniden Parts Department for a replacement battery.
Caution
•Use only the specified Uniden battery pack (BT-446).
•Do not remove the batteries from the handset to charge them.
•Never throw the battery into a fire, disassemble them, or heat them.
•Do not remove or damage the battery casing.
To avoid the risk of personal injury or property damage from fire or electrical shock, only use the Uniden battery model and Uniden adapter model specifically designated for this product.
Installing the Beltclip
To attach the beltclip
Insert the beltclip into the holes on each side of the handset. Press down until it clicks into place.
To remove the beltclip
Pull either side of the beltclip to release the tabs from the holes.
[ ]
Headset Installation
Your phone may be used with an optional headset, the Uniden HS910. To use this feature, insert the headset plug into the headset jack. Your phone is ready for handsfree conversations. Headset is available through Uniden authorized retailers.
Display and Icons
Example of the standby mode display
SUN 12:00A |
|
|
|
Day of the week and time / battery icon |
||
|
|
|
||||
Handset #1 |
|
|
|
Handset ID and Banner |
||
|
|
|
||||
New: 5 |
:OFF |
|
|
Number of new Caller ID calls received / Ringer off icon (when the ringer is Off) |
||
|
|
|||||
|
|
|
|
|
|
|
|
|
|
|
|
|
|
ICON |
STATUS |
DESCRIPTION |
|
|||
Standby/Talk |
Battery icon indicates the handset battery status. This icon |
|||||
cycles depending on the battery status (full, medium, low, |
||||||
|
|
|
|
|
and empty). |
|
|
|
|
|
|||
:OFF |
Standby |
Ringer off icon indicates that ringer is turned off. |
||||
Talk Mute icon appears when you mute the handset.
|
Talk |
Speaker icon appears when the handset speaker phone is |
|
|
used. |
|
|
|
B |
Talk |
Booster icon appears when the Clarity Booster feature is in |
|
|
use. |
|
|
|
|
Talk |
Privacy icon appears when the Privacy Mode is turned on. |
[ ]

During Global Setup and System Reset, make sure your cordless phone is in standby mode (not in use), and all handsets are within range of the main base unit.
About the Menu options
There are 5 main menu options, (DirectLink Mode, Room Monitor, Handset Setup, Global Setup and System Reset) and submenu options.
Summary of the Main Menu and Submenu
Two Way Communication between the Handsets Anywhere without the Base (DirectLink)
DirectLink Mode allows a pair of handsets to work without the base unit, for direct handset-to-handset communication. Use them at sporting events or while shopping to stay in contact with family members or friends. You must set the two handsets to DirectLink Mode to utilize this feature.
Room Monitor
This feature only works if you have two or more handsets, allowing you to monitor sounds in another room (see page 12 for setup). One handset is placed in the desired room to monitor (acts as remote mic), and the other is placed near listener (remote speaker). This is useful for monitoring child activities.
[ ]
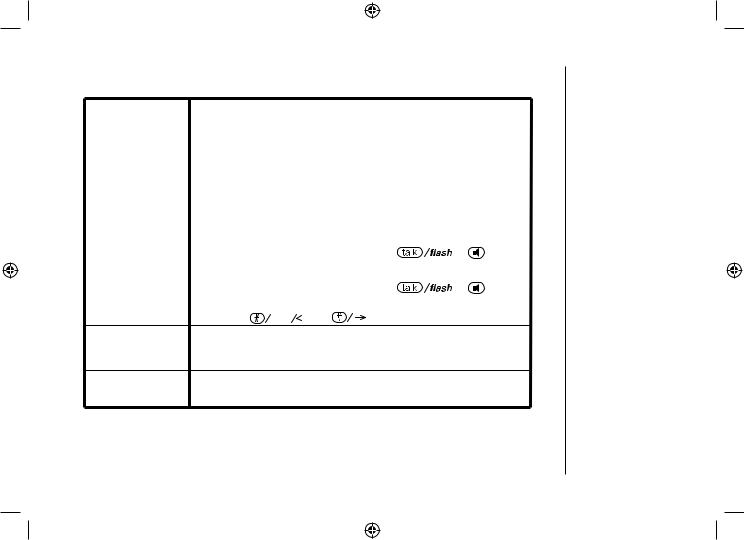
Handset Setup
The following submenu options must be set separately for each handset.
Submenu name |
|
|
|
Description |
|
|
|
|
Edit Voice Mail |
Program or delete the voice mail access number (see page 12). |
|
||||||
Ringer Tones |
Adjusting the ringer tone (tone your phone makes when ringing) |
|
||||||
(Default is Flicker) |
(see page 13). |
|
|
|
|
|
|
|
|
|
|
|
|||||
Distinct. Ring |
Set the distinctive ring (see page 13). “Distinctive Ring” allows you to preset |
|||||||
|
memory locations with a designated ring tone. When an incoming call |
|||||||
(Default is on) |
is received and the Caller ID information matches the information in one |
|||||||
|
of the memory locations, the distinctive ring that has been stored for that |
|||||||
|
particular Caller will sound. If you have set multiple memory locations with |
|||||||
|
distinctive rings, switching the setting to “Distinctive Off” will result in no |
|||||||
|
distinctive ringing. All incoming calls will have a normal ring tone. Switching |
|||||||
|
to “Distinctive On” will activate all programmed distinctive ring memory |
|||||||
|
locations. |
|
|
|
|
|
|
|
|
|
|
|
|
|
|||
AutoTalk |
Allows you to answer the phone without pressing |
|
or |
speaker. |
||||
|
||||||||
(Default is on) |
When the AutoTalk is set to on, simply remove the handset from the |
|
||||||
|
cradle and the phone automatically answers the call (see page 13). |
|
||||||
|
|
|
|
|
|
|||
Anykey Answer |
Allows you to answer the phone without pressing |
|
or |
|
||||
|
|
|||||||
(Default is on) |
speaker. |
|
|
|
|
|
|
|
|
When the Anykey Answer is on, you can answer a call by pressing any |
|||||||
|
number key, |
tone |
|
, or |
on the handset (see page 14). |
|||
|
|
|||||||
Banner (True Banner) Customize your handset(s) by giving it a banner name. The name will be displayed on the LCD screen during standby mode, Intercom, Transfer, Room Monitor and Copy Phonebook operation. The banner name will be displayed on the receiving handset as well (see page 14).
Key Touch Tone Allows you to set your phone’s key touch-tone to on or off (tone your (Default is on) keypad makes when keys are pressed) (see page 14).
[ ]
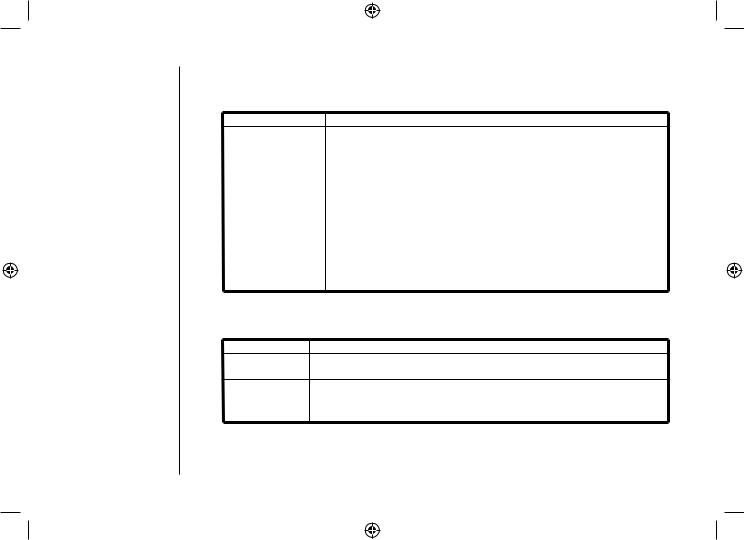
Global Setup
If you change one of the Global settings, you change the setting for all additional handsets. Only one handset can change Global settings at a time.
Submenu name |
Description |
Name Tag (POP ID) Display the stored name with the Caller ID telephone number, if the displayed Caller ID telephone number is exactly the same as
(Default is on) a number stored in the phone book (see page 15).
Insert 0 |
Add “0” or “00” to the number, when you receive the Caller ID |
(New Zealand only) |
message (see page 15). |
|
|
Day & time |
Set the day and time of your display (see page 15). |
|
|
Dial Mode |
Set the dial mode to tone or pulse (see page 16). Most phone |
|
systems use tone dialing, which send DTMF tone through |
(Australia only) |
phone line. The default is tone dialing. |
(Default is tone) |
Depends on your dialing system, set the dial mode. |
|
|
Copy Phonebook |
Allow you to transfer the phonebook data stored in one handset to |
|
another handset (see page 16). |
System Reset
System Reset is used to clear the handset’s ID from the main base unit, or the base ID from the handset.
Submenu name |
Description |
Deregister HS Clear the handset ID from the base. Use this option, for example, when you change the digital security code (see page 17).
Replacing Base Clear the base ID. Use this option, for example, if you wish to deregister the base to use the handset with
another base of the WDECT3315 and WDECT3355 series (see page 17).
[ 10 ]
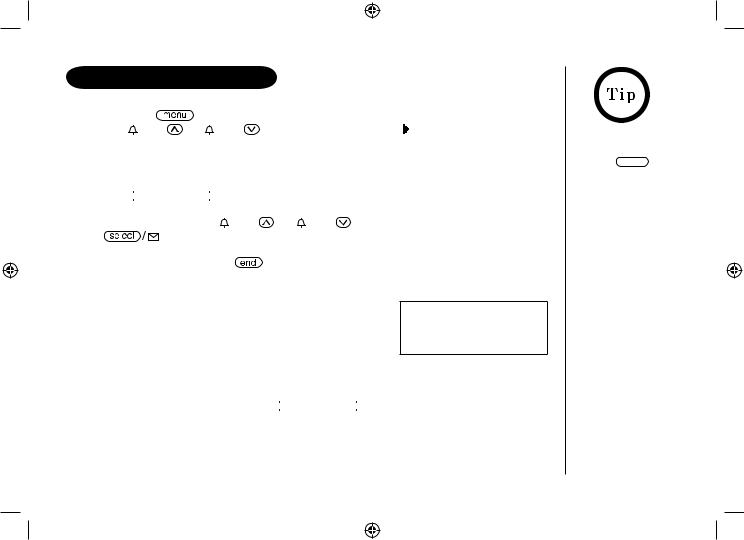
Setting up the Menu
Entering the Menu
1) |
Press the |
/del key in standby mode. |
|
|
DirectLink Mode |
||||
2) |
Use /vol/ |
or /vol/ to move the pointer to |
||
|
a desired main menu (DirectLink Mode, Room |
Room Monitor |
||
|
Monitor, Handset Setup, Global Setup, and |
Handset Setup |
||
|
System Reset). |
|
||
|
|
|||
3)Press 
 to select the desired main menu.
4)Use  /vol/
/vol/ or
or  /vol/
/vol/ to select a desired submenu, and then press

 to enter.
In the submenu, use /vol/ |
or /vol/ |
to select an item. Press |
|
|
to confirm your selection. For detailed instructions, see the following |
||
|
|||
|
|||
sections for the desired submenu. |
|
||
5) To exit the menu, press |
or return the handset to the cradle. |
||
DirectLink Mode
Entering the Two Way Communication between the Handsets Anywhere without the Base
1)Enter the DirectLink Mode menu (see “Entering the Menu” on page 11). To enter DirectLink mode press [SELECT] appears.
To enter DirectLink mode press [SELECT]
2)Press 
 to enter the DirectLink mode. You will hear a confirmation tone, and DirectLink Mode Complete appears.
To adjust ringer volume, press  /vol/
/vol/ or
or  /vol/
/vol/ to select one of three ringer volume (off, low, or high).
3)To return back to the normal mode, exit the DirectLink mode.
Press  /del, and then
 , or return the handset to the cradle.
DirectLink Mode Cancel appears.
To back to the previous screen, press 
 / del.
[ 11 ]
This is an example, if you have handset #1 and #2.
The Room/ Baby monitor function is not a replacement for
regularly checking the safety and security of children. The operating time is limited to the remaining charge of the battery and is not suitable
for continuous overnight use.
Room Monitor
Using Room Monitor
1)Enter the Room Monitor menu (see “Entering the Menu” on page 11).
To Room Monitor appears.
2)Select the handset you want to monitor by using
 /vol/
/vol/ or
or  /vol/
/vol/ .
.
3)Press 
 .
.
Room Monitor appears, and you hear sounds in the room where the handset is installed.
4)To finish the Room Monitor, press  or return the handset to the cradle.
Handset Setup
To Room Monitor
 Handset #2
RoomMonitor 


 Handset #2
Programming your Voice Mail Access Number
1) Enter the Handset Setup menu, and then the Edit |
|
|
Edit V_mail No. |
||
Voice Mail submenu (see “Entering the Menu” on |
||
page 11). Edit V-mail No. appears. |
1234567890 |
|
|
|
2)Enter your personal access number using the number keypad (0-9),
 tone
tone ,
, 

 ,
,  /del, or
  redial/pause (up to 20 digits).
3)Press 
 . You will hear a confirmation tone.
To delete the current Voice Mail Access Number, delete all numbers in step 2 using  /del and
 .
.
[ 12 ]

Selecting a Ringer Tone
1)Enter the Handset Setup menu, and then the Ringer Tones submenu (see “Entering the Menu” on page 11).
There are 10 ringer tones or 10 Polyphonic Tones to choose from.
Ringer Tones
 Flicker
Clatter
-Ringers [Flicker, Clatter, Soft Alert, Wake Up, Light Bug, Beep Boop, Tone Board, Chip Chop, Party Clap, Reminder]
-Polyphonic Tones [Beethoven’s Symphony #9 (Beethoven9), For Elise (Elise), We Wish You A Merry Christmas (Merry-Xmas), Home Sweet Home (Hm Swt Hm), Lorri Song #6 (Lorri Song), When the Irish Eyes Are Smiling (Irish Eyes), Aura Lee, Let Me Call You Sweet Heart (Sweetheart), Waltzing Matilda (W Matilda), Old MacDonald (Old MacDld)]
2)Press  /vol/
/vol/ or
or  /vol/
/vol/ to move the pointer. You will hear the ringer or Polyphonic Tone as you scroll through the options.
3)Press 
 . You will hear a confirmation tone.
Distinctive Ringer Setup
1)Enter the Handset Setup menu, and then the Distinct. Ring submenu (see “Entering the Menu” on page 11).
2)Press  /vol/
/vol/ or
or  /vol/
/vol/ to select On or Off.
3)Press 
 . You will hear a confirmation tone.
Distinctive Ring
 On
On
Off
Setting the AutoTalk
1)Enter the Handset Setup menu, and then the Auto Talk submenu (see “Entering the Menu” on page 11).
2)Press  /vol/
/vol/ or
or  /vol/
/vol/  to select On or Off.
3)Press 
 . You will hear a confirmation tone.
Auto Talk
On
 Off
Off
Distinctive ringing will only operate if you subscribe to the Caller ID service.
[ 13 ]
 Loading...