


UH015sx
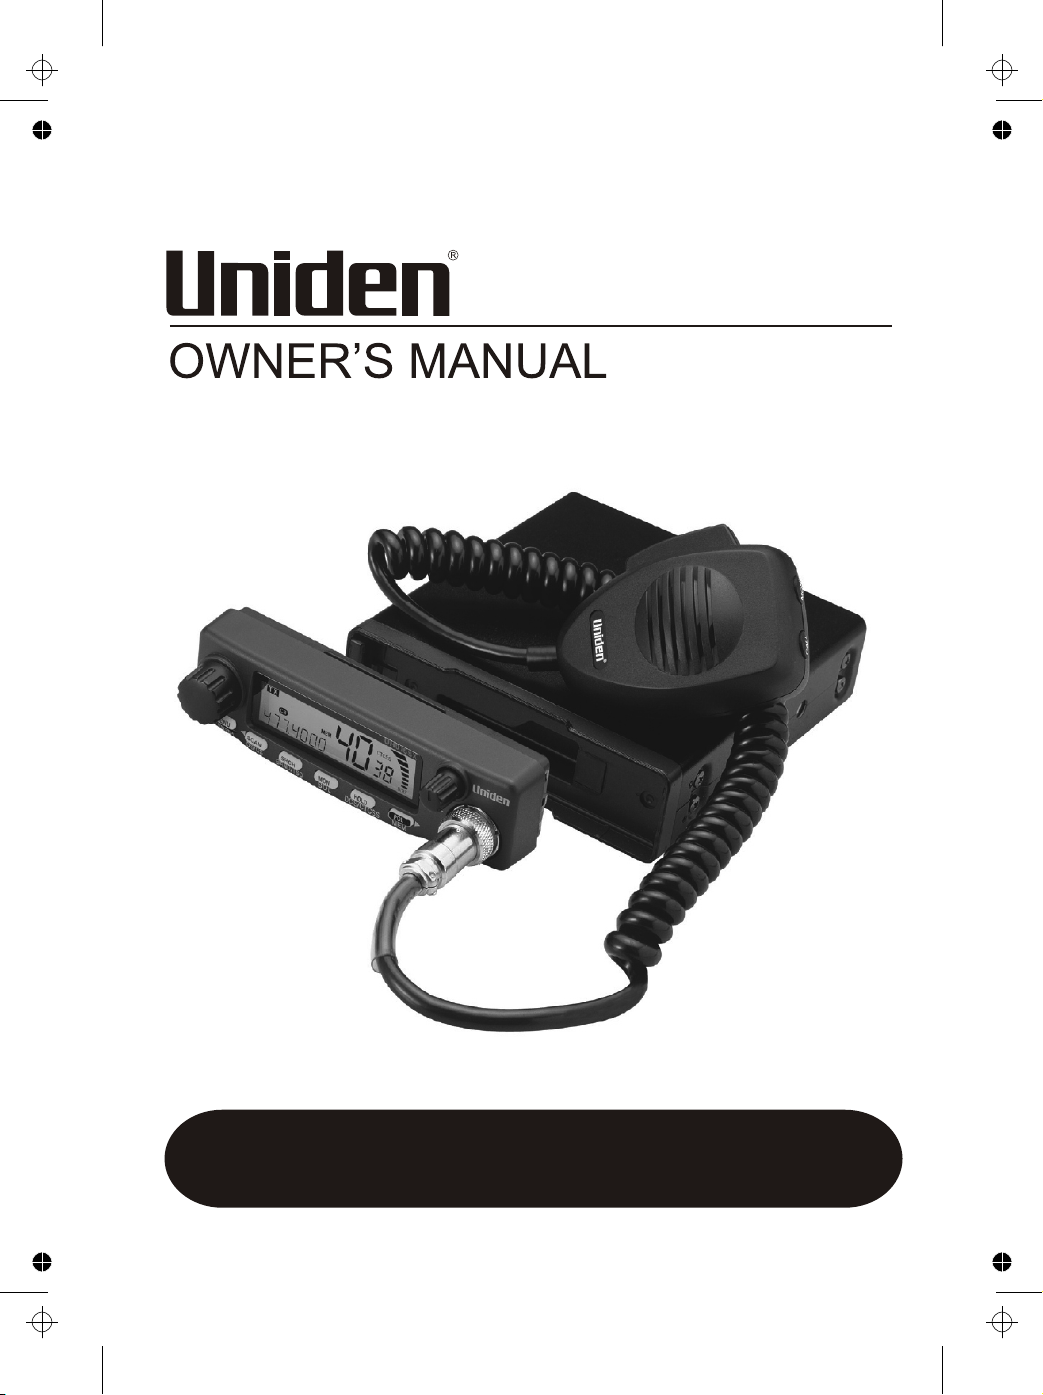
UNIDEN Model uh015sx UHF
CB Radio

UNIDEN Model uh015sx UHF CB Radio
Contents
Introduction 3
Features 3
Preventive Maintenance 3
Troubleshooting 3
Controls / Connectors 4
Indicators 5
Package Contents 6
Mounting Options 7
Operation 9
Setting the Squelch 9
Monitor 9
Selecting a Channel/POLICE and CB Channel Groups 9
Transmitting 10
Using Repeater Channels (Duplex Mode) 10
Operating the uh015sx in Duplex Mode 11
Scanning 11
Open Scan (OS) Mode 11
Group Scan (GS) Mode 12
Memorizing Channels and Frequencies for Scan 13
Wide Band Searching 13
60 RX Channels 14
Manual Programming 14
Copying a Police frequency to a RX Channel 14
Copying a frequency found using SEARCH
to a RX Channel 15
Busy Channel Lockout 16
VOX Operation (optional VOX headset required) 16
Programming the Instant Priority Channel 16
Recalling the Instant Channel 16
CTCSS (Continuous Tone Coded Squelch System) 17
DCS (Digitally Coded Squelch) 17
1
UNIDEN Model uh015sx UHF CB Radio
Contents
Selective Calling 18
Outline 18
Receiver Quieting 18
Call Receiving 19
Tone Squelch Scanning 20
Tone Calling 20
5/6 TX Tone Selcall Programming 21
Group Calling 22
TX Selcall ID Format 22
5/6 Tone Selcall Programming 23
Receiver Selcall ID 24
Programming Your Selcall ID 24
Other Selcall Parameters 26
Selcall ID 27
Tone Period 27
Lead-in Delay 28
Lead-in Tone 30
Alarm Mode 32
Group Call Mode 34
Default Settings 35
Selcall Tone Frequency List 35
UHF-CB Channels & Frequencies 36
CTCSS & DCS Code List 37
Warranty 38
2
UNIDEN Model uh015sx UHF CB Radio
Introduction
The Uniden uh015sx is designed to provide you with years of trouble free service. Its rugged
components and materials are capable of withstanding harsh environments. Please read this
Operating Manual carefully to ensure you gain the optimum performance of the unit.
The citizen band radio service is licenced in Australia by ACMA Radio-communications
(Citizen Band Radio Stations) Class Licence and in New Zealand by MED General
User Licence for Citizen Band Radio and operation is subject to conditions contained in
those licenses.
Features
Preventative Maintenance:
The following system checks should be made every six to twelve months:
! Check the Standing Wave Ratio (SWR).
! Inspect the tightness of all electrical connections.
! Inspect the antenna coaxial cable for wear or breaks on the shielding.
! Inspect the tightness of all screws and other mounting hardware.
Troubleshooting:
Should the unit malfunction or perform poorly, follow these procedures:
If the transceiver is completely inoperative: Check the power cord and fuse.
If there is trouble with receiving: Check the VOLUME control setting. Be sure the SQUELCH is
adjusted properly. Possibly the radio is over-squelched.
If there is trouble with transmitting: Check that the transmission line (coaxial cable) is
securely connected to the ANTENNA connector. Check that the antenna is fully extended for
proper operation. Check that all transmission line (coaxial cable) connections are secure and free
of corrosion.
Blackening may occur on the Liquid Crystal Display if the uh015sx has been
subjected to extreme high temperature (above 60°C) . This is not a fault. Normal LCD
operation resumes when the temperature stabilizes back to standard operating
3
! Detachable Display Unit ! Busy Channel Lock-out
! Transmit & Receive FM 40CH (UHF-CB, TX ! 38 Built-in CTCSS codes & 104 additional
Power 5W) DCS codes
! 60 Programmable RX Channels ! Volume Control with Power On/Off Switch
! 115 Pre-programmed Police Frequencies ! VOX (Voice Activated Function) optional
(65 for Australia, 50 for New Zealand) VOX headset required
! 3 Levels Preset Squelch ! 9 Step VOX Mic sensitivity adjustment
! Wide Band Scanner (400MHz - 512MHz) ! Memory backup if power fails
! Band Search Function (5 Bands separately) ! Tone Squelch Function (5/6 Tone)
! LCD Display with Backlight ! Tone Calling Function (5/6 Tone)
! Signal Strength Meter ! Tone Squelch Scan
! RF Power Indicator ! W125mm x H35mm x D156mm(including
! One touch Instant Channel recalling
Display Unit) - allow 40mm+ for antenna
fitting at rear of unit.
! Duplex Capability (from CH01 - CH08)
! DIN mountable (optional DIN mount kit
! Group Scan and Priority Channel Watch
required)
! Open Scan
UNIDEN Model uh015sx UHF CB Radio
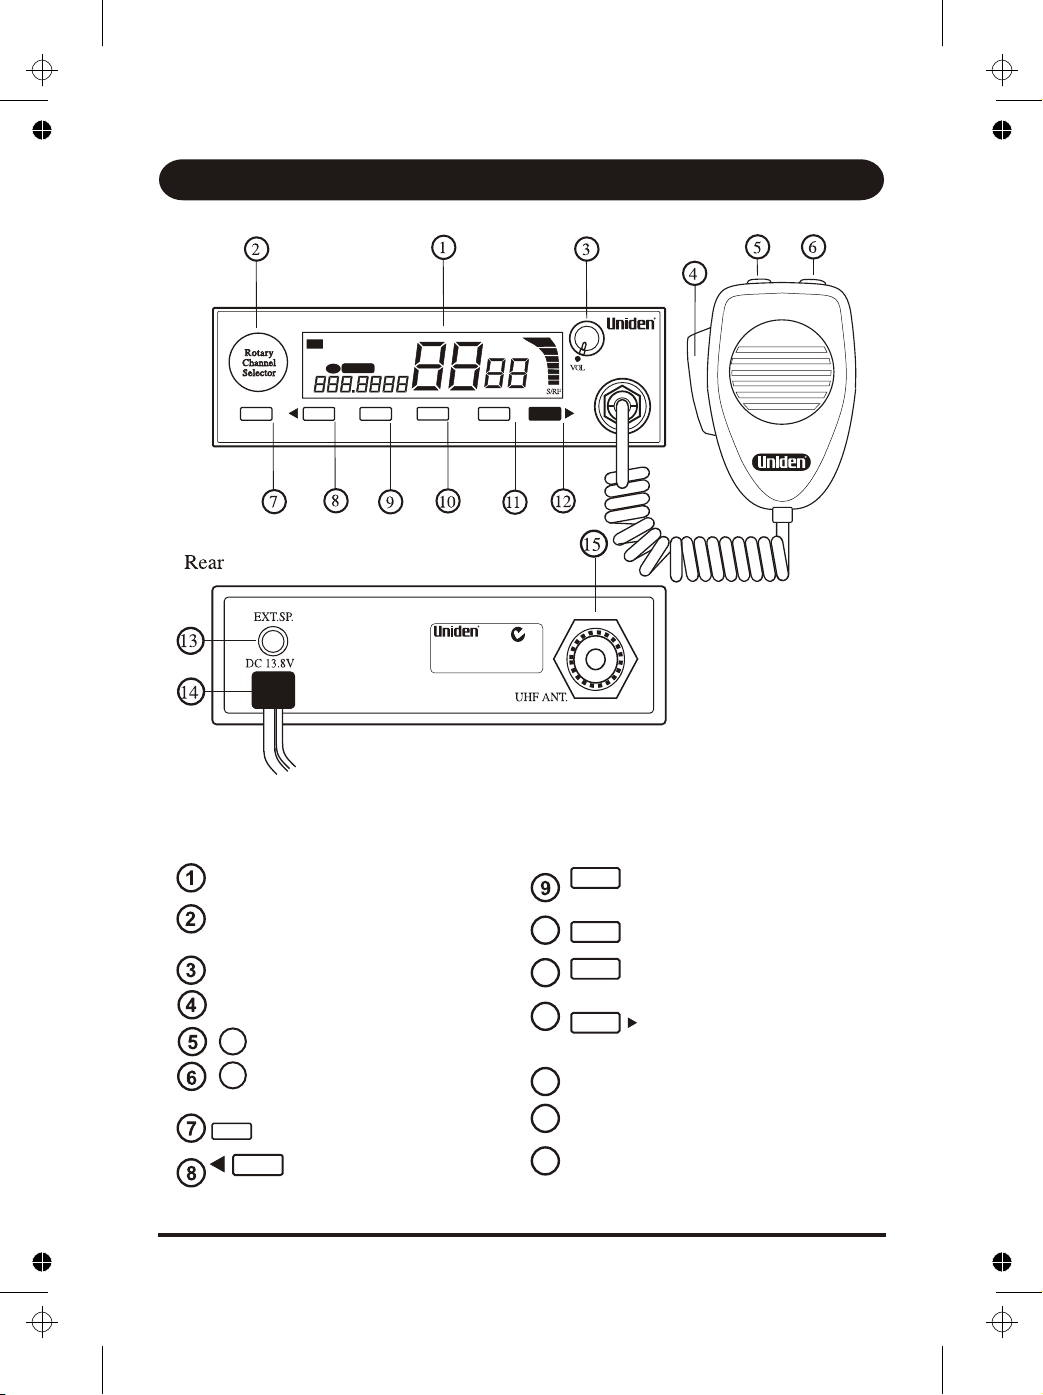
Controls/Connectors
Controls and Connectors
Ref Item Page
Ref Item Page
- Search, Search Band/Tone
Liquid Crystal Display (LCD) 5
Squelch 13
Rotary Channel Selector
- Monitor, Squelch button 9
(Rotary Knob) 9
- Hold, DCS/CTCSS
On/Off Volume 9
button 11, 17
Push to Talk (PTT) Button 10
- Channel Group Select
(Police, CB), Memory, move right
- Tone Call 20
button 14
- Instant Channel Recall and
External Speaker Jack -
Instant Channel Programming 16
Power Input (13.8V DC) -
- Menu, Enter button 11
- Move left, Scan,
UHF Antenna Connection -
Open/Group Scan button 11,12
4
10
11
12
13
14
15
MENU
SCAN
OS/GS
SRCH
BAND/TSQ
MON
SQL
HOLD
DCS/CTCSS
POL
MEM
TX
TSQ
SCN
DUPGSCAL
HOLD
MON
PRI
SRC
SQT
INST
MEM
CB POLICE
VOX
CTCSS
BCL
DCS
Front
SCAN
MON
SRCH
HOLD
POL
MENU
ENTER
INST
TCAL
TX
TSQ
SCN
DUPGSCAL
HOLD
MON
PRI
SRC
SQT
INST
MEM
CB POLICE
VOX
CTCSS
BCL
DCS
UNIDEN Model uh015sx UHF CB Radio
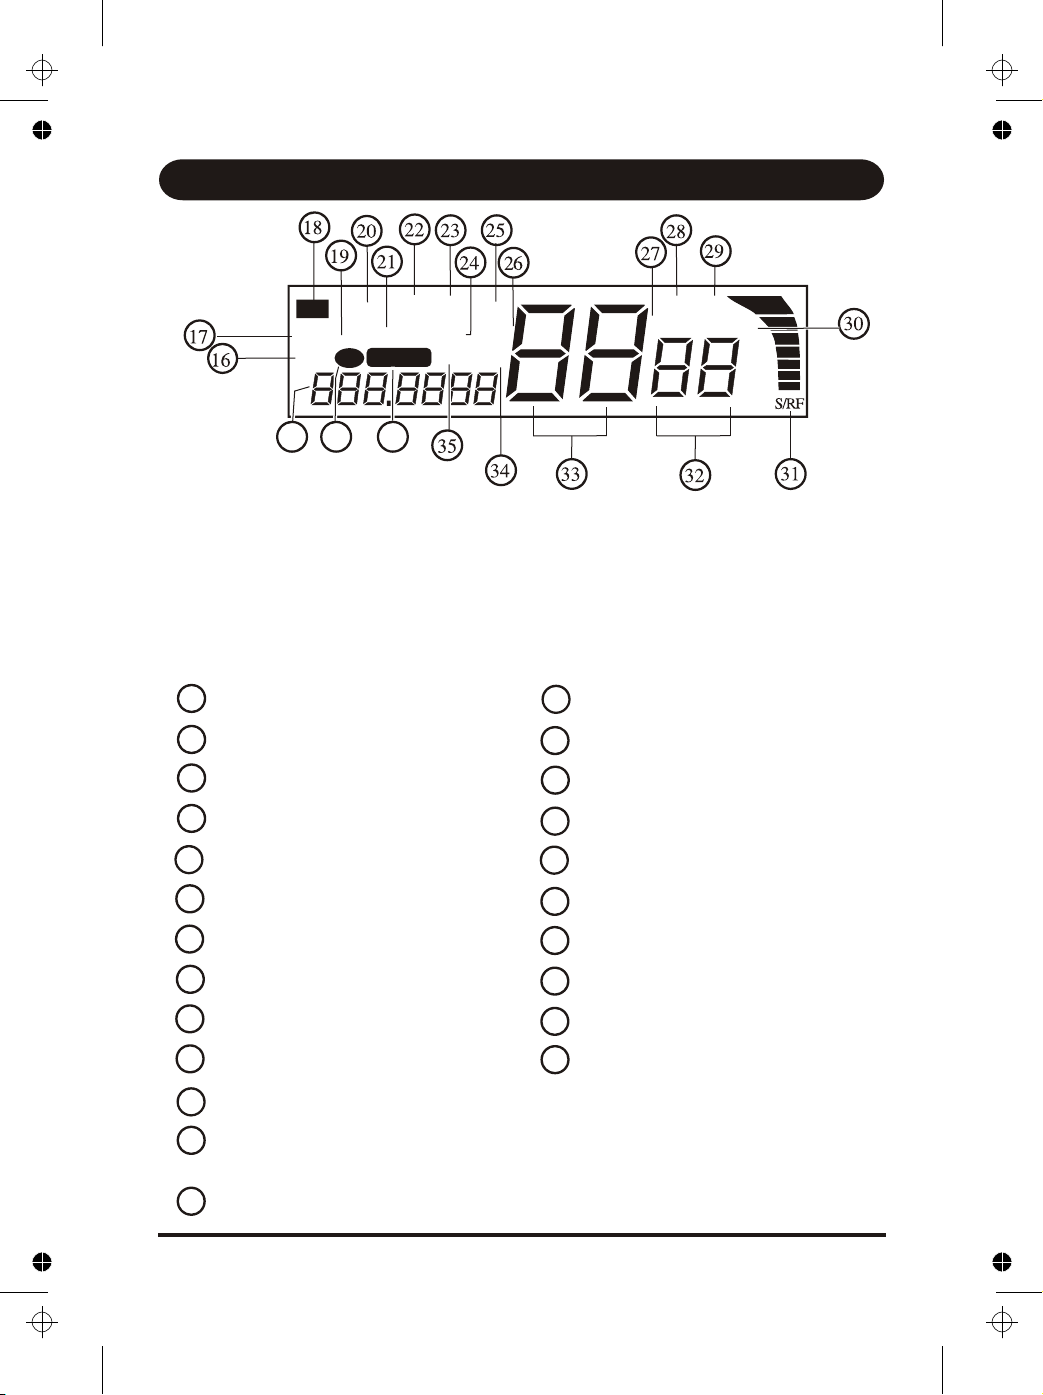
Indicators
Indicators
Ref. Item Page Ref. Item Page
16 SCN - Scan 11 29 BCL - Busy Channel Lockout 16
17 TSQ - Tone Squelch 18 30 DCS - Digital Coded Squelch 17
18 TX - Transmit 10 31 S/RF - RF Strength Meter -
19 GS - Group Scan 12 32 DCS/CTCSS Code Indicator 17
20 DUP - Duplex 10 33 Channel Number Indicator 9
21 HOLD - Hold 11 - 15 34 MEM - Memory 11,13
22 CAL - Tone Call 20 35 SRC - Search 13
23 MON - Monitor 9 36 POLICE - Police channel 9
24 PRI - Priority 12 37 CB - CB channel 9
25 SQT - Squelch 9 38 Frequency Indicator 9
26 INST - Instant Channel 16
27 CTCSS - Continuous Tone 17
Coded Squelch System
28 VOX - Voice Activation 16
5
37 3638
UNIDEN Model uh015sx UHF CB Radio
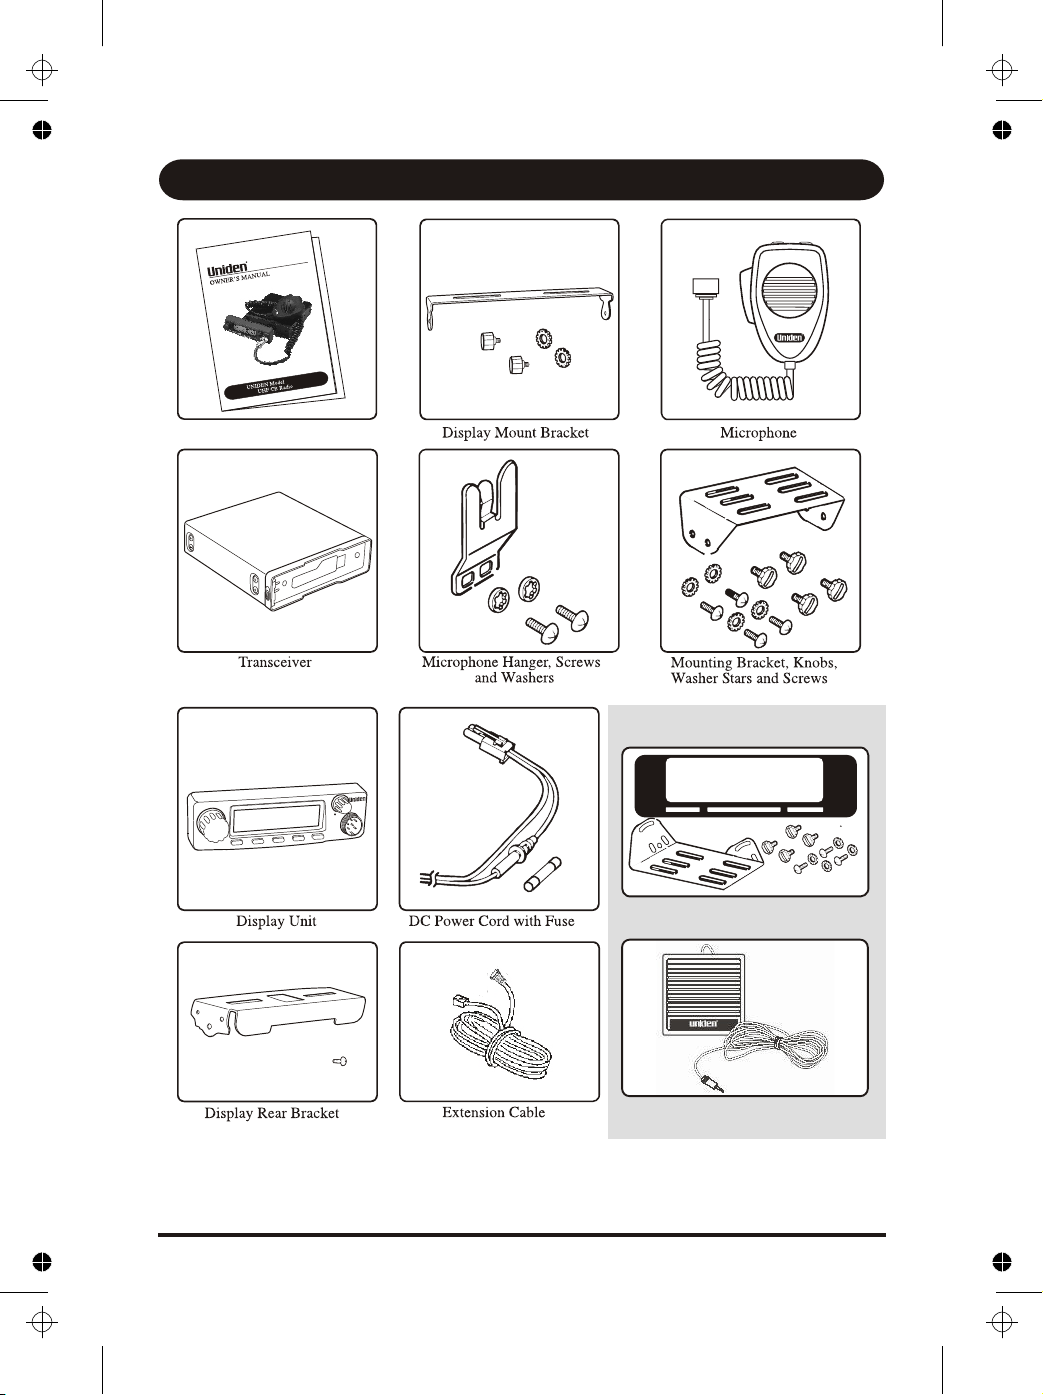
Package Contents
6
uh015sx Owners Manual
Optional Accessories
DIN Mounting Kit (DMK8990)
External Speaker (MS100)
uh015sx
UNIDEN Model uh015sx UHF CB Radio
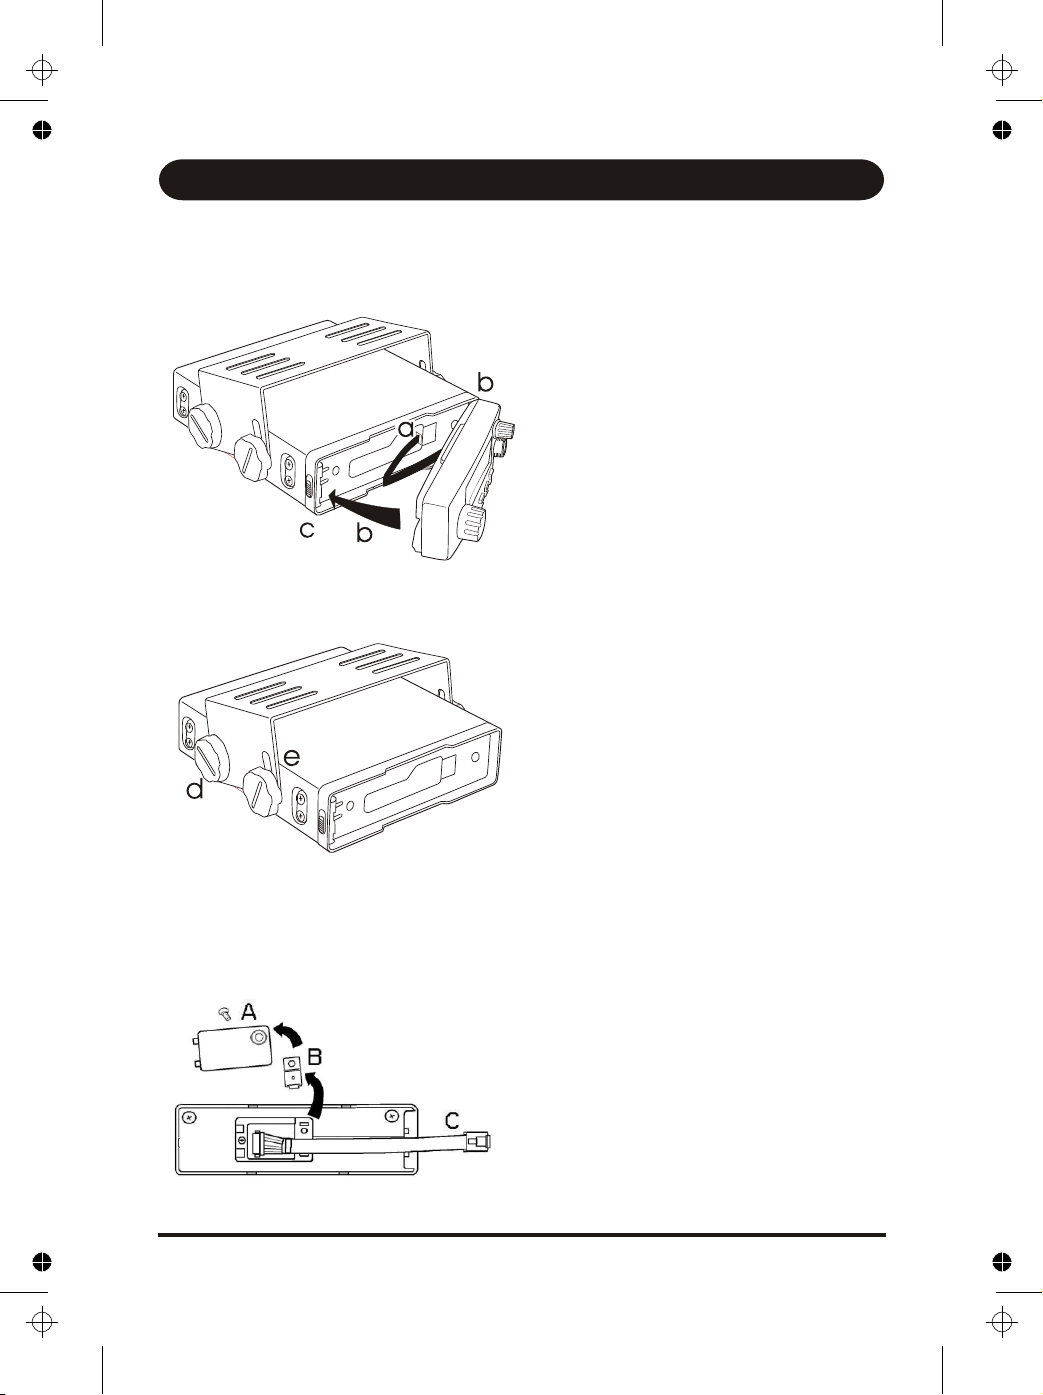
Mounting Options
The radio can be mounted complete - or - with the Display Unit remote of the
Transceiver.
Mounting the complete radio (Transceiver with Display Unit)
a) Plug in display cable from the
Display Unit to the transceiver.
b) Hinge the Display Unit into the
transceiver as shown in the
diagram, then snap closed.
c) Should you wish, at a later stage,
to position the Display Unit
remote from the Transceiver,
release the Display Unit by
pushing up the slide on the side.
Remote mounting of the Transceiver Unit
If the Display Unit is not already
separate of the Transceiver then
remove it as detailed in c) above.
Fix the Transceiver Mounting Bracket
in an appropriate location (screws
and washers supplied). Then fix the
Transceiver in the bracket using the
Knob bolts supplied d).
The bracket can be fixed on the top
or under the transceiver. An arced
slot e) allows you to mount the
transceiver at an angle.
Changing Remote Extension Cable
At the back of the Display Unit
unscrew the cable cover A) and
release bracket B).
Unplug the short cable C) and plug in
the extension cable.
Replace bracket B) over the cable.
Then replace back cover A) and
screw in place.
7
UNIDEN Model uh015sx UHF CB Radio
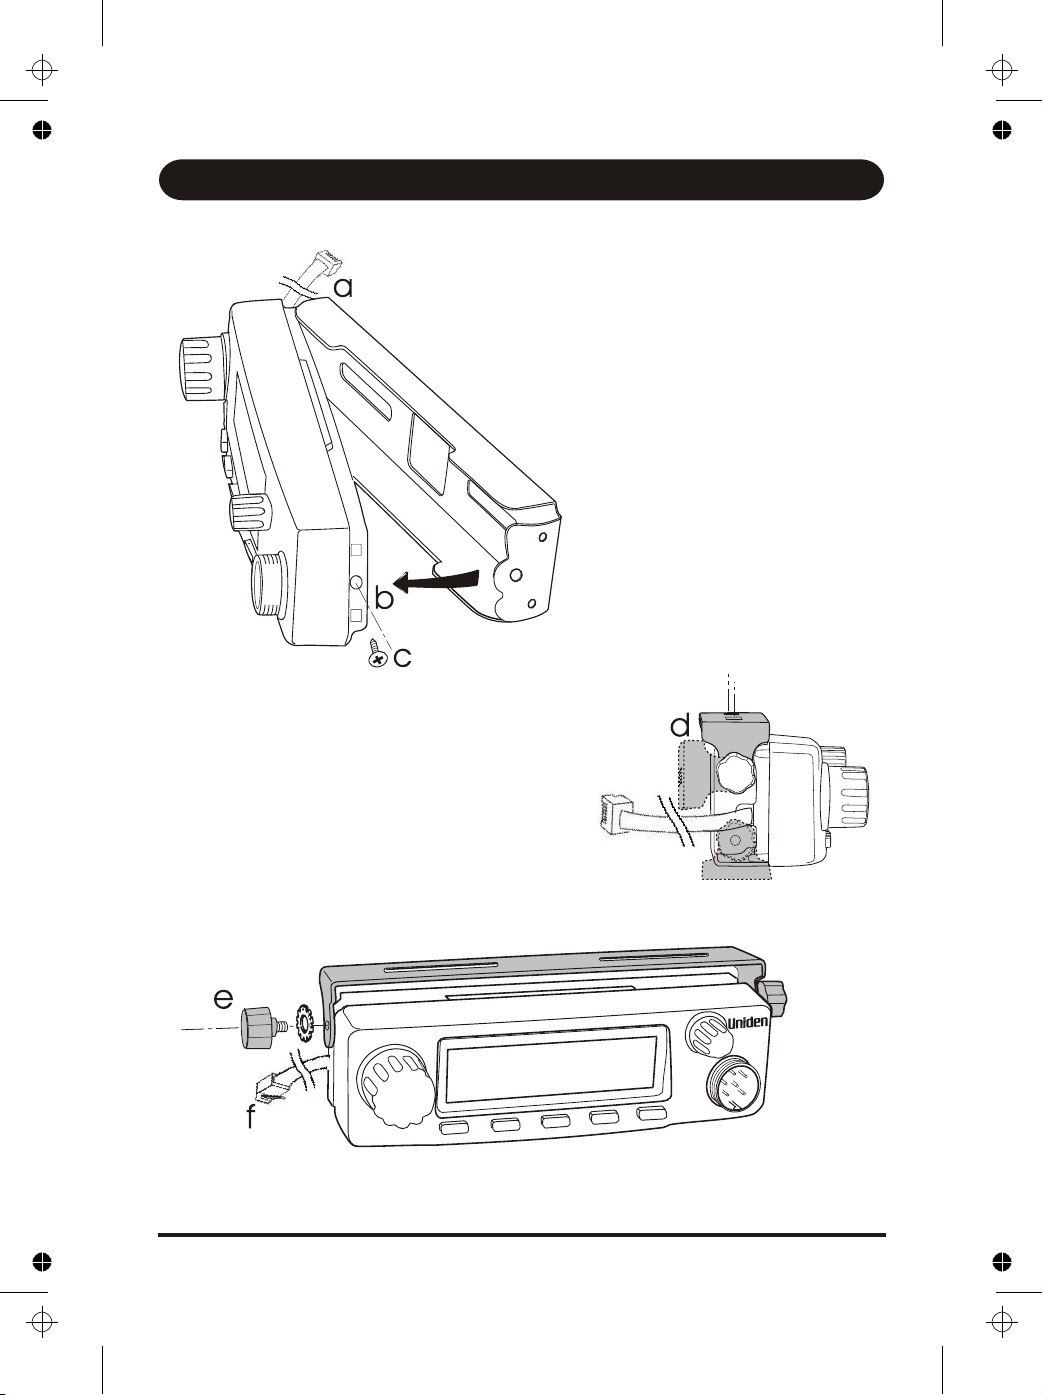
Mounting Options
8
Top fix
Back fix
Bottom fix
Remote mounting of the Display Unit
Fixing the Display Rear
Bracket
To mount the Display Unit it needs to
be fitted with a Display Rear Bracket
(included in package).
a)Position the Display Rear Bracket
so that one end fits over the two
studs at the end of the Display
Unit.
b)Push it into place until the fixing
screw hole is aligned with its
threaded counterpart.
c)Secure the Display Rear Bracket
with the screw provided.
Optional mounting positions
The Display Unit can be mounted from the top, back or bottom.
d) Fix the Display Mount Bracket in place (above, at the
rear or at the bottom) by screwing through the
slots in the bracket.
e) Fix the Display Unit to the bracket with the
thumb screws provided.
f) Connect the Extension Cable between the Display
Unit and the Transceiver.
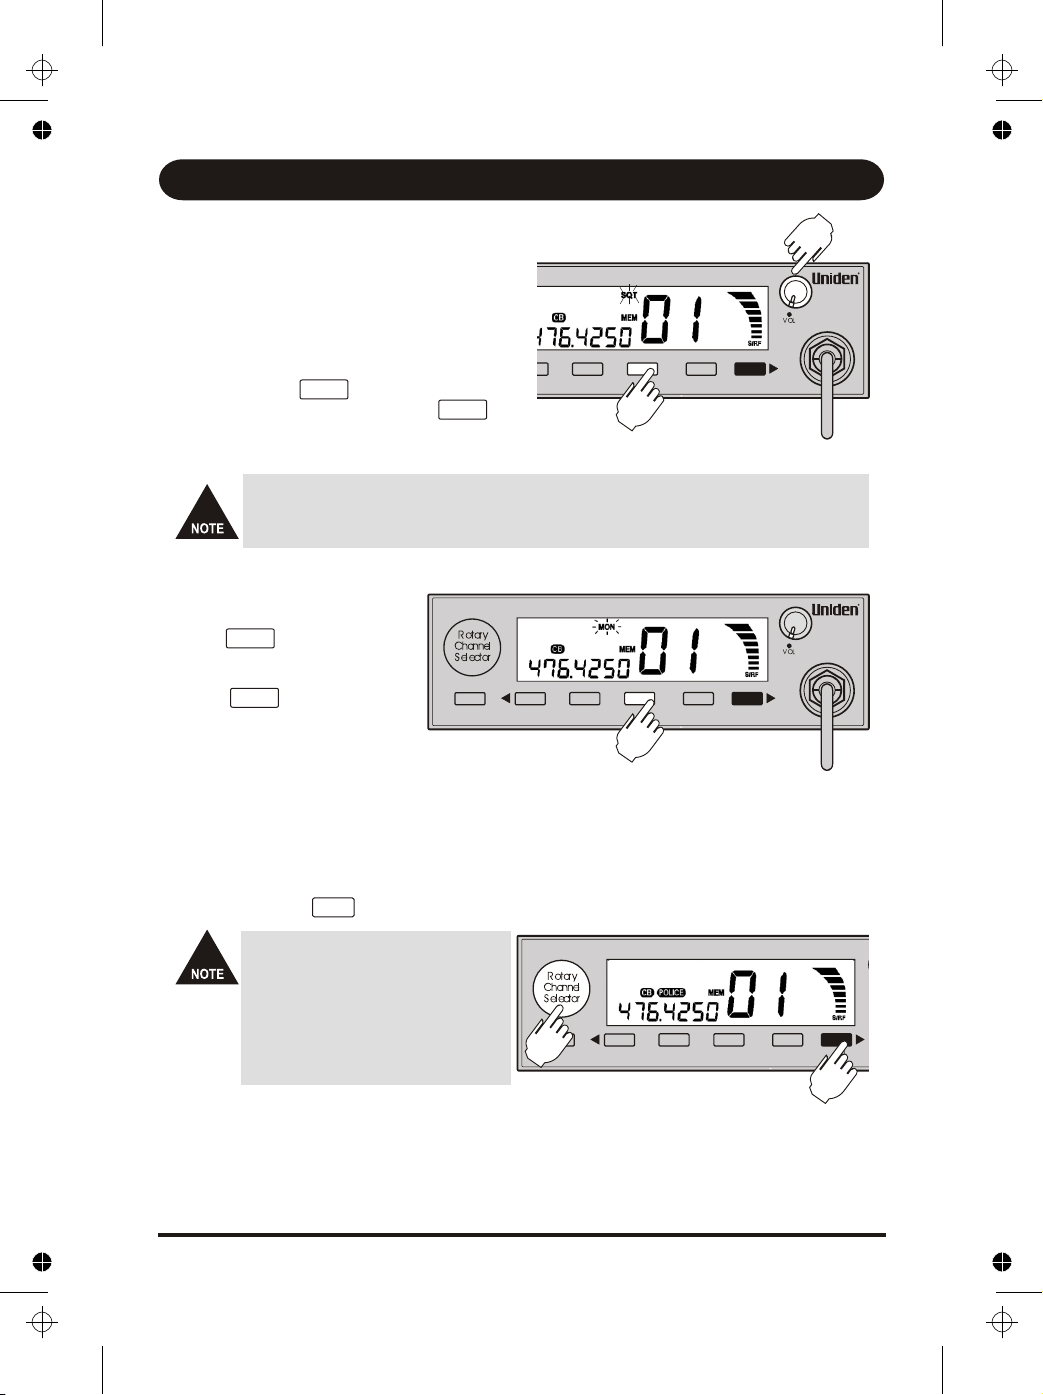
Setting the Squelch
Turn the Unit ON by rotating the volume control clockwise. The uh015sx
has 3 preset squelch levels:
1 - max sensitivity (min squelch)
2 - med sensitivity (med squelch)
3 - min sensitivity (max/tight squelch)
It requires no adjustment.
Press and hold MON . The squelch will flash.
Turn rotary knob to select. Press MON to set.
The SQT icon appears if level 3 is selected.
! Selecting tight squelch mode may prevent the
reception of weak signals.
! High noise areas may still break the squelch.
UNIDEN Model uh015sx UHF CB Radio
Operation
9
Monitor
Press MON to open the
squelch and receive all
weak signals.
Press MON again
momentarily to cancel.
Selecting a Channel/POLICE and CB Channel Groups
Turn the Rotary Channel Selector to select the desired channel.
The uh015sx has two groups of channels to select from. When the CB icon is showing
the 40 UHF-CB and any user programmed RX channel will be available for selection or
scanning. When the POLICE icon is showing then the 115 police frequencies will be
available. Press POL to select which group(s) to activate or deactivate.
For your reference a list of the
available UHF CB channels,
corresponding frequencies and
guidelines for their use is printed
on page 36. For Australia,
Channels 05 and 35 are
reserved for Emergency Calls.
The 40 UHF-CB channels are numbered 1-40. The programmable RX channels are
numbered 41-100 (100 is shown as o0) - and only show when programmed. The 115
police frequencies do not have channel numbers but you can still select them ( - appears in the channel display) or copy them to a programmable RX channel.
MENU
ENTER
SCAN
OS/GS
SRCH
BAND/TSQ
MON
SQL
HOLD
DCS/CTCSS
POL
MEM
SRCH
BAND/TSQ
MON
SQL
HOLD
DCS/CTCSS
POL
MEM
MENU
ENTER
SCAN
OS/GS
SRCH
BAND/TSQ
MON
SQL
HOLD
DCS/CTCSS
POL
MEM

UNIDEN Model uh015sx UHF CB Radio
Operation
Transmitting
The uh015sx uses the 40 UHF-CB Channels. See page 36 for
UHF-CB Channels & Frequencies.
Channels 22 and 23 are for telemetry and
telecommand applications. Transmit is
inhibited on these channels.
Select the desired channel. Press the microphone's PTT button and speak normally
into the microphone. Hold it approx. 7cm from your mouth. The TX icon appears while
transmitting. Release the PTT button to end the transmission and listen for a reply.
Using Repeater Channels (Duplex Mode)
UHF CB repeaters are used to retransmit or relay your signal. Repeaters will extend
the range of your radio and overcome the shielding effect caused by solid
obstructions. In normal Simplex operation, your radio transmits on one particular
frequency and receives on that same frequency. If there is a barrier that partially
blocks your transmitted signal, the probability of another radio receiving the signal is
very slim. Hills, tall buildings, metallic structures,...etc tend to act as a screen between
radios.
Standard Operation without the aid of a
Repeater Station.
Operation with the aid of a Repeater
Station (Duplex).
The signal coming from your radio is received by the Repeater Station and then
re-transmitted at the same time on another channel. This operation is called
"Duplexing".
For example,
CH01 on Duplex Mode will Receive on CH01 but Transmit on CH31
CH02 on Duplex Mode will Receive on CH02 but Transmit on CH32 etc...
If you transmit on CH01 Duplex mode, you are actually transmitting on CH31 the
repeater station down-coverts your signal and retransmits on CH01.
10
UNIDEN Model uh015sx UHF CB Radio
Operation
11
Operating the uh015sx in Duplex Mode
For this example we are adopting CH01 as the channel being used in your area for
repeater use.
To Set Duplex ON/OFF
Press once. The DUP setting
will flash. Turn the rotary knob to adjust
the setting to or . Press & hold
/ENTER to set. A confirmation
tone sounds.
The DUP icon appears.
! Only channels 01 - 08 are available for Duplex.
! Check with your local Retailer for information on available repeaters.
! If a button is not pressed within 10 seconds the uh015sx will automatically exit MENU Mode.
Scanning
The uh015sx scanning feature allows you to search the SCAN MEMORY for active
channels automatically.
The scan memory has two main groups; Open Scan (OS) and Group Scan (GS), OS
Scan searches all the channels and frequencies in its memory continuously. GS Scan
has the ability of monitoring a priority channel every 1.5 seconds while searching
channels and frequencies in its memory.
Furthermore, while scanning you can select which channel groups to activate (CB or
POLICE).
Press and Scanning starts.
The SCN icon appears.
You may change the scan direction by
turning the rotary channel selector.
Press again to exit scanning.
Open Scan (OS) Mode
Allows continuous scanning of channels stored in the Open Scan memory. If an active
channel is found, scanning will stop on that channel.
This example shows CH17 active.
If the received signal ceases, the unit will wait 3
seconds for the signal to return, otherwise scanning
resumes. During Scan you may...
! Press to hold scan. Press again to resume scan.
! If scan stops on a frequency and you wish to continue then turn rotary channel
selector.
! The direction of scan can be changed using the rotary channel selector.
! To remove an active channel from scan memory press and hold /MEM and
scan resumes.
! Press and hold /OS/GS for 2 seconds to switch between GS and OS modes.
To deactivate scan, press momentarily.
! When Scan is deactivated the starting channel will be reinstated.
! If scan is deactivated while on hold the hold channel will be reinstated.
! OS Mode is indicated by the absence of the GS icon.
SCAN
OS/GS
SRCH
BAND/TSQ
MON
SQL
HOLD
DCS/CTCSS
POL
MEM
MENU
ENTER
SCAN
OS/GS
SRCH
BAND/TSQ
MON
SQL
HOLD
DCS/CTCSS
POL
MEM
POL
MENU
MENU
HOLD
HOLD
 Loading...