


 Loading...
Contents |
|
Welcome/Accessibility................................................... |
2 |
Terminology/Manual Conventions................................ |
3 |
Product Overview........................................................... |
4 |
Controls and Functions................................................. |
5 |
Installing the Phone....................................................... |
7 |
Choosing the Best Location................................................ |
7 |
Installing the Rechargeable Battery Pack into the |
|
Handset......................................................................... |
8 |
Installing the Base Unit........................................................ |
9 |
Mounting the Base Unit on a Wall..................................... |
11 |
Installing the Belt Clip........................................................ |
12 |
Headset Installation........................................................... |
12 |
Basic Setup................................................................... |
13 |
Activating AutoTalk............................................................ |
13 |
Activating Caller ID on Call Waiting................................... |
13 |
Programming Your Area Code........................................... |
14 |
Choosing the Dialing Mode............................................... |
15 |
Setting the Language........................................................ |
16 |
Using the Speed Dial Memory..................................... |
17 |
Storing a Name and Number in Memory........................... |
17 |
Storing Caller ID in Speed Dial Memory............................ |
20 |
Using Your Phone......................................................... |
21 |
Making and Receiving Calls.............................................. |
21 |
Making a Call from Speed Dial Memory............................ |
21 |
Making a Call from the Caller ID List................................. |
22 |
Redialing the Last Dialed Number..................................... |
23 |
Selecting the Ring Tone and Volume................................. |
23 |
Adjusting the Earpiece Volume......................................... |
23 |
Using Call Waiting............................................................. |
24 |
Selecting a Different Channel............................................ |
24 |
Find Handset..................................................................... |
25 |
Tone Dialing Switch-over................................................... |
25 |
Caller ID and CIDCW (Caller ID on Call Waiting)....... |
26 |
Caller ID on Call Waiting (CIDCW).................................... |
27 |
Viewing the Caller ID Message List................................... |
27 |
Deleting Information from the Caller ID List...................... |
28 |
The Integrated Answering Machine............................ |
29 |
Setting Up Your Answering Machine.......................... |
30 |
Setting Your Outgoing Message (Greeting)....................... |
35 |
Using Your Answering Machine.................................. |
38 |
Turning the Answering Machine On/Off............................. |
38 |
Remote Operation............................................................. |
41 |
Changing the Digital Security Code........................... |
45 |
Maintenance.................................................................. |
46 |
Troubleshooting........................................................... |
49 |
Liquid Damage.................................................................. |
52 |
Precautions................................................................... |
53 |
The FCC Wants You To Know........................................... |
54 |
I.C. Notice.......................................................................... |
56 |
One Year Limited Warranty.......................................... |
57 |
Index.............................................................................. |
58 |
Welcome
Congratulations on your purchase of the Uniden cordless telephone. This cordless phone is designed for reliability, long life, and outstanding performance.
Note: Illustrations in this manual are used for explanation purposes. Some illustrations in this manual may differ from the actual unit. The color of your cordless telephone may vary.
Uniden® is a registered trademark of Uniden America Corporation.
AutoTalk, AutoStandby and UltraClear Plus are trademarks of Uniden America Corporation.
Accessibility
Uniden provides a customer service hotline for accessibility questions. If you have a disability and need customer service assistance or if you have any questions about how Uniden’s products can accommodate
persons with disabilities, please call the accessibility voice/TTY line:
1-800-874-9314.
Our customer care hours as well as accessibility information can be found on our website, www.uniden.com, under the "Accessibility" link. If your call is received outside of our business hours, you can leave us a message and we will call you back.
Terminology
Base |
The main part of the phone that connects to your phone line and lets you make and receive calls. |
|
CID |
Caller ID is available from your telephone provider. With this service, you can see the name and number |
|
of incoming callers. |
||
|
||
CIDCW |
Caller ID on Call Waiting is available from your telephone provider. With this service, you can see |
|
incoming caller information while on another call. |
||
|
||
Handset |
A cordless handset that can be placed anywhere in your home or office where AC power is available. |
|
Standby |
The handset may be sitting on the base charging or out of the base cradle, but is NOT in use. |
|
[talk/flash] has not been pressed and there is no dial tone. |
||
Talk |
When a dial tone has been enabled allowing the user to dial and carry on a conversation with an outside |
|
party. |
||
|
Manual Conventions
This manual uses several different type styles to help you distinguish between different parts of the phone:
•lower case bold text with "[ ]" indicates a key or button on the phone
•ALL CAPITALS indicates text on the display, such as menu options, prompts, and confirmation messages
•lower case bold text indicates a status light on the phone base
Product Overview
Main Phone Features
• 5.8 GHz Extended Range Technology |
• Tone/Pulse Dialing |
|
• Caller ID/Caller ID on Call Waiting |
• Page/Find Handset Key |
|
• 3-Line Backlit LCD |
• Earpiece/Ringer Volume Controls |
|
• Trilingual Menu Displays (English, Spanish, or French) |
• Mute or Turn Ringer Off |
|
• 30 |
Caller ID Memory |
• Hearing Aid Compatible |
• 10 |
Number Memory Dialing |
• 20-Channel Auto Scan |
• Last Number Redial |
• Desk or Wall Mountable |
|
Answering Machine Features
• Digital Tapeless Recording |
• Time and Day Announcement |
• Access Messages with Handset Remote Key |
• Remote Message Retrieval |
• Up to 13 minutes of Recording Time |
• Toll Saver |
• Call Screening |
• Conversation Recording |
• Personal or Pre-recorded Outgoing Messages |
• Voice Memo |
• Voice Prompts (English, Spanish, or French) |
• Selectable Ringer Options (High, Low or Off) |
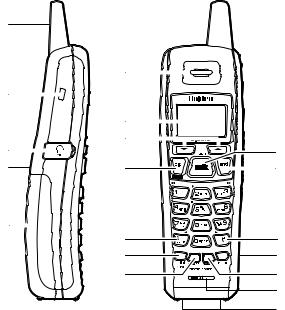
Controls and Functions
Handset
1
|
6 |
2 |
|
|
7 |
3 |
8 |
|
|
4 |
9 |
5
10
11
12
1.Handset antenna
2.Belt clip hole
3.Jack for optional headset
4.Handset ringer speaker
5.Handset battery compartment
6.Handset earpiece
7.LCD display
8.[ ] and [
 ] (volume & ringer up/down) keys
9.[cid/menu] key
10.[ /tone/
 ] (left cursor) key
1311. [redial/pause] key
1412. [select/remote] key
13.[talk/flash] key
14.[end] key
15.[#/ ] (right cursor) key
16.[mem] (memory) key
1517. [delete/channel] key
1618. Handset microphone
1719. Handset charging contacts
18
19
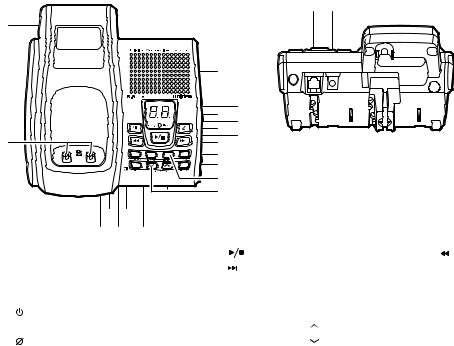
Main Base Unit
38 39
20
|
22 |
|
|
24 |
23 |
|
25 |
|
21 |
26 |
27 |
28 |
|
|
|
29 |
|
|
30 |
|
|
31 |
|
|
32 |
|
34 36 |
|
|
33 35 |
37 |
|
20. |
Base antenna |
27. |
[ |
] (play/stop) key |
33. |
[ ] (repeat/rewind) key |
|
21. |
Base charging contacts |
28. |
[ |
] (skip/fast forward) key |
34. |
[menu/clock] key |
|
22. |
Base speaker |
29. |
[ringer] key |
|
35. |
[set] key |
|
23. |
Message counter LED |
30. |
[find hs] key |
|
36. |
Mic (microphone) |
|
24. |
[ ] (answer on/off) key |
31. |
[greeting] key |
|
37. |
[memo] key |
|
25. charge/in use LED |
32. |
[volume/select/ |
] (up) and |
38. |
TEL LINE jack |
||
26. |
[ ] (delete) key |
|
[volume/select/ |
] (down) keys |
39. |
Base DC IN 9V jack |
|
Installing the Phone
Choosing the Best Location
Before choosing a location for your new phone, here are some important guidelines you should consider:
Avoid heat sources, such as radiators, |
Avoid noise sources such as a window by |
air ducts, and sunlight |
a street with heavy traffic |
Avoid television sets and other electronic equipment
Choose a central location 
Avoid microwave ovens
Avoid excessive moisture, extremely low temperatures, dust, mechanical vibration, or shock
 Avoid personal computers Avoid other cordless telephones
•The location should be close to both a phone jack and a continuous power outlet (one which is not connected to a switch).
•The base and handset should be kept away from sources of electrical noise such as motors, microwave ovens, and fluorescent lighting.
•The base can be placed on a desk, tabletop, or mounted on a standard wall plate. For better reception, place the base as high as possible.
•The base should be placed in an open area for optimum range and reception.
•If your home has specially wired alarm equipment connected to the telephone line, be sure that installing the system does not disable your alarm equipment. If you have questions about what will disable your alarm equipment, contact your telephone company or a qualified installer.
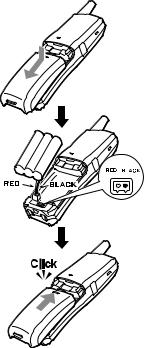
Installing the Rechargeable Battery Pack into the Handset
The handset is powered by a rechargeable battery pack. Once installed, the battery charges automatically when the handset is placed in the base unit.
To install the rechargeable battery pack:
1)Press down on the handset battery case cover (use the finger indention for a better grip) and slide the cover downward to remove.
2)Plug the battery pack connector (red & black wires) into the small jack inside the battery compartment. (The connector notches fit into the grooves of the jack only one-way.) Match the wire colors to the polarity label in the battery compartment, connect the battery, and listen for a click to insure connection.
3)Make sure you have a good connection by slightly pulling on the battery wires. If the connection is secure, the battery jack will remain in place.
4)Place the battery case cover back in the handset by sliding it upwards until it clicks into place.
Note: Use only the Uniden (BT-905) rechargeable battery pack supplied with your phone.
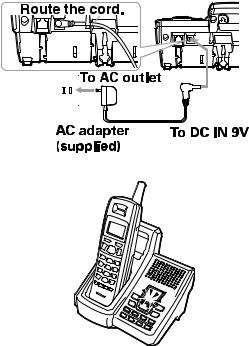
Installing the Base Unit
1)Connect the AC adapter to the DC IN 9V jack and to the standard 120V AC wall outlet.
Note:
•Use only the supplied AD-314 AC adapter. Do not use any other AC adapter.
•Do not place the power cord where it creates a trip hazard or where it could become chafed and create a fire or electrical hazard.
2)Charge the handset by placing in the base unit with the keypad facing forward.
3) Make sure that the charge/in use LED illuminates. If the LED does not illuminate, check to see that the AC adapter is plugged in and that the handset makes good contact with the base's charging contacts.
Note:
• Connect the AC adapter to a continuous power supply (not
controlled by a wall switch). |
|
|
|
|
|
|
|
|
|
|
|
|
|
|
|
• Place the base unit close to the AC outlet to avoid long |
|
|
|
|
|
|
|
|
|
|
|
|
|
|
|
extension cords. |
|
|
|
|
|
|
|
|
|
|
|
|
|
|
|
|
|
|
|
|
|
|
|
|
|
|
|
|
|
|
|
|
|
|
|
|
|
|
|
|
|
|
|
|
|
|
|
• Charge your handset at least 15 - 20 hours before plugging |
|
|
|
|
|
|
|
|
|
|
|
|
|
|
|
into the phone line. |
|
|
|
|
|
|
|
|
|
|
|
|
|
|
|
4) Once the handset battery pack is fully charged, connect the telephone |
|
|
|
|
|
|
|||||||||
|
Modular |
|
|
||||||||||||
line cord to the TEL LINE jack and a telephone outlet. If your telephone |
|
|
|
|
|
|
|
|
|
|
|
|
|
|
|
outlet isn't modular, contact your telephone company for assistance. |
|
|
|
|
|
|
|
|
|
|
|
|
|
|
|
10
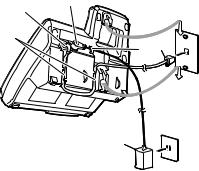
Mounting the Base Unit on a Wall
Standard wall plate mounting
This phone can be mounted on any standard wall plate.
1) |
Plug the AC adapter to the DC IN 9V jack. |
|
1 |
|
|
4 |
7 |
||
|
|
5 |
|
|
2) |
Route the AC adapter cord through the molded wiring channel as shown. |
2 |
6 |
|
|
|
|
||
3) |
Plug the AC adapter into a standard 120V AC wall outlet. |
|
|
7 |
4) |
Plug the telephone line cord into the TEL LINE jack. |
|
|
|
|
|
|
||
5) |
Route the telephone line cord through the molded wiring channel as |
|
|
|
|
shown. |
|
3 |
|
6) |
Plug the telephone line cord into the telephone outlet. |
|
|
|
7)Align the mounting slots on the base with the mounting posts on the wall.
Then push in and down until the phone is firmly seated.
Direct wall mounting
If you don’t have a standard wall plate, you can mount your phone directly to the wall. Before doing this, consider the following:
•Avoid electrical cables, pipes, or other items behind the mounting location that could cause a hazard when inserting screws into the wall.
•Try to mount your phone within 5 feet of a working phone jack to avoid excessive cord lengths.
11
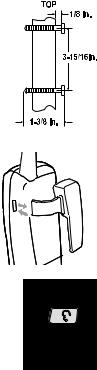
•Make sure the wall material is capable of supporting the weight of the base and handset.
•Use #10 screws (minimum length of 1-3/8 inches) with anchoring devices suitable for the wall
material where the base unit will be placed.
1)Insert two mounting screws into the wall (with their appropriate anchoring device), 3-15/16 inches apart. Allow about 1/8 of an inch between the wall and screw heads for mounting the phone.
2)Refer to steps 1 through 7 on page 11 to mount the telephone.
Installing the Belt Clip
To attach the belt clip
Insert the belt clip into the holes on each side of the handset. Press down until it clicks.
To remove the belt clip
Pull both sides of the belt clip to release the tabs from the holes.
Headset Installation
Your phone may be used with an optional headset. To use this feature, insert the headset plug into the headset jack. Your phone is ready for hands-free conversations. (Headsets may be purchased by visiting our website at www.uniden.com or by calling our Parts Department. See back cover page.)
12
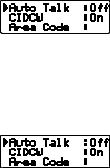
Basic Setup
There are five basic options that you will need to set up: AutoTalk, CIDCW (Caller ID on Call Waiting), Area Code,
Dial Mode and Language.
Activating AutoTalk
AutoTalk will allow you to answer the phone simply by removing the handset from the base. You do not have to press a key to answer the incoming call.
To activate:
1) When the phone is in standby, press and hold [cid/menu]. The following screen appears. 2) Press [select/remote] to turn AutoTalk on.
3) Press [end] or return the handset to the base unit to complete the setting. The handset returns to standby.
Activating Caller ID on Call Waiting
Caller ID allows you to see the name and number of the calling party before you answer the phone. Caller ID on Call Waiting (CIDCW) lets you see the name and number of a call that comes in when you are on the line. You must subscribe to Caller ID service through your local telephone provider to use this feature.
1) When the phone is in standby, press and hold [cid/menu]. The following screen appears.
13
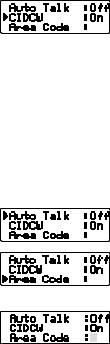
2) Press [ ] to move the pointer to select CIDCW. 3) Press [select/remote] to toggle and turn on Caller ID on Call Waiting. 4) Press [end] and return the handset to the base unit to complete the setting. The handset
returns to standby.
Note: To enable the setting change of CIDCW, you need to return the handset to the base unit when you complete the setting.
Programming Your Area Code
In some areas the telephone company may allow you to place a local call by dialing only 7 digits (instead of 10). If this is the case in your area, you can program your local area code in your phone. Programming your area code will allow you to see the caller’s 7-digit phone number which will allow you to easily return the local call without modifying the number before dialing. If you get a call from outside your area code, you'll see all 10 digits.
To program your area code:
1) When the phone is in standby, press and hold [cid/menu]. The following screen appears.
2) Press [ ] to move the pointer to select AREA CODE.
3) Press [select/remote]. If an area code was already stored, the phone will display it.
4) Use the number keys ( [0] – [9] ) to enter the 3-digit area code.
If you make an error, use [delete/channel] to backspace.
5) Press [select/remote]. A confirmation tone sounds.
6) Press [end] or return the handset to the base unit to complete the setting. The handset returns to standby.
14
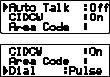
Choosing the Dialing Mode
Your phone can communicate with the telephone network in two different ways: tone dialing and pulse dialing. These days, most telephone networks use a method called tone dialing, so your phone comes programmed for tone dialing by default.
If your phone company uses pulse dialing, you'll need to change your phone's dial mode. There's an easy way to tell: try making a call. If your call connects, your phone's setting is fine. If not, you may need to change the dial mode.
To change the dial mode:
1) When the phone is in standby, press and hold [cid/menu]. The following screen appears.
2) Press [ ] to move the pointer to select DIAL. 3) Press [select/remote] to set the phone to pulse dialing. 4) Press [end] or return the handset to the base unit to complete the setting. The handset
returns to standby.
Note: If your phone system requires pulse dialing and you need to send the DTMF tones during a call, you can temporarily switch over to tone dialing. (Refer to "Tone Dialing Switch-over" on page 25.)
15
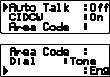
Setting the Language
You can change the language the handset menu displays. Choose from English, French, or Spanish.
To change the language setting:
1) When the phone is in standby, Press and hold [cid/menu]. The following screen appears.
2) Press [ ] to move the pointer to select LANGUAGE.
3) Press [select/remote] to select ENG, FR. or ESP. 


 4) Press [end] or return the handset to the base unit to complete the setting. The handset returns to standby.
16
Using the Speed Dial Memory
Your cordless phone allows you to store up to 10 names and numbers in the handset. You can dial these numbers with just a few key presses. The speed dial memory is not limited to phone numbers. You can store any number (up to 20 digits) that you need to enter once your call connects. This is referred to as Chain Dialing. An example is a frequently refilled prescription number. Store your pharmacy phone number in one speed dial and your most frequently refilled prescription number as another speed dial. To use, once you ring your pharmacy's automated prescription line, simply press [mem] and the speed dial number where you stored your prescription number and press [select/remote].
Note: When editing the speed dial memory, you must press a key within 30 seconds or the phone will return to standby. If you return the handset to the base, the phone will return to standby also.
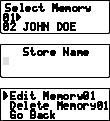
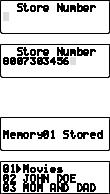
Storing a Name and Number in Memory
1)With the phone in standby, press [mem].
2)Enter [0] - [9] or use [ ] and [
 ] to select the speed dial location where you would like to
store this entry, and then press [select/remote] twice.
3) STORE NAME appears and a cursor flashes indicating that the phone is ready for the name to be entered.
Note: If the selected speed dial number is already assigned, the Edit screen appears. You can select EDIT MEMORY to edit this entry, select DELETE MEMORY to erase this entry, or select GO BACK to choose another speed dial number.
17
4)Enter a name according to the instructions below, then press [select/remote]. If no name is required, go to step 5.
•The name can be up to 13 characters.
•Use [ /tone/
 ] and [#/
 ] to move the cursor to the desired location.
•Press [delete/channel] to delete characters as needed or press and hold to delete all characters.
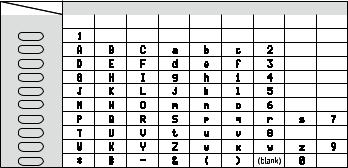
Refer to the letters on the number keys to select the desired characters.
With each press of a numeric key, the displayed character appears in the following order: upper case letters first, lower case letters next and finally the number corresponding to the key.
Note: If the next character uses the same number key, you must press [#/ ] to move the cursor over. Otherwise the next time you press the number key, it changes the character that was previously set.
For example, to enter Movies.
1)Press [6] once. Then press [#/ ] to move the cursor to the right.
2)Press [6] six times.
3)Press [8] six times.
4)Press [4] six times.
5)Press [3] five times.
6)Press [7] eight times.
Number of times key is pressed
keys |
1 |
2 |
3 |
4 |
5 |
6 |
7 |
8 |
9 |
1
2abc
3def
4ghi
5jkl
6mno
7pqrs
8tuv
9wxyz
0oper
18
If you make a mistake while entering a name
Use [ /tone/
 ] or [#/
 ] to move the cursor to the incorrect character.
Press [delete/channel] to erase the wrong character. Then enter the correct character. To delete all characters, press and hold [delete/channel].
5) STORE NUMBER is displayed. The cursor flashes indicating that the phone is ready for the number to be entered.
6) Use the keypad to enter the phone number; each number can be up to 20 digits. If you need the phone to pause during the dialing sequence, press [redial/pause] to insert a two-second pause between the numbers. You can enter multiple pauses to increase the delay. Each pause counts as a digit. The display shows a P for every pause.
7) Press [mem]. You will hear a confirmation tone, and the following screen appears.
Memory storage is complete.
8) After about 2 seconds, the following screen displays all the speed dial memory entries.
9) Press [end] to exit memory setup mode. The phone returns to standby.
Note: When storing numbers into memory, if the handset is idle (i.e., no key is pressed) for more than 30 seconds, it will beep rapidly, and the phone will return to standby.
19
Loading...