


 Loading...
Uniden D2998-6, D2998-3, D2998-5, D2998-2, D2998 User Manual
...D2998 Series User's Guide
What's in the box? |
Base AC adapter |
D2998 base with |
(PS-0034) |
|
Corded |
answering system |
|
|
||
handset |
|
|
Coiled cord |
Telephone |
|
cord |
||
(to connect |
||
|
||
handset to |
|
|
base) |
|
DCX291 |
Charger AC adapter |
accessory |
|
handset and |
(PS-0035) |
charger |
|
Battery cover 
Rechargeable battery pack (BT-1016 or BT-1025)
Desk/wall 


 mount stand

 (may be attached to the base)
If you purchased |
You should |
model number: |
have: |
|
|
D2998 |
1 of each |
D2998-2 |
2 of each |
D2998-3 |
3 of each |
|
|
D2998-4 |
4 of each |
|
|
D2998-5 |
5 of each |
|
|
D2998-6 |
6 of each |
|
|
If any items are missing or damaged, contact our Customer Care Line immediately. Never use damaged products!
Need Help? Get answers 24/7 at our website: www.uniden.com.
If You... |
Contact Uniden’s... |
Phone Number |
|
|
|
|
|
have a question or problem |
Customer Care Line* |
817-858-2929 or |
|
800-297-1023 |
|||
|
|
||
|
|
|
|
need a replacement part or an |
Parts Department* |
800-554-3988 |
|
accessory (headset, belt clip, etc.) |
|||
|
|
|
|
need special assistance due to a |
Accessibility Help Line |
800-874-9314 |
|
disability |
(voice or TTY) |
||
|
|||
|
|
|
* Duringregularbusinesshours,CentralStandardTime.Visitourwebsitefordetailedbusinesshours.
© 2011 Uniden America Corp. |
Printed in Vietnam |
Ft. Worth, Texas |
U01UN246BZZ(0) |

What's in the manual?
Getting Started.................................. |
3 |
Set Up the Base...................................................... |
3 |
Set Up the Accessory Handset(s).................... |
5 |
Getting to Know Your Phone........................... |
6 |
Using the Menus.................................................. |
10 |
Entering Text on Your Phone......................... |
11 |
Using Your Phone............................ |
12 |
Using Caller ID and Call Waiting................... |
12 |
Using the Phonebook....................................... |
13 |
Using Special Features.................... |
14 |
Using Text-To-Speech....................................... |
14 |
Adjusting the Base Visual Ringer.................. |
15 |
Using the Audio Boost...................................... |
15 |
Silent Mode............................................................ |
15 |
Using Multi-Station Features.......................... |
15 |
Using Voice Message Notification................ |
17 |
Using an Optional Headset............................. |
17 |
Using Your Phone During a Power |
|
Failure.................................................................... |
17 |
Using the Answering System......... |
18 |
Answering System Options (Ans. Setup).... |
18 |
Accessing the Answering System................ |
18 |
Recording Your Personal Greeting.............. |
19 |
Getting Your Messages..................................... |
20 |
Using the System While You're Away |
|
from Home.......................................................... |
21 |
Important Information................... |
22 |
Solving Problems................................................ |
22 |
Resetting Stations............................................... |
24 |
Registering a Handset....................................... |
24 |
Compliance Information.................................. |
25 |
One-year Limited Warranty............................. |
27 |
Important Safety Instructions!
When using your telephone equipment, basic safety precautions should always be followed to reduce the risk of fire, electric shock and injury to persons, including the following:
This unit is NOT waterproof. DO NOT expose it to rain or moisture.
Do not use this product near water, for example, near a bath tub, wash bowl, kitchen sink or laundry tub, in a wet basement or near a swimming pool.
Avoid using a telephone (other than a cordless type) during an electrical storm. There may be a remote risk of electric shock from lightning.
Do not use the telephone to report a gas leak in the vicinity of the leak.
Use only the power cord and batteries indicated in this manual. Do not dispose of batteries in a fire. They may explode. Check with local codes for possible special disposal instructions.
Do not place the handset in any charging cradle without the battery installed and the battery cover securely in place.
SAVE THESE INSTRUCTIONS!
CAUTION! Risk of explosion if battery is replaced by an incorrect type! Dispose of used batteries according to the instructions. Do not open or mutilate the battery. Disconnect the battery before shipping this product.
For more details, see the Important Information section.
2 - English

Getting Started
Set Up the Base
Attach the Stand
For desktop use |
For wall mount use |
DESK
WALL
WALL
DESK
1.Turn the stand so the word Desk is right-side up (it will be on the left).
2.Insert the tabs into the notches at the top of the base.
3.Press in on the latches and slip them into the notches marked Desk.
1.Turn the stand so the word Wall is right-side up (it will be on the left).
2.Insert the tabs into the notches at the bottom of the base.
3.Press in on the latches and slip them into the notches marked Wall.
Remove the Stand
Press in on the latches and slide them out of the notches.
Connect the Corded Handset
Use the coiled cord to connect the corded handset to the connector on the left side of the base.
For wall mount use only
1. |
On the front of the base, slide the clip |
|
|
|
out of its slot. |
|
|
2. |
Rotate the clip 180 degrees. |
1 |
|
3. |
Flip it from front to back and slide it |
||
2 |
back into the slot.
3
English - 3
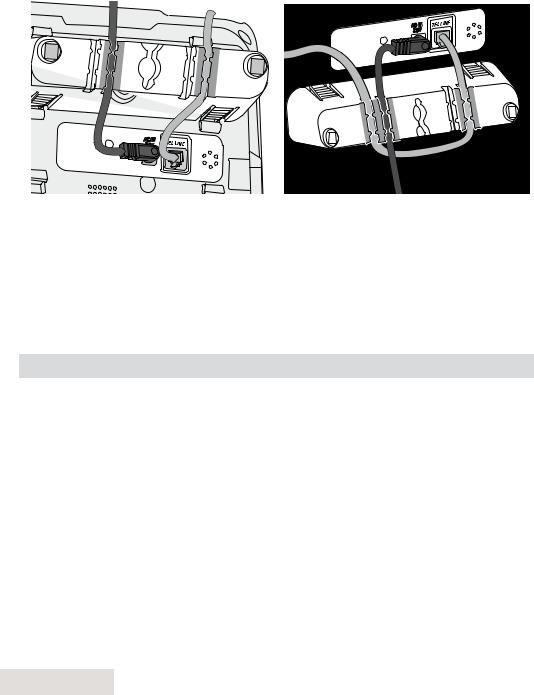
Connect the Power and Telephone Cords
1.Connect the base AC adapter to the power jack and the telephone cord to the TEL LINE jack. Route the cords as shown below:
For desktop use |
For wall mount use |
2.Plug the AC adapter into a standard 120 V AC power outlet, and connect the telephone cord to a standard telephone wall jack.
3.If you are mounting the phone on the wall, place the mounting slots over the pins on the wall plate, and slide the base down to lock it into place.
Test the Connection
Pick up the corded handset from the base. You should hear a dial tone and the display on the base should say Talk. When you get a dial tone, make a quick test call.
If... |
Try... |
|
|
the display says Check Tel Line or you |
checking the connection between the base |
don't hear a dial tone |
and the phone jack. |
you keep hearing a dial tone |
changing to pulse dialing. |
|
|
Changing from Tone to Pulse Dialing
Your phone uses tone dialing by default. If your phone company uses pulse dialing, you need to change your phone’s dial mode.
1.Press Select/menu and select Global Setup (see p. 10 for using the menus).
2.Select Dial mode, then Pulse. You'll hear a confirmation tone.
To send DTMF tones during a call (e.g., for an automated response system), press to temporarily switch to tone dialing. When you hang up, the phone automatically returns to pulse dialing.
4 - English

Set Up the Accessory Handset(s)
Install and Charge the Battery
1. Unpack all handsets, battery packs, and battery covers.
If any handset has the battery cover already attached, press in on the notch and slide the cover down off.
2. Line up the battery pack connector with
the jack inside the handset. (The battery connector will only fit one way.)
3. Push the battery pack connector in until it
clicks into place. Tug gently on the wires to make sure the battery pack is securely connected.
4. Place the batter cover and slide it up into place.
5. Use an AC adapter to connect the power jack on each charger to a regular indoor (120V AC) power outlet.
6. Place each handset in a charger with the display facing forward. If the charge light on the charger doesn’t light up, reseat the handset or connect the charger to a different outlet.
##Charge all handsets completely (about 15 hours) before using them.
Test the Connection
Pick up each handset and press Talk/end. You should hear a dial tone, and the display should say Talk. (Press Talk/end again to hang up.)
If there is noise or static, see p. 22 for tips on avoiding interference.
English - 5

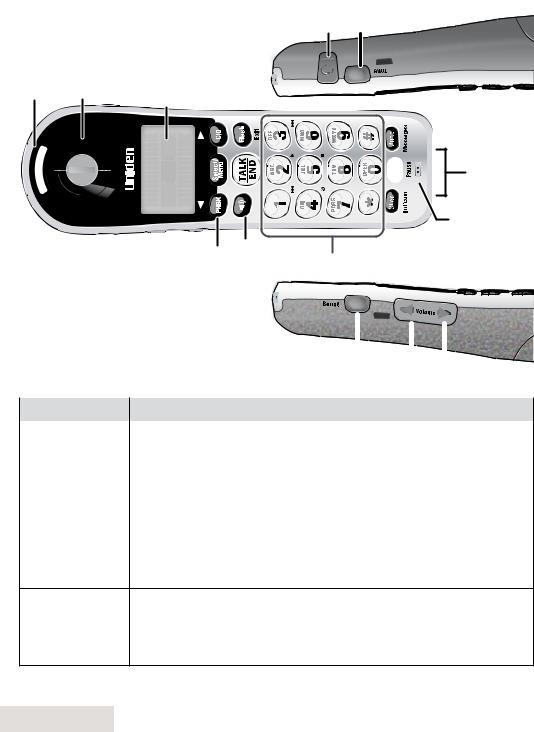
Getting to Know Your Phone
Parts of the Base
If the key name is spelled out on the key itself, it's not labeled in the drawing.
Visual ringer |
|
|
|||
Handset |
switch |
Hook |
|
|
|
(on top) |
Display |
CID |
|||
clip |
|
|
switch |
||
|
|
|
|
||
|
|
|
|
|
|
UP |
DOWN |
Visual |
ringer |
Answering system controls
|
|
|
|
|
|
|
|
|
|
|
|
Twelve- |
|
|
|
|
|
|
|
|
|
|
|
|
|
||
|
|
|
|
|
|
|
|
|
|
|
|
||
|
|
|
|
|
|
|
|
|
|
|
|
||
|
|
|
|
|
|
|
|
|
|
|
|
||
|
|
|
|
|
|
|
|
|
|
|
|
key dial |
|
|
|
|
|
|
|
|
|
|
|
|
|
pad |
|
|
|
|
|
|
|
|
|
|
|
|
|
||
|
|
|
|
|
|
|
|
|
|
|
|
Microphone |
|
|
|
|
|
|
|
|
|
|
|
|
|
||
|
|
|
|
|
|
|
|
|
|
|
|
||
|
|
INTERCOM/ |
|||||||||||
Speaker |
(on bottom) |
||||||||||||
|
|
HOLD |
|
||||||||||
|
|
|
|
|
|
|
|
|
|
|
|
||
Key (icon) |
What it does |
|
|||||||||||
|
|
|
|
|
|
|
|
|
|
|
|
||
On/off |
|
xxIn standby: turn the answering system on or off. |
|||||||||||
|
|
|
|
|
|
|
|
|
|
|
|
||
Slow |
|
xxReduce the speed of the answering system playback by 30%. |
|||||||||||
|
|
|
|
|
|
|
|
|
|
|
|
||
Repeat ( |
) |
xxIn the first 2 seconds of a message: go to the previous message. |
|||||||||||
xxAnytime after that: go back to the beginning of this message. |
|||||||||||||
|
|
|
|
|
|
|
|
|
|
|
|
|
|
Play/stop |
xxIn standby: start playing new messages. |
|
|||||||||||
xxWhile a message is playing: stop playing messages. |
|||||||||||||
|
|
||||||||||||
|
|
|
|
|
|
|
|
|
|
|
|
||
Skip ( |
) |
xxWhile a message is playing: skip to the next message. |
|||||||||||
Delete |
|
xxIn standby: delete all messages. |
|
||||||||||
|
xxWhile a message is playing: delete this message. |
||||||||||||
|
|
||||||||||||
|
|
|
|
|
|
|
|
|
|
|
|
|
|
6 - English

Key (icon) |
What it does |
|
|
|
|
Intercom/hold |
xxIn standby: page a handset using the intercom. |
|
xxDuring a call: put the call on hold and start a call transfer. |
||
|
|
|
Silent ( ) |
xxIn standby: turn the Silent Mode on or off (see p. 15). |
|
|
|
|
|
xxWhile the phone is ringing: ignore this call (mute the ringer). |
|
Clear/mute |
xxDuring a call: mute the microphone. |
|
xxWhile entering text: delete the last character, or press and hold |
||
|
||
|
to delete all the characters. |
|
|
|
|
Flash |
xxDuring a call: switch to a waiting call. |
|
|
xxIn standby: start a speakerphone call (get a dial tone). |
|
Talk/end |
xxDuring a normal call: switch to the speakerphone. |
|
|
xxDuring a speakerphone call: hang up. |
|
|
|
Common Operation Keys
These keys work the same way on the base and the handset.
Key (icon) |
What it does |
|
|
|
|
select/Menu |
xxIn standby: open the menu. |
|
xxIn any menu or list: select the highlighted item. |
||
|
|
|
CID |
xxIn standby or during a call: open the Caller ID list. |
|
xxWhen entering text: move the cursor to the right. |
||
|
||
|
|
|
|
xxIn standby or during a call: open the phonebook. |
|
Phonebook |
xxIn the menu: go back to the previous screen. |
|
|
xxWhen entering text: move the cursor to the left. |
|
|
|
|
|
xxIn standby: increase the ringer volume. |
|
Up ( ) |
xxDuring a call or while a message is playing: increase the volume. |
|
|
xxIn any menu or list: move the cursor up one line. |
|
|
|
|
|
xxIn standby: decrease the ringer volume. |
|
Down ( ) |
xxDuring a call or while a message is playing: decrease the volume. |
|
|
xxIn any menu or list: move the cursor down one line. |
|
|
|
|
Redial/pause |
xxIn standby: open the redial list. |
|
xxDuring a phone number entry: insert a two-second pause. |
||
|
|
|
Tone |
xxDuring a call: adjust the audio tone (see p. 22). |
|
Boost |
xxDuring a call: boost the volume of the earpiece (see p. 15). |
|
|
|
English - 7
Parts of the Handset
If the key name is spelled out on the key itself, it's not labeled in the drawing.
Headset jack TONE (Right side)
Visual |
|
|
ringer |
Earpiece |
Display |
|
|
Charging
contacts
Microphone
PHONEBOOK SPEAKER Twelve-key dial pad
|
(Left side) |
|
|
|
|
|
|
|
|
|
|||
|
|
|
|
|
|
|
|
BOOST |
|
|
|
||
|
UP DOWN |
|||||
|
|
|
||||
|
|
|
|
|
|
|
Key (icon) |
What it does |
|
|
|
||
|
|
|
|
|
||
Talk/end |
xxIn standby: start a telephone call (get a dial tone). |
|||||
xxDuring a call: hang up. |
|
|
|
|||
|
|
|
|
|||
|
|
|
|
|
|
|
Flash/exit |
xxDuring a call: switch to a waiting call. |
|
|
|
||
xxIn any menu or list: exit and go back to the previous operation. |
||||||
|
||||||
|
|
|
|
|
|
|
|
xxIn standby: access your answering system. |
|
|
|
||
mute/Messages |
xxDuring a call: mute the microphone. |
|
|
|
||
|
xxWhile the phone is ringing: ignore this call (mute the ringer). |
|||||
|
|
|
|
|
||
Speaker |
xxSwitch a normal call to the speakerphone (and back). |
|||||
xxIn standby: page another station using the intercom.
Clear/intercom xxDuring a call: put the call on hold and start a call transfer. xxWhile entering text: delete the last character, or press and
hold to delete all the characters.
8 - English
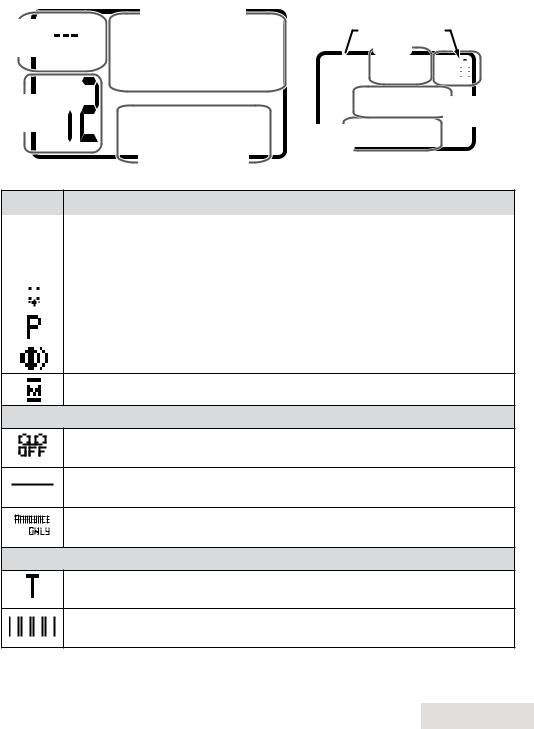
Reading the Displays
On the base On the handset
Status 


icons 


Message 
counter
Day and time
SUN 12:00 AM 
New CID: 5 Caller ID
count
Caller ID count
Status icons
Time
12:00A 

Handset #1 Handset New CID: 5 banner
Icon |
What it means |
|
|
|
The volume of the earpiece is boosted (see p. 15). |
|
|
|
|
|
The ringer is turned off: this station will not ring when a call comes in. |
|
|
|
|
|
You have a voice message waiting (see p. 17). |
|
|
|
|
|
|
|
|
|
Privacy Mode is on: no other station can use the line or join your call. |
|
|
|
The speakerphone is on. |
The microphone is muted, and the caller can't hear you.
Icons you might see only on the base
The answering system is turned off: the system will not answer the phone or take messages.


 The memory on the answering system is full: you need to delete some


 messages before the system can record any new ones.
The answering system is set to Announce Only: the system will answer the phone, but it will not let callers leave a message.
Icons you might see only on the handset
T-coil mode is on (see p. 10).


 The battery is 1) fully charged, 2) half charged, 3) getting low, or 4)


 empty.
English - 9
Loading...