


Astra 2000U/P
OWNER’S GUIDE
Trademarks
UMAX is a trademark of UMAX Technologies, Inc. Astra is a trademark of UMAX Technologies. IBM PC/AT is a trademark of International Business Machines Corporation. MS-Windows, Windows, and MS-DOS are trademarks of Microsoft Corporation. PhotoDeluxe is a trademark of Adobe Systems, Inc. Presto! PageManager is a trademark of NewSoft Technology Corporation. Other names and trademarks appearing herein are trademarks of their respective holders.
Copyright
©1999 UMAX Technologies, Inc. All rights reserved. No part of this publication may be reproduced, transmitted, transcribed, stored in a retrieval system, or translated into any language or computer language, in any form or by any means, electronic, mechanical, magnetic, optical, chemical, manual, or otherwise, without the prior written permission of UMAX Technologies, Inc.
2
UMAX Astra 2000U/P Owner’s Guide
Table of Contents
CHAPTER 1. GETTING STARTED .............................. |
9 |
Introduction............................................................................................... |
9 |
Unpacking the Scanner............................................................................. |
9 |
Astra 2000U Package Contents............................................................. |
10 |
Astra 2000P Package Contents ............................................................. |
10 |
Getting to Know Your Scanner ............................................................. |
11 |
Astra 2000U and Astra 2000P Scanner Elements................................. |
11 |
Astra 2000U Backpanel ........................................................................ |
11 |
Astra 2000P Backpanel......................................................................... |
12 |
System Requirements ............................................................................. |
12 |
Installing the Hardware ......................................................................... |
13 |
About Scanner Connectors.................................................................... |
13 |
Setting Up – General Information......................................................... |
14 |
Connecting the Hardware Interface Cables........................................... |
15 |
Connecting the Power Adapter ............................................................. |
17 |
Installing the Software............................................................................ |
18 |
Installing PhotoDeluxe on Your PC...................................................... |
18 |
Installing PhotoDeluxe on Your Macintosh.......................................... |
19 |
Install VistaScan Drivers, Presto! PageManager, Presto! PhotoAlbum, |
|
Presto! PageType, OmniPage LE and Online Manuals ........................ |
20 |
CHAPTER 2. YOUR FIRST SCAN ............................. |
21 |
Opening the PhotoDeluxe Software....................................................... |
21 |
Scanning an Image From the PC........................................................... |
23 |
Scanning an Image From the Macintosh............................................... |
25 |
Turning the Scanner Lamp On and Off ............................................... |
27 |
Setting VistaScan Preferences................................................................ |
29 |
General.................................................................................................. |
29 |
Scan Destination ................................................................................... |
31 |
3
Scanner Information............................................................................. |
34 |
VistaScan Beginner Window Features................................................. |
35 |
VistaScan Advanced Features .............................................................. |
40 |
Using VistaAccess – Direct Access...................................................... |
59 |
Using VistaShuttle................................................................................ |
61 |
Using the UMAX Copy Utility ............................................................ |
63 |
CHAPTER 4. SCANNING PROJECTS....................... |
67 |
Using VistaScan to Scan a Photo to E-mail......................................... |
69 |
Using VistaScan with PhotoDeluxe to Create Web-ready Images ..... |
70 |
Using Presto! PageManager to Scan a Form and Edit it with |
|
PageType................................................................................................. |
75 |
Creating a Calendar with PhotoDeluxe................................................ |
77 |
Converting Scanned Text to Editable Text with OmniPage............... |
81 |
Opening OmniPage LE ........................................................................ |
81 |
Converting Scanned Text with OmniPage LE...................................... |
83 |
Creating an Album with Presto! PhotoAlbum.................................... |
84 |
Opening PhotoAlbum:.......................................................................... |
84 |
Creating a Photo Album....................................................................... |
85 |
CHAPTER 5. HOW TO GET HELP ............................ |
89 |
Using Online Manuals............................................................................ |
89 |
Accessing the UMAX VistaScan Online Manual ................................ |
89 |
Accessing the Adobe PhotoDeluxe Online Manual ............................. |
90 |
Accessing the Presto! PageManager Online Manual............................ |
91 |
Accessing the Caere OmniPage Online Manual................................... |
91 |
Installing Acrobat Reader for Macintosh Users ................................... |
92 |
Troubleshooting...................................................................................... |
92 |
General Problems and Solutions .......................................................... |
92 |
Astra 2000U (Windows 98/95 OSR2) Problems and Solutions ........... |
93 |
Astra 2000U (Macintosh version) Problems and Solutions.................. |
97 |
Astra 2000P (Windows 98/95 OSR2) Problems and Solutions.......... |
100 |
4
UMAX Astra 2000U/P Owner’s Guide |
|
Contacting Technical Support ............................................................. |
103 |
Maintenance .......................................................................................... |
104 |
Static Electricity Precautions............................................................... |
104 |
Cleaning ................................................................................................. |
105 |
APPENDIX A. TECHNICAL SPECIFICATIONS....... |
107 |
Scanner Specifications.......................................................................... |
107 |
GLOSSARY .............................................................. |
109 |
FCC DECLARATION OF CONFORMITY................. |
115 |
WARRANTY ............................................................. |
116 |
INDEX ....................................................................... |
117 |
5
6
UMAX Astra 2000U/P Owner’s Guide
ABOUT THIS MANUAL
This is the Owner’s Guide for the UMAX Astra 2000U and the Astra 2000P scanners. It will provide information you will need to operate your scanner, as well as show you how to use the software that comes with it.
This manual assumes you have a basic knowledge of personal computers, and scanning terms and functions. However, a glossary of scanner terms is included at the end of this guide to explain the scanning terms used throughout this guide.
The information in this manual is organized as follows:
Chapter 1. Getting Started
Chapter 1 introduces you to the Astra 2000 series scanner and tells you how to install the scanner hardware and software.
Chapter 2. Your First Scan
Chapter 2 steps you through the basic procedures to use the scanner. These steps include scanning an image, and saving an image to a specified location.
Chapter 3. Scanning Basics
Chapter 3 describes the VistaScan software and other scanning utilities that have been included with the scanner to provide worryfree scanning. The VistaScan software includes several features that make scanning images and text easier than ever.
Chapter 4. Scanning Projects
Chapter 4 explains how to use this scanner with the bundled software applications. It shows you how to use the scanner for creative projects like making photo albums and calendars, sending scanned images via e-mail, and using the text recognition program to scan a document into your word processor.
7
Chapter 5. How to Get Help
Chapter 5 contains information you can refer to when you need assistance with the scanner or the bundled software. The information includes: how to access the online manuals for all the bundled software, troubleshooting guidelines, and how to contact the manufacturer for additional assistance.
Glossary
Includes definitions of common scanning terminology.
8
UMAX Astra 2000U/P Owner’s Guide
CHAPTER 1. Getting Started
Introduction
Thank you for purchasing the UMAX Astra 2000U or Astra 2000P scanner. These versatile units are perfect for the home or office. Use these scanners to add variety and flair to your documents, or to help you share images with others.
The hardware connection is the only difference between the two scanners. The Astra 2000U scanner is equipped with a USB connector that allows you to make a fast and easy connection to the USB port on your PC, or USB-equipped Macintosh computer (such as the iMac or G3). The Astra 2000P scanner uses a parallel connector that simply plugs in to the parallel (printer) port on your Windows PC. Throughout this guide the scanners will be referred to as the Astra 2000 scanner unless specified otherwise.
In addition to being easy to connect, these scanners are also easy to use. Simply follow the instructions in this guide and you’ll be scanning in no time. With the powerful software included with your scanner, you can create an archive of scanned images, e-mail or fax images to friends or clients, or create your own web site gallery. Get ready to unleash your creativity with the UMAX Astra 2000 scanner.
Unpacking the Scanner
Your scanner package includes the cables and software you need to get the scanner up and running. The scanner package should contain all of the items listed below. If you do not find all of the listed items, contact the retailer from whom you purchased the scanner, or contact UMAX. For information about contacting UMAX directly, refer to Chapter 5. How to Find Help.
9
Astra 2000U Package Contents
•UMAX Astra 2000U Flatbed scanner
•USB Interface Cable
•Quick Start Guide and Owner’s Manual
•Power Adapter
•Adobe® PhotoDeluxe® Home Edition 3.0 CD-ROM (PC version)
•Adobe® PhotoDeluxe® 2.0 CD-ROM (Macintosh version)
•UMAX Scanner CD-ROM which contains:
•UMAX VistaScan
•VistaAccess
•VistaShuttle (PC only)
•Caere® OmniPage® LE OCR
•NewSoft® Presto! PageManager
•NewSoft® Presto! PhotoAlbum™ (PC only)
•NewSoft® Presto! Type™ (PC only)
•UMAX Copy Utility (PC only)
Astra 2000P Package Contents
•UMAX Astra 2000P Flatbed scanner
•Parallel Interface Cable
•Quick Start Guide and Owner’s Manual
•Power Adapter
•Adobe® PhotoDeluxe® Home Edition 3.0 CD-ROM
•UMAX Scanner CD-ROM which contains:
•UMAX VistaScan
•VistaAccess
•VistaShuttle
•Caere® OmniPage® LE OCR
•NewSoft® Presto! PageManager™
•NewSoft® Presto! PhotoAlbum™
•NewSoft® Presto! Type™
•UMAX Copy Utility
10

UMAX Astra 2000U/P Owner’s Guide
Getting to Know Your Scanner
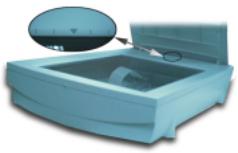
To gain a complete understanding of the information contained in this manual, it is important that you become familiar with your scanner. The graphics below identify the key scanner components.
Document Cover
The plastic cover that protects the object glass.
Object Glass
The glass surface on which documents or images are placed.
Power Indicator
Illuminates to indicate that the scanner is powered on.
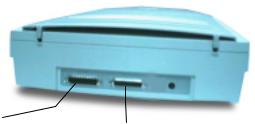
Astra 2000U and Astra 2000P Scanner Elements
4-Pin USB Connector
Power Adapter
 Receptacle
Astra 2000U Backpanel
11
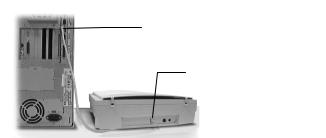
Power Adapter
 Receptacle
Parallel Interface |
Parallel Interface |
|
Connector ”TO PC” |
||
Connector ”TO |
||
|
||
|
Printer” |
Astra 2000P Backpanel
There are two parallel ports on the Astra 2000P scanner. This allows your printer and your scanner to communicate with your computer using the parallel connector. The first parallel port is used to connect the scanner to your computer. You attach your printer cable to the second parallel port, which acts as a pass-through port.
System Requirements
This section defines the minimum system requirements necessary to operate either the Astra 2000U or Astra 2000P scanner. Please refer to the section below that applies to your scanner and computer type.
Astra 2000U Scanner
PC Requirements
•An IBM-compatible PC with 80486, Pentium processor or higher
•Microsoft® Windows 98, 95 OSR 2, or higher
•USB interface connector
•At least 16 MB RAM memory (32 MB recommended)
•CD-ROM drive
•170 MB of available hard disk space
12
UMAX Astra 2000U/P Owner’s Guide
Macintosh Requirements
•iMac or USB-compatible Macintosh
•Macintosh OS 8.1 or higher
•USB interface connector
•At least 16 MB RAM memory (32 MB recommended)
•CD-ROM drive
•170 MB of available hard disk space
Astra 2000P Scanner
•An IBM-compatible PC with 80486, Pentium processor or higher
•Microsoft® Windows 98, 95 OSR 2, NT 4.0 or higher
•Parallel interface connector
•At least 16 MB RAM memory (32 MB recommended)
•CD-ROM drive
•170 MB of available hard disk space
Installing the Hardware
After you have removed the scanner from the box and verified that all of the package contents have been included, please check to make sure that your computer is compatible with the scanner’s connectors.
About Scanner Connectors
USB Connectors
Many newer computers, including most PCs, the Apple iMac, and USB capable Macintosh computers rely on USB technology as the primary method of communication between the computer and its peripherals. With this new USB “plug-and-play” technology, your computer automatically configures any recently attached peripherals (such as a mouse or a scanner) as soon as you reboot the computer.
13

If your computer has a USB port, you must make sure that this port is enabled in the system BIOS. Please refer to the troubleshooting section to learn more about enabling the USB port.
Parallel Port Connectors
Another common communication interface is the parallel port. The parallel port interface is the standard method for connecting a printer to a PC computer. In order to use the Astra 2000P scanner, you must make sure that the mode of your parallel port is set correctly. Please refer to the troubleshooting section of this manual to learn how to correctly set the port mode.
Checking Your Computer’s Connectors
To use your scanner you need to understand what type of connectors you have on your computer. To determine the connector type, look at the back panel of your computer:
•A USB port is a small slot ½” long and ¼” wide.
•A Parallel port is about 1 ½” long and ¼” wide, with two rows of tiny holes (25).
NOTE: If your computer has a USB port, check to make sure that your computer's operating system supports USB. The following factory-installed operating systems support USB: Microsoft Windows 95 OSR2, 98 or higher, and Mac OS8.1.
Setting Up – General Information
•Find a suitable location near your computer to place the scanner.
14
UMAX Astra 2000U/P Owner’s Guide
CAUTION: Make sure the surface is flat. Operating your scanner on an uneven surface can damage the internal components.
•Turn your computer off. Unplug the computer’s power cable from the electrical outlet.
Connecting the Hardware Interface Cables
If your computer has a USB port, follow the instructions in the “Connecting the USB Cable” section to connect the scanner to your computer.
If your computer has a parallel port, follow the instructions in the “Connecting the Parallel Cable” section to connect the scanner to your computer.
Connecting the USB Cable
The instructions for connecting the hardware interface cable are different for PC and Macintosh users. Refer to the section below that applies to your computer type.
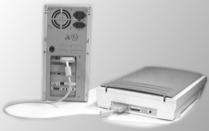
PC Connection
1.Turn off your computer and unplug the power cord.
2.Locate the USB cable that is provided. Plug one end of this cable firmly into the USB port on the back of the computer.
USB Connector Port
USB Connector Port
15
3.Plug the other end of this cable into the port located on the back panel of the scanner.
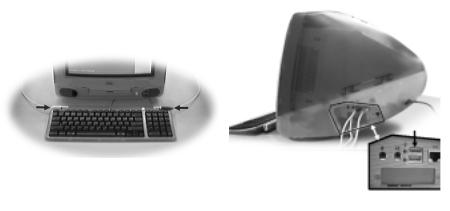
Macintosh Connection
1.Turn off your computer and unplug the power cord.
2.Locate the USB cable that is provided. Plug one end of it firmly into one of the USB ports. iMac computer ports are located on the right side of the computer, or at either side of the keyboard. The USB port on other Macintosh computers is located on the back panel of the computer, or on a USB interface card.
3.Plug the other end of this cable into the port located on the back panel of the scanner.
Connecting the Parallel Port Cable
1.Turn off your computer and unplug the power cord.
2.Locate the parallel cable included with your scanner. Connect the 25-pin parallel interface cable to your PC’s parallel port.
16
UMAX Astra 2000U/P Owner’s Guide
NOTE: If you have a printer connected to your computer’s parallel port, disconnect the printer and plug it into the “To Printer” port located on the back of the scanner. Plug the scanner cable into the parallel port. This provides a passthrough connection so you can use the printer of the scanner.
3.Plug the other end of this cable into the port located on the back panel of the scanner.
Connecting the Power Adapter
1.Plug the scanner’s power adapter into an electrical outlet.
2.Insert the other end of this cable into the power adapter receptacle on the rear panel of the scanner. The power indicator on the front panel of the scanner should now be illuminated.
3.Plug your computer’s power cable into an electrical outlet.
4.Turn your computer on.
17
Installing the Software
Now that you have made the physical connection between the Astra 2000U/P scanner and your computer, the next step is to install the software that allows the two devices to communicate with one another.
Because the Macintosh and PC installation procedures are different for PhotoDeluxe, the installation instructions for that software is divided into PC and Macintosh software installation sections.
Installing PhotoDeluxe on Your PC
NOTE: PhotoDeluxe is compatible with Windows 98, 95 and higher. Use the following steps to install your scanning software rather than using the add/remove programs to install the software.
1.Insert the CD-ROM labeled “PhotoDeluxe” into your computer’s CD-ROM drive. Your computer should automatically read the disc and display a series of screens regarding product licensing. Follow the onscreen instructions.
NOTE: If your computer does not automatically read the CDROM after insertion, click on the “Start bar” and select “Run…” A dialog box appears. Type “d:\autoplay.exe” in the open text box. If your CD-ROM is designated with another letter, substitute the appropriate letter for the drive.
2.A Licensing Agreement window appears. Enter the country where you are currently located in and click Next.
3.Read the licensing agreement and then click Agree.
4.A PhotoDeluxe Install window appears. Click the Install button. Follow the onscreen instructions.
5.When you get to the Setup Type window, choose Typical.
18
UMAX Astra 2000U/P Owner’s Guide
6.Fill in the user information.
7.Click Next in the Start Copying Files window to begin installing PhotoDeluxe Home Edition 3.0, Adobe Acrobat Reader 3.01, Adobe ATM 4.0 and Microsoft Internet Explorer 4.01. Follow the onscreen instructions.
8.After Adobe Acrobat Reader 3.01 has been installed, a ReadMe file appears. When you have read the ReadMe, select Exit from the File menu.
9.The Adobe Type Manager window appears. Click the Install button. Follow the onscreen instructions.
10.When the Adobe Product Registration window appears, enter the relevant information and continue following the onscreen instructions.
11.When a screen appears asking if you want to restart your computer to finish the installation procedure, select Yes and click the OK button.
NOTE: To access these files you must click on the “Start” bar, select “Programs,” and then select “Adobe.” A cascading file appears with “Read Me” information and other selections to choose from. For information about setting up desktop shortcuts, refer to your Microsoft Windows documentation.
Installing PhotoDeluxe on Your Macintosh
1.Insert the CD-ROM labeled “PhotoDeluxe” into your computer’s CD-ROM drive. Your computer should automatically read the disc and display the folders contained on the CD-ROM.
2.Double-click on the Adobe PhotoDeluxe Installer icon. Follow the onscreen instructions.
19
3.An Adobe ReadMe file appears. After reading the text, click
Continue.
4.A PhotoDeluxe Installer window appears. Click the Install button. Follow the onscreen instructions.
5.Complete the product registration form and click Next. Click the Install Now button. After installation is complete, restart your computer by clicking the Restart button. After the system restarts, re-insert the PhotoDeluxe CD-ROM.
6.Double-click on the ATM application folder inside the PhotoDeluxe CD-ROM window. Double-click on the Font and Utilities folder, then Double-click on the Installer icon. Click the Install icon to install the ATM files. Restart your system after the installation is complete.
Install VistaScan Drivers, Presto! PageManager,
Presto! PhotoAlbum, Presto! PageType,
OmniPage LE and Online Manuals
1.Insert the UMAX Scanner CD into your computer’s CD-ROM after you have finished installing the software on the PhotoDeluxe CD.
FOR PC USERS: If your computer does not automatically begin installing the programs contained on this disc after inserting it into the CD-ROM, click on the “Start bar,” select “Run…” A dialog box appears. Type “d:/setup” in the dialog box. If your CD-ROM is designated with another letter, substitute the appropriate letter for the drive.
2.Follow the onscreen instructions to complete the installation of Presto! PageManager, UMAX VistaScan, OmniPage LE, MagicMatch Profile Pack and the online User’s Guide.
3.Restart your computer as suggested by the onscreen instructions to complete the installation.
20
UMAX Astra 2000U/P Owner’s Guide
CHAPTER 2. Your First Scan
Before you begin your first scan, you must install the scanner and the bundled software. Refer to the Quick Start Guide for installation and scanner test instructions.
You can perform a basic scan using any of the software applications bundled with this scanner. For your first scan, we suggest using the PhotoDeluxe software.
PCs and Macintosh have two different versions of the PhotoDeluxe software, so we have included two separate sets of instructions. Please follow the proper set of instructions for your system.
Opening the PhotoDeluxe Software
Open the PhotoDeluxe software application.
For PC Users:
1.Click the Start bar in the bottom-left corner of the screen.
2.Click Programs.
3.Select Adobe.
4.Select PhotoDeluxe Home Edition 3.0.
5.Click Adobe PhotoDeluxe Home Edition 3.0.
6.The PhotoDeluxe screen appears. Click the Get & Fix Photo tab. A row of icons appears.
7.Click the Get Photo icon. A drop-down list appears. Click the Scanners… option. A tabbed bar appears at the top of the screen. Click the Scanner tab.
21
NOTE: You only need to select the device driver once in PhotoDeluxe and your selection will be saved.
8.Click the Choose Scanner icon. Click on the VistaScan, and click OK. Click the Mode tab. Click the Custom icon. The VistaScan window opens. VistaScan software controls the various functions of the scanner and provides a communication path between the scanner and the PhotoDeluxe software.
NOTE: Before using your scanner for the first time, use the Scanner Test utility to verify that the scanner is able to communicate with the computer. A test window appears the first time you launch the VistaScan software after installing the scanner.
9.Click the Scanner Test, and the UMAX Scanner Test Program window opens. Click the Test button to test the scanner.
10.If the scanner passes, “Scanner Link Successful,” appears in the status box. Click OK. If the scanner test fails, check your connections and try the test again.
11.Click the Custom icon.
22
UMAX Astra 2000U/P Owner’s Guide
Scanning an Image From the PC
1.Select an item you would like to scan (a picture, a drawing, etc.).
2.Lift the document cover and place the item facedown so it aligns with the arrow ( ) at the back edge of the object glass.
3.Click the Preview button on the right side of the VistaScan Beginner window. The scanner begins a low-resolution scan of the item.
4.When the preview scan is complete the preview image is displayed in the Preview window (on the left side of the VistaScan window).
You can change the view of the Preview image using the “Zoom Tool,” or select a scanning region using the “Frame Selection Tool.” To find out more about how to use these tools, click on the user tips text that appears when your cursor pauses over the tool.
NOTE: You must have a browser installed in order to view the VistaScan online help.
5.In the Click to Scan section of the VistaScan Beginner window, click the icon that corresponds to the type of image you are scanning.
23
For example, if you are scanning a color photograph, choose “Color Photo.” To scan text or a black and white drawing, choose “Text/Lineart”. The image is scanned and you are returned to the PhotoDeluxe window.
NOTE: Choosing an icon in the “Click to Scan” area does two things: it activates the scanner, and automatically sets the scanner settings. This ensures you get the best scanning results for the item you are scanning.
6.A pop-up message appears on the right side of the screen indicating that you should click the Done tab.
7.Click the Done tab. A Save as window opens. Enter a file name for the scanned image. Indicate which folder or directory you want to save the image file to, and specify in what file format you want to save the image.
NOTE: If you do not assign a file name, the computer automatically assigns a name that consists of the date, and a two-digit reference number.
8.Enter a graphic title for the image that will appear in the My Photos window.
9.Click on the Save & Send icon. Choose save from the dropdown menu. Click the Save button to save the image.
10.Close the VistaScan window by clicking Exit.
For Macintosh Users:
1.Double-click the Hard Drive icon.
2.Double-click the Adobe PhotoDeluxe 2.0 folder.
3.Double-click the Adobe PhotoDeluxe application icon to launch PhotoDeluxe. The PhotoDeluxe screen appears.
24

UMAX Astra 2000U/P Owner’s Guide
4.Click the Get Photo button.
5.Click the Get Photo tab.
6.Click the Scanner button to display a menu of available input sources. Select UMAX VistaScan, then click OK. The VistaScan Beginner window appears.
NOTE: You only need to select the device driver once in PhotoDeluxe. It will remember your selection the next time you use the application.
Scanning an Image From the Macintosh
1.Select an item you would like to scan (a picture, a brochure, etc.).
2.Lift the document cover and place the item facedown so it aligns with the arrow ( ) at the back edge of the object glass.
3.Click the Preview button on the right side of the VistaScan Beginner window and the scanner begins a low-resolution scan.
4.When the preview scan is complete the preview image is displayed in the Preview window (on the left side of the VistaScan window).
25
You can change the view size of the Preview image before scanning the final image using the “Zoom Tool,” or select a region to scan using the “Frame Selection Tool.” To find out more about how to use these tools, click on the user tips text that appears when your cursor pauses over the tool.
NOTE: You must have a browser installed in order to view the VistaScan online help.
5.In the Click to Scan section of the VistaScan Beginner window, click the icon that corresponds to the type of image you are scanning.
For example, if you are scanning a color photograph, choose “Color Photo.” To scan text or a black and white drawing, choose “Text/Lineart”. The image is scanned and you are returned to the PhotoDeluxe window.
6.When the scan is complete, a window appears requesting that you save the document. Type a name in the field that appears to the right of “Save this document as:”
NOTE: By default the image is saved as “untitled - #” in the Acquire section of the floating gallery window. You can also choose to save the image in the hard drive or on the desktop by clicking on the arrow to the right of the My Photos box at the top of this window.
7.After a moment the image appears in the My Photos gallery window. Double-click the thumbnail to view a full-size, highresolution scan of the image in the work area.
8.Exit PhotoDeluxe by selecting Quit from the File menu.
26

UMAX Astra 2000U/P Owner’s Guide
Turning the Scanner Lamp On and Off
For PC Users Only: You can turn the scanner lamp on and off using the Astra 2000’s built-in Power Saving utility. The lamp remains on whenever the scanner has power, unless you turn it off using the UMAX Power Saving utility. Turning off the scanner lamp when you are not scanning prolongs the life of the lamp.
The Power Saving utility window appears whenever you close VistaScan.
It appears in the bottom-right corner of your desktop by default. The window displays an image of the scanner with the lamp illuminated.
To turn the scanner lamp off:
Click on the image of the scanner in the Power Saving utility window. After a second or two, the light in the scanner image goes out, and your scanner lamp is turned off.
To turn the scanner lamp on:
Open the VistaScan software, or simply click on the scanner image in the Power Saving utility window.
NOTE: The scanner lamp is different from the Power Indicator light. The Power Indicator light is the very small, green light located directly above the UMAX logo on the front panel of the scanner. This indicator remains ON whenever the scanner is plugged into an electrical outlet (regardless of whether the Power Saving utility is engaged).
27
28
UMAX Astra 2000U/P Owner’s Guide
CHAPTER 3. Scanning Basics
VistaScan is the primary program or "driver" that you will use to scan with your Astra 2000 scanner. It is a "TWAIN-compliant" program, which means that it can be run from other programs that support scanning, like PhotoDeluxe, OmniPage, and others. It is also a "stand-alone" program, which allows you to scan images for a variety of uses, even without launching another program first.
Setting VistaScan Preferences
Preferences control scanner settings that you generally do not modify every time you use the scanner. The Preference settings are used as the default settings for several of the scan settings.
To access the VistaScan Preferences, click the Preferences icon in the upper right corner of the VistaScan window.
The Preferences cover three areas:
•General
•Scan Destination
•Scanner Information
A tab at the top of the Preferences window indicates each VistaScan preference group. To view the Preference settings for an area, click on the associated tab.
General
The General tab contains preference settings that control color matching and color correction, and whether to display the ruler and tips.
29
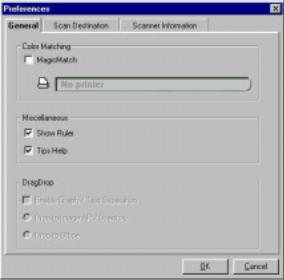
Color Matching/Correction
Color Matching allows you to fine-tune the colors of scanned images so that they emulate the colors of your original source documents as closely as possible. This is accomplished using MagicMatch.
When you click on the MagicMatch checkbox (so a checkmark appears) the Profile List displays. A profile is a list of applicable calibration profiles, which MagicMatch uses to render a final output image. If a printer or calibration profile is not chosen, MagicMatch will calibrate the image to optimize its display on a monitor.
MagicMatch only functions when you are scanning in color mode. When you are using Magic Match you need to disable the Level/Curve and Color Adjustment/Balance settings in the VistaScan Advanced window.
30
 Loading...