


 Loading...
Astra 1600U
Color scanner
Operation Manual
UMAX Data Systems, Inc.
1299
1

This operation manual contains all the information that you can not find in Quick Start Guide. For quick installation instructions, see the Quick Start Guide accompanying your scanner.
! Make sure the power is OFF before installing .
Trademarks
IBM PC/AT is a trademark of International Business Machines Corporation. MS-Windows, Windows, and MS-DOS are trademarks of Microsoft Corporation. Mac OS, iMac , Power Macintosh and Mac Series are trademarks of Apple Computer, Inc. Photoshop is a trademark of Adobe Systems, Inc. Other names and trademarks appearing herein are trademarks of their respective holders.
Copyright
Copyright 1999 UMAX Data Systems, Inc. All Rights Reserved. No part of this publication may be reproduced, transmitted, transcribed, stored in a retrieval system, or translated into any language or computer language, in any form or by any means, electronic, mechanical, magnetic, optical, chemical, manual, or otherwise, without the prior written permission of UMAX Data Systems, Inc.
2

Important Safeguards
♦Read all of the instructions.
♦Save these instructions for later use.
♦Follow all warnings and instructions marked on the product.
♦When replacement parts are required, be sure that service technicians have used replacement parts that conform to at least the same safety standards with regard to fire, electric shock, or other hazards.
♦Do not use this product near water or in rainy/moist environment.
♦Do not place the scanner on an uneven surface. This may cause serious damage to the scanner.
♦The product should be operated using only the type of power source indicated on the product label.
♦Do not attempt to service this product yourself as opening or removing the enclosure may expose you to dangerous voltage or other hazards.
♦This unit has input circuitry suitable for a 12V DC supply.
♦The sound pressure level at the operators position according to IEC 7041:1982 should be less than or equal to 70dB(A).
3

Contents
A Glance at Your Scanner .................................................................... |
5 |
Completing your first Scan................................................................... |
6 |
Troubleshooting................................................................................. |
14 |
Maintenance....................................................................................... |
16 |
Specifications..................................................................................... |
18 |
Glossary ............................................................................................. |
19 |
4
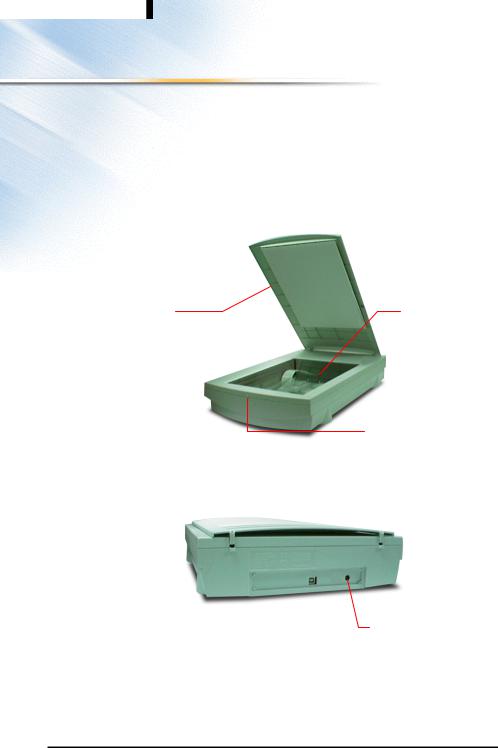
A Glance at Your Scanner
The Front View
Document Cover
The plastic cover over the object glass which can be raised and lowered over a document.
Object Glass
The glass surface on which the document or image should be placed.
Power Indicator
Illuminates to indicate that the scanner is powered on.
The Rear View
|
|
Power Adapter |
4-Pin USB Connector |
|
Receptacle |
|
||
|
|
The power adapter is plugged |
|
|
in here. |
5

Completing your first Scan
Before proceeding with the steps below, please finish the hardware and software installation first. Refer to Quick Start Guide.
Testing Your Scanner (For PC only)
1.Turn on your scanner.
2.Run Windows and open the VistaScan program group.
3.Click the “Scanner Test” icon to begin self-testing.
If the scanner test fails, please refer to the Troubleshooting s e c t i o n o f t h i s m a n u a l f o r a s o l u t i o n .
Original Image Placement
1.Raise the scanner’s document cover.
2.Place the document (graphic, text or photo) face down on the scanner. Center the document along the triangular mark.
3.Lower the document cover.
6

Start Your Scan by Using VistaScan
N o t e I t i s i m p o r t a n t t o r e a l i z e t h a t d i f f e r e n t a p p l i c a t i o n s may use different methods of acquiring an image and only the most general case is given here . Please refer t o y o u r a p p l i c a t i o n ' s u s e r d o c u m e n t a t i o n f o r d e t a i l s o n i t s u s a g e .
For Windows users
There are two ways to initiate VistaScan.
A. Using Application programs to invoke VistaScan
1.From Microsoft Windows, launch the application that will be used to call VistaScan. (e.g. Presto! PageManager or Adobe PhotoShop).
2.Pull down the "File" menu.
3.Choose “Select Source”. Remember the specific wording of parameters may vary among different applications.
4.Select “VistaScan” as the data source. (You only need to do this once).
5.Pull down the “File” menu again.
6.Select “Acquire” to activate the scanning dialog box as shown in next page.
7.Place the image you will scan on top of scanner's object glass.
8.From the four modes on the “Click to Scan” panel, click a scan mode button that best suits the required scan. For example, if you wish to scan a color photograph, click the Color Photo button in order for the image to be scanned in true color. Scanning will commence upon selection of a button.
9.Click "Exit" to close VistaScan when scanning is complete. The scanned image will be placed on the application's desktop ready to be edited.
10.Edit the scanned image using the application. (e.g. Presto! PageManager or Adobe PhotoShop).
F o r m o r e d e t a i l s a b o u t s c a n n i n g t h e i m a g e , p l e a s e r e f e r t o t h e o n - l i n e h e l p o f V i s t a S c a n
7
Loading...