


SAFETY FIRST!
Before operating this equipment, read this Owner's Manual and the separate manual supplied by the engine manufacturer.
Model
52063 - 5HP Recoil Start
52064 - 6HP Electric Start
OWNER’S MANUAL
Trimmer/Mower
•Safety
•Assembly
•Features and Controls
•Operation
•Maintenance
•Parts List
(Electric Start Model Shown)
GARDEN WAY INCORPORATED

Dear Owner:
You now own one of the finest trimmer/mowers available. It was designed to easily handle a wide variety of trimming, mowing and clearing chores. You will find the machine to be an invaluable tool in caring for your property.
Please carefully read this Manual. It tells you how to safely and easily assemble, operate and maintain your machine.
Be sure that you and any other operators carefully follow the recommended safety practices at all times. Failure to do so could result in personal injury or property damage.
Of course, if you should ever have any problems or questions, please contact your local authorized service dealer or call the Factory (see back cover).
We want to be sure that you are completely satisfied at all times.
See Back Cover for Customer Service information
Safety Alert Symbol
This is a safety alert symbol. It is used in this manual and on the unit to alert you to potential hazards. When you see this symbol, read and obey the message that follows it. Failure to obey safety messages could result in personal injury or property damage.
 WARNING
The engine exhaust from this product contains chemicals known to the State of California to cause cancer, birth defects or other reproductive harm.
Table of Contents |
|
|
SECTION 1: SAFETY ........................................... |
|
1 |
General Operation ...................................................... |
|
1 |
Slope Operation ......................................................... |
|
2 |
Children...................................................................... |
|
2 |
Service ....................................................................... |
|
2 |
Safety Decals ............................................................. |
|
3 |
SECTION 2: ASSEMBLY ....................................... |
|
4 |
Inspection After Delivery ............................................ |
|
4 |
Step 1: Unpacking Unit .............................................. |
|
4 |
Step 2: Install Handlebars .......................................... |
|
4 |
Step 3: Attach Throttle Control Lever ......................... |
|
5 |
Step 4: Add Motor Oil................................................. |
|
5 |
Step 5: Check Trimmer Head Hardware ..................... |
|
5 |
Step 6: Connect and Charge Battery........................... |
|
6 |
SECTION 3: FEATURES AND CONTROLS ................... |
|
7 |
SECTION 4: OPERATION ...................................... |
|
8 |
Pre-Start Checklist ..................................................... |
|
8 |
Fill Fuel Tank .............................................................. |
|
8 |
Adjust Handlebar Height ............................................ |
|
8 |
Adjust Line Cutting Height ......................................... |
|
8 |
Use Correct Diameter Trimmer Line........................... |
|
9 |
How to Use the Trimmer Head Control Bail |
................ |
9 |
Operating the Machine ............................................... |
|
9 |
Additional Operating Tips and Techniques ............... |
|
10 |
Trimming/Cutting Quick Reference Chart................. |
|
10 |
SECTION 5: MAINTENANCE ................................. |
|
11 |
Required Maintenance Schedule .............................. |
|
11 |
Adjusting Trimmer Head Engagement...................... |
|
11 |
Removing and Replacing the Trimmer Head ............ |
12 |
|
Inspecting/Replacing the Drive Belt.......................... |
|
12 |
Cleaning and Debris Removal .................................. |
|
14 |
Cleaning the Engine ................................................. |
|
14 |
Lubrication ............................................................... |
|
14 |
Compact Storage ..................................................... |
|
14 |
General Engine Maintenance .................................... |
|
14 |
Engine Oil Service .................................................... |
|
14 |
Air Cleaner Service ................................................... |
|
14 |
Spark Plug Service ................................................... |
|
14 |
Spark Arrester Screen Service.................................. |
|
14 |
Carburetor/Governor Adjustments ........................... |
|
14 |
Throttle Control Adjustment ..................................... |
|
15 |
Off-Season Storage .................................................. |
|
15 |
Battery Recharging/Replacement ............................. |
|
15 |
Changing Trimming Lines ........................................ |
|
16 |
Troubleshooting ....................................................... |
|
17 |
PARTS LIST ................................................... |
|
18 |
ACCESSORIES & KITS ....................................... |
|
21 |
CUSTOMER SERVICE INFORMATION ........... |
Back Cover |
|
1
Section1 Safety
SPARK ARRESTER WARNING TO RESIDENTS OF CALIFORNIA AND SEVERAL OTHER STATES
Under California law, and under the laws of several other states, you are not permitted to operate an internal combustion engine using hydrocarbon fuels on any forest, brush, hay, grain, or grass covered land; or land covered by any flammable agricultural crop without an engine spark arrester in continuous effective working order.
The engine on the unit is an internal combustion engine which burns gasoline, a hydrocarbon fuel, and must be equipped with a spark arrester muffler in continuous effective working order. The spark arrester must be attached to the engine exhaust system in such a manner that flames or heat from the system will not ignite flammable material. Failure of the owner/operator of the unit to comply with this regulation is a misdemeanor under California law (and other states) and may also be a violation of other state and/or federal regulations, laws, ordinances or codes. Contact your local fire marshal or forest service for specific information about which regulations apply in your area.
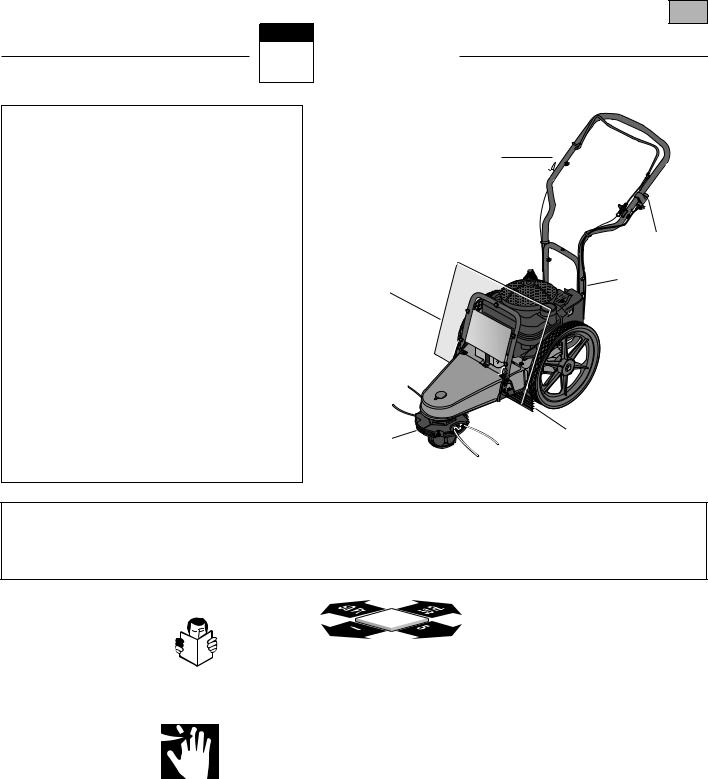
Trimmer Head Control Bail 
Engine Throttle Control Lever 


Keyswitch
(Electric Start Model)
Handlebar
Height Adjuster
Debris Shield
Trimmer Head |
Debris Flap |
Figure 1-1 - Electric start model shown.
IMPORTANT
Safe Operation Practices for Walk-Behind Mower
This cutting machine is capable of amputating hands and feet and throwing objects. Failure to observe the following safety instructions could result in serious injury or death.
GENERAL OPERATION
1. Read, understand, and follow all instructions on the machine  and in the manuals. Be thoroughly familiar with the controls
and the proper use of the equipment before starting.
2. Do not put hands or feet near or under rotating parts. Keep clear of the rotating trimmer head and line at all times.
3.Only allow responsible adults, who are familiar with the instructions, to operate the unit. Never let children or untrained adults operate this equipment.
4.Inspect area where machine is to be used. The machine can propel small objects at high speed, causing personal injury or property damage.
Clear area of objects such as rocks, toys, wire, bones, sticks, etc., which could be picked up and thrown by trimmer line.
5. Be sure
the area is  clear of other


 people (particularly small children and pets) before mowing. Stop machine if
anyone enters the area. Keep bystanders at least 50 feet from the area of operation.
6.Do not operate the machine when barefoot or wearing open sandals. Always wear substantial footwear.
7.Wear appropriate clothing such as a long-sleeved shirt or jacket and long trousers or slacks. Do not wear shorts.
8.Do not wear loose clothing– it could catch in the equipment.
9.Do not mow in reverse unless absolutely necessary. Always look down and behind before and while moving backwards.
10.Do not operate the unit without proper guards, plates, or other protective safety devices in place.
11.Refer to provided instructions for proper operation and installation of accessories. Only use factory-approved accessories.
12.Stop trimmer head when crossing gravel drives, walks, or roads. Wait for trimmer lines to stop.
13.Stop engine and disconnect spark plug wire from spark plug whenever you leave the unit, clean the equipment, or replace trimmer line. Remove key on electric start model.
14.Wait until the trimmer head comes to a complete stop, shut the engine off, and disconnect the spark plug wire before installing or removing trimmer line. Be sure trimmer head is securely attached before operating equipment.
15.Mow only during daylight hours or when good artificial light is available.
16.Do not operate the machine while under the influence of alcohol or drugs, or when tired or ill.

2 Section 1: Safety
17.If using unit in wet conditions, exercise extreme care to prevent loss of footing. Wear footwear that will improve traction. Avoid sloping ground. Hold the handlebars with two hands and walk; never run.
18.Release the Trimmer Head Control Bail before starting the engine.
19.If the unit starts to vibrate abnormally, stop the engine and disconnect the spark plug wire. Check immediately for the cause. Vibration is generally a warning of trouble.
20.Always wear approved safety goggles or safety glasses with side shields when operating equipment. The use of any powered machine can result in foreign objects being thrown by high-speed rotating parts which can cause personal injury or property damage. Stay away from glass and other easily thrown or breakable objects.
21.Wear work gloves and sturdy footwear when using this equipment. Leather work shoes or short boots are ideal. They protect ankles and shins from rocks, pebbles, splinters, etc.
22.It is advisable to wear protective headgear to prevent the possibility of being hit by small flying particles, etc.
23.Before each use, inspect the Throttle Control Lever and cable. Make sure the cable is free and the lever functions properly.
24.Watch for traffic when near or when crossing roadways.
25.Never attempt to carry children or other passengers on the equipment. They could fall off and be seriously injured, or they could interfere with safe operation of the equipment.
26.The machine is equipped with a plastic debris shield in front of the engine and a rubber debris flap under the frame. They must be in place and working properly. Never remove or cause the debris shield or debris flap to cease working. If either of these parts is missing or not working properly, do not use the equipment until this situation is corrected.
27.Be aware of where the machine is discharging materials and do not point the discharge at anyone.
28.Never run the engine in an enclosed area. Engine exhaust contains carbon monoxide, a deadly gas that is odorless, colorless and tasteless. Always run the engine outdoors where there is adequate ventilation.
29.Slow down before turning.
30.Shut off engine when not trimming or mowing.
31.Use extra care when loading or unloading machine into a trailer or truck.
32.Use this equipment for its intended purpose only.
33.Always make sure the handlebars are tight and comfortably positioned.
They should never be in an awkward position for the operator.
SLOPE OPERATION
Slopes are a major factor related to loss of control and tip-over accidents which can result in severe injury or death. All slopes require extra caution. If you can not back up the slope or you feel uneasy on a slope, do not mow it.
Do:
Mow across the face of slopes; never up and down. Exercise
extreme caution when changing direction on slopes. Avoid slopes greater than 15o.
Remove objects such as rocks, tree limbs, etc.
Uneven terrain could overturn the machine. Watch for holes, ruts, or bumps. Tall grass can hide obstacles.
Use slow speed.
Use extra care with grass catchers or other attachments. These can change the stability of the machine. Keep all movement on the slopes slow and gradual.
Avoid starting or stopping on a slope.
Do Not:
Do not mow near drop-offs, ditches, or embankments. You could lose footing or balance.
Do not mow on very steep slopes.
Do not mow on wet grass. Slippery footing can be hazardous.
CHILDREN
Tragic accidents can occur if the operator is not alert to the presence of children. Children are often attracted to the machine and the mowing activity. Never assume that children will remain where you last saw them.
1.Keep children out of the mowing area and under the watchful care of a responsible adult.
2.Be alert and turn machine off if children enter the area.
3.Before and while moving backwards, look behind and down for small children.
4.Never allow children to operate the machine.
5.Use extra care near blind corners, shrubs, trees, or other objects that may obscure vision.
6.Never carry children, even with the trimmer head stopped. Children may fall off and be seriously injured or interfere with safe machine operation.
7.Do not allow children nearby if you are working.
SERVICE
1. Use extra care in handling gasoline and other fuels. They are flammable and their vapors are explosive. To help prevent a fire or explosion:
a)Use only an approved container.
b)Never remove gas cap or add fuel when the engine is running. Let engine cool before refueling. Do not smoke.
c)Never refuel the machine indoors. Fill the fuel tank outdoors and with extreme care.
d)Never store the machine or fuel container inside where there is an open flame, such as a water heater, etc.
e)Replace caps on the fuel tank and fuel container and clean up spilled fuel before starting engine. Move machine away from any gasoline fumes before starting the engine.
f)Keep matches, smoking materials, open flames, and sparks away from the fuel tank and fuel container.
g)Leave 1/2" air space at the top of the fuel tank to allow for fuel expansion.
|
Section 1: Safety |
3 |
|
|
|
|
|
|
2.Never run the engine inside a closed area.
3.Never clean, or make adjustments or repairs with the engine running. Disconnect the spark plug wire and keep the wire away from the plug to prevent accidental starting. Remove key on electric start models.
4.Keep all nuts and bolts tight, especially the trimmer head attachment bolts, and keep equipment in good condition. Check mounting hardware on trimmer head every time you change trimmer line and prior to each use.
5.Never tamper with safety devices. Check their proper operation regularly.
6.To reduce fire hazard, keep mower free of grass, leaves or other debris build-up. Clean up oil or fuel spills. Let machine cool before storing.
7.After striking an object, stop the engine and disconnect the spark plug wire. Inspect the machine and repair, if necessary, before restarting.
8.Never make adjustments or repairs while engine is running.
9.Components subject to wear, damage and deterioration could expose moving parts or allow objects to be thrown. Frequently check components and replace with factory recommended
parts, when necessary. Regularly inspect the trimmer head and debris shield. Make sure they are not bent, damaged, or loose.
10.Only use eighteen-inch long .130" or
.155" diameter trimmer line. Never use other lengths, diameters or material as trimmer line.
11.Trimmer line moves at high speed and can cut. Always stop the engine and let all moving parts stop before replacing the trimmer lines. Let the engine cool.
12.Do not change the engine governor setting or overspeed the engine. The governor controls maximum safe operating speed and protects the engine and all moving parts from damage caused by overspeed. Authorized service shall be sought if a problem exists.
13.Do not touch engine parts which may be hot from operation. Allow parts to cool completely before inspecting, cleaning or repairing the unit.
14.Maintain or replace safety and instructional decals. Refer to the Parts List for replacement decal information.
15.Use only original-equipment replacement parts. Parts manufactured by others could present safety hazards and affect performance even though they may fit on this machine.
16.Remember – the end of the season is a good time to inspect equipment prior to storage.
17.To guard against engine overheating, always keep the engine debris guard mounted and clean.
18.For units equipped with electric start:
a)Batteries produce explosive gases. Keep sparks, flame, cigarettes, etc., away. Ventilate area when charging battery. Do not charge battery in an airtight space.
b)Do not use a battery charger other than the one provided with the unit.
c)The battery contains toxic materials. Do not damage the battery case. If the case is broken or damaged, avoid contact with the battery contents.
d)Properly dispose of a damaged or worn out battery. Check with local authorities for proper disposal methods.
e)Do not short circuit the battery. Severe burns and fire can result.
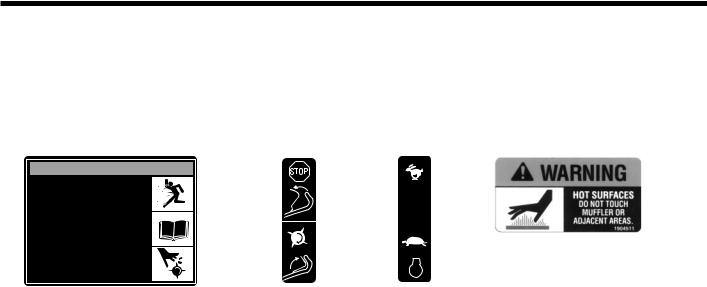
SAFETY DECALS
For your safety and the safety of others, various safety and operational decals are located on your unit (see below).
Keep the decals clean and legible at all times. Contact your local service dealer or the factory for replacements if any decals are damaged or missing.
Refer to the Parts List in this manual for decal locations, part numbers and ordering instructions.
 WARNING
THROWN OBJECT HAZARD
•Objects will be thrown violently by the cutting head, resulting in significant hazard!
•Keep children, pets and bystanders 50 feet away from machine while operating.
•Be alert to hidden obstacles.
READ OWNERS MANUAL
If you need a replacement manual, write to the address listed on the serial number decal on this unit.
ROTATING CUTTING HEAD
Do not service or adjust cutting head or other moving parts unless engine is stopped and spark plug wire is disconnected.
1918115 (12/99)
1918304 (02/00)
On engine, above muffler
STOP
At front of deck |
On left |
On right |
|
handlebar |
handlebar |

4
Section2 Assembly
 WARNING
To prevent personal injury or property damage, do not attempt to start the engine until all assembly steps are complete and you have read and understand all of the safety and the operating instructions in this Manual.
INTRODUCTION
Carefully follow these assembly steps to correctly prepare your machine for use. It is recommended that you read this Section in its entirety before beginning assembly.
INSPECTION AFTER DELIVERY
Inspect your machine immediately after it has been delivered. Make sure that neither the carton nor the contents have been damaged.
If you find or suspect any damage, contact the carrier (trucking company) right away. Inform them of the specific damage and that you wish to file a claim. To protect your rights, be sure to put this in writing to the carrier within 15 days after your machine arrives. Please let us know if you need assistance with this matter.
IMPORTANT: The engine is shipped without motor oil in its crankcase. Motor oil must be added to the engine before starting.
NOTE: LEFT and RIGHT sides of unit are as viewed from operator’s position behind the handlebars.
ASSEMBLY STEPS
Tools/Supplies Needed:
•(1) Utility Knife or Scissors
•(2) 1/2" (or adjustable) Wrenches
•(2) 7/16" Wrenches (one with a boxed end)
•Motor Oil (see engine manual for oil specifications and quantity required)
STEP 1: Unpack Unit
1.Remove the protective packaging material (plastic film and cardboard) from the handlebars and the unit.
2.Remove the handlebars from the insert and carefully (do not pinch or kink the attached cables) put them aside before removing the unit from the shipping carton.
3.Compare the parts inside the carton with the following list:
•Machine Assembly (A, Figure 2-1)
•Extra Trimmer Line (B, Figure 2-1): six pieces of heavy-duty gauge .130" dia. line and six pieces of extra-heavy-duty gauge .155" dia. line.
•The following items are in a separate package:
(3) Plastic cable ties
(1)Hex Hd. Screw, 1/4-20 x 2
(1)Hex Locknut, 1/4-20
(2)Hex Hd. Screw, 5/16-18 x 2
(2)Hex Locknut, 5/16-18
•Electric Start Model Only:
(1)Battery (installed on unit – see C, Figure 2-1)
(2)Ignition Keys and (1) Battery Recharger (in separate electric start package)
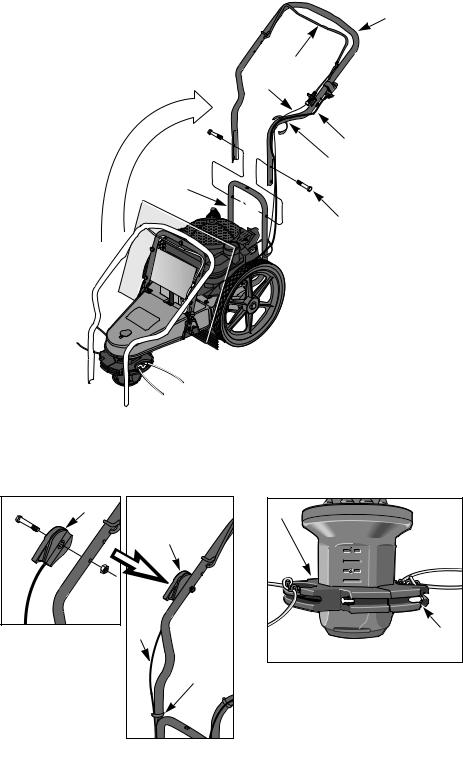
STEP 2: Install Handlebars
1. Cut the plastic tie and remove the tape that secures the control bail (G, Figure 2-2) to the handlebar (A).
NOTE: Do not pinch or kink the attached cable(s) while unfolding and securing the handlebars.
2. Carefully lift the handlebars (A, Figure 2-2) to rear of the unit and align the handlebar legs with the handlebar support bracket (B).
3.Route the trimmer head control cable (C, Figure 2-2) to the outside of the handlebar. On electric start models, also route the electrical wire harness (O) to the outside of the handlebar.
4.Select the low or high height setting holes in the handlebar legs and attach the legs with the two 5/16-18 x 2 hex hd. screws (D) and 5/16-18 locknuts (E) from the hardware bag.
IMPORTANT: Adjust the handlebars as close as possible to waist level so that your arms are at a comfortable height.
This position will result in less pressure on the mower wear cup, making the unit easier to roll and reducing wear to the wear cup.
5. Use two cable ties (F, Figure 2-2) to secure the trimmer head control cable (C) and the electrical wiring harness (O) to the handlebar at the locations shown.
A |
B |
C |
Figure 2-1: Unit as shipped (recoil start model shown). Battery for |
model is |
shown in inset. |
|
|
Section 2: Assembly |
5 |
|
|
|
|
|
|
STEP 3: Attach Throttle Control Lever
1. One end of the Throttle Control Cable (H, Figure 2-3) is attached to the engine. Gently unwind the cable from its shipping position and position the Throttle Control Lever (I) on the outside of the right handlebar, next to the throttle control decal.
2.Secure the Throttle Control Lever to the handlebar with a 1/4-20 x 2 hex hd. screw (J, Figure 2-3) and 1/4-20 hex locknut (K).
3.Use a cable tie (L, Figure 2-3) to secure the throttle cable (H) to the handlebar at the location shown.
STEP 4: Add Motor Oil
1. The engine is shipped without motor oil which MUST BE ADDED before the engine is started.
2. See the engine manual for filling instructions and for the correct oil specifications. Engine must be level when checking oil level. In ambient temperatures above 400 F, use a high-quality, SAE 30 weight detergent oil classified for Service SF, SG or SH. Use no special additives. Do not mix oil with fuel.
STEP 5: Check Trimmer Head Hardware
Check that the two bolts (M, Figure 2-4) on the trimmer head are tightened securely. The trimmer head can be rotated to make access to the hardware easier.
IMPORTANT: The trimmer head hardware is designed to be permanently installed and is not removable. Do not attempt to replace it with non-factory specified hardware.
NOTE: The two holes (one is covered with a plastic plug) on the top, front end of the mower deck are access holes that allow certain parts to be serviced.
A
G
C
O
F
B
 E
E
D
Figure 2-2: Handlebar installation (electric start model shown).
I |
M |
J |
|
H |
|
M |
|
|
|
|
L |
Figure 2-4: Check trimmer head hard- |
|
ware for tightness. |
|
|
|
Figure 2 |
lever to right-side |
handlebar |
|

6 Section 2: Assembly
STEP 6: Connect
Battery
•Wet conditions shock hazard recharging. Avoid when charging
•Recharging the equipment could explosion. Use charger
engine plug wire away from
Failure to sonal injury
1. Lift and
5) forward the red wire tive (+) red tery. Then, the negative the battery Figure 2-
2. Connect
Figure 2-7) on the battery recharger cord to the wire harness plug (V) located near the keyswitch. Then, plug the charger box (W) into a grounded, 120V wall outlet.
3. Charge the battery for 24 hours. After charging, first unplug the charger box (W) from the wall outlet, then disconnect the recharging line plugs (U and V).
X
P
Figure 2-5: Lift and tilt debris shield forward to access battery.
R |
S |
Figure 2-6 |
W
V U
Figure 2-7
 Loading...