


OPERATING & INSTALLATION
INSTRUCTIONS
TUMBLE DRYER
TM 560
125996112
CONTENTS
Warnings . . . . . . . . . . . . . . . . . . . . . . . . . . |
Page |
3 |
|
Intallation . . . . . . . . . . . . . . . . . . . . . . . . . |
Page |
4 |
|
Positioning. . . . . . . . . . . . . . . . . . . . . . . . . . |
Page |
4 |
|
Levelling . . . . . . . . . . . . . . . . . . . . . . . . . . |
Page |
5 |
|
Door reversal . . . . . . . . . . . . . . . . . . . . . . . . . |
Page |
5 |
|
Electrical connections . . . . . . . . . . . . . . . . . . . . . . |
Page |
6 |
|
Use . . . . . . . . . . . . . . . . . . . . . . . . . . . |
Page |
7 |
|
Control panel . . . . . . . . . . . . . . . . . . . . . . . . . |
Page |
7 |
|
Use of controls . . . . . . . . . . . . . . . . . . . . . . . . |
Page |
7 |
|
Drying Times . . . . . . . . . . . . . . . . . . . . . . . . . |
Page |
8 |
|
Drying |
. . . . . . . . . . . . . . . . . . . . . . . . . . |
Page |
9 |
Useful hints . . . . . . . . . . . . . . . . . . . . . . . . . |
Page |
9 |
|
Maintenance . . . . . . . . . . . . . . . . . . . . . . . . . |
Page |
10 |
|
External cleaning . . . . . . . . . . . . . . . . . . . . . . . |
Page |
10 |
|
Cleaning the door . . . . . . . . . . . . . . . . . . . . . . . |
Page |
10 |
|
Cleaning the filter . . . . . . . . . . . . . . . . . . . . . . . |
Page |
10 |
|
Servicing . . . . . . . . . . . . . . . . . . . . . . . . . . |
Page |
10 |
|
Tricity Bendix Guarantee Conditions . . . . . . . . . . . . . . . . . |
Page |
11 |
|
Tricity Bendix Service Centres . . . . . . . . . . . . . . . . . . . |
Page |
12 |
|
TECHNICAL SPECIFICATIONS
DIMENSIONS |
Height |
85 cm (33.5”) |
|
Width |
60 cm (23.6”) |
|
Depth |
57 cm (22.4”) |
|
|
|
ELECTRICAL CONNECTION |
Voltage |
230-240 V/50 Hz |
|
Max. power absorbed |
2650 W (13A) |
|
|
|
DRYING CAPACITY |
Cotton, linen |
5 kg (11 lb) |
|
Synthetics |
2.5 kg (5 lb) |
|
|
|
This appliance complies with the following E.E.C. Directives:
-73/23 EEC of 19.2.73 (Low Voltage Directive) and subsequent modifications;
-89/336 EEC of 3.5.89 (Electromagnetic Compatibility Directive) and subsequent modifications.
Stacking kit
A special stacking kit is available through your dealer, to enable the mounting of the dryer on top of your washing machine.
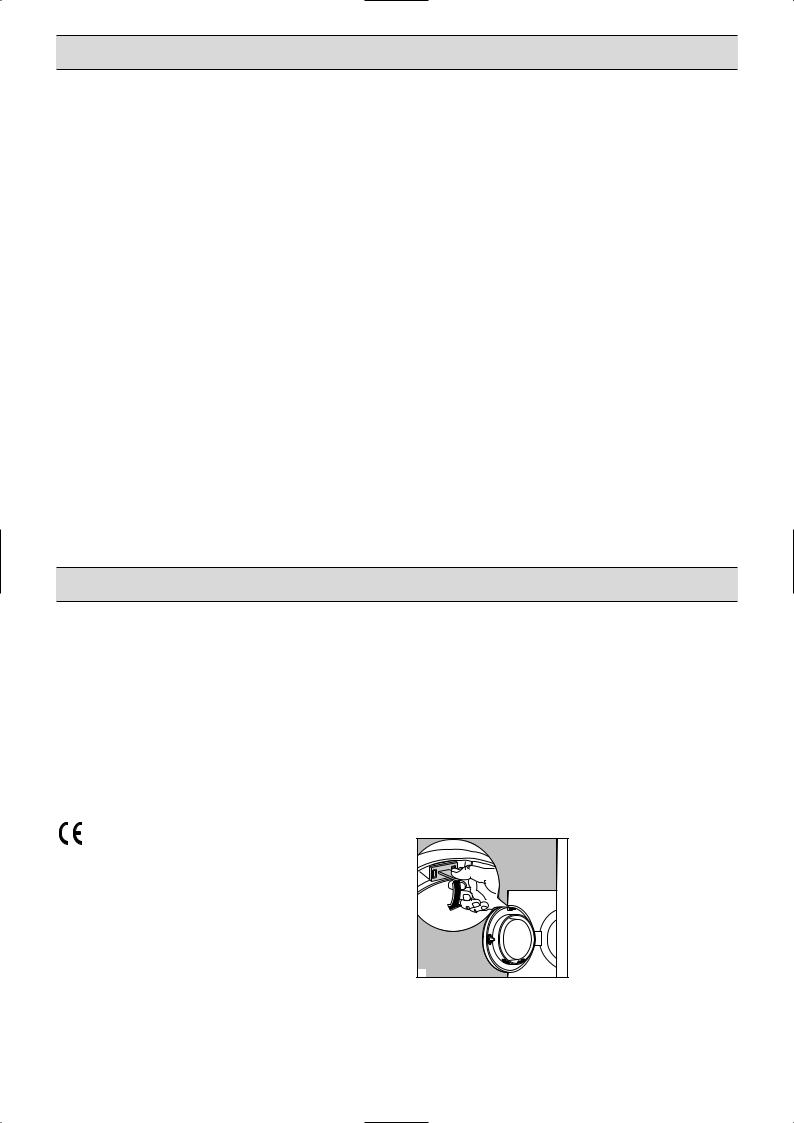
Child safety device
|
This tumble dryer incor- |
|
porates a special child |
|
safety feature. |
|
At the top, on the inside |
|
of the porthole door, you |
|
will notice a catch, if this |
|
is removed it will prevent |
|
the machine from work- |
|
ing. To remove, press the |
26 |
catch downwards (see |
|
picture). You MUST replace the catch to enable the appliance to work.
2

WARNINGS
It is most important that this instruction book should be retained with the appliance for future reference. Should the appliance be sold or transferred to another owner, or should you move house and leave the appliance, always ensure that the book is supplied with the appliance in order that the new owner can get to know the functioning of the appliance and the relevant warnings.
These warnings have been provided in the interest of safety. You MUST read them carefully before installing or using the appliance.
INSTALLATION
■Any electrical work required to install this appliance should be carried out by a qualified electrician or competent person.
■Make sure that the appliance does not stand on its electrical supply cable.
■If the machine is situated on a carpeted floor, please adjust the feet in order to allow air to circulate freely.
■This tumble dryer is designed to be vented through to the open air. It should have its own ventilation system which should not be joined with any other ventilation system connected to any other appliance.
USE
■Always unplug the appliance after use.
■Clothes which are dripping wet should not be placed in the dryer.
Always load well spun laundry. The higher the spin speed, the lower the electricity consumption and the shorter the drying times.
■Never tumble dry items that have been in contact with chemicals such as dry cleaning fluid. These are of a volatile nature and could cause an explosion.
■As some bulky items such as duvets and eiderdowns should be dried in large commercial machines because of their bulk, check with the manufacturer of the item if it is suitable for drying in a domestic machine, even if the dry weight of the item is within the limit advised.
■Always check that no cigarette lighters have been left in pockets.
■Leave the porthole door slightly ajar when not in use to preserve the door seal.
■The fluff filter must be cleaned after every use.
■Do not operate the appliance with a damaged filter as this may cause a fire.
■Do not overload the appliance.
■Do not allow fluff to accumulate around the dryer.
SERVICE/REPAIR
■Under no circumstances should you attempt to repair the machine yourself. Repairs carried out by inexperienced persons may cause injury or serious malfunctioning. Refer to your local Tricity Bendix Service Centre. Always insist on genuine Tricity Bendix spare parts.
GENERAL SAFETY
■It is dangerous to modify or try to modify the specifications of this appliance in any way.
■This appliance is designed to be used by adults. Children should not be allowed to touch the controls or play with the product.
■Pets and small children may climb into tumble dryers. Check your appliance each time before use.
ENVIRONMENT PROTECTION
■The materials used on this appliance marked with
the symbol  are recyclable.
This means that they can be recycled by disposing of them properly in appropriate collection containers.
■If you take your appliance to a refuse disposal site, cut off the power cable flush with the appliance to avoid the danger of the appliance being reused, and disable the door catch to prevent children becoming trapped inside.
3

INSTALLATION
Positioning
The appliance may be placed in any room, provided the following precautions are taken.
The appliance expels hot, very moist air. The rest of the house must be able to easily absorb this moisture. Normally, absorption is only possible in houses where there is very little humidity. Otherwise, the room must have ventilation towards the outside; generally, an open door or window is enough.
The capacity of the venting circuit must be at least 150 m3/hour. Check that the air inlet and outlet vents are unobstructed.
The best way of evacuating the moisture is through a vent hose to the outside of the building. Use the special 100 mm diameter flexible hose supplied with the appliance connected to one of the air outlet vents with the collar supplied.
The unused outlets must be covered.
Never connect the air vent hose into an existing discharge pipe or duct, as this could be dangerous, might disturb neighbours and could cause the dryer to malfunction.
This product is supplied with a 2.50 metre vent hose, although the maximum length of the vent hose may be:
4 metres with no bends, or
2 metres with 2 bends.
Advice: If the hose is long and the room temperature low, the moisture might condense to water inside the hose. This is an unavoidable natural phenomenon.
To prevent this water from Iying in the hose or flowing back into the tumble dryer, it is advisable to drill a small hole (dia. 3 mm) in the lowest point of the hose and to place a small container below it.(See picture, point A).
A |
P0751
Connect the other end of the hose to an opening in a door or window. Fit a suitable shield or point the hose downwards to prevent any rain water and wind from getting in.
Rain and wind shields for placing over openings usually consist of valves or movable flaps. Periodically check the shield since strong winds and other factors (rust, dirt) can sometimes prevent it from opening, so causing problems with air venting.
If you use a rain shield, check that the openings in it are large enough to allow air to escape. Openings which are too small restrict the flow of air.
Problems can be encountered in rooms fitted with a very powerful central extractor fan. If you find that drying times are too long, switch off the extractor or close its grille whilst the tumble dryer is in use.
A highly effective solution is to simply poke the vent hose through a window or skylight. This might however cause problems in winter because the dryer will draw in very cold (and often also very damp) air through the open window, so increasing drying times and leading to very high energy consumption.
If the dryer is fitted next to kitchen units, make sure that the vent hose is not squashed. If the hose is partially squashed, drying efficiency wlll be reduced, resulting in longer drying times and higher energy consumption.
If the hose is completely squashed, the safety cutouts with which the machine is fitted may operate.
Condensation discharge through the vent hose
Condensation may be discharged either through a vent outlet provided at the back or through the left or right side outlet.
The vent hose collar is placed in the rear vent outlet.
P0330 |
Remove the collar by pulling it out of the vent outlet. Screw the collar to the vent hose.
Fit the hose into the required vent outlet, and place vent covers provided over the unused outlets.
A |
P0279 |
P0055 |
The vent hose must not contain more than two bends when it is placed in position for operation.
You should NOT connect the flexible vent hose to, for example, a chimney or flue pipe designed to carry the exhaust from a fuel burning heating appliance.
4
The tumble dryer must be installed in a clean place, where dirt does not build up.
P0281 |
Important |
Make sure there are no obstructing items or material near the air-in- take louvres provided at the back (e.g. paper, rags
etc.).
When operating the tumble dryer, the room temperature must not exceed 35°C, as it may affect the performance of the appliance.
To save energy, the room temperature should not be lower than +15°C.
Levelling |
P0046 |
Level the tumble dryer into place by screwing or unscrewing the front feet as required.
Accurate levelling will keep vibration and noise to a minimum when the dryer is in use.
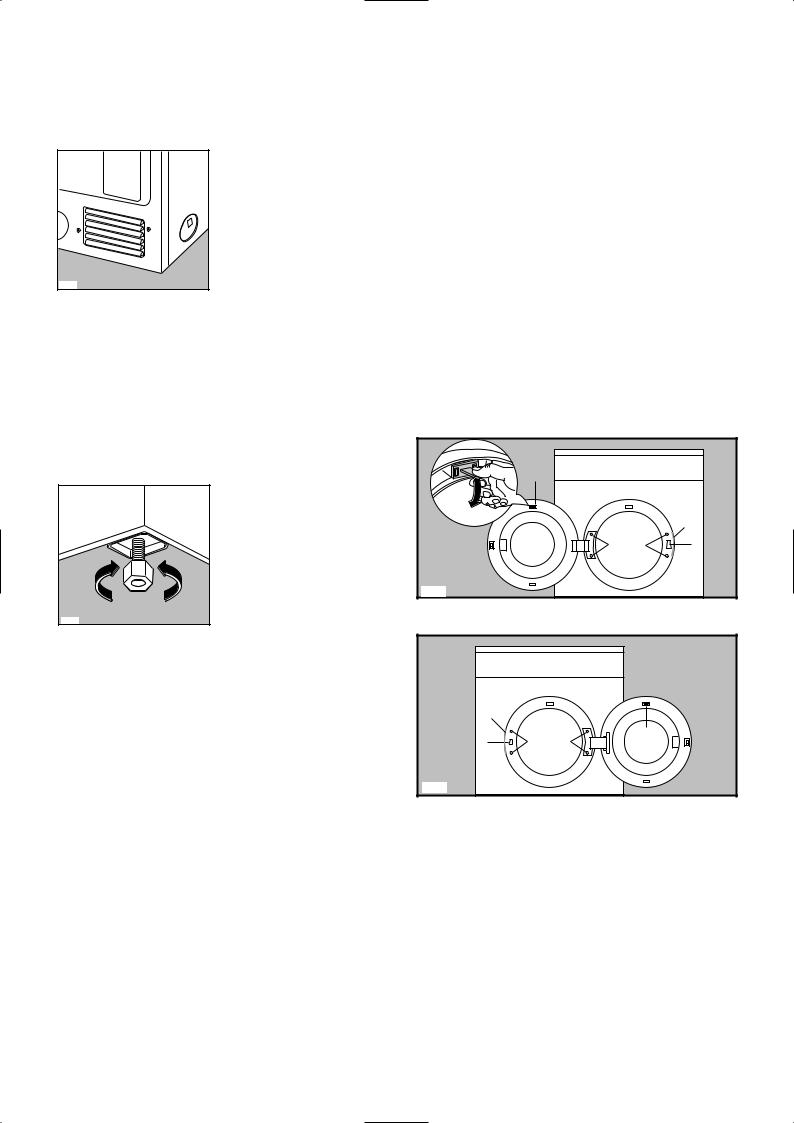
Door reversal
To make it easier to load or unload the laundry the door can be reversed.
This operation must be carried out by qualified personnel.
Operate as follows:
-Remove the door by unscrewing the two screws (1) fastening the hinge to the cabinet (Fig. A).
-Remove the safety catch (2) by pressing it downwards (Fig. A) and refit it on the opposite side of the door.
-Using a screwdriver, remove screws (3), plastic plate (4) and plug (5), see picture A. Take care not the damage the cabinet.
Refit them on the opposite side (Fig. B)
-Refit the door by screwing in the two screws (1) which fasten the door to the cabinet (Fig. B).
2
5
1 |
3 |
4 |
A
P0883
5 |
|
|
4 |
3 |
2 |
1 |
P0884 |
B |
|
5
 Loading...