


Safety
Federal Communication Commission Interference Statement
This equipment has been tested and found to comply with the limits for a Class B digital device, pursuant to Part 15 of the FCC Rules. These limits are designed to provide reasonable protection against harmful interference in a residential installation. This equipment generates, uses and can radiate radio frequency energy and, if not installed and used in accordance with the instructions, may cause harmful interference to radio communications. However, there is no guarantee that interference will not occur in a particular installation. If this equipment does cause harmful interference to radio or television reception, which can be determined by turning the equipment off and on, the user is encouraged to try to correct the interference by one of the following measures:
Reorient or relocate the receiving antenna.
Increase the separation between the equipment and receiver.
Connect the equipment into an outlet on a circuit different from that to which the receiver is connected.
Consult the dealer or an experienced radio/TV technician for help.
This device complies with Part 15 of the FCC Rules. Operation is subject to the following two conditions: (1) This device may not cause harmful interference, and (2) this device must accept any interference received, including interference that may cause undesired operation.
FCC Caution: Any changes or modifications not expressly approved by the party responsible for compliance could void the user's authority to operate this equipment.
IMPORTANT NOTE:
FCC Radiation Exposure Statement:
This equipment complies with FCC radiation exposure limits set forth for an uncontrolled environment. This equipment should be installed and operated with minimum distance 20cm between the radiator & your body.
This transmitter must not be co-located or operating in conjunction with any other antenna or transmitter.

CE Mark Warning
This equipment complies with the requirements relating to electromagnetic compatibility, EN 55022 Class A for ITE, the essential protection requirement of Council Directive 2004/108/EC on the approximation of the laws of the Member States relating to electromagnetic compatibility and R&TTE Directive 1999/5/EC to meet the regulation of the radio equipment and telecommunications terminal equipment.
Company has an on-going policy of upgrading its products and it may be possible that information in this document is not up-to-date. Please check with your local distributors for the latest information. No part of this document can be copied or reproduced in any form without written consent from the company.
RoHS
This product is RoHS compliant.
Table of Contents
Chapter 1: Product Overview........................................................................................... |
6 |
||
1.1 |
Technical Features ................................................................................................. |
8 |
|
1.1 |
Package Contents .................................................................................................. |
9 |
|
1.2 |
System Requirements............................................................................................ |
9 |
|
1.3 |
Device Label......................................................................................................... |
10 |
|
1.4 |
LEDs & Buttons .................................................................................................... |
10 |
|
1.5 |
Top Panel............................................................................................................. |
12 |
|
1.6 |
Defaults Settings.................................................................................................. |
12 |
|
Chapter 2: Wireless Access Point Initial Setup............................................................... |
13 |
||
Chapter 3: Wireless Access Point Web Management Interface .................................... |
19 |
||
3.1 |
Default Configuration Settings ............................................................................. |
19 |
|
3.2 |
Menu Items ......................................................................................................... |
19 |
|
3.3 |
Status................................................................................................................... |
20 |
|
3.4 |
Wireless............................................................................................................... |
21 |
|
|
3.4.1 Apply/Reset Changes .......................................................................................................... |
21 |
|
|
3.4.2 Basic Settings....................................................................................................................... |
21 |
|
|
3.4.3 Multiple SSID ....................................................................................................................... |
23 |
|
|
3.4.4 Active Wireless Client Table................................................................................................ |
24 |
|
|
3.4.5 Advanced Settings ............................................................................................................... |
24 |
|
|
3.4.6 |
Security............................................................................................................................... |
25 |
|
WEP Security ................................................................................................................................. |
26 |
|
|
WPA/WPA2 Security ..................................................................................................................... |
27 |
|
|
WPA Mixed.................................................................................................................................... |
28 |
|
|
3.4.7 |
Access Control .................................................................................................................... |
29 |
|
3.4.8 |
WDS Settings ...................................................................................................................... |
30 |
|
3.4.9 |
Mesh Settings ..................................................................................................................... |
31 |
|
3.4.10 |
Site Survey........................................................................................................................ |
32 |
|
3.4.11 |
WPS .................................................................................................................................. |
33 |
|
3.4.12 |
Schedule........................................................................................................................... |
34 |
3.5 |
TCP/IP Settings..................................................................................................... |
35 |
|
3.6 |
Log....................................................................................................................... |
|
36 |
3.7 |
Statistics............................................................................................................... |
37 |
|
3.8 |
Upgrade Firmware ............................................................................................... |
37 |
|
3.9 |
Save/Reload Settings ........................................................................................... |
37 |
|
3.10 |
Password.............................................................................................................. |
38 |
|
3.11 |
System Time ........................................................................................................ |
38 |
|
3.12 |
Logout.................................................................................................................. |
38 |
|
Chapter 4: Powerline...................................................................................................... |
39 |
||
4.1 |
Create a powerline network and extend you wireless network ........................... |
40 |
|
4.2 |
Securing your Powerline Network ....................................................................... |
42 |
|
4.3 |
Changing the Network Name/Security Key using the Sync Button....................... |
42 |
|
4.4 |
Adding the Powerline Adapter to an Existing Powerline Network........................ |
43 |
4.5 |
Overlapping Powerline Networks......................................................................... |
44 |
4.6 |
Moving Powerline Adapters between different Powerline Networks .................. |
45 |
Chapter 5: Powerline Configuration Utility.................................................................... |
46 |
|
5.1 |
Software Installation............................................................................................... |
46 |
5.2 |
Using the Utility ...................................................................................................... |
50 |
Chapter 6: Troubleshooting............................................................................................ |
52 |
|
|
Powerline............................................................................................................. |
52 |
|
Wireless Installation Considerations .................................................................... |
53 |
Chapter 7: Specifications ................................................................................................ |
54 |
|

Chapter 1: Product Overview
The TPL-310AP 200Mbps Powerline AV Wireless N Access Point is an excellent solution that can be used to extend your network using your home or small office electrical wiring. In a home or small office building, use TPL-310AP adapters to link multiple locations without the need to run long Ethernet cables. Combined with a single broadband DSL/Cable Internet connection, every room with electrical power outlets can provide easy access to your high-speed Internet connection.
The TPL-310AP 200Mbps Powerline AV Wireless N Access Point allows you to create or extend a wireless network using powerline technology. Using powerline as the network backbone, the TPL-310AP can be placed at where a wireless signal is needed, rather than at the farthest corner of a wireless network. Multiple TPL-310AP adapters can be used to cover larger areas without increasing wireless radiation and through the use of powerline as your network backbone with no additional wiring required. In addition, any Ethernet-enabled device may be connected to the 10/100Mbps Auto-MIDX Fast Ethernet port.
The TPL-310AP coverage is provided by sending data signals through the walls themselves via the electrical system using powerline technology and then supplying 802.11 wireless connectivity in the room where it is needed. In environments where wireless cannot provide a high degree of performance/connectivity, powerline will provide an alternative option to this obstacle. With 802.11n wireless data rates of up to 300Mbps and HomePlug® AV speeds of up to 200Mbps, this easy-to-setup solution can provide fast streaming HD movies, online multiplayer games, and other data intensive applications for today’s HD Entertainment Center demand.
This versatile Powerline product has many applications:
Expanding an Existing Powerline Network
If you have an existing Powerline AV network already installed, simply plug in TRENDnet’s TPL-310AP into any outlet on your electrical system and connect it to your Powerline network. You will then have Internet access from the TPL-310AP’s wireless network and from its Ethernet port.
Expanding a Wireless Network
If you already have an existing wireless network and would like to expand wireless coverage, simply connect a TRENDnet Powerline AV adapter to your existing router. Then plug in TRENDnet’s TPL-310AP in an area with poor or no wireless coverage. Finally, connect the TPL-310AP to the first Powerline adapter using the one-touch Sync button. You will now have wireless coverage in an area that was not covered in the past.
Expanding a Wired Network
If you have an existing wired router and would like to create both a wireless and a Powerline network, simply connect TRENDnet’s TPL-310AP to your wired router and plug it into an electrical outlet. To further expand the Powerline network, plug in up to 15 additional TRENDnet Powerline AV adapters into any outlet on your electrical system.
If you have an existing wired router and would like to create both a wireless and a
Powerline network, simply connect TRENDnet’s TPL-310AP to your wired router and plug it into an electrical outlet. To further expand the Powerline network, plug in up to 15 additional TRENDnet Powerline AV adapters into any outlet on your electrical system.
Combination 200Mbps Powerline adapter and 300Mbps wireless n access point
Create a 300Mbps wireless network from any room in your home
Connect up to 16 high speed powerline adapters
Wireless n access point offers Access Point, Client, WDS, and Mesh mode functionality
Advanced encryption
1.1 Technical Features
Powerline
1 x 10/100Mbps Auto-MDIX Ethernet port
Connect one 200Mbps** Powerline AV Adapter to the Internet and then plug in up to 15* additional Powerline AV adapters for instant building connectivity
One-touch Sync button networks adapters quickly
Share data intensive files, play games, download music, and more at faster data transfer rates
Advanced 128-bit AES encryption to ensure total network security
Neighbor network support for up to 4 overlapping networks
Tri-color LED Indicator
Network signal transmits up to 300 meters (984ft.)
Auto QoS support through traffic classification and multiple priority queuing
Windows-based Powerline configuration utility: compatible with Windows 7 (32/64-bit), Vista (32/64-bit), and XP (32/64-bit) operating systems
Wireless
Integrated high performance wireless n access point
Based on IEEE 802.11n technology and compliant with IEEE 802.11b/g standards
High-speed data rates of up to 300Mbps*** with IEEE 802.11n
One-touch Wi-Fi Protected Setup (WPS) button connects wireless clients quickly
Supports Access Point or Access Point (AP) Client (wireless adapter) mode
In Access Point mode: expand a wireless network using Repeater mode (listed as AP Mode Support), Wireless Distribution System (WDS), or Mesh mode (bridging)
MAC filter feature for added security (AP mode only)
Wireless security up to WPA/WPA2-RADIUS
Create a weekly schedule to enable or disable wireless network
Wi-Fi Multimedia (WMM) Quality of Service (QoS) support
Broadcast up to 4 SSIDs with different wireless encryption
Web graphical user interface provides backup, configuration, and firmware management
Wireless indoor coverage up to 100 m (328 ft.)***
3-year limited warranty
*Maximum of 16 adapters (nodes) recommended for streaming video across your network. Additional adapters may decrease performance.
**200Mbps is the maximum theoretical Powerline data rate. Actual throughput will vary depending on environment.
***Maximum wireless signal rates are referenced from IEEE 802.11 theoretical specifications. Actual data throughput and coverage will vary depending on interference, network traffic, building materials and other conditions.
**** Networked Powerline devices need to be plugged into power outlets that are on the same electrical system.
*****It is not recommended to use this product on electrical systems that use AFCI circuit breakers or plugged into GFI protected outlets as this may cause performance degradation or loss in connectivity.
1.1Package Contents
The product package should contain the following items:
TPL-310AP
Multi-Language Quick Installation Guide
CD-ROM (Utility & User’s Guide)
Network Cable (1.5 m / 4.9 ft.)
If any of the parts are incorrect, missing, or damaged, contact your dealer. Keep the carton, including the original packaging materials, in case you need to return the Powerline adapter for repair.
1.2System Requirements
CD-ROM drive
A Desktop or Laptop PC with wired or wireless Network Adapter Installed
Existing 10/100Mbps wired network when TPL-310AP is used as a bridge device
Web Browser: Internet Explorer (6.0 or higher)
Additional HomePlug® AV powerline adapter
(e.g. TRENDnet TPL-303E, TPL-304E, TPL-305E or another TPL-310AP)
Note: You will need at least 2 powerline adapters to establish a powerline network. Please ensure that you have an additional powerline adapter before following the installation procedure for this product.
Powerline Configuration Utility System Requirements
Supported Operating |
|
|
Systems |
CPU |
Memory |
|
|
|
Windows 7 (32/64-bit) |
1GHz or above |
1GB RAM or above |
|
|
|
Windows Vista (32/64-bit) |
800MHz or above |
512MB RAM or above |
|
|
|
Windows XP (32/64-bit) |
300MHz or above |
256MB RAM or above |
|
|
|
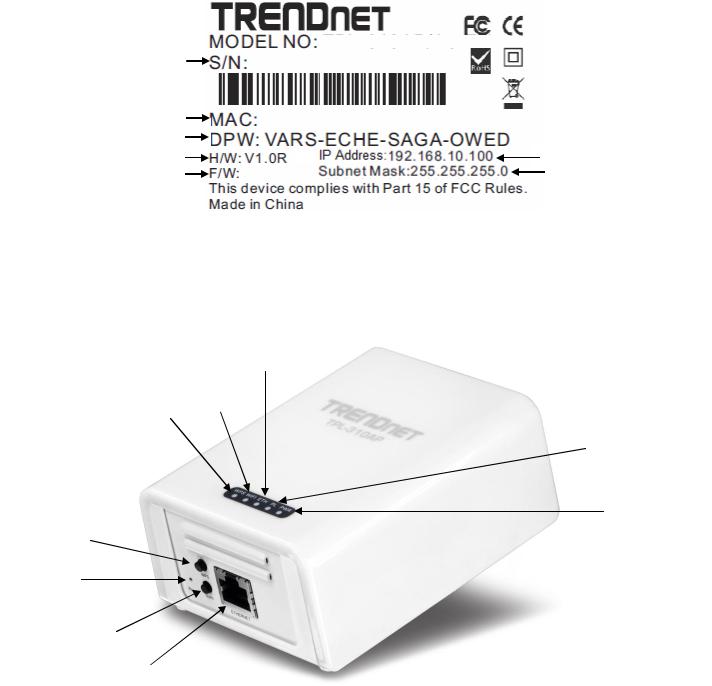
1.3Device Label
The device label can be located on the back of the device where the power prong is found.
Product Model 
Device Serial Number |
|
Device MAC Address |
|
Device Password (DPW) |
|
Product Hardware Version |
Default IP Address |
Powerline Firmware Version |
Default Subnet Mask |
1.4LEDs & Buttons
|
|
|
|
Ethernet |
|
|
|
|
|
|
|
|
(ETH) |
|
|
|
Wi-Fi |
|
Wireless |
|
|
|
|
|
|
|
|
|
|
||
|
|
||||||
|
Protected |
|
(WIFI) |
|
|
|
|
|
Setup |
|
|
|
|||
|
|
|
|
|
|
|
|
|
(WPS) |
|
|
|
|
|
Powerline |
|
|
|
|
|
|
|
(PLC) |
|
|
|
|
|
|
|
|
|
|
|
|
|
|
|
|
|
|
|
|
|
|
|
Power |
WPS Button |
|
|
|
|
|
(PWR) |
|
|
|
|
|
|
|
||
Reset Button |
|
|
|
|
|
|
|
|
|
|
|
|
|
||
Sync Button
Fast Ethernet Port
|
LED |
|
|
Color |
|
|
Sequen |
|
|
Definition |
|
|
|
|
|
|
ce |
|
|
|
|||
|
|
|
|
|
|
|
|
|
|
|
|
|
|
|
|
|
|
|
|
|
|
|
|
|
PWR (Power) |
|
Green |
|
Solid |
|
|
Device powered On |
|||
|
|
|
|
|
|
|
|
|
|
||
|
|
N/A |
|
Off |
|
|
Device powered Off |
||||
|
|
|
|
|
|
|
|||||
|
|
|
|
|
|
|
|
|
|
|
|
|
|
|
|
|
|
|
Solid |
|
|
Powerline Connected (Connection Quality is Best) |
|
|
PL (Powerline) |
|
Green |
|
|
|
|
|
|
||
|
|
|
Blinking |
|
|
Syncing or Powerline Data Transmitting/Receiving (Connection Quality is |
|||||
|
|
|
|
|
|
|
|
|
|||
|
|
|
|
|
|
|
|
|
Best) |
||
|
|
|
|
|
|
|
|
|
|
||
|
|
|
|
|
|
|
|
|
|
||
|
Note: LED color |
|
Amber |
|
Solid |
|
|
Powerline Connected (Connection Quality is Better) |
|||
|
indicates the strength |
|
|
|
|
|
|
|
|||
|
|
|
Blinking |
|
|
Powerline Data Transmitting/Receiving (Connection Quality is Better) |
|||||
|
|
|
|
|
|
|
|||||
|
and quality of the |
|
|
|
|
|
|
||||
|
|
|
|
|
|
|
|
|
|
||
|
powerline connection |
|
Red |
|
Solid |
|
|
Powerline Connected (Connection Quality is Good) |
|||
|
through the electrical |
|
|
|
|
|
|
|
|||
|
|
|
Blinking |
|
|
Powerline Data Transmitting/Receiving (Connection Quality is Good) |
|||||
|
system |
|
|
|
|
|
|
||||
|
|
|
|
|
|
|
|
|
|
||
|
|
|
|
N/A |
|
Off |
|
|
Powerline is not synced or connected |
||
|
|
|
|
|
|
|
|
|
|
|
|
|
|
|
|
|
|
|
Solid |
|
|
10/20 Mbps, 100/200Mbps, or 1000/2000Mbps (Half/Full |
|
|
|
|
|
|
|
|
|
|
Duplex) Connected |
||
|
|
|
|
Green |
|
|
|
|
|||
|
ETH |
|
|
|
|
|
|
|
|||
|
|
|
Blinking |
|
|
10/20Mbps, 100/200Mbps, or 1000/2000Mbps (Half/Full Duplex) Data |
|||||
|
(Ethernet Port) |
|
|
|
|
|
|
||||
|
|
|
|
|
|
|
Transmitting/Receiving |
||||
|
|
|
|
|
|
|
|
||||
|
|
|
|
|
|
|
|
|
|
||
|
|
|
|
|
|
|
|
|
|
||
|
|
|
|
N/A |
|
Off |
|
|
Port Disconnected/No Ethernet Link |
||
|
|
|
|
|
|
|
|
|
|||
|
WIFI |
|
Green |
|
Blinking |
|
|
Wireless is on or enabled / Wireless Data Transmission |
|||
|
(Wireless) |
|
|
|
|
|
|
|
|||
|
|
N/A |
|
Off |
|
|
Wireless is off or disabled |
||||
|
|
|
|
|
|
|
|
|
|||
|
WPS |
|
Green |
|
Blinking |
|
|
WPS is activated |
|||
|
(WiFi Protected Setup) |
|
|
|
|
|
|
|
|||
|
|
N/A |
|
Off |
|
|
WPS is not activated or disabled |
||||
|
|
|
|
|
|
|
|
|
|
|
|
*Note: The following factors may affect the powerline network’s connection quality:
Noise – Generated by appliances that are connected to your electrical system through power outlets that have high power consumption requirements. (e.g. Microwaves, ovens, blow dryer, iron, dishwasher, etc.) The quality of your household electrical wiring may also cause additional noise on your electrical system.
Distance – Long lengths of electrical wiring through your electrical system between connected powerline adapters.
|
Button |
|
|
Action |
|
|
Function |
|
|
|
|
|
|
|
|
|
|
|
|
|
|
|
|
|
Initiate Sync/Connection and generate random network name/key on first |
|
|
|
|
|
|
|
|
adapter (PWR LED will start blinking) |
|
|
|
|
|
|
|
|
|
|
|
|
|
|
|
|
|
Match network name/key on secondary or additional adapter and connect to |
|
|
Sync |
|
|
Push/Hold for 2 sec |
|
|
first adapter. (PWR LED will start blinking) |
|
|
|
|
|
|
|
|
|
|
|
|
|
|
|
|
Note: The secondary or additional powerline adapter’s Sync button must also |
|
|
|
|
|
|
|
|
|
|
|
|
|
|
|
|
|
|
be pushed within 2 minutes (120 sec) of pushing the Sync button of the first |
|
|
|
|
|
|
|
|
adapter in order to establish connectivity. |
|
|
|
|
|
|
|
|
|
|
|
|
|
|
Push/Hold for 10 sec |
|
|
Erases the network name/key (All LEDs will turn off and turn back on) |
|
|
|
|
|
|
|
|
|
|
|
WPS |
|
|
Push/Hold for 3 sec |
|
|
Activates Wi-Fi Protected Setup (WPS) |
|
|
|
|
|
|
|
|
|
|
|
|
|
|
|
|
|
Reset to Powerline factory defaults only (All LEDs will turn off and turn back on, |
|
|
|
|
|
|
|
|
PL LED will blink Amber) |
|
|
|
|
|
Push/Hold for 1 sec |
|
|
Note: Will reset to the factory default private network name “HomePlugAV”. |
|
|
|
|
|
|
|
|
|
|
|
Reset |
|
|
|
|
|
This will not reset Wireless Access Point settings and the settings will remain |
|
|
|
|
|
|
|
intact. |
|
|
|
|
|
|
|
|
|
|
|
|
|
|
|
|
|
|
|
|
|
|
|
|
|
|
|
Reset to Wireless Access Point factory defaults only (All LEDs will turn off and |
|
|
|
|
|
Push/Hold for 5 sec |
|
|
turn back on) |
|
|
|
|
|
|
|
|
|
|
|
|
|
|
|
|
|
Note: This will not reset Powerline settings and the settings will remain intact. |
|
|
|
|
|
|
|
|
|
|
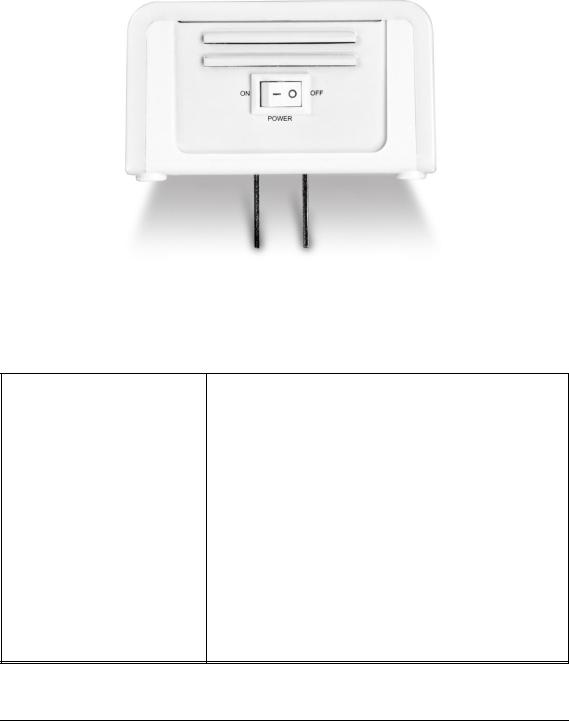
1.5 Top Panel
There On/Off Power switch is located on the top panel of the device which is used to power the device
on or off.
On/Off Power 
Switch
1.6 Defaults Settings
Wireless AP |
|
|
Setting |
|
|
|
|
IP Address / Subnet Mask |
192.168.10.100 / 255.255.255.0 |
||
|
|
|
|
SSID |
|
|
TRENDnet310 |
|
|
|
|
SSID Broadcast |
|
|
Enabled |
|
|
|
|
Mode |
|
|
Access Point (AP) |
|
|
|
|
Channel |
|
|
Auto |
|
|
|
|
Channel Width |
|
|
20MHz |
|
|
|
|
802.11 Mode |
|
|
802.11b/g/n Mixed |
|
|
|
|
Security |
|
|
Disabled |
|
|
|
|
Username / Password |
|
|
admin / admin |
Powerline |
|
Setting |
|
|
|
Network Name/Security Key |
|
HomePlugAV |

Chapter 2: Wireless Access Point Initial Setup
When installing the TPL-310AP for the first time, it required for you to configure the device from a wired computer. Since the default IP address of the TPL-310AP is 192.168.10.100, please make sure to assign an IP address to the TPL-310AP that is NOT assigned to any other devices on your network. If your network IP address range is NOT 192.168.10.x, then the TPL-310AP IP address should be assigned with your network’s IP address range (i.e. 192.168.1.x, 192.168.2.x, 192.168.0.x) This chapter covers the typical configuration of the TPL-310AP in Access Point (AP) mode using the Setup Wizard. If you are an experienced user, other web configuration settings can be referenced in Chapter 3. Once the initial setup is complete, Chapter 4 will cover creating a powerline network with one additional powerline adapter, or adding the TPL-310AP to existing powerline network.
1.Plug the TPL-310AP into an available power outlet within reach of your computer’s network cable.
2.Connect a network cable from the TPL-310AP Wireless Access Point’s network port (located at the bottom of the device) into the computer’s network port.
3.Move the power switch (located at the top of the device) to the “On” position.
4.Assign a static IP address to your computer’s network adapter to 192.168.10.10 and subnet mask 255.255.255.0.
Windows 7: Click on the Start Button, select Control Panel, click Network and Internet, click on
Network and Sharing Center, and click Change Adapter Settings. Then, right-click the Local Area Connection icon and click Properties. Click Internet Protocol Version 4 (TCP/IPv4) and then click
Properties. Select Use the following IP address, and manually enter the IP address settings.
Windows Vista: Click on the Start Button, select Control Panel, click Network and Internet, click on Network and Sharing Center, and click Manage Network Connections. Then, right-click the Local Area Connection icon and click Properties. Click Internet Protocol Version 4 (TCP/IPv4) and then click Properties. Select Use the following IP address, and manually enter the IP address settings.
Windows XP/2000: Click on the Start Button, select Control Panel, double-click the Network Connections icon, and then click Properties. Click Internet Protocol (TCP/IP) and then click Properties. Select Use the following IP address, and manually enter the IP address settings.
5.Open your Web browser, and type http://192.168.10.100 in the Address bar, and then press Enter.
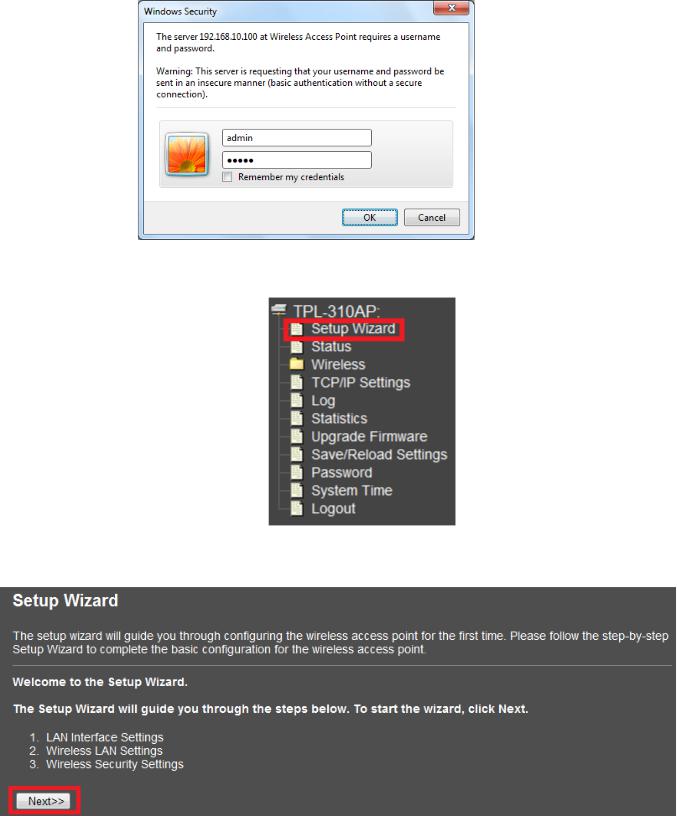
6. Enter the User Name and Password and then click OK.
7. In the menu in the left-hand panel, click on Setup Wizard.
8. In the Setup Wizard window, click Next
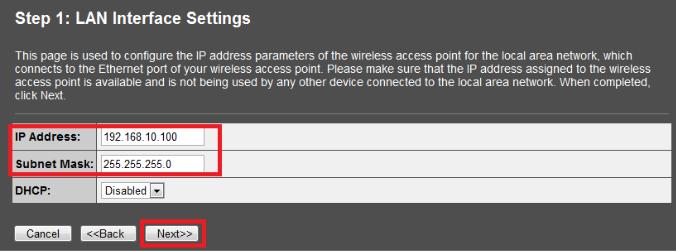
9. Configure the LAN Interface Settings of the TPL-310AP. Click Next.
IP Address: The assigned IP address should match the network IP address range of your network. This IP address should not be used by any other devices on your network.
Subnet Mask: The assigned Subnet Mask should match the network Subnet Mask of your network. In most cases, the default Subnet Mask setting (255.255.255.0) should be fine.
DHCP: Setting DHCP to Client will set your device to obtain an IP address automatically from your DHCP server (router). If Disabled, you will need to manually configure the IP address settings.
Note: It is recommended to manually configure the LAN Interface Settings (IP Address and Subnet Mask) in case you need access the device in the future. Please write down the IP address settings assigned for future reference.

10. Configure the Wireless LAN Settings. Then click Next.
Band: In most cases, the default setting (2.4GHz (B+G+N)) should be fine.
Mode: In most cases, the default setting AP (Access Point) should be fine.
Network Type: This setting does not apply to (AP) mode, only in (AP Client) mode. Continue to the next setting.
SSID: The SSID is the network name of your wireless network (The name wireless clients will discover, when scanning for wireless networks). It is recommended to assign a unique SSID (Network Name) and to not assign anything that would be personally identifying like “Smith Family Network” however, an
SSID easily identifiable when searching for available wireless networks. Manually enter the name of your wireless network.
Channel Width: In most cases, the default setting (20MHz) should be fine.
Channel Number: This setting is only configurable when setting the Channel Width to 40MHz. In most cases, the default setting (Auto) should be fine.
Enable MAC Clone (Single Ethernet Client): This setting does not apply to (AP) mode, only in (AP Client) mode.
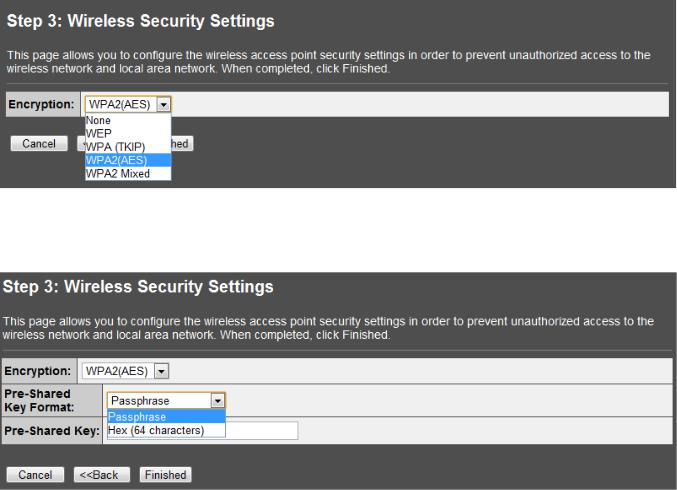
11.Configure the Wireless Security Settings. Click the drop-down menu Encryption: and select
WPA2(AES).
Note: To protect your network from unauthorized wireless access, it is strongly recommended to enable wireless security. It is highly recommended to use WPA2 if all of your wireless devices also support WPA2, since it is the highest security protocol supported currently. Once wireless security is enabled on the TPL-310AP, each wireless computer or device must be configured to use the same protocol (WEP, WPA, WPA2) and configured with the same security key. Make sure your wireless devices support the security protocol configured on the TPL-310AP. If you are unsure of the security protocols supported, please refer the manuals for your wireless devices or contact the manufacturer to find out these details. The example demonstrates how to configure the TPL-310AP for WPA2.
12. Click the drop-down menu Pre-Shared Key Format: and select Passphrase.
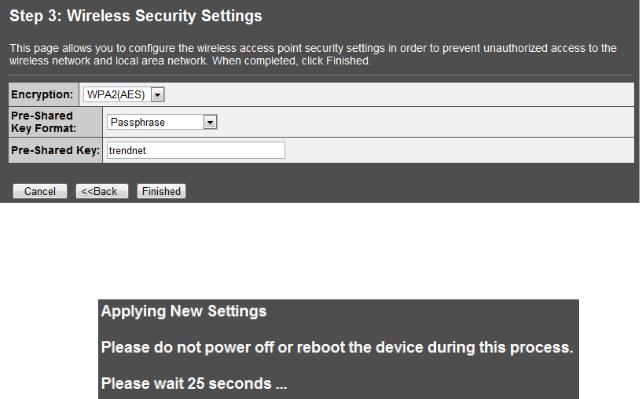
13.In the box next to Pre-Shared Key, manually enter your wireless security key (8 – 63 characters). Click Finished.
Note: This will be the key required to enter for your wireless computers or devices when connecting wirelessly. If needed, write down your wireless security settings and security key for reference when configuring your other wireless devices.
14. Please wait 25 seconds while the TPL-310AP applies the changes and reboots.
15.If you are finished configuring the TPL-310AP wireless settings, after the changes are applied and the TPL-310AP has rebooted, disconnect the network cable from the TPL-310AP Ethernet network port, and unplug the TPL-310AP from the power outlet and skip over to the Powerline section (Chapter 4) for creating a powerline network. If you would like to configure any additional wireless parameters, continue to Chapter 3 for any additional wireless settings.
16.Change your computer’s network adapter settings back to obtain an IP address automatically.
Windows 7: Click on the Start Button, select Control Panel, click Network and Internet, click on
Network and Sharing Center, and click Change Adapter Settings. Then, right-click the Local Area Connection icon and click Properties. Click Internet Protocol Version 4 (TCP/IPv4) and then click Properties. Select Obtain an IP address automatically.
Windows Vista: Click on the Start Button, select Control Panel, click Network and Internet, click on Network and Sharing Center, and click Manage Network Connections. Then, right-click the Local Area Connection icon and click Properties. Click Internet Protocol Version 4 (TCP/IPv4) and then click Properties. Select Obtain an IP address automatically.
Windows XP/2000: Click on the Start Button, select Control Panel, double-click the Network Connections icon, and then click Properties. Click Internet Protocol (TCP/IP) and then click Properties. Select Obtain an IP address automatically.
 Loading...