


TSD-DR40HD

Tevion TSD-DR40HD User Guide
Document Id: SE080325
Written by
Sven Eriksen, Melbourne, Australia
Email: svencsh@optushome.com.au
Revision 1.3
http://members.optusnet.com.au/democsh/documents/tevion-tsddr40hd-userguide.pdf
Last saved:
18-Sep-08

Computer System HyperTools Tevion TSD-DR40HD User Guide
F:\Our Files\Our Computers\User Guides\Tevion (Wintal)\Tevion TSD-DR40HD DVR User Guide.docTevion TSD-DR40HD DVR User Guide.doc 18/9/08 Page ii
Change Register for this document
Date Revision Description of Change Changed By
20-May-08 1.0 Initial version Sven Eriksen
03-Jun-08 1.1 Added section on transferring a video tape cassette recording
from VCR to DVD
Sven Eriksen
09-Jul-08 1.2 Updated Section 3.1 which is now called “Searching for
Australian Free-to-Air TV Channels
Sven Eriksen
31-08-08 1.3 Updated Section 5.4.2 Compiling a DVD by copying from HDD
to DVD
Sven Eriksen

Computer System HyperTools Tevion TSD-DR40HD User Guide
F:\Our Files\Our Computers\User Guides\Tevion (Wintal)\Tevion TSD-DR40HD DVR User Guide.docTevion TSD-DR40HD DVR User Guide.doc 18/9/08 Page iii
Contents
1. Introduction..............................................................................................................1
1.1 Purpose.................................................................................................................................................................. 1
1.2 Home Entertainment System Components............................................................................................................ 1
1.3 Home Entertainment System Remote Controls..................................................................................................... 1
1.4 The Tevion TSD-DR40HD Digital Video Recorder (DVR) ................................................................................. 1
1.5 Some Technical Terms.......................................................................................................................................... 2
1.6 Front Panel ............................................................................................................................................................ 3
1.7 Rear Panel ............................................................................................................................................................. 3
1.8 Power/Mode Indicator........................................................................................................................................... 3
1.9 Display Panel ........................................................................................................................................................ 4
1.10 System Messages................................................................................................................................................... 4
1.11 Remote Control ..................................................................................................................................................... 5
2. Connections ..............................................................................................................6
2.1 Connection Diagram ............................................................................................................................................. 6
2.2 Connection Details................................................................................................................................................ 6
3. Initial DVR Set Up Procedure ................................................................................7
3.1 Searching for Australian Analogue TV Channels ................................................................................................. 7
3.2 Searching for Australian Digital TV Channels...................................................................................................... 8
3.3 Complete List of Australian TV Channels found by Scan..................................................................................... 8
3.4 Deleting a TV Channel from List.......................................................................................................................... 9
3.5 Reassigning Program Numbers for TV Channels in List .................................................................................... 10
3.6 Renaming Australian TV Channels in List.......................................................................................................... 11
4. DVR Set Up Menus in Detail ................................................................................12
4.1 Setup Menu – Recording..................................................................................................................................... 12
4.2 Setup Menu – Video............................................................................................................................................ 13
4.3 Setup Menu – Audio ........................................................................................................................................... 14
4.4 Setup Menu – Language...................................................................................................................................... 14
4.5 Setup Menu – Date/Time .................................................................................................................................... 14
4.6 Setup Menu – Preferences................................................................................................................................... 15
4.7 Setup Menu – Time Shifting and Hard Disk Management.................................................................................. 15
4.8 Setup Menu – DVB............................................................................................................................................. 16
5. Using the DVR........................................................................................................17
5.1 Watching TV Live............................................................................................................................................... 17
5.1.1 Watching a TV Program (Digital Video Brodcast) Live............................................................................................. 17
5.1.2 Time-Shifting while Watching a TV Program (Digital Video Brodcast) Live............................................................ 17
5.2 Playing Discs....................................................................................................................................................... 18
5.2.1 Playing CDs................................................................................................................................................................ 18
5.2.2 Playing DVDs............................................................................................................................................................. 18
5.3 Using the Hard Disk Drive.................................................................................................................................. 19
5.3.1 Watching a TV Program from HDD........................................................................................................................... 19
5.3.2 Recording a TV Program (DVB) Live on HDD..........................................................................................................19
5.3.3 Scheduling the Recording of a TV Program on HDD................................................................................................. 20
5.3.4 Deleting a TV Program Recorded on HDD ................................................................................................................22
5.3.5 Changing the Title of a TV Program Recorded on HDD............................................................................................ 23
5.3.6 Changing the Index Picture of a TV Program Recorded on HDD............................................................................... 24
5.3.7 Hiding Unwanted Segments from a TV Program Recorded on HDD......................................................................... 25
5.4 Using the DVD Recorder .................................................................................................................................... 26
5.4.1 Scheduling the Recording of a TV Program on DVD................................................................................................. 26
5.4.2 Compiling a DVD by Copying from HDD to DVD.................................................................................................... 28
5.4.3 Transferring a Video Tape Cassette Recording to DVD............................................................................................. 29
5.4.4 Finalising a DVD for External Use............................................................................................................................. 31
6. Troubleshooting, Warranty and Technical Support..........................................32
6.1 Troubleshooting Guide........................................................................................................................................ 32
6.2 Warranty.............................................................................................................................................................. 33
6.3 Customer Service from Pebble Electronics ......................................................................................................... 33
6.4 Help Line Queries ............................................................................................................................................... 34
7. Conclusion ..............................................................................................................36

Computer System HyperTools Tevion TSD-DR40HD User Guide
F:\Our Files\Our Computers\User Guides\Tevion (Wintal)\Tevion TSD-DR40HD DVR User Guide.doc 18/9/08 at 21:49 Page 1
1. Introduction
1.1 Purpose
The purpose of this document is to explain setup, performance and common usage of the
Tevion DVR TSD-DR40HD Digital Video Recorder (DVR).
The DVR was purchased from Aldi, Brandon Park Shopping Centre, Glen Waverley, Victoria,
on the 20
th
March 2008 for inclusion in our home entertainment system.
1.2 Home Entertainment System Components
Our Home Entertainment System now includes the following components:
• Roof-top Television Antenna providing TV/FM signal
• Television Antenna Booster providing stronger TV/FM signal to two devices
• Three-Way Splitter for feeding TV antenna signal to three devices
• Bang & Olufsen Beomaster 7000 Radio/Amplifier (for quality sound)
• Bang & Olufsen Beocord 8000 Audio Tape Cassette Player
• Toshiba 2918DH Television (TV)
• Panasonic NV-HV60 Video Cassette Recorder (VCR)
• Tevion TSD-DR40HD Digital Video Recorder & DVD/HDD Recorder (DVR)
1.3 Home Entertainment System Remote Controls
Our Home Entertainment System includes the following remote control devices:
• Bang & Olufsen Beolink 7000 Remote Control (large BRC for complete control)
• Bang & Olufsen Beolink 1000 Remote Control (small BRC for partial control)
• Toshiba 2918DH Television Remote Control (TRC)
• Panasonic NV-HV60 Video Cassette Recorder Remote Control (VRC)
• Tevion TSD-DR40HD Digital Video Recorder Remote Control (DRC)
• Logitech Harmony 880 Universal Remote Control (LRC) to replace all of the above
1.4 The Tevion TSD-DR40HD Digital Video Recorder (DVR)
The DVR is capable of processing and recording various video signals into high quality DVD
disc and HDD, such as the input signals of TV stations, ordinary disc players and Digital Video
cameras.
In addition, the machine has all the functions of an ordinary DVD player. It can record on hard
disk and DVD and it can copy from hard disk to DVD.

Computer System HyperTools Tevion TSD-DR40HD User Guide
F:\Our Files\Our Computers\User Guides\Tevion (Wintal)\Tevion TSD-DR40HD DVR User Guide.doc 18/9/08 at 21:49 Page 2
1.5 Some Technical Terms
TERM MEANING
BRC
Beomaster Remote Control (s). Small one in bedroom and large one in
lounge room.
Button A button on a Remote Control (shown in Bold Face, e.g. DVB) or
displayed on screen.
Chapter and Track Each title can contain one or more “Chapters” or “Tracks”
DRC
DVR Remote Control
DVD Digital Versatile Disk. A removable storage device for video and data
files. We make a distinction between:
• DVD-R or DVD+R, disks that can be recorded once only.
• DVD-RW or DVD+RW, disks that are rewritable.
Recordings on rewritable DVD disks can be done in several sessions
(prior to disk finalisation).
DVDs recorded can always be played back on this device, but to make a
recorded DVD playable on a computer and other DVD players a process
of “Disk Finalisation” needs to be performed.
DVR Digital Video Recorder. A machine that can record video using digital
(rather than analogue) technology. This term is perhaps not used as
much as PVR, but is probably the better term.
HDD Hard Disk Drive. A storage device for large amounts of data. The
Tevion DVR has an HDD capacity of 400Gb,
Key A key on a Remote Control (shown in Bold Face, e.g. HDD)
PVR Personal Video Recorder. A machine that can record video not just for
you but for anyone else who is around.
Recording Quality This device can record on HDD and DVD in six different densities
giving rise to six different levels of recording quality each taking up
increasing amounts of space:
SPEED DVD HDD QUALITY
SLP (Super Long Play) 6 hrs 562 hrs Low
EP (Extended Play) 4 hrs 371 hrs Moderate
LP (Long Play) 3 hrs 261 hrs Normal
SP+ (Standard Play +) 2.5 hrs 221 hrs Good
SP (Standard Play) 2 hrs 191 hrs Very Good
HQ (High Quality) 1 hrs 94 hrs Best
Title Each recording is called a “Title” or a “program”. The term “Title” is
also used for a text field associated with a recorded TV program in
which you can enter a textual name to identify the program.
TRC
TV Remote Control
VCR Video Cassette Recorder. A machine that can record video on video
tape cassettes.
VRC
VCR Remote Control

Computer System HyperTools Tevion TSD-DR40HD User Guide
F:\Our Files\Our Computers\User Guides\Tevion (Wintal)\Tevion TSD-DR40HD DVR User Guide.doc 18/9/08 at 21:49 Page 3
1.6 Front Panel
The Front Panel of the DVR allows basic operation without the use of the Remote Control.
On the left is a door leading to some further connection sockets:
1394 DV IN VIDEO IN AUDIO IN USB IN
1.7 Rear Panel
The Rear Panel of the DVR contains a number of sockets allowing connection to other
television and hi-fi equipment.
1.8 Power/Mode Indicator
A large circular Power Indicator is located at the right corner on the front of the unit. When the
unit is plugged in and powered on, the power indicator will be lit in one of three different
colours, depending on the current mode of operation:
Red Unit is in stand by mode, meaning the unit is currently not in use. Press STAND
BY/ON button to place it into playback mode.
Blue Unit is in playback mode, meaning the unit is ready for normal operation, such as
watching a TV program or playing a DVD.
Purple Unit is in recording mode, meaning the unit is currently recording a program on
HDD or DVD. The unit cannot be used for any other purpose (except watching the
program being recorded) until the current recording task has been completed.
Computer System HyperTools Tevion TSD-DR40HD User Guide
F:\Our Files\Our Computers\User Guides\Tevion (Wintal)\Tevion TSD-DR40HD DVR User Guide.doc 18/9/08 at 21:49 Page 4
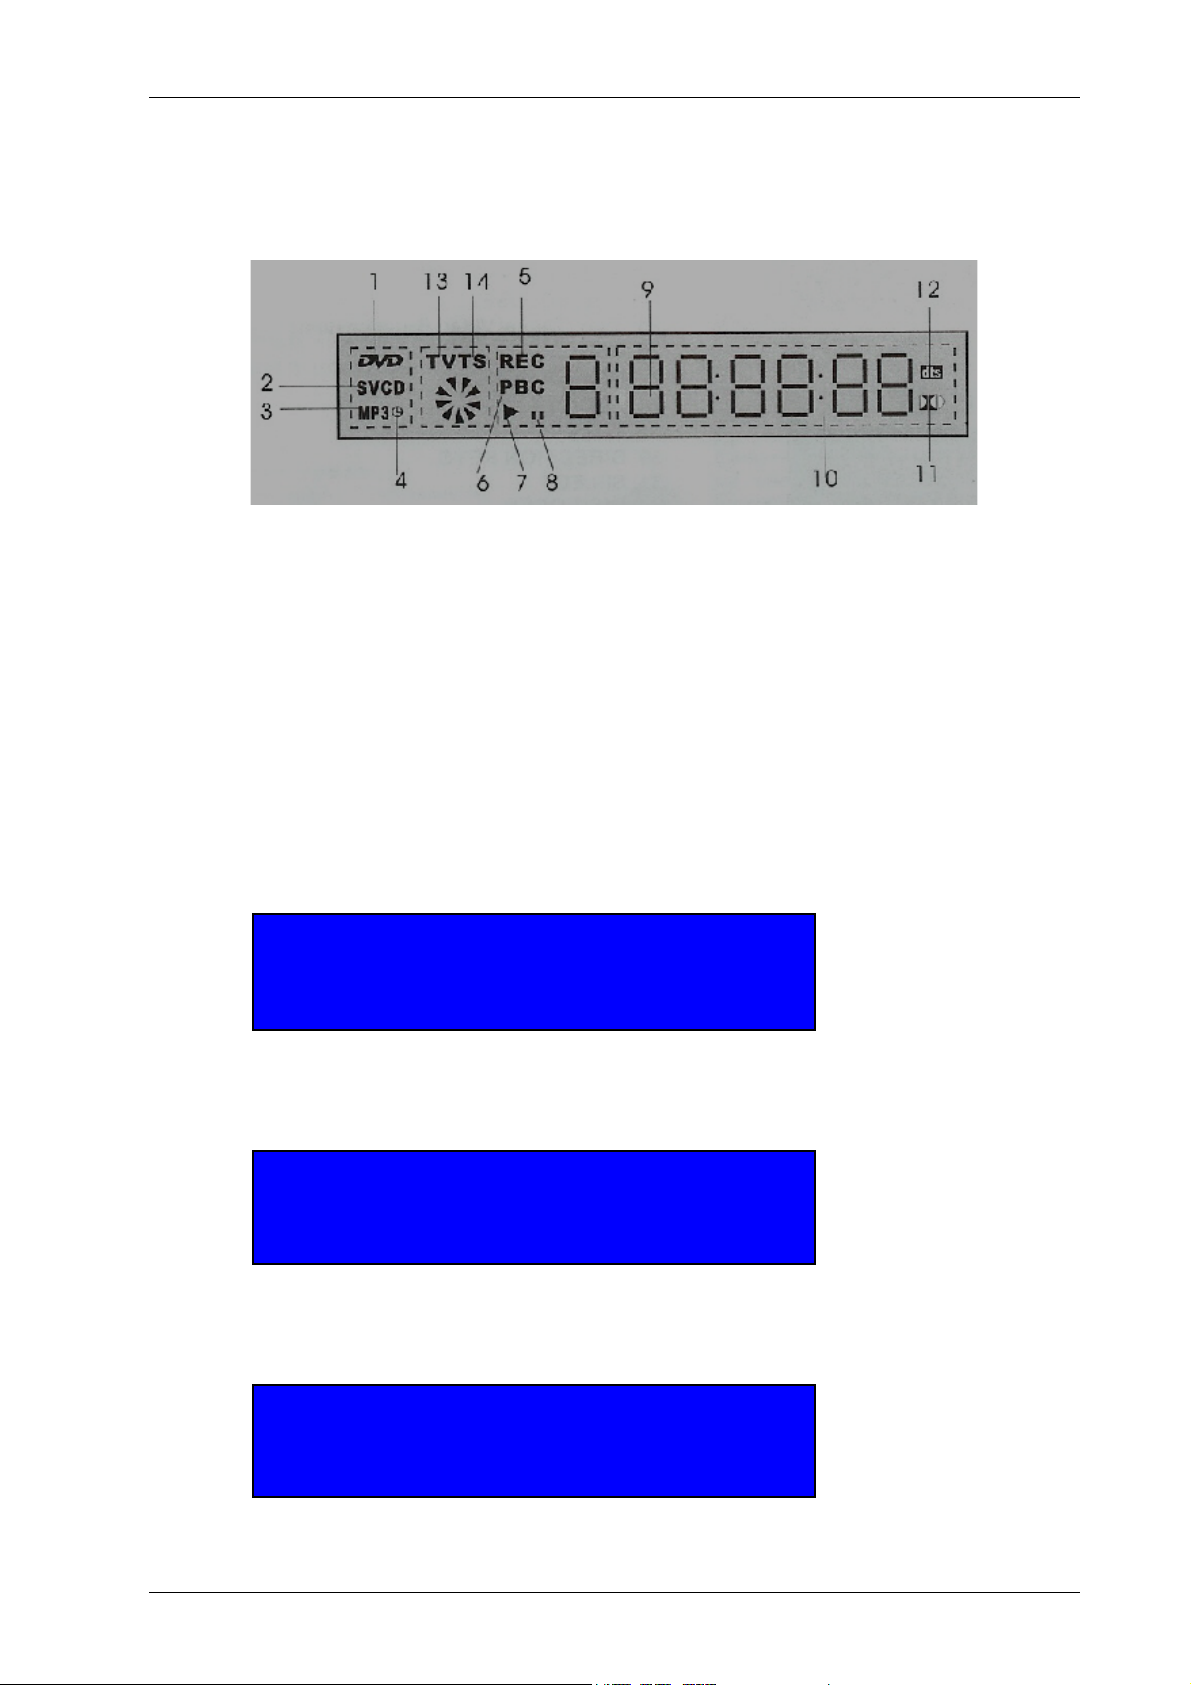
1.9 Display Panel
The Display Panel of the DVR makes use of a number of Indicators to provide information
about what the unit is currently being used for (media type, chapter/track, elapsed time, etc.).
The Display panel will be blank, if the unit has been powered off.
1 DVD Indicator 8 Pause Indicator
2 SVCD/VCD/CD Indicator 9 Chapter Indicator
3 MP3 Indicator 10 Elapsed Time Indicator
4 Timer Recording Indicator 11 Dolby Digital Indicator
5 Recording Indicator 12 Surround Sound Indicator
6 Play Back Control (PBC) Indicator 13 TV Indicator
7 Play Indicator 14 Time Shift Indicator
1.10 System Messages
As a result of tasks being initiated by the user, system status and other messages will be
displayed on the TV screen.
For example, a couple of minutes prior to a scheduled hard disk recording actually starting, the
following message will appear on screen:
Notice:
A timer recording task is preparing to be executed.
Please wait…. Only STOP key can terminate this.
When the recording actually starts, the following system status message will be displayed on
screen:
Sys. State: RECORDING
Record To: Hard Disk AS: EP(50min/GB)
Elapsed time: hh:mm:ss Remain Time: hh:mm:ss
When the recording has stopped, the following system status message will be displayed on
screen:
Sys. State: STOP
Record To: Hard Disk AS: EP(50min/GB)
Elapsed time: 00:00:00 Remain Space: xx:xx:xx
Computer System HyperTools Tevion TSD-DR40HD User Guide
F:\Our Files\Our Computers\User Guides\Tevion (Wintal)\Tevion TSD-DR40HD DVR User Guide.doc 18/9/08 at 21:49 Page 5
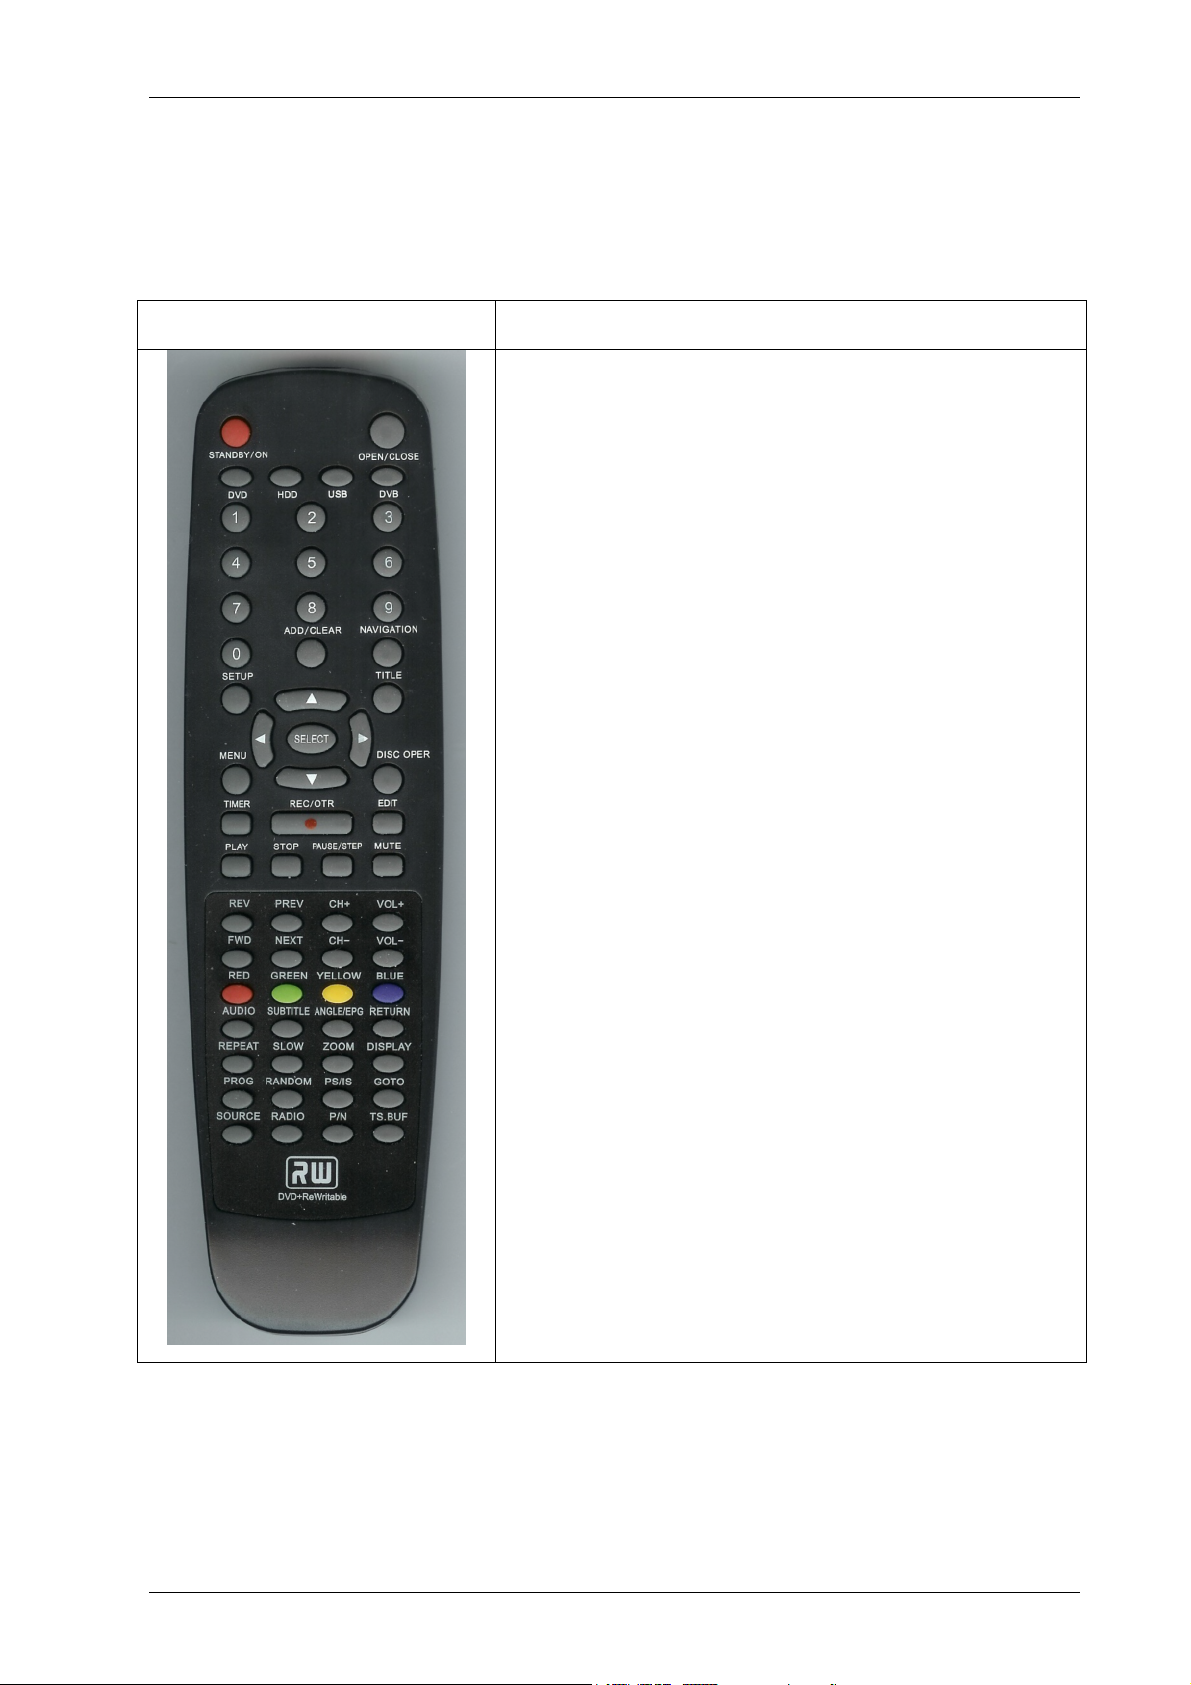
1.11 Remote Control
The DVR Remote Control (DRC) allows operational control of the DVR for television viewing
and recording (on DVD or HDD), playing CDs and DVDs as well as recording from/to USB
and/or DV devices attached at the front or rear of the unit.
REMOTE CONTROL BUTTON FUNCTION
STANDBY/ON
OPEN/CLOSE
DVD
HDD
USB
DVB
Buttons 0-99
ADD/CLEAR
NAVIGATION
SETUP
TITLE
SELECT
MENU
DISC OPER
TIMER
REC/OTR
EDIT
PLAY
STOP
PAUSE/STEP
MUTE
REV
FWD
PREV
NEXT
CH+/CH-
VOL+/VOL
RED
GREEN
YELLOW
BLUE
AUDIO
SUBTITLE
ANGLE/EPG
RETURN
REPEAT
SLOW
ZOOM
DISPLAY
PROG
RANDOM
PS/IS
GOTO
SOURCE
RADIO
P/N
TS/BUF
Turn DVR Off Red Light) or On (Blue Light)
Open or close DVD tray
Use DVD for playback or recording
Use Hard Disk for playback or recording
Use USB device for playback or recording
Use TV Tuner(s) for playback or recording
Select Program n for playback or recording
Mark programs for copying from HDD to DVD
Enter On-Screen Display (OSD) Navigation Menus
Enter Setup Menus
Show list of programs, or edit program title
Select current choice (also Up, Down, Left, Right)
Enter Menu system
Enter DVD editing menus
Enter Timer Recording Menus
Each Press gives 30 mins of One Touch Recording
Enter Edit menu for DVD recordings
Start or resume playback
Stop playback (twice to “rewind”)
Pause or move forwards in steps (frames)
Turn speakers off or back on
Reverse through current program (DVD or HDD)
Go forwards in current program (DVD or HDD)
Go to previous chapter or track (DVD or HDD)
Go to next chapter or track (DVD or HDD)
Change channel up or down (DVB)
Change volume up or down (DVB, DVD, HDD)
Use for Digital Channel setup and management
Use for Digital Channel setup and management
Use for Digital Channel setup and management
Use for Digital Channel setup and management
Select an audio track on a disk
Enter subtitle language menu (some DVDs)
Change viewing angle (some DVD) or Open EPG (Radio)
Return to upper level menu
Enter Repetition menus (DVD)
Slow down HDD/DVD video display speed/Sort HDD program list
Enlarge screen image (3 sizes)
Show timeline for a few seconds
Edit program playlist (does not appear to work?)
Play DVD or CD tracks in random sequence
Hold down for 3 secs to toggle TV output format between PS and IS
Use with DVD for repositioning by title, chapter or time
Enter Source Selection menu
Select from list of digital radio stations
Toggle TV system between PAL and NTSC
Enter time shift mode (does not appear to work?)
The PROG and the TS/BUF buttons do not appear to work. Further investigation or technical
support is required to resolve this.
Computer System HyperTools Tevion TSD-DR40HD User Guide
F:\Our Files\Our Computers\User Guides\Tevion (Wintal)\Tevion TSD-DR40HD DVR User Guide.doc 18/9/08 at 21:49 Page 6
2. Connections
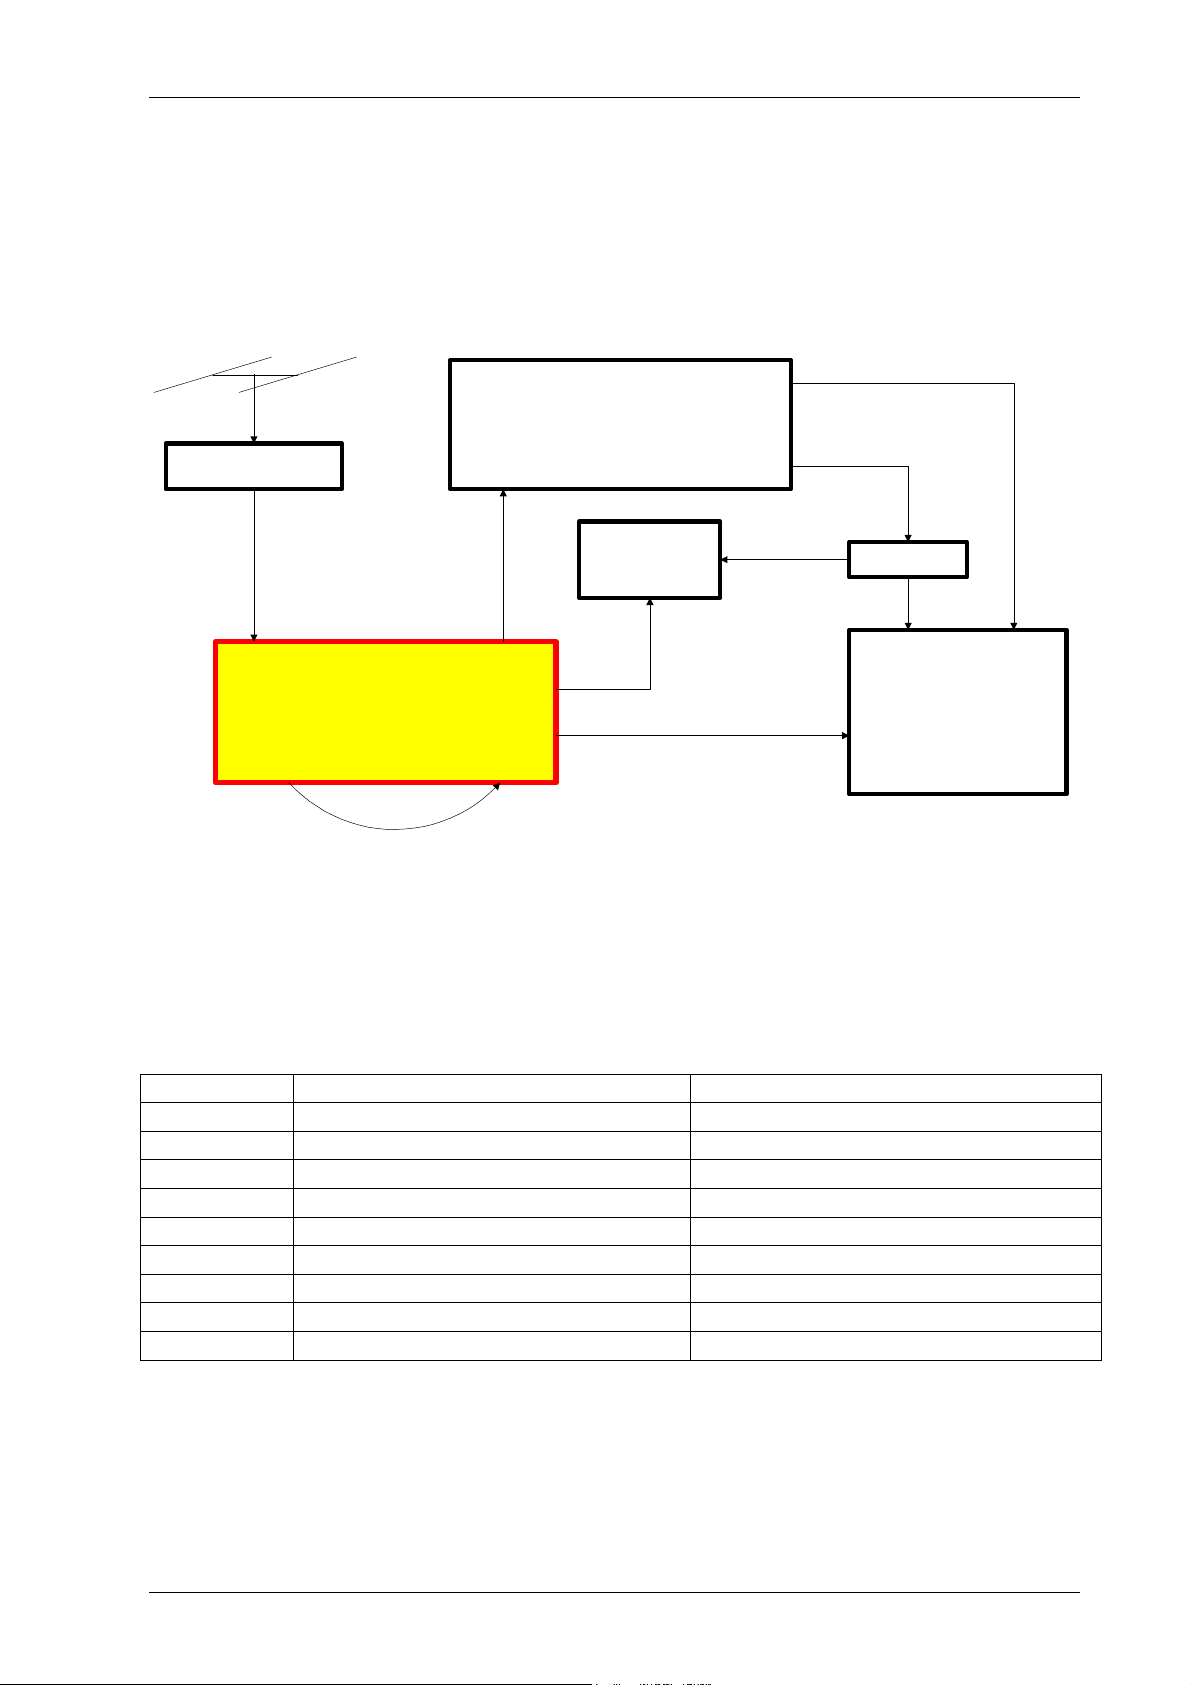
2.1 Connection Diagram
The following diagram provides a pictorial view of the equipment and connections used in our
Home Entertainment System.
Toshiba TV
Roof-top TV/FM
Antenna
Tevion TDS-DR40HD
Hard Disk / DVD
Digital Video Player /
Digital Video Recorder
Bang & Olufsen
Beomaster 7000
Radio/Amplifier
Panasonic
VCR
3-Way Splitter
Booster
A
udio
O
utput
FR/FL
Digital Tuner IN
Digital Tuner OUT
A
nalog Tuner IN
Analog Tuner OUT
RF IN
R
F OUT
S-Video
OUT
S-Video IN
T
V/AUX
F
M
IN
Antenna IN Video 1 IN
Video/Audio OUT
RCA
COAX
COAX
COAX
COAX
2.2 Connection Details
Cable connections are shown below to facilitate reconnections should that be required. Most
cables are Quad Shielded Radio Frequency (RF) Coaxial type. By utilising the “pass-
through/loop” features on both DVR and VCR, the cabling has been made as simple as possible
giving priority to the DVR and VRC and leaving only Radio/Amplifier and TV to be connected
via a splitter. One socket on Booster and one socket on Splitter are still unused.
Cable Type Connect One End of Cable To Connect Other End of Cable To
RF/Coaxial Antenna socket in wall Antenna socket on Antenna Booster
RF/Coaxial TV OUT socket 1 on Booster Digital Tuner IN socket on DVR
RF/Coaxial Digital Tuner OUT socket on DVR Analogue Tuner IN socket on DVR
RF/Coaxial Analogue Tuner OUT socket on DVR RF IN socket on VCR
RF/Coaxial RF OUT socket on VCR IN socket on 3-Way Splitter
RCA Video/Audio OUT socket on VCR Video-1 IN on Toshiba TV
RF/Coaxial Out socket 1 on 3-Way Splitter FM Antenna IN on Beomaster 7000
RF/Coaxial Out socket 2 on 3-Way Splitter Antenna IN on Toshiba TV
RCA/DIN Audio Output FR/FL on DVR TV/Aux socket on Beomaster 7000

Computer System HyperTools Tevion TSD-DR40HD User Guide
F:\Our Files\Our Computers\User Guides\Tevion (Wintal)\Tevion TSD-DR40HD DVR User Guide.doc 18/9/08 at 21:49 Page 7
3. Initial DVR Set Up Procedure
After all device connections have been accomplished a number of initial setup procedures will
need to be performed. Areas shaded in grey may or may not be needed as part of the procedure
(they are mostly to do with our particular procedures for powering devices up or down).
3.1 Searching for Australian Free-to-Air TV Channels
Since we are (in Australia) still using analogue TV signals, the available channels need to be
configured:
1. On TRC press Power button to turn on the TV (if not already on).
2. On TRC press button until
2
is shown.
3. On DRC press STANDBY/ON button to turn on the DVR and wait until “No disc”
message is shown.
4. On DRC press SETUP button to enter “Setup” menus and display the “Setup Menu –
Recording”.
5. On DRC press Right Arrow button to actually enter “Setup Menu – Recording”.
6. On DRC press Down Arrow button to “Auto Scan Channel” option and press SELECT
button.
7. On DRC if prompted to confirm the action just press SELECT button.
8. On DRC in “Scan Channels” screen press SELECT button leaving “Tuner input source”
set to “Air”.
9. On DRC press SELECT button to start a search for Analogue TV Channels.
10. The actual scanning will take a minute or two and will probably find six Fre-to-Air TV
channels. Each channel found is identified by a program number (Pxxx) and a channel
number (CHzzz).
11. On DRC press Down Arrow button to “Program Table”. Then press SELECT button to
enter the “Sort” screen where the list of program numbers and channel names will be
visible. The list is as follows:
P003 CH002 (should be renamed ABC01)
P009 CH007
P011 CH009
P013 CH010
P025 CH028 (should be renamed SBS28)
P028 CH031
12. On DRC press Down Arrow button to get to P003 CH002 then press the SELECT
button to enter the “Modify channel information” screen.
13. On DRC press Down Arrow button to move down to the Name field and change it one
character at a time to the desired name (e.g. CH002 changed to ABC01) and leaving all
other settings as they are.
14. Repeat Steps 11-13 renaming CH028 to SBS28.
15. On DRC press SETUP button to exit “Setup” menus.

Computer System HyperTools Tevion TSD-DR40HD User Guide
F:\Our Files\Our Computers\User Guides\Tevion (Wintal)\Tevion TSD-DR40HD DVR User Guide.doc 18/9/08 at 21:49 Page 8
3.2 Searching for Australian Digital TV Channels
Since we are (in Australia) beginning to use digital TV signals, the available channels need to
be configured.
1. On TRC press Power button to turn on the TV (if not already on).
2. On TRC pressed button until
2
is shown.
3. On DRC press STANDBY/ON button to turn on the DVR and wait until “No disc”
message is shown.
4. On DRC press DVB button.
5. On DRC press SETUP button to enter “Setup” menus and display the “Setup Menu –
Recording”.
6. On DRC press Up Arrow button to display the “Setup Menu – DVB”.
7. On DRC press Right Arrow button to actually enter “Setup Menu – DVB”
8. On DRC press Down Arrow button to “Auto Scan Digital Channels” option.
9. On DRC press SELECT button to start a search for Digital TV Channels. This will take a
few minutes. Each channel found is identified by a program number and a channel name.
10. It turns out that the list of 21 available digital TV channels identified by this search
actually includes 5 of the 6 available analogue TV channels (only Channel 31 was not
found for some reason). In addition, the scan also found 6 digital radio stations (available
via the RADIO button).
11. On DRC press SETUP button to exit Setup menu.
3.3 Complete List of Australian TV Channels found by Scan
The list of 21 TV channels found by the Scan for Digital Channels contains a number of
duplicate channels as well as some that are not yet available or deemed not useful.
0001 TEN HD
0002 TEN Digital should be deleted (is experimental)
0003 TEN HD should be deleted (is a duplicate)
0004 SBS
0005 SBS NEWS
0006 SBS2 should be deleted (is a duplicate)
0007 Nine Digital
0008 Nine Digital should be deleted (is a duplicate)
0009 Nine Guide should be deleted (is of little interest)
0010 7 Digital
0011 7 Digital 1 should be deleted (is a duplicate)
0012 7 Digital 2 should be deleted (is a duplicate)
0013 7 Digital 3 should be deleted (is a duplicate)
0014 7 HD Digital should be deleted (is a duplicate)
0015 7 Guide should be deleted (is of little interest)
0016 ABC HDTV should be deleted (is a duplicate)
0017 ABC1
0018 ABC2
0019 ABC1 should be deleted (is a duplicate)
0020 ABC3 should be deleted (is a duplicate)
0021 SBS HD should be deleted (is a duplicate)

Computer System HyperTools Tevion TSD-DR40HD User Guide
F:\Our Files\Our Computers\User Guides\Tevion (Wintal)\Tevion TSD-DR40HD DVR User Guide.doc 18/9/08 at 21:49 Page 9
3.4 Deleting a TV Channel from List
To get down to the list of useful channels, do the following:
1. On TRC press Power button to turn on the TV (if not already on).
2. On TRC pressed button until
2
is shown.
3. On DRC press STANDBY/ON button to turn on the DVR and wait until “No disc”
message is shown.
4. On DRC press DVB button.
5. On DRC press SETUP button to enter “Setup” menus and display the “Setup Menu –
Recording”.
6. On DRC press Up Arrow button to display the “Setup Menu – DVB”.
7. On DRC press Right Arrow button to actually enter “Setup Menu – DVB”.
8. On DRC press SELECT to enter “Digital Channel Management” menu and display the
current list of available programs and channels.
9. On DRC press SELECT to enter “Digital Channel Management” menu.
10. Use CH+ or CH- button to highlight channel to be deleted.
11. Press GREEN button to mark channel for deletion.
12. Go back to Step 10 until all 14 channels deemed unnecessary have been marked for
deletion leaving only 7 relevant ones.
13. Press SELECT button twice to confirm deletion and save updated list:
0001 TEN HD should be reassigned to 0005 CH 10
0002 SBS should be reassigned to 0001 SBS
0003 SBS NEWS should be reassigned to 0006 SBS NEWS
0004 Nine Digital should be reassigned to 0004 CH 9
0005 7 Digital should be reassigned to 0003 CH 7
0006 ABC1 should be reassigned to 0002 ABC1
0007 ABC2 should be reassigned to 0007 ABC2
 Loading...