


 Loading...
User’s Manual
TOSHIBA AT100

TOSHIBA AT100
Introduction
Welcome and thank you for choosing a TOSHIBA product.
For your convenience, your TOSHIBA product is furnished with two guides:
■a Quick Start Guide, and
■this comprehensive PDF User’s Manual.
We recommend to backup the User's Manual onto an external device.
Please backup your data that is saved in internal storage before updating the platform.
User’s Manual |
2 |

TOSHIBA AT100
Table of Contents
Introduction. . . . . . . . . . . . . . . . . . . . . . . . . . . . . . . . . . . . . . . . . . . . . . . . 2 Check the components . . . . . . . . . . . . . . . . . . . . . . . . . . . . . . . . . . . . . . 6 Safety instructions . . . . . . . . . . . . . . . . . . . . . . . . . . . . . . . . . . . . . . . . . . 6
Getting Started & Grand Tour
Getting Started . . . . . . . . . . . . . . . . . . . . . . . . . . . . . . . . . . . . . . . . . . . . . 9 Grand Tour . . . . . . . . . . . . . . . . . . . . . . . . . . . . . . . . . . . . . . . . . . . . . . . 14 Power conditions . . . . . . . . . . . . . . . . . . . . . . . . . . . . . . . . . . . . . . . . . . 18
Basic Operations & Home screen
Using the Touch Screen. . . . . . . . . . . . . . . . . . . . . . . . . . . . . . . . . . . . . 19 Getting to know the HOME screen . . . . . . . . . . . . . . . . . . . . . . . . . . . . 20 Opening and switching applications . . . . . . . . . . . . . . . . . . . . . . . . . . 21 Monitoring your tablet’s status . . . . . . . . . . . . . . . . . . . . . . . . . . . . . . . 21 Quick Settings . . . . . . . . . . . . . . . . . . . . . . . . . . . . . . . . . . . . . . . . . . . . 22 Managing Notifications . . . . . . . . . . . . . . . . . . . . . . . . . . . . . . . . . . . . . 22 Locking your screen . . . . . . . . . . . . . . . . . . . . . . . . . . . . . . . . . . . . . . . 23 Customizing the Home screen . . . . . . . . . . . . . . . . . . . . . . . . . . . . . . . 23 Changing the Screen Orientation . . . . . . . . . . . . . . . . . . . . . . . . . . . . . 25 Managing Tasks and Applications . . . . . . . . . . . . . . . . . . . . . . . . . . . . 25 Factory Reset . . . . . . . . . . . . . . . . . . . . . . . . . . . . . . . . . . . . . . . . . . . . . 25
Connecting to networks
Connecting to mobile networks . . . . . . . . . . . . . . . . . . . . . . . . . . . . . . 26 Connecting to Wi-Fi networks. . . . . . . . . . . . . . . . . . . . . . . . . . . . . . . . 27 Connecting to Bluetooth devices . . . . . . . . . . . . . . . . . . . . . . . . . . . . . 28
Applications & Widgets
Analog clock . . . . . . . . . . . . . . . . . . . . . . . . . . . . . . . . . . . . . . . . . . . . . . 31 Browser . . . . . . . . . . . . . . . . . . . . . . . . . . . . . . . . . . . . . . . . . . . . . . . . . . 31 Calculator . . . . . . . . . . . . . . . . . . . . . . . . . . . . . . . . . . . . . . . . . . . . . . . . 33 Calendar . . . . . . . . . . . . . . . . . . . . . . . . . . . . . . . . . . . . . . . . . . . . . . . . . 33 Camera . . . . . . . . . . . . . . . . . . . . . . . . . . . . . . . . . . . . . . . . . . . . . . . . . . 34 Clock . . . . . . . . . . . . . . . . . . . . . . . . . . . . . . . . . . . . . . . . . . . . . . . . . . . . 35 Contacts . . . . . . . . . . . . . . . . . . . . . . . . . . . . . . . . . . . . . . . . . . . . . . . . . 36 Downloads . . . . . . . . . . . . . . . . . . . . . . . . . . . . . . . . . . . . . . . . . . . . . . . 37 Email . . . . . . . . . . . . . . . . . . . . . . . . . . . . . . . . . . . . . . . . . . . . . . . . . . . . 37
User’s Manual |
3 |

TOSHIBA AT100
Gallery . . . . . . . . . . . . . . . . . . . . . . . . . . . . . . . . . . . . . . . . . . . . . . . . . . . 38 TOSHIBA Media Player. . . . . . . . . . . . . . . . . . . . . . . . . . . . . . . . . . . . . . 39 Music . . . . . . . . . . . . . . . . . . . . . . . . . . . . . . . . . . . . . . . . . . . . . . . . . . . . 40 Picture frame. . . . . . . . . . . . . . . . . . . . . . . . . . . . . . . . . . . . . . . . . . . . . . 41 Service Station . . . . . . . . . . . . . . . . . . . . . . . . . . . . . . . . . . . . . . . . . . . . 41 TOSHIBA File Manager. . . . . . . . . . . . . . . . . . . . . . . . . . . . . . . . . . . . . . 43 Online Manual . . . . . . . . . . . . . . . . . . . . . . . . . . . . . . . . . . . . . . . . . . . . . 45
Settings
Wireless & networks . . . . . . . . . . . . . . . . . . . . . . . . . . . . . . . . . . . . . . . 46 Sound . . . . . . . . . . . . . . . . . . . . . . . . . . . . . . . . . . . . . . . . . . . . . . . . . . . 47 Screen . . . . . . . . . . . . . . . . . . . . . . . . . . . . . . . . . . . . . . . . . . . . . . . . . . . 47 Multimedia. . . . . . . . . . . . . . . . . . . . . . . . . . . . . . . . . . . . . . . . . . . . . . . . 48 Location & security . . . . . . . . . . . . . . . . . . . . . . . . . . . . . . . . . . . . . . . . 48 Applications . . . . . . . . . . . . . . . . . . . . . . . . . . . . . . . . . . . . . . . . . . . . . . 49 Accounts & sync. . . . . . . . . . . . . . . . . . . . . . . . . . . . . . . . . . . . . . . . . . . 50 Privacy. . . . . . . . . . . . . . . . . . . . . . . . . . . . . . . . . . . . . . . . . . . . . . . . . . . 50 Storage . . . . . . . . . . . . . . . . . . . . . . . . . . . . . . . . . . . . . . . . . . . . . . . . . . 51 Language & input . . . . . . . . . . . . . . . . . . . . . . . . . . . . . . . . . . . . . . . . . . 51 Accessibility . . . . . . . . . . . . . . . . . . . . . . . . . . . . . . . . . . . . . . . . . . . . . . 52 Date & time . . . . . . . . . . . . . . . . . . . . . . . . . . . . . . . . . . . . . . . . . . . . . . . 52 About tablet. . . . . . . . . . . . . . . . . . . . . . . . . . . . . . . . . . . . . . . . . . . . . . . 52
Hardware & Options Operation
Hardware . . . . . . . . . . . . . . . . . . . . . . . . . . . . . . . . . . . . . . . . . . . . . . . . . 54 Optional devices. . . . . . . . . . . . . . . . . . . . . . . . . . . . . . . . . . . . . . . . . . . 61 TOSHIBA Tablet Dock . . . . . . . . . . . . . . . . . . . . . . . . . . . . . . . . . . . . . . 67 Optional accessories . . . . . . . . . . . . . . . . . . . . . . . . . . . . . . . . . . . . . . . 72
Troubleshooting
Problem solving process. . . . . . . . . . . . . . . . . . . . . . . . . . . . . . . . . . . . 73 Hardware and system checklist . . . . . . . . . . . . . . . . . . . . . . . . . . . . . . 74 TOSHIBA Support. . . . . . . . . . . . . . . . . . . . . . . . . . . . . . . . . . . . . . . . . . 76
Specifications
Physical Dimensions . . . . . . . . . . . . . . . . . . . . . . . . . . . . . . . . . . . . . . . 78 Environmental Requirements . . . . . . . . . . . . . . . . . . . . . . . . . . . . . . . . 78
Regulatory information
Copyright. . . . . . . . . . . . . . . . . . . . . . . . . . . . . . . . . . . . . . . . . . . . . . . . . 79 Disclaimer . . . . . . . . . . . . . . . . . . . . . . . . . . . . . . . . . . . . . . . . . . . . . . . . 79 Trademarks . . . . . . . . . . . . . . . . . . . . . . . . . . . . . . . . . . . . . . . . . . . . . . . 80 AVC/H.264 License Notice . . . . . . . . . . . . . . . . . . . . . . . . . . . . . . . . . . . 81 FCC information . . . . . . . . . . . . . . . . . . . . . . . . . . . . . . . . . . . . . . . . . . . 81 CE compliance . . . . . . . . . . . . . . . . . . . . . . . . . . . . . . . . . . . . . . . . . . . . 82
User’s Manual |
4 |

TOSHIBA AT100
Indication of restrictions of use . . . . . . . . . . . . . . . . . . . . . . . . . . . . . . 82 Working environment. . . . . . . . . . . . . . . . . . . . . . . . . . . . . . . . . . . . . . . 83 Additional environments not related to EMC. . . . . . . . . . . . . . . . . . . . 83 REACH - Compliance Statement . . . . . . . . . . . . . . . . . . . . . . . . . . . . . . 84 Following information is only valid for EU-member States:. . . . . . . . 84 Canadian regulatory information (Canada only) . . . . . . . . . . . . . . . . . 85 Canada – Industry Canada (IC) . . . . . . . . . . . . . . . . . . . . . . . . . . . . . . . 85 Wireless LAN and your Health . . . . . . . . . . . . . . . . . . . . . . . . . . . . . . . 85
User’s Manual |
5 |

TOSHIBA AT100
Check the components
Check to make sure you have all of the following items:
Hardware
■TOSHIBA AT100 Tablet
■AC adaptor and power cord (2-pin plug or 3-pin plug)
■Battery pack (installed in the tablet)
■Sleeve case (provided with some models)
Documents
■TOSHIBA AT100 Quick Start Guide
■Instruction Manual for Safety and Comfort
If any of the items is missing or damaged, contact your dealer immediately.
Safety instructions
■Always read the safety instructions carefully:
■Do not disassemble, modify, tamper with or repair your product. Disassembly, modification, tampering or repairing the product could cause fire or electric shock, possibly resulting in serious injury. Please contact an authorized Toshiba service provider for any repair service.
■When handling the power cable/cord, follow these precautions:
■Never tamper with the power cable/cord or plug.
■Never splice, alter, bend or twist a power cable/cord.
■Never pull on a power cable/cord to remove a plug from a socket.
■Never place heavy objects on a power cable/cord.
■Never run a power cable/cord through a pinch point such as a door or window.
■Never place a power cable/cord near a heat source.
■Never use nails, staples or similar objects to fasten or attach cord in place.
■Never attempt to disassemble or repair an AC adaptor.
Doing any of the above may damage the cables, and/or result in a fire or electric shock, possibly resulting in serious injury.
■Always confirm that the power plug (and extension cable plug if used) has been fully inserted into the socket, to ensure a secure electrical connection. Failure to do so may result in a fire or electric shock, possibly resulting in serious injury.
■Be careful if you use a multiple connector. An overload on one socket could cause a fire or electric shock, possibly resulting in serious injury.
User’s Manual |
6 |

TOSHIBA AT100
■If dust gets on the power plug connectors or connector base, turn the power off and disconnect the power plug. Then clean the connector and/or connector base with a dry cloth. Continuing to use the product without cleaning the power plug may result in a fire or an electric shock, possibly resulting in serious injury.
■Always use the TOSHIBA AC adaptor that was provided with your product, or use AC adaptors specified by TOSHIBA to avoid any risk of fire or other damage to the product. Use of an incompatible AC adaptor could cause fire or damage to the product possibly resulting in serious injury. TOSHIBA assumes no liability for any damage caused by use of an incompatible adaptor or charger.
■Never plug the AC adaptor into a power source that does not correspond to both the voltage and the frequency specified on the regulatory label of the unit. Failure to do so could result in a fire or electric shock, possibly resulting in serious injury.
■Never attempt to connect or disconnect a power plug with wet hands. Failure to follow this instruction could result in an electric shock, possibly resulting in serious injury.
■Never leave small parts such as covers, caps and screws within the reach of infants or small children. Swallowing a small part may cause choking and suffocation resulting in death or serious injury. If a part is swallowed, immediately take appropriate emergency action and consult a doctor.
■Never allow any liquids to spill into any part of your product, and never expose the product to rain, water, seawater or moisture. Exposure to liquid or moisture can cause electric shock or fire, resulting in damage or serious injury. If any of these eventualities should accidentally occur, immediately:
1.Turn off the product.
2.Disconnect the AC adaptor from the power plug socket and product.
Do not turn on the power again, until you have taken the product to an authorized service center. Failure to follow these instructions could result in serious injury or permanent damage to the product.
■Never place your product or AC adaptor on a wooden surface, furniture, or any other surface that could be marred by exposure to heat since the product base and AC adaptor's surface increase in temperature during normal use.
■Always place your product or AC adaptor on a flat and hard surface that is resistant to heat damage.
■Never place your product where it will be exposed to excess heat, such as in direct sunlight, an unventilated vehicle or near a heater. This may result in a system failure, malfunction, loss of data or damage to the product.
■Never place your product in a location where it will be exposed to extremely low temperatures. This may result in a system failure, malfunction or loss of data.
User’s Manual |
7 |

TOSHIBA AT100
■Never subject your product to sudden temperature variations. This may result in condensation, causing a system failure, malfunction or loss of data.
■Never operate your product on AC power during a thunderstorm. If you see lightning or hear thunder, immediately turn off the product. An electric surge caused by the storm, may result in a system failure, loss of data or hardware damage.
■Always use the battery pack supplied as an accessory or an equivalent battery pack specified in the User’s Manual. Other battery packs have different voltage and terminal polarities. Use of non-conforming battery packs could generate smoke or cause fire or rupture, possibly resulting in serious injury.
User’s Manual |
8 |
Getting Started & Grand Tour
This chapter provides an equipment checklist, grand tour of your tablet and basic information to start using your tablet.
Some of the features described in this manual may not function properly if you use an operating system that was not pre-installed by TOSHIBA.
Getting Started
■ All users should be sure to read the section Initial Setup.
This section provides basic information to start using your tablet. It covers the following topics:
■Connecting the AC adaptor
■Turning on the power
■Initial Setup
■Turning off the power
■ Use a virus-check program and make sure it is updated regularly.
■Never format storage media without checking its content - formatting destroys all stored data.
■It is a good idea to periodically back up main storage device to external media. General storage media is not durable or stable over long periods of time and under certain conditions may result in data loss.
Connecting the AC adaptor
The AC adaptor can automatically adjust to any voltage ranging from 100 to 240 volt and to a frequency of either 50 or 60 hertz, enabling you to use this product in almost all country/region. The adaptor converts AC power to DC power and reduces the voltage supplied to this tablet.
User’s Manual |
9 |

Getting Started & Grand Tour
(Sample Illustration) The AC adaptor (2-pin plug)
(Sample Illustration) The AC adaptor (3-pin plug)
■Depending on the model, either a 2-pin or 3-pin adaptor/power lead will be bundled with the tablet.
■Do not use a 3-pin to 2-pin conversion plug.
■The supplied power cord conforms to safety rules and regulations in the region the tablet is bought and should not be used outside of this region. In order to use the adaptor/tablet in other regions, you should buy a power cord that conforms to the safety rules and regulations in that particular region.
Attach the AC adaptor when you need to charge the battery or you want to operate from AC power. It is also the fastest way to get started, because the battery pack will need to be charged before you can operate from battery power.
User’s Manual |
10 |
Getting Started & Grand Tour
■ Always use the TOSHIBA AC adaptor that was included with your tablet, or use AC adaptors specified by TOSHIBA to avoid any risk of fire or other damage to the tablet. Use of an incompatible AC adaptor could cause fire or damage to the tablet possibly resulting in serious injury. TOSHIBA assumes no liability for any damage caused by use of an incompatible adaptor.
■Never plug the AC adaptor into a power source that does not correspond to both the voltage and the frequency specified on the regulatory label of the unit. Failure to do so could result in a fire or electric shock, possibly resulting in serious injury.
■Always use or purchase power cables that comply with the legal voltage and frequency specifications and requirements in the country of use. Failure to do so could result in a fire or electric shock, possibly resulting in serious injury.
■Do not use a 3-pin to 2-pin conversion plug.
■When you connect the AC adaptor to the tablet, always follow the steps in the exact order as described in the User’s Manual. Connecting the power cable to a live electrical outlet should be the last step otherwise the adaptor DC output plug could hold an electrical charge and cause an electrical shock or minor bodily injury when touched. As a general safety precaution, avoid touching any metal parts.
■Never place your tablet or AC adaptor on a wooden surface, furniture, or any other surface that could be marred by exposure to heat since the tablet base and AC adaptor's surface increase in temperature during normal use.
■Always place your tablet or AC adaptor on a flat and hard surface that is resistant to heat damage.
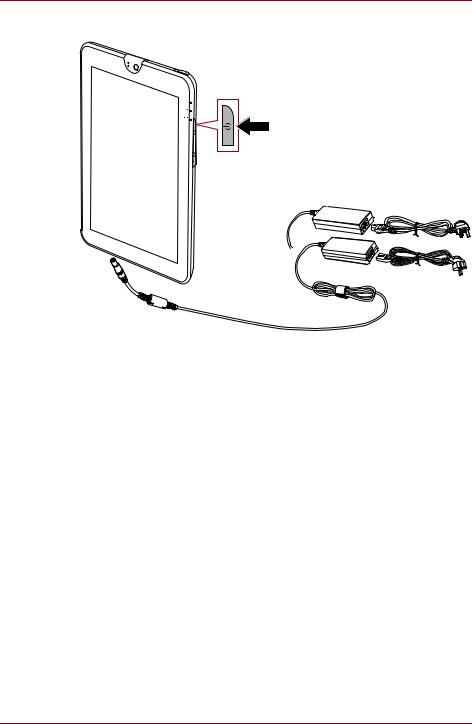
1.Connect the power cord to the AC adaptor.
2.Connect the AC adaptor’s DC output plug to the DC IN 19V jack on the tablet.
3.Plug the power cord into a live wall outlet - the Battery indicator on the display panel of the tablet should glow.
Turning on the power
This section describes how to turn on the power - the Power and Battery indicators will then indicate the status.
User’s Manual |
11 |
Getting Started & Grand Tour
Press the power button on the tablet to turn on the power.
3 PIN
2 PIN
(Sample Illustration) Turning on the tablet
Initial Setup
The Setup Screen will be the first screen displayed when you turn on the power. Setup your tablet according to the following steps:
1.Choose the language as you want and then tap Start to continue.
2.Connect via Wi-Fi or 3G (if an option).
You may also skip this section and turn Wi-Fi on later in Settings screen.
3.Choose Google™ location service and tap Next to continue.
4.Set date and time, and tap Next to continue.
5.Register or log in with a Google account. You may also skip this section by tapping Cancel.
Turning off the power
If you are not going to use your tablet for a long time, shut it down. You can also turn the LCD off in order to extend the battery life.
Shut Down the Tablet
When you shut down the tablet, no data will be saved. The tablet will boot to the main screen when the next time it is turned on.
User’s Manual |
12 |
Getting Started & Grand Tour
1.If you have entered data, either save it to flash memory or to other storage media.
■Press the Power button for 2 seconds and select OK to turn off the tablet.
■Never turn off the power while an application is running. Doing so could
cause loss of data.
■Never turn off the power, disconnect an external storage device or remove storage media during data read/write. Doing so can cause data loss.
■In any emergency case, you can also press the power button for about six seconds to force power off.
2.Turn off any peripheral devices connected to the TOSHIBA AT100 tablet.
Do not turn the tablet or peripheral devices back on immediately - wait a short period to avoid any potential damage.
Turning the LCD off/on
You can turn the LCD off (while the system is still on) in one of the following ways:
■Press the power button.
■Set the screen timeout in the Settings. To turn the LCD on:
■Press the power button again.
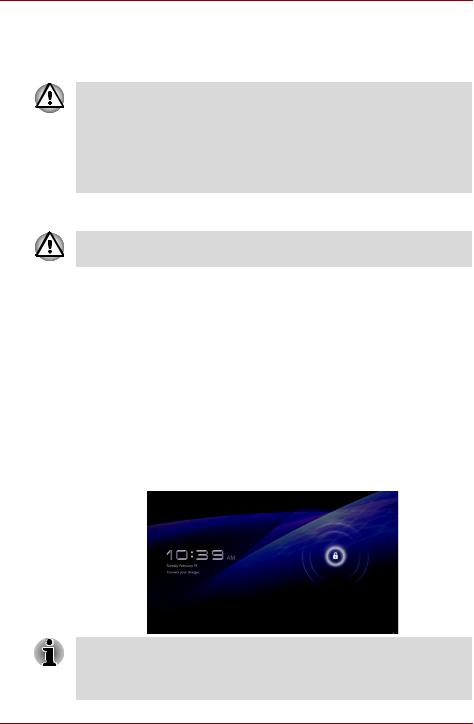
Unlocking your screen
After turning on the LCD, the screen remains locked. You can unlock the screen in the following ways:
1.Tap and hold the unlock icon (  ).
).
2.Slide the icon towards the appearing circle.
If you have set up a screen lock through one of the three ways as pattern, PIN or password, the method of unlocking the screen will be different. See Location & security section for other ways to protect your tablet and privacy.
User’s Manual |
13 |
Getting Started & Grand Tour
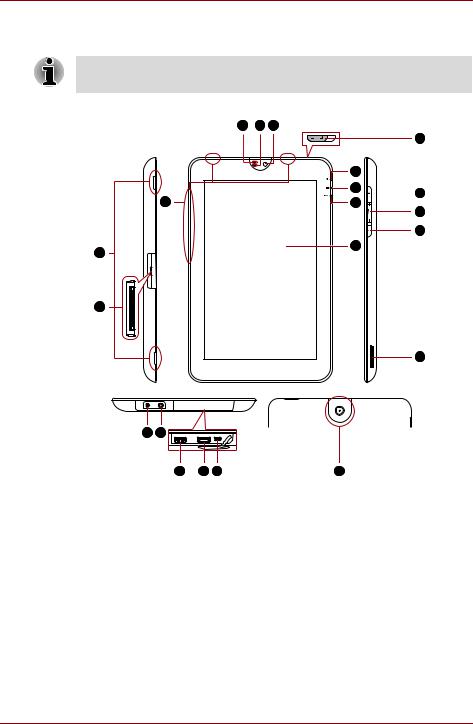
Grand Tour
Please handle your product carefully to avoid scratching or damaging the surface.
The following figure shows the grand tour of your tablet.
1 |
2 |
3 |
|
|
|
|
5 |
|
|
6 |
|
|
|
7 |
10 |
4 |
|
8 |
|
|
11 |
||
|
|
|
|
|
|
|
12 |
21 |
|
9 |
|
|
|
|
20
13
|
19 |
18 |
|
|
|
|
|
|
17 |
16 |
15 |
|
14 |
1. |
Web Camera LED |
|
|
12. |
Orientation lock switch |
|
2. |
Microphone |
|
|
|
13. |
Memory media slot |
3. |
Web Camera (front) |
|
|
14. |
Web Camera (back) |
|
4. |
Wireless LAN, 3G* and Bluetooth |
15. |
Mini USB port |
|||
antennas (not shown) |
|
|
|
|
||
5. |
Battery cover lock |
|
|
16. |
HDMI port |
|
6. |
Power indicator |
|
|
17. |
Universal Serial Bus (USB) 2.0 port |
|
7. |
Battery indicator |
|
|
18. |
Headphone/Microphone combo jack |
|
8. |
Wi-Fi/3G indicator |
|
|
19. |
DC IN 19V jack |
|
9. |
Display screen |
|
|
20. |
Docking interface |
|
10. Power button |
|
|
|
21. |
Speakers |
|
11. Volume down/up buttons |
|
|
|
|||
*Provided with some models. |
|
|
|
|
||
|
|
(Sample Illustration) |
Grand tour of the tablet |
|||
User’s Manual |
14 |
|
|
|
|
|
|
|
Getting Started & Grand Tour |
|
|
|
|
|
|
|
|
|
|
|
|
|
|
|
|
|
|
|
|
|
|
Web Camera LED |
The Web Camera LED will glow blue when the |
|
|
|
|
|
|
|
Web Camera is in operation. |
|
|
|
|
|
|
|
|
|
|
|
|
|
|
Microphone |
A built-in microphone allows you to import and |
|
|
|
|
|
|
|
record sounds for your application. |
|
|
|
|
|
|
|
|
|
|
|
|
|
|
Web Camera |
Your tablet is equipped with a front Web Camera |
|
|
|
|
|
|
|
and a back Web Camera used for recording |
|
|
|
|
|
|
|
video or taking photographs with your tablet. |
|
|
|
|
|
|
|
|
|
|
|
|
|
|
Wireless LAN |
Some models are equipped with Wireless LAN |
|
|
|
|
|
|
antennas |
antennas. |
|
|
|
|
|
|
|
|
|
|
|
|
|
|
Battery cover lock |
Slide this lock to the unlock ( ) position in |
|
|
|
|
|
|
|
order to remove the battery cover. |
|
|
|
|
|
|
|
|
|
|
|
|
|
|
Power indicator |
The Power indicator LED normally glows white |
|
|
|
|
|
|
||
|
|
|
|
|
|
|
when the tablet is turned on and the AC adaptor |
|
|
|
|
|
|
|
|
|
|
|
|
|
|
|
is connected. |
|
|
|
|
|
|
|
|
|
|
|
|
|
|
Battery indicator |
The Battery indicator shows the status of the |
|
|
|
|
|
|
|
battery's charge - white indicates the battery is |
|
|
|
|
|
|
|
fully charged while the power is being correctly |
|
|
|
|
|
|
|
supplied from the AC power adaptor. For details, |
|
|
|
|
|
|
|
please refer to Power conditions section. |
|
|
|
|
|
|
|
|
|
|
|
|
|
|
Wi-Fi/3G indicator |
This indicator glows amber when the |
|
|
|
|
|
|
|
communication function is used. |
|
|
|
|
|
|
|
|
|
|
|
|
|
|
Display screen |
Display screen brightness can be adjusted in the |
|
|
|
|
|
|
|
Screen settings. |
|
|
|
|
|
|
|
|
|
|
|
|
|
|
3G antennas |
Some models are equipped with the 3G |
|
|
|
|
|
|
|
antennas. |
|
|
|
|
|
|
|
|
|
|
|
|
|
|
Bluetooth antenna |
Some models are equipped with a Bluetooth |
|
|
|
|
|
|
|
antenna. |
|
|
|
|
|
|
|
|
|
|
|
|
|
|
Power button |
Press this button to turn the tablet's power on |
|
|
|
|
|
|
||
|
|
|
|
|
|
|
and off. |
|
|
|
|
|
|
|
|
|
|
|
|
|
|
|
|
|
|
|
|
|
|
Volume down/up |
Press these buttons to increase or decrease the |
|
|
|
|
|
|
buttons |
volume. |
|
|
|
|
|
|
|
|
User’s Manual |
15 |
Getting Started & Grand Tour
Orientation lock switch Switch to lock/unlock automatic rotation of the screen orientation.
Memory media slot This slot lets you insert an SD™/SDHC™/SDXC™ memory card, a miniSD™/microSD™ Card and a MultiMediaCard.
Please refer to the Memory media slot section in "Hardware & Options Operation" chapter for details.
Keep foreign metal objects, such as screws, staples and paper clips, out of the memory media slot. Foreign metal objects can create a short circuit, which can cause damage and fire, possibly resulting in serious injury.
|
|
Mini USB port |
Mini USB port allows you to connect this tablet to |
|
|
|
your computer, which can be used to transfer |
|
|
|
files. |
|
|
|
Please refer to the Mini USB port section in |
|
|
|
"Hardware & Options Operation" chapter for |
|
|
|
details. |
|
|
|
|
|
|
HDMI port |
HDMI port can connect with Type A connector |
|
|
||
|
|
|
HDMI cable. |
|
|
|
|
|
|
|
You can send video and audio signals via HDMI |
|
|
|
cable. In addition to this, you can send and |
|
|
|
receive control signals via it. |
|
|
|
Please refer to the HDMI device section in |
|
|
|
"Hardware & Options Operation" chapter for |
|
|
|
details. |
Universal Serial Bus One Universal Serial Bus port, which complies to
(USB 2.0) port |
the USB 2.0 standard, is provided. |
|
Please refer to the USB device section in |
|
"Hardware & Options Operation" chapter for |
|
details. |
|
|
Keep foreign metal objects, such as screws, staples and paper clips, out of the USB port. Foreign metal objects can create a short circuit, which can cause damage and fire, possibly resulting in serious injury.
Please note that it is not possible to confirm the operation of all functions of all USB devices that are available. In view of this it may be noted that some functions associated with a specific device might not operate properly.
User’s Manual |
16 |
|
|
|
|
|
|
Getting Started & Grand Tour |
|
|
|
|
|
|
|
|
|
|
|
|
|
|
|
|
|
|
|
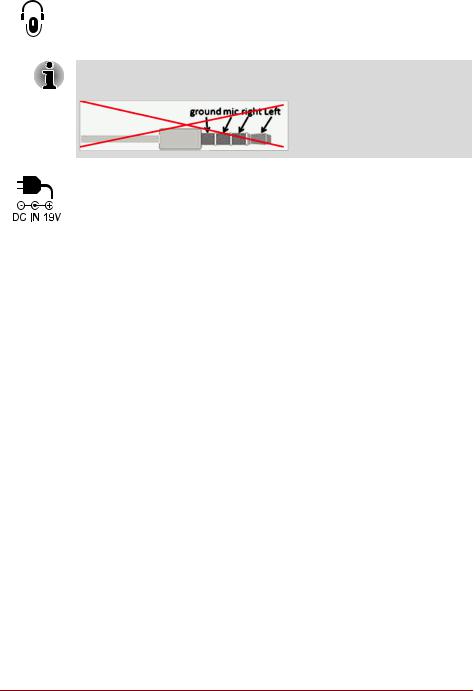
Headphone/ |
A 3.5 mm mini headphone/microphone combo |
|
|
|
|
|
Microphone combo jack enables connection of a monaural |
|
|
|
|
|
|
jack |
microphone or a stereo headphone. |
|
|
|
|
|
|
|
Both the internal and external microphones will be disabled if you use a headset other than a 4-pin headset headphone.
|
|
|
|
|
|
|
|
DC IN 19V jack |
The AC adaptor connects to this jack in order to |
||
|
|
power the tablet and charge its internal batteries. |
|
|
|
Please note that you should only use the model |
|
|
|
of AC adaptor supplied with the tablet at the time |
|
|
|
of purchase - using the wrong AC adaptor can |
|
|
|
cause damage to the tablet. |
|
|
|
||
Docking interface |
The interface enables the connection of an |
||
|
|
optional dock described in Hardware & Options |
|
|
|
Operation chapter. |
|
|
|
||
Speakers |
The speakers emit sound generated by your |
||
|
|
software as well as audio alarms, such as low |
|
|
|
battery condition, generated by the system. |
|
|
|
|
|
User’s Manual |
17 |

Getting Started & Grand Tour
Power conditions
The tablet's operating capability and battery charge status are affected by different power conditions, including whether an AC adaptor is connected, whether a battery pack is installed and what the charge level is for that battery.
The LED in the table below refers to the Battery indicator.
|
|
Power on |
Power off |
|
|
|
|
(no operation) |
|
|
|
|
|
|
AC |
Remaining |
• LED: off |
|
|
adaptor |
battery capacity is |
|
|
|
not |
above low battery |
|
|
|
connected |
trigger point |
|
|
|
|
|
|
|
|
|
Remaining |
• LED: blink |
• LED: off |
|
|
battery capacity is |
amber |
||
|
|
|||
|
below low battery |
|
|
|
|
trigger point |
|
|
|
|
|
|
|
|
|
No battery |
• LED: off |
|
|
|
installed |
|
|
|
|
|
|
|
|
AC |
Battery fully |
• LED: white |
• LED: white |
|
adaptor |
charged |
|
|
|
connected |
|
|
|
|
Battery partially |
• LED: amber |
• LED: amber |
||
|
||||
|
charged |
|
|
|
|
|
|
|
|
|
No battery |
• LED: off |
• LED: off |
|
|
installed |
|
|
|
|
|
|
|
User’s Manual |
18 |

Basic Operations & Home screen
This chapter describes the basic operations of your tablet and the Home screen.
Using the Touch Screen
You can use your finger to manipulate icons, buttons, menu items, the onscreen keyboard, and other items on the touch screen.
■Tap
Simply tap your finger on the touch screen to act on items on the screen, such as application and settings icons, to type letters and symbols using the onscreen keyboard, or to tap onscreen buttons.
■Tap & hold
Tap & hold an item on the screen by tapping it and not lifting your finger until an action occurs. For example, to customize the Home screen, you tap an empty area on the Home screen until the screen settings utility launches.
■Drag
Tap & hold an item for a moment and then, without lifting your finger, move your finger on the screen until you reach the target position. You can drag items on the Home screen to reposition them.
■Swipe or slide
To swipe or slide, you quickly move your finger across the surface of the screen, without pausing when you first touch it (so you don’t drag an item instead). For example, you slide the screen up or down to scroll a list.
■Double tap
Tap quickly twice on a webpage, map or other screen to zoom.
■Pinch
In some apps (such as Browser and Gallery), you can zoom in/out by placing two fingers on the screen at once and pinching them together or spreading them apart.
User’s Manual |
19 |

Basic Operations & Home screen
Getting to know the HOME screen
The HOME screen is your starting point for using all the installed applications on your tablet. You can customize the HOME screen to display the widgets, application shortcuts, wallpapers and other shortcuts you prefer.
1 2
3
4
|
5 |
6 |
7 |
|
8 |
1. |
Apps menu |
|
5. |
Back |
|
2. |
Customize |
|
|
6. |
Home |
3. |
Widgets |
|
|
7. |
Recent apps |
4. |
Application shortcuts |
8. |
System bar |
||
|
(Sample Illustration) Home screen |
|
|
|
|
Item |
|
Description |
|
|
|
Customize |
|
Add widgets, apps, wallpapers, and more to your |
|
|
Home screen. |
|
|
|
Widgets |
|
Widgets show you the latest updates of |
|
|
applications. You can tap the widgets to open |
|
|
these applications. |
|
|
|
Application shortcuts |
|
Tap these icons on Home screen to open |
|
|
applications. |
|
|
|
Back |
|
Return to the previous screen. |
|
|
|
Home |
|
Return to the home screen. |
|
|
|
Recent apps |
|
See recent applications. |
|
|
|
User’s Manual |
20 |
|
|
Basic Operations & Home screen |
|
|
|
|
|
|
|
Item |
Description |
|
|
|
|
System bar |
Show app notifications, tablet status and quick |
|
|
settings. |
|
|
|
|
Apps menu |
See all your tablet’s apps. |
|
|
|
■Slide to see more Home screen panels.
■Use panels to organize your widgets and shortcuts. See Customizing the Home screen section for the details.
■To return to the center panel, tap Home button.
Apps menu
Tap the |
icon at the upper right corner of Home screen to open Apps |
menu. |
|
You can find all your apps in this place.
To manage your apps, tap Settings → Applications → Manage applications.
Opening and switching applications
The Apps menu, which you can open from the Home screen, holds icons for all the applications on your tablet.
■Tap My apps tab on the top of Apps menu screen to view applications that you downloaded and installed.
Opening an application
You may open any application by:
■Tapping an application icon on the Home screen
■Tapping an application icon from the Apps menu.
Switch to a recently used application
You may switch to recently used application by:
■Tapping Recent apps icon ( ), and select the application that you want to switch.
Monitoring your tablet’s status
The status bar appears on the bottom of every screen. It displays time and icons indicating that you have received notifications and icons indicating the tablet’s status, along with the current time.
User’s Manual |
21 |

Basic Operations & Home screen
Status icons
The icons on the right of the status bar indicate the status of your tablet.
Notification icons
The icons on the left of the status bar indicate different types of notifications. In addition to system notification icons, applications you installed on your tablet may use their own notification icons.
Quick Settings
You can use Quick Settings to change settings, such as Airplane mode, Wi-Fi, Lock screen orientation, Brightness, Notifications. Double tap the status bar to open Quick Settings screen, and tap the area outside of the Quick Settings screen to close it.
■Airplane mode
Turn on airplane mode to disable all wireless radios.
■Wi-Fi
Tap to open Wi-Fi Setting screen.
■Lock screen orientation
Turn on this option to lock screen orientation as you turn your tablet sideways.
■Brightness
Set the brightness of display. You can also tap Auto to adjust brightness automatically.
■Notifications
Turn on this option to show notification on system bar.
■Settings
Tap this option to open Settings screen.
Managing Notifications
Notification icons report the arrival of new messages, calendar events, and alarms, as well as ongoing events.
When you receive a notification, its icon appears in the status bar, along with a summary that appears only briefly.
You can open the Notifications panel to view a list of all your notifications. Depending on your settings and the model of your tablet, you may also hear a notification sound.
Adjusting sound volume and other general notifications settings is described in the Sound settings in "Settings" chapter.
Applications that produce notifications, such as Email, have their own settings, which you can use to configure whether and how they send notifications. See the sections on those applications for details.
User’s Manual |
22 |

Basic Operations & Home screen
Opening the Notifications panel
Tap the status bar to open the notifications panel. The notifications panel displays a list of your current notifications. Notifications about ongoing activities are listed first, followed by notifications about events, such as a new mail notifications.
Responding to a notification
To respond to a notification, follow the below steps:
1.Open the notifications panel.
Your current notifications are listed in the panel, each with a brief description.
2.Tap a notification to respond to it.
The notifications panel closes. What happens next depends on the notification.
Closing the Notifications panel
Tap the area out of the notifications panel to close the notifications panel.
Locking your screen
You can lock your screen so that only you can unlock it to access your data, run applications and so on. See Location & security section for other ways to protect your tablet and privacy.
Locking your screen with a Pattern lock
For example, you can use a Pattern lock to lock your screen with following steps.
1.Open the Location & security settings by tapping the Apps → Settings → Location & security.
2.Tap Configure lock screen → Pattern.
The first time you open it, a short tutorial about creating an unlock pattern will appear. Then you’re prompted to draw and redraw your own pattern. Follow the onscreen instructions to finish the creation.
The next time you turn on your tablet or wake up the screen, you will be prompted to draw your unlock pattern to unlock the screen.
Customizing the Home screen
You can add application icons, shortcuts, widgets and other items to any part of the Home screen. You can also change the wallpaper.
User’s Manual |
23 |

Basic Operations & Home screen
Adding an item to the Home screen
To add an item to the Home screen, follow the steps listed below:
1.Tap the  icon at the upper right corner of the home screen.
2.Tap a tab of Widgets, App shortcuts, Wallpapers or More.
3.Drag the Widgets, shortcuts, or other items to the Home screen panel you want.
■ You can also tap Widgets, shortcuts to add them to current Home screen panel.
■The amount of Widgets you can add depends on the size of Widgets.
■Widgets
Add any of a variety of miniature applications (widgets) to your Home screen, including an analog clock, a music player, and a picture frame. You can also download widgets from other websites.
■ App shortcuts
Add shortcuts to applications you have installed.
■ Wallpapers
Add a wallpaper you like or change the wallpaper for your Home screen from the Gallery, Live Wallpapers or Wallpapers.
■ More
Add shortcuts to bookmarks, contacts, playlists and so on. You can also add items to the Home screen by following ways:
■Tap and hold an empty area of the Home screen.
■Tap and hold an app shortcut on Apps menu, and drag it to the Home screen panel you want.
Moving an item on the Home screen
To move an item on the Home screen, follow the steps below:
1.Tap and hold the item you want to move until its icon is magnified. Don’t lift your finger from the screen.
2.Drag the item to a new location on the screen.
It will pause at the left or right edge of the screen to drag the item onto extended Home screen.
3.When the item is at where you want it, lift your finger.
Removing an item from the Home screen
To remove an item from the Home screen, follow the steps below:
1.Tap and hold the item you want to remove until its icon is magnified. A Trash bin icon appears on the top right corner.
2.Drag the item to the Trash bin icon.
3.When the icon glows red, lift your finger.
User’s Manual |
24 |
Basic Operations & Home screen
Changing the Screen Orientation
You can change the screen orientation to Portrait mode by rotating the tablet sideways. The screen orientation automatically changes according to the rotation angle detected.
You can also lock the auto rotation and use the tablet always in Portrait or Landscape mode. These settings can be performed in the Screen settings. Please refer to Screen section for details.
In the Portrait mode, some drivers/utilities may not perform install and uninstall operation. If it occurs, switch to the Landscape mode to proceed.
Managing Tasks and Applications
You can manage some of the running applications, please follow the steps below:
1.Tap Apps → Settings → Applications → Manage applications.
2.Tap an item you want to manage from Downloaded/Running/All tab.
Please refer to Applications in Settings section for details.
You can close an item by tapping Force stop, or remove an item by tapping Uninstall.
In order to improve the performance of your tablet, close some of the running applications.
Factory Reset
The tablet provides you with the function to reset it. Before executing this function, you need to backup the system settings, application settings, user installed applications and data in the internal storage.
To perform the factory data reset, please follow the steps below:
1.Tap Apps → Settings → Privacy → Factory data reset → Reset tablet → Erase everything.
2.The factory data reset will be done.
■Please note that the following data will be erased:
■System settings and application settings
■User installed applications
■Internal storage files, such as music or photos
■Data in the removable media will not be erased.
User’s Manual |
25 |
Connecting to networks
Your tablet can connect to a variety of networks and devices, mobile networks for voice and data transmission, Wi-Fi data networks and Bluetooth devices, such as headsets. This chapter will describe how to connect to different networks.
Connecting to mobile networks
This section only applies to models with 3G modules.
When you assemble your tablet with a SIM card from your wireless service provider, your tablet is configured to use your provider’s mobile networks for transmitting data.
Your tablet is configured to work with many mobile carriers’ networks. If your tablet does not connect to a network when you insert a SIM card and turn it on, contact your carrier to obtain the details of its access point name.
Disabling data when roaming
1.Open the Settings screen.
2.Tap Wireless & networks → Mobile networks, and uncheck Data roaming.
With Data roaming unchecked, you can still transmit data with a Wi-Fi connection.
Editing or creating a new access point
If you and your wireless service provider determine that you need to change the settings of your current access point name (APN) or to create a new one, you must obtain the APN and detailed settings from your provider.
1.Open the Settings screen.
2.Tap Wireless & networks → Mobile networks → Access Point Names.
3.Tap an existing APN to edit it, or tap New APN to create a new one. Enter the APN settings that you obtained from your wireless service provider by tapping each setting that you need to edit.
4.When you finished, tap Save.
If you have created a new APN, tap it in the APNs screen to start using it.
User’s Manual |
26 |
Loading...