


User’s Manual
PORTÉGÉ M700/M710

Table of Contents
Copyright. . . . . . . . . . . . . . . . . . . . . . . . . . . . . . . . . . . . . . . . . . . . . . . . . vi Disclaimer . . . . . . . . . . . . . . . . . . . . . . . . . . . . . . . . . . . . . . . . . . . . . . . . vi Trademarks . . . . . . . . . . . . . . . . . . . . . . . . . . . . . . . . . . . . . . . . . . . . . . . vi FCC information . . . . . . . . . . . . . . . . . . . . . . . . . . . . . . . . . . . . . . . . . . . vii EU Conformity Statement . . . . . . . . . . . . . . . . . . . . . . . . . . . . . . . . . . viii VCCI Class B Information . . . . . . . . . . . . . . . . . . . . . . . . . . . . . . . . . . viii Modem warning notice. . . . . . . . . . . . . . . . . . . . . . . . . . . . . . . . . . . . . viii Japan regulations . . . . . . . . . . . . . . . . . . . . . . . . . . . . . . . . . . . . . . . . . . ix Instructions for IC CS-03 certified equipment . . . . . . . . . . . . . . . . . . . xii Notes for Users in Australia and New Zealand . . . . . . . . . . . . . . . . . xiii Following information is only for EU-member states: . . . . . . . . . . . xvi Description on Laser specification. . . . . . . . . . . . . . . . . . . . . . . . . . . xvi
Preface
Conventions . . . . . . . . . . . . . . . . . . . . . . . . . . . . . . . . . . . . . . . . . . . . . xvii
General Precautions
Creating a computer-friendly environment . . . . . . . . . . . . . . . . . . . . . xx Stress injury . . . . . . . . . . . . . . . . . . . . . . . . . . . . . . . . . . . . . . . . . . . . . . xx Heat injury . . . . . . . . . . . . . . . . . . . . . . . . . . . . . . . . . . . . . . . . . . . . . . . xxi Pressure or impact damage. . . . . . . . . . . . . . . . . . . . . . . . . . . . . . . . . xxi PC Card overheating . . . . . . . . . . . . . . . . . . . . . . . . . . . . . . . . . . . . . . xxi Mobile phones . . . . . . . . . . . . . . . . . . . . . . . . . . . . . . . . . . . . . . . . . . . xxi Instruction Manual for Safety and Comfort . . . . . . . . . . . . . . . . . . . . xxi
Chapter 1 Getting Started
Equipment checklist. . . . . . . . . . . . . . . . . . . . . . . . . . . . . . . . . . . . . . . 1-1 Getting Started . . . . . . . . . . . . . . . . . . . . . . . . . . . . . . . . . . . . . . . . . . . 1-3 System Recovery Options . . . . . . . . . . . . . . . . . . . . . . . . . . . . . . . . . 1-12 System Recovery . . . . . . . . . . . . . . . . . . . . . . . . . . . . . . . . . . . . . . . . 1-13
Chapter 2 The Grand Tour
Front with the display closed . . . . . . . . . . . . . . . . . . . . . . . . . . . . . . . 2-1 Left side . . . . . . . . . . . . . . . . . . . . . . . . . . . . . . . . . . . . . . . . . . . . . . . . . 2-3
User’s Manual |
ii |

PORTÉGÉ M700/M710
Right side . . . . . . . . . . . . . . . . . . . . . . . . . . . . . . . . . . . . . . . . . . . . . . . 2-4 Back . . . . . . . . . . . . . . . . . . . . . . . . . . . . . . . . . . . . . . . . . . . . . . . . . . . . 2-5 Underside . . . . . . . . . . . . . . . . . . . . . . . . . . . . . . . . . . . . . . . . . . . . . . . 2-7 Front with the display open. . . . . . . . . . . . . . . . . . . . . . . . . . . . . . . . . 2-9 Indicators . . . . . . . . . . . . . . . . . . . . . . . . . . . . . . . . . . . . . . . . . . . . . . 2-13 Optical disc drives . . . . . . . . . . . . . . . . . . . . . . . . . . . . . . . . . . . . . . . 2-15 AC adaptor . . . . . . . . . . . . . . . . . . . . . . . . . . . . . . . . . . . . . . . . . . . . . 2-17
Chapter 3 Hardware, Utilities and Options
Hardware . . . . . . . . . . . . . . . . . . . . . . . . . . . . . . . . . . . . . . . . . . . . . . . . 3-1 Special features . . . . . . . . . . . . . . . . . . . . . . . . . . . . . . . . . . . . . . . . . . 3-6 TOSHIBA Value Added Package . . . . . . . . . . . . . . . . . . . . . . . . . . . . . 3-9 TOSHIBA Tablet PC Extension . . . . . . . . . . . . . . . . . . . . . . . . . . . . . 3-10 Utilities and Applications. . . . . . . . . . . . . . . . . . . . . . . . . . . . . . . . . . 3-10 Optional devices. . . . . . . . . . . . . . . . . . . . . . . . . . . . . . . . . . . . . . . . . 3-14 Bridge media slot . . . . . . . . . . . . . . . . . . . . . . . . . . . . . . . . . . . . . . . . 3-18 Optional accessories . . . . . . . . . . . . . . . . . . . . . . . . . . . . . . . . . . . . . 3-45
Chapter 4 Operating Basics
Pointing Devices. . . . . . . . . . . . . . . . . . . . . . . . . . . . . . . . . . . . . . . . . . 4-1 Using the Tablet mode . . . . . . . . . . . . . . . . . . . . . . . . . . . . . . . . . . . . . 4-9 Using the Fingerprint Sensor . . . . . . . . . . . . . . . . . . . . . . . . . . . . . . 4-17 Web Camera . . . . . . . . . . . . . . . . . . . . . . . . . . . . . . . . . . . . . . . . . . . . 4-25 Changing Ultra Slim Bay modules . . . . . . . . . . . . . . . . . . . . . . . . . . 4-26 Using optical disc drives . . . . . . . . . . . . . . . . . . . . . . . . . . . . . . . . . . 4-29 Writing CD/DVDs on DVD Super Multi drives . . . . . . . . . . . . . . . . . 4-33 Media care . . . . . . . . . . . . . . . . . . . . . . . . . . . . . . . . . . . . . . . . . . . . . . 4-40 Sound System. . . . . . . . . . . . . . . . . . . . . . . . . . . . . . . . . . . . . . . . . . . 4-41 Modem . . . . . . . . . . . . . . . . . . . . . . . . . . . . . . . . . . . . . . . . . . . . . . . . . 4-43 Wireless communications . . . . . . . . . . . . . . . . . . . . . . . . . . . . . . . . . 4-47 LAN . . . . . . . . . . . . . . . . . . . . . . . . . . . . . . . . . . . . . . . . . . . . . . . . . . . 4-50 Computer Handling . . . . . . . . . . . . . . . . . . . . . . . . . . . . . . . . . . . . . . 4-52 Using the Hard Disk Drive (HDD) Protection . . . . . . . . . . . . . . . . . . 4-53 Heat dispersal . . . . . . . . . . . . . . . . . . . . . . . . . . . . . . . . . . . . . . . . . . . 4-55
Chapter 5 The Keyboard
Typewriter keys. . . . . . . . . . . . . . . . . . . . . . . . . . . . . . . . . . . . . . . . . . . 5-1 Function keys: F1 … F12 . . . . . . . . . . . . . . . . . . . . . . . . . . . . . . . . . . . 5-2 Soft keys: FN key combinations . . . . . . . . . . . . . . . . . . . . . . . . . . . . . 5-2 Hot keys. . . . . . . . . . . . . . . . . . . . . . . . . . . . . . . . . . . . . . . . . . . . . . . . . 5-3 Windows special keys . . . . . . . . . . . . . . . . . . . . . . . . . . . . . . . . . . . . . 5-5 Keypad overlay . . . . . . . . . . . . . . . . . . . . . . . . . . . . . . . . . . . . . . . . . . . 5-6 Generating ASCII characters. . . . . . . . . . . . . . . . . . . . . . . . . . . . . . . . 5-7
Chapter 6 Power and Power-Up Modes
Power conditions . . . . . . . . . . . . . . . . . . . . . . . . . . . . . . . . . . . . . . . . . 6-1 Monitoring of power condition . . . . . . . . . . . . . . . . . . . . . . . . . . . . . . 6-4
User’s Manual |
iii |

PORTÉGÉ M700/M710
|
Battery . . . . . . . . . . . . . . . . . . . . . . . . . . . . . . . . . . . . . . . . . . . . . . . . . |
. 6-5 |
|
TOSHIBA Password Utility. . . . . . . . . . . . . . . . . . . . . . . . . . . . . . . . . |
6-14 |
|
Tablet mode. . . . . . . . . . . . . . . . . . . . . . . . . . . . . . . . . . . . . . . . . . . . . |
6-18 |
|
Power-up modes. . . . . . . . . . . . . . . . . . . . . . . . . . . . . . . . . . . . . . . . . |
6-18 |
|
Panel power on/off . . . . . . . . . . . . . . . . . . . . . . . . . . . . . . . . . . . . . . . |
6-19 |
|
System Auto Off . . . . . . . . . . . . . . . . . . . . . . . . . . . . . . . . . . . . . . . . . |
6-19 |
Chapter 7 |
HW Setup & BIOS Setup |
|
|
Accessing HW Setup . . . . . . . . . . . . . . . . . . . . . . . . . . . . . . . . . . . . . |
. 7-1 |
|
HW Setup window . . . . . . . . . . . . . . . . . . . . . . . . . . . . . . . . . . . . . . . |
. 7-1 |
|
BIOS Setup Program . . . . . . . . . . . . . . . . . . . . . . . . . . . . . . . . . . . . . . |
7-8 |
Chapter 8 |
Troubleshooting |
|
|
Problem solving process. . . . . . . . . . . . . . . . . . . . . . . . . . . . . . . . . . . |
8-1 |
|
Hardware and system checklist . . . . . . . . . . . . . . . . . . . . . . . . . . . . . |
8-3 |
|
TOSHIBA support . . . . . . . . . . . . . . . . . . . . . . . . . . . . . . . . . . . . . . . . |
8-26 |
Appendix A |
Specifications |
|
|
Physical Dimensions . . . . . . . . . . . . . . . . . . . . . . . . . . . . . . . . . . . . . . |
A-1 |
|
Environmental Requirements . . . . . . . . . . . . . . . . . . . . . . . . . . . . . . . |
A-1 |
Appendix B |
Display Controller and Video mode |
|
|
Display controller . . . . . . . . . . . . . . . . . . . . . . . . . . . . . . . . . . . . . . . . . |
B-1 |
|
Video mode . . . . . . . . . . . . . . . . . . . . . . . . . . . . . . . . . . . . . . . . . . . . . . |
B-1 |
Appendix C |
AT Commands |
|
Appendix D |
S-registers |
|
|
S-register values. . . . . . . . . . . . . . . . . . . . . . . . . . . . . . . . . . . . . . . . . . |
D-1 |
|
AT command set result codes. . . . . . . . . . . . . . . . . . . . . . . . . . . . . . . |
D-5 |
Appendix E |
V.90 |
|
|
V.90 mode . . . . . . . . . . . . . . . . . . . . . . . . . . . . . . . . . . . . . . . . . . . . . . . |
E-1 |
|
AT Command. . . . . . . . . . . . . . . . . . . . . . . . . . . . . . . . . . . . . . . . . . . . . |
E-3 |
Appendix F |
Wireless LAN |
|
|
Card Specifications . . . . . . . . . . . . . . . . . . . . . . . . . . . . . . . . . . . . . . . |
F-1 |
|
Radio Characteristics. . . . . . . . . . . . . . . . . . . . . . . . . . . . . . . . . . . . . . |
F-2 |
|
Supported Frequency Sub-bands. . . . . . . . . . . . . . . . . . . . . . . . . . . . |
F-3 |
Appendix G |
Intel® Matrix Storage Manager |
|
|
Manually Setting up Windows (Windows Vista®) . . . . . . . . . . . . . . . |
G-1 |
|
Manually Setting up Windows Manually (Windows XP) . . . . . . . . . . |
G-2 |
|
How to install Intel® Matrix Storage Manager on Windows XP or |
|
|
Windows Vista®: . . . . . . . . . . . . . . . . . . . . . . . . . . . . . . . . . . . . . . . . . . |
G-3 |
Appendix H |
Bluetooth wireless technology Interoperability |
|
|
Bluetooth wireless technology and your Health . . . . . . . . . . . . . . . . |
H-3 |
|
Regulatory statements . . . . . . . . . . . . . . . . . . . . . . . . . . . . . . . . . . . . . |
H-3 |
|
Using Bluetooth™ Adaptor from TOSHIBA equipment in Japan. . . |
H-6 |
User’s Manual |
iv |

PORTÉGÉ M700/M710
Appendix I AC Power Cord and Connectors
Certification agencies . . . . . . . . . . . . . . . . . . . . . . . . . . . . . . . . . . . . . . I-1
Appendix J TOSHIBA Anti-theft Protection Timer
Appendix K Legal Footnotes
Non-applicable Icons*1 . . . . . . . . . . . . . . . . . . . . . . . . . . . . . . . . . . . . K-1
CPU*2. . . . . . . . . . . . . . . . . . . . . . . . . . . . . . . . . . . . . . . . . . . . . . . . . . . K-1
Memory (Main System)*3 . . . . . . . . . . . . . . . . . . . . . . . . . . . . . . . . . . . K-2
Battery Life*4 . . . . . . . . . . . . . . . . . . . . . . . . . . . . . . . . . . . . . . . . . . . . K-3
Hard Disk Drive (HDD) Capacity*5 . . . . . . . . . . . . . . . . . . . . . . . . . . . K-3
LCD*6. . . . . . . . . . . . . . . . . . . . . . . . . . . . . . . . . . . . . . . . . . . . . . . . . . . K-3
Graphics Processor Unit ("GPU")*7 . . . . . . . . . . . . . . . . . . . . . . . . . . K-3
Wireless LAN*8 . . . . . . . . . . . . . . . . . . . . . . . . . . . . . . . . . . . . . . . . . . . K-4
Copy Protection*9 . . . . . . . . . . . . . . . . . . . . . . . . . . . . . . . . . . . . . . . . K-4
Images*10 . . . . . . . . . . . . . . . . . . . . . . . . . . . . . . . . . . . . . . . . . . . . . . . K-4
Glossary
Index
User’s Manual |
v |

PORTÉGÉ M700/M710
Copyright
© 2007 by TOSHIBA Corporation. All rights reserved. Under the copyright laws, this manual cannot be reproduced in any form without the prior written permission of TOSHIBA. No patent liability is assumed, with respect to the use of the information contained herein.
TOSHIBA PORTÉGÉ M700/M710 Portable Personal Computer User’s Manual
First edition November 2007
Copyright authority for music, movies, computer programs, databases and other intellectual property covered by copyright laws belongs to the author or to the copyright owner. Copyrighted material can be reproduced only for personal use or use within the home. Any other use beyond that stipulated above (including conversion to digital format, alteration, transfer of copied material and distribution on a network) without the permission of the copyright owner is a violation of copyright or author's rights and is subject to civil damages or criminal action. Please comply with copyright laws in making any reproduction from this manual.
Disclaimer
This manual has been validated and reviewed for accuracy. The instructions and descriptions it contains are accurate for the TOSHIBA PORTÉGÉ M700/M710 Portable Personal Computer at the time of this manual’s production. However, succeeding computers and manuals are subject to change without notice. TOSHIBA assumes no liability for damages incurred directly or indirectly from errors, omissions or discrepancies between the computer and the manual.
Trademarks
IBM is a registered trademark and IBM PC is a trademark of International Business Machines Corporation.
Intel, Intel SpeedStep, Intel Core and Centrino are trademarks or registered trademarks of Intel Corporation.
Windows, Microsoft and Windows Vista are registered trademarks of Microsoft Corporation.
Bluetooth is a trademark owned by its proprietor and used by TOSHIBA under license.
InterVideo and WinDVD are registered trademarks of InterVideo Inc. Photo CD is a trademark of Eastman Kodak.
Memory Stick and i.LINK are trademark and registered trademark of Sony Corporation.
Other trademarks and registered trademarks not listed above may be used in this manual.
User’s Manual |
vi |

PORTÉGÉ M700/M710
FCC information
FCC notice "Declaration of Conformity Information"
This equipment has been tested and found to comply with the limits for a Class B digital device, pursuant to part 15 of the FCC rules. These limits are designed to provide reasonable protection against harmful interference in a residential installation. This equipment generates, uses and can radiate radio frequency energy and, if not installed and used in accordance with the instructions, may cause harmful interference to radio communications. However, there is no guarantee that interference will not occur in a particular installation. If this equipment does cause harmful interference to radio or television reception, which can be determined by turning the equipment off and on, the user is encouraged to try to correct the interference by one or more of the following measures:
■Reorient or relocate the receiving antenna.
■Increase the separation between the equipment and receiver.
■Connect the equipment into an outlet on a circuit different from that to which the receiver is connected.
■Consult the dealer or an experienced radio/TV technician for help.
Only peripherals complying with the FCC class B limits may be attached to this equipment. Operation with non-compliant peripherals or peripherals not recommended by TOSHIBA is likely to result in interference to radio and TV reception. Shielded cables must be used between the external devices and the computer’s external monitor port, Universal Serial Bus (USB 2.0) ports, i.LINK (IEEE1394) port and microphone jack. Changes or modifications made to this equipment, not expressly approved by TOSHIBA or parties authorized by TOSHIBA could void the user’s authority to operate the equipment.
FCC conditions
This device complies with part 15 of the FCC Rules. Operation is subject to the following two conditions:
1.This device may not cause harmful interference.
2.This device must accept any interference received, including interference that may cause undesired operation.
Contact
Address: TOSHIBA America Information Systems, Inc.
9740 Irvine Boulevard
Irvine, California 92618-1697
Telephone: (949) 583-3000
User’s Manual |
vii |
PORTÉGÉ M700/M710
EU Conformity Statement
This product and - if applicable - the supplied accessories too are marked with "CE" and comply therefore with the applicable harmonized European standards listed under the Low Voltage Directive 2006/95/EC, the EMC Directive 2004/108/EC and/or R&TTE Directive 1999/5/EC.
Responsible for CE- |
TOSHIBA EUROPE GMBH, Hammfelddamm 8, |
marking: |
41460 Neuss, Germany. |
Manufacturer: |
Toshiba Corporation, 1-1 Shibaura 1-chome, |
|
Minato-ku, Tokyo, 105-8001, Japan |
The complete official EU CE Declaration can be obtained on following internet page:
http://epps.toshiba-teg.com/
VCCI Class B Information
Modem warning notice
This information is applicable to the models equipped with a built-in modem.
Conformity Statement
The equipment has been approved to [Commission Decision "CTR21"] for pan-European single terminal connection to the Public Switched Telephone Network (PSTN).
However, due to differences between the individual PSTNs provided in different countries/regions the approval does not, of itself, give an unconditional assurance of successful operation on every PSTN network termination point.
User’s Manual |
viii |

PORTÉGÉ M700/M710
In the event of problems, you should contact your equipment supplier in the first instance.
Network Compatibility Statement
This product is designed to work with, and is compatible with the following networks. It has been tested to and found to conform with the additional requirements conditional in EG 201 121.
Germany |
ATAAB AN005,AN006,AN007,AN009,AN010 |
|
and DE03,04,05,08,09,12,14,17 |
Greece |
ATAAB AN005,AN006 and GR01,02,03,04 |
Portugal |
ATAAB AN001,005,006,007,011 and |
|
P03,04,08,10 |
Spain |
ATAAB AN005,007,012, and ES01 |
Switzerland |
ATAAB AN002 |
All other countries/regions ATAAB AN003,004
Specific switch settings or software setup are required for each network, please refer to the relevant sections of the user guide for more details.
The hookflash (timed break register recall) function is subject to separate national type approvals. It has not been tested for conformity to national type regulations, and no guarantee of successful operation of that specific function on specific national networks can be given.
Japan regulations
Region selection
If you are using the computer in Japan, technical regulations described in the Telecommunications Business Law require that you select the Japan region mode. It is illegal to use the modem in Japan with any other selection.
Redial
Up to two redial attempts can be made. If more than two redial attempts are made, the modem will return Black Listed. If you are experiencing problems with the Black Listed code, set the interval between redials at one minute or longer.
Japan’s Telecommunications Business Law permits up to two redials on analogue telephones, but the redials must be made within a total of three minutes.
The internal modem is approved by Japan Approvals Institute for Telecommunications Equipment.
A05-0413001
User’s Manual |
ix |
PORTÉGÉ M700/M710
This label is located on the module.
Pursuant to FCC CFR 47, Part 68:
When you are ready to install or use the modem, call your local telephone company and give them the following information:
■The telephone number of the line to which you will connect the modem
■The registration number that is located on the device
The FCC registration number of the modem will be found on either the device which is to be installed, or, if already installed, on the bottom of the computer outside of the main system label.
■The Ringer Equivalence Number (REN) of the modem, which can vary. For the REN of your modem, refer to your modem’s label.
The modem connects to the telephone line by means of a standard jack called the USOC RJ11C.
Type of service
Your modem is designed to be used on standard-device telephone lines. Connection to telephone company-provided coin service (central office implemented systems) is prohibited. Connection to party lines service is subject to state tariffs. If you have any questions about your telephone line, such as how many pieces of equipment you can connect to it, the telephone company will provide this information upon request.
User’s Manual |
x |
PORTÉGÉ M700/M710
Telephone company procedures
The goal of the telephone company is to provide you with the best service it can. In order to do this, it may occasionally be necessary for them to make changes in their equipment, operations, or procedures. If these changes might affect your service or the operation of your equipment, the telephone company will give you notice in writing to allow you to make any changes necessary to maintain uninterrupted service.
If problems arise
If any of your telephone equipment is not operating properly, you should immediately remove it from your telephone line, as it may cause harm to the telephone network. If the telephone company notes a problem, they may temporarily discontinue service. When practical, they will notify you in advance of this disconnection. If advance notice is not feasible, you will be notified as soon as possible. When you are notified, you will be given the opportunity to correct the problem and informed of your right to file a complaint with the FCC. In the event repairs are ever needed on your modem, they should be performed by TOSHIBA Corporation or an authorized representative of TOSHIBA Corporation.
Disconnection
If you should ever decide to permanently disconnect your modem from its present line, please call the telephone company and let them know of this change.
Fax branding
The Telephone Consumer Protection Act of 1991 makes it unlawful for any person to use a computer or other electronic device to send any message via a telephone fax machine unless such message clearly contains in a margin at the top or bottom of each transmitted page or on the first page of the transmission, the date and time it is sent and an identification of the business, other entity or individual sending the message and the telephone number of the sending machine or such business, other entity or individual. In order to program this information into your fax modem, you should complete the setup of your fax software before sending messages.
User’s Manual |
xi |
PORTÉGÉ M700/M710
Instructions for IC CS-03 certified equipment
1.The Industry Canada label identifies certified equipment. This certification means that the equipment meets certain telecommunications network protective, operational and safety requirements as prescribed in the appropriate Terminal Equipment Technical Requirements document(s). The Department does not guarantee the equipment will operate to the user’s satisfaction.
Before installing this equipment, users should ensure that it is permissible to be connected to the facilities of the local telecommunications company. The equipment must also be installed using an acceptable method of connection.
The customer should be aware that compliance with the above conditions may not prevent degradation of service in some situations. Repairs to certified equipment should be coordinated by a representative designated by the supplier. Any repairs or alterations made by the user to this equipment, or equipment malfunctions, may give the telecommunications company cause to request the user to disconnect the equipment.
Users should ensure for their own protection that the electrical ground connections of the power utility, telephone lines and internal metallic water pipe systems, if present, are connected together. This precaution may be particularly important in rural areas.
Users should not attempt to make such connections themselves, but should contact the appropriate electric inspection authority, or electrician, as appropriate.
2.The user manual of analog equipment must contain the equipment’s Ringer Equivalence Number (REN) and an explanation notice similar to the following:
The Ringer Equivalence Number (REN) of the modem, which can vary. For the REN of your modem, refer to your modem’s label.
The Ringer Equivalence Number (REN) assigned to each terminal device provides an indication of the maximum number of terminals allowed to be connected to a telephone interface. The termination on an interface may consist of any combination of devices subject only to the requirement that the sum of the Ringer Equivalence Numbers of all the devices does not exceed 5.
3.The standard connecting arrangement (telephone jack type) for this equipment is jack type(s): USOC RJ11C.
The IC registration number of the modem is shown below.
Canada: 4005B-DELPHI
User’s Manual |
xii |

PORTÉGÉ M700/M710
Notes for Users in Australia and New Zealand
Modem warning notice for Australia
Modems connected to the Australian telecoms network must have a valid Austel permit. This modem has been designed to specifically configure to ensure compliance with Austel standards when the country/region selection is set to Australia. The use of other country/region setting while the modem is attached to the Australian PSTN would result in you modem being operated in a non-compliant manner. To verify that the country/region is correctly set, enter the command ATI which displays the currently active setting.
To set the country/region permanently to Australia, enter the following command sequence:
AT%TE=1
ATS133=1
AT&F
AT&W
AT%TE=0 ATZ
Failure to set the modem to the Australia country/region setting as shown above will result in the modem being operated in a non-compliant manner. Consequently, there would be no permit in force for this equipment and the Telecoms Act 1991 prescribes a penalty of $12,000 for the connection of non-permitted equipment.
Notes for use of this device in New Zealand
■The grant of a Telepermit for a device in no way indicates Telecom acceptance of responsibility for the correct operation of that device under all operating conditions. In particular the higher speeds at which this modem is capable of operating depend on a specific network implementation which is only one of many ways of delivering high quality voice telephony to customers. Failure to operate should not be reported as a fault to Telecom.
■In addition to satisfactory line conditions a modem can only work properly if:
a/ it is compatible with the modem at the other end of the call and.
b/ the application using the modem is compatible with the application at the other end of the call - e.g., accessing the Internet requires suitable software in addition to a modem.
■This equipment shall not be used in any manner which could constitute a nuisance to other Telecom customers.
User’s Manual |
xiii |

PORTÉGÉ M700/M710
■Some parameters required for compliance with Telecom’s PTC Specifications are dependent on the equipment (PC) associated with this modem. The associated equipment shall be set to operate within the following limits for compliance with Telecom Specifications:
a/ There shall be no more than 10 call attempts to the same number within any 30 minute period for any single manual call initiation, and
b/ The equipment shall go on-hook for a period of not less than 30 seconds between the end of one attempt and the beginning of the next.
c/ Automatic calls to different numbers shall be not less than 5 seconds apart.
■Immediately disconnect this equipment should it become physically damaged, and arrange for its disposal or repair.
■The correct settings for use with this modem in New Zealand are as follows:
ATB0 (CCITT operation) AT&G2 (1800 Hz guard tone)
AT&P1 (Decadic dialing make-break ratio =33%/67%) ATS0=0 (not auto answer)
ATS6=4 (Blind dial delay)
ATS7=less than 90 (Time to wait to carrier after dialing)
ATS10=less than 150 (loss of carrier to hangup delay, factory default of 15 recommended)
ATS11=90 (DTMF dialing on/off duration=90 ms)
ATX2 (Dial tone detect, but not (U.S.A.) call progress detect)
■When used in the Auto Answer mode, the S0 register must be set with a value of 3 or 4. This ensures:
■a person calling your modem will hear a short burst of ringing before the modem answers. This confirms that the call has been successfully switched through the network.
■caller identification information (which occurs between the first and second ring cadences) is not destroyed.
■The preferred method of dialing is to use DTMF tones (ATDT...) as this is faster and more reliable than pulse (decadic) dialing. If for some reason you must use decadic dialing, your communications program must be set up to record numbers using the following translation table as this modem does not implement the New Zealand “Reverse Dialing” standard.
Number to be dialed: 0 1 2 3 4 5 6 7 8 9
Number to program into computer: 0 9 8 7 6 5 4 3 2 1
Note that where DTMF dialing is used, the numbers should be entered normally.
User’s Manual |
xiv |

PORTÉGÉ M700/M710
■The transmit level from this device is set at a fixed level and because of this there may be circumstances where the performance is less than optimal. Before reporting such occurrences as faults, please check the line with a standard Telepermitted telephone, and only report a fault if the phone performance is impaired.
■It is recommended that this equipment be disconnected from the Telecom line during electrical storms.
■When relocating the equipment, always disconnect the Telecom line connection before the power connection, and reconnect the power first.
■This equipment may not be compatible with Telecom Distinctive Alert cadences and services such as FaxAbility.
NOTE THAT FAULT CALLOUTS CAUSED BY ANY OF THE ABOVE CAUSES MAY INCUR A CHARGE FROM TELECOM
General conditions
As required by PTC 100, please ensure that this office is advised of any changes to the specifications of these products which might affect compliance with the relevant PTC Specifications.
The grant of this Telepermit is specific to the above products with the marketing description as stated on the Telepermit label artwork. The Telepermit may not be assigned to other parties or other products without Telecom approval.
A Telepermit artwork for each device is included from which you may prepare any number of Telepermit labels subject to the general instructions on format, size and color on the attached sheet.
The Telepermit label must be displayed on the product at all times as proof to purchasers and service personnel that the product is able to be legitimately connected to the Telecom network.
The Telepermit label may also be shown on the packaging of the product and in the sales literature, as required in PTC 100.
The charge for a Telepermit assessment is $337.50. An additional charge of $337.50 is payable where an assessment is based on reports against non-Telecom New Zealand Specifications. $112.50 is charged for each variation when submitted at the same time as the original.
An invoice for $NZ1237.50 will be sent under separate cover.
User’s Manual |
xv |

PORTÉGÉ M700/M710
Following information is only for EU-member states:
The use of the symbol indicates that this product may not be treated as household waste. By ensuring this product is disposed of correctly, you will help prevent potential negative consequences for the environment and human health, which could otherwise be caused by inappropriate waste handling of this product. For more detailed information about recycling of this product, please contact your local city office, your household waste disposal service or the shop where you purchased the product.
This symbol may not stick depending on the country and region where you purchased.
Description on Laser specification
The optical disc drive such as DVD Super Multi drive that is used in this computer is equipped with laser. The classification label with the following sentence is affixed to the surface of the drive.
CLASS 1 LASER PRODUCT
LASER KLASSE 1
LUOKAN 1 LASERLAITE
APPAREIL A LASER DE CLASSE 1
KLASS 1 LASER APPARAT
The drive with the above label is certified by the manufacturer that the drive complies with the requirement for laser product on the date of manufacturing pursuant to article 21 of Code of Federal Regulations by the United States of America, Department of Health & Human Services, Food and Drug Administration.
In other countries, the drive is certified to comply with the requirement pursuant to IEC 60825-1 and EN 60825-1 on class 1 laser product.
This computer is equipped with the optical disc drive in the following list according to the model.
Manufacturer |
Type |
|
|
Panasonic |
UJ-852 |
|
|
Panasonic |
UJ-862 |
|
|
User’s Manual |
xvi |

Preface
Congratulations on your purchase of the PORTÉGÉ M700/M710 series computer. This powerful notebook computer provides excellent expansion capability, includes multimedia functionality, and is designed to provide years of reliable, high-performance computing.
This manual tells how to set up and begin using your PORTÉGÉ M700/M710 computer. It also provides detailed information on configuring your computer, basic operations and care, using optional devices and troubleshooting.
If you are a new user of computers or if you’re new to portable computing, first read over the Chapter 1, Getting Started and Chapter 3, Hardware, Utilities and Options chapters to familiarize yourself with the computer’s features, components and accessory devices. Then read Chapter 1, Getting Started for step-by-step instructions on setting up your computer.
If you are an experienced computer user, please continue reading the preface to learn how this manual is organized, then become acquainted with this manual by browsing through its pages. Be sure to read the Special features section in Chapter 3, Hardware, Utilities and Options to learn about features that are uncommon or unique to this computer, as well as the section on Chapter 7, HW Setup & BIOS Setup, to understand how to setup and configure these features.
Read Chapter 3, Hardware, Utilities and Options if connecting optional products or external devices.
Conventions
This manual uses the following formats to describe, identify, and highlight terms and operating procedures.
Abbreviations
On first appearance, and whenever necessary for clarity, abbreviations are enclosed in parentheses following their definition. For example: Read Only Memory (ROM). Acronyms are also defined in the Glossary.
User’s Manual |
xvii |

PORTÉGÉ M700/M710
Icons
Icons identify ports, dials, and other parts of your computer. The indicator panel also uses icons to identify the components it is providing information on.
Keys
The keyboard keys are used in the text to describe many computer operations. A distinctive typeface identifies the key top symbols as they appear on the keyboard. For example, ENTER identifies the ENTER key.
Key operation
Some operations require you to simultaneously use two or more keys. We identify such operations by the key top symbols separated by a plus sign
(+). For example, CTRL + C means you must hold down CRTL and at the same time press C. If three keys are used, hold down the first two and at the same time press the third.
ABC |
When procedures require an action such as |
|
clicking an icon or entering text, the icon's name |
||
|
||
|
or the text you are to type in is represented in the |
|
|
typeface you see to the left. |
|
Display |
|
|
S ABC |
Names of windows or icons or text generated by |
|
the computer that appear on its display screen |
||
|
are presented in the type face you see to the left. |
|
Messages |
|
Messages are used in this manual to bring important information to your attention. Each type of message is identified as shown below.
Pay attention! A caution informs you that improper use of equipment or failure to follow instructions may cause data loss or damage your equipment.
Please read. A note is a hint or advice that helps you make best use of your equipment.
Indicates a potentially hazardous situation, which could result in death or serious injury, if you do not follow instructions.
User’s Manual |
xviii |

PORTÉGÉ M700/M710
Terminology
This term is defined in this document as follows:
Start |
The word "Start" refers to the " |
" button in |
|
Microsoft® Windows Vista®. |
|
User’s Manual |
xix |

General Precautions
TOSHIBA computers are designed to optimize safety, minimize strain and withstand the rigors of portability. However, certain precautions should be observed to further reduce the risk of personal injury or damage to the computer.
Be certain to read the general precautions below and to note the cautions included in the text of the manual.
Creating a computer-friendly environment
Place the computer on a flat surface that is large enough for the computer and any other items you are using, such as a printer.
Leave enough space around the computer and other equipment to provide adequate ventilation. Otherwise, they may overheat.
To keep your computer in prime operating condition, protect your work area from:
■Dust, moisture, and direct sunlight.
■Equipment that generates a strong electromagnetic field, such as stereo speakers (other than speakers that are connected to the computer) or speakerphones.
■Rapid changes in temperature or humidity and sources of temperature change such as air conditioner vents or heaters.
■Extreme heat, cold, or humidity.
■Liquids and corrosive chemicals.
Stress injury
Carefully read the Instruction Manual for Safety and Comfort. It contains information on the prevention of stress injuries to your hands and wrists that can be caused by extensive keyboard use. Instruction Manual for Safety and Comfort also includes information on work space design, posture and lighting that can help reduce physical stress.
User’s Manual |
xx |
PORTÉGÉ M700/M710
Heat injury
■Avoid prolonged physical contact with the computer. If the computer is used for long periods, its surface can become very warm. While the temperature will not feel hot to the touch, if you maintain physical contact with the computer for a long time, for example if you rest the computer on your lap or if you keep your hands on the palm rest, your skin might suffer a low-heat injury.
■If the computer has been used for a long time, avoid direct contact with the metal plate supporting the various interface ports as this can become hot.
■The surface of the AC adaptor can become hot when in use but this condition does not indicate a malfunction. If you need to transport the AC adaptor, you should disconnect it and let it cool before moving it.
■Do not lay the AC adaptor on a material that is sensitive to heat as the material could become damaged.
Pressure or impact damage
Do not apply heavy pressure to the computer or subject it to any form of strong impact as this can damage the computer's components or otherwise cause it to malfunction.
PC Card overheating
Some PC Cards can become hot during prolonged use which may result in errors or instability in the operation of the device in question. In addition, you should also be careful when you remove a PC Card that has been used for a long time.
Mobile phones
Please be aware that the use of mobile phones can interfere with the audio system. The operation of the computer will not be impaired in any way, but it is recommended that a minimum distance of 30cm is maintained between the computer and a mobile phone that is in use.
Instruction Manual for Safety and Comfort
All important information on the safe and proper use of this computer is described in the enclosed Instruction Manual for Safety and Comfort. Be sure to read it before using the computer.
User’s Manual |
xxi |

Chapter 1
Getting Started
This chapter provides an equipment checklist, and basic information to start using your computer.
Some of the features described in this manual may not function properly if you use an operating system that was not pre-installed by TOSHIBA.
Equipment checklist
Carefully unpack your computer, taking care to save the box and packaging materials for future use.
Hardware
Check to make sure you have all the following items:
■PORTÉGÉ M700/M710 Portable Personal Computer
■AC adaptor and power cord (2-pin plug or 3-pin plug)
■Battery pack (Is pre-installed in some computers)
■Slice Expansion Battery (Is included with some models)
■Tablet PC Pen (Is included with some models)
■Reserve Pen (Is included with some models)
■Ultra Slim Bay Weight Saver (Is included with some models)
■Ultra Slim Bay Case (Is provided with some models)
■For some models, Tablet PC Pen is included together with spare pen tips and a tip removal tool in the small case coming with the product.
■For some models, Reserve Pen is included in the small case coming with the product.
User’s Manual |
1-1 |

Getting Started
Documentation
■PORTÉGÉ M700/M710 Series User Information Guide
■Instruction Manual for Safety and Comfort
■End User License Agreement
If any of the items are missing or damaged, contact your dealer immediately.
Software
The following Windows® operating system and utility software are preinstalled.
■Microsoft® Windows Vista®
■TOSHIBA Value Added Package
■Recovery Disc Creator
■DVD Video Player
■TOSHIBA SD Memory Utilities
■TOSHIBA SD Memory Boot Utility
■CD/DVD Drive Acoustic Silencer
■TOSHIBA Assist
■TOSHIBA ConfigFree
■TOSHIBA HDD Protection
■TOSHIBA Disc Creator
■TOSHIBA Tablet PC Extension
■TOSHIBA Tablet Access Code Logon Utility
■Fingerprint Utility
■Windows Mobility Center
■Online Manual
■ PORTÉGÉ M700/M710 User's Manual (This manual)
User’s Manual |
1-2 |

Getting Started
Getting Started
■All users should be sure to read the section Starting up for the first time.
■Be sure to read the enclosed Instruction Manual for Safety and Comfort for information on the safe and proper use of this computer. It is intended to help you be more comfortable and productive while using a notebook computer. By following the recommendations in it you may reduce your chance of developing a painful or disabling injury to your hand, arms, shoulders or neck.
This section provides basic information to start using your computer. It covers the following topics:
■About the Tablet mode
■Connecting the AC adaptor
■Opening the display
■Turning on the power
■Starting up for the first time
■Turning off the power
■Restarting the computer
■Creating Optical Recovery Discs
■Restoring the pre-installed software from the Recovery hard disk drive
■Restoring the pre-installed software from your created Recovery Discs
■Use a virus-check program and make sure it is updated regularly.
■Never format storage media without checking its content - formatting destroys all stored data.
■It is a good idea to periodically back up the internal hard disk drive or other main storage device to external media. General storage media is not durable or stable over long periods of time and under certain conditions may result in data loss.
■Before you install a device or application, save any data in memory to the hard disk drive or other storage media. Failure to do so may result in the loss of data.
About the Tablet mode
Change to "The TOSHIBA PORTÉGÉ M700/M710" computer can be used in two ways, as an ordinary laptop PC and as a Tablet PC. You can use the computer as Tablet PC, operated with the supplied Tablet PC Pen, by turning the display panel through 180 degrees and closing it. This manual calls the use as an ordinary laptop PC "Laptop mode", and the use as a Tablet PC "Tablet mode". Refer to Changing to the Tablet mode section in Chapter 4, Operating Basics for details on changing the mode.
User’s Manual |
1-3 |

Getting Started
Connecting the AC adaptor
Attach the AC adaptor when you need to charge the battery or you want to operate from AC power. It is also the fastest way to get started, because the battery pack will need to be charged before you can operate from battery power.
The AC adaptor can be connected to any power source supplying from 100 to 240 volts and 50 or 60 hertz. For details on using the AC adaptor to charge the battery pack, refer to Chapter 6, Power and Power-Up Modes.
■Always use the TOSHIBA AC adaptor that was included with your computer, or use AC adaptors specified by TOSHIBA to avoid any risk of fire or other damage to the computer. Use of an incompatible AC adaptor could cause fire or damage to the computer possibly resulting in serious injury. TOSHIBA assumes no liability for any damage caused by use of an incompatible adaptor.
■Never plug the AC adaptor into a power source that does not correspond to both the voltage and the frequency specified on the regulatory label of the unit. Failure to do so could result in a fire or electric shock, possibly resulting in serious injury.
■Always use or purchase power cables that comply with the legal voltage and frequency specifications and requirements in the country of use. Failure to do so could result in a fire or electric shock, possibly resulting in serious injury.
■The supplied power cord conforms to safety rules and regulations in the region the product is bought and should not be used outside this region. For use in other regions, please buy power cords that conform to safety rules and regulations in the particular region.
■Do not use a 3-pin to 2-pin conversion plug.
■When you connect the AC adaptor to the computer, always follow the steps in the exact order as described in the User’s Manual. Connecting the power cable to a live electrical outlet should be the last step otherwise the adaptor DC output plug could hold an electrical charge and cause an electrical shock or minor bodily injury when touched. As a general safety precaution, avoid touching any metal parts.
■Never place your computer or AC adaptor on a wooden surface, furniture, or any other surface that could be marred by exposure to heat since the computer base and AC adaptor's surface increase in temperature during normal use.
■Always place your computer or AC adaptor on a flat and hard surface that is resistant to heat damage.
Refer to the enclosed Instruction Manual for Safety and Comfort for detailed precautions and handling instructions.
User’s Manual |
1-4 |

Getting Started
1. Connect the power cord to the AC adaptor.
Figure 1-1 Connecting the power cord to the AC adaptor (2-pin plug)
Figure 1-2 Connecting the power cord to the AC adaptor (3-pin plug)
Either a 2-pin or 3-pin adaptor/cord will be included with the computer depending on the model.
2.Connect the AC adaptor’s DC output plug to the DC IN 15V jack on the back of the computer.
DC IN 15V jack
DC output plug
Figure 1-3 Connecting the DC output plug to the computer
3.Plug the power cord into a live wall outlet - the Battery and DC IN indicators on the front of the computer should glow.
User’s Manual |
1-5 |
Getting Started
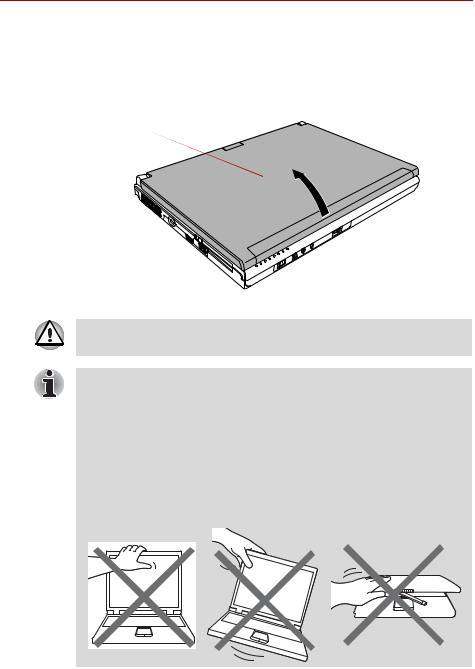
Opening the display
The display panel can be opened to a wide range of angles for optimal viewing.
While holding down the palm rest with one hand so that the main body of the computer is not raised, slowly lift the display panel - this will allow the angle of the display panel to be adjusted to provide optimum clarity.
Display panel
Figure 1-4 Opening the display panel
Use reasonable care when opening and closing the display panel. Opening it vigorously or slamming it shut could damage the computer.
■Be careful not to open the display panel too far as this could put stress on the display panel’s hinges and cause damage.
■Do not press or push on the display panel.
■Do not lift the computer by the display panel.
■Do not close the display panel with pens or any other objects left in between the display panel and the keyboard.
■When opening or closing the display panel, place one hand on the palm rest to hold the computer in place and use the other hand to slowly open or close the display panel (Do not use excessive force when opening or closing the display panel).
|
|
|
|
|
|
|
|
|
|
|
|
|
|
|
|
|
|
|
|
|
|
|
|
|
|
|
|
|
|
|
|
|
|
|
|
|
|
|
|
|
|
|
|
|
|
|
|
|
|
|
|
|
|
|
|
|
|
|
|
|
|
|
|
|
|
|
|
|
|
User’s Manual |
1-6 |
||||||||

Getting Started
Turning on the power
This section describes how to turn on the power - the Power indicator will then indicate the status. Please refer to the Monitoring of power condition section in Chapter 6, Power and Power-Up Modes for more information.
■After you turn on the power for the first time, do not turn it off until you have set up the operating system. Please refer to the section Starting up for the first time for more information.
■Volume cannot be adjusted during Windows Setup.
1.Open the display panel.
2.Slide the Power Button Lock Switch to the right.
3.Press and hold the computer's power button for two or three seconds.
Power button
Power Button
Lock Switch
Figure 1-5 Turning on the power
Starting up for the first time
The Microsoft Windows Vista® Startup Screen will be the first screen displayed when you turn on the power. Follow the on-screen instructions on each screen in order to properly install the operating system.
When it is displayed, be sure to read the Software License Terms carefully.
Turning off the power
The power can be turned off in one of three modes, either Shut Down (Boot) Mode, Hibernation Mode or Sleep Mode.
Shut Down mode (Boot Mode)
When you turn off the power in Shut Down Mode no data will be saved and the computer will boot to the operating system's main screen the next time it is turned on.
1.If you have entered data, either save it to the hard disk drive or to other storage media.
2.Make sure all disk/disc activity has stopped before removing the CD/DVD or floppy diskette.
User’s Manual |
1-7 |
Getting Started
■Make sure the Hard Disk Drive and Ultra Slim Bay's module indicator is off. If you turn off the power while a disk (disc) is being accessed, you may lose data or damage the disk.
■Never turn off the power while an application is running. Doing so could cause loss of data.
■Never turn off the power, disconnect an external storage device or remove storage media during data read/write. Doing so can cause data loss.
3.Click Start.
4.Click the arrow button (  ) located in the power management buttons (
  ) and select Shut Down from the menu.
5.Turn off any peripheral devices connected to your computer.
Do not turn the computer or peripheral devices back on immediately - wait a short period to avoid any potential damage.
Sleep Mode
If you have to interrupt your work, you are able to turn off the power without exiting from your software by placing the computer into Sleep Mode. In this mode data is maintained in the computer's main memory so that when you turn on the power again, you can continue working right where you left off.
When you have to turn off your computer aboard an aircraft or in places where electronic devices are regulated or controlled, always completely shut down the computer. This includes turning off any wireless communication switches or devices, and canceling settings that reactivate the computer automatically, such as a timer recording function. Failure to completely shut down the computer in this way could allow the operating system to reactivate and run pre-programmed tasks or preserve unsaved data, which could interfere with aviation or other systems, possibly causing serious injury.
■Before entering Sleep Mode, be sure to save your data.
■Do not install or remove a memory module while the computer is in Sleep Mode. The computer or the memory module could be damaged.
■Do not remove the battery pack while the computer is in Sleep Mode (unless the computer is connected to an AC power source). Data in memory could be lost.
User’s Manual |
1-8 |

Getting Started
■When the AC adaptor is connected, the computer will go into Sleep Mode according to the settings in the Power Options (to access it, Start
-> Control Panel -> System and Maintenance -> Power Options).
■To restore the operation of the computer from Sleep Mode, press and hold the power button or any key on the keyboard for a short amount of time. Please note that keyboard keys can only be used if the Wake-up on Keyboard option is enabled within the HW Setup utility.
■If the computer enters Sleep Mode while a network application is active, the application might not be restored when the computer is next turned on and the system returns from Sleep Mode.
■To prevent the computer from automatically entering Sleep Mode, disable Sleep Mode within the Power Options (to access it, Start ->
Control Panel -> System and Maintenance -> Power Options). However, please be aware that this configuration will nullify the computer's Energy Star compliance.
■To use the Hybrid Sleep function, configure it in the Power Options.
Benefits of Sleep Mode
The Sleep Mode feature provides the following benefits:
■Restores the previous working environment more rapidly than does the Hibernation Mode feature.
■Saves power by shutting down the system when the computer receives no input or hardware access for the time period set by the System Sleep Mode feature.
■Allows the use of the panel power off feature.
Executing Sleep Mode
You can also enable Sleep Mode by pressing FN + F3 - please refer to Chapter 5, The Keyboard, for further details.
You can enter Sleep Mode in one of four ways:
■Click Start then click the power button (  ) located in the power
management buttons (  ).
).
Please note that this feature must be enabled within the Power Options (to access it, click Start -> Control Panel -> System and Maintenance -> Power Options).
■Click Start then click the arrow button (  ) and select Sleep from the menu.
■Close the display panel. Please note that this feature must be enabled within the Power Options (to access it, click Start -> Control Panel ->
System and Maintenance -> Power Options).
■Press the power button. Please note that this feature must be enabled within the Power Options (to access it, click Start -> Control Panel ->
System and Maintenance -> Power Options).
User’s Manual |
1-9 |
 Loading...