


 Loading...
TOSHIBA Label Printer
B-EX Series
B-EX Setting Tool Operation Manual
Second Edition: January 25, 2012

Table of Contents |
|
1. INTRODUCTION |
1 |
SUPPORTED PRINTERS .......................................................................................................................................... |
1 |
SOFTWARE LICENSE AGREEMENT .......................................................................................................................... |
1 |
FEATURES............................................................................................................................................................. |
1 |
OUTLINE OF THE FUNCTIONS.................................................................................................................................. |
2 |
NOTATION ............................................................................................................................................................. |
2 |
SCREENS USED IN THIS DOCUMENT ....................................................................................................................... |
3 |
TRADEMARK AND COPYRIGHT ................................................................................................................................ |
3 |
OPERATIONAL CONDITIONS .................................................................................................................................... |
4 |
Software (Operation System) .......................................................................................................................... |
4 |
Hardware ......................................................................................................................................................... |
4 |
Interface........................................................................................................................................................... |
4 |
DISCLAIMER .......................................................................................................................................................... |
4 |
2. INSTALLATION |
5 |
INSTALLATION PROCEDURE .................................................................................................................................... |
5 |
UNINSTALLATION ................................................................................................................................................... |
7 |
3. START-UP |
8 |
PRINTER ............................................................................................................................................................... |
8 |
PC ....................................................................................................................................................................... |
8 |
4. PREPARATION |
9 |
MAIN SCREEN ....................................................................................................................................................... |
9 |
MENUS ................................................................................................................................................................ |
11 |
File.................................................................................................................................................................. |
11 |
Edit ................................................................................................................................................................ |
13 |
View............................................................................................................................................................... |
14 |
Help ............................................................................................................................................................... |
15 |
PRINTER SETTING ............................................................................................................................................... |
16 |
USB ............................................................................................................................................................... |
18 |
LAN................................................................................................................................................................ |
19 |
Multi LAN ....................................................................................................................................................... |
20 |
COM .............................................................................................................................................................. |
22 |
ENVIRONMENT .................................................................................................................................................... |
24 |
Password Change ......................................................................................................................................... |
26 |
PROCESSING SCREEN ......................................................................................................................................... |
27 |
Progress Bar Screen ..................................................................................................................................... |
27 |
Completion Screen........................................................................................................................................ |
28 |
Progress Status ............................................................................................................................................. |
29 |
PRINTER LIST SCREEN ........................................................................................................................................ |
31 |
5. FUNCTIONS |
32 |
PARAMETER SETTING .......................................................................................................................................... |
32 |
General Tab ................................................................................................................................................... |
35 |
General (2) Tab.............................................................................................................................................. |
39 |
Device Tab..................................................................................................................................................... |
43 |
LAN Tab......................................................................................................................................................... |
45 |
WLAN Tab ..................................................................................................................................................... |
48 |
WLAN (2) Tab ................................................................................................................................................ |
52 |
RFID Tab ....................................................................................................................................................... |
55 |
MAINTENANCE..................................................................................................................................................... |
57 |
Self Diagnosis Tab......................................................................................................................................... |
57 |
Memory Management Tab............................................................................................................................. |
61 |
DOWNLOAD......................................................................................................................................................... |
64 |
Firmware Download....................................................................................................................................... |
64 |
BASIC Download........................................................................................................................................... |
66 |
Create HTML/XML ROM ............................................................................................................................... |
69 |
TOOL .................................................................................................................................................................. |
71 |
Tool Tab ......................................................................................................................................................... |
71 |

Create External Character Tab...................................................................................................................... |
72 |
Test Print Tab................................................................................................................................................. |
76 |
6. APPENDIX |
79 |
ERROR MESSAGE LIST ........................................................................................................................................ |
79 |
SETUP ITEMS LIST ............................................................................................................................................... |
82 |
General Tab ................................................................................................................................................... |
82 |
General (2) Tab.............................................................................................................................................. |
85 |
Device Tab..................................................................................................................................................... |
86 |
LAN Tab......................................................................................................................................................... |
87 |
WLAN Tab ..................................................................................................................................................... |
88 |
WLAN (2) Tab ................................................................................................................................................ |
90 |
RFID Tab ....................................................................................................................................................... |
91 |

1. Introduction
Thank you for purchasing the "B-EX Setting Tool", a setting tool for the label printers of TOSHIBA TEC Corporation (hereinafter referred to as "TOSHIBA TEC").
This document gives you a general description of the "B-EX Setting Tool" (hereinafter referred to as "the Product") including the installation procedure and features.
Supported Printers
The Product supports the following printers:
B-EX4T1-G
B-EX4T1-T
B-EX4T2-G
B-EX4T2-T
B-EX4T2-H
Software License Agreement
Please read the following terms and conditions of this Agreement carefully before using this Software. This is a legal agreement between you and TOSHIBA TEC. By installing this Software on your computer, you are agreeing to be bound by the terms and conditions of this Agreement.
1.You may use this Software on a single TOSHIBA TEC barcode printer acquainted from affiliated company, dealer or distributor of TOSHIBA TEC.
2.You shall not grant a sub-license, distribute, transfer, lend or otherwise dispose of this Software, in whole or in part, for the use of any third party other than you except as otherwise expressly provided herein.
3.You shall not modify, reverse engineering, reverse compile or reverse disassemble this Software, in whole or in part, except as otherwise expressly provided herein.
4.You shall not copy or make a duplicate (or backup copy) of this Software, in whole or in part, except as otherwise expressly provided herein.
5.All title and copyrights in and to this Software are owned by TOSHIBA TEC or its licenser.
6.TOSHIBA TEC or its licenser makes no representation or warranty, expressed or implied, including but not limited to the correction of any error or failure, maintenance and support relating to this Software.
7.IN NO EVENT SHALL TOSHIBA TEC OR ITS LICENSER BE LIABLE TO YOU OR ANY THIRD PARTIES FOR ANY DAMAGES, INCLUDING ANY LOST PROFITS, LOST SAVINGS OR OTHER INCIDENTAL OR CONSEQUENTIAL DAMAGE ARISING OUT OF THE USE OR INABILITY TO USE THIS PROGRAMS, EVEN IF TOSHIBA TEC HAS ADVISED OF THE POSSIBILITY OF SUCH DAMAGES, NOR FOR ANY CLAIMS BY A THIRD PARTY.
8.TOSHIBA TEC or its licenser will terminate this Agreement if you fail to comply with any of this terms and conditions. Upon the termination of this Agreement, you agree to uninstall the Software and return it to TOSHIBA TEC.
9.This Agreement shall become effective upon the installation or use of this Software by You. By installing or using this Software you hereby indicate your acceptance of these terms and conditions.
Features
The Product is software, which allows you to configure, download files to, and perform maintenance of the supported TOSHIBA TEC Label Printers under a Windows XP/Vista/7 environment.
Please note the Product is targeted for a user who is familiar with the Supported Printers.
1

Outline of the Functions
The Product provides the following functions.
There are some restrictions depending on the communication method.
|
|
|
|
|
Communication |
||
Function |
|
|
Description |
|
method |
||
|
|
|
|
|
One-to-one |
|
Collective |
Displaying the |
|
|
Obtains and displays the current parameter settings. |
|
Enabled |
|
Disabled |
parameters |
|
|
|
|
|||
|
|
|
|
|
|
|
|
|
|
|
|
|
|
|
|
Setting the parameters |
|
Changes the specified parameter settings. |
|
Enabled |
|
Enabled |
|
|
|
|
|
|
|
|
|
Saving the parameter |
|
|
Saves parameter settings in a file. When this file is opened, the |
|
Enabled |
|
Enabled |
settings for backup |
|
|
saved settings are retrieved. |
|
|
||
|
|
|
|
|
|
||
|
|
|
|
|
|
|
|
Downloading ROM |
|
|
Sends printer firmware to the printer for upgrading the |
|
Enabled |
|
Enabled |
files |
|
|
program. |
|
|
||
|
|
|
|
|
|
||
|
|
|
|
|
|
|
|
Downloading BASIC |
|
|
Sends BASIC files to the printer for upgrading the BASIC |
|
Enabled |
|
Enabled |
files |
|
|
program. |
|
|
||
|
|
|
|
|
|
||
Downloading |
|
|
Generates ROM files for HTML/XML data. Generated files are |
|
Enabled |
|
Enabled |
HTML/XML ROM files |
|
|
updated by downloading ROM files. |
|
|
||
|
|
|
|
|
|
||
|
|
|
|
|
|
|
|
Displaying the |
|
|
Obtains the self-diagnostic result from the printer including the |
|
|
|
|
maintenance |
|
|
firmware version, maintenance counter and parameter setting |
|
Enabled |
|
Disabled |
information |
|
|
values, and displays such information. |
|
|
|
|
|
|
|
|
|
|
|
|
Saving the |
|
|
Obtains the self-diagnostic result from the printer including the |
|
|
|
|
maintenance |
|
|
firmware version, maintenance counter and parameter setting |
|
Enabled |
|
Enabled |
information |
|
|
values, and saves such information in a file. |
|
|
|
|
|
|
|
|
|
|
|
|
Obtaining the log |
|
|
Obtains dump data for error analysis from the printer, and |
|
Enabled |
|
Enabled |
|
|
saves it in a file. |
|
|
|||
|
|
|
|
|
|
|
|
|
|
|
|
|
|
|
|
Maintenance counter |
|
|
Clears the maintenance counter data such as the running |
|
Enabled |
|
Enabled |
clear |
|
|
distance and print distance. |
|
|
||
|
|
|
|
|
|
||
Parameter clear |
|
|
Initializes the parameter settings to the values for the specified |
|
Enabled |
|
Enabled |
|
|
destination. |
|
|
|||
|
|
|
|
|
|
|
|
|
|
|
|
|
|
|
|
Print head check |
|
|
Sends a head broken dots check command to the printer to |
|
Enabled |
|
Enabled |
|
|
check for any abnormality on the print head. |
|
|
|||
|
|
|
|
|
|
|
|
|
|
|
|
|
|
|
|
Reset |
|
|
Sends a reset command to the printer for rebooting the printer. |
|
Enabled |
|
Enabled |
|
|
|
|
|
|
|
|
Displaying stored data |
|
Obtains and displays the internal information of the memory. |
|
Enabled |
|
Disabled |
|
|
|
|
|
|
|
|
|
Setup of the data |
|
|
Allocates or formats the storage areas for external characters, |
|
Enabled |
|
Enabled |
storage area |
|
|
printer commands and BASIC files. |
|
|
||
|
|
|
|
|
|
||
|
|
|
|
|
|
|
|
File transmission |
|
|
Sends a selected file to the printer as a binary file. |
|
Enabled |
|
Enabled |
|
|
|
|
|
|
|
|
Registering external |
|
|
Creates an external character command file from a bitmap file. |
|
|
|
|
|
|
The created file is sent to the printer and registered as an |
|
Enabled |
|
Enabled |
|
characters |
|
|
|
|
|||
|
|
external character. |
|
|
|
|
|
|
|
|
|
|
|
|
|
|
|
|
|
|
|
|
|
Print test |
|
|
Performs print tests to check the communication or print |
|
Enabled |
|
Enabled |
|
|
quality. |
|
|
|||
|
|
|
|
|
|
|
|
|
|
|
|
|
|
|
|
Notation
Names of menus, screens, icons, buttons, tabs, and items are enclosed in square brackets ([ ]). For example: Click the [OK] button.
Wordings shown on the computer monitor and the LCD message display of your printer are enclosed in double quotation marks (" ").
For example: "ON LINE".
Titles of the chapters and sections to be referred to are enclosed in single quotation marks (' '). For example: Please refer to 'Introduction'.
2

Screens Used in This Document
Screens shown in this document are examples used for explaining operations. Unless otherwise specified, an operation system used in this document is Windows 7. Please note that the screens shown may differ depending on your usage environment and conditions.
Trademark and Copyright
Microsoft and Windows are trademarks of Microsoft Corporation in the United States and other countries. Other company and product names may be registered trademarks or trademarks of others.
Each company’s registered trademarks and trademarks are not marked with TM or ®. This document uses the following abbreviations.
Microsoft® Windows® XP Home Edition and Microsoft® Windows® XP Professional: Windows XP
Microsoft® Windows® Vista Ultimate and Microsoft® Windows® Vista Enterprise and Microsoft® Windows® Vista Business and Microsoft® Windows® Vista Home Premium and Microsoft® Windows® Vista Home Basic: Windows Vista
Microsoft® Windows® 7 Ultimate and Microsoft® Windows® 7 Enterprise and
Microsoft® Windows® 7 Professional and Microsoft® Windows® 7 Home Premium: Windows 7
All technologies other than the above are exclusive property of TOSHIBA TEC. Copyright of TOSHIBA TEC in Japan and other countries is expressed as: Copyright© 2011-2012 TOSHIBA TEC CORPORATION. All Rights Reserved.
3

Operational Conditions
The Product can be used under the following system and environmental requirements.
Software (Operation System)
English operation systems of:
Windows XP (Service Pack 3 or later), Windows Vista, Windows 7 (32-bit / 64-bit)
Note: 64-bit operating systems except Windows 7 are not applicable.
Hardware
A DOS/V (IBM AT compatible) machine must be used under the above Windows operation system and recommended conditions explained in the table below.
|
Recommended Conditions |
CPU |
Intel® Pentium® 4 1.5 GHz or higher |
Memory |
256 MB or more |
HDD |
Free space of 1 GB or more |
Display size |
1024 x 768 pixels or more |
Interface
Connections are made through the following interface. Parallel
Serial
USB Wired LAN
Wireless LAN
When the parallel or serial interface is used, please assign the installed printer driver port to a port other than the selected port.
Please note that some functions are disabled by using the parallel interface.
When USB is used, Plug and Play requests printer driver installation. The Product does not need any printer driver. However, printer driver installation is requested in every connection. If you use the Product frequently, it is recommended to install a printer driver. For information about printer driver installation, please refer to our web site.
When wired LAN or wireless LAN is used, it is possible to collectively send files to multiple printers connected to the network.
Before executing any processing, please confirm there is no access to the printer from the other tools. If unrelated data is sent to the printer while the processing is executed, an error may occur.
Disclaimer
The Product allows the Administrator/User to monitor printer statuses, check/change printer setting, and download a setting file on the computer monitor for the Supported Printers. When an invalid setting is made for the Supported Printers using the Product, they may malfunction and may not be used afterwards.
The Product is intended to be used by the Administrator who is familiar with the Supported Printers. The Setting Tool and Downloader must be used by the Administrator or under instructions of the Administrator.
TOSHIBA TEC shall not be liable for any outcome resulted from a failure to follow the above instructions (both the Product and the Supported Printers).
4
2. Installation
Installation Procedure
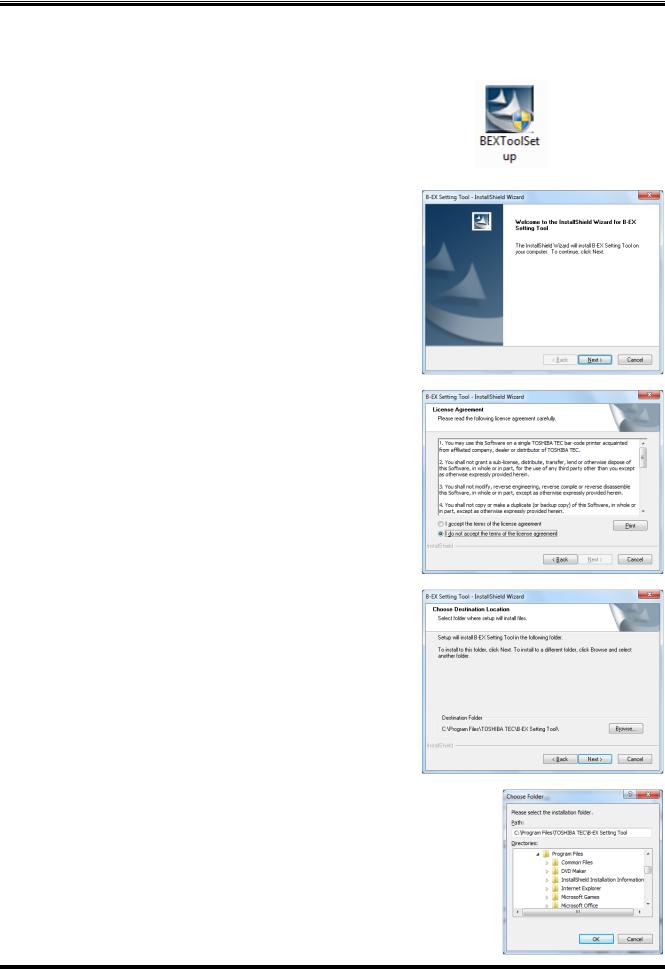
1. Double-click the setup program (BEXToolSetup.exe) of the Product.
Note: With Windows Vista/7, the User Account Control dialog box may appear. In that case, click [Allow] to continue.
2. The InstallShield Wizard starts. Click [Next].
3. The [License Agreement] screen appears.
When you agree, click [I accept the terms of the license agreement] and click [Next].
'Software License Agreement'
4. The [Choose Destination Location] screen appears. Check the folder where the Product is going to be installed, and click [Next].
When you want to change the location, click [Browse...]. On the [Choose Folder] screen, select a desired folder.
5
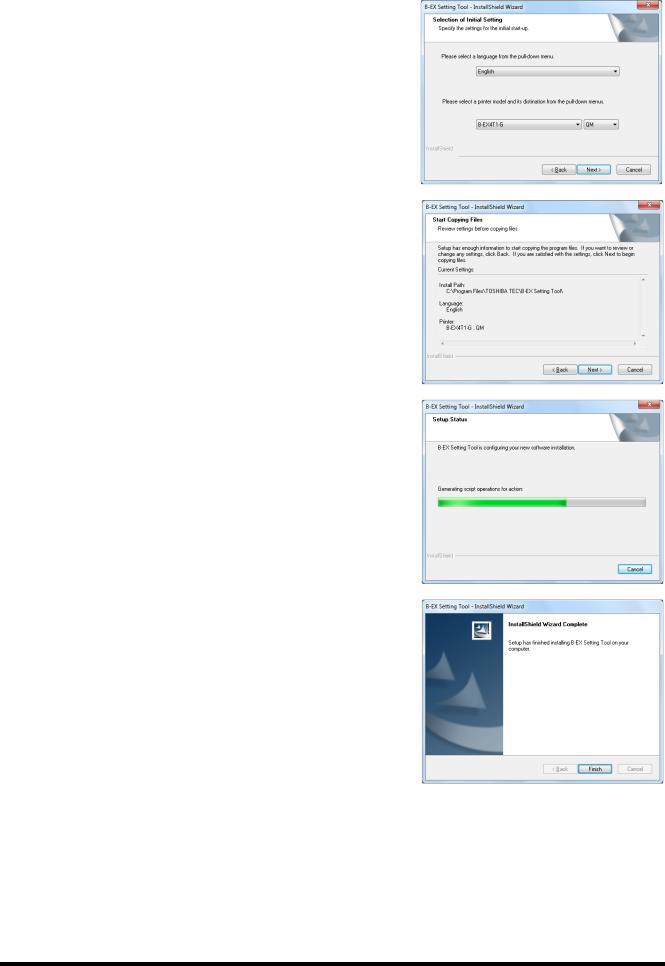
5. The [Selection of Initial Setting] screen appears. Select a language used for the Product, a printer model to be connected and its destination from the pull down menus.
These are changeable after installation.
6. The [Start Copying Files] screen appears.
Check the descriptions under [Current Settings] and click [Next] when the descriptions are correct. Then, the installation starts.
When you want to change the setting, click [Back] until the applicable screen appears, then make the change.
7. The installation is being performed. Click [Cancel] to stop the installation.
8. The [InstallShield Wizard Complete] screen appears when the installation is completed.
Click [Finish] to complete the operation.
6
Uninstallation
1. Select [Start] - [Control Panel] - [Programs and Features].
Note: With Windows Vista/7, the User Account Control dialog box may appear. In that case, click [Allow] to continue.
2.
3.
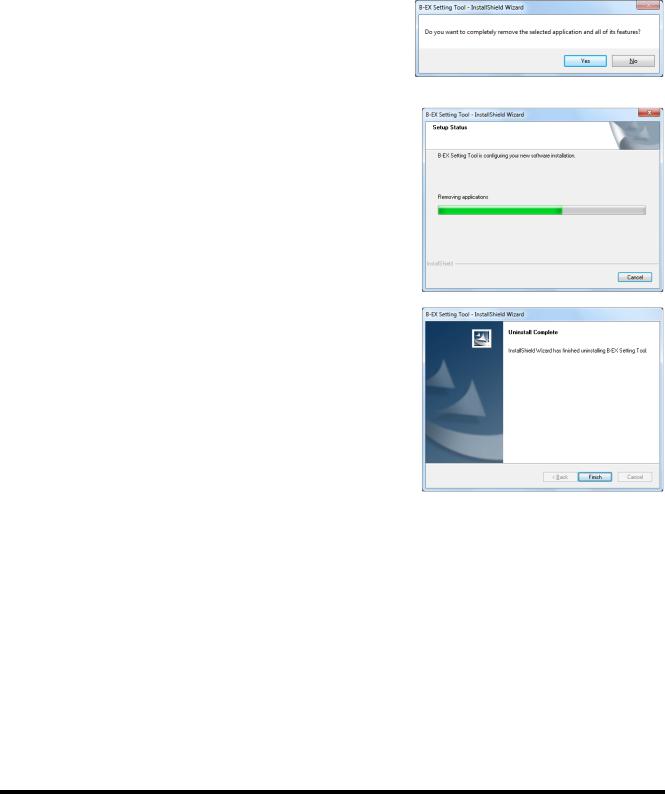
Choose the Product on [Uninstall or change a program] screen, then click [Uninstall].
The dialog box appears to confirm the removal of the
Product.
Clicking [OK] starts uninstallation.
4. The screen which shows a progress bar appears. Clicking [Cancel] stops the operation.
5. The [Uninstall Complete] screen appears when uninstallation is completed.
Click [Finish] to complete the operation.
7
3. Start-up
Printer
The printer shall be idle in online mode which accepts print jobs (hereinafter referred to as "online mode") to communicate with the Product.
The functions of the Product are not executed unless the printer is in online mode or idle state. Exceptionally, file transmissions and reset function are accepted regardless of the printer status when the
interface type is other than the parallel. Some functions may not be enabled depending on the printer status. In this case, turn off the printer and back to on.
Changes in the parameter settings take effect upon completion of the setting. Depending on the changed parameters, printer configurations need to be changed accordingly.
In the case the security settings for the wireless LAN are changed, change the security settings for the computer, too.
When IP address, port number, or host name for LAN is changed, the setting on the printer will be automatically changed properly.
When the USB serial number is changed, the setting on the printer will be automatically changed properly. When the command control code is changed, the environment setting will be automatically changed accordingly.
PC
1. Select [Start] - [All Programs] - [TOSHIBA TEC] - [B-EX Setting Tool] - [B-EX Setting Tool] and click [B-EX Setting Tool].
2. The [Login] screen is displayed when the log-in password has been set.
Enter the password, then click [OK].
When [Cancel] is clicked, the [Login] screen is closed.
The entered password is displayed with hidden characters.
When the password matched, the Product starts.
If a wrong password is entered, the error message is displayed.
3. When the Product is started, the [Printer Setting] screen is displayed.
Select the printer model to be connected and the interface used for communication.
8

4. Preparation
Main Screen
When the Product is started, the [Printer Setting] screen is displayed.
Menu bar
Menus to support each function are provided.
Menu icon
Menu icons are placed in this area.
When an icon is clicked, the corresponding menu screen appears on the main view area. The icon being selected is highlighted.
Printer Setting: |
Enables selecting the printer model to be connected and configuring the interface |
|
|
used. |
|
Parameter Setting: |
Obtains or changes the parameter settings. |
|
|
▪ General Tab, General (2) Tab: |
Settings related to basic printer behaviors and |
|
|
fine adjustment |
|
▪ Device Tab: |
Settings related to the device including the |
|
|
interface |
|
▪ LAN Tab: |
Settings related to the network |
|
▪ WLAN Tab, WLAN (2) Tab: |
Settings related to wireless LAN |
|
▪ RFID Tab: |
Settings related to RFID encoding |
Maintenance: |
Obtains or initializes the printer maintenance information. |
|
|
▪ Self Diagnosis Tab: |
Processing related to self-diagnosis |
|
|
|
|
|
|
9

|
▪ Memory Management Tab: |
Processing related to the memory |
Download: |
Downloads the printer firmware or BASIC program. |
|
|
▪ Firmware Download Tab: |
Downloads printer firmware |
|
▪ BASIC Download Tab: |
Downloads the BASIC program |
|
▪ Create HTML/XML ROM Tab: |
Creates HTML/XML ROM file |
Tool: |
Other functions |
|
|
▪ Tool Tab: |
Sends a selected file in binary format. |
|
▪ Create External Character Tab: |
Creates external character files to be stored in |
|
|
the printer. |
|
▪ Test Print Tab: |
Performs a test print for checking the |
|
|
communication and print quality. |
Header view
Displays the conditions for communication with the printer.
The settings specified in the [Printer Setting] screen are reflected.
[Options...] button
Displays the [Environment] screen which allows changing the operating conditions for the Product. The Product needs to be restarted for the changed language take effect.
Main view
Displays the setting screen of the selected menu icon.
The functions of the selected menu are executed on this area.
10

Menus
File
[Import...]
This menu is used to retrieve setup information from a specified file.
This menu is selectable only when the [Parameter Setting] screen is activated.
When this menu is clicked, the [Import] screen is displayed. Specify a setup information file, click [Open], and the file import is started.
When a file other than the setup information file is specified, the error message is displayed
When the setup information file is not for the printer model selected on the [Printer Setting] screen, the following confirmation message appears.
When [Yes] is clicked, the printer model selected on the [Printer Setting] screen is changed and a file import is executed.
When [No] is clicked, the file import is canceled.
The setup screen status at storage can be reproduced.
In addition to parameters, the checkbox settings for groups are reproduced.
When no security information is found in the specified file, the following message is displayed.
When the specified file contains security information, imported security information is displayed with hidden characters.
11
[Export...]
This menu is used to store setup information in a specified file.
This menu is selectable only when the [Parameter Setting] screen is activated.
When this menu is clicked, the [Export] screen is displayed. Specify a file where the setup information is saved, click [Save], then the file export is started.
It also stores the status of the current setup screen.
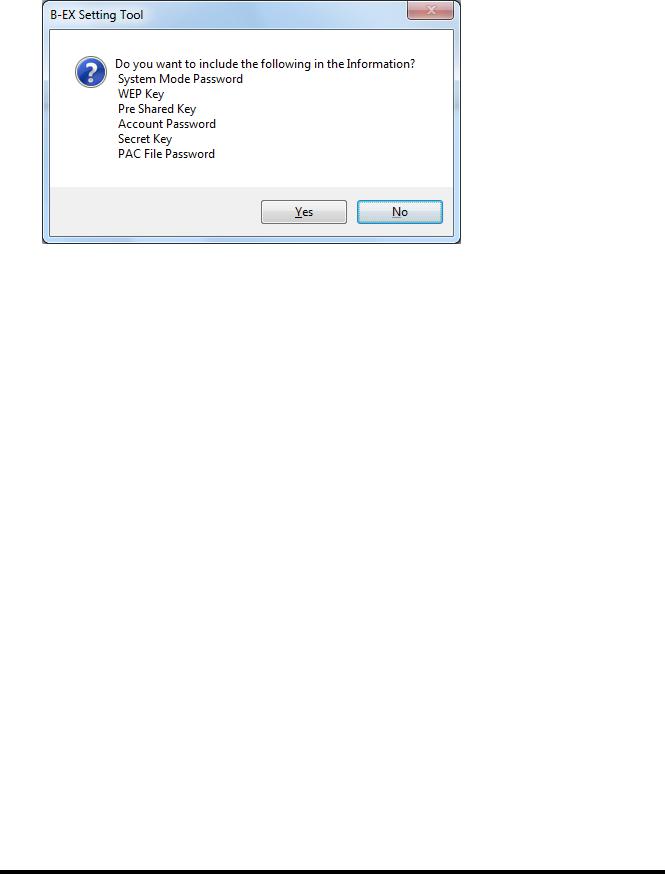
In addition to parameters, the checkbox settings for groups are reproduced. Before storage, the following message is displayed.
When you want to store security information contained in the setup information, click [Yes]. Since security information is important, be careful before storing files.
When you do not want to store security information, click [No].
[Exit]
When this menu is clicked, the Product exits without saving the current settings.
However, the settings on the [Printer Setting] screen and [Environment] screen remain effective.
When the Product is started next time, the settings in the all pages except the [Printer Setting] screen and [Environment] screen are initialized.
12

Edit
[Enable All]
This menu is used to check all checkboxes on all tabs.
This menu is selectable only when the [Parameter Setting] screen is activated.
[Disable All]
This menu is used to uncheck all checkboxes on all tabs.
This menu is selectable only when the [Parameter Setting] screen is activated.
[Enable All in Tab]
This menu is used to check all checkboxes on the tab.
This menu is selectable only when the [Parameter Setting] screen is activated.
[Disable All in Tab]
This menu is used to uncheck all checkboxes on the tab.
This menu is selectable only when the [Parameter Setting] screen is activated.
13
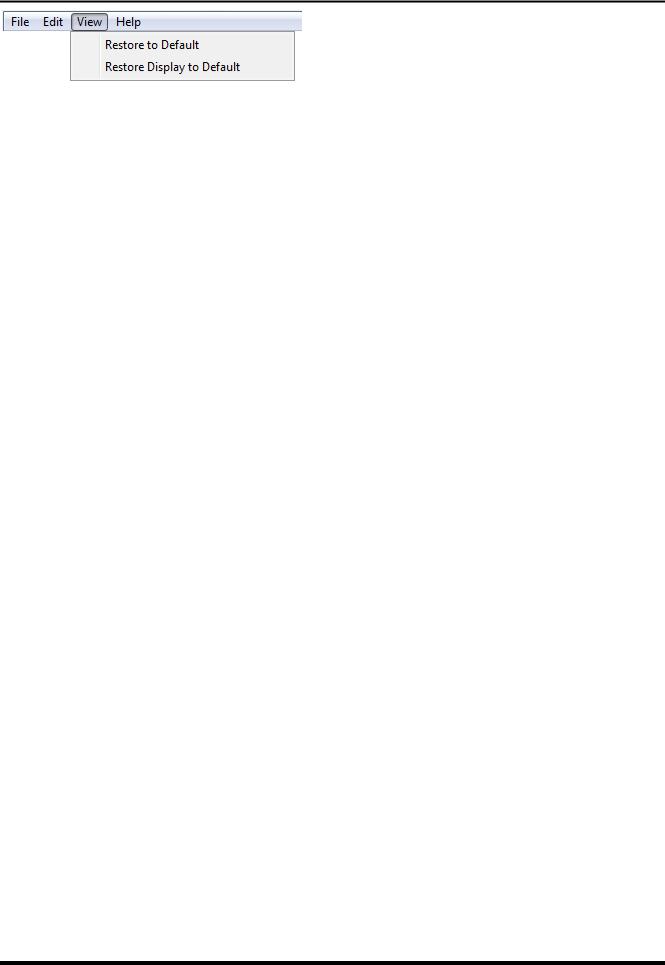
View
[Restore to Default]
This menu is used to restore the all setting values on the all tab pages to the default. This menu is selectable only when the [Parameter Setting] screen is activated.
[Restore Display to Default]
This menu is used to restore all setting values on the selected tab page to the default.
While the [Parameter setting] screen is activated, the setting values only on the displayed tab page are restored to the default.
14

Help
[Contents...]
This menu is used to display the main screen for Help.
[About...]
This menu is used to display version information.
15
Printer Setting
The printer setting menu enables selecting a printer model to be connected and configuring the interface used. When the [Printer Setting] icon on the menu icon area is clicked, and the following screen is displayed.
The setting is not saved by a member of the Users.
[Printer]
Select a printer model to be connected.
The default is the printer model selected during the installation.
The setting is saved upon changed, and reflected in the header view.
When the specified printer model is different from the actually connected one, the Product does not work properly.
Be sure to select the same printer model with the one to be connected.
When the printer model is changed, the all setting values on the all menu screens except the [Printer Setting] screen are restored to the initial values.
At this time, the confirmation message is displayed.
16

When [Yes] is clicked, the printer model is changed.
When [No] is clicked, the printer model remains unchanged.
Options |
B-EX4T1-G, B-EX4T1-T, B-EX4T2-G, B-EX4T2-T, B-EX4T2-H, B-EX6T2-G, |
||
B-EX6T2-T |
* B-EX6T2-G and B-EX6T2-T are not approved at present. |
||
|
|||
[Destination]
Select the destination of the printer to be connected.
The default is the destination selected during the installation.
The setting is saved upon changed, and reflected in the header view.
The initial values for the parameter settings differ depending on the destination.
When the destination is changed, the all setting values on the all menu screens except the [Printer Setting] screen are restored to the initial values.
At this time, the confirmation message is displayed.
When [Yes] is clicked, the destination is changed.
When [No] is clicked, the destination remains unchanged.
Options |
JP, QM, CN |
|
|
|
Depending on the destination, the default for the following settings varies. |
|
|||
|
|
JA |
QM |
CN |
Ribbon Save |
|
Tag |
Disable |
Disable |
LCD Language |
|
Japanese |
English |
English |
RS-232C - Parity |
|
Even |
None |
None |
[Interface]
Select an interface to be used.
The default right after the installation is "USB".
The setting is saved upon changed, and reflected in the header view.
When USB, LAN, Multi LAN, or COM is selected, the communication parameters are displayed. Communication with the printer is performed with the selected interface and communication parameter settings.
Multi LAN enables collective processing for multiple printers connected to the network. Up to 50 printers can be registered.
Options
Note: When COM, LPT1, LPT2 or LPT3 is used, assign the installed printer driver port to a port other than the selected port. If the same interface is specified for both the printer driver and the Product, proper communication with the printer may not be established.
17
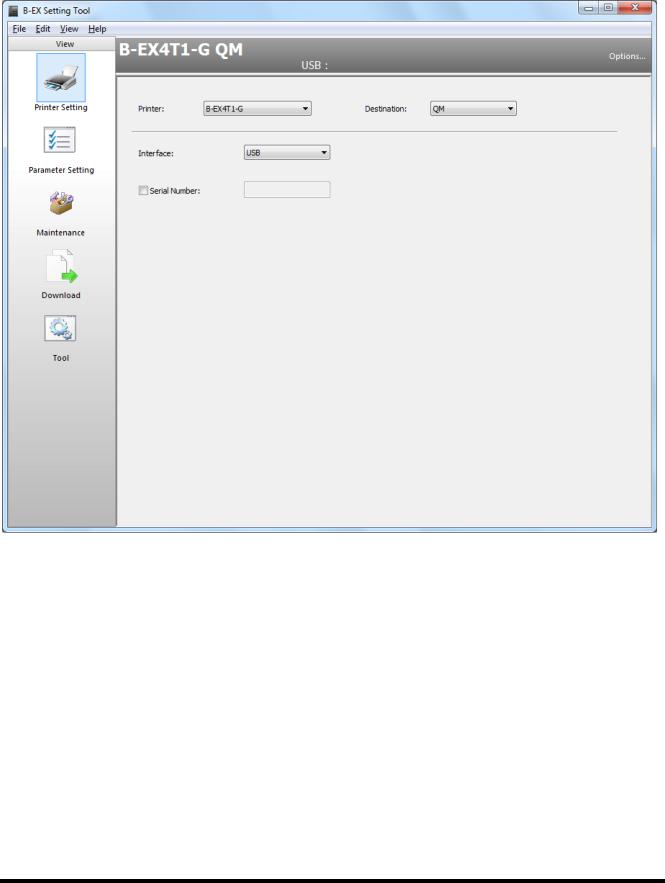
USB
[Serial Number]
Enter the USB serial number assigned to the connected printer.
If this is not entered, the printer to be connected is automatically selected. The Serial number checkbox is unchecked as default.
When checked, an entry of the serial number is enabled.
Enter 12 one-byte characters using "0" to "F". The serial number is not case-sensitive. The Product is connected to the printer with the specified serial number.
When no serial number is set, the Product is connected to the only B-EX printer connected to the PC. Connection of more than one B-EX printer results in an error.
18
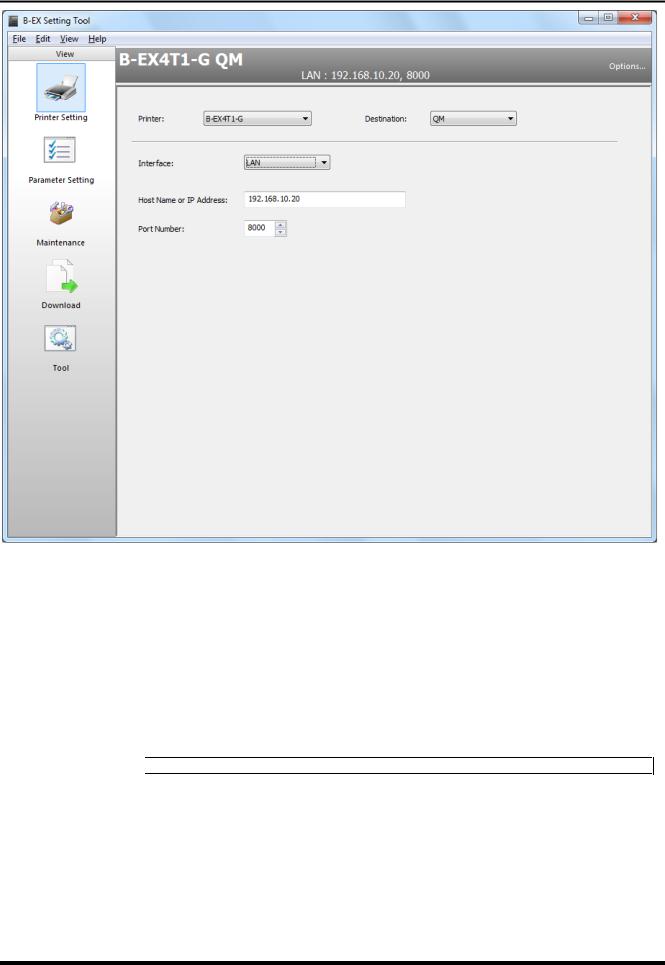
LAN
[Host Name or IP Address]
Enter the host name or IP address set for the connected printer. The default right after the installation is "192.168.10.20".
When specifying the printer with the IP address, use "X.X.X.X" format.
When specifying the printer with the host name, enter up to 32 alphanumeric characters. The setting is saved upon changed, and reflected in the header view.
When the other menu is selected without entering the IP address or host name, the value is automatically restored to the default.
[Port Number]
Set the port number that has been set for the connected printer. The default right after the installation is "8000".
The setting is saved upon changed, and reflected in the header view.
Range |
0 to 65535 |
19
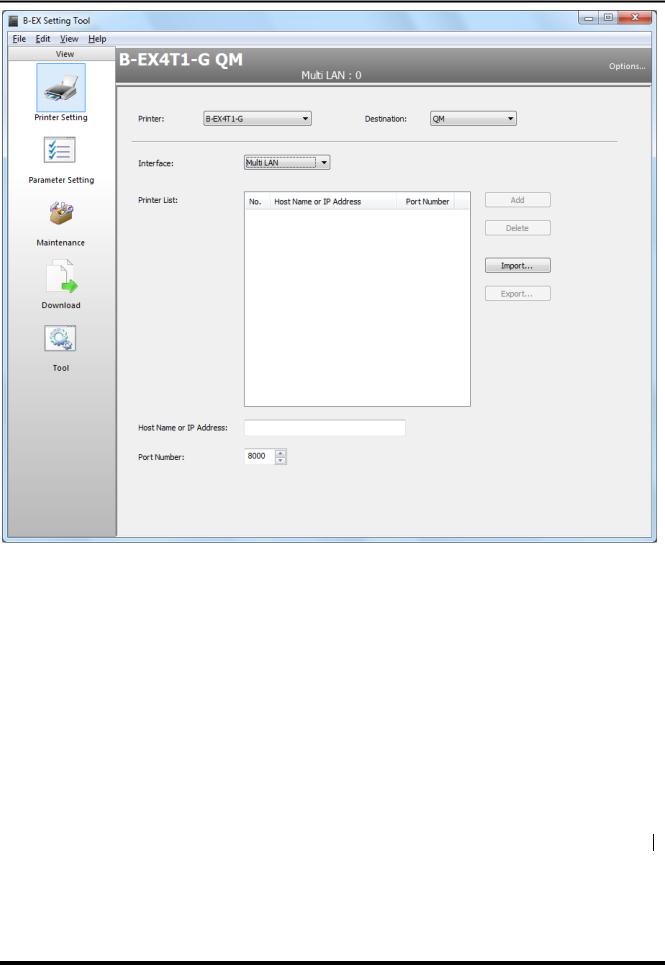
Multi LAN
[Printer List]
Multiple printers on the network to access at one time are displayed. No printer is specified as default right after the installation. Changes are saved upon changed.
Collective processing is executed in ascending order of the number.
When no printer is registered in the list, an error occurs at the start of communication with the printer.
[Host Name or IP Address]
Enter the host name or IP address set for the connected printer. Nothing is specified as default.
When a printer is selected from the [Printer List], its host name or IP address is displayed. When specifying the printer with the IP address, use "X.X.X.X" format.
When specifying the printer with the host name, enter up to 32 alphanumeric characters.
[Port Number]
Set the port number that has been set for the connected printer. The default is "8000".
When a printer is selected from the [Printer List], its port number is displayed.
Range |
0 to 65535 |
[Add]
When this button is clicked, the printer, of which [Host Name or IP Address] and [Port Number] are specified, is added to the [Printer List].
This button is grayed out unless a value is correctly set for the [Host Name or IP Address] and the [Port Number].
20

However, when 50 printers have been registered in the list, the [Add] button becomes disabled. The maximum number of registrable printers in the list is 50.
If a printer having the same [Host Name or IP Address] already exists, the addition of a new printer is not allowed.
An added printer is inserted under the currently selected printer.
Clicking this button while selecting no printer on the [Printer List] causes a printer to be added to the bottom of the list.
[Delete]
When this button is clicked, a selected printer is deleted from the [Printer List]. This button becomes effective when a printer is selected from the [Printer List].
[Import...]
A printer list is imported from the specified Multi LAN configuration file.
When this button is clicked, the [Import] screen is displayed. Specify a Multi LAN configuration file, click [Open], and the file import is started.
The imported printer list is shown in the [Printer List].
If the specified file is not a Multi LAN configuration file, the error message is displayed.
It is possible to create a Multi LAN configuration file when collective processing failed. This printer list can be loaded later.
The printers registered prior to a file import are discarded.
[Export...]
The currently displayed printer list is saved in a specified file as a Multi LAN configuration file.
When this button is clicked, the [Export] screen is displayed. Specify a file where the printer list is saved, click [Save], and the file export is started.
The currently displayed printer list is saved.
When the export failed, the error message is displayed.
21
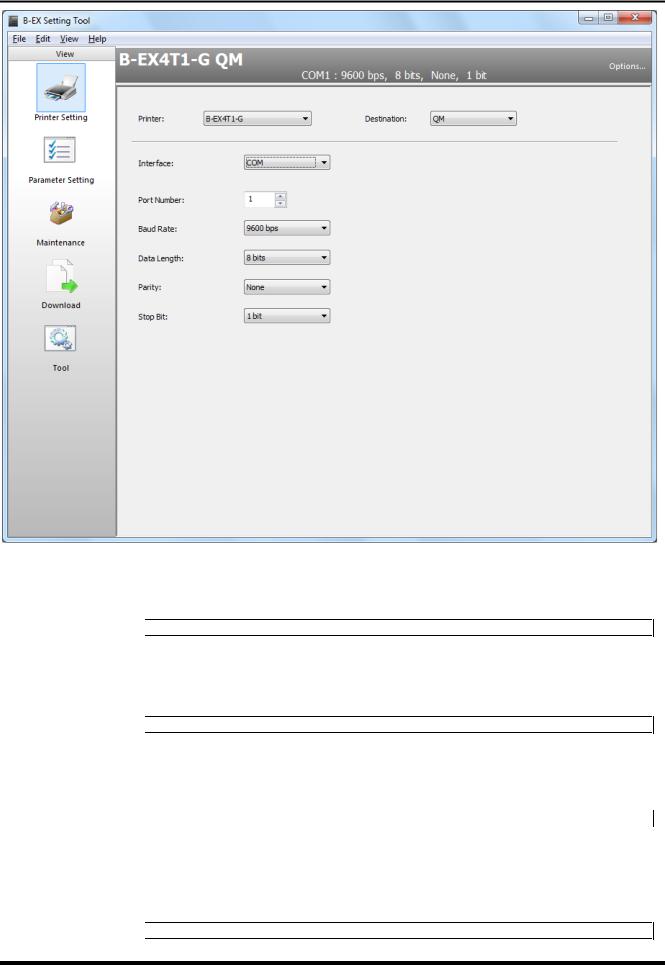
COM
[Port Number]
Select the COM port number used for communication. The default right after the installation is "1".
The setting is saved upon changed, and reflected in the header view.
Range |
1 to 99 |
[Baud Rate]
Select the baud rate for the RS-232C port that has been set for the connected printer. The default right after the installation is "9600 bps".
The setting is saved upon changed, and reflected in the header view.
Options |
2400 bps, 4800bps, 9600 bps, 19200 bps, 38400 bps, 115200 bps |
[Data Length]
Select the data length for the RS-232C port that has been set for the connected printer. The default right after the installation is "8 bits".
The setting is saved upon changed, and reflected in the header view.
Options |
7 bits, 8 bits |
[Parity]
Select the parity for the RS-232C port that has been set for the connected printer. When the destination is JP, The default right after the installation is "Even".
When the destination is QM or CN, The default right after the installation is "None". The setting is saved upon changed, and reflected in the header view.
Options |
None, Even, Odd |
22

[Stop Bit]
Select the stop bit for the RS-232C port that has been set for the connected printer. The default right after the installation is "1 bit".
The setting is saved upon changed, and reflected in the header view.
Options |
1 bit, 2 bits |
23
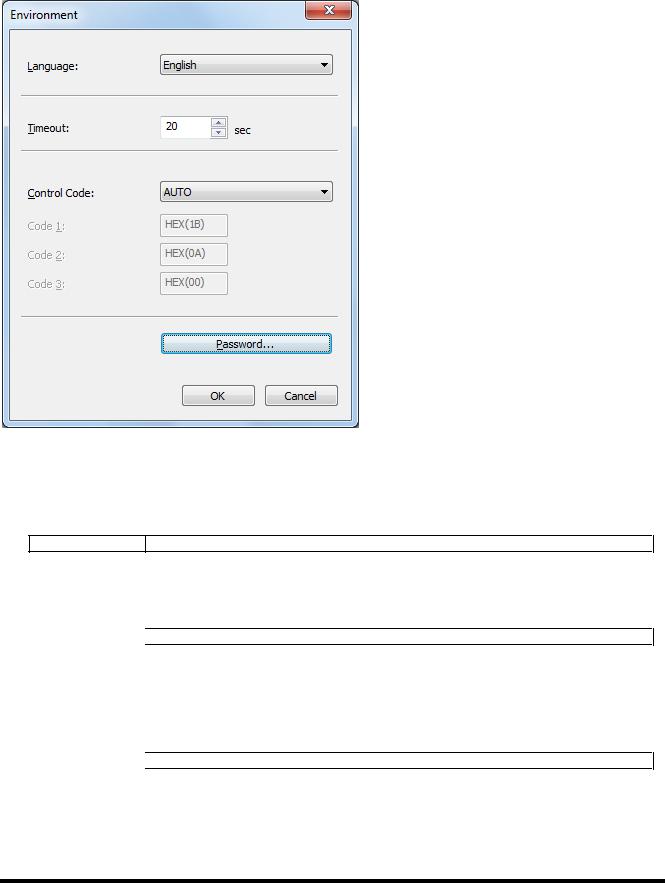
Environment
Set the operating environment for the Product.
When [Options] at the right end on the header view is clicked, the [Environment] screen appears. The setting is not saved by a member of the Users.
[Language]
Select a language used to display the Product.
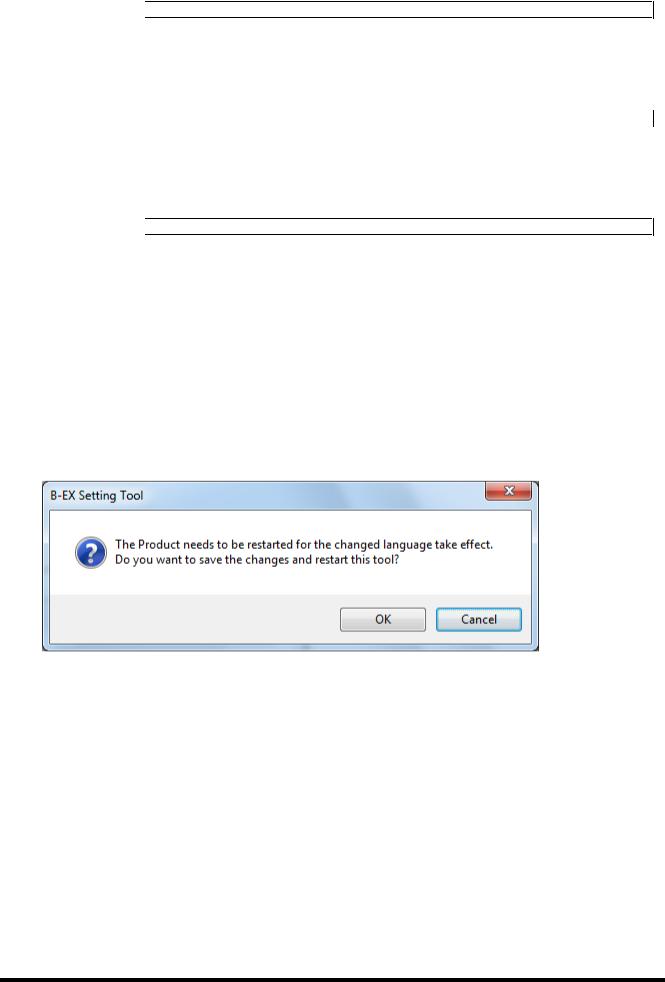
The language selected during the installation has been set as default. Restart the Product for the changed language to take effect.
After the Product is restarted, the all values on the all screens, except the [Printer Setting] and [Environment], are initialized.
Options
[Timeout]
Set the timeout period for the printer update after downloading, in units of seconds. The default right after the installation is "20".
Basically, it is not necessary to change this value as an appropriate value has been set for the printer.
Range |
1 to 600 sec |
[Control Code]
Select the same control code that is set for the connected printer. The default right after the installation is "AUTO".
Basically, it is not necessary to change this value as the default for the printer has been selected. Entering the same value for all of the [Code 1], [Code 2], and [Code 3] results in an error.
If a value improper for the control code is entered, the Product does not work properly.
Options |
AUTO, [ESC] [LF] [NUL], { | }, Manual |
[Code 1]
Enter the same value in hex. format that is set for the connected printer. The default right after the installation is "1B".
[Code 1] is editable only when "Manual" is selected for the [Control Code].
24
Change the value when the control code is set to "Manual" for the printer.
Range |
00 to FF |
[Code 2]
Enter the same value in hex. format that is set for the connected printer. The default right after the installation is "0A".
[Code 2] is editable only when "Manual" is selected for the [Control Code]. Change the value when the control code is set to "Manual" for the printer.
Range |
00 to FF |
[Code 3]
Enter the same value in hex. format that is set for the connected printer. The default right after the installation is "00".
[Code 3] is editable only when "Manual" is selected for the [Control Code]. Change the value when the control code is set to "Manual" for the printer.
Range |
00 to FF |
[Password...]
Set a password to log in the Product.
No password is set right after the installation.
When you want to protect the Product from unauthorized use, set a password. When this button is clicked, the [Password Change] screen is displayed.
Once the password is set, the [Login] screen appears at a start-up of the Product and entry of the password is requested.
Up to 16 one-byte alphanumeric characters can be used for the password. The password is case-sensitive.
The password cannot be set when the Product is started by a user without administrative authority.
[OK]
When this button is clicked, the [Environment] screen is closed saving the changes.
When the same value is set for all of the [Code 1], [Code 2] and [Code 3], the error message appears. The Restart confirmation message is displayed only when the [Language] is changed.
When [Yes] is clicked, the Product is restarted after saving the changes.
When [No] is clicked, the screen returns to the [Environment] screen without saving the changes.
[Cancel]
When this button is clicked, the [Environment] screen is closed without saving any changes. However, the password set on the [Password Change] screen remains effective.
25
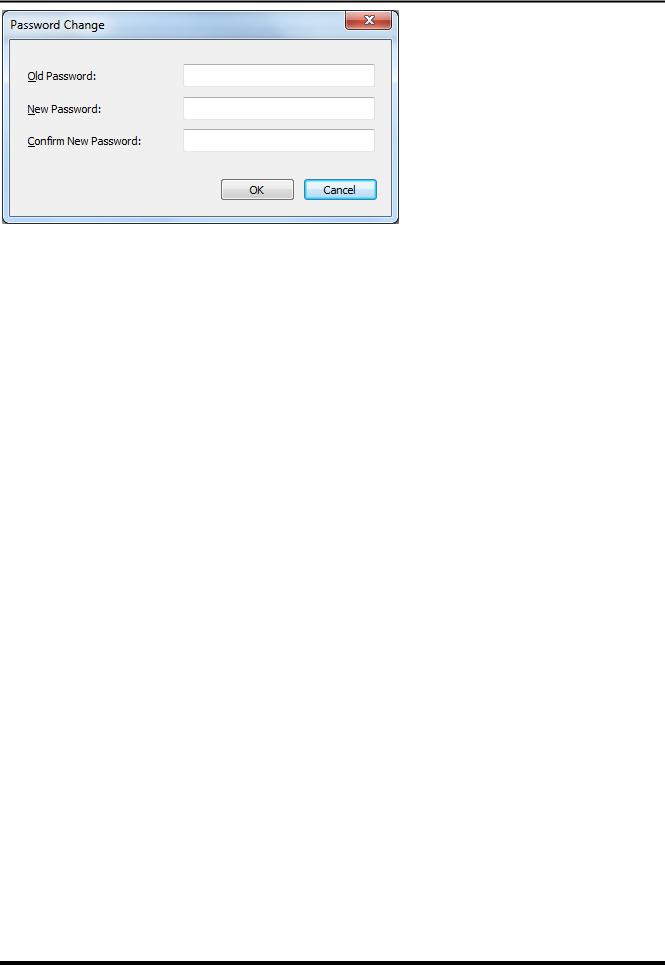
Password Change
[Old Password]
When the password has been set, enter the current password.
It is not necessary to enter a password when this is the first time to set the password. The entered password is displayed with hidden characters.
[New Password]
Enter a new password.
It is not necessary to enter a password when you want to invalidate the current password. The entered password is displayed with hidden characters.
[Confirm New Password]
Re-enter the new password to confirm it.
It is not necessary to enter a password when you want to invalidate the current password. The entered password is displayed with hidden characters.
[OK]
When this button is clicked, the [Password Change] screen is closed saving the new password. Clicking [Cancel] on the [Environment] screen does not affect password saving.
If the [Old Password] is incorrect, or if the [New Password] and the [Confirm New Password] do not match, the error message appears.
Entering only the [Old Password] invalidates the password.
[Cancel]
When this button is clicked, the [Password Change] screen is closed without saving any changes.
26
Loading...