


OWNER'S MANUAL
Integrated Digital LCD TV
42XV550A_560A 46XV550A_560A
Owner's Record
You will find the model number and serial number on the back of the TV. Record these numbers in the spaces provided below. Refer to them whenever you call upon your TOSHIBA dealer regarding this product.
Model number:
Serial number:
Trademark of the DVB - Digital Video Broadcasting Project
2008
VX1A00121000

Contents
Introduction
Welcome to Toshiba . . . . . . . . . . . . . . . . . . . . . . . . . . . . . . . . . . . . . . . . . . . . . . . . . . . . . . . . . . . . . . . . . . .3 Important Safety Instructions. . . . . . . . . . . . . . . . . . . . . . . . . . . . . . . . . . . . . . . . . . . . . . . . . . . . . . . . . . . . .3 Important information . . . . . . . . . . . . . . . . . . . . . . . . . . . . . . . . . . . . . . . . . . . . . . . . . . . . . . . . . . . . . . . . . .6
Getting started
Connecting an aerial. . . . . . . . . . . . . . . . . . . . . . . . . . . . . . . . . . . . . . . . . . . . . . . . . . . . . . . . . . . . . . . . . . . .7 Exploring your new TV . . . . . . . . . . . . . . . . . . . . . . . . . . . . . . . . . . . . . . . . . . . . . . . . . . . . . . . . . . . . . . . . .7 TV front and side panel controls . . . . . . . . . . . . . . . . . . . . . . . . . . . . . . . . . . . . . . . . . . . . . . . . . . . . . . . . . .8 TV back panel connections . . . . . . . . . . . . . . . . . . . . . . . . . . . . . . . . . . . . . . . . . . . . . . . . . . . . . . . . . . . . . .9 Learning about the remote control . . . . . . . . . . . . . . . . . . . . . . . . . . . . . . . . . . . . . . . . . . . . . . . . . . . . . . . .10 Turning the TV on . . . . . . . . . . . . . . . . . . . . . . . . . . . . . . . . . . . . . . . . . . . . . . . . . . . . . . . . . . . . . . . . . . . .12 Tuning the TV for the first time. . . . . . . . . . . . . . . . . . . . . . . . . . . . . . . . . . . . . . . . . . . . . . . . . . . . . . . . . .12 Learning about the menu system . . . . . . . . . . . . . . . . . . . . . . . . . . . . . . . . . . . . . . . . . . . . . . . . . . . . . . . . .12 Programming channels into the TV’s channel memory. . . . . . . . . . . . . . . . . . . . . . . . . . . . . . . . . . . . . . . .14 Watching TV programmes. . . . . . . . . . . . . . . . . . . . . . . . . . . . . . . . . . . . . . . . . . . . . . . . . . . . . . . . . . . . . .16
Using the TV’s features (General)
Picture adjustment . . . . . . . . . . . . . . . . . . . . . . . . . . . . . . . . . . . . . . . . . . . . . . . . . . . . . . . . . . . . . . . . . . . .17 Sound adjustment . . . . . . . . . . . . . . . . . . . . . . . . . . . . . . . . . . . . . . . . . . . . . . . . . . . . . . . . . . . . . . . . . . . . .21 Other feature settings . . . . . . . . . . . . . . . . . . . . . . . . . . . . . . . . . . . . . . . . . . . . . . . . . . . . . . . . . . . . . . . . . .22 The timers. . . . . . . . . . . . . . . . . . . . . . . . . . . . . . . . . . . . . . . . . . . . . . . . . . . . . . . . . . . . . . . . . . . . . . . . . . .23 Confirming Software Version . . . . . . . . . . . . . . . . . . . . . . . . . . . . . . . . . . . . . . . . . . . . . . . . . . . . . . . . . . .23 Resetting the TV . . . . . . . . . . . . . . . . . . . . . . . . . . . . . . . . . . . . . . . . . . . . . . . . . . . . . . . . . . . . . . . . . . . . .24 Selecting the video input source . . . . . . . . . . . . . . . . . . . . . . . . . . . . . . . . . . . . . . . . . . . . . . . . . . . . . . . . .24 Using REGZA-LINK . . . . . . . . . . . . . . . . . . . . . . . . . . . . . . . . . . . . . . . . . . . . . . . . . . . . . . . . . . . . . . . . . .25 Teletext in Analogue TV . . . . . . . . . . . . . . . . . . . . . . . . . . . . . . . . . . . . . . . . . . . . . . . . . . . . . . . . . . . . . . .26 Teletext in Digital TV . . . . . . . . . . . . . . . . . . . . . . . . . . . . . . . . . . . . . . . . . . . . . . . . . . . . . . . . . . . . . . . . .28 Subtitles . . . . . . . . . . . . . . . . . . . . . . . . . . . . . . . . . . . . . . . . . . . . . . . . . . . . . . . . . . . . . . . . . . . . . . . . . . . .28
Other Digital TV features and settings
Using the EPG (Electronic Programme Guide) . . . . . . . . . . . . . . . . . . . . . . . . . . . . . . . . . . . . . . . . . . . . . .29 Favourite Channel Lists . . . . . . . . . . . . . . . . . . . . . . . . . . . . . . . . . . . . . . . . . . . . . . . . . . . . . . . . . . . . . . . .29 Digital settings - Channel Options . . . . . . . . . . . . . . . . . . . . . . . . . . . . . . . . . . . . . . . . . . . . . . . . . . . . . . . .30 Digital settings - Parental Control . . . . . . . . . . . . . . . . . . . . . . . . . . . . . . . . . . . . . . . . . . . . . . . . . . . . . . . .30 Local Time Settings . . . . . . . . . . . . . . . . . . . . . . . . . . . . . . . . . . . . . . . . . . . . . . . . . . . . . . . . . . . . . . . . . . .31 Digital Output Format . . . . . . . . . . . . . . . . . . . . . . . . . . . . . . . . . . . . . . . . . . . . . . . . . . . . . . . . . . . . . . . . .31
Connecting your TV
Back connections . . . . . . . . . . . . . . . . . . . . . . . . . . . . . . . . . . . . . . . . . . . . . . . . . . . . . . . . . . . . . . . . . . . . .32 Side connections. . . . . . . . . . . . . . . . . . . . . . . . . . . . . . . . . . . . . . . . . . . . . . . . . . . . . . . . . . . . . . . . . . . . . .33 Connecting an HDMI or a DVI device . . . . . . . . . . . . . . . . . . . . . . . . . . . . . . . . . . . . . . . . . . . . . . . . . . . .34 Selecting the PC/HDMI1 audio mode . . . . . . . . . . . . . . . . . . . . . . . . . . . . . . . . . . . . . . . . . . . . . . . . . . . . .35 Setting the HDMI1 audio mode . . . . . . . . . . . . . . . . . . . . . . . . . . . . . . . . . . . . . . . . . . . . . . . . . . . . . . . . . .35 Connecting a computer . . . . . . . . . . . . . . . . . . . . . . . . . . . . . . . . . . . . . . . . . . . . . . . . . . . . . . . . . . . . . . . .36 Using the PC Settings. . . . . . . . . . . . . . . . . . . . . . . . . . . . . . . . . . . . . . . . . . . . . . . . . . . . . . . . . . . . . . . . . .37 REGZA-LINK connection. . . . . . . . . . . . . . . . . . . . . . . . . . . . . . . . . . . . . . . . . . . . . . . . . . . . . . . . . . . . . .38
Reference section
Troubleshooting . . . . . . . . . . . . . . . . . . . . . . . . . . . . . . . . . . . . . . . . . . . . . . . . . . . . . . . . . . . . . . . . . . . . . .39 APPENDIX . . . . . . . . . . . . . . . . . . . . . . . . . . . . . . . . . . . . . . . . . . . . . . . . . . . . . . . . . . . . . . . . . . . . . . . . .40 Broadcast system . . . . . . . . . . . . . . . . . . . . . . . . . . . . . . . . . . . . . . . . . . . . . . . . . . . . . . . . . . . . . . . . . . . . .41 Specifications . . . . . . . . . . . . . . . . . . . . . . . . . . . . . . . . . . . . . . . . . . . . . . . . . . . . . . . . . . . . . . . . . . . . . . . .41
2

Introduction
Welcome to Toshiba
•Thank you for purchasing this Toshiba LCD Colour Television. This manual will help you use the exciting features of your new TV.
•Instructions in this manual are based on using the remote control.
•Please read all safety and operating instructions in this manual carefully, and keep this manual for future reference.
Important Safety Instructions
Be sure to observe the following instructions and precautions to ensure safe use of this TV.
Installation
1)Always connect the power plug to an appropriate electrical outlet equipped with 220-240V, AC 50Hz.
Never use the TV outside the specified voltage range. It may cause a fire or an electric shock.
220-240V AC, 50Hz
Check!
2)Never insert or remove the power plug with wet hands.
This may cause an electric shock.
3)Never place the TV in an unstabilized location such as on a shaky table, incline or location subject to vibration.
The TV may drop or fall off which may cause injury or damage.
4)Never block or cover the slots and openings in the cabinet.
•Never place the TV so that it is facing upward or on its side.
•Never place the TV in a closet, bookcase or other similar area where the ventilation is poor.
•Never drape a newspaper, tablecloth or curtain on the TV.
•When installing the TV against a wall, always keep the TV at least 10 cm away from the wall.
•Never place the TV on a soft unstable surface, such as a carpet, or a cushion.
The inside of this TV will overheat if the ventilation holes are covered, blocked or sealed, which may result in a fire.
5)Never place the TV near a heater or in direct sunlight.
The surface of the cabinet or power cord may melt and result in a fire or an electric shock.
6)Never place the TV in an area exposed to high humidity levels, such as in a bathroom or close to a humidifier.
This may cause a fire or an electric shock.
7)Never place the TV next to a stove where it will be exposed to oil, smoke, or steam, or in a location where there is a large quantity of dust.
This may cause a fire or an electric shock.
3

Introduction
8)Install the TV in a horizontal, stable location. Connect between two clips on the back of the TV and a wall, pillar, etc., with a sturdy tie and clip of supplied accessories (- page 42).
•Use as short a tie as possible to ensure the TV is stable.
•If the TV is not installed securely, it may lean or fall over and cause an injury.
•To prevent injury, use the exclusive optional stand or wall-hanging bracket to install this TV on the floor or wall securely in accordance with a qualified technician.
Sturdy tie
(as short as possible)
|
Clip |
Clip |
Clip |
|
Side view |
Top view |
9)Precautions for moving the TV
•When moving the TV, be sure to remove the plug from the wall outlet and disconnect the aerial cable and audio/video cables, any steady ties. Fire or electric shock may result if the power cord is damaged.
•When carrying the TV, at least two people are needed. Be sure to carry it upright.
•Never carry the TV with the screen facing up or down.
Use
1)Never place hot objects or open flame sources, such as lighted candles or nightlights, on or close to the TV.
High temperatures can melt plastic and lead to fires.
2)The apparatus shall not be exposed to dripping or splashing and that no objects filled with liquids, such as vases, shall be placed on the apparatus.
When liquids are spilled or small items are dropped inside the TV, this may cause a fire or an electric shock. If small objects drop inside the TV, turn off the TV and remove the power plug from the outlet immediately and contact a service technician.
3)Never insert objects (metal or paper) or pour water inside the TV through ventilation holes and other openings.
These items may cause a fire or an electric shock.
If these objects are inserted inside the TV, turn off the TV and remove the power plug from the outlet immediately and contact a service technician. Be especially careful that children do not insert objects in the TV.
10)Precautions for installing on outdoor aerial
An outside aerial system should not be located in the vicinity of overhead power lines, or other electric light or power circuits.
If the aerial falls down or drops, it may cause injury or electric shock.
 Clip
Clip 
4)Never stand or climb on the TV.
Be especially careful in households with children to prevent them through climbing on top of the TV.
It may move, fall over, break, become damaged or cause an injury.
4

Introduction
5)When the TV will not be used for a long period of time, such as during vacation or travel, remove the power plug from the wall outlet for safety.
•The TV is not completely disconnected from the power supply line, as minute current is consumed even when the ! Power switch is turned off.
•The Mains plug or an appliance coupler is used as the disconnect device, therefore the disconnect device shall remain readily operable.
6)Never pull on the power cord when removing the plug from the wall outlet.
Always hold the plug firmly when removing it. If the power cord is yanked, the cord may become damaged and a fire or an electric shock may occur.
7)Never cut, break, modify, twist, bunch up or bent the cord or apply excessive force or tension to it.
Never place heavy objects on the cord or allow it to overheat as this may cause damage, a fire or an electric shock. Contact a service technician if the power cord is damaged.
8)If there is thunder or lightning, never touch the aerial cable or other connected cables.
You may suffer an electric shock.
Service
1)Never repair, modify or disassemble the TV by yourself.
It may cause a fire or an electric shock. Consult a service technician for inspection and repairs.
2)When a malfunction occurs, or if smoke or an unusual odor comes from the TV, turn off the TV and remove the power plug from the outlet immediately.
Make sure that the smoke or smell has stopped, then contact a service technician. If the TV is still used in this condition, it may cause a fire or an electric shock.
3)If the TV is dropped or the cabinet is broken, turn off the TV and remove the power plug from the outlet immediately.
If the TV has power in this condition, it may cause a fire or an electric shock. If the cabinet is broken, be careful when handling the TV to prevent an injury. Contact a service technician for inspection and repair.
4)When the TV reaches the end of its useful life, ask a qualified service technician to properly dispose of the TV.
Note:
The lamp unit contains a small amount of mercury. Disposal of mercury may be regulated due to environmental considerations.
Dispose of the used lamp unit by the approved method for your area. For disposal or recycling information, please contact your local authorities.
5
Introduction
Cleaning
1)Remove the power plug before cleaning.
Never use solvents such as benzine or thinner to clean the TV.
•These solvents may distort the cabinet or damage its finish.
•If rubber or vinyl products remain in contact with the
TV for a long time, a stain may result.
If the cabinet becomes dirty, clean it with a soft, dry cloth.
When cleaning the surface of the LCD display, wipe the panel surface gently with a soft, dry cloth.
2)Periodically disconnect the power plug from the outlet and check it.
If dust has collected on the power plug connectors, clean off the dust with dry cloth.
This dust may cause a fire due to reduced insulation on the plug.
Clean here
Important information
1)LCD screen
•If you have the LCD screen facing to the sun, the LCD screen will be damaged. Be aware of locating the TV close to a window or outdoors.
•Never press the LCD screen strongly or scratch it, and never put anything on it. These actions will damage the LCD screen.
2)Cabinet and LCD screen
Never spray volatile compounds such as insecticide on the cabinet and LCD screen.
This may cause a discoloration or damage the cabinet and LCD screen.
3)Some pixels of the screen do not light up
The LCD display panel is manufactured using an extremely high level of precision technology; however, sometimes some pixels of the screen may be missing picture elements or have luminous spots. This is not a sign of malfunction.
4)Interference
The LCD display may cause interference in image, sound, etc. of other electronic equipment that receives electromagnetic waves (e.g. AM radios and video equipment).
5)Using in low temperature areas
If you use the TV in the room of 0°C or less, the picture brightness may vary until the LCD monitor warms up. This is not a sign of malfunction.
6)Afterimages
If a still picture is displayed, an afterimage may remain on the screen; however, it will disappear.
This is not a sign of malfunction.
Exemptions
•Toshiba is not liable for any damage caused by fires, natural disaster (such as thunder, earthquake, etc.), acts by third parties, accidents, owner's misuse, or uses in other improper conditions.
•Toshiba is not liable for incidental damages (such as profit loss or interruption in business, modification or erasure of record data, etc.) caused by use or inability to use product.
•Toshiba is not liable for any damage caused by neglect of the instructions described in the owner's manual.
•Toshiba is not liable for any damage caused by misuse or malfunction through simultaneous use of this product and the connected equipment.
6
Getting started
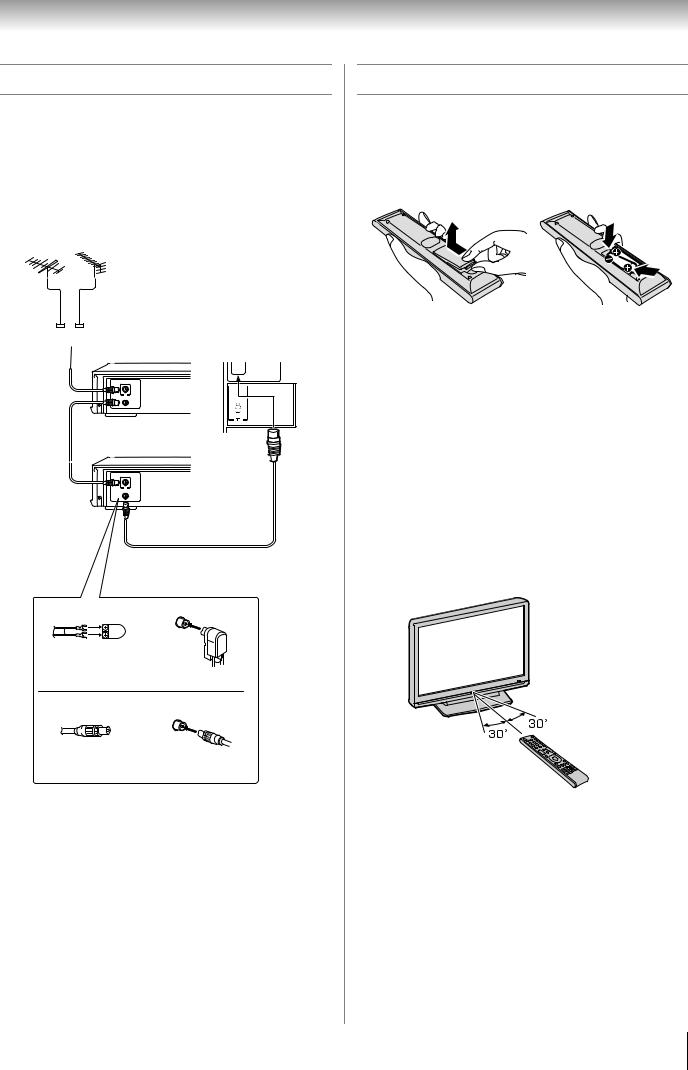
Connecting an aerial
Optimum reception of colour requires a good signal and will generally mean that an outdoor aerial must be used.
The exact type and positioning of the aerial will depend upon your particular area.
Your Toshiba dealer or service personnel can best advise you on which aerial to use in your area.
Before connecting the aerial cable, turn off all main power switches.
VHF |
|
UHF |
|
|
|
Outdoor aerial |
|
|
|
|
|
|
Mixer |
|
|
|
|
Decoder |
TV back view |
|
|
||
|
|
|
|
IN
OUT
Media Recorder
IN
OUT
Aerial cable (75 7 coaxial) (not supplied)
300 7 twin-lead feeder
Aerial adaptor |
75 7 |
|
(not supplied) |
||
|
aerial |
|
|
terminal |
|
75 7 coaxial cable |
|
|
Plug |
75 7 aerial |
|
(not supplied) |
||
terminal |
||
|
Exploring your new TV
Installing the remote control batteries
Remove the battery cover.
Insert two R03 (AAA) batteries matching the –/+ polarities of the battery to the –/+ marks inside the battery compartment.
Cautions:
•Dispose of batteries in a designated disposal area. Batteries must not be exposed to excessive heat such as sunshine, fire or the like.
•Attention should be drawn to the environmental aspects of battery disposal.
•Never mix battery types or combine used batteries with new ones.
Notes:
•If the remote control does not operate correctly, or if the operating range becomes reduced, replace both batteries with new ones.
•If the batteries are dead or if you will not use the remote control for a long time, remove the batteries to prevent battery acid from leaking into the battery compartment.
Effective range
within 5 m
7
Getting started
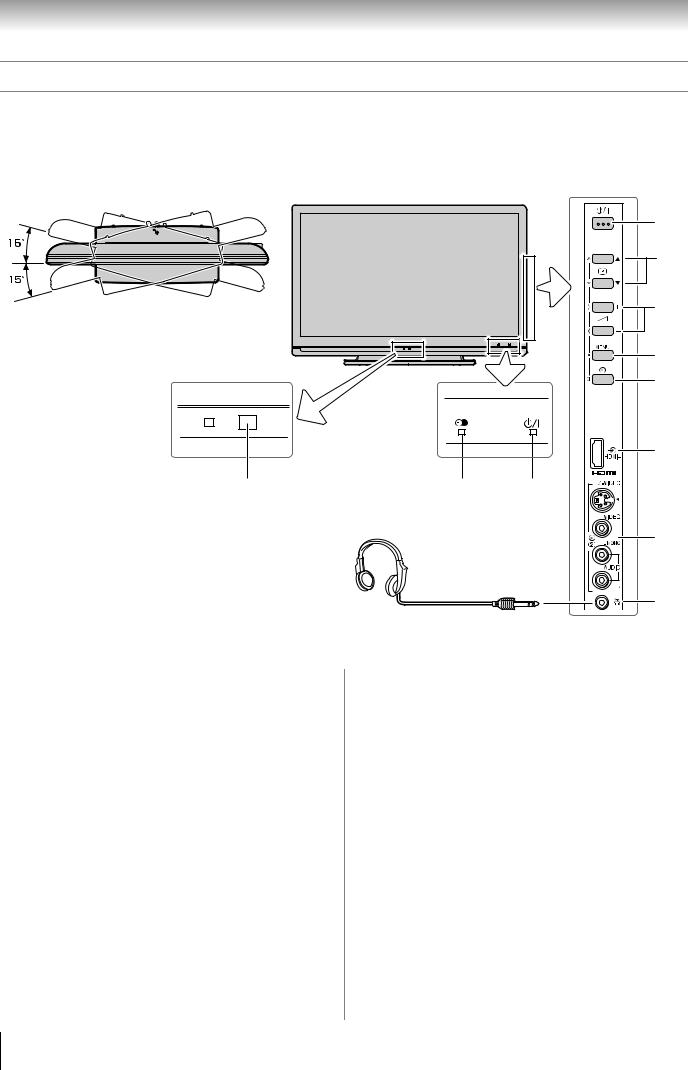
TV front and side panel controls
•You can operate your TV using the buttons on the side panel or the remote control. The back and side of the panel provide the terminal connections to connect other equipment to your TV (- “Connecting your TV” pages 32 - 38).
•For the use of each control, see the pages in brackets.
TV top view |
TV front view |
Right side view |
You can swivel the TV screen. (Only 46XV550A model)
Swivel angle: 15 degrees to left and right.
4
5
6
7
8
9
1 |
2 |
3 |
Headphones
(Not supplied)
10
11
1(Remote sensor) — Point the remote control toward this remote sensor (- page 7).
2 (DTV timer LED) — Digital TV timer Indicator (- page 23).
3! (Power LED) — Power indicator (- page 12).
4! (Power on/Standby) — Press to turn the TV on/ standby (- page 12).
5pBb(Programme position) — When no menu is onscreen, these buttons select the programme position. (- page 16).
Uu (MENU up/down) — When a TV menu is onscreen, these buttons function as up/down menu navigation buttons (- page 12).
62 – + (Volume) — When no menu is on-screen, these buttons adjust the volume level (- page 10).
Ii (MENU left/right) — When a TV menu is on-screen, these buttons are used for left/right menu navigation and to adjust settings (- page 12).
7MENU — Press to access the TV SETUP menu (- page 12).
8o (Input source selection) — When no menu is onscreen, this button selects the input source (- page 24).
OK — When a TV menu is on-screen, this button functions as the next menu navigation button (- page 12, 24).
9o HDMI4 (input terminal) — High-Definition Multimedia Interface input receives digital audio and uncompressed digital video from an HDMI device (- page 34).
10o (2) (Video 2 input terminals) — Optional S-video or standard video and standard audio inputs (-page 33).
11D (Headphone jack) — For use with headphones.
Note:
When the Headphone jack is being used, the sound from all speakers will be muted, and normal sound will be output to the headphones only.
8
Getting started
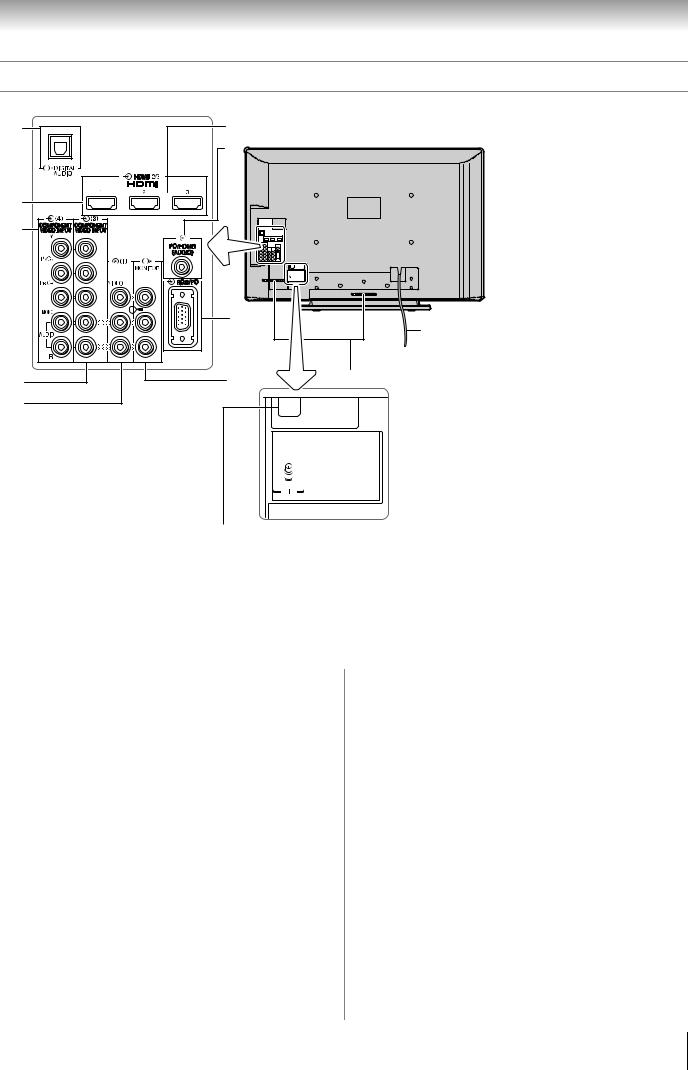
TV back panel connections
13 |
12 |
|
18 |
14 |
|
15 |
|
|
19 |
16 |
20 |
17 |
|
TV back view
*You can use the cable holder to hold aerial cable, video and audio cables etc.
When moving the TV, never hold this holder.
Power cord
 Cable holder*
21
12o HDMI2 and o HDMI3 (input terminals) — HighDefinition Multimedia Interface input receives digital audio and uncompressed digital video from an HDMI device (- page 35).
13O DIGITAL AUDIO (OPTICAL) (output terminal)
— For use when connecting an amplifier with optical type digital audio input (- page 32).
14o HDMI1 (input terminal) — High-Definition Multimedia Interface input receives digital audio and uncompressed digital video from an HDMI device or uncompressed digital video from a DVI device
(- page 34).
15o (4) (Video 4 input terminals) — High-definition component video and standard (analogue) stereo audio inputs (- page 33).
16o (3) (Video 3 input terminals) — High-definition component video and standard (analogue) stereo audio inputs (- page 32).
17o (1) (Video 1 input terminals) — Standard (composite) video and standard (analogue) stereo audio inputs (- page 32).
18oPC/HDMI1 (AUDIO) (input terminal) — PC audio input terminal is shared with HDMI-1 analogue audio input terminal, and their use can be configured in the SETUP menu. (- page 34, 36).
19o RGB/PC (input terminal) — For use when connecting a personal computer (PC) (- page 36).
20O MONITOR (output terminals) — Standard video and standard audio outputs (- page 33).
No On-Screen-Display will output from these terminals.
21A (Aerial input terminal) — Aerial signal input (- page 7).
9
Getting started
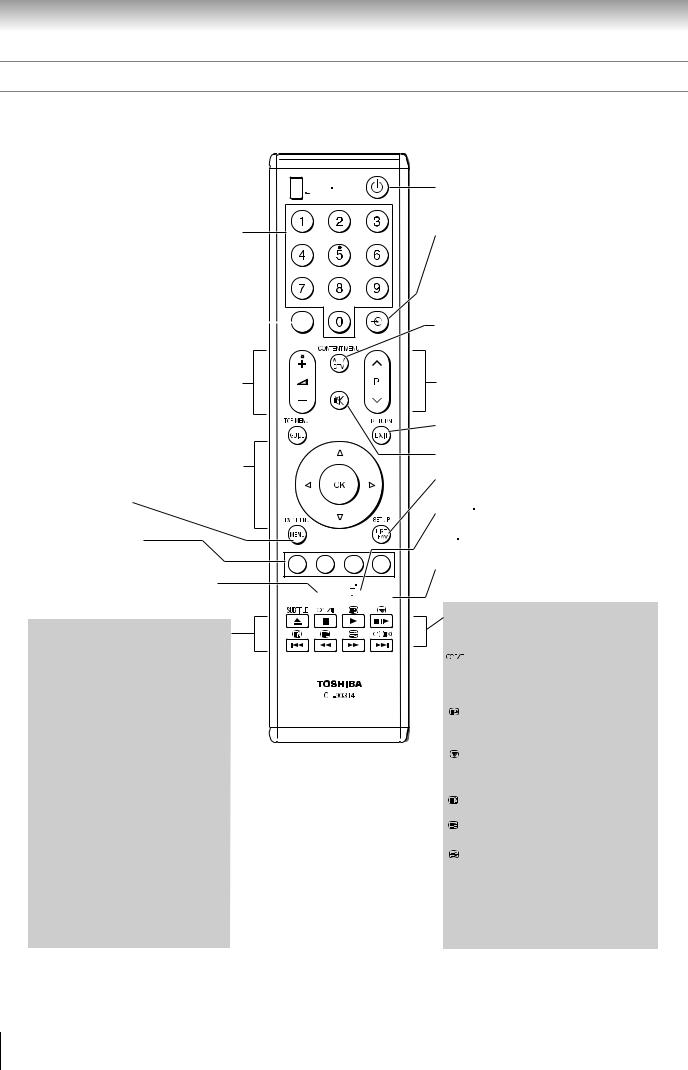
Learning about the remote control
Location of controls
To selectTV, REGZA-LINK 


 or DVD mode


Number buttons (0-9) (- pages 16, 23)
To return to the previous programme 
 (- page 16)
Volume – +
(These buttons adjust the volume level.)
To display digital on-screen  information (- page 29)
•Menu (- page 12)
•OK (- page 12)
MENU (- page 12)
Teletext control buttons
(Four coloured buttons : Red, Green, Yellow, Blue) (- page 27)
Picture mode selection (- page 19) 


 Picture size selection (- page 17)


When using Toshiba DVD, press  to EJECT
press  to STOP press
  to PLAY press


 to PAUSE
press 
 to SKIP REVERSE press
  to REVERSE press
  to FORWARD press
 to SKIP FORWARD
Press DVD MENU to display the menu of DVD disc.
Press RETURN to return to the previous menu accessed.
Press TOP MENU to display the title menu on DVD disc.
Press SET UP to access the on-screen Setup menu for setting adjustment.
Press AUDIO to toggle between different audio modes.
Power on/Standby (- page 12)
Input source selection
(DTV, o1 – o4, HDMI1 – HDMI4, PC, ATV) (- page 24)
To switch between Analogue and Digital TV
Position U u (- page 16)
EXIT (- page 13)
Sound mute (This button turns the sound off/on.)
To display the Channel Lists (- page 29)
• /
/ To display on-screen information (- page 16)
• Initial/index function for Teletext
-analogue only - (- page 27) Teletext on/Superimpose Teletext/off (- page 27)
When in TV mode:


 Digital subtitle on/off (- page 28)
Stereo/bilingual selection (- page 21)
To display the Audio Track menu - digital only-
To access sub-pages
when in teletext - analogue only - (- page 27)
Picture still (- page 18)
Teletext function - analogue only -
To reveal concealed text (- page 27)
To hold a wanted page (- page 27)
To enlarge teletext display size (- page 27)

 To select a page while viewing a normal picture (- page 27) To select the time display
(- page 27)
*For REGZA-LINK remote control functions, please refer to “Location of controls for REGZA-LINK mode” (- page 11).
10
Getting started
Location of controls for REGZA-LINK mode
Set to REGZA-LINK |
To turn the device On/Off |
Number buttons for device 

To display content menu |
To select input from external source |
||
To change volume of the AV |
Position U / u |
||
amplifier |
|
|
|
To display Top Menu |
To exit menu or return to previous |
||
|
menu accessed |
||
To operate menu |
To Mute AV amplifier |
||
|
|
||
|
To display Set Up Menu |
||
To display DVD menu |
To display information |
||
To work interactive |
|||
|
|
||
service control on device |
To select audio mode |
||
Picture mode selection |
|
|
|
Picture size selection |
|
|
|
|
press |
to EJECT |
|
|
press |
to STOP |
|
|
press |
to PLAY |
|
|
press |
to PAUSE |
|
|
press |
to SKIP REWIND |
|
|
press |
to REWIND |
|
|
press |
to FAST FORWARD |
|
|
press |
to SKIP FORWARD |
|
The REGZA-LINK mode switch on the TV remote control allows control of the connected REGZA-LINK device being watched. (- page 25)
Note:
These functions are dependent on the connected device. Not all of the remote control buttons may be available. Please refer to the owner’s manuals of the connected devices.
11
Getting started
Turning the TV on
Switching on the TV
Connect the power cord to a wall outlet. The ! power indicator light should be red (standby mode).
1 Press  on the remote control or ! on the TV right side panel. The ! power indicator light should be green.
Note:
If you watch black and white programmes when the colour system mode is set to Auto, colour noise may appear on the screen. In this case select the appropriate Colour system (For the system of each country or region, refer to pages 14 and 41).
Switching off the TV
1 Press  on the remote control or !on the TV right side panel to switch to the standby mode.
Notes:
•The TV is not fully disconnected from the main supply, as minute current is consumed even when ! is turned off. When the TV will not be used for a long period of time, such as during vacation or travel, remove the power plug from the wall outlet.
•The TV will automatically turn itself off after approximately 15 minutes if it is tuned to a vacant channel or a station that completes its broadcast for the day. This function does not work for external inputs or if Blue Screen mode is set to 'Off'.
•If power is cut off while you are viewing the TV, the Last Mode Memory function turns on the TV automatically when power is applied again. If power is going to be off for a long time and you are going to be away from your TV, unplug the power cord to prevent the TV from turning on in your absence.
Tuning the TV for the first time
Before switching on the TV, put your decoder and media recorder to Standby, if they are connected, and ensure the aerial is connected. To setup the TV, use the buttons on the remote control as detailed on page 10.
1 Press the  button. The Quick Setup screen will appear. This screen will appear the first time that the TV is switched on and each time “Reset TV” (- page 24) is executed.
Quick Setup
Menu Language |
English |
|
|
Time Zone |
New South Wales |
|
|
2 Press Y or Z to select the menu language English or
Français.
3 Press Vto select Time Zone, then press Yor Zto select the item you want to set. (New South Wales, Northern Territory, Queensland, South Australia, Tasmania, Victoria, Western Australia or Australian Capital Territory)
4 Press Qto display the Auto Tuning startup screen. Use Y or Z to select DTV and ATV, DTV or ATV. Then press V to select Start Scan and press Q.
You must allow the TV to complete the search.
Auto Tuning |
|
|
|
|||
|
Progress |
|
Found |
|||
DTV Tune |
3% |
|
|
|
2 |
|
ATV Tune |
|
|
|
Waiting... |
|
|
|
|
|
|
Channel: 10 |
|
|
|
|
|
|
|
|
|
When the search is complete, the TV will automatically select position one.
The Auto Tuning results screen will display the services that are found.
Auto Tuning |
|
|
|
|
|
|
|
||||
|
DTV Services Found :77 |
ATV Services Found: 12 |
|
|
|||||||
|
DTV |
|
ATV |
|
|
|
|
|
|
|
|
|
Pos. |
Name |
|
Type |
Ch. |
||||||
1 |
|
|
|
|
|
|
|
|
35 |
|
|
|
|
|
|
|
|
|
|
|
|||
|
|
|
|
|
|
|
|
|
|||
6 |
|
|
|
|
|
|
|
|
24 |
|
|
9 |
|
|
|
|
|
|
|
|
24 |
|
|
|
|
|
|
|
|
|
|
|
|||
10 |
|
|
|
|
|
|
|
|
35 |
|
|
|
|
|
|
|
|
|
|
|
|||
11 |
|
|
|
|
|
|
|
|
24 |
|
|
|
|
|
|
|
|
|
|
|
|||
12 |
|
|
|
|
|
|
|
|
35 |
|
|
|
|
|
|
|
|
|
|
|
|||
21 |
|
|
|
|
|
|
|
|
32 |
|
|
|
|
|
|
|
|
|
|
|
|||
|
|
|
|
|
|
|
|
|
|
|
|
5 Press Y or Z to view the DTV (digital channel) or ATV (analogue channel) lists.
Auto Tuning |
|
|
|
||||
|
DTV Services Found :77 |
ATV Services Found: 12 |
|||||
|
DTV |
|
ATV |
|
|
|
|
|
Pos. |
Name |
|
|
Ch. |
||
0 |
|
|
|
|
|
31 |
|
1 |
|
|
|
|
|
2 |
|
2 |
|
|
|
|
|
4 |
|
3 |
|
|
|
|
|
6 |
|
4 |
|
|
|
|
|
8 |
|
5 |
|
|
|
|
|
9 |
|
6 |
|
|
|
|
|
10 |
|
6 Use V or U to move through the list to select a channel then press Qto view.
Notes:
•The time will be set automatically by transmission but can be advanced or decreased by up to 3 hours using Local Time Setting.
•The Quick Setup menu can also be displayed at any time from the SETUP menu.
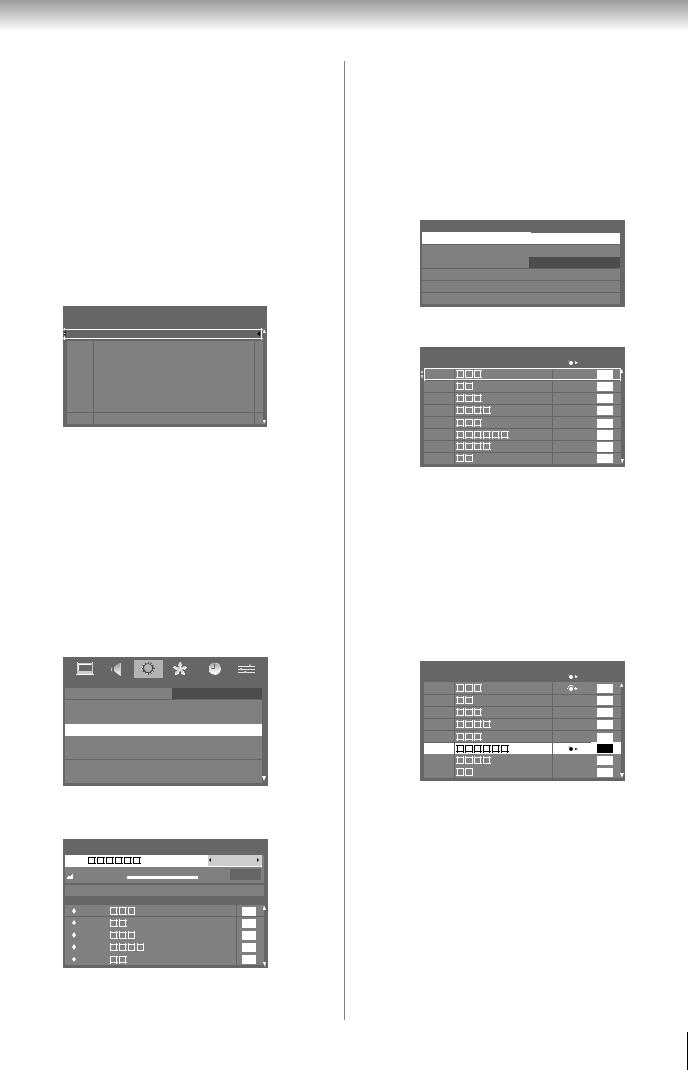
Learning about the menu system
We suggest you familiarize yourself with the display charts before using the menu system:
•Press Mto display menu, then press Y or Z to select main menu headings.
•Press V or U to select an item.
•Press Y or Z to select or adjust setting.
•Press Qto display the next menu.
12
Getting started
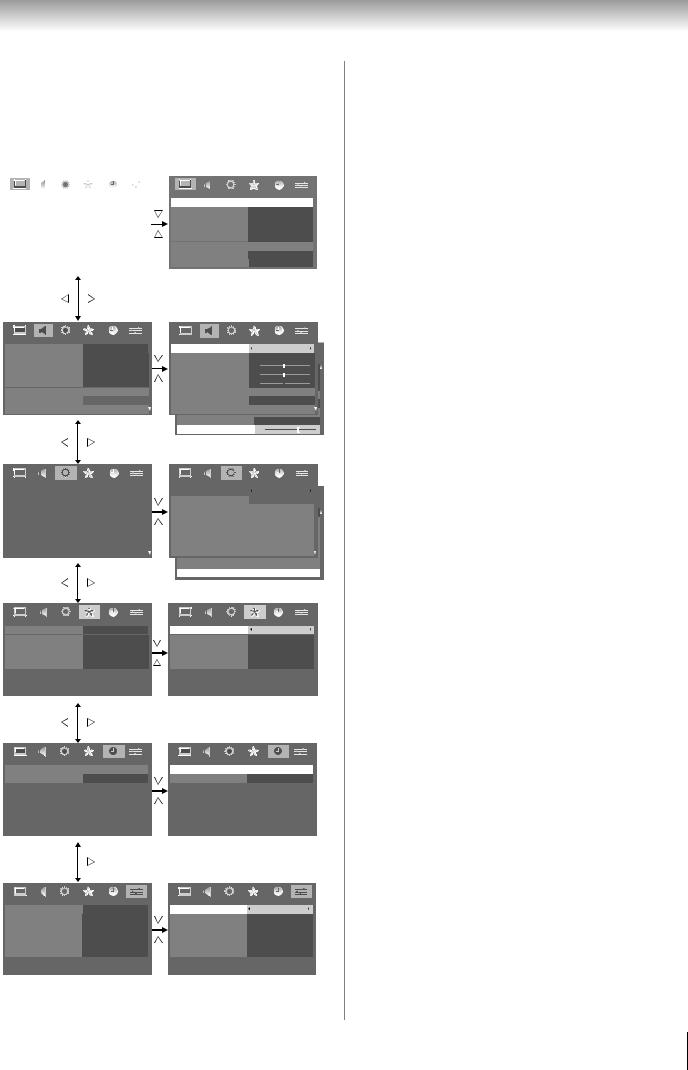
Displaying the menu chart
Note:
The same menu is displayed in DTV (Digital TV) and ATV (Analogue TV) modes; however some items are greyed out in each case.
PICTURE menu
|
|
|
|
|
|
PICTURE |
|
PICTURE |
|
||
Picture Settings |
|
Picture Settings |
|
||
Active Backlight Control |
On |
Active Backlight Control |
On |
||
Auto Contrast |
Off |
Auto Contrast |
Off |
||
x.v.Colour Selection |
Auto |
x.v.Colour Selection |
Auto |
||
3D Colour Management |
Off |
3D Colour Management |
Off |
||
Base Colour Adjustment |
|
Base Colour Adjustment |
|
||
MPEG NR |
Low |
MPEG NR |
Low |
||
DNR |
Auto |
DNR |
Auto |
||
SOUND menu
SOUND
MTS |
|
Auto |
|
||
Dual |
|
Dual 1 |
|
||
Bass |
0 |
|
|
|
|
|
|
|
|
||
|
|
|
|
||
Treble |
0 |
|
|
|
|
|
|
|
|
||
|
|
|
|
||
|
|
|
|
||
Balance |
0 |
|
|
|
|
|
|
|
|
||
|
|
|
|
||
WOW |
|
|
|
|
|
|
|
|
|
||
Stable Sound |
|
Off |
|
||
Dynamic Range Control |
|
|
|
|
|
SETUP menu
SETUP
Menu Language |
English |
Auto Tuning |
|
|
|
ATV Manual Tuning |
|
|
|
DTV Manual Tuning |
|
|
|
DTV Settings |
|
|
|
AV Connection |
|
Picture Position |
|
Quick Setup |
|
REGZA-LINK menu
REGZA-LINK
Enable REGZA-LINK |
On |
TV Auto Power On |
On |
Auto Standby |
On |
Amplifier Control |
On |
Speaker Preference |
TV Speakers |
TIMERS menu
TIMERS
Programme Timers |
|
Sleep Timer |
00:00 |
FUNCTION  menu
menu
FUNCTION
Teletext |
Auto |
Panel Lock |
Off |
Auto Format |
On |
4:3 Stretch |
Off |
Blue Screen |
On |
Side Panel |
1 |
SOUND |
|
|
MTS |
|
Auto |
Dual |
|
Dual 1 |
SOUND |
0 |
|
Bass |
0 |
|
Bass |
|
|
Treble |
0 |
0 |
Treble |
|
|
Balance |
0 |
0 |
Balance |
|
|
WOW |
|
|
WOW |
|
Off |
Stable Sound |
|
|
Stable Sound |
|
Off |
Dynamic Range Control |
|
|
Dynamic Range Control |
|
|
Bass Boost |
|
On |
Bass Boost Level |
|
70 |
SETUP
Menu Language |
English |
Auto Tuning |
|
SETUP |
|
ATV Manual Tuning |
|
ATV Manual Tuning |
English |
DTV Manual Tuning
DTV Manual Tuning
DTV Settings
DTV Settings
AV Connection
AV Connection
Picture Position
Picture Position
Quick Setup
Quick Setup
System Information
Reset TV
REGZA-LINK
Enable REGZA-LINK |
On |
TV Auto Power On |
On |
Auto Standby |
On |
Amplifier Control |
On |
Speaker Preference |
TV Speakers |
TIMERS
Programme Timers
Sleep Timer |
00:00 |
FUNCTION
Teletext |
Auto |
Panel Lock |
Off |
Auto Format |
On |
4:3 Stretch |
Off |
Blue Screen |
On |
Side Panel |
1 |
Notes for menu system:
•In the video input mode (o1 - o4), Auto Tuning, ATV Manual Tuning, DTV Manual Tuning and DTV Settings
are not available. Instead, Manual Settings appears in the SETUP menu (- page 24).
•If you connect external equipment via component video source, Colour system selection in the Manual Settings menu is not available.
•If you do not make a selection for a while, the menu display disappears automatically.
•If you want to close the menu display instantly, press P.
•To return to the previous menu, press M.
•In the PC input mode, PC Settings appears in the SETUP menu (- page 37).
•In the 480i, 576i or 1080i input signal mode, you can select the Cinema Mode in the Picture Settings menu (- page 19).
•When the 3D colour management function is set to on (- page 20), you can select Base Colour Adjustment in the
PICTURE menu.
13
Getting started
Programming channels into the TV’s channel memory
Auto Tuning
Auto Tuning will completely re-tune the TV and can be used to up-date the channel list.
It is recommended that Auto Tuning is run periodically to ensure that all new services are added. All current channels and settings, i.e. favourites and locked channels, will be lost.
Note:
As new services are broadcast, it will be necessary to retune the TV in order to view them.
1 |
Press M, and then press Y or Z to display the SETUP |
||||||||
|
menu. |
|
|
|
|
||||
2 |
Press V to select Auto Tuning, and then press Q. |
||||||||
|
|
|
|
|
|
|
|||
|
|
|
|
|
|
|
|
|
|
|
|
|
|
|
|
|
|
|
|
|
|
|
|
|
|
|
|
|
|
|
SETUP |
|
|
|
|
||||
|
|
Menu Language |
English |
|
|||||
|
|
|
|
|
|
|
|
|
|
Auto Tuning
ATV Manual Tuning
DTV Manual Tuning
DTV Settings
AV Connection
Picture Position
Quick Setup
3 A screen will appear warning that previous settings will be deleted.
Auto Tuning
Previous settings will be lost! Press EXIT for no change.
Tuning Mode |
DTV and ATV |
Start Scan
Use Y or Z to select DTV and ATV, DTV or ATV. Then, press V to select Start Scan and press Qto continue with the Auto Tuning.
The TV will start to search for all available DTV and/or ATV services.
You must allow the TV to complete the search.
When the search is complete, the Auto Tuning screen will display the services found.
4 Use V or U to move through the list to select a channel, and then press Qto view.
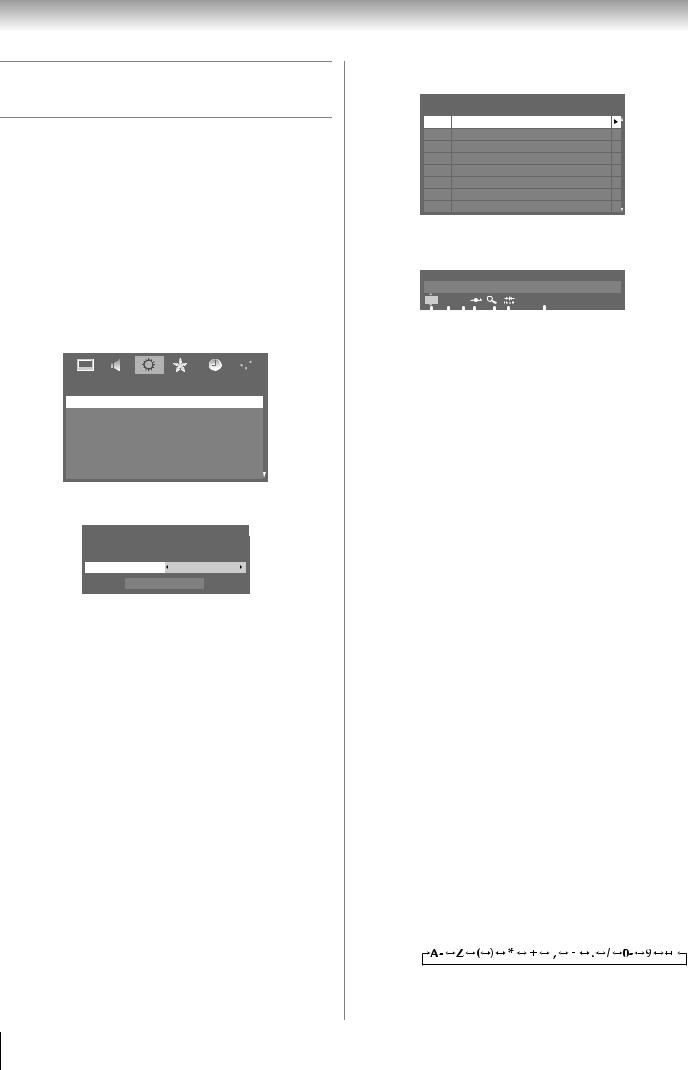
ATV Manual Tuning - analogue only -
Use the Manual tuning operation if desired channels cannot be preset by Auto Tuning or if you would like to preset channels to specific position numbers one by one.
1 From the SETUP menu, press V or U to select ATV Manual Tuning.
2 Press Qto display the ATV Manual Tuning menu. Press V or U to select the position you want to arrange.
ATV Manual Tuning
Pos. Station
1
2
3
4
5
6
7
8
3 Press Qto display the settings menu.
Press Y or Z to select an item, then press V or U to set the item as shown below.
ATV Manual Tuning
Position: 1
1 B/G A
|
|
|
|
|
|
|
|
|
|
A |
|
C |
E |
|
G |
||||
|
B |
|
D |
F |
|||||
A.Position selection
B.Sound system (- page 41)
C.Colour system (- page 41)
A : Automatic (factory set), P : PAL, S : SECAM N4 : NTSC 4.43 (MHz), N3 : NTSC 3.58 (MHz) If the colour of a certain channel is abnormal, the automatic colour system selection (A) may have
malfunctioned, or sound system selection is wrong. In such a case, select another colour and/or sound system (- page 41).
D.Position skip selection
Press Vor Uto turn the position skip option on “8” or off “(”.
The position will then be skipped when you select channels with PU or P u.
The “8” mark will appear beside the position number when you use the Number button on the remote control.
E.Channel search operation
Press Uto search up the band or Vto search down the
band.
Press V or U repeatedly until your desired channel is displayed.
When a station/satellite is found, it will be displayed. NEVER PRESS ANY OTHER BUTTONS WHILE THE SET IS TUNING.
F.Auto Fine Tuning
Press V or U to turn the Auto Fine Tuning option on
“


 ” or off “0”.
The Auto Fine Tuning function automatically corrects slight fluctuations when receiving signals.
Manual Fine Tuning
With the Auto Fine Tuning set to “0”, press V or U until the better picture and sound are obtained.
G.Label
Station labels appear beside the position display each time you turn on the TV, select a channel, or press k.
To change or create station labels:
1)Press V or U repeatedly to select a character for the first space, then press Z.
*(blank space)
14
Getting started
2)Repeat step 1) to enter the rest of the characters. If you would like a blank space in the label name, you must choose a blank space from the list of characters.
Press Qto store your settings.
Sorting positions - analogue -
ATV channels may be moved and stored to the position of your choice.
1 From the SETUP menu, press V or U to select ATV Manual Tuning.
2 With the list of channels now showing, press V or U to select the channel you want to move and press Z.
ATV Manual Tuning |
|
|
||
Pos. |
Station |
|||
1 |
|
|
ABCD |
|
2EFGH
3IJKL
4MNOP
5
6
7
8
3 Use V or U to move through the list to your preferred position. As you do so, the other channels will move to make room.
4 Press Y to store your move. Repeat as necessary, then press P.
DTV Manual Tuning - digital only -
This feature is available for service engineers or can be used for direct channel entry if the multiplex channel is known.
1 Press M, then press Yor Zto display the SETUP menu.
2 Press Vor Uto select DTV Manual Tuning, then press
Q.
SETUP
Menu Language English
Auto Tuning
ATV Manual Tuning
DTV Manual Tuning
DTV Settings
AV Connection
Picture Position
Quick Setup
3 Enter the multiplex number using the number buttons or use Y or Z to adjust the number up or down and then press Q. The TV will start to search for that multiplex.
DTV Manual Tuning
UHF |
|
|
34 |
Signal Strength WEAK |
STRONG |
Quality |
GOOD |
16 New channels - Total |
26 |
|
|
New Pos. Name |
|
|
Type |
831 |
|
|
|
832
833
834
835
When the multiplex is found, any channels that are not currently in the channel list will be added and the channel information will be updated.
4 Repeat as necessary. Press Pto finish.
Channels
The DTV channel order may be changed to suit your personal preference.
1 From the SETUP menu, press V or U to select DTV Settings and press Q.
2 Press V or U to select Channels, then press Q.
DTV Settings
Channels
Channel Options |
|
TV/Radio Mode |
All Channels |
PIN Setting
Parental Control
Local Time Setting
3 With the list of channels showing, press Vor Uto select the channel you want to move, then press Q.
Channels
Pos. Name |
Type |
6
9
11
31
34
36
48
52
4 Use V or U to move through the list to your preferred position. As you do so, the other channels will move to make room.
5 Press Qto store your move. Repeat as necessary, then press P.
The Skip setting for the highlighted channel can be switched between “Set/Not Set” by pressing the RED button on the remote control. This feature allows you to set channels that will be skipped when Puor PUare used to tune. However, these channels will still be available by direct number entry (when tuned a 8 icon will be displayed in the banner to indicate as a skipped channel).
Channels
Pos. Name |
Type |
805
806
807
808
809
810
811
812
15

Getting started
Watching TV programmes
Viewing Digital programmes - digital only -
After you have tuned the TV, you have several ways to navigate through all programmes:
•Press the Number buttons. You may omit the leading zeroes, which will be appended automatically.
•Press PU / P u to view the previous and next position. The channels are arranged in ascending order according to the channel number.
•Press  to display the Channel Lists and press V or U to select a channel, then press Qto view the channel. See page 29 for more details.
Changing the position - analogue only -
1 Enter the desired position number using the Number buttons on the remote control.
For positions below 10, use 0 and the required number e.g., for position 1.
2 You can also change the position by using PU or P u.
Note:
Position selection change between different format channels takes several seconds.
Switching between positions
You can switch positions without entering an actual position number each time.
1 Select the first position you want to view.
2 Select the second position with the Number buttons (0- 9).
3 Press :. The previous position will be displayed.
Each time you press :, the TV will switch back and forth between the two positions.
Selecting the menu language
Choose from 2 different languages (English or French) for the On-Screen-Display.
1 Press M, and then press Y or Z to display SETUP menu.
2 |
Press V or U to select Menu Language. |
||||||||
3 |
Press Y or Z to select the desired language. |
||||||||
|
|
|
|
|
|
|
|||
|
|
|
|
|
|
|
|
|
|
|
|
|
|
|
|
|
|
|
|
|
|
|
|
|
|
|
|
|
|
|
SETUP |
|
|
|
|
||||
|
|
Menu Language |
English |
|
|||||
|
|
|
|
|
|
|
|
|
|
Auto Tuning
ATV Manual Tuning
DTV Manual Tuning
DTV Settings
AV Connection
Picture Position
Quick Setup
Displaying the on-screen information
- analogue only -
1 Press kto display the following on-screen information.
4 ABCD |
Stereo |
The information will disappear in 6 seconds.
•Position or external input mode selected
•Position skip on/off information
•Label (if set)
•Mono/Stereo/Dual audio status
2 To close the display instantly, press kagain.
On-screen information - digital only -
When viewing in Digital TV, the on-screen information will give the details of the programme currently being viewed.
1 Press  , to display the on-screen information.
Now |
|
|
|
|
|
|
|
|
|
|
|
|
|
|
11:00 - 12:00 |
||
|
|
|
|
|
|
|
|
|
|
|
|
|
|
|
|
|
|
HD |
|
16:9 |
|
|
|
|
|
|
|
|
|
|
|
|
|
News |
31 min left |
|
|
|
|
|
|
|
|
|
|
|
|
|
|
|
|
|
|
Comprehensive coverage of local, national and international news with analysis of the key stories of the day and a strong focus on health, social and environmental issues.
Next |
|
12:00 - 12:59 |
|
|
|
|
|
|
Change |
EXIT |
Watch TV |
On-screen information contains the following information:
•Current Channel Number
•Channel Name
•Skip (if set) (8)
•Now and Next Programme Names
•Current date and time
•Received programme video format (SD/HD)
•Teletext availability ( )
)
•Subtitle (closed-caption) availability (indicated by CC)
•Parental rating (PG, MA, G, R, etc.)
•Dolby® Digital audio track availability (indicated by
Dolby D)
•Programme Timer (if set) (4)
2 Press Vor Uto select the “Now” or “Next” information guide.
3 To record the following programme, select “Next” and, press Q. The SET TIMER screen will appear.
SET TIMER |
11:20 Tue, 6 Dec |
Tue, 06 Dec 12:00 - 12:59 |
|
Start Time |
12:00 |
End Time |
12:59 |
Repeat |
Once |
4 The details of the programme will have been added to the timer. Press Qto save.
To indicate that a timer has been set, a clock icon will be displayed in the Next field of the information screen (4).
16
Using the TV’s features (General)
Picture adjustment
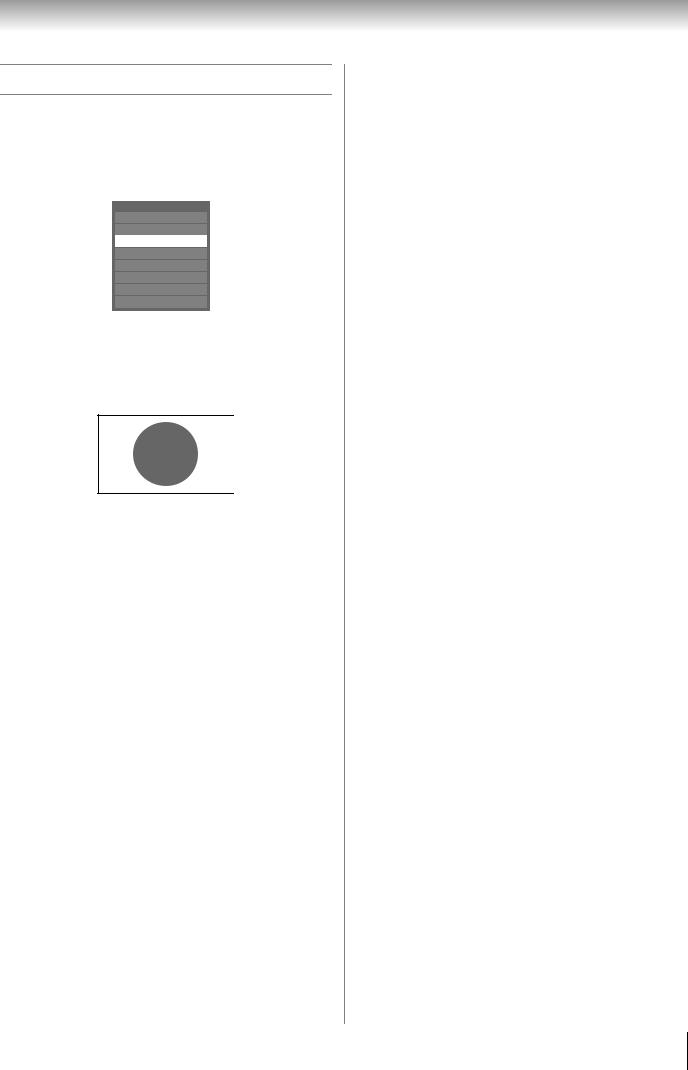
Selecting the picture size
1 Press Oto display the picture size list, and then press V or U to select the appropriate picture size (or press O repeatedly to select required picture size directly).
Ex. HDMI 1080i input signal
Picture Size
Exact Scan
Native
Wide
Super Live 2
Cinema 2
4:3
Super Live 1
Cinema 1
2 Press Q.
Wide
Use this setting when watching a wide-screen DVD, widescreen video tape or a 16:9 broadcast (when available). Due to the range of wide-screen formats (16:9, 14:9, 20:9 etc.), you may see bars on the top and bottom of the screen.
Super Live 2
When receiving “side panel format” signal, this setting will enlarge the image to fit the screen by stretching the image vertically and horizontally, holding the better proportions at the centre of the image. Also the black bars on the both sides of the screen will eliminate or reduce.
Cinema 2
When watching “all sides panel format” films/video tapes, this setting will eliminate or reduce the black bars on all the sides of the screen by zooming in and selecting the image without distortion.
4:3
Use this setting to view a true 4:3 broadcast.
Super Live 1
When receiving “4:3 format” signal, this setting will enlarge the image to fit the screen by stretching the image vertically and horizontally, holding the better proportions at the centre of the image.
Cinema 1
When watching “letterbox format” films/video tapes, this setting will eliminate or reduce the black bars at the top and bottom of the screen by zooming in and selecting the image without distortion.
Subtitle
When subtitles are included on a letterbox format broadcast, this setting will raise the picture so that the most of the text is displayed.
Subtitle
14:9
Use this setting when watching a 14:9 broadcast.
Exact Scan
When receiving 1080i or 1080p signal format, this setting will display the image corrrectly without distortion or picture clipping.
Native
Use this setting for PC connected via HDMI. When receiving video signal source via HDMI input, this setting will display the image correctly without distortion or picture clipping.
17
 Loading...