


15VL63 Series

List of contents |
|
Important Information............................................... |
4 |
Special features ......................................................... |
5 |
Safety instructions ..................................................... |
6 |
Where to install ......................................................... |
7 |
Getting started .......................................................... |
8 |
Aerial connection .................................................................. |
8 |
Switching on......................................................................... |
8 |
Battery fitting ........................................................................ |
8 |
Control unit................................................................ |
9 |
Front and rear panel.............................................................. |
9 |
External connections table ...................................................... |
9 |
Remote control .................................................................... |
10 |
Using the TV ............................................................ |
11 |
Tuning the TV...................................................................... |
12 |
Automatic tuning ................................................................. |
12 |
Manual tuning .................................................................... |
13 |
Program organising ............................................................. |
14 |
TV setup .................................................................. |
15 |
Sound menu ....................................................................... |
15 |
Sound Features............................................................... |
15-16 |
Picture menu ....................................................................... |
16 |
Features Menu .................................................................... |
17 |
Using teletext ..................................................... |
18-19 |
Connecting external equipment .......................... |
20-25 |
Help and service tips ............................................... |
26 |
Technical specifications table.................................... |
27 |
ENGLISH -3-

Important Information
The LCD display panels are manufactured using an extremely high level of precision technology, however sometimes some parts of the screen may be missing picture elements or have luminous spots. This is not a sign of a malfunction.
Please take note
EXCLUSION CLAUSE
Toshiba shall under no circumstances be liable for loss and/or damage to the product caused by ;
i)fire;
ii)earthquake;
iii)accidental damage;
iv)intentional misuse of the product;
v)use of the product in improper conditions;
vi)loss and/or damage caused to the product whilst in the possession of a third party;
vii)any damage or loss caused as a result of the owner’s failure and/or neglect to follow the instructions set out in the owner’s manual;
viii)any loss or damage caused directly as a result of misuse or malfunction of the product when used simultaneously with associated equipment;
Furthermore, under no circumstances shall Toshiba be liable for any consequential loss and/or damage including but not limited to the following, loss of profit, interruption of business, the loss of recorded data whether caused during normal operation or misuse of the product.
Stationary Image
If stationary images generated by teletext, channel identification logos, computer displays, video games, on screen menus, etc. are left on the TV screen for any length of time they could become conspicuous, it is always advisable to reduce both the brightness and contrast settings.
Cleaning the screen and the cabinet...
After turning off the power, clean the screen and the cabinet with a soft, dry cloth. We recommend that you do not use any proprietary polishes or solvents on the screen or cabinet as this may cause damage.
Disposal...
The cold cathode fluorescent lamp in the LCD panel contains a small amount of mercury, when the set reaches the end of its useful life please dispose of it in accordance with Local Government Regulations or at a recycling centre.
ENGLISH -4-

Television
Thank you for buying this television which is designed to give you many years of satisfactory service.
you may already be familiar with using a television but do please take time to read these instructions. They are designed to familiarise you with the unit’s many new features and to ensure you get the very best out of your purchase.
Special Features of the Television
•Available for Cable Channels (A decoder may be required)
•Wide angle perspective
•SCART socket AV Socket and external sound system connection
•Minimum energy consumption
•AVL – Automatic Volume Limiting
•ATS – Automatic Tuning System
•Intelligent program switch
•Programmed power on
•Programmed power off
•Graphic equalizer
•On screen viewing of all control commands, program numbers and additional features
•Manual Fine Tuning
•100 Program memory
•Infrared Remote Control
•Child Lock
ENGLISH -5-

For your safety
This equipment has been designed and manufactured to meet international safety standarts but, like any electrical equipment, care must be taken if you are to obtain the best results and safety is to be assured. So, please read the points below for your own safety. They are of a general nature, intended to help you with all your electronic consumer products and some points may not apply to the goods you have just purchased.
Air Circulation...
Leave at least 10 cm clearance around the television to allow adequate ventilation. This will prevent the TV from overheating and consequential possible damage to the TV. Dusty places should also be avoided.
Heat Damage...
Damage may occur if you leave the TV in direct sunlight or near a heater. Avoid places subject to extremely high temperatures or humidity, or locations where the temperature is likely to fall below 5 C (41F).
Mains Supply...
The mains supply required for this equipment is 110 - 240 V AC 50 Hz. Your TV set is designed to operate with the adapter provided. The adaptor will become hot during use, this is normal. ONLY USE THE ADAPTOR SUPPLIED WITH THIS TV. Use only the power cord supplied with the unit. Never connect to a DC supply or any other power source. DO ensure that the TV is not standing on the mains lead. DO NOT cut off the mains plug from this equipment, this incorporates a special Radio Interference Filter, the removal of which will impair its performance. In the UK, the fuse fitted in this plug is approved by ASTA or BSI to BS1362. It should only be replaced by a correctly rated and approved type and the fuse cover must be refitted. IF IN DOUBT PLEASE CONSULT A COMPETENT ELECTRICIAN.
Do...
DO read the operating instructions before you attempt to use the equipment.
DO ensure that all electrical connections (including the mains plug, extension leads and inter-connections between pieces of equipment) are properly made and in accordance with the manufacturers instructions. Switch off and withdraw the mains plug before making or changing connections.
DO consult your dealer if you are ever in doubt about the installation, operation or safety of your equipment.
DO be careful with glass panels or doors on equipment.
Do not...
DON’T remove any fixed cover as this may expose dangerous voltages.
DON’T obstruct the ventilation openings of the equipment with items such as newspapers, tablecloths, curtains, etc. Overheating will cause damage and shorten the life of the equipment.
DON’T allow electrical equipment to be exposed to dripping or splashing or objects filled with liquids, such as vases, to be placed on the equipment.
DON’T place hot objects or naked flame sources, such as lighted candles or nightlights on, or close to equipment. High temperatures can melt plastic and lead to fires.
DON’T use makeshift stands and NEVER fix legs with wood screws. To ensure complete safety, always fit the manufacturer’s approved stand or legs with the fixings provided according to the instructions.
DON’T listen to headphones at high volume, as such use can permanently damage your hearing.
DON’T leave equipment switched on when it is unattended, unless it is specifically stated that it is designed for unattended operation or has a standby mode. Switch off using the switch on the equipment and make sure your family know how to do this. Special arrangements may need to be made for infirm or disabled people.
DON’T continue to operate the equipment if you are in anay doubt about it working normally, or it is damaged in any way – switch off, withdraw the mains plug and consult your dealer.
ABOVE ALL – NEVER let anyone, especially children, push anything into holes, slots or any other openings in the case – this could result in a fatal electric shock.
NEVER guess or take chances with electrical equipment of any kind – it is better to be safe than sorry.
THE MAINS PLUG IS USED TO COMPLETELY DISCONNECT THE TELEVISION AND THEREFORE SHOULD BE EASILY ACCESSIBLE.
ENGLISH -6-
Where to install
Locate the television away from direct sunlight and strong lights, soft, indirect lighting is recommended for comfortable viewing. Use curtains or blinds to prevent direct sunlight falling on the screen.
Place on a sturdy platform, the mounting surface should be flat and steady It should then be secured to the wall with a sturdy tie using the hook that is on stand, or secured to the platform.
The LCD display panels are manufactured using an extremely high level of precision technology, however sometimes some parts of the screen may be missing picture elements or have luminous spots. This is not a sign of a malfunction.
Make sure the television is located in a position where it cannot be pushed or hit by objects, as pressure will break or damage the screen, and that small items cannot be inserted into slots or openings in the case.
ENGLISH -7-
Getting started
Remove your Television carefully from the box. You may wish to store the packaging for future use.
In the box
Inside the carton box you should have:
•Accessories box
•Power cord
•Adapter
•Remote control
•Batteries
Note: Scart, VGA and RCA leads are not supplied.
Aerial connection
To connect an aerial, plug the aerial lead into the aerial socket on the rear of the TV.
15VL63
You can use an outdoor or indoor aerial. However, if you use an indoor aerial the quality of the reception may be reduced and adjustment of the aerial may be required when changing programs.
Please note: If you live in a poor reception area or use an indoor aerial you may experience loss or corruption of teletext transmissions.
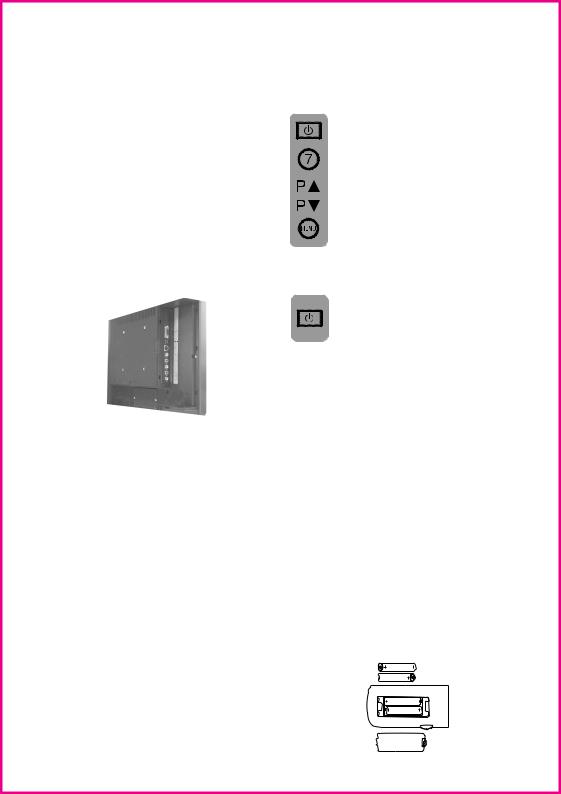
Switching on and First Use
1.Connect the power cord to the mains plug.
2.Connect the input socket of the adapter to the DC socket at the back panel of the LCD TV.
3.Connect adapter to the mains plug.
Note 1: Your TV will move to stand-by mode in five minutes when there is no broadcast signal. Note 2: Your TV is equiped to operate with front panel buttons, “MENU”, “
 ”, “-
”, “-  +” in case your R/C is broken or the batteries are exhausted.
Please Note: When not in use disconnect the plug from the mains power supply.
4.Press the Stand-by button on the under side of the TV, indicated by
the “ /I) symbol. The stand-by indicator will turn red.
5. Press a Numeric button or the (
 ) or (
 ) button on the remote
handset or (
 ), (
), (
 ) or (MENU) button on the top panel to switch the TV on.
The standby indicator changes from Red to Blue.
The picture will appear after a few seconds.
Press the ( ) button on the remote control to switch the TV to stand-by . The stand-by indicator will change from blue to red.
Please Note: Do not leave the television in standby unattended or overnight.
Switching the TV on for the first time
To install your TV, please read the sections “TV controls” and “Tuning the television”.
The batteries
Remove the back cover of your remote control to reveal the battery compartment and make sure you insert the batteries the right way round.
Suitable battery types for this remote are IEC R03 or AAA 1.5V.
Do not throw your old batteries into a fire, dispose of them in a designated disposal area.
Do not combine a used, old battery with a new one or mix battery types.
The performance of the remote control will deteriorate beyond a distance of 8 metres or outside an angle of 30 degrees from the centre of the TV.
ENGLISH -8-
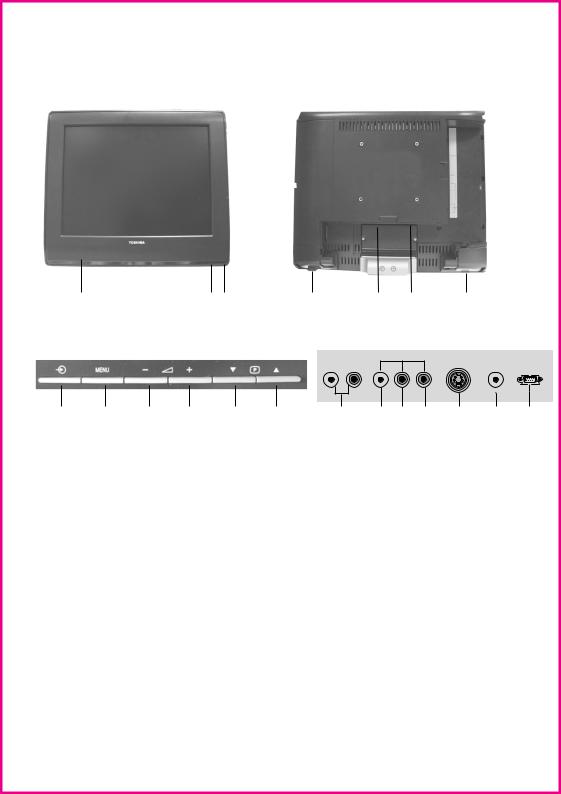
Control Unit
15VL63
1 2 3 7 5 6 4
|
|
Top control units |
|
|
|
|
AV3 |
|
|
|
|
|
|
|
|
|
|
|
|
|
|
|
|
|
|
|
|
|
|
|
AUDIO OUT |
|
|
|
|
|
|
|
|
|
|
|
|
L |
R |
L |
R |
VIDEO |
S-VHS |
DC 12V |
VGA |
20 |
17 |
15 |
16 |
18 |
19 |
8 |
9 |
10 |
11 |
12 |
13 |
14 |
1.Speaker |
8. |
Audio out (R,L) |
15. |
Volume down |
2.Stand-by |
9. |
Audio RCA (L) |
16. |
Volume up |
3.Remote control |
10. |
Audio RCA (R) |
17. |
Menu button |
4.Stand-by switch |
11. |
Video input PHONO connector |
18. |
Program down |
5.Scart |
12. |
S-VHS |
19. |
Program up |
6.Antenna input |
13. |
DC 12V |
20. |
Source Select |
7.Headphone |
14. |
VGA |
|
|
Please note
•Do not use Video RCA and S-Video connections at the same time, otherwise they will effect the picture.
•RGB inputs from scart will give you better picture quality.
ENGLISH -9-

Remote control
27
4
5
6
22
8
10
11
13
14
26
1
15
16
17
1.Teletext / TV choice buttons (
 )
)
2.Info button ( )
)

 18 3. Numeric buttons
|
4. |
Return to Selected Program Button ( ) |
|
|||
|
5. |
Picture Mode button ( |
) |
|
||
|
6. |
MENU button ( |
) |
|
|
|
3 |
7. |
Upward movement (Menu) |
|
|||
|
|
Program Up button ( |
) |
|
||
|
8. |
Left movement ( |
) (Menu) |
|
||
|
|
Volume down button |
|
|
||
19 |
9. |
Down button (Menu) |
) |
|
||
|
|
Program down button ( |
|
|||
20 |
10. |
Red Fastext Button |
|
|
||
11. |
Green Fastext Button |
|
|
|||
21 |
|
|
||||
12. |
Sound Type / Language choice button ( |
) |
||||
|
||||||
713. RC mode choice button
14. PC/TV mode button
23 |
15. |
No function at tv mode |
|
16. |
Txt Question/Answer button (Reveal) ( ) |
||
|
|||
9 |
17. |
Txt Stop Button (Hold) ( ) |
|
18. |
Stand-by On/Off button ( ) |
||
|
2419. External Input (AV) select button ( )
)
2520. Picture Format choice button ( )
)
21. Exit button ( )
)
2
12
28
29
31
30
CT-873
22.OK button ( )
)
23.Right button ( ) (Menu) Volume Up button
24.Blue Teletext Button
25.Yellow teletext Button
26.Sound Smart control button ( )
)
27.Mute button ( )
)
28.Teletext index button ( )
)
29.Teletext subpage button ( )
)
30.Teletext enlarge button (Double size) ( )
)
31.Teletext time / Update button ( )
)
Note: The switch on the lefthand side of your remote control is used to switch the bottom 8 keys between TV, VCR & DVD mode. In VCR & DVD mode these keys can be used to operate the basic functions of your Toshiba VCR & DVD.
ENGLISH -10-
 Loading...