


Webr@cer 881 PSTN
QUICK INSTALLATION GUIDE
INSTALLATIE GIDS
GUIDE D’INSTALLATION RAPIDE SCHNELLE INSTALLATIONSANLEITUNG SNABBINSTALLATIONSGUIDE
HURTIG INSTALLATIONSGUIDE
HURTIGINSTALLASJON
PIKA-ASENNUSOHJEET
MANUAL DE USUARIO
MANUAL DO UTILIZADOR
V1.1

GB |
The features described in this manual are published with reservation to modifications. |
NL |
De in deze handleiding beschreven mogelijkheden worden gepubliceerd onder voorbehoud |
|
van wijzigingen. |
FLes possibilités décrites dans ce manuel sont publiées sous réserve de modifications.
DDie in dieser Bedienungsanleitung umschriebenen Möglichkeiten, werden vorbehaltlich Änderungen publiziert.
SFunktionerna i denna bruksanvisning publiceras med reservation för ändringar.
DK |
Vi forbeholder os retten til ændringer af de specifikationer, der er beskrevet |
|
i denne brugsanvisning. |
NFunksjoner beskrevet i denne manualen kan endres uten nærmere informasjon.
SF |
Tässä ohjekirjassa julkaissut tiedot voivat muuttua ilman ennakkoilmoitusta. |
ES |
Las características descritas en este manual pueden ser objeto de futuras modificaciones. |
PAs características descritas neste manual são publicadas sob reserva de poderem ser modificadas.
This product is made by Topcom Belgium

FOR USE IN: BELGIUM, HOLLAND,
GERMANY, SWEDEN, DENMARK, NORWAY,
FINLAND, SPAIN, ITALY, PORTUGAL, GREECE,
TURKEY
This product is in compliance with the essential requirements and other relevant provisions of the R&TTE directive 1999/5/EC. The Declaration of conformity can be found on :
http://www.topcom.net/support/cedeclarations.php

Topcom Webr@cer 881 PSTN |
|
|
1 |
THE CONNECTION PANEL |
5 |
2 |
CONFIGURING THE PC TO CONNECT TO THE DSL ROUTE |
5 |
3 |
VERIFY YOUR PC’S IP CONFIGURATION |
7 |
4 |
SETUP THE BROADBAND ROUTER |
8 |
5 |
FIRMWARE UPDATE |
11 |
6 |
TOPCOM WARRANTY |
13 |
6.1 |
WARRANTY PERIOD |
13 |
6.2 |
WARRANTY HANDLING |
13 |
6.3 |
WARRANTY EXCLUSIONS |
13 |
SAFETY INSTRUCTIONS
•Only use the power adapter plug supplied.
•Do not place the unit in a damp room or at a distance of less than 1.5 m away from a water source. Keep water away from the unit.
•You have to dispose of the unit in an environment friendly manner according to your country regulations.
CLEANING
Clean the unit with a slightly damp cloth or with an anti-static cloth. Never use cleaning agents or abrasive solvents.
The CE symbol indicates that the unit complies with the essential requirements of the R&TTE directive.
4 |
Topcom Webr@cer 881 PSTN |
Topcom Webr@cer 881 PSTN
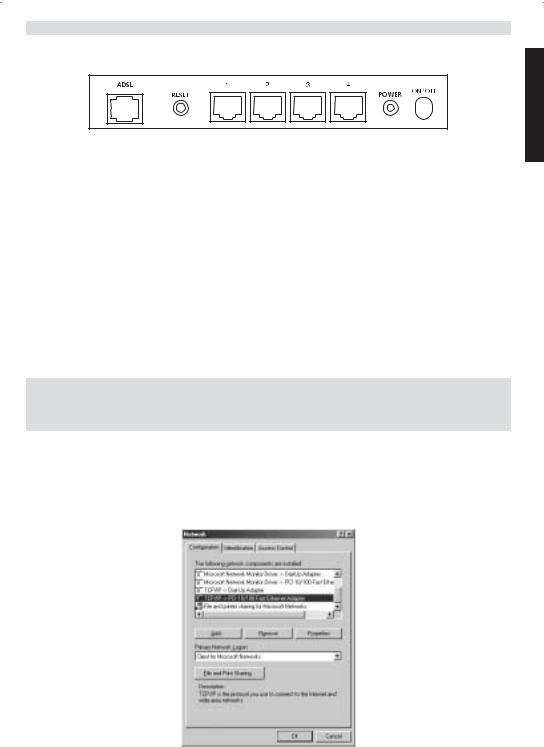
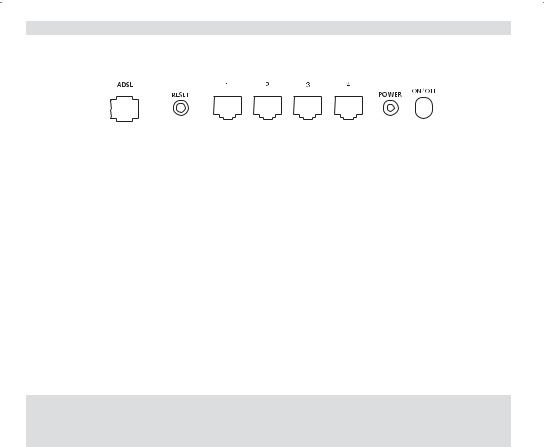
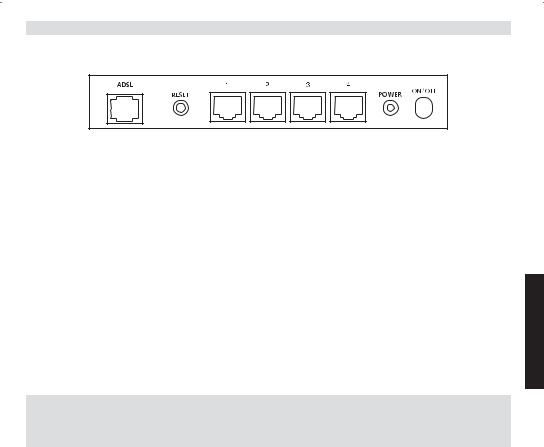
1 THE CONNECTION PANEL
ENGLISH
•POWER: The power port is to connect the 9 V AC power adapter.
--> The power LED on the front panel will go ON when the power adapter is connected.
•ADSL: The ADSL port is to connect your ASDL PSTN line.
--> The SHOWTIME LED will go ON when the ADSL link is established.
•Ports 1- 4 (10/100): This is to connect networked devices, such as PCs, ftp servers or anything else you want to put on your network.
--> The LAN LED’s will indicate the connection status.
•Reset Button: If you would like to load default settings, press the reset button and hold it for 5 ~ 6 seconds. It will load the factory default settings for the device. Do not press the reset button unless you want to clear the current data.
2 CONFIGURING THE PC TO CONNECT TO THE DSL ROUTE
Remark
-The routers default IP address is: 192.168.1.1
-DHCP server is ON
If you do not wish to set a static IP address on your PC, you will need to configure your PC to accept the IP address that the router will provide.
1.Click Start button, select Settings, then Control Panel
2.Double-click the Network Icon
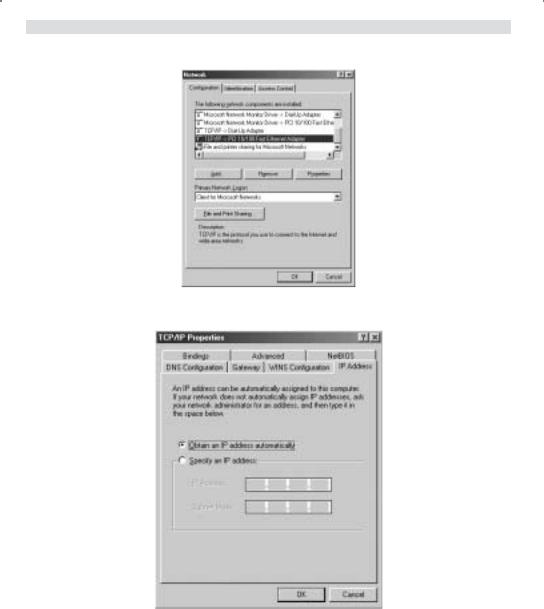
3.In the configuration windows, select the TCP/IP protocol line that has been associated with your network card/ adapter.
Topcom Webr@cer 881 PSTN |
5 |
Topcom Webr@cer 881 PSTN
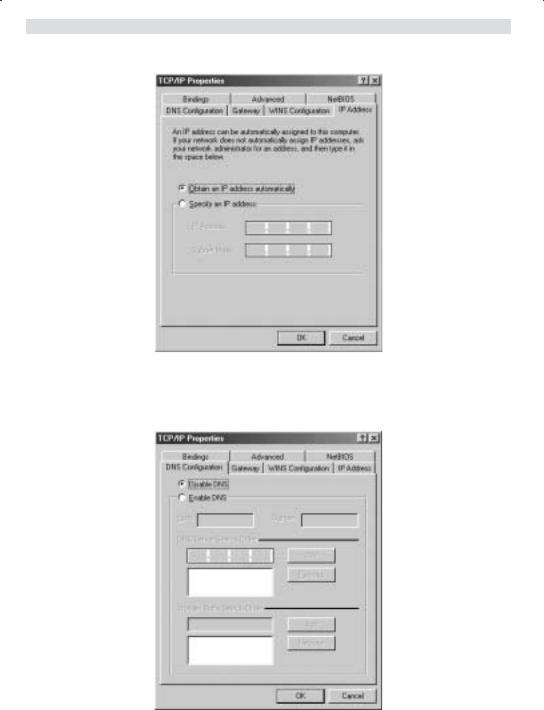
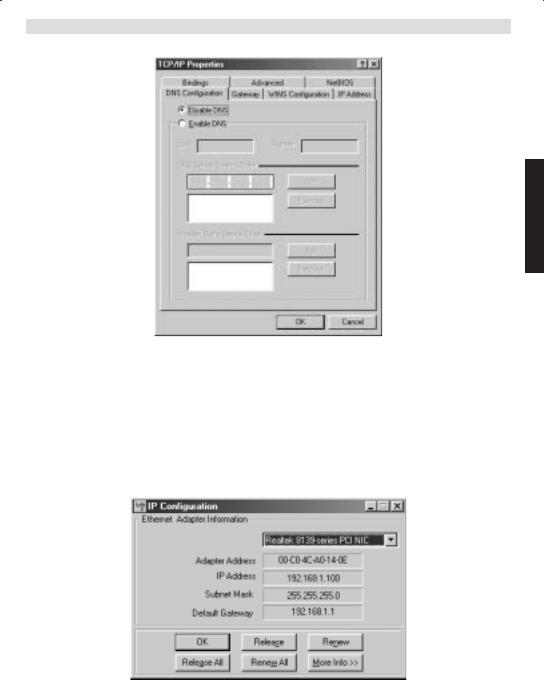
4.Click the Properties button, then choose the IP ADDRESS tab. Select Obtain an IP address automatically.
5.Then select DNS configuration tab to add DNS IP address. Select Disable DNS function. Press OK. You have completed the client settings.
6.After clicking OK, windows will ask you to restart the PC. Click Yes.
6 |
Topcom Webr@cer 881 PSTN |
Topcom Webr@cer 881 PSTN
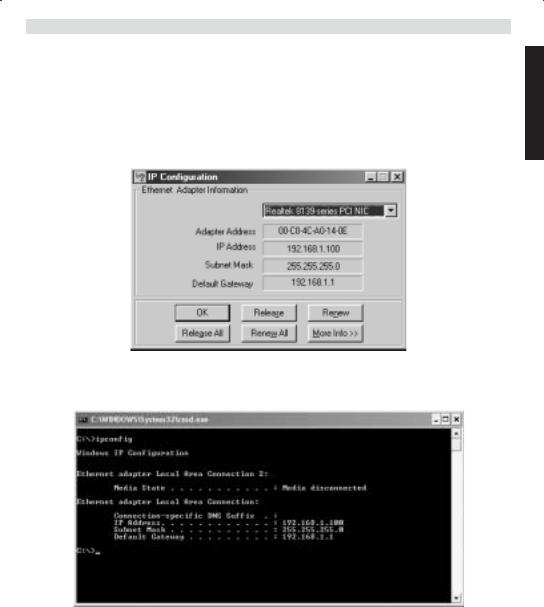
3 VERIFY YOUR PC’S IP CONFIGURATION
There are some tools which are great for finding out a computer’s IP configuration: MAC address and default gateway.
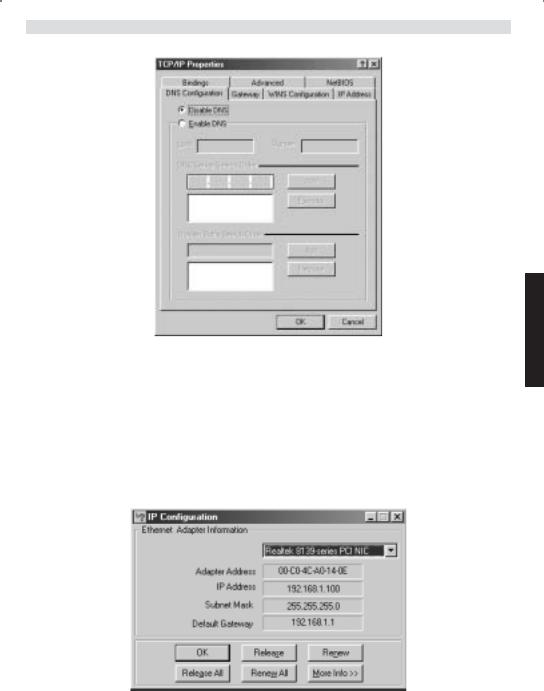
•WINIPCFG (for windows 95/98)
Inside the windows 95/98/ME Start button, select Run and type winipcfg. In the example below this computer has a IP address of 192.168.1.100 and the default gateway is 192.168.1.1. The default gateway should be the broadband router IP address. The MAC address in windows 95/98 is called the Adapter Address.
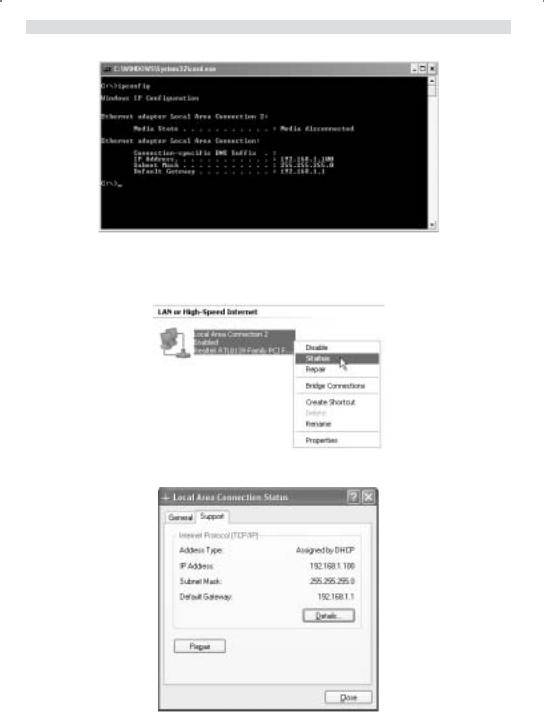
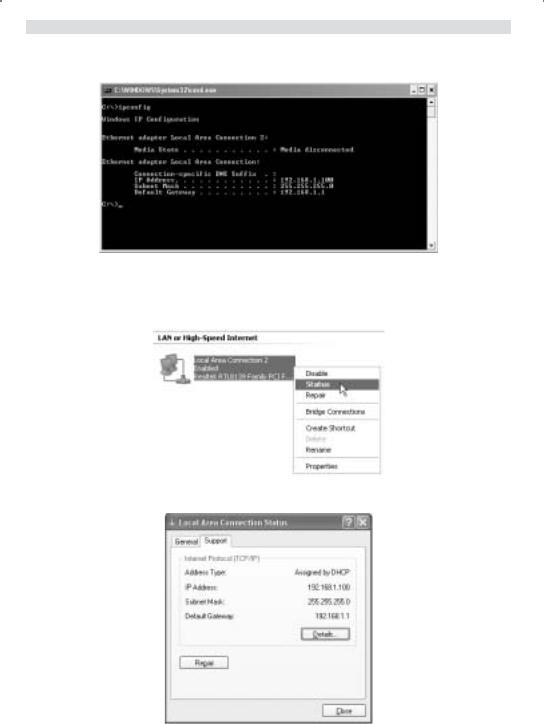
•IPCONFIG (for windows 2000/NT)
In the DOS command type IPCONFIG and press Enter. Your PC IP information will be displayed as shown below.
ENGLISH
•IPCONFIG / RENEW will renew the IP address, gateway and DNS.
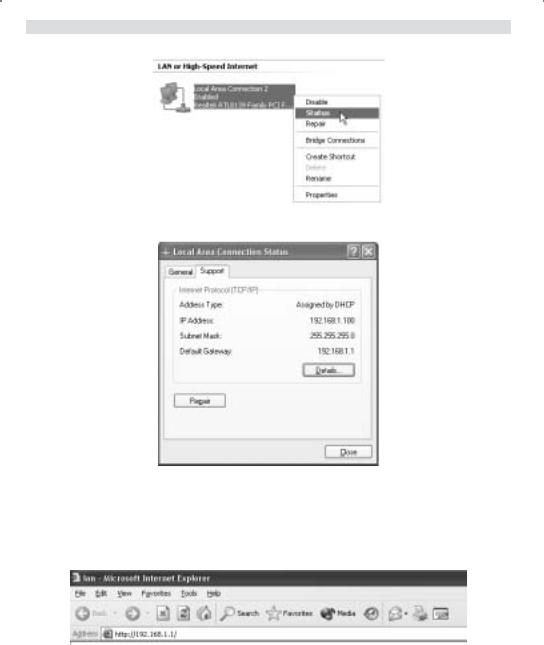
•Windows XP
Click the right mouse key on your network adapter and select Status
Topcom Webr@cer 881 PSTN |
7 |
Topcom Webr@cer 881 PSTN
The support screen will display the IP information.
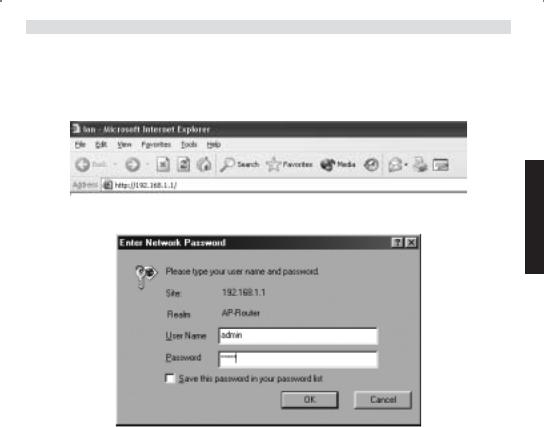
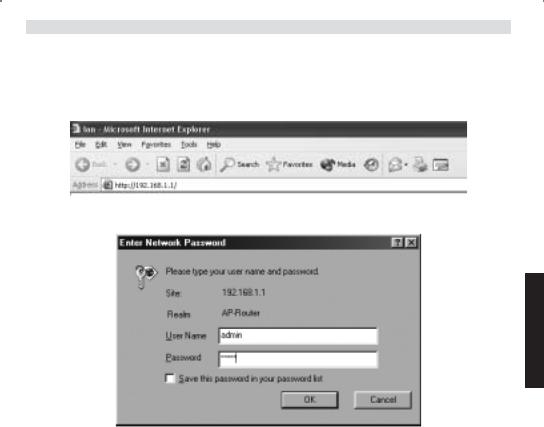
4 SETUP THE ADSL ROUTER
When your PC has a valid IP address, you can access the router setup web page. Open Internet Explorer or Netscape Navigater and goto address: 192.168.1.1
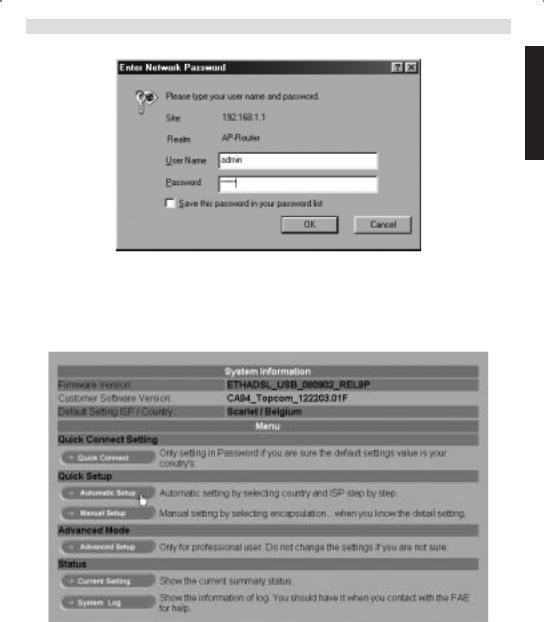
Now the login screen will appear.
8 |
Topcom Webr@cer 881 PSTN |
Topcom Webr@cer 881 PSTN
ENGLISH
•Enter the username and password.
By default the username is admin and the password is password. --> Click OK to proceed.
You will enter the router menu with all the available options:
--> Click Automatic Setup
Topcom Webr@cer 881 PSTN |
9 |
Topcom Webr@cer 881 PSTN
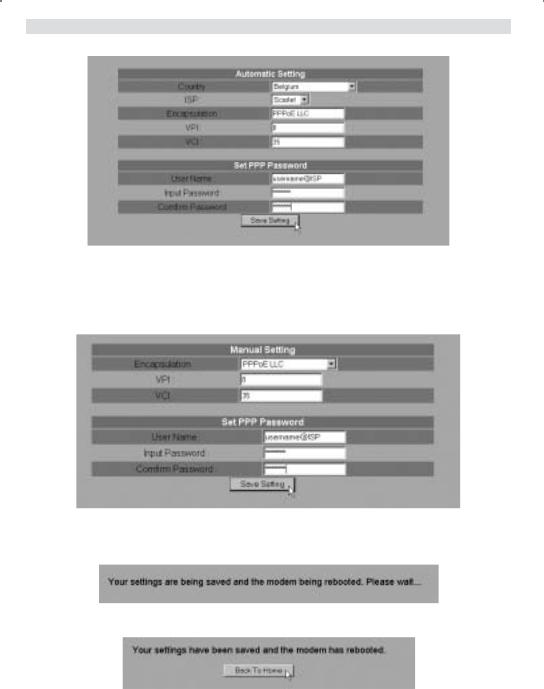
--> Select your Country and ISP
--> Enter your Username and Password to get connected with your ISP. --> Click Save Settings to confirm.
!!! Remark !!!: if your Country or ISP is not listed in the Automatic Settings, you need to enter the settings manually. Please go to the Manual Setup screen in this case.
--> Select the Encapsulation and enter VPI and VCI settings
--> Enter your Username and Password to get connected with your ISP. --> Click Save Settings to confirm.
•The settings are being saved.
•Now the settings are saved and the modem has rebooted. --> Click Back To Home to go to the start page.
10 |
Topcom Webr@cer 881 PSTN |
Topcom Webr@cer 881 PSTN
ENGLISH
--> Click Advanced Setup to go to the advanced settings. Please refer to the full user guide on the provided CD for these settings.
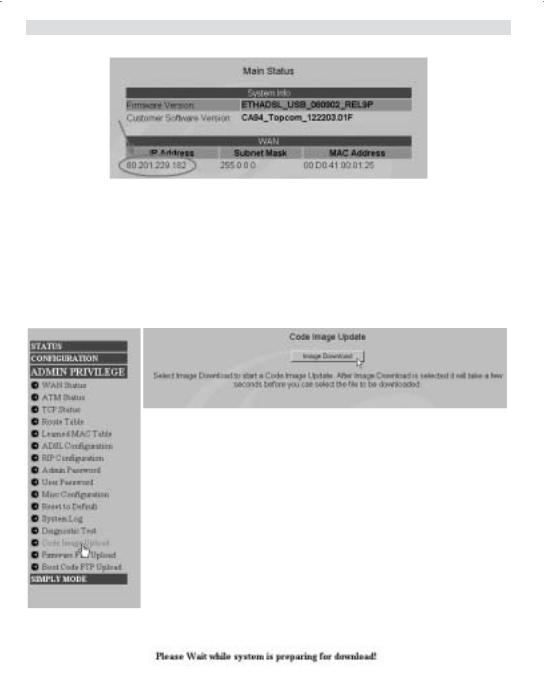
In the Main Status screen you will see the WAN IP address when the Internet connection is successful.
5 FIRMWARE UPDATE
When a new firmware is available, it will be published on the www.topcom.net website in the support – downloads section.
--> Please download the file to your computer. --> Go to the Advanced Setup mode screen
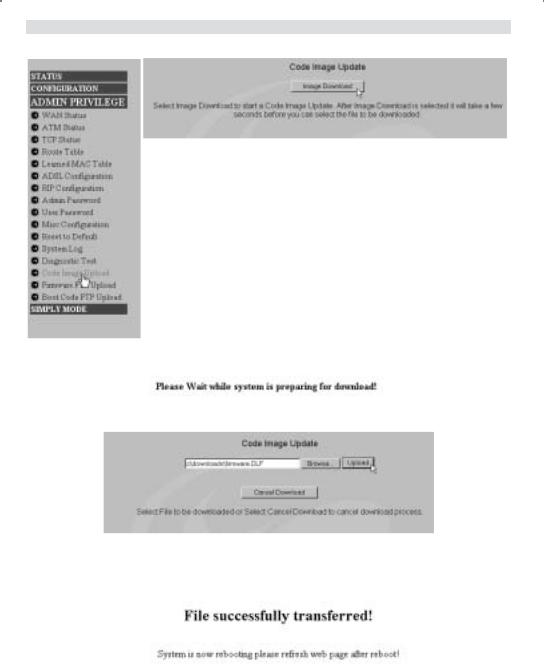
--> Click Code Image Upload in the ADMIN PRIVILEGE menu.
Topcom Webr@cer 881 PSTN |
11 |
Topcom Webr@cer 881 PSTN
--> Click Image Download to start the update procedure
•The router will now prepare the firmware update.
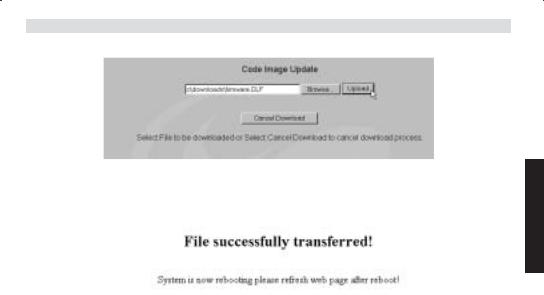
--> Now Browse for the file you have downloaded from the Topcom website. --> Click Upload.
•The router will be updated now. This can take about one minute.
•When the update is successful the router will automatically reboot.
12 |
Topcom Webr@cer 881 PSTN |

Topcom Webr@cer 881 PSTN
6 TOPCOM WARRANTY
6.1WARRANTY PERIOD
The Topcom units have a 24-month warranty period. The warranty period starts on the day the new unit is purchased. The warranty on batteries is limited to 6 months after purchase. Consumables or defects causing a negligible effect on operation or value of the equipment are not covered.
The warranty has to be proven by presentation of the original purchase receipt, on which the date of purchase and the unit-model are indicated.
6.2WARRANTY HANDLING
A faulty unit needs to be returned to a Topcom service centre including a valid purchase note.
If the unit develops a fault during the warranty period, Topcom or its officially appointed service centre will repair any defects caused by material or manufacturing faults free of charge.
Topcom will at its discretion fulfil its warranty obligations by either repairing or exchanging the faulty units or parts of the faulty units. In case of replacement, colour and model can be different from the original purchased unit.
The initial purchase date shall determine the start of the warranty period. The warranty period is not extended if the unit is exchanged or repaired by Topcom or its appointed service centres.
6.3WARRANTY EXCLUSIONS
Damage or defects caused by incorrect treatment or operation and damage resulting from use of non-original parts or accessories not recommended by Topcom are not covered by the warranty.
Topcom cordless phones are designed to work with rechargeable batteries only. The damage caused by the use of non-rechargeable batteries is not covered under warranty.
The warranty does not cover damage caused by outside factors, such as lightning, water and fire, nor any damage caused during transportation.
No warranty can be claimed if the serial number on the units has been changed, removed or rendered illegible.
ENGLISH
Topcom Webr@cer 881 PSTN |
13 |

Topcom Webr@cer 881 PSTN |
|
|
1 |
HET AANSLUITINGSPANEEL |
15 |
2 |
DE PC CONFIGUREREN OM DE DSL-ROUTER AAN TE SLUITEN |
15 |
3 |
CONTROLEER DE IP-CONFIGURATIE VAN UW PC |
17 |
4 |
DE ADSL-ROUTER INSTELLEN |
19 |
5 |
FIRMWARE UPDATE |
22 |
6 |
TOPCOM GARANTIE |
23 |
6.1 |
GARANTIEPERIODE |
23 |
6.2 |
AFWIKKELING VAN GARANTIECLAIMS |
23 |
6.3 |
GARANTIEBEPERKINGEN |
23 |
VEILIGHEIDSVOORSCHRIFTEN
•Gebruik enkel de meegeleverde adapter.
•Het apparaat niet opstellen in vochtige ruimten en niet op minder dan 1,5 m van een waterbron. Niet in aanraking brengen met water.
•Ontdoe u op een milieuvriendelijke wijze van het apparaat.
REINIGEN
Veeg het apparaat met een licht vochtig doek of met een antistatische doek af. Gebruik nooit reinigingsmiddelen of agressieve oplosmiddelen.
Het toestel voldoet aan de basiseisen van de R&TTE-richtlijn. Dit wordt bevestigd door de CE-markering.
14 |
Topcom Webr@cer 881 PSTN |
Topcom Webr@cer 881 PSTN
1 HET AANSLUITINGSPANEEL
|
|
|
|
|
|
|
|
|
|
|
|
|
|
|
|
|
|
|
|
|
|
|
|
|
|
|
|
|
|
|
|
|
|
|
|
|
|
|
|
|
|
|
|
|
• POWER: In de stroompoort steekt u de AC-netadapter van 9 V. |
|
|||||||||||||
--> De power LED op het frontpaneel begint te branden wanneer de stroomadapter is aangesloten. |
|
|||||||||||||
NEDERLANDS |
||||||||||||||
• ADSL: In de ADSL-poort steekt u uw ASDL PSTN-lijn. |
||||||||||||||
|
||||||||||||||
--> De SHOWTIME LED gaat branden wanneer de ADSL-verbinding tot stand is gekomen. |
|
|||||||||||||
• Poorten 1- 4 (10/100): Hier sluit u de toestellen in het netwerk aan, zoals PC’s, ftp-servers of om het even welk |
|
|||||||||||||
ander toestel dat u aan uw netwerk wilt hangen. |
|
|||||||||||||
--> De LAN LED’s geven de status van de verbinding weer. |
|
|||||||||||||
• Reset Button:Als u de standaardinstellingen wilt laden, houdt u de reset-knop 5 ~ 6 seconden ingedrukt. Zo |
|
|||||||||||||
worden de standaard fabrieksinstellingen voor het toestel geladen. Druk niet op de reset-knop tenzij u de huidige |
|
|||||||||||||
gegevens wilt wissen. |
|
|||||||||||||
2 DE PC CONFIGUREREN OM DE DSL-ROUTER AAN TE SLUITEN
Opmerking
-Het standaard IP-adres van de router is: 192.168.1.1
-De DHCP-server staat AAN
Als u geen statisch IP-adres wilt instellen op uw PC, moet u uw PC zo configureren dat hij het IP-adres aanneemt dat de router geeft.
1.Klik op Start, selecteer Instellingen , dan Configuratiescherm
2.Dubbelklik op het Netwerk-pictogram
Topcom Webr@cer 881 PSTN |
15 |

Topcom Webr@cer 881 PSTN
3.In het configuratievenster, selecteert u de regel met het TCP/IP-protocol dat is ingesteld voor uw netwerkkaart/ adapter.
4.Klik op Eigenschappen, kies vervolgens het tabblad IP-ADRES. Selecteer Automatisch een IP-adres verkrijgen.
5.Selecteer vervolgens het tabblad DNSconfiguratie om het DNS IP-adres toe te voegen. Selecteer DNS-functie uitschakelen. Druk op OK. De client-instellingen zijn voltooid.
6.Nadat u op OK heeft geklikt, zal Windows u vragen om de PC opnieuw te starten. Klik op Ja.
16 |
Topcom Webr@cer 881 PSTN |
Topcom Webr@cer 881 PSTN
NEDERLANDS
3 CONTROLEER DE IP-CONFIGURATIE VAN UW PC
Er bestaan tools waarmee u de IP-configuratie van een computer makkelijk kunt vinden: MAC-adres en standaard gateway.
• WINIPCFG (voor Windows 95/98)
Klik in Windows 95/98/ME op de Start-knop, selecteer Uitvoeren en tik winipcfg in. In het onderstaande voorbeeld heeft de computer als IP-adres 192.168.1.100 en de standaard gateway is 192.168.1.1. De standaard gateway moet het IP-adres van de breedband router zijn. Het MAC-adres in Windows 95/98 wordt het adapteradres genoemd.
• IPCONFIG (voor Windows 2000/NT)
In het DOS-venster tikt u IPCONFIG in en drukt u op Enter. De IP-informatie van uw PC wordt weergegeven zoals hieronder geïllustreerd.
Topcom Webr@cer 881 PSTN |
17 |
Topcom Webr@cer 881 PSTN
Met |
- IPCONFIG / RENEW worden het IP-adres, de gateway en de DNS vernieuwd. |
• Windows XP
Klik met de rechtermuisknop op uw netwerkadapter en selecteer Status
Op het support-scherm verschijnt de IP-informatie.
18 |
Topcom Webr@cer 881 PSTN |
Topcom Webr@cer 881 PSTN
4 DE ADSL-ROUTER INSTELLEN
Als uw PC een geldig IP-adres heeft, kunt u naar de setup-webpagina van de router gaan. Open Internet Explorer of Netscape Navigator en ga naar het adres: 192.168.1.1
Nu verschijnt het aanmeldingsscherm.
NEDERLANDS
•Voer de gebruikersnaam en het wachtwoord in.
Standaard is de gebruikersnaam admin en het wachtwoord password.
--> Klik op OK om verder te gaan.
U komt in het routermenu met alle beschikbare opties terecht:
Topcom Webr@cer 881 PSTN |
19 |

Topcom Webr@cer 881 PSTN
--> Klik op Automatic Setup
--> Selecteer uw Country en ISP
--> Voer uw Username en Password in om verbinding tot stand te brengen met uw ISP. --> Klik op Save Settings om te bevestigen.
!!! Opmerking !!!: Als uw land of ISP niet in de lijst met Automatic Settings voorkomt, moet u de instellingen manueel invoeren. Ga in dat geval naar het scherm Manual Setup.
20 |
Topcom Webr@cer 881 PSTN |
Topcom Webr@cer 881 PSTN
--> Selecteer Encapsulation en voer de VPI- en VCI-instellingen in.
--> Voer uw Username en Password in om verbinding tot stand te brengen met uw ISP. --> Klik op Save Settings om te bevestigen.
•De instellingen worden opgeslagen.
•Nu zijn de instellingen opgeslagen en is de modem opnieuw gestart. --> Klik op Back To Home om naar de startpagina te gaan.
--> Klik op Advanced Setup om naar de geavanceerde instellingen te gaan. Lees de volledige gebruikershandleiding op de meegeleverde CD voor deze instellingen.
NEDERLANDS
Topcom Webr@cer 881 PSTN |
21 |
Topcom Webr@cer 881 PSTN
Op het scherm Main Status ziet u het WAN IP-adres wanneer de Internetverbinding is tot stand gekomen.
5 FIRMWARE UPDATE
Als nieuwe firmware beschikbaar is, zal die worden gepubliceerd op de website www.topcom.net in het hoofdstuk supportdownloads.
--> Download het bestand naar uw computer. --> Ga naar het scherm Advanced Setup
--> Klik op Code Image Upload in het menu ADMIN PRIVILEGE.
--> Klik op Image Download om de updateprocedure te starten
•De router zal nu de firmware update voorbereiden.
22 |
Topcom Webr@cer 881 PSTN |
Topcom Webr@cer 881 PSTN
--> Klik nu op Browse om het bestand te selecteren dat u van de Topcom-website heeft gedownload. --> Klik op Upload.
•De router wordt nu geüpdatet. Dit kan een minuutje duren.
NEDERLANDS
•Als de update is voltooid, zal de router automatisch opnieuw opstarten.
6 TOPCOM GARANTIE
6.1GARANTIEPERIODE
Op de Topcom-toestellen wordt een garantie van 24 maanden verleend. De garantieperiode begint op de dag waarop het nieuwe toestel wordt gekocht. De garantie op batterijen is beperkt tot 6 maanden na aankoop. Kleine onderdelen of defecten die een verwaarloosbaar effect hebben op de werking of waarde van het toestel zijn niet gedekt door de garantie.
De garantie moet worden bewezen door voorlegging van het aankoopbewijs waarop de datum van aankoop en het toesteltype staan.
6.2AFWIKKELING VAN GARANTIECLAIMS
Een defect toestel moet, samen met een geldig aankoopbewijs, worden teruggestuurd naar een Topcom-hersteldienst. Als het toestel tijdens de garantieperiode een defect vertoont, zal Topcom of diens officieel erkende hersteldienst eventuele defecten te wijten aan materiaalof productiefouten gratis herstellen.
Topcom zal naar keuze haar garantieverplichtingen vervullen door defecte toestellen of onderdelen van defecte toestellen ofwel te herstellen ofwel te vervangen. In het geval dat het toestel wordt vervangen, kan de kleur en het model verschillend zijn van het oorspronkelijk gekochte toestel.
De oorspronkelijke aankoopdatum is bepalend voor het begin van de garantieperiode. De garantieperiode wordt niet verlengd als het toestel wordt vervangen of hersteld door Topcom of diens officieel erkende hersteldienst.
6.3GARANTIEBEPERKINGEN
Schade of defecten te wijten aan onoordeelkundig gebruik of bediening en schade te wijten aan het gebruik van nietoriginele onderdelen of accessoires die niet zijn aanbevolen door Topcom, worden niet gedekt door de garantie. Topcom draadloze telefoons mogen enkel met oplaadbare batterijen worden gebruikt. Schade te wijten aan het gebruik van niet-oplaadbare batterijen is niet gedekt door de garantie.
De garantie dekt geen schade te wijten aan externe factoren, zoals bliksem, water en brand, noch enige transportschade.
Er kan geen garantie worden ingeroepen als het serienummer op het toestel is gewijzigd, verwijderd of onleesbaar gemaakt.
Garantieclaims zijn ongeldig indien het toestel hersteld, gewijzigd of aangepast werd door de koper of door nietgekwalificeerde, niet-officieel erkende Topcom-hersteldienst.
Topcom Webr@cer 881 PSTN |
23 |

Topcom Webr@cer 881 PSTN |
|
|
1 |
LE PANNEAU DE CONNEXION |
25 |
2 |
CONFIGURATION DU PC POUR CONNECTER LE ROUTEUR DSL |
25 |
3 |
VÉRIFIEZ LA CONFIGURATION IP DE VOTRE PC |
27 |
4 |
PARAMÉTRER LE ROUTEUR ADSL |
29 |
5 |
MISE À JOUR DU FIRMWARE |
32 |
6 |
GARANTIE TOPCOM |
33 |
6.1 |
PÉRIODE DE GARANTIE |
33 |
6.2 |
TRAITEMENT DE LA GARANTIE |
33 |
6.3 |
EXCLUSIONS DE GARANTIE |
33 |
CONSIGNES DE SÉCURITÉ
•Utilisez uniquement l’adaptateur fourni à la livraison.
•Ne pas placer dans une pièce humide ou à moins de 1,5 m d'un point d'eau. L’appareil ne peut être en contact avec l'eau.
•Respectez les directives relatives à la mise en décharge et au retraitement de l’appareil.
ENTRETIEN
Frottez l’appareil avec un chiffon légèrement humide ou avec un linge antistatique.
N'utilisez jamais de produits détergents ou agressifs.
La conformité de l’appareil avec les exigences fondamentales de la directive européenne R&TTE relative aux terminaux, est confirmée par le label CE.
24 |
Topcom Webr@cer 881 PSTN |
Topcom Webr@cer 881 PSTN
1 LE PANNEAU DE CONNEXION
•POWER: Le port power sert à connecter l’adaptateur 9V AC.
--> La power LED sur la face avant s’allume lorsque l’adaptateur est connecté.
•ADSL: Le port ADSL sert à connecter votre ligne ASDL PSTN.
--> La SHOWTIME LED s’allume lorsque la liaison ADSL est établie.
•Ports 1- 4 (10/100) : Ces ports servent à connecter des appareils mis en réseau, tels que des PC, des serveurs ftp ou tout autre appareil que vous désirez mettre en réseau.
--> Les LAN LED indique le statut de connexion.
•Bouton Reset : Si vous désirez charger les paramètres par défaut, appuyez sur le bouton reset et maintenez-le enfoncé pendant 5 ~ 6 secondes. Cela chargera les paramètres par défaut d’usine pour l’appareil. N’appuyez pas sur le bouton reset à moins que vous ne vouliez effacer les données actuelles.
2 CONFIGURATION DU PC POUR CONNECTER LE ROUTEUR DSL
Remarque
-L’adresse IP par défaut du routeur est: 192.168.1.1
-Le serveur DHCP est ON
Si vous ne souhaitez pas régler une adresse statique sur votre PC, vous devrez configurer votre PC pour accepter l’adresse IP que le routeur fournit.
1.Cliquez sur le bouton Start, sélectionnez Paramètres, et ensuite Panneau de configuration.
2.Double-cliquez sur l’icône Réseau
FRANÇAIS
Topcom Webr@cer 881 PSTN |
25 |
Topcom Webr@cer 881 PSTN
3.Dans la fenêtre de configuration, sélectionnez la ligne Protocole TCP/IP qui a été associé à votre carte/ adaptateur réseau.
4.Cliquez sur le bouton Propriétés, ensuite choisissez l’onglet ADRESSE IP . Sélectionnez Obtenir une adresse
IP automatiquement
5.Sélectionnez ensuite l’onglet configuration DNS pour ajouter Adresse IP DNS . Sélectionnez Désactiver fonction DNS . Appuyez sur OK. Vous avez achevé le paramétrage client.
6.Après avoir cliqué sur OK, windows vous demandera de relancer l’ordinateur. Cliquez sur Yes.
26 |
Topcom Webr@cer 881 PSTN |
Topcom Webr@cer 881 PSTN
FRANÇAIS
3 VÉRIFIEZ LA CONFIGURATION IP DE VOTRE PC
Certains outils sont excellents pour découvrir la configuration IP de votre ordinateur: Adresse MAC et passerelle par défaut.
• WINIPCFG (pour windows 95/98)
Dans le menu du bouton Start de windows 95/98/ME, sélectionnez Exécuter et tapez winipcfg. Dans l’exemple cidessous, cet ordinateur a l’adresse IP de 192.168.1.100 et la passerelle par défaut est 192.168.1.1. La passerelle par défaut doit être l’adresse IP des routeurs à bande large. L’adresse MAC dans windows 95/98 est appelée l’adresse Adapter.
• IPCONFIG (pour windows 2000/NT)
Topcom Webr@cer 881 PSTN |
27 |
Topcom Webr@cer 881 PSTN
Dans la ligne de commande DOS, tapez IPCONFIG et appuyez Enter. Les informations IP de votre PC sont affichées comme indiqué ci-dessous.
•IPCONFIG / RENEW renouvellera l’adresse IP, la passerelle et le DNS.
•Windows XP
Cliquez avec le bouton droit de la souris sur votre adaptateur réseau et sélectionnez Status.
L’écran de support affiche les informations IP.
28 |
Topcom Webr@cer 881 PSTN |
Topcom Webr@cer 881 PSTN
4 PARAMÉTRER LE ROUTEUR ADSL
Lorsque votre PC dispose d’une adresse IP valide, vous pouvez accéder à la page web de paramétrage du routeur. Ouvrez Internet Explorer ou Netscape Navigater et allez à l’adresse : 192.168.1.1
L’écran de connexion apparaît à l’écran.
FRANÇAIS
•Entrez le nom d’utilisateur et le mot de passe.
Par défaut, le nom d’utilisateur est admin et le mot de passe est password.
--> Cliquez sur OK pour continuer.
Vous entrez dans le menu du routeur avec toutes les options disponibles :
Topcom Webr@cer 881 PSTN |
29 |
 Loading...