


Z |
77-20SR70I00020 |
|
SR-L70i
Hi-Fi Table Radio
OWNER’S MANUAL
MODE D’EMPLOI MANUAL DEL USUARIO
ESPAÑOL FRANÇAIS ENGLISH
C AU T I O N: TO R ED U CE T HE R ISK O F ELECTRIC SHOCK, DO NOT REMOVE COVER (OR BACK). NO USER-SERVICEABLE PARTS INSIDE. REFER SERVICING TO QUALIFIED SERVICE PERSONNEL.
The lightning flash with arrowhead s y m b o l, w i t hin an e qu ilate r a l triangle, is intended to alert the user to the presence of uninsulated “dangerous voltage” within the product’s enclosure that may be of sufficient magnitude to constitute a risk of electric shock to persons.
The exclamation point within an equilateral triangle is intended to alert the user to the presence of i m p o r t a n t o p e r a t i n g a n d maintenance (servicing) instructions in the literature accompanying the appliance.
IMPORTANT SAFETY INSTRUCTIONS
1)Read these instructions.
2)Keep these instructions.
3)Heed all warnings.
4)Follow all instructions.
5)Do not use this apparatus near water.
6)Clean only with dry cloth.
7)Do not block any ventilation openings.
I n s t a l l i n a c c o r d a n c e w i t h t h e manufacturer’s instructions.
8)Do not install near any heat sources such as radiators, heat registers, stoves, or other apparatus (including amplifiers) that produce heat.
2
9)Do not defeat the safety purpose of the polarized or grounding-type plug. A polarized plug has two blades with one wider than the other. A grounding type plug has two blades and a third grounding prong. The wide blade or the third prong are provided for your safety. If the provided plug does not fit into your outlet, consult
an electrician for replacement of the obsolete outlet.
10)Protect the power cord from being walked on or pinched par ticularly at plugs, convenience receptacles, and the point where they exit from the apparatus.
11)Only use attachments/accessories specified by the manufacturer.
12)Use only with the cart, stand,
t r i p o d , b r a c k e t , o r t a b l e 
 specified by the manufacturer,
  or sold with the apparatus.
  When a cart is used, use caution when moving the cart/apparatus combination to avoid injury from tip-over.
13)Unplug this apparatus during lightning storms or when unused for long periods of time.
14)Refer all servicing to qualified service personnel. Servicing is required when the apparatus has been damaged in any way, such as power-supply cord or plug is damaged, liquid has been spilled or objects have fallen into the apparatus, the apparatus has been exposed to rain or moisture, does not operate normally, or has been dropped.
CLASS II apparatus with double insulation, and no protective earth provided.
<Do not expose this apparatus to dripps or splashes.
<Do not place any objects filled with liquids, such as vases, on the apparatus.
<Do not install this apparatus in a confined space such as a book case or similar unit.

<The apparatus draws nominal non - operating power from the AC outlet with its POWER or STANDBY/ON switch not in the ON position.
<The apparatus should be located close enough to the AC outlet so that you can easily grasp the power cord plug at any time.
<The mains plug is used as the disconnect device, the disconnect device shall remain readily operable.
<Products with Class I construction are equipped with a power supply cord that has a 3-prong grounding plug. The cord of such a product must be plugged into an AC outlet that has a protective grounding connection.
<If the product uses batteries (including a battery pack or installed batteries), they should not be exposed to sunshine, fire or excessive heat.
<CAUTION for products that use replaceable lithium batteries: there is danger of explosion if a battery is replaced with an incorrect type of battery. Replace only with the same or equivalent type.
<Caution should be taken when using earphones or headphones with the product because excessive sound pressure (volume) from earphones or headphones can cause hearing loss.
WARNING: TO PREVENT FIRE OR SHOCK HAZARD, DO NOT EXPOSE THIS APPLIANCE TO RAIN OR MOISTURE.
CAUTION
<DO NOT REMOVE THE EXTERNAL CASES OR CABINETS TO EXPOSE THE ELECTRONICS. NO USER SERVICEABLE PARTS ARE WITHIN.
<IF YOU ARE EXPERIENCING PROBLEMS WITH THIS PRODUCT, CONTACT TEAC FOR A SERVICE REFERR AL . DO NOT USE THE PRODUCT UNTIL IT HAS BEEN REPAIRED.
For U.S.A.
This equipment has been tested and found to comply with the limits for a Class B digital device, pursuant to Part 15 of the FCC Rules. These limits are designed to provide reasonable protection against harmful interference in a residential installation. This equipment generates, uses, and can radiate radio frequency energy and, if not installed a n d u s e d i n a c c o r d a n c e w i t h t h e instructions, may cause harmful interference to radio communications. However, there is no guarantee that interference will not occur in a particular installation. If this equipment does cause harmful interference to radio or t e l e v i s i o n r e c e p t i o n , w h i c h c a n b e determined by turning the equipment off and on, the user is encouraged to try to correct the interference by one or more of the following measures:
•Reorient or relocate the equipment and/ or the receiving antenna.
•Increase the separation between the equipment and receiver.
•Connect the equipment into an outlet on a circuit different from that to which the receiver is connected.
•Consult the dealer or an experienced radio/TV technician for help.
CAUTION
Changes or modifications to this equipments n o t e x p r e s s l y a p p r o v e d b y T E A C CORPORATION for compliance will void the user’s warranty.
iPod is a trademark of Apple Inc., registered in the U.S. and other countries.
“Made for iPod” means that an electronic accessory has been designed to connect specifically to iPod and has been certified by the developer to meet Apple performance standards.
Apple is not responsible for the operation of this device or its compliance with safety and regulatory standards.
3
ENGLISH

Contents
Thank you for choosing TEAC. Read this m a n u a l c a r e f u l l y t o g e t t h e b e s t performance from this unit.
Before Using the Unit. . . . . . . . . . . . . 4 Battery Precautions. . . . . . . . . . . . . . 5 Identifying the Parts (Display). . . . . . . . . 5 Identifying the Parts (Main Unit). . . . . . . . 6 Identifying the Parts (Remote Control Unit). . 8 Remote Control Unit. . . . . . . . . . . . . . 9 Connections. . . . . . . . . . . . . . . . . 10 Setting the Clock. . . . . . . . . . . . . . . 12
Basic Operation. . . . . . . . . . . . . . . . 13 Listening to an iPod . . . . . . . . . . . . . 14 Listening to an External Source. . . . . . . . 17 Listening to the Radio . . . . . . . . . . . . 18 Preset Tuning. . . . . . . . . . . . . . . . . 19 Timer. . . . . . . . . . . . . . . . . . . . .20
Troubleshooting. . . . . . . . . . . . . . . 24 Specifications . . . . . . . . . . . . . . . . 25
4
Before Using the Unit
Read this before attempting any operations.
<When the unit is turned on, switching on the TV may cause lines to appear on the TV screen, depending on the condition of the electric waves of the TV broadcast. This is not a malfunction of the unit or the TV. If this happens, turn off the unit.
<Since the unit could become warm during operation, always leave sufficient space around the unit for ventilation. Do not place anything on top of the unit.
<The voltage supplied to the unit should match the voltage that is printed on the rear panel. If you are in any doubt regarding this matter, consult an electrician.
<Choose the installation location of your unit carefully. Avoid placing it in direct sunlight or close to a source of heat. Also avoid locations subject to vibration, excessive dust, heat, cold or moisture.
<Do not place the unit on an amplifier or receiver.
<Do not open the cabinet because this might result in damage to the circuitry or electrical shock. If a foreign object should get into the unit, contact your dealer or service company.
<When removing the power plug from the wall outlet, always pull directly on the plug, never yank on the cord.
<Do not attempt to clean the unit with chemical solvents as this might damage the finish. Use a clean, dry or slightly damp cloth.
<Keep this manual in a safe place for future reference.
Battery Precautions
<Be sure to insert the batteries with correct positive “+” and negative “_” polarities.
<Use batteries of the same type. Never use different types of batteries together.
<Either rechargeable and non-rechargeable b at te r i e s c a n b e us e d . R e f e r to t h e precautions on their labels.
<When the remote control unit is not to be used for a long time (more than a month), remove the battery from the remote control unit to prevent them from leaking.
<If the batteries leak, wipe away the leakage inside the battery compartment and replace the batteries with new ones.
<Do not use any batteries other than those specified. Do not mix new batteries with old ones or use different types of batteries together.
<Do not heat or disassemble batteries and never throw them in fire or water.
<Do not carry or store batteries with other metallic objects. Doing so could cause batteries to short circuit, leak or explode.
<Never recharge a battery unless it is a verified rechargeable type.
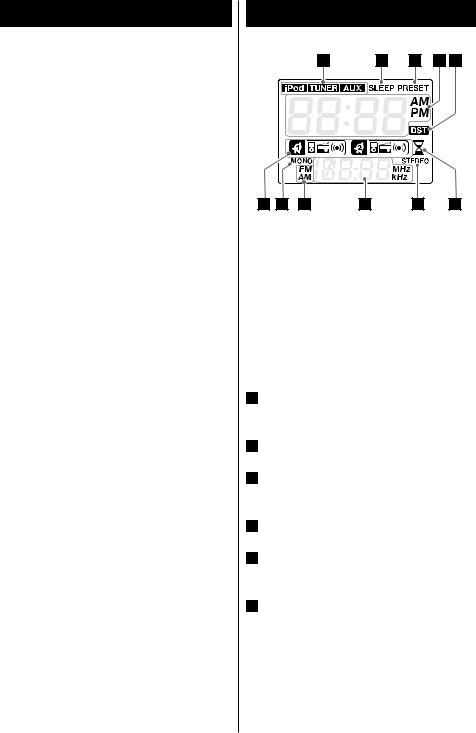
Identifying the Parts (Display)
A |
B |
C |
D E |
J G |
I |
H |
G |
F |
|
When the unit is on, one of these indicators |
|
A |
|
|
|
||
|
lights to show the current source. |
ENGLISH |
|
Lights when the Sleep Timer is active. |
|
B |
|
|
|
Lights in preset tuning mode. |
|
C |
|
|
|
Shows the digital clock or preset channels. |
|
D |
|
ELights when the DST switch on the rear of the unit is ON.
FLights when the Nap Alarm is active.
GWhen FM mode is active, shows whether the signal is stereo or monaural.
HShows frequency, volume, etc.
IShows FM or AM when receiving a radio signal.
JThis indicates the source set when the Wake Up Timer is set.
5

Identifying the Parts (Main Unit)
H I
|
|
|
|
|
|
|
|
|
|
|
|
|
|
A |
|
B |
C |
|
D |
|
|
E |
|
F |
|
G |
|
|
|
|
|
|
|
|
|
|
|
|
|
|
|
|
|
|
|
|
|
|
|
|
|
|
|
|
|
|
|
|
|
|
|
|
|
|
|
|
|
|
|
This can be rotated up to 90º in either direction.
J |
K |
L |
M |
6

ASTANDBY/ON
Use this button to turn the unit on or put it into standby mode.
BVOLUME
Turn this knob to adjust the volume.
CSLEEP
Use this button to set the Sleep Timer (page 20).
DNAP
Use this but ton to set the Nap Alarm (page 21).
EALARM 1, ALARM 2
Hold down these buttons for more than 2 seconds to enter the Wake Up Timer setting mode.
Use these buttons also to turn the Wake Up Timer on and off (page 21).
FSNOOZE/DIMMER
Use this button to dim the display (page 14). After the timer ON time is reached, use this button to turn the unit off for 10 minutes (page 23).
GTUNING/SET
In TUNER mode, turn this knob to tune in stations (page 18).
In Wake Up Timer setting mode, turn this knob to set the hour, minute and source (page 21).
In clock setting mode, turn this knob to set the hour and minute (page 12).
HAC Outlet
This outlet can be used, for example, to charge a mobile phone.
Caution:
Do not use with devices that use more than 0.5 A or 60 W. Use of such a device could cause a blown fuse, fire or electric shock.
IDock connector
Insert an iPod into this dock (page 14).
J Display
KTUNER
Use this button to enter TUNER mode (page 18).
LPHONES
To listen with headphones, first lower the volume level to the minimum. Then insert the headphones plug into the PHONES jack, and adjust the volume by turning the VOLUME knob.
The speakers will make no sound when headphones are plugged in.
Caution:
Do not turn the unit on or off, or insert or disconnect headphones from this jack while wearing headphones. Very loud sound could b e out put from t he headphones.
Always lower the volume level to the m i n i m u m b e f o r e p l u g g i n g i n headphones.
AVOID DAMAGING YOUR HEARING - Do not put on headphones until after plugging them in.
MAUX
Use this button to listen to an external source connected to the AUX IN jacks (page 17).
NiPod (y/J)
Use this button to enter iPod mode.
In iPod mode, use this button to start or pause playback of the iPod (page 14).
ORemote Sensor
PSpeakers (Stereo)
7
ENGLISH

Identifying the Parts (Remote Control Unit)
A
K
Q
B
T
B
U
W
8
C
M
S
R
V
X
QMUTING
Use this button to mute the sound (page 14).
RMEMORY
In TUNER mode, use this button to store for a preset the currently tune d s tation (page 19).
SFM MODE
In TUNER mode, use this button to select stereo or monaural (page 19).
In iPod mode, use this button to turn on the shuffle function (page 16).
TSkip (.//)
In iPod mode, use these buttons to skip to other tracks. Hold down these buttons to search for a part of a track (page 15).
In TUNER mode, use these buttons to tune in stations (page 18).
UPRESET/SCROLL (‡/°)
In iPod mode, use these buttons to scroll up and down in a menu (page 16). This button has the same functions as the click wheel of iPod.
In TUNER mode, use these buttons to select a preset station (page 19).
VMENU
In iPod mode, use this button to go back to the previous menu (page 16). This button h a s t h e s a m e f u n c t i o n s a s i t s i Po d counterpart.
WREPEAT
In iPod mode, use this button to set the repeat function (page 16).
XSELECT
In iPod mode, use this button to confirm a selection in a menu (page 16). This button has the same functions as the center button of the click wheel of iPod.

Remote Control Unit
The included remote control unit allows the unit to be operated from a distance.
When using the remote control, point it towards the remote sensor on the front of the unit.
<Even if the remote control is used within its effective operation range, the unit might not respond to the remote if there are any obstacles between them.
<T h e rem ote co nt ro l mi ght f un c t i o n incorrectly if it is operated near other products that generate infrared rays, or if other remote control devices that use infrared rays are operated near the unit. Likewise, the other products might also operate incorrectly.
Battery Installation
1.Remove the battery compartment cover.
2.Put in the lithium battery (CR2032, 3V).
3.Close the cover.
Battery Replacement
If the distance to the unit from which the remote control can be used decreases, the battery has lost its charge. In this case replace the battery with a new one.
For more information about the collection of batteries, please contact your local municipality, your waste disposal service or the place where you purchased the items.
9
ENGLISH
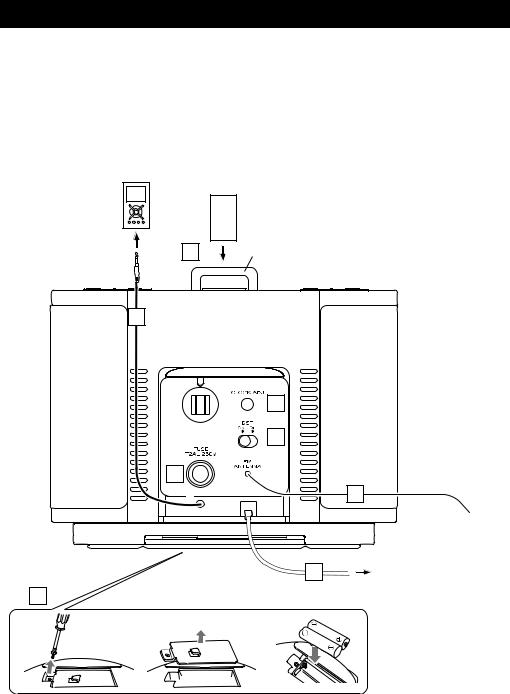
Connections
CAUTION:
<Turn off the power before making connections.
<Read the instructions for each component that you intend to use with this unit.
<Be sure to insert each plug securely. To prevent hum and noise, do not bundle the connection cords.
|
|
iPod (back side) |
|
|
B |
Adjuster |
SR-L70i |
|
|
|
|
|
A |
|
|
|
|
C |
|
|
|
D |
|
|
G |
|
E |
|
|
|
|
|
|
F |
AC wall socket |
|
H |
|
|
1 |
2 |
3 |
|
10
A
B
C
D
E
F
G
AUX in plug |
H Battery compartment |
|
Analog 2-channel audio signals can be |
The batteries supply backup power to |
|
input through this plug. Connect this plug |
the built-in clock and memory if the unit |
|
to the output of an iPod, CD player, |
is momentarily disconnected from an |
|
cassette tape deck, etc. |
AC outlet. |
|
Dock connector |
Insert two AAA (R03, SUM-4) batteries. |
|
Make sure that the batteries are inserted |
||
Insert an iPod into this dock (page 14). |
with their positive “+” and negative “_” |
|
CLOCK ADJ |
poles oriented correctly. |
|
Battery replacement |
||
Use this but ton to adjust the clock |
||
If the clock starts to show the wrong time, |
||
(page 12). |
||
replace the batteries with new ones. |
||
|
||
DST |
The total life of a pair of batteries is about |
|
100 hours. |
||
|
||
Use this switch to set daylight saving time |
|
|
(page 12). |
|
|
FM antenna |
|
|
While in FM mode, tune in an FM station |
|
|
and extend the antenna lead to find the |
|
|
best position for reception. This antenna |
|
|
might need to be repositioned if you move |
|
|
the unit to a new location. |
|
|
AC Power Cord |
|
|
Plug this AC power cord into an AC wall |
|
|
socket. |
|
|
FUSE |
|
|
If the fuse becomes blown, replace it with |
|
|
a T2 AL 250V fuse. |
|
|
Caution: |
|
|
For the sake of safety, disconnect the |
|
|
power plug before replacing the fuse. |
|
11
ENGLISH

Setting the Clock
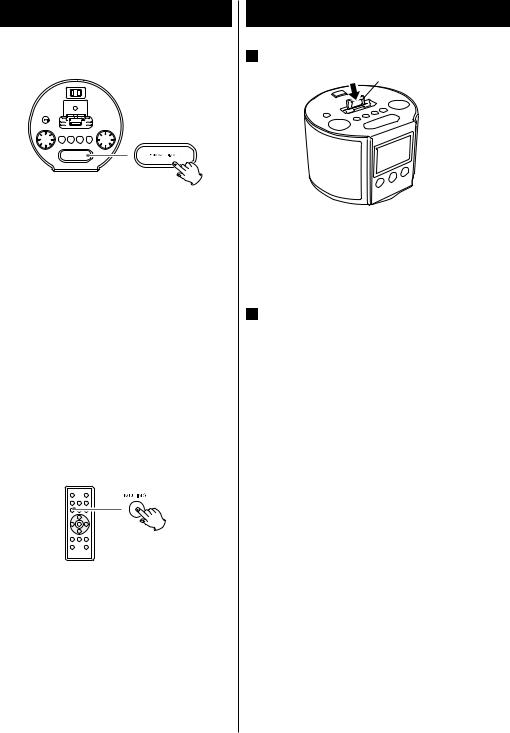
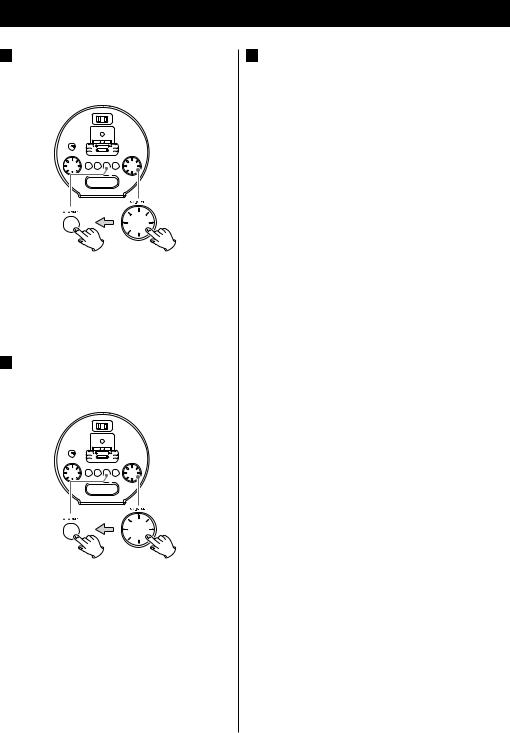
1Press and hold the CLOCK ADJ button for more than 3 seconds, and release it when “12 HR” or “24 HR” blinks on the display.
If you want to change the hour mode, turn the TUNING/SET knob.
<If you do not turn the knob or press the button for 8 seconds, timer setting mode will end.
2Press the CLOCK ADJ button again.
The “hour” value blinks.
3Turn the TUNING/SET knob to set the current hour, and then press the CLOCK ADJ button.
4Turn the TUNING/SET knob to set the current minute, and then press the CLOCK ADJ button.
Setting the clock is now completed and the clock starts from the 00 second.
Setting daylight saving time
To change the clock for daylight saving time, set the DST switch to ON. The DST indicator (  ) appears on the display.
12
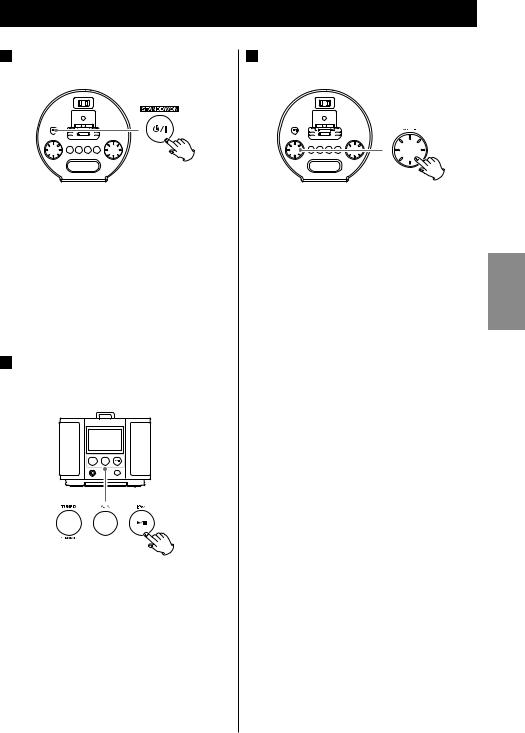
Basic Operation (1)
1Press the STANDBY/ON switch to turn the unit on.
<The unit turns on with the source that was last selected ready to play. If an iPod that is in playback mode is inserted into the dock, the SR-L70i automatically turns on and starts playback of the iPod.
<You can also turn the unit on by pressing the TUNER button, the AUX button, or the iPod button (y/J).
2 Press the TUNER button, the AUX
button, or the iPod button (y/J) to select the sound source.
3Play the source, and adjust the volume using the VOLUME knob.
The volume is adjustable from MIN (00) to MAX (40).
When you use the remote control unit, hold down the VOLUME – or + buttons to turn the volume down or up continuously.
<Select AUX to listen to an external source connected to the AUX IN plug.
<If you select “iPod” when no iPod is docked, the iPod indicator on the display blinks.
13
ENGLISH
Basic Operation (2)
Dimmer
You can change the brightness of the front panel display. Use the SNOOZE/DIMMER button to set the brightness to one of three levels.
If this button is pressed in standby mode, the display is brightened for about 5 seconds.
<T his f u n c t i o n is c a n ce l e d w h e n t h e STANDBY/ON switch is pressed.
Muting
To mute the sound temporarily, press the MUTING button. Press the MUTING button again to restore the sound.
<If you change the volume or source when muted, muting is canceled.
14
Listening to an iPod (1)
1 Insert the iPod into the dock connector.
Adjuster
<After inserting the iPod, slide the dock adjuster to fit the iPod being used.
The iPod indicator ( ) appears on the display.
2Press the Play/Pause button (y/J) on the iPod or the iPod button (y/J) on the SR-L70i. The SR-L70i will turn on and start playing music on the iPod.
<Whenever an iPod is docked and the SR-L70i is connected to an AC power supply, the battery of the iPod is recharged until it is full. However, to avoid noise, the iPod will not be charged when using the tuner in AM mode.
<When headphones are plugged into the iPod, sound is output from both the SR-L70i speakers and the headphones.
Compatible iPod Software
If your iPod will not work with the SR-L70i or with the remote control, a software update might solve the problem.
Visit the Apple website and download the latest iPod Software.
http://www.apple.com/ipod/download/

Selecting iPod mode
Press the iPod button (y/J).
If an iPod that is playing is inserted into the dock, the SR-L70i automatically star ts outputting the sound.
When no iPod is docked, the iPod indicator on the display blinks.
<You can also use the button on the iPod or the Play/Pause button (y/J) on the remote control unit to select the iPod for playback.
Suspending playback temporarily (pause mode)
Press the iPod but ton (G/ J) during playback. Playback stops at the current position. To resume playback, press the iPod button (G/J) again.
<You can also use the button on the iPod or the Play/Pause button (y/J) on the remote control to pause playback.
Searching for a part of a track
During playback, hold down a Skip button (.or /) for more than 2 seconds and release it when the part you want to listen to is found.
Skipping to a following or previous track
During playback, repeatedly press a Skip button (.or /) until the desired track is found. The selected track will be played from the beginning.
<If the . but ton is presse d during playback, the track being played will be played from the beginning. To return to the beginning of the previous track, press the
.button twice.
15
ENGLISH
Listening to an iPod (2)
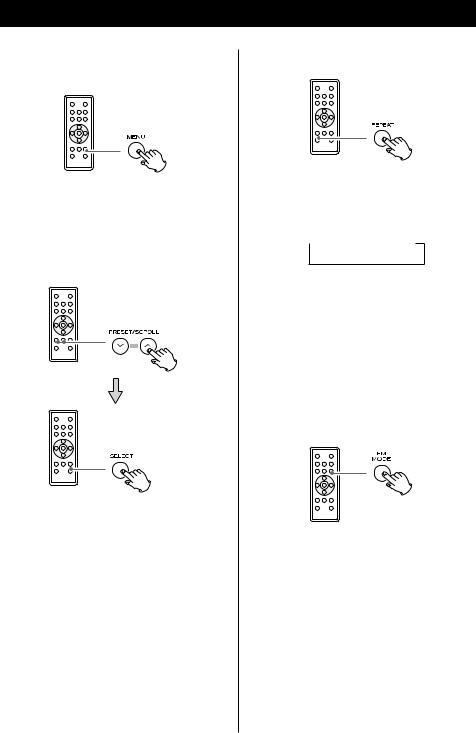
Returning to the previous iPod menu
Press the MENU button. This button has the same functions as its iPod counterpart.
Selecting a menu item
Press the PRESET/SCROLL buttons (‡/°) to scroll to the menu item you want, and then press the SELECT button.
Activating the repeat mode
During playback, press the REPEAT button to change the repeat mode.
Each time the REPEAT button is pressed, the iPod REPEAT setting is changed as follows:
 One
One  All
All  off
off
If the iPod is set to repeat one song, the repeat once icon (
 ) appears on the iPod’s display.
If the iPod is set to repeat all songs, the repeat icon (  ) appears on the iPod’s display.
Activating the shuffle mode
During playback, pressing the FM MODE button turns the shuffle mode ON and OFF.
When the iPod is set to shuffle, the shuffle icon ( ) appears on the iPod’s display.
16
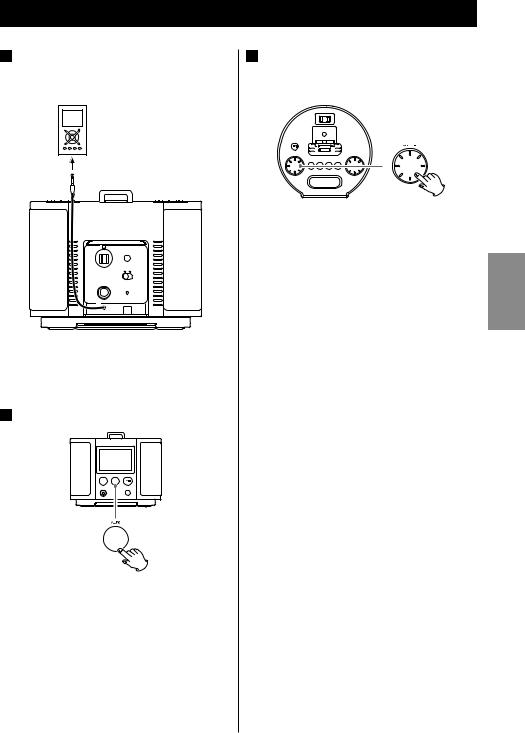
Listening to an External Source
1Connect the AUX IN plug of the SR-L70i to the PHONES jack (audio output jack) of a portable audio player.
You can use this means of connection to listen to an iPod that do not have dock connectors.
2 Press the AUX button.
3Play the source, and adjust the volume on both the SR-L70i and the audio player.
When using the PHONES jack of the audio player, you must adjust its volume or you might not hear any sound from the SR-L70i.
<Turning the volume of the audio player up too high may cause the sound from the SR-L70i to be distorted. If this is the case, reduce the volume of the audio player until the distortion stops and then adjust the volume level of the SR-L70i to a comfortable listening level.
The AUX indicator (  ) appears on the display.
17
ENGLISH
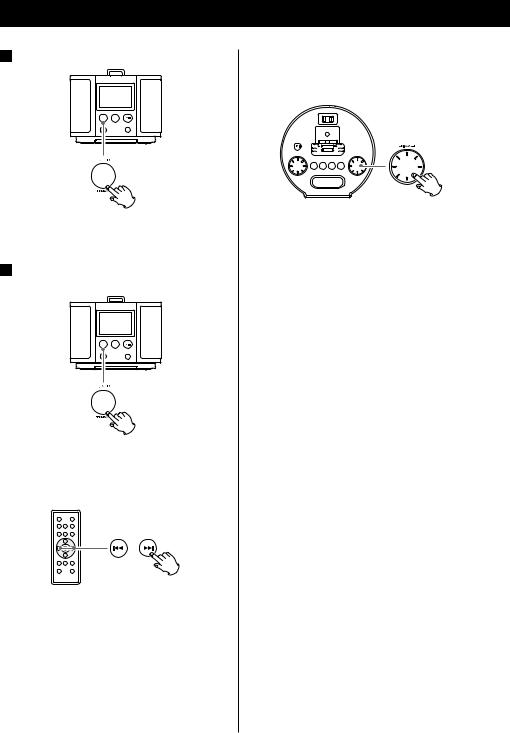
Listening to the Radio
1 Press the TUNER button.
The TUNER indicator (  ) appears on the display.
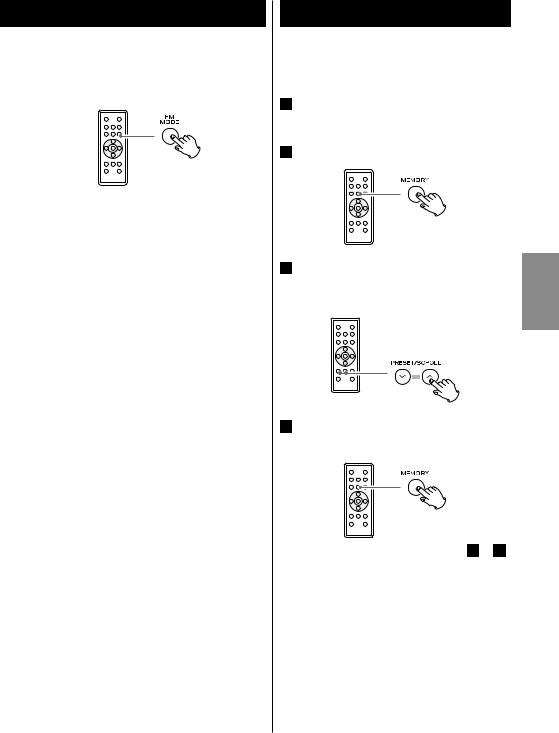
2Press the TUNER button again to select FM or AM.
Selecting a station
Automatic selection
Hold down a Skip button (.or /) for more than 2 seconds and release it when the frequency display begins to change.
When a station is tuned in, the tuning process will stop automatically.
<To stop automatic selection, press a Skip button (.or /).
18
Manual selection
Use the TUNING/SET knob to select stations that cannot be tuned automatically.
<You can also use the Skip buttons (. or /) on the remote control.
When a Skip button (.or/) is pressed momentarily the frequency changes by a fixed step.
Press the Skip button repeatedly until the station you want to listen to is found.
FM MODE button
Pressing this button alternates between Stereo mode and Mono mode.
Stereo
When an FM stereo broadcast is received, the “STEREO” indicator lights on the display.
<If the sound is distorted and the “STEREO” indicator flashes, the signal is not strong enough for good stereo reception. In this case, change to MONO mode.
Mono
To co m p e n s a te f o r w e a k FM s te r e o reception, select this mode. Reception will b e force d to b e m onaur al, re ducing unwanted noise. The “MONO” indicator appears on the display.
If the reception is poor
AM broadcast
The AM antenna is built into the main unit. Rotate or move the unit to find the best position for AM reception.
FM broadcast
Extend and turn the FM antenna to improve the reception of a station.
Preset Tuning (1)
You can program 10 FM and 10 AM channel presets.
1Tune in a station you want to save as a preset (page 18).
2Press the MEMORY button.
3Within 3 seconds, select a preset channel to store the station using the PRESET/SCROLL (‡/°) buttons.
4Within 10 seconds, press the MEMORY button.
To store more stations, repeat steps 1 to 4 .
19
ENGLISH
Preset Tuning (2)
Selecting a preset station
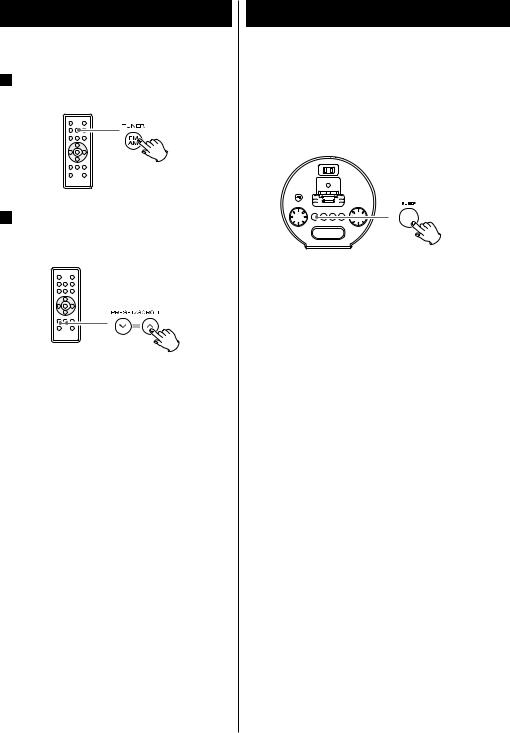
1 In TUNER mode, press the TUNER button to select FM or AM.
2Press the PRESET/SCROLL (‡/°) buttons repeatedly until the desired preset station is found.
20
Timer (1)
Sleep Timer
You can set the Sleep Timer so the unit turns itself off after a specified amount of time.
Press the SLEEP button repeatedly until the desired time appears on the display.
The SLEEP indicator (  ) appears on the display.
SLEEP 120, 90, 60, 30 or 15:
Depending on the selection, the power will be switched to standby after 120, 90, 60, 30 or 15 minutes.
OFF:
The Sleep Timer is OFF.
<If you want to check the time remaining until the unit is switched to standby, press the SLEEP button once. The remaining time will be displayed for a few seconds.
Nap Alarm
You can set a Nap Alarm so that a buzzer sounds after a set amount of time. The buzzer sounds for 5 minutes.
Press the NAP button repeatedly until the desired time appears on the display.
The NAP indicator (  ) appears on the display.
 30, 60, 90, or 120:
Depending on the selection, the buzzer will sound after 30, 60, 90, or 120 minutes.
OFF:
The Nap Alarm is OFF.
<If you want to check the time remaining until the nap alarm buzzes, press the NAP button once. The remaining time will be displayed for a few seconds.
<After the Nap Alarm has been set, it will function even if the unit is put into standby mode.
Caution:
The buzzer sound is loud, so do not use headphones when the Nap Alarm is on.
To stop the alarm
When the buzzer sounds after the set time elapses, press the SNOOZE/DIMMER button to stop the buzzer for 10 minutes. It will sounds again after 10 minutes.
To turn the Nap Alarm off completely, press the NAP button again.
Wake Up Timer
The unit can be programmed to turn on at a specified time.
The unit turns on when the timer reaches the ON time. Then, after 120 minutes the unit will switch to standby. Or the buzzer sounds for 5 minutes.
You can set two different timers separately with ALARM 1 and ALARM 2.
<Adjust the clock before setting the timer (page 12).
Setting the Wake Up Timer (When using the Alarm 1 button)
1Press and hold the ALARM 1 button for more than 2 seconds.
The clock and the timer indicator (  ) appear on the display and blink.
<If no button is pressed for about 8 seconds, the timer setting mode will be canceled.
At their default settings, Alarm 1 is set for 6:00 AM and Alarm 2 is set for 7:00 AM.
<If you want to restore the unit to the default f ac tor y set tings, press and hold the SNOOZE/DIMMER button for more than 5 seconds.
21
ENGLISH
Timer (2)
2Turn the TUNING/SET knob to set the hour and minute, and then press the ALARM 1 button.
The Timer indicator and source indicator blink.
<The Wake Up Timer can be set by 5 minutes’ step.
3Turn the TUNING/SET knob to set the source, and then press the ALARM 1 button.
<If you want to wake up with the buzzer, select “  ”.
”.
<You cannot select “AUX” as a source.
The Clock Timer is now set and the indicator ( ) appears on the display.
4Prepare the source.
When the source is set to “iPod,” insert an iPod.
When the source is set to “Tuner”, tune in a station.
<Playback volume will gradually increase when the unit is turned on by timer.
<If the source is set to “iPod” but no iPod is set, the buzzer will sound.
22
 Loading...