Teac DR H338i, DVD Receiver User Manual
41008765
Z
DR-H338i
DVD Receiver
OWNER’S MANUAL
MODE D’EMPLOI
MANUAL DEL USUARIO
ENGLISH
FRANÇAIS
ESPAÑOL
C AUTION: TO REDUCE THE RISK OF ELEC TRIC SHOCK , DO NOT REMOVE COVER (OR BACK). NO USER-SERVICEABLE PARTS INSIDE. REFER SERVICING TO QUALIFIED SERVICE PERSONNEL.
T he lightning f lash with arrowhead s ymbol, within an equilateral triangle, is intended to aler t the user to the presence of uninsulated “dangerous voltage” within the product’s enclosure that may be of sufficient magnitude to constitute a risk of electric shock to persons.
The exclamation point within an equilateral triangle is intended to aler t the user to the presence of impor tant operating and maintenance (servicing) instructions in the literature accompanying the appliance.
WARNING: TO PREVENT FIRE OR SHOCK HAZARD, DO NOT EXPOSE THIS APPLIANCE TO R AIN OR MOISTURE.
CAUTION
<DO NOT REMOVE THE EXTERNAL CASES OR CABINETS TO EXPOSE THE ELECTRONICS. NO USER SERVICEABLE PARTS ARE WITHIN.
<IF YOU AR E E XPER IEN CIN G PR O BLEMS W I T H T HIS PR O DUC T, CO N TAC T T E AC FO R A SER V ICE R EFER R AL . D O N OT USE T HE PRODUCT UNTIL IT HAS BEEN REPAIRED.
<USE OF CON T ROL S OR ADJUS TMEN T S OR PERFORMANCE OF PROCEDURES OTHER THAN THOSE SPECIFIED HEREIN MAY RESULT IN HAZARDOUS RADIATION EXPOSURE.
IMPORTANT SAFETY INSTRUCTIONS
1)Read these instructions.
2)Keep these instructions.
3)Heed all warnings.
4)Follow all instructions.
5)Do not use this apparatus near water.
6)Clean only with dry cloth.
7)Do not block any ventilation openings. Install in accordance with the manufacturer’s instructions.
8)D o not ins tall near any heat sources such as r adiators, heat registers, stoves, or other apparatus (including amplifiers) that produce heat.
9)Do not defeat the safety purpose of the polarized or groundingtype plug. A polarized plug has two blades with one wider than the other. A grounding t ype plug has t wo blades and a third grounding prong. The wide blade or the third prong are provided for your safety. If the provided plug does not fit into your outlet, consult an electrician for replacement of the obsolete outlet.
10)Prote c t th e p ower co rd f ro m b ein g w alke d o n o r p in ch e d par ticularly at plugs, convenience receptacles, and the point where they exit from the apparatus.
2
11) Only use attachments/accessories specified by the manufacturer. 12) Use only with the cart, stand, tripod, bracket, or
table specified by the manufacturer, or sold with the apparatus. When a cart is used, use caution when moving the cart/apparatus combination to avoid injury from tip-over.
13)Unplug this apparatus during lightning storms or when unused for long periods of time.
14)Refer all ser vicing to qualified ser vice personnel. Ser vicing is required when the apparatus has been damaged in any way, such as power-supply cord or plug is damaged, liquid has been spilled or objects have fallen into the apparatus, the apparatus has been exposed to rain or moisture, does not operate normally, or has been dropped.
15)Grounding or Polarization – This product may be equipped with a polarized alternating-current line plug (a plug having one blade wider than the other). This plug will fit into the power outlet only one way. This is a safety feature. If you are unable to inser t the plug fully into the outlet, try reversing the plug. If the plug should still fail to fit, contact your electrician to replace your obsolete outlet. Do not defeat the safety purpose of the polarized plug.
Alternate Warnings – This product is equipped with a three-wire grounding-type plug, a plug having a third (grounding) pin. This plug will only fit into a grounding-t ype power outlet. This is a safety feature. If you are unable to insert the plug into the outlet, contact your electrician to replace your obsolete outlet. Do not defeat the safety purpose of the grounding-type plug.
16)Ventilation – Slots and openings in the cabinet are provided for ventilation and to ensure reliable operation of the product and to protect it from overheating, and these openings must not be blocked or covered. The openings should never be blocked by placing the product on a bed, sofa, rug, or other similar surface. This product should not be placed in a built-in installation such as a bookcase or rack unless proper ventilation is provided or the manufacturer’s instructions have been adhered to.
17)The MAINS plug or an appliance coupler is used as the disconnect device, the disconnect device shall remain readily operable.
18)Battery pack or battery installed shall not be exposed to excessive heat such as sunshine, fire or the like.
19)Manufacture date is located on bottom of product.
20): CLASS II apparatus with double insulation, and no protective earth provided.
<Do not expose this apparatus to drips or splashes.
<Do not place any objects filled with liquids, such as vases, on the apparatus.
<Do not install this apparatus in a confined space such as a book case or similar unit.
<T he apparatus draws nominal non - operating power from the AC outlet with its POWER or STANDBY/ON switch not in the ON position.
<The apparatus should be located close enough to the AC outlet so that you can easily grasp the power cord plug at any time.
<T h e ap p lian ce co up ler is us e d as th e dis co nn e c t d ev ice,th e disconnect device shall remain readily operable.
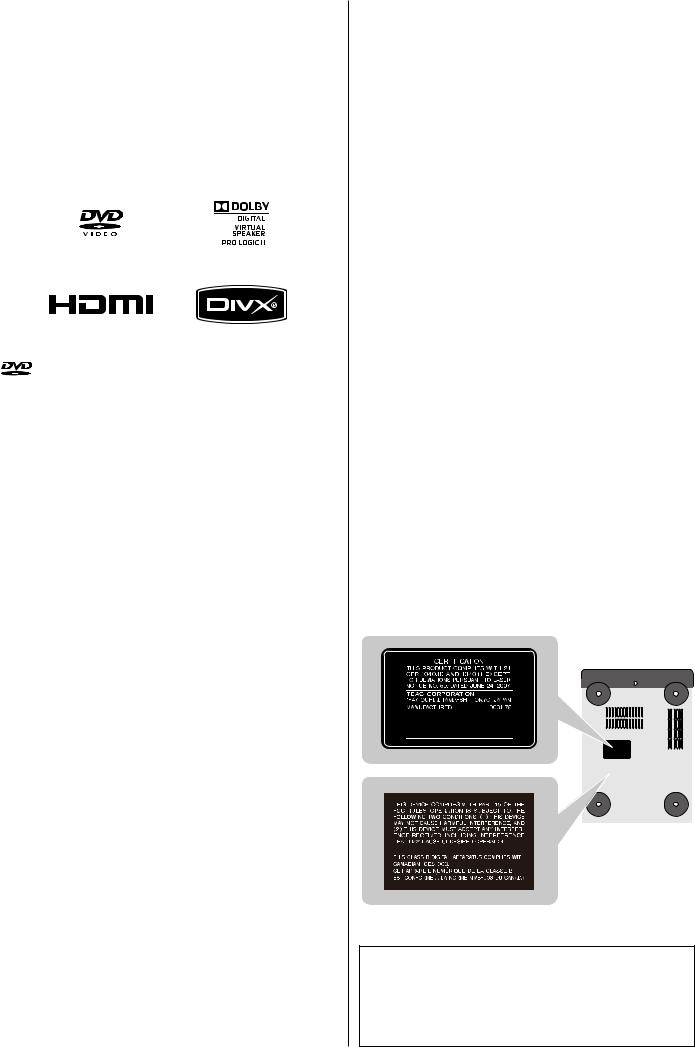
<If the product uses batteries (including a battery pack or installed batteries), they should not be exposed to sunshine, fire or excessive heat.
<CAUTION for products that use replaceable lithium batteries: there is danger of explosion if a battery is replaced with an incorrect type of battery. Replace only with the same or equivalent type.
<Caution should be taken when using earphones or headphones with the product because excessive sound pressure (volume) from earphones or headphones can cause hearing loss.
is a trademark of DVD Format/Logo Licensing Corporation.
This product incorporates copyright protection technology that is protected by U.S. patents and other intellectual property rights.
Use of this copyright protection technology must be authorized by Macrovision, and is intended for home and other limited viewing uses only unless otherwise authorized by Macrovision. Reverse engineering or disassembly is prohibited.
Manufactured under license from Dolby Laboratories. Dolby, Pro Logic and the double-D symbol are trademarks of Dolby Laboratories.
HDMI, the HDMI logo and High-Definition Multimedia Inter face are trademark s or registered trademark s of HDMI Licensing LLC in the United States and other countries.
DivX and the associated DivX logos are registered trademarks of DivX, Inc.
MPEG Layer-3 audio coding technology licensed from Fraunhofer IIS and Thomson.
This produc t is licensed under the MPEG - 4 Visual patent por t folio license for the personal and non-commercial use of a consumer for
(i) encoding video in compliance with the MPEG -4 Visual Standard ( "MPEG - 4 V id e o" ) an d /o r (ii) d e co din g MPEG - 4 V id e o that w as encoded by a consumer engaged in a personal and non-commercial activity and/or was obtained from a video provider licensed by MPEG LA to provide MPEG-4 Video. No license is granted or shall be implied for any other use. Additional information including that relating to promotional, internal and commercial uses and licensing may be obtained from MPEG LA, LLC. See http://www.mpegla.com.
This product is protected by cer tain intellectual proper t y rights of Microsoft.
Use or distribution of such technology outside of this produc t is prohibited without a license from Microsoft.
Windows Media is either a registered trademark or trademark of Microsoft Corporation in the United States and/or other countries.
iPod is a trademark of Apple Inc., registered in the U.S. and other countries.
“M a d e fo r iPo d ” m eans that an e l e c t ro ni c a cce ss o r y has b e en designed to connect specifically to iPod and has been certified by the developer to meet Apple performance standards.
App le is not resp onsib le for the op er ation of this dev ice or it s compliance with safety and regulatory standards.
For U.S.A.
This equipment has been tested and found to comply with the |
|
|
|
limits for a Class B digital device, pursuant to Part 15 of the FCC |
|
|
|
Rules. These limits are designed to provide reasonable protection |
|
|
|
agains t harmf ul inter ference in a residential ins tallation . T his |
|
|
|
equipment generates, uses, and can radiate radio frequency energy |
|
|
|
and, if not installed and used in accordance with the instructions, |
|
|
|
may cause harmful interference to radio communications. However, |
|
|
|
there is no guarantee that interference will not occur in a particular |
|
|
|
installation. If this equipment does cause harmful interference to |
|
|
|
radio or television reception, which can be determined by turning |
|
|
|
the equipment off and on, the user is encouraged to try to correct |
|
|
|
the interference by one or more of the following measures: |
|
|
|
r R e o r ient o r rel o c ate th e e quip m ent an d /o r th e re cei v in g |
|
|
|
|
antenna. |
|
|
r |
Increase the separation between the equipment and receiver. |
|
|
r |
Connec t the equipment into an outlet on a circuit dif ferent |
|
|
|
from that to which the receiver is connected. |
|
|
|
|
||
r |
Consult the dealer or an experienced radio/ T V technician for |
|
ENGLISH |
|
help. |
|
|
|
|
|
|
CAUTION |
|
|
|
Ch a n g e s o r m o d i f i c at i o ns to t h is e q u i p m e nt n ot e x p re s s l y |
|
|
|
approved by TEAC CORPORATION for compliance will void the |
|
|
|
user’s warranty. |
|
|
|
|
|
|
|
This produc t has been designed and manufac tured according to |
|
||
FDA regulations “title 21, CFR, chapter 1, subchapter J, based on the |
|
||
Radiation Control for Health and Safety Act of 1968“, and is classified |
|
||
as class 1 laser product. There is not hazardous invisible laser radiation |
|
||
during operation because invisible laser radiation emitted inside of |
|
||
this product is completely confined in the protective housings. |
|
||
The label required in this regulation is as follows: |
|
||
For U.S.A.
of the unit
Optical pickup |
|
|
|
|
|
|
|
|
|
|
|
|
|
|
|
|
|
|
|
|
|
|
|
|
|
|
|
|
|
Type |
: KHS-313A |
|
||
Manufacturer : Sony Electronics Inc. |
|
|||
Laser output |
: 7 mW (CD) |
|
||
|
5 mW (DVD) |
|
||
Wavelength |
: 655 +5, -10 nm / 790+10, -20 nm |
|
||
3

Contents
Thank you for choosing TEAC. Read this manual carefully to get the best performance from this unit.
Before Use . . . . . . . . . . . . . . . . . . . . . . . . . . . . . . . . . . . . . . . . . . . . . . . . . . . . 5
Discs . . . . . . . . . . . . . . . . . . . . . . . . . . . . . . . . . . . . . . . . . . . . . . . . . . . . . . . . . 6 USB memor y device compatibilit y . . . . . . . . . . . . . . . . . . . . . . . . . . . . . 8
Connecting Antennas (AM) . . . . . . . . . . . . . . . . . . . . . . . . . . . . . . . . . . . . 8 Connecting Antennas (FM) . . . . . . . . . . . . . . . . . . . . . . . . . . . . . . . . . . . . 9 Speaker Connection . . . . . . . . . . . . . . . . . . . . . . . . . . . . . . . . . . . . . . . . . 10 Connection to Audio Equipments etc. . . . . . . . . . . . . . . . . . . . . . . . . 11 Connection to a T V . . . . . . . . . . . . . . . . . . . . . . . . . . . . . . . . . . . . . . . . . . 12
Identif ying the Par ts (Main Unit) . . . . . . . . . . . . . . . . . . . . . . . . . . . . . . 14 Identif ying the Par ts (Remote Control Unit) . . . . . . . . . . . . . . . . . . . 16 Remote Control Unit . . . . . . . . . . . . . . . . . . . . . . . . . . . . . . . . . . . . . . . . . 18
Setting the Clock . . . . . . . . . . . . . . . . . . . . . . . . . . . . . . . . . . . . . . . . . . . . 19
Basic Operation . . . . . . . . . . . . . . . . . . . . . . . . . . . . . . . . . . . . . . . . . . . . . . 20
Getting Star ted with an iPod . . . . . . . . . . . . . . . . . . . . . . . . . . . . . . . . . 22 Listening to an iPod . . . . . . . . . . . . . . . . . . . . . . . . . . . . . . . . . . . . . . . . . . 23
Listening to a Disc . . . . . . . . . . . . . . . . . . . . . . . . . . . . . . . . . . . . . . . . . . . 25
Listening to an USB Memor y Device . . . . . . . . . . . . . . . . . . . . . . . . . . 26
On-screen Menu . . . . . . . . . . . . . . . . . . . . . . . . . . . . . . . . . . . . . . . . . . . . . 26 Pausing Playback (Freezing a Picture) . . . . . . . . . . . . . . . . . . . . . . . . . 28 Stopping Playback (Resume Mode) . . . . . . . . . . . . . . . . . . . . . . . . . . . 28 Skipping Playback . . . . . . . . . . . . . . . . . . . . . . . . . . . . . . . . . . . . . . . . . . . . 29 Searching for a Par t of a Chapter or Track . . . . . . . . . . . . . . . . . . . . . 29 Selecting a Chapter or Track . . . . . . . . . . . . . . . . . . . . . . . . . . . . . . . . . . 29 Selecting Audio . . . . . . . . . . . . . . . . . . . . . . . . . . . . . . . . . . . . . . . . . . . . . . 29 Selecting Subtitles . . . . . . . . . . . . . . . . . . . . . . . . . . . . . . . . . . . . . . . . . . . 30 Changing Camera Angle . . . . . . . . . . . . . . . . . . . . . . . . . . . . . . . . . . . . . 30 Picture Zoom . . . . . . . . . . . . . . . . . . . . . . . . . . . . . . . . . . . . . . . . . . . . . . . . 30 Slow Motion . . . . . . . . . . . . . . . . . . . . . . . . . . . . . . . . . . . . . . . . . . . . . . . . . 30 Repeat and Shuf f le Playback . . . . . . . . . . . . . . . . . . . . . . . . . . . . . . . . . 31 A-B Repeat Playback . . . . . . . . . . . . . . . . . . . . . . . . . . . . . . . . . . . . . . . . . 32 Changing the Display Mode . . . . . . . . . . . . . . . . . . . . . . . . . . . . . . . . . . 32 Time Search (VCD/CD) . . . . . . . . . . . . . . . . . . . . . . . . . . . . . . . . . . . . . . . 33 Time Search (MP3/ WMA) . . . . . . . . . . . . . . . . . . . . . . . . . . . . . . . . . . . . . 33 Chapter Search/ Time Search (DVD) . . . . . . . . . . . . . . . . . . . . . . . . . . . 34 Chapter Search/ Time Search (DivX) . . . . . . . . . . . . . . . . . . . . . . . . . . . 34 Programmed Playback (DVD, VCD, CD) . . . . . . . . . . . . . . . . . . . . . . . . 35 Programmed Playback (MP3, WMA, DIV X) . . . . . . . . . . . . . . . . . . . . . 36
4
Settings (Introduction) . . . . . . . . . . . . . . . . . . . . . . . . . . . . . . . . . . . . . . . 37 Settings (GENERAL SETUP). . . . . . . . . . . . . . . . . . . . . . . . . . . . . . . . . . . . 38 Settings (AUDIO SETUP) . . . . . . . . . . . . . . . . . . . . . . . . . . . . . . . . . . . . . . 39 Settings (VIDEO SETUP) . . . . . . . . . . . . . . . . . . . . . . . . . . . . . . . . . . . . . . 40 Settings (PREFERENCE) . . . . . . . . . . . . . . . . . . . . . . . . . . . . . . . . . . . . . . . 41 Settings (PASSWORD SETUP) . . . . . . . . . . . . . . . . . . . . . . . . . . . . . . . . . 42
Listening to the Radio (FM/AM) . . . . . . . . . . . . . . . . . . . . . . . . . . . . . . . 43 Preset Tuning (FM/AM) . . . . . . . . . . . . . . . . . . . . . . . . . . . . . . . . . . . . . . . 44
Listening to an External Source . . . . . . . . . . . . . . . . . . . . . . . . . . . . . . . 45
Sleep Timer . . . . . . . . . . . . . . . . . . . . . . . . . . . . . . . . . . . . . . . . . . . . . . . . . . 46 Wake Up Timer . . . . . . . . . . . . . . . . . . . . . . . . . . . . . . . . . . . . . . . . . . . . . . 46
Troubleshooting . . . . . . . . . . . . . . . . . . . . . . . . . . . . . . . . . . . . . . . . . . . . . 48
Specifications . . . . . . . . . . . . . . . . . . . . . . . . . . . . . . . . . . . . . . . . . . . . . . . . 50
Conventions about this manual
<The types of functions and operations that can be used for a particular disc vary depending on the features of that disc. In some cases, these functions and operations may dif fer from the descriptions given in this manual. In this event, follow the instructions given on the screen. This manual only covers basic disc operations.
<For some operations, the PROHIBIT icon “ A” may appear on the screen. This indicates that the operation described in this manual is not permitted for the current disc.
Before Use
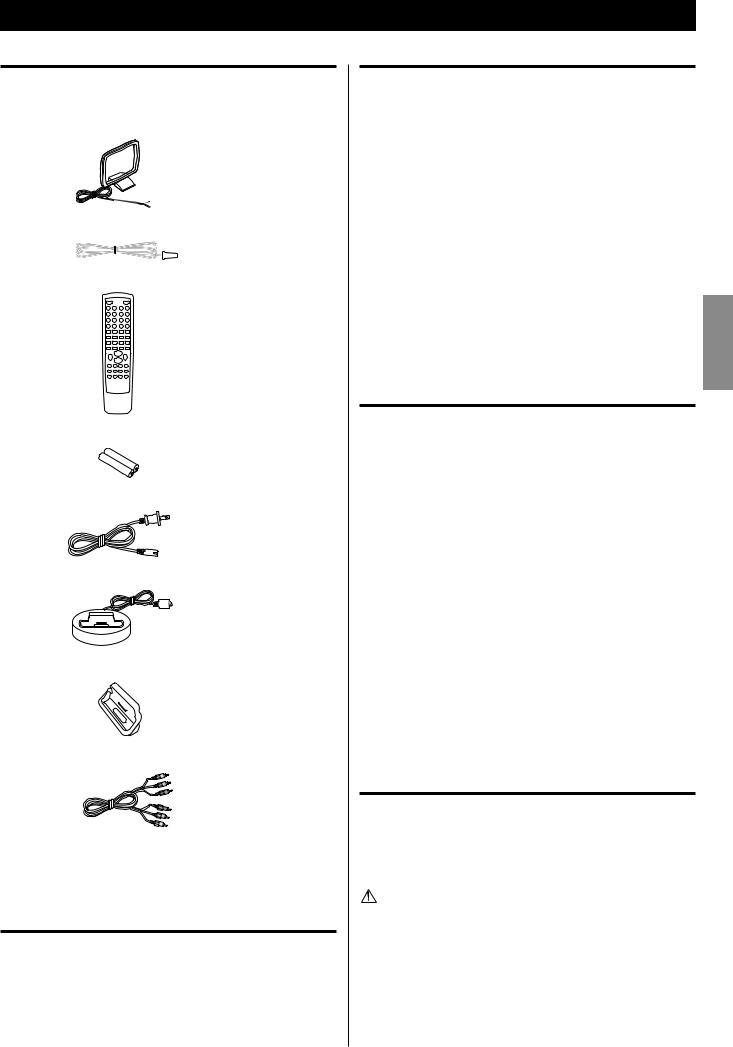
What’s in the box
Confirm the supplied standard accessories.
AM antenna x 1
FM antenna x 1
Remote control unit (RC-1240) x 1
Batteries (AAA, R03, UM-4) for remote control unit x 2
AC power cord x 1
iPod dock x 1
Dock adapter x 2
RCA AV cable x 1
Owner’s manual (this document) x 1
< Keep this manual in a safe place for future reference.
Warranty card x 1
Beware of condensation
When the unit is moved from a cold to a warm place, or used after a sudden temperature change, there is a danger of condensation; vapor in the air could condense on the internal mechanism, making correct operation impossible. To prevent this, or if this occurs, leave the unit turned on for one or two hours. Then the unit will stabilize at the temperature of its surroundings.
Placement of the unit
< Choose the installation location of your unit carefully. Avoid placing it in direct sunlight or close to a source of heat. Also avoid locations
subject to vibrations and excessive dust, heat, cold or moisture. |
|
< As the unit may become warm during operation, always leave |
|
sufficient space around the unit for ventilation. |
|
Make sure there is at least 8” (20 cm) of space above and at least 2” |
|
(5 cm) of space on each side of the unit. Do not place anything on |
|
top of the unit. |
|
< Do not place the unit on an amplifier or receiver or any other |
|
device that generates heat. |
|
< When the unit is turned on, switching on the T V may cause lines |
ENGLISH |
unit or the T V. If you see such lines, keep this unit well away from |
|
to appear on the T V screen, depending on the condition of the |
|
electric waves of the T V broadcast. This is not malfunction in the |
|
the T V set. |
|
 CAUTION
<Do not move the unit during disc playback.
During playback, the disc rotates at high speed. Do not lif t or move the unit during playback. Doing so may damage the disc or the unit.
<The voltage supplied to the unit should match the voltage as printed on the rear panel. If you are in any doubt regarding this matter, consult an electrician.
<Do not open the cabinet as this might result in damage to the circuitry or electrical shock. If a foreign object should get into the unit, contact your dealer or service company.
<When removing the power plug from the wall outlet, always pull directly on the plug, never yank on the cord.
<To keep the laser pickup clean, do not touch it and always close the disc tray.
<Always remove the disc before relocating or moving this unit. Moving the unit with a disc inside it could cause malfunction.
Maintenance
If the sur f ace of the unit get s dir t y, wip e it with a sof t cloth or use diluted mild liquid soap. Allow the sur face of the unit to dr y completely before using.
For safet y, disconnect the power cord from the socket before cleaning.
<Never spray liquid directly on this unit.
<Do not use thinner, benzene or alcohol as they could damage the surface of the unit.
5
Discs
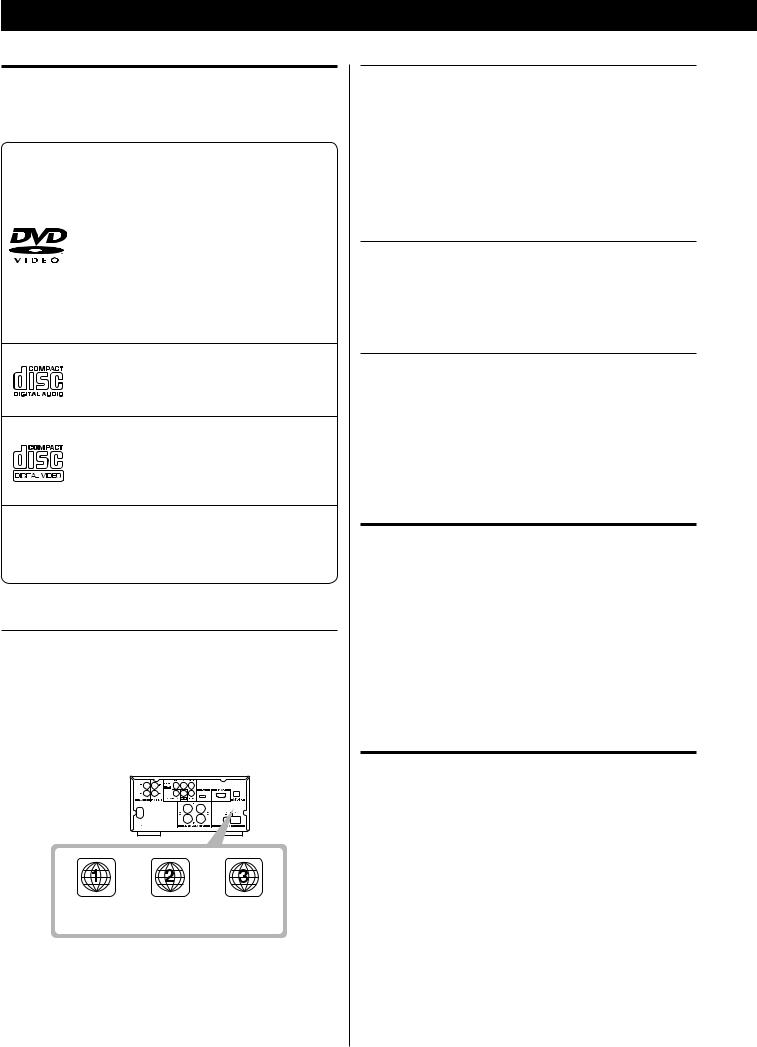
Type of discs that can be played on this unit
This player can playback discs bearing any of the following logos:
DVD Video
M Single-sided or double-sided discs M Single layer or dual layer discs
M Dolby Digital, MPEG or Linear PCM digital audio M MPEG-2 digital video
M This unit can play DVD-R discs recorded in DVD video format.
MThis unit can play DVD -RW discs recorded in DV D v id e o fo r mat o r DV D v id e o re co rdin g format.
Discs are generally divided into one or more titles.
Titles may be further subdivided into chapters.
Audio CD
M 12cm or 8cm discs
M Linear PCM digital audio
Audio CDs are divided into tracks.
Video CD
M 12cm or 8cm discs
M MPEG-1 digital audio
M MPEG-1 digital video
Video CDs are divided into tracks.
SVCD
M 12 cm or 8 cm discs
M MPEG-1 Audio Layer2
M MPEG-2 digital video
Region Number of DVD Video discs
DVD players and discs are designed with region numbers that dictate the regions in which a disc can be played. If the region number on the disc you want to play does not match the region number of your DVD player, you will not be able to play the disc. In that case, an error message will appear on the screen.
The region number is printed on the rear panel of this unit.
U.S.A./Canada |
Europe |
Asia |
model |
model |
model |
About DVD-RW
<DVD-RW discs that were recorded with copy-once only permission cannot be played.
<When playing a DVD-RW disc that was edited on a DVD recorder, the screen may momentarily black out at the edited point.
<When playing a DVD-RW disc that was edited on a DVD recorder, you may see scenes from just before the edited point.
About CD-R/CD-RW
CD - R /CD - RW dis c s re co rd e d in Au dio CD fo r mat an d f inali ze d correctly are playable. But depending on the quality of the disc and/ or the condition of the recording, some CD-R/CD-RW discs may not be playable.
CAUTION
<If you record a disc using a personal computer, even if it is recorded in a compatible format, there are cases in which it may not play because of the settings of the application software used to create the disc. (Check with the sof t ware publisher for more detailed information.)
<Unfinalized CD-R/CD-RW/DVD-R/RW discs cannot be played.
Discs cannot be played with this unit
<DVD -Audio, Super Audio CD, CD - G, Data part of CD -EX TRA, and PHOTO CD discs
<discs recorded in a color system other than PAL or NTSC
<illegally produced discs
<scratched or damaged discs
<discs that are dusty, soiled or marked with fingerprints
 CAUTION
If you attempt to play back such discs, there is a risk that sudden loud noise can blast over the speakers at full volume and cause damage to the speakers and your hearing.
Copy-protected discs, DualDiscs and other discs that do not conform to the CD standard may not play back correctly in this player. If you use such discs in this unit, TEAC Corporation and its subsidiaries cannot be responsible for any consequences or guarantee the quality of reproduction. If you experience problems with such non-standard discs, you should contact the producers of the disc.
6
Playable file format
This unit can play following files recorded on a CD-R, CD-RW, DVD-R, DVD-RW or USB memory device:
M MP3 files
M Windows Media-formatted audio files
M JPEG files
MDivX video files
(DivX 5, DivX 4, DivX 3 and DivX VOD video content)
<File names should be alphanumeric characters. This unit cannot display s ymbols and full -size or double - by te charac ters (such as Japanese, Chinese, etc.) correctly. Also, be sure to use the file extension. (‘.mp3’ for MP3 files, ‘.wma’ for WMA files, ‘.avi’ or ‘.divx’ for DivX video files, ‘.jpg or ‘.jpeg’ for JPEG files.)
<Files are played in alphabetical order.
<MP3 files mus t b e monaural or s tere o MPEG -1 Audio L ayer 3 format . T his unit can play MP3 files with sampling f requenc y 44.1 kHz or 48 kHz, bit-rate 320 kbps or less.
<This unit can play WMA files with sampling frequency 44.1 kHz, bitrate 192 kbps or less.
<This unit cannot display the bit-rate of VBR (variable bit rate) files correctly.
<The disc must be finalized in order to play.
<This player is NOT compatible with multi-session discs.
<The CD-ROM must be ISO 9660 compatible.
<It may take time to display a progressive JPEG picture.
<Dep ending on the file size and compression rate, some JPEG pictures cannot be displayed correctly.
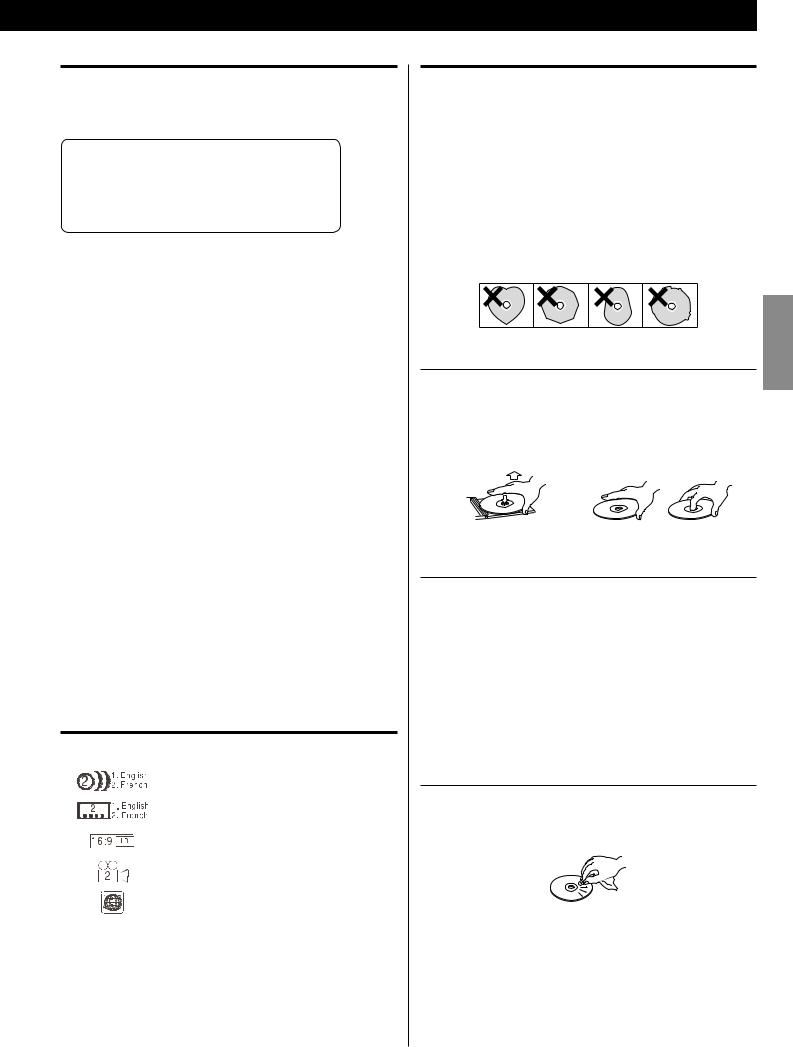
Example of Icons used on DVD discs
Number of audio tracks recorded on the disc
Number of subtitles recorded on the disc
Screen aspect ratio
Disc recorded with multiple camera angles
Region code
CAUTION
<Do not play any disc that is warped, deformed or damaged. Playing such discs may cause irreparable harm to the playing mechanisms.
<Printable discs are not recommended, as the label side might be sticky and damage the unit.
<Do not stick papers or protective sheets on the discs and do not use any protective coating spray.
<Never use a stabilizer. Using commercially available CD stabilizers with this unit will damage the mechanisms and cause them to malfunction.
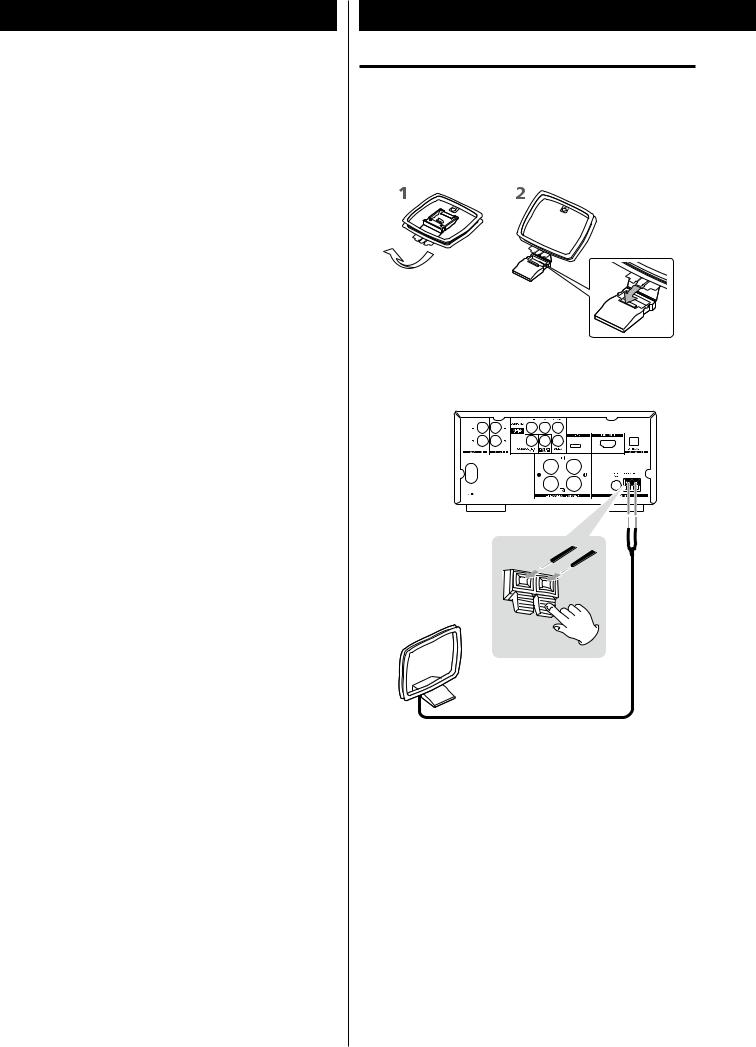
<Do not use irregular shape discs (octagonal, heart shaped, business card size, etc.). Discs of this sort can damage the unit:
ENGLISH
Handling precautions
<Always place the disc on the disc tray with the label side up. Compact discs can be played or recorded only on one side.
<To remove a disc from its storage case, press down on the center of the case and lift the disc out, holding it carefully by the edges.
How to remove the disc |
How to hold the disc |
Storage precautions
<Discs should be returned to their cases after use to avoid dust and scratches that could cause the laser pickup to “skip.”
<D o not e xp ose disc s to dire c t sunlight or high humidit y and te m p e r at u re f o r e x te n d e d p e r i o ds . Lo n g e x p o su re to h i g h temperatures will warp the disc.
<CD -R and CD -RW discs are more sensitive to the ef fects of heat and ultraviolet rays than ordinary CDs. It is important that they are not stored in a location where direct sunlight will fall on them, and away from sources of heat such as radiators or heatgenerating electrical devices.
Maintenance
<Should the disc become dirty, wipe the surface radially (from the center hole outward towards the outer edge) with a soft, dry cloth.
<Never use such chemicals as record sprays, antistatic sprays or fluid, benzine or thinner to clean the discs. Such chemicals will do irreparable damage to the disc’s plastic surface.
If you are in any doubt as to the care and handling of a disc, read the
precautions supplied with the disc, or contact the disc manufacturer.
7
USB memory device compatibility
<Only USB flash memory can be used. Do NOT use a high-capacity USB hard disc with this unit.
<Some f lash memor y players that charge from an USB terminal cannot be played back.
<Hard disk drives, CD/DVD drives, and other devices than f lash memory connected via USB cannot be used.
<The DR-H338i cannot copy, move, or delete files.
<Playable format: FAT12, FAT16, FAT32
<NTFS, HFS, HFS+ cannot be used.
<Max. number of playable folders: 300
<Max. number of playable files: 650
8
Connecting Antennas (AM)
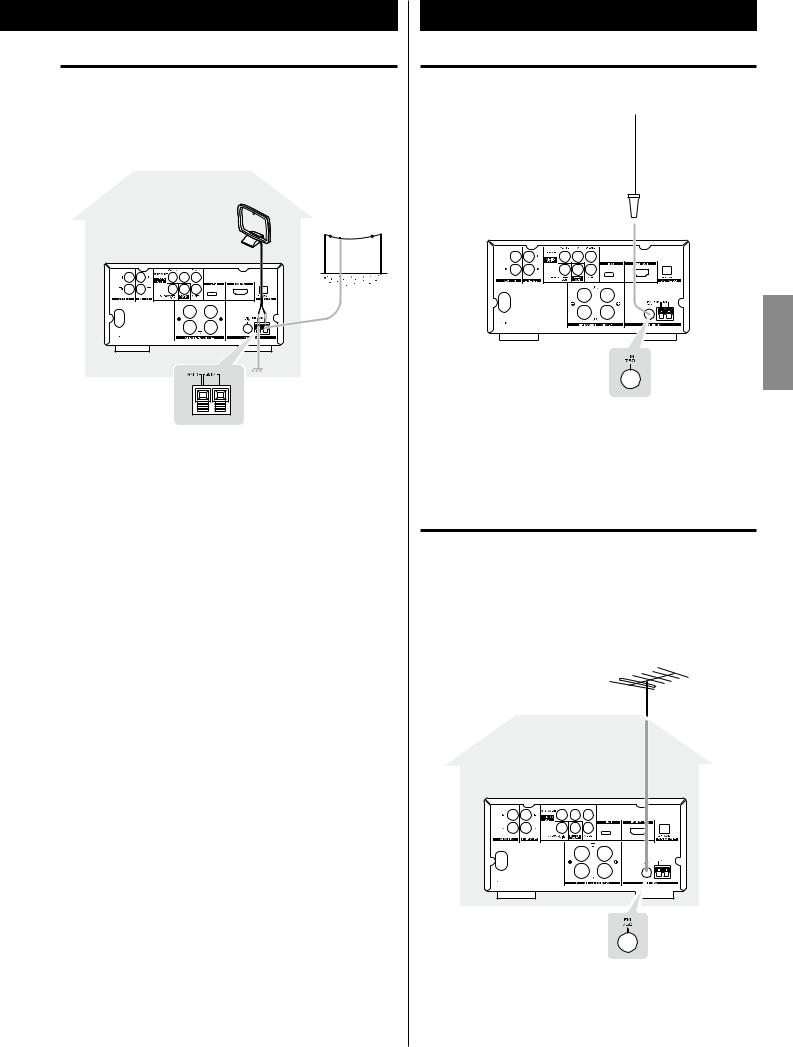
AM indoor loop antenna
The supplied high -per formance AM loop antenna provided with this unit is suf ficient for good reception in most areas.
To stand the loop antenna on a sur face, fix the claw to the slot in the antenna base.
Connect the loop antenna‘s wires to the AM antenna terminals.
Press the lever, insert the end of the cord, then release the lever. Make sure it is fastened securely by pulling the cord lightly. Make sure only the bare, stripped wire is inserted in the jack and that no plastic insulation is preventing contact between the antenna wire and terminal.
Place the antenna on a shelf or hang it on a window frame, etc., in the direc tion which gives the best reception. Keep all other wires such as power cords, speaker wires or interconnect wires as far away as possible from the antenna.
AM outdoor antenna
I f t h e A M l o o p a nte n n a p r o v i d e d d o e s n o t d e l i v e r s u f f i c i e nt reception (of ten due to being too far from the transmit ter or in a concrete building, etc.), it may be necessar y to use an outdoor AM antenna.
Use either a high qualit y commercially available AM antenna or, if not available, an insulated wire more than 16 f t (5 m) long, strip one end, and connect this to the terminal as shown above.
The antenna wire should be strung outdoors or indoors near a window. For bet ter reception, connec t the GND terminal to a reliable ground.
<Even when using an outdoor AM antenna, do not disconnect the AM loop antenna.
Connecting Antennas (FM)
FM indoor antenna
ENGLISH
Co nn e c t th e sup p lie d l ea d - t y p e FM antenna to th e FM 75Ω socket and extend the lead.
Adjust the antenna in a suitable location like a window frame or wall which gives the best reception and then fix the antenna in that position with thumb tacks or the like.
FM outdoor antenna
In an area where FM signals are weak, it will be necessar y to use a 75 Ω unbalanced-type outdoor FM antenna. Generally, a 3-element antenna will be sufficient; if you live in an area where the FM signals are particularly weak, it may be necessary to use one with 5 or more elements.
<Disconnect the FM indoor antenna when using an FM outdoor antenna.
9
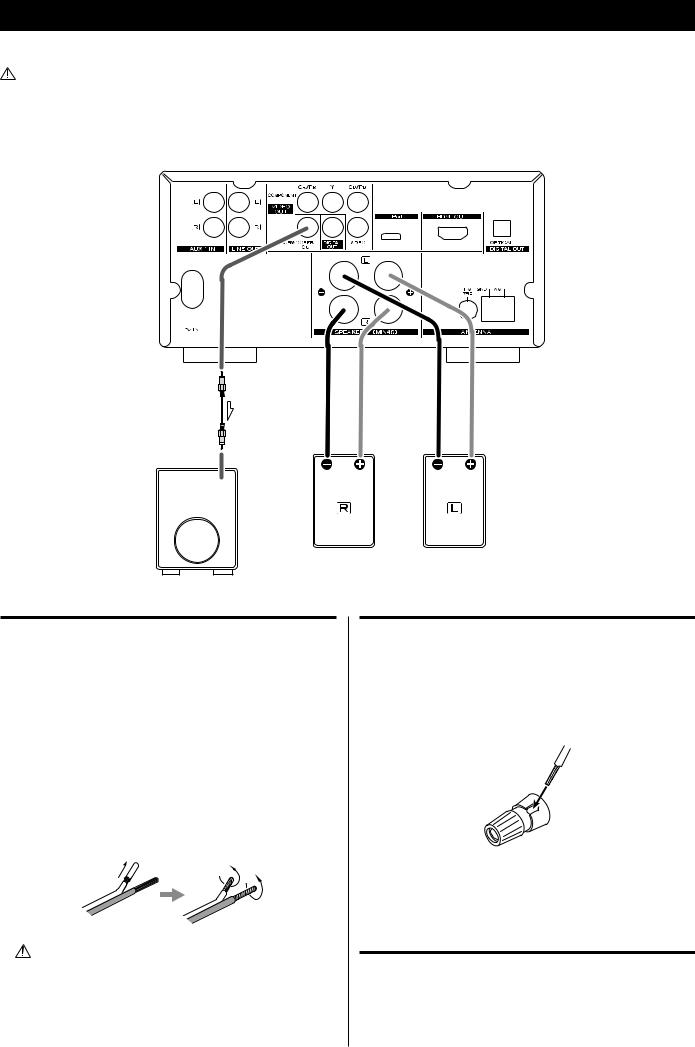
Speaker Connection
After all connections are complete, connect the power cord’s plug to the AC wall socket.
<Read the instructions of each component you intend to use with this unit.
<Be sure to connect each plug securely. To prevent hum and noise, do not bundle the connection cords.
Subwoofer
Before connection
Check the impedance of your speakers. Connect speaker with an impedance of 4 Ω or more.
The black speaker terminals are “_” (negative).
Generally, the “+” side of the speaker cable is marked to make it distinguishable from the “_” side of the cable. Connec t this marked side to the “+” terminal and the unmarked side to the black “_” terminal.
Pre p a re t h e sp ea ke r c a b l e s fo r co n n e c t i o n b y s t r i p p in g o f f approximately 3/8” (10 mm) or less of the outer insulation.
Twist the strands of the stripped wires tightly together:
CAUTION
The metal portions of the two separate wires should not touch or an electrical short can occur. Removing too much insulation may lead to a short circuit if the bared wired should come in contact with each other. Shorted wires can create a fire hazard or induce a failure in your equipment.
10
How to connect
1.Turn the terminal cap counterclockwise to loosen it. The speaker terminal caps cannot be fully removed from the base.
2.Insert the wire into the terminal fully and turn the terminal cap clockwise to securely connect it:
Make sure none of the wire insulation is under the terminal, only the bare, stripped wire.
3. Make sure it is fastened firmly by pulling the cable lightly.
Subwoofer
Connect a subwoofer using a commercially-available RCA cable.
Use a subwoofer with built-in amplifier referred to as a “powered subwoofer”.
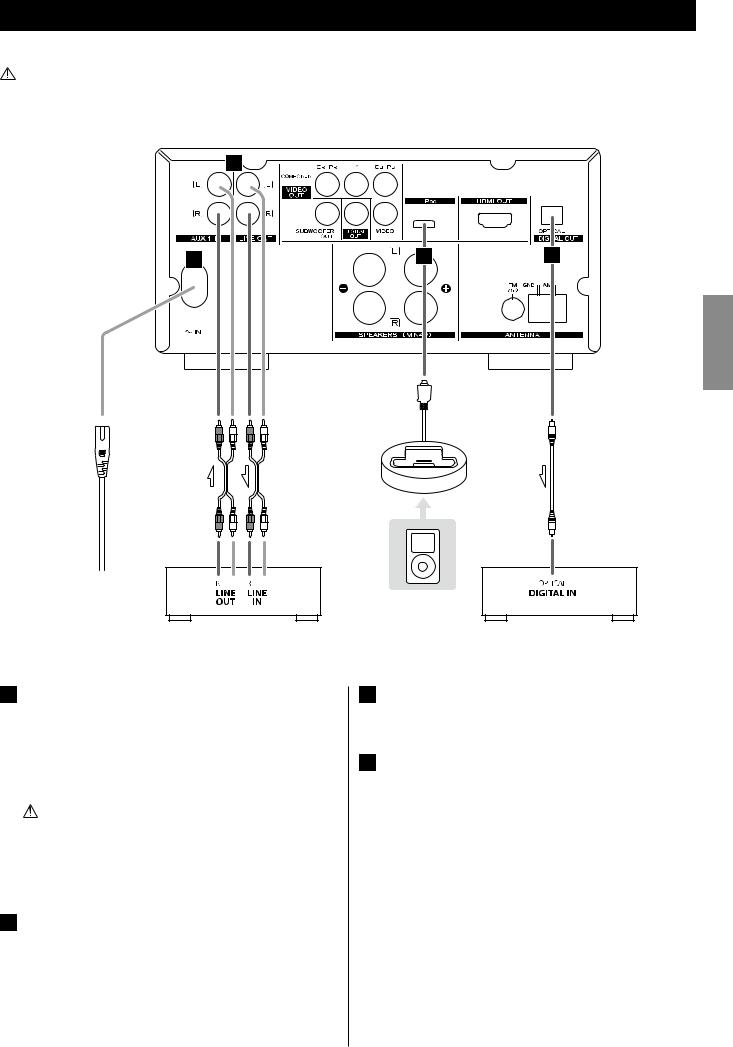
Connection to Audio Equipments etc.
After all connections are complete, connect the power cord’s plug to the AC wall socket.
<Read the instructions of each component you intend to use with this unit.
<Be sure to connect each plug securely. To prevent hum and noise, do not bundle the connection cords.
B
A |
C |
D |
ENGLISH
cable RCA |
cable digital Optical |
Wall socket
Cassette tape deck etc. |
Digital audio device |
|
(CD recorder, MD deck, etc.) |
A Power cord receptacle
After all other connections have been made, insert the supplied AC p ower cord into this receptacle, then connec t the other end of the power cord into the wall socket. Ensure that your AC voltage corresponds to the voltage marked on the rear panel of the unit. Consult a qualified electrician if you are in doubt.
In order to avoid the risk of electric shock, fire, and so on, only use the supplied power cord.
<If you are not going to use the unit for some time, disconnect the power cord from the wall socket.
B AUX 1/LINE OUT jacks
Analog 2- channel audio signal is input or output from these jack s. Connec t a casset te tape deck etc. to these jack s using commercially-available RCA cables.
Make sure to connect:
White plug e White jack (L: lef t channel)
Red plug e Red jack (R: right channel)
C iPod port
Connect the iPod dock to this port.
D Digital audio output terminal
Digital audio from DVD-Video, CD and video CD is output from this terminal.
Conne c t an amplif iers including a de co der, or digital audio devices such as CD recorders, etc. to this jack using commerciallyavailable optical digital audio cable (TOS).
< Select “ALL” or “PCM only” in the DIGITAL AUDIO SETUP (page 39).
11
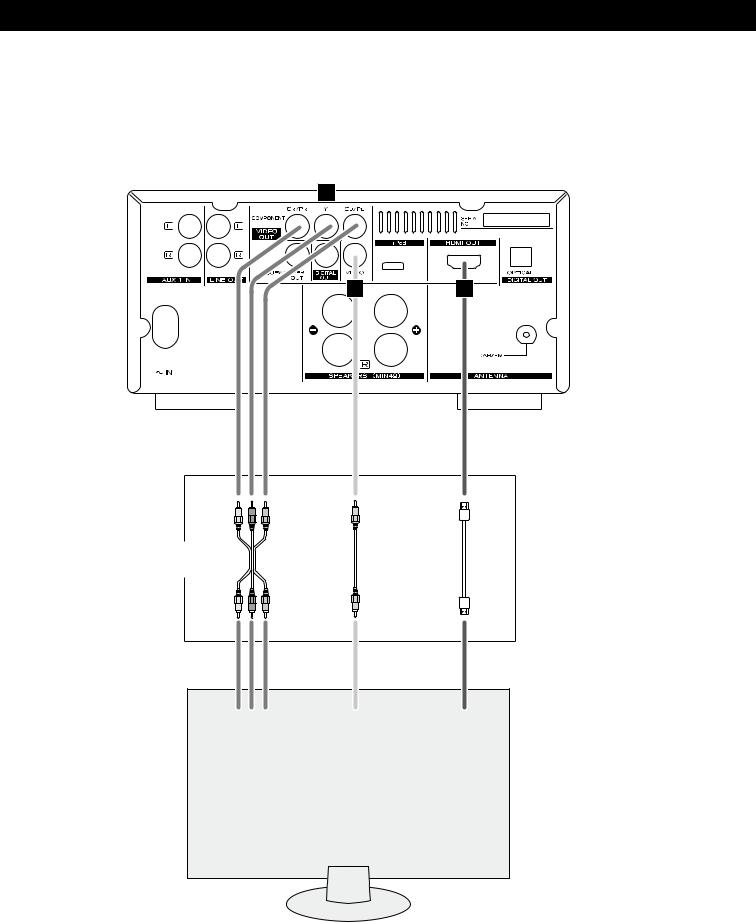
Connection to a TV
E
F
 G
G
Connect one of these cables.
cable video Component |
cable video RCA |
cable HDMI |
CR Y CB |
VIDEO |
HDMI |
COMPONENT |
IN |
IN |
VIDEO IN |
|
|
TV (Monitor)
12
<Adjust the video aspect ratio to match that of the T V (page 38).
<This unit adopts analog copy protec tion features. If the unit is connected to a T V through a VCR (video cassette recorder), the resulting playback may be affected. Connect the unit directly to the TV.
<In all cases, use the highest qualit y cables for the best possible picture.
<Select proper setting in the VIDEO OUTPUT setup (page 40).
E Component video output terminals
Use commercially available component video cables to connect the unit to the component video inputs of a suitably equipped T V or monitor to enjoy a high-quality picture.
U s e t h e s e t e r m i n a l s i n p r e f e r e n c e t o c o m p o s i t e v i d e o connections.
<If the component video terminals are connected to a T V with progressive scan capabilities, the output can be set to match this (page 40).
<Note that these terminals cannot be connected to high definition component terminals.
F Composite video output terminal
Use a commercially available RCA (pin) video cable to connect the unit to the composite video connector of a T V or monitor. Use this connection only if no other video connection method is available.
G HDMI video/audio output terminal
Use a commercially available HDMI cable to connect the unit to a HDMI compatible T V or monitor.
< If the T V or monitor is equipped only with a DVI terminal, a suitable adaptor cable or adaptors should be used. Note that the T V connected in this way must be HDCP compatible.
Also note that this connection outputs no sound.
< Make sure that you read and understand the documentation
|
provided with the HDMI component. |
|
|
|
|
|
|
|
HDMI video output formats |
|
|
|
<480p (NTSC) or 576p (PAL) |
|
|
|
ENGLISH |
||
|
<1080p |
||
|
<720p |
|
|
|
<1080i |
|
|
< See page 41 for further details on HDMI video output formats. |
|
||
|
|||
|
|
|
|
|
To output audio from the HDMI terminal |
|
|
|
If the connected HDMI component is capable of inputting HDMI |
|
|
|
audio, digital audio can be output from the HDMI terminal. |
|
|
< Select “ALL” or “PCM only” in the DIGITAL AUDIO SETUP (page 39). |
|
||
< To enjoy the digital sur round audio f rom DV D -V ide o disc s, |
|
||
|
connect the HDMI terminal to a surround amplifier and set the |
|
|
|
DIGITAL AUDIO SETUP to “ALL” (page 39). |
|
|
13
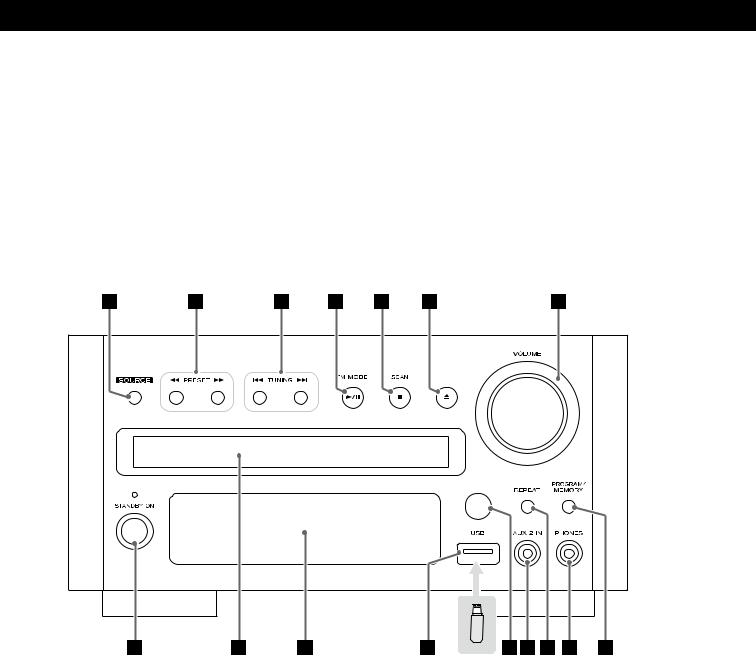
Identifying the Parts (Main Unit)
A B C D E F G
P |
O |
N |
M |
L K J I H |
14
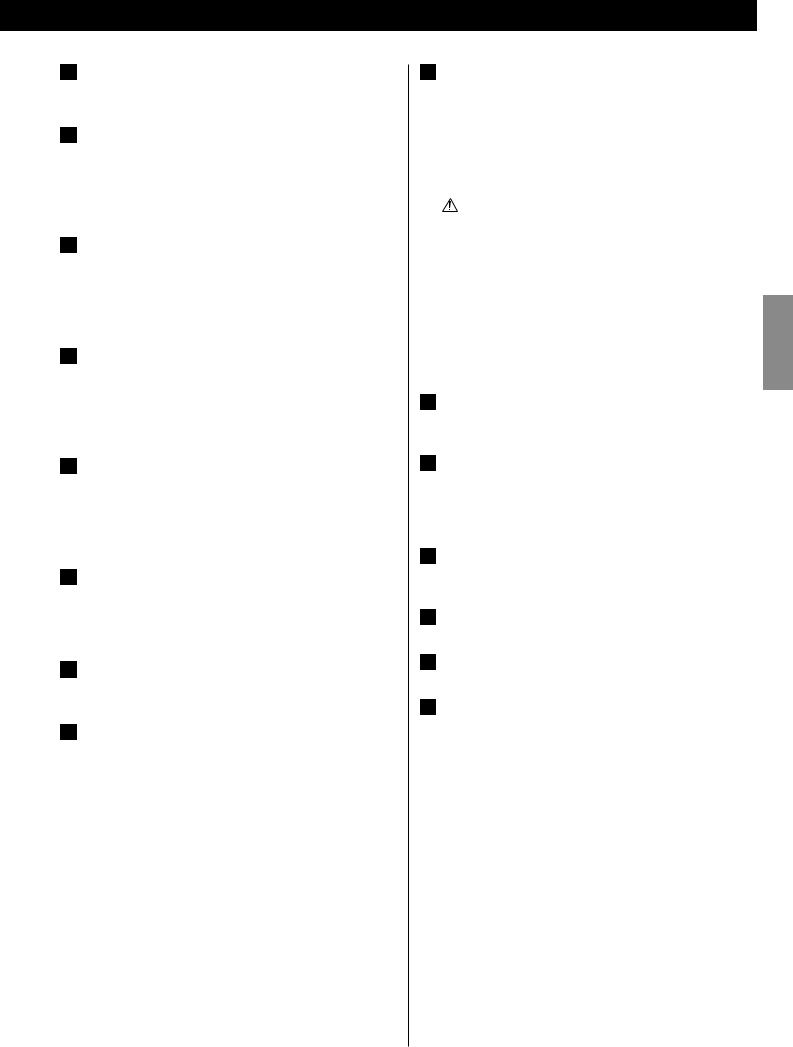
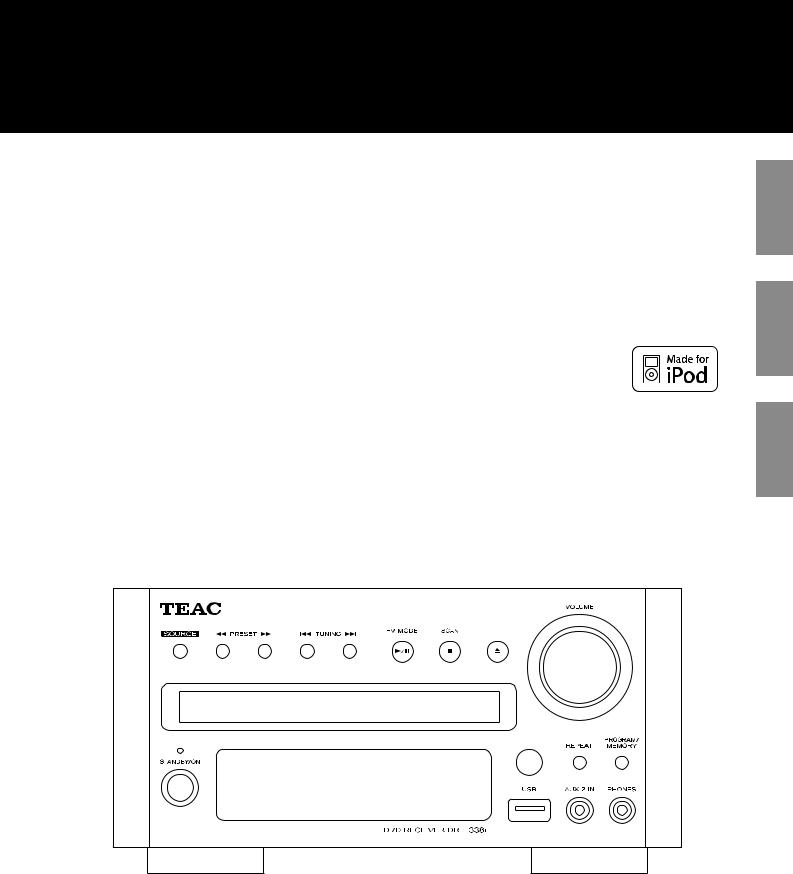
ASOURCE
Use this button to select a source.
BSearch (m/,)/PRESET
In FM or AM mode, use these buttons to select a preset channel.
In DISC, USB or iPod mode, use these buttons to search for a part of a track /file/song.
CSkip (.//)/TUNING
In FM or AM mode, use these buttons to tune in a station.
In DISC, USB or iPod mode, use these buttons to skip tracks/files/ songs.
DPlay/Pause (G/J)/FM MODE
In FM mode, use this button to select stereo or monaural.
In DISC, USB or iPod mode, use this but ton to star t or pause playback.
EStop ( H)/SCAN
I n FM o r A M m o d e , u s e t h i s b u t t o n t o p r e s e t s t a t i o n s automatically.
In DISC or USB mode, use this button to stop playback.
FOpen/Close (L)
Use this button to open and close the disc tray.
When the tray is opened during playback , it may take a few seconds before the disc is “unloaded” and the tray opens.
GVOLUME
Turn this knob to adjust the volume level.
HPROGRAM/MEMORY
In FM or AM mode, use this button to preset stations.
In DISC or USB mode, use this button to programme tracks.
IPHONES
To listen with headphones, first lower the volume level to the minimum. Then, connect the headphones plug into the PHONES jack, and adjust the volume by turning the VOLUME knob.
The speakers will make no sound when headphones are plugged in.
CAUTION
D o n ot co nn e c t h ea dp h o n es w i th th e PH O NE S ja ck w hil e wearing them. Moreover, do not disconnect headphones or turn the unit on or off while wearing them. Very loud sound could be output from the headphones.
AVOID DAMAGING YOUR HEARING - Do not put on headphones until after plugging them in.
|
In DISC, USB or iPod mode, use this button for repeat playback. |
ENGLISH |
J |
REPEAT |
|
KAUX 2 IN
You can connect a portable audio player to this jack.
LRemote control sensor
Receives signals from the remote control unit. Point the remote control unit at this sensor when operating the remote control unit.
MUSB connector
You can connect an USB memory device to this connector.
NDisplay
ODisc tray
PSTANDBY/ON
Use this button to turn the unit on and standby. The indicator lights blue when the unit is turned on.
The indicator lights orange when the unit is in the standby mode.
15
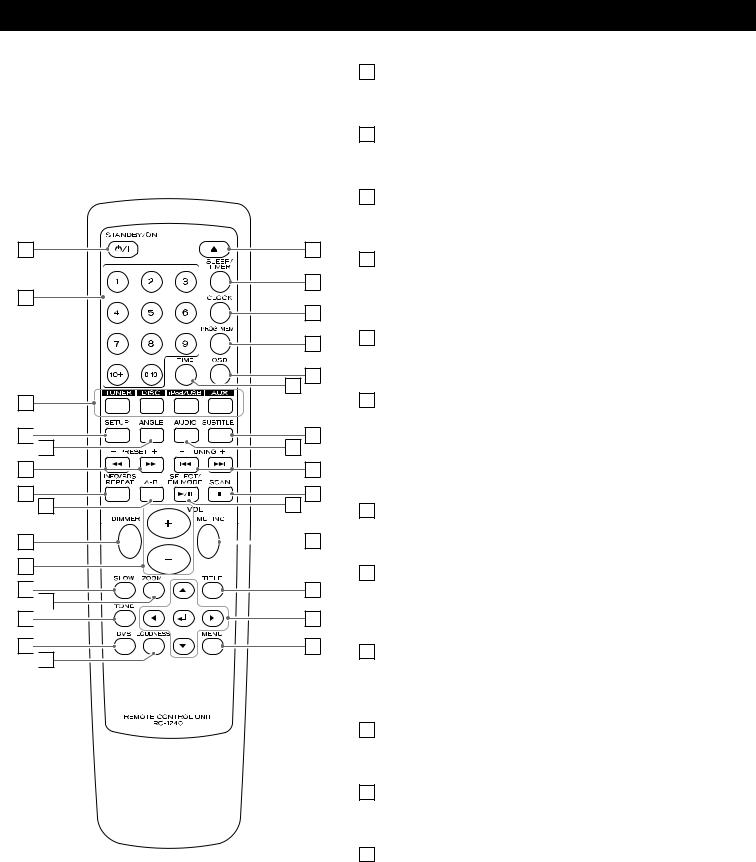
A
B
C
D
 E
E
F
G H
I
J
K 
 L
L
M

N
 O
O
16
Identifying the Parts (Remote Control Unit)
|
|
|
|
|
|
A STANDBY/ON |
|
|
|
|
|
|
|
||
|
|
|
|
|
|
|
Use this button to turn the unit on and standby. |
|
|
|
|
|
|
B Number buttons |
|
|
|
|
|
|
|
|
Use these buttons to enter track numbers, passwords, etc. |
|
|
|
|
|
|
C |
Source |
|
|
|
|
|
|
|
Use these buttons to select a source. |
|
|
|
P |
D SETUP |
|||
|
|
|
|
|
|
||
|
|
|
Q |
|
Use this button to enter the setup menu where you can set up |
||
|
|
|
R |
|
the parameters of the unit. |
||
|
|
|
E |
ANGLE |
|||
|
|
|
S |
||||
|
|
|
|
Use this button to select camera angles during DVD playback. |
|||
|
|
|
T |
|
|||
|
|
U |
F |
Search (m/,)/PRESET (+/–) |
|||
|
|
|
|
|
|
||
|
|
W V |
|
In FM or AM mode, use these buttons to select a preset channel. |
|||
|
|
|
In DISC, USB or iPod mode, use these buttons to search for a part |
||||
|
|
|
X |
|
|
of a track /file/song. |
|
|
|
Z |
Y |
G REPEAT/INFO/RDS |
|||
|
|
|
|
|
|
||
|
|
|
|
a |
|
In DISC, USB or iPod mode, use this button for repeat playback. |
|
|
|
|
|
H A-B (Repeat) |
|||
|
|
|
|
||||
|
|
|
b |
||||
|
|
|
|
In DISC or USB mode, use this button to specif y a section and |
|||
|
|
|
c |
|
|
play it repeatedly. |
|
|
|
|
|
|
|
||
|
|
|
d |
I |
DIMMER |
||
|
|
|
|
|
|
|
Use this but ton to change the brightness of the front panel |
|
|
|
|
|
|
|
display. |
|
|
|
|
|
|
J |
VOL (+/–) (Volume) |
|
|
|
|
|
|
|
Use these buttons to adjust the volume level. |
|
|
|
|
|
|
K SLOW |
|
|
|
|
|
|
|
|
In DISC mode, use this button for slow motion video playback. |
|
|
|
|
|
|
L |
ZOOM |
|
|
|
|
|
|
|
In DISC or USB mode, use this button to enlarge the image. |
|
|
|
|
|
|
|
|
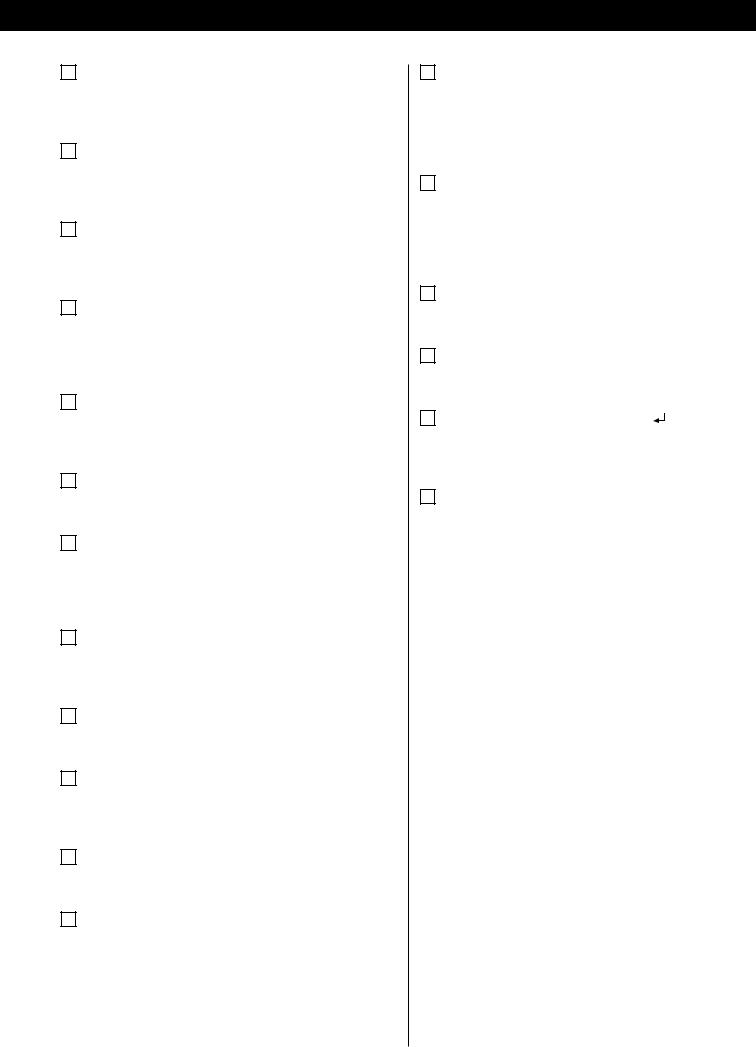
MTONE
Use this but ton to adjust bass and treble together with the VOLUME buttons.
NDVS (Dolby Virtual Speaker)
In DISC or USB mode, use this but ton to selec t the listening mode.
OLOUDNESS
Us e this b ut ton to comp ens ate for th e loss of b ass at low volumes.
POpen/Close (L)
Use this button to open and close the disc tray.
When the tray is opened during playback , it may take a few seconds before the disc is “unloaded” and the tray opens.
QSLEEP/TIMER
When the unit is on, use this button to set the sleep timer.
In the standby mode, use this button to set the wake up timer.
RCLOCK
In the standby mode, use this button to adjust clock.
SPROG/MEM (Program/Memory)
In FM or AM mode, use this button to preset stations.
In DISC or USB mode, use this button to programme tracks.
TOSD (On Screen Displays)
Use this button to display information about the currently playing disc.
UTIME
Use this button to start time search.
VSUBTITLE
Use this but ton to selec t the displayed subtitles during DVD playback.
WAUDIO
Use this button to select the audio for playback.
XSkip (.//)/TUNING (+/–)
In FM or AM mode, use these buttons to tune in a station.
In DISC, USB or iPod mode, use these buttons to skip tracks/files/ songs.
YStop ( H)/SCAN
I n FM o r A M m o d e , u s e t h i s b u t t o n t o p r e s e t s t a t i o n s automatically.
In DISC or USB mode, use this button to stop playback.
ZPlay/Pause (G/J)/SELECT/FM MODE
In FM mode, use this button to select stereo or monaural.
In DISC, USB or iPod mode, use this but ton to star t or pause playback.
a |
MUTING |
|
|
|
|
||
|
Use this button to mute the sound. |
|
ENGLISH |
b |
TITLE |
|
|
|
During PBC playback, use this button to display a menu. |
|
|
c |
Cursor buttons (5/b/t/g) and Enter ( |
) |
|
|
|||
|
Use these Cursor buttons for navigation of on-screen menus and |
||
|
the Enter button to confirm selections. |
|
|
dMENU
In DISC mode, use this button with menu-enabled DVD discs to bring up the DVD menu.
During playback of MP3/ WMA /JPEG files, use this but ton to switch between the folder list and the file list.
In iPod mode, use this button to go back to previous menu of iPod. This button is equivalent to the MENU button on your iPod.
When a video CD (version 2.0) is loaded, use this button to turn the PBC function on or off.
Note:
To simplif y explanations, instructions in this manual might refer to the main unit or remote control only. In such cases, the same controls on the remote control and main unit will operate similarly.
17
Remote Control Unit
The provided Remote Control Unit allows the unit to be operated from a distance.
When operating the remote control unit, point it towards the remote sensor on the front panel of the unit.
<Even if the remote control unit is operated within the ef fective range (16 ft/5 m), remote control operation may be impossible if there are any obstacles between the unit and the remote control.
<If the remote control unit is operated near other products which generate infrared rays, or if other remote control devices using infrared rays are used near the unit, it may operate incorrec tly. Conversely, the other products may operate incorrectly.
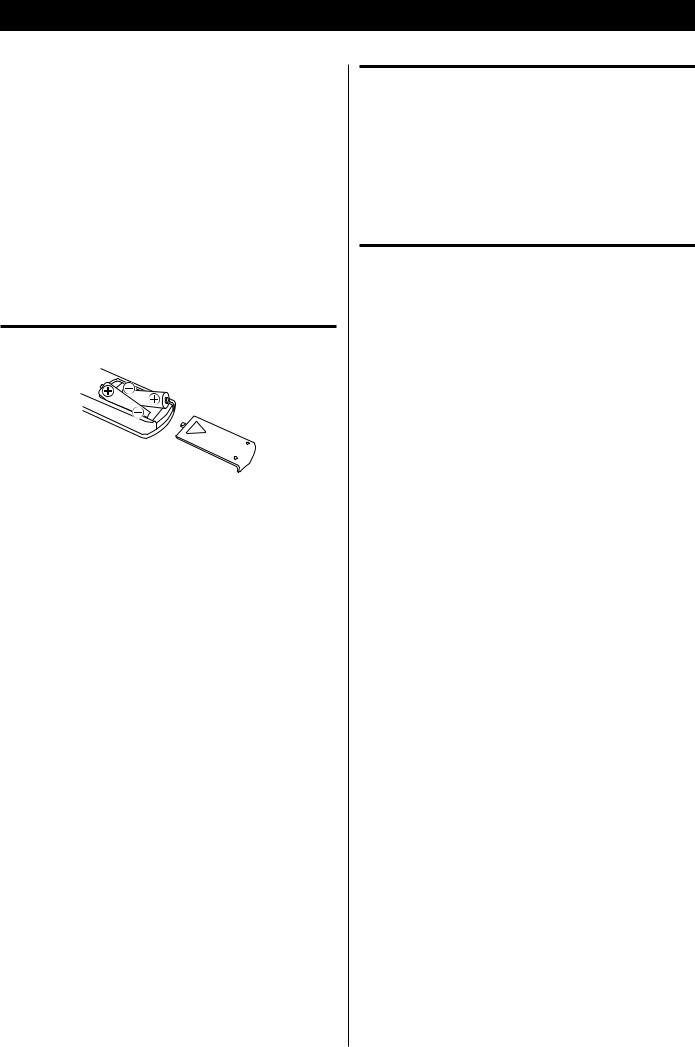
Battery installation
1.Remove the battery compartment cover.
2.Insert two “AAA” (R03 or UM-4) dry batteries. Make sure that the batteries are inser ted with their positive “+” and negative “_” poles positioned correctly.
3.Close the cover.
Battery replacement
If the distance required between the remote control unit and main unit decreases, the batteries are exhausted. In this case replace the batteries with new ones.
For more information about collection of batteries, please contact your local municipality, your waste disposal service or the point of sale where you purchased the items.
 Precautions concerning batteries
Misuse of batteries could cause them to rupture or leak leading to fire, injury or the staining of nearby things. Please read and observe the following precautions carefully.
<Be sure to inser t the bat teries with correc t positive (+) and negative (_) orientations.
<Use bat teries of the same t ype. Never use dif ferent t ypes of batteries together.
<Both rechargeable and non-rechargeable batteries can be used. Refer to the precautions on their labels.
<If the remote control will not be used for a long time (more than a month), remove the batteries to prevent them from leaking.
<If the bat teries leak, wipe away the leakage inside the bat ter y compartment and replace the batteries with new ones.
<Do not use batteries of types other than those specified. Do not mix new batteries with old ones or use different types of batteries together.
<Do not heat or disassemble batteries. Never throw batteries into fire or water.
<Do not carr y or store batteries with other metallic objects. The batteries could short circuit, leak or explode.
<N e v e r r e c h a r g e a b a t te r y u n l e s s i t i s co n f i r m e d to b e a rechargeable type.
18
Setting the Clock
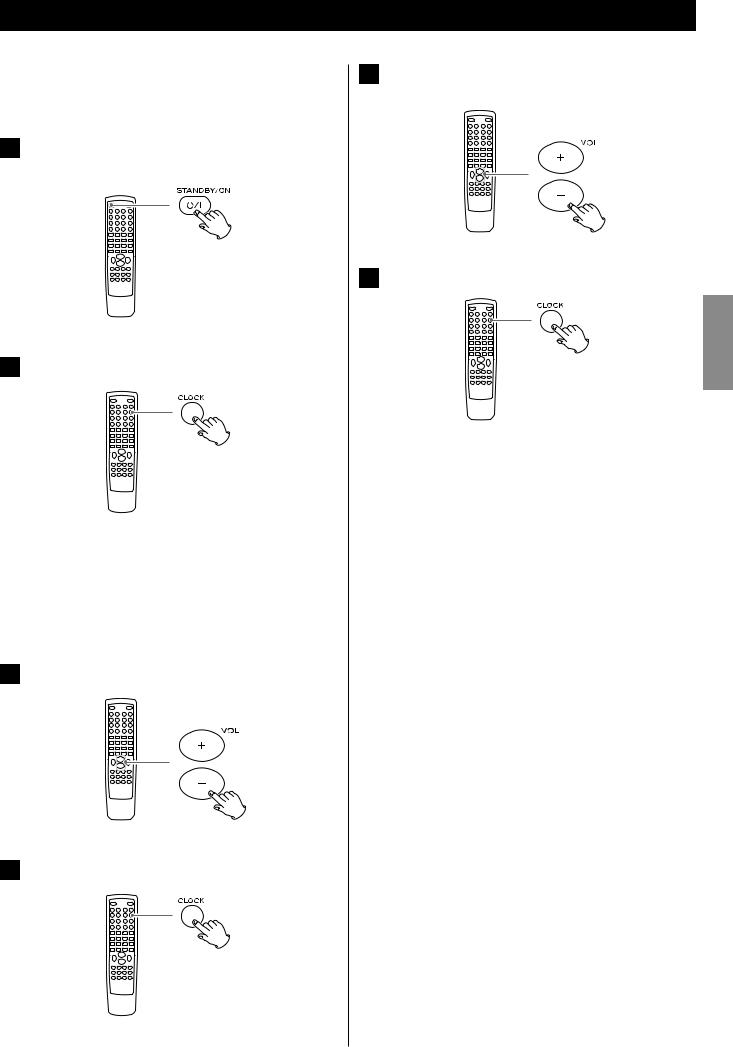
When you connect the power cord into the wall socket and turn on the unit for the first time, set the clock.
1 If the unit is on, press the STANDBY/ON button to turn it standby.
2 Press the CLOCK button.
<If “- -:- -” blinks on the display, press the CLOCK button again.
“Clock Set” appears on the display, and the “hour” value starts blinking.
<When no but ton is pressed for 30 seconds, the time set ting mode will be cancelled.
3 Press the Volume buttons (+ or –) to set the current hour.
4 Press the CLOCK button.
The “minute” value starts blinking.
5 Press the Volume buttons (+ or –) to set the current minute.
6 Press the CLOCK button.
ENGLISH
The clock starts.
After the clock is set, also set the settings of the unit using the SETUP menu (page 37).
19
Basic Operation (1)
This chapter describes the basic operation which is available in every mode.
When you use the unit for the first time, set the clock and the setting of the unit. (see previous page for “Setting the Clock ”, page 37 for “Settings”).
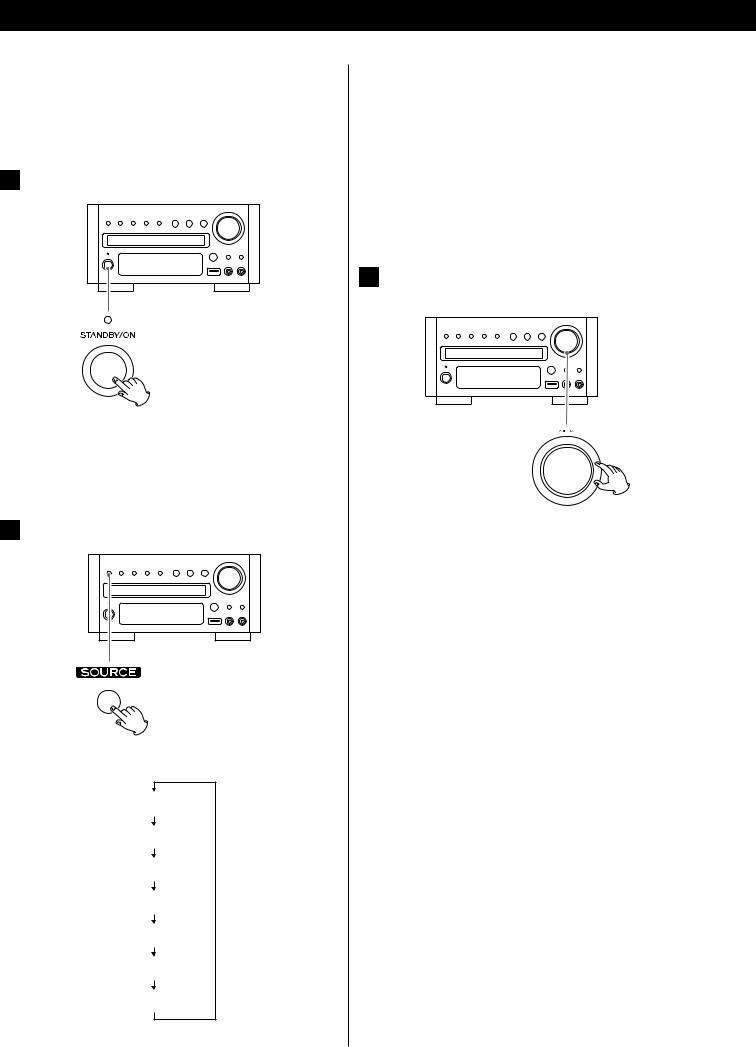
1 Press the STANDBY/ON button to turn the unit on.
<The unit turns on with the source that was last selected.
<You can also use the SOURCE button (or the TUNER, DISC, iPod/ USB or AUX button on the remote control unit) to turn the unit on.
2 Press the SOURCE button to select a source.
Each time the SOURCE button is pressed, the source changes as follows:
FM Radio
AM Radio
AUX1 Source
AUX2 Source
iPod
DISC Source
USB Source
The selected source is shown on the front panel’s display.
20
<You can also select FM or AM by pressing the TUNER button on the remote control unit once or twice.
<You can also select iPod or USB by pressing the iPod/USB button on the remote control unit once or twice.
<To listen to an external source connected to the AUX IN jack, select AUX1 or AUX2.
<You can also select AUX1 or AUX2 by pressing the AUX button on the remote control unit once or twice.
3 Play the source, and adjust the volume using the VOLUME knob.
The volume is adjustable from MIN to MAX. You can hold down the VOLUME – or + buttons on the remote control unit to reduce or bring up the volume continuously.
<Press the STANDBY/ON button to put the unit in the standby mode when it is not being used.
<If you press the S TANDBY/ON but ton to put the unit in the standby mode when SOURCE is set for AUX1 or AUX2, first, the speaker sound stops and then after about 2 seconds the output to the sub woofer stops.
Recording a source
You can record a source onto a CD or a cassette tape connected to the DIGITAL OUT terminal or the LINE OUT jacks.
1.Select a source to be recorded by pressing the SOURCE button.
2.Start recording.
<The volume, and tone control (DVS, LOUDNESS and TONE) have no effect on the recording signals.
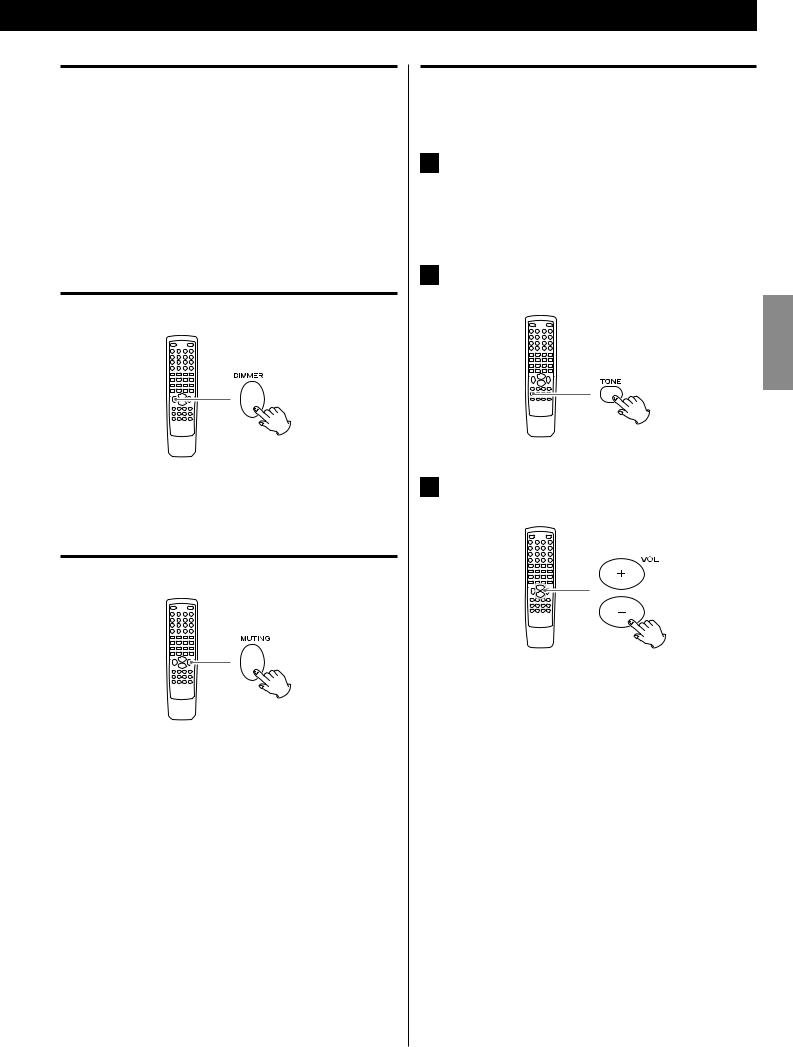
Dimmer
Press the DIMMER button to dim the display.
Press the button again to cancel the dimmer function.
Muting
To mute the sound temporarily, press the MUTING button. Press the MUTING button again to restore the sound.
<“MUTING” blinks on the display while muting is engaged.
<If you change the volume when the sound is muted, it will be unmuted.
Adjusting the bass and treble
You can change the bass and treble sound between “–5” to “+5”.
1 If the LOUDNESS function is on, press the LOUDNESS button to turn it off.
<When the LOUDNESS function is on, the bass and treble sound level automatically set to “0”.
2 Press the TONE button repeatedly to selec t Bass or Treble.
ENGLISH
3 Press the VOLUME buttons to adjust the sound level within 5 seconds.
The higher the treble number, the more the high frequencies are emphasized.
The higher the bass number, the more the low frequencies are emphasized.
21
Basic Operation (2)
DVS (Dolby Virtual Speaker) (DISC/USB mode only)
D o l b y V i r t u a l Sp ea ke r te c h n o l o g y si m u l ate s a h i g h l y rea l is t i c 5.1-speaker surround sound listening environment from as few as two speakers. Dolby Virtual Speaker technology also creates a wider twochannel environment during playback of stereo CDs and MP3 content, and when combined with Dolby Pro Logic II processing, delivers a vir tual surround listening experience from any highqualit y stereo source.
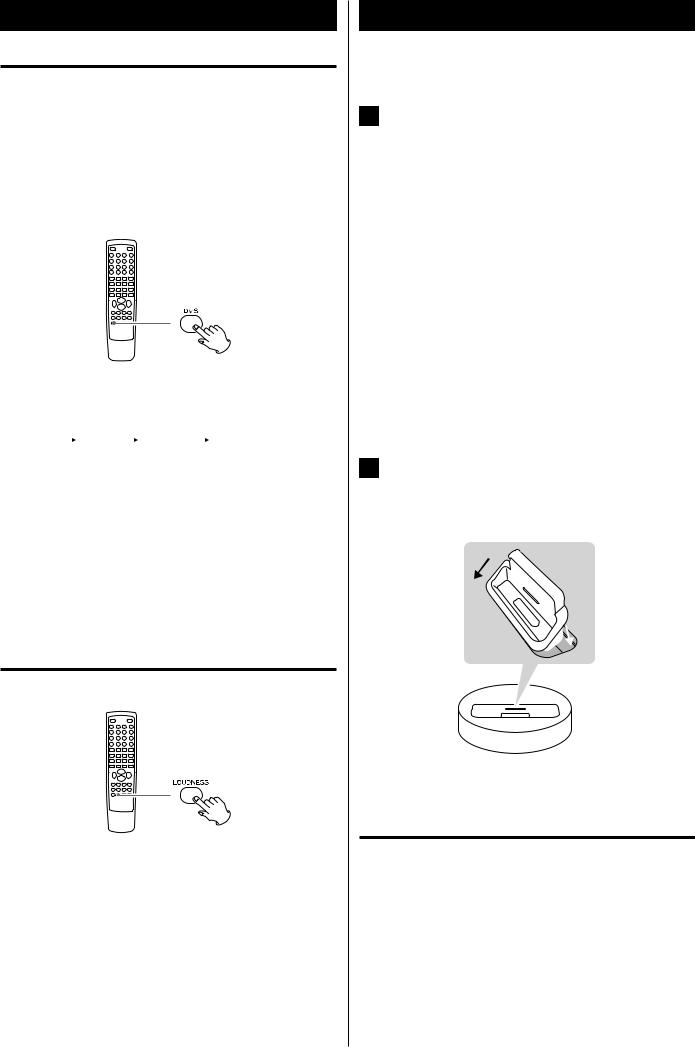
Press DVS button repeatedly to select the listening mode.
Each time the DVS button is pressed, the mode changes as follows:
|
|
|
|
|
|
|
|
|
|
|
|||
|
|
|
|
|
|
|
DVS Ref (Reference mode):
The width of the front sound image is defined by actual distance between your two speakers.
DVS Wide (Wide mode):
The width of the image seems to extend beyond the speakers.
< The DVS and the LOUDNESS buttons do not work together.
LOUDNESS button
This button compensate for the loss of bass at low volumes. Select off when listening at normal levels.
<When the LOUDNESS function is on, the bass and treble sound level automatically set to “0”. If you want to change the bass and/or treble sound level, turn the LOUDNESS function off.
22
Getting Started with an iPod
To play your iPod through the DR-H338i, you must first inser t the adapter for your model of iPod.
1 Select the Dock Adapter that fits your iPod.
No.4 : 20 GB + U2
iPod with click wheel 20 GB,
iPod with click wheel U2 Special Edition 20 GB, iPod with color display 20/30 GB,
iPod with color display U2 Special Edition 20 GB, iPod with video 30 GB,
iPod with video U2 Special Edition 30 GB, iPod Classic 80/120 GB
No.7 : 60GB(color) + Photo 40/60 GB iPod with click wheel 40 GB,
iPod with color display (iPod photo) 40/60 GB, iPod with color display 60 GB,
iPod with video 60/80 GB, iPod Classic 160 GB
<Use the adapter that supplied with the iPod or a commercially available one to use the other types of iPod.
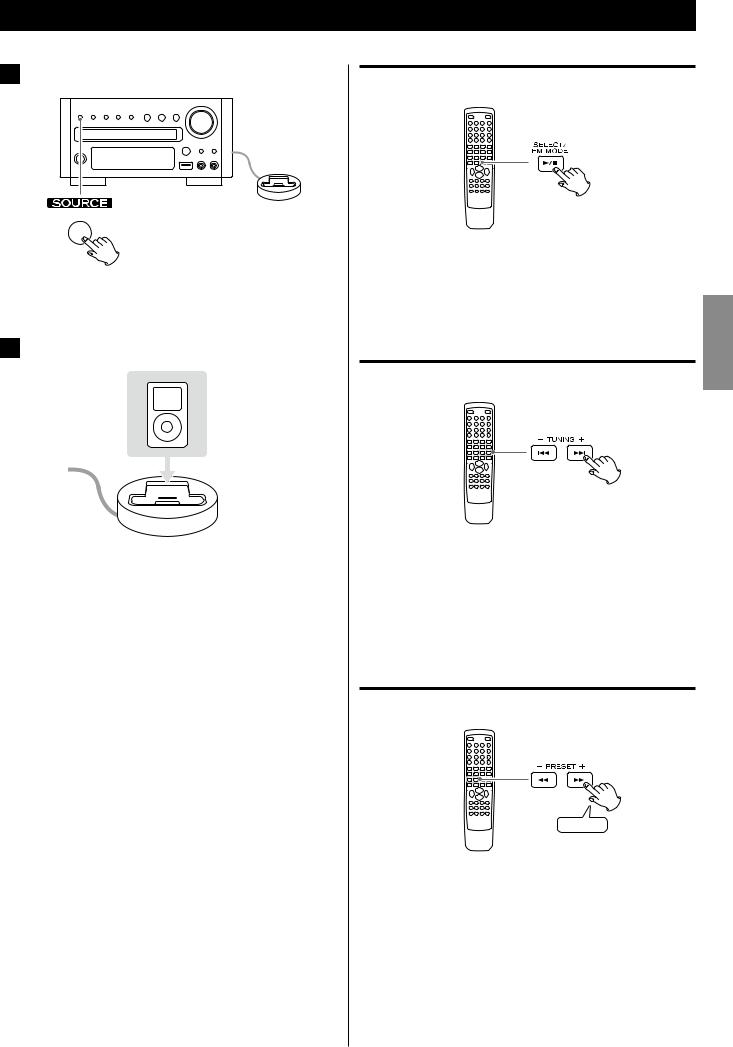
2 Insert the adapter into the DR-H338i dock.
Fit the front edge of the adapter into the Dock, and then press the back edge of the adapter onto the Dock until a slight “click” is heard indicating the adapter is inserted correctly.
1
 2
2
<To remove the adapter, hold its left and right sides and gently pull it up.
Compatible iPod software
If your iPod will not work with the DRH338i or with the remote control unit, software update might solve the problem.
Listening to an iPod (1)
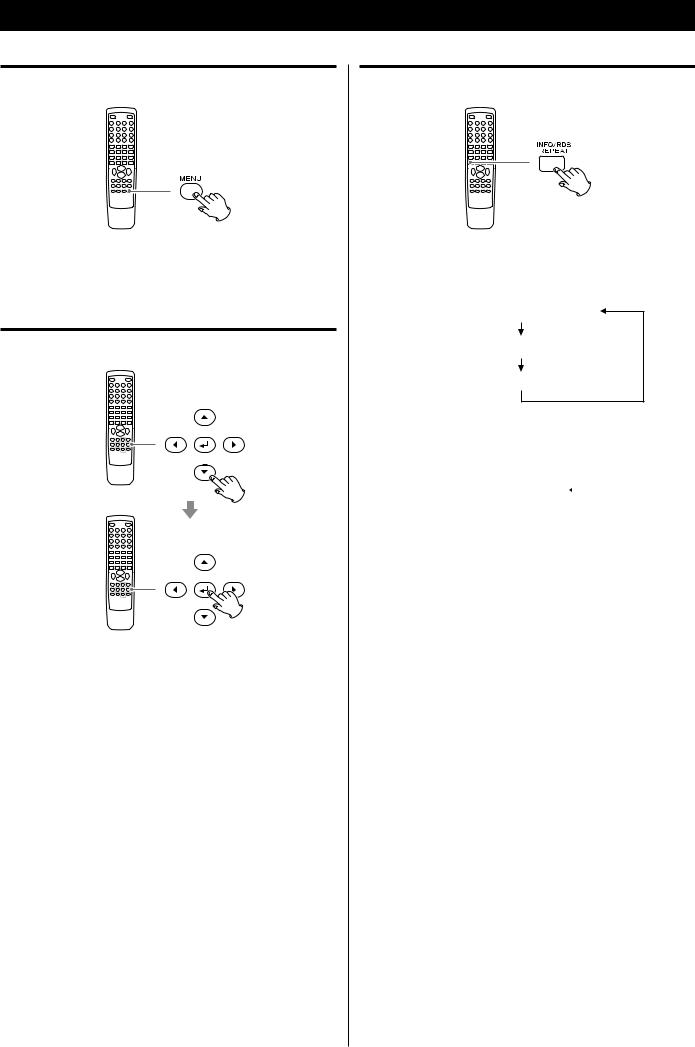
1 Press the SOURCE button to select “iPod”.
<You can also select iPod by pressing the iPod/USB button on the remote control unit once or twice.
2 Insert the iPod into the dock.
The iPod automatically turns on and star ts playback from the iPod’s music list.
<When the iPod is inser ted while a source other than iPod is selected, the iPod will turn on and enter the pause mode.
<Make sure to use an appropriate dock adapter (see previous page).
<The iPod is recharged when it is plugged into the dock and the DR-H338i is on. While the unit is on standby, the iPod is not recharged because the unit’s power consumption is minimized to meet the regulation of IEA.
<When headphones are plugged into the iPod, sound comes from both the speakers and the headphones.
<The video signal from a connected iPod is output only from the video output terminals of DR-H338i.
Pausing playback
During playback , press the Play/Pause but ton (G/J). Playback stops at the current position.
< To resume playback, press the Play/Pause button (G/J) again.
ENGLISH Skipping playback
During playback, press the Skip but tons (.//) repeatedly until the desired song is found.
<When the Sk ip but ton (.) is presse d during playback , the current song will be played from the beginning. If you want to play the previous songs, press the Skip button (.) twice or more.
Searching for a part of a song
Hold down
During playback, hold down the Search button (mor ,) and release it when the par t you want to listen to is found.
23
Listening to an iPod (2)
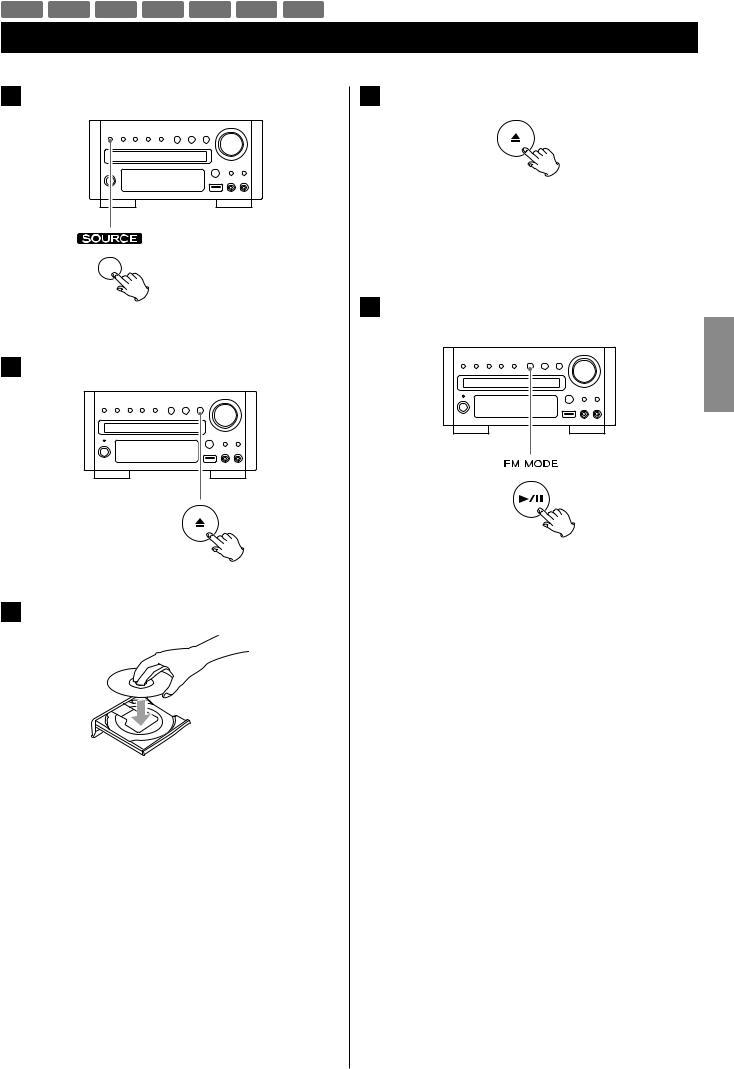
Going back to the previous menu
Press the MENU button.
This button has the same functions as its iPod counterpart.
Selecting the menu item
Press the b/5buttons to scroll to the menu item you want, and then press the Enter button.
24
Repeat playback
Each time the REPEAT button is pressed, the repeat mode of iPod changes as follows:
<When you select “One”, the Repeat One icon (
 ) appears on the iPod’s display.
<When you select “All”, the Repeat icon ( ) appears on the iPod’s display.
DVD VCD CD MP3 WMA JPEG DIVX
Listening to a Disc
1 Press the SOURCE button to select “DISC Source”.
< When no disc is loaded in the disc tray, “NO DISC” is displayed.
2 Press the Open/Close button (L) to open the tray.
3 Insert the disc label side up.
<In the case of double-sided discs, the side to be played should be face down.
<Make sure the disc is centered in the tray in order to avoid any malfunction or jamming of the tray or damage to the disc.
4 Press the Open/Close button (L) again to close the tray.
The tray will close. Take care that you do not catch your fingers in the tray.
It takes a few seconds for the unit to load the disc.
< Some discs may automatically start playback.
5 Press the Play/Pause button (y/J) to start playback if playback has not started automatically.
ENGLISH
If a menu is shown on screen (some DVD or video discs may show such a menu), see “On-screen menu” on the next page.
25

MP3 WMA JPEG DIVX
Listening to an USB Memory Device
For about USB memory device compatibility, see page 8.
1 Press the SOURCE button to select “USB Source”.
2 Plug your USB memory device into the USB connector.
It takes a few seconds for the unit to load the USB memor y device. Some files may automatically start playback.
<You can reverse steps 1 and 2 .
<Only USB f lash memor y can b e use d . D o NOT use a high - capacity USB hard disc with this unit.
3 Press the Play/Pause button (y/J) to start playback if playback has not started automatically.
26
DVD VCD MP3 WMA JPEG
On-screen Menu (1)
An on-screen menu is shown when a DVD or video CD with playback control (PBC) content is loaded.
The way in which the menu works may differ according to disc.
DVD menus
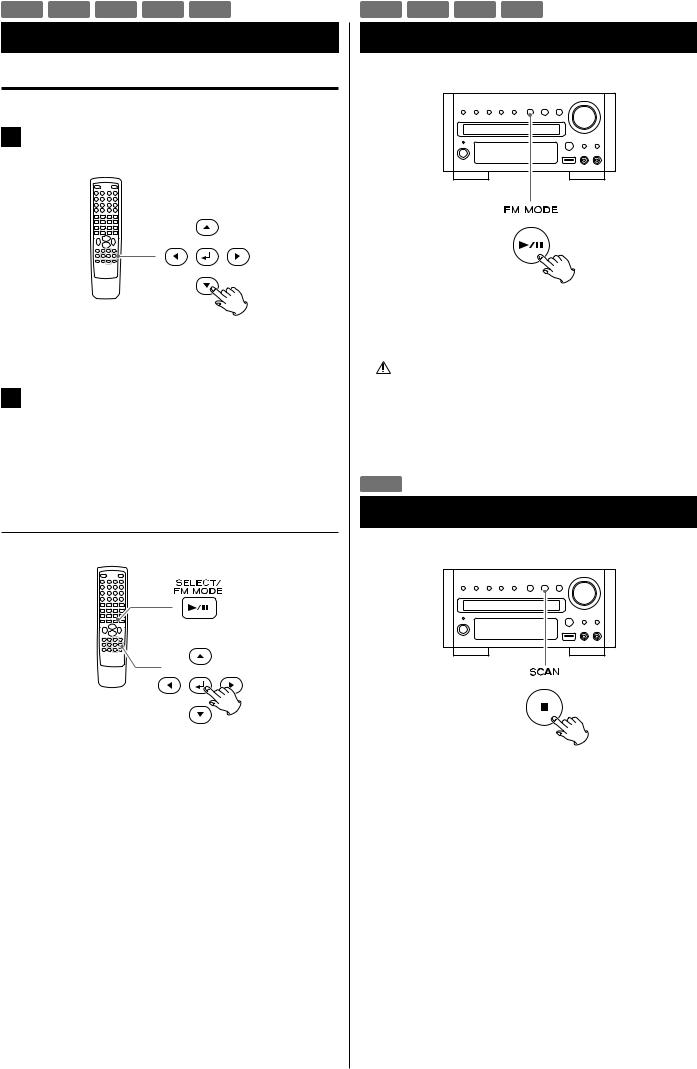
Use the Cursor buttons (5/b/t/g) to select the menu item from a DVD, and confirm the selection using the Enter button.
Returning to the menu screen
Press either the MENU button or the TITLE button.
<Depending on the disc, pressing the MENU button during playback may restart playback from the first chapter.
<This function is not available with a DVD-RW disc with VR content.
Video CDs with PBC
When a Video CD ( Version 2.0) or Super Video CD with Playback Control functions (PBC) is loaded, a menu will appear on the screen.
Select an item using the Number buttons to start playback.
<Press the /button to advance to the next page. Press the . button to return to the previous page.
<If you press the T IT LE but ton during playback , the menu will appear on the screen.
Turning on or off the PBC function
Press the MENU button to turn the PBC function on or off.
When the PBC function is off:
If you press the Play/Pause but ton (y/J) in the stop mode, playback will star t from the first track.
When the PBC function is on:
If you press the Play/Pause button (y/J) in the stop mode, a menu will appear on the screen.
Select an item using the Number buttons to star t playback.
MP3 and Windows Media-formatted audio files
When a disc or USB is loaded, a list of direc tories appears on the screen.
<It may take 30 seconds or more to display the list of files depending on the disc you are playing back.
1Select a director y by pressing the 5/b buttons and press the Enter button.
ENGLISH
File names will appear on the screen.
2 Select a file and press the Enter button or the Play/Pause (y/J) button. Playback will start from the selected file.
<Press the MENU button to switch between the folder list and the file list. When you select the file list, you can select a file without selecting the folder.
<If you want to return to the parent folder, display the folder list using the MENU button, select “.........” using the Cursor buttons and press the Enter button.
<Depending on the disc, invisible folders such as “ TRASH” might be shown on the screen. Please disregard folders which do not contain playable files.
<During playback, elapsed time of the current file is displayed on the front panel display.
27
DVD VCD MP3 WMA JPEG
On-screen Menu (2)
JPEG files
1 Choose a picture in the directory list by pressing the 5/b buttons.
After a short wait a thumbnail of the picture will appear on the right.
2 Press the Cursor buttons to select a picture to large view.
<Some photos may appear distorted due to the configuration or characteristics of the disc. Larger photos may take a short while to appear due to their larger data size.
Viewing the picture at full-screen size
or
Press the Enter or Play/Pause button (y/J).
<When viewing at full-screen size, press Skip buttons (.//) to view a previous or next photo. You can also use the g/tbuttons to rotate the image.
<When viewing at full-screen size, press the Stop but ton (H) to display a number of thumbnails at a time on the screen. You can use the Cursor buttons to select a particular photo and then press the Enter button to view that image at full-screen size. You can also select “Slide Show” to view all the photos in a series or “Menu” to adjust settings. You can also select gPREV or NEXTt to move to the previous or next screen of thumbnail images.
<Press the MENU button to exit thumbnail or full-screen views.
28
DVD VCD JPEG DIVX
Pausing Playback (Freezing a Picture)
Press the Play/Pause button (y/J) to pause audio playback. Any DVD or video CD image is frozen.
Press the Play/Pause button (y/J) again to restar t playback.
CAUTION
Do not leave player in the pause mode for extended periods of time. Damage to your T V or the player may occur.
DVD
Stopping Playback (Resume Mode)
When the Stop button (H) is pressed, playback is stopped, and the display shows “Press Play Key To Continue”. Pressing Play/ Pause (y/J) continues playback.
Pressing any of the following buttons cancels resume mode:
Stop (H) in the stop mode,
Open/Close (L), SOURCE, STANDBY/ON
DVD VCD CD MP3 WMA JPEG DIVX
Skipping Playback
Press the Skip but ton (.//) repeatedly until the desired chapter or track is found. The selec ted chapter or track will be played from the beginning.
<W hen p lay ing b ack v ide o CDs with PBC, the . but ton is disabled (page 27).
DVD VCD CD MP3 WMA JPEG DIVX
Searching for a Part of a Chapter or Track
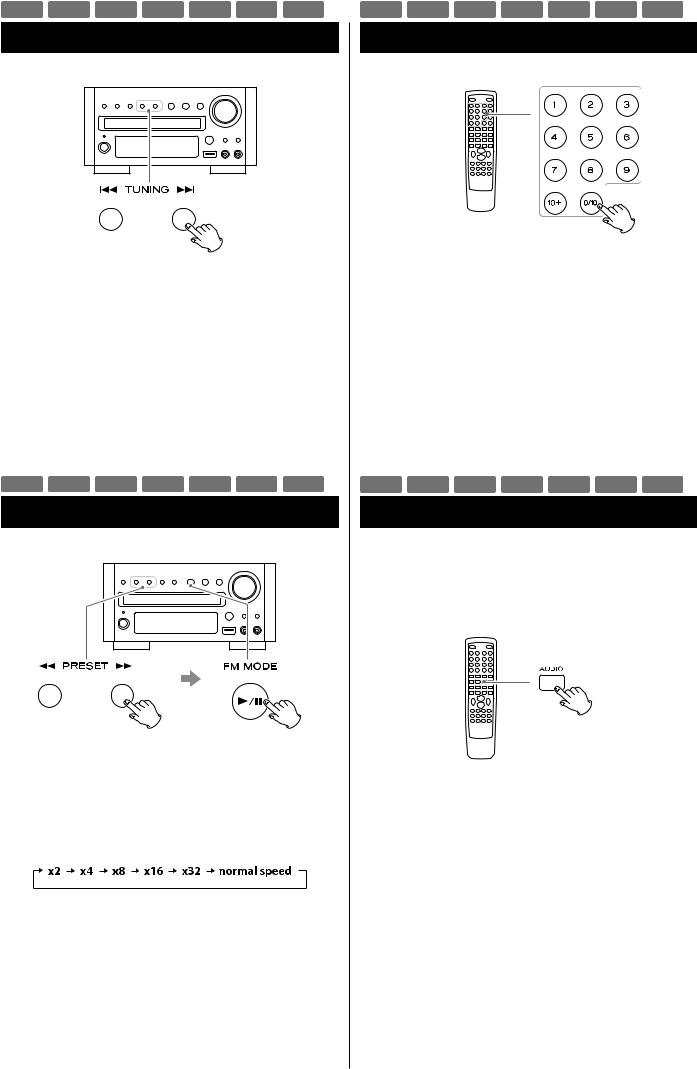
To Search quickly the disc in the for ward or reverse direc tion, press the Search buttons (mor ,) during playback.
Press the Play/Pause button (y/J) when the par t you want to listen to is found.
Each time the Search button (mor ,) is pressed, the search speed changes as follows:
<CD/ Video CD/MP3: When you forward fast to the end of a track (or reverse to the beginning of a track), the scan function will be cancelled and normal speed playback will continue.
<The sound is muted during fast search of DVD and video CD.
<This function may not work with some discs.
DVD VCD CD MP3 WMA JPEG DIVX
Selecting a Chapter or Track
DVD, Video CD and CD
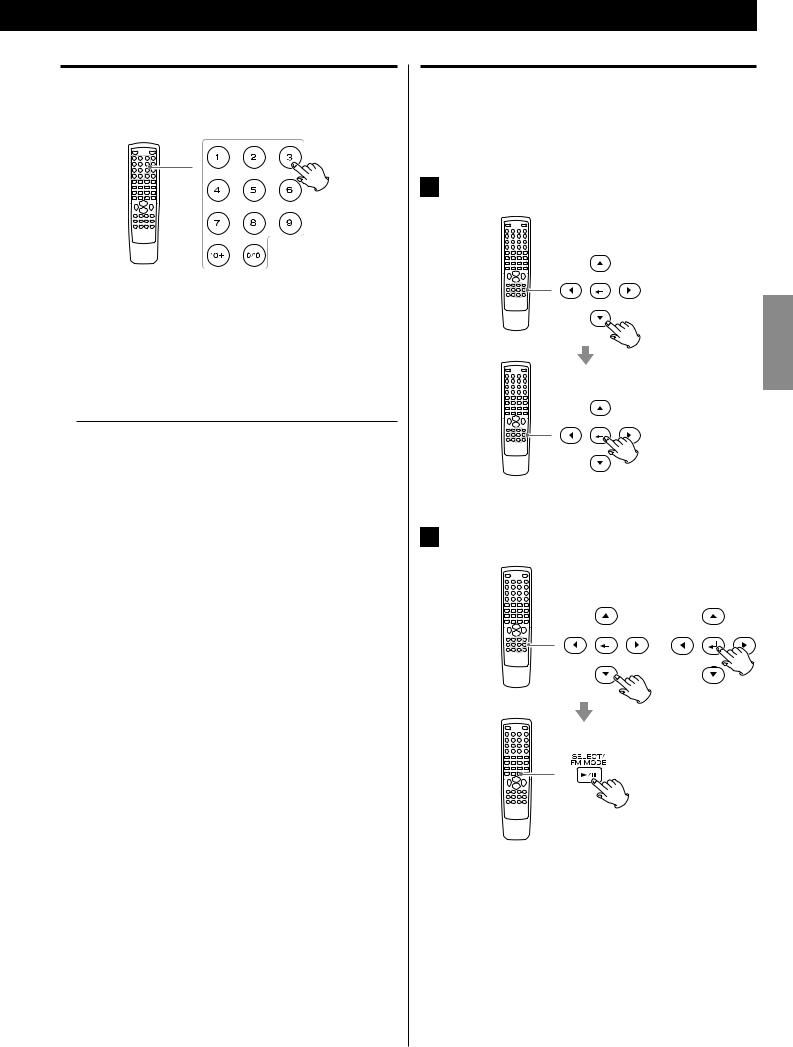
Use the Number buttons to select tracks or chapters for playback. For instance, to select track number 35, press “10”, “10”, “10” and “5”.
< The Number buttons do not work during PBC playback of video |
|
|
|
CDs (page 27). |
ENGLISH |
To select a file, enter 3 digit numbers. As an example, to select |
|
MP3, WMA, JPEG and DIVX |
|
number 5, press “0”, “0” and “5”. (Optionally, you may press just the |
|
number “5” and then wait a few seconds.) |
|
|
DVD VCD CD MP3 WMA JPEG DIVX
Selecting Audio
Many DVD discs include audio in different languages, as well as stereo and multi-channel surround versions of the soundtrack.
CDs and video CDs allow the lef t, right or stereo channels to be selected.
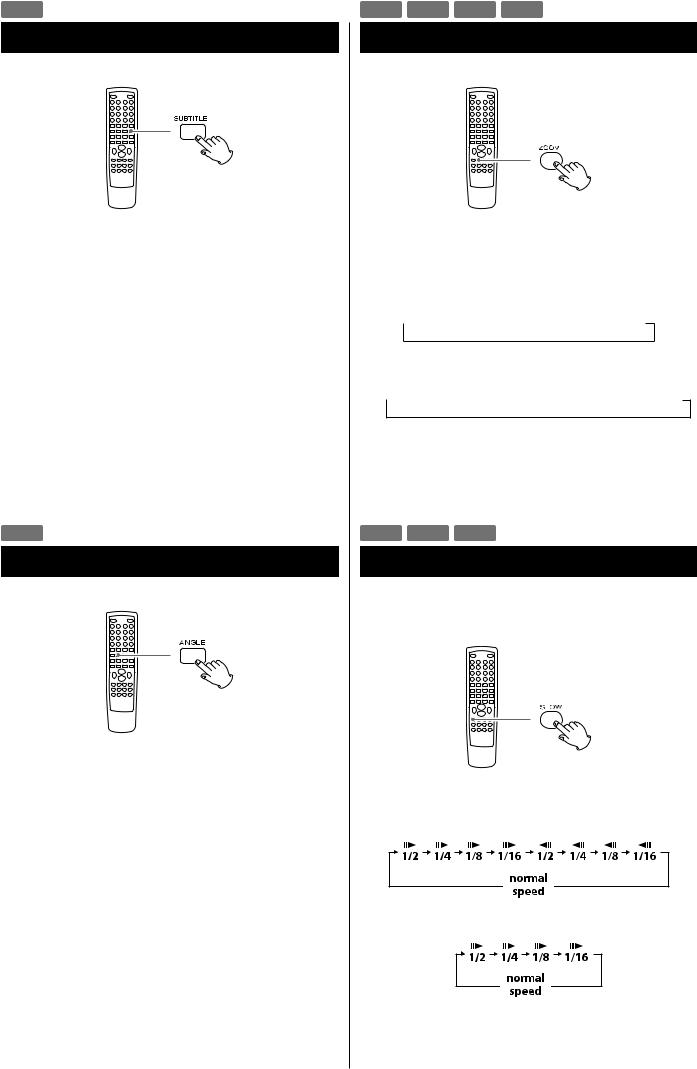
Pressing the AUDIO button changes between the different audio tracks available, and the result is shown on screen.
<Sometimes the picture playback will appear to freeze momentarily when the audio is changed.
<It may be necessary to change the audio on some discs using the on-screen disc menu.
<Some discs cannot have their audio changed in the way described here, as well as some discs which only have one audio stream. If you attempt to select different audio with these discs, the prohibit icon “A” is shown on screen.
29
DVD
Selecting Subtitles
Repeated presses of the SUBTITLE button cycle through available languages on a disc.
<Subtitles do not always appear immediately after the language has been selected. It may take a few seconds until the subtitles appear.
<Some captions on some discs cannot be removed or changed using this but ton. Some discs may have only one sub - caption language, in which case, the choice is obviously restricted to one subtitle or no subtitles.
<It may be necessary to change the subtitles on some discs using the on-screen disc menu.
<S o m e dis c s c ann ot have th eir subtitles chan g e d in th e w ay described here. If you attempt to select a dif ferent subtitle with these discs, the prohibit icon “A” is shown on screen.
DVD
Changing Camera Angle
When a scene recorded with multiple angles is played, the angle icon appears on the screen. Each time you press the ANGLE button while the angle icon is displayed, the camera angle changes.
<If you attempt to select a different angle with a disc which no other angle is recorded, the prohibit icon “A” will be displayed.
<The ANGLE button does not work during pause mode.
30
DVD VCD JPEG DIVX
Picture Zoom
To zoom the picture, press the ZOOM button during playback.
Each time the ZOOM button is pressed, the magnification level changes as follows:
DVD, DivX, Video CD:
 2x
2x  3x
3x  4x
4x  1/2
1/2  1/3
1/3  1/4
1/4  O!
O!
JPEG:


<You can shif t the zoom point by pressing the Cursor but tons during zoom playback.
<Zooming does not work on subtitles or menu screens.
DVD VCD DIVX
Slow Motion
For video discs only (DVD and video CD)
To play a disc in slow motion, press the SLOW button. Each time the SLOW button is pressed, the speed changes as follows:
DVD:
Video CD/DivX:
To resume normal playback, press the Play/Pause button (y/J).
< The sound is muted during slow-motion playback.
 Loading...