


Electronic Slow Cooker 5.5L
Instruction/Recipe Booklet
HP5590
Please read these instructions carefully and retain for future reference.
Contents
Sunbeam’s Safety Precautions |
1 |
Features of your Electronic Slow Cooker 5.5L |
2 |
Using your Electronic Slow Cooker |
4 |
To Program Cooking |
5 |
Tips for Slow Cooking |
6 |
Care and Cleaning |
7 |
Recipes |
|
Soups |
8 |
Main Meals |
10 |
Desserts |
19 |
Important instructions – retain for future use.

Sunbeam’s Safety Precautions
SAFETY PRECAUTIONS FOR YOUR |
• Use your slow cooker well away from walls and |
SUNBEAM SlOw COOkER. |
curtains. |
• Do not operate the slow cooker on an inclined |
• Do not use your slow cooker in confined |
surface. |
spaces. |
• Do not move or cover the slow cooker while in |
• Do not touch any metal surface of the slow |
operation. |
cooker whilst in use as it will be hot. |
•Do not immerse the base of the slow cooker in water or any other liquid.
|
Sunbeam is very safety conscious when |
• Do not use an appliance for any purpose |
|
designing and manufacturing consumer products, |
other than its intended use. |
|
but it is essential that the product user also |
• Do not place an appliance on or near a hot gas |
|
exercise care when using an electrical appliance. |
flame, electric element or on a heated oven. |
|
Listed below are precautions which are essential |
• Do not place on top of any other appliance. |
|
for the safe use of an electrical appliance: |
• Do not let the power cord of an appliance hang |
• |
Read carefully and save all the instructions |
over the edge of a table or bench top or touch |
|
provided with an appliance. |
any hot surface. |
• |
Always turn the power off at the power outlet |
• Do not operate any electrical appliance with |
|
before you insert or remove a plug. Remove |
a damaged cord or after the appliance has |
|
by grasping the plug - do not pull on the cord. |
been damaged in any manner. If damage is |
• Turn the power off and remove the plug |
suspected, return the appliance to the nearest |
|
|
when the appliance is not in use and |
Sunbeam Appointed Service Centre |
|
before cleaning. |
for examination, repair or adjustment. |
• Do not use your appliance with an extension |
• For additional protection, Sunbeam |
|
|
cord unless this cord has been checked |
recommend the use of a residual current |
|
and tested by a qualified technician or |
device (RCD) with a tripping current not |
|
service person. |
exceeding 30mA in the electrical circuit |
• Always use your appliance from a power |
supplying power to your appliances. |
|
|
outlet of the voltage (A.C. only) marked |
• Do not immerse the appliance in water |
|
on the appliance. |
or any other liquid unless recommended. |
• This appliance is not intended for use by |
• Appliances are not intended to be operated |
|
|
persons (including children) with reduced |
by means of an external timer or separate |
|
physical, sensory or mental capabilities, or |
remote control system. |
|
lack of experience and knowledge, unless they |
• This appliance is intended to be used in |
|
have been given supervision or instruction |
household and similar applications such |
|
concerning use of the appliance by a person |
as: staff kitchen areas in shops, offices and |
|
responsible for their safety. |
other working environments; farm houses; by |
• |
Children should be supervised to ensure that |
clients in hotels, motels and other residential |
|
they do not play with the appliance. |
type environments; bed and breakfast type |
• The temperature of accessible surfaces may be |
environments. |
|
|
high when the appliance is operating. |
|
•Never leave an appliance unattended while in use.
If you have any concerns regarding the performance and use of your appliance, please visit www.sunbeam.com.au or contact the Sunbeam Consumer Service Line.
Ensure the above safety precautions are understood. |
1 |
|
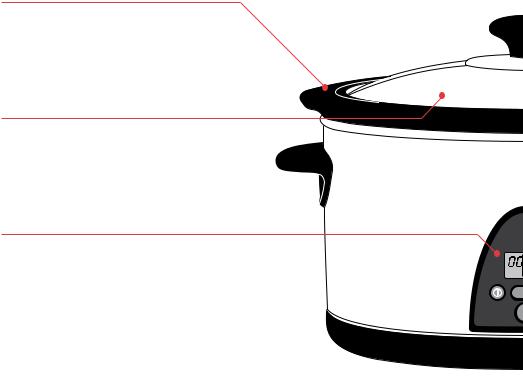
Features of your Electronic Slow Cooker 5.5L
Removable Crock Insert
The durable crock insert is removable to allow for convenient serving at the table, storing of leftovers and easy cleaning. The crock insert is also dishwasher safe for added convenience.
Quality Glass Lid
Fits neatly onto the crock insert to retain heat and moisture for best results. The transparent glass allows you to view the
food during cooking without lifting the lid, preventing the heat from escaping.
Electronic Control Dial
3 heat settings: LO, HI and WARM. The
Theprogrammablefunctionfunctionallowsallowsyou toyoupresetto presetyour cookingyour cookingtime thentimeautomaticallythen automatically switches to warm once the selected time has hasfinishedfinished. The. electronic panel also allows you to see the remaining cooking time.
HI
T
C
2
LO WARM
EMP
OOK
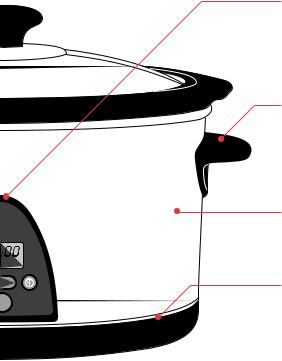
Removable Power Cord
Added convenience for serving at the dinner table.
Cool Touch Handles and Lid Knob
Allows you to lift and carry the slow cooker to the table for serving when hot.
Large 5.5 Litre Capacity
For cooking family-sized meals.
Wrap-Around Element
The element surrounds the crock insert to ensure even cooking. It prevents food from sticking to the bottom of the crock insert and eliminates the need to stir your food.
3
Using your Electronic Slow Cooker
1.Before using your Sunbeam slow cooker Electronic for the first time, remove the crock insert and lid and wash them in warm soapy water. Rinse and dry thoroughly and replace.
2.Place the slow cooker on a flat level surface.
3.Prepare the food to be cooked and place inside the slow cooker. Replace the lid.
Note: Do not place very cold or frozen food in the crock insert if it has been preheated.
4.Insert the plug into a 230-240V power outlet and turn the power ON.
5.Press the ‘Standby button  ’. Three bars on the LED will be displayed and HI temperature setting is indicated with a red light.
6.Press the TEMP SELECT to select your desired cooking temperature of HI, LO or WARM setting.
7.Press the ‘Timer button  ’ to set the desired amount of hours for cooking. HI and LO can be set for a maximum of 12 hours and KEEP WARM can be set for a maximum of 6 hours.
Important: Food should not be cooked on the WARM setting as this setting will not get hot enough to cook. This setting should only be used to keep hot, cooked food warm for serving.
8.Once the temperature and time has been set press the ‘START’ button to commence cooking. The LED will start counting down.
Note: Cooking time can be increased or decreased during cooking by pressing the ‘Timer button  ’ until the desired time is achieved.
Note: Cooking can be stopped at any time by pressing the ‘Standby button  ’.
’.
9.When the slow cooker has completed the desired cooking time the unit will switch to WARM and the LCD will start to count down from 6 hours. After 6 hours your slow cooker will switch off automatically.
Important: The WARM setting should only be used for a maximum of 6 hours.
10.Press the ‘Standby button  ’ button to turn your slow cooker off.
Tip: If at anytime you choose to switch back from the Warm setting before your selected cooking time had finished, the slow cooker remembers the amount of cooking time that was remaining.
Note: Transfer cooked food from the crock insert into a airtight container before storing in fridge or freezer
4
•All of the recipes contained in this book have recommended temperature settings. Most recipes can be cooked on the LOW setting, however when using the HIGH setting cooking times can often be halved.
•Food will be brought to a simmer on all settings. The setting determines the time needed to reach a simmer.
•When cooking with vegetables, place them in the crock insert first, and then place the meat on top.
•Always ensure that food or liquid comes to at least half way up the wall of the crock insert, as the element is located on the sides of the slow cooker.
•When roasting whole pieces of lamb, beef or chicken, it is not necessary to add liquid. Pot roasts and corned meats should be barely covered with liquid.
•Do not use oven bags in your slow cooker.
•When preparing meat for casseroles, lightly coat the pieces in flour and brown before adding to the slow cooker. This helps to seal in the juices and flavours, and keeps the meat tender.
•Frozen casseroles can be placed in the cold slow cooker and heated for 5-8 hours, depending on the quantity. Do not place frozen food into a heated slow cooker.
•If a recipe results in too much liquid,
turn the slow cooker to the HIGH setting, remove the lid and cook until sufficient liquid has evaporated.
•To thicken a casserole, set the slow cooker to the HIGH setting and stir through a thickening agent such as cornflour combined with a little water. Allow to simmer until thickened, stirring occasionally.
•Stirring is rarely necessary, as the element wraps around the sides of the slow cooker, preventing the food from sticking to the base.
•Leave the lid on the slow cooker during cooking to maintain heat and moisture.
•Reduce cooking times when the slow cooker is not completely full to achieve a better cooking result as the slow cooker heats up faster when not filled up to the rim.
Care and Cleaning
Wash the crock insert and lid in hot soapy water. To remove food that is cooked onto the bottom, soak the crock insert in warm water before cleaning and scrub lightly with a plastic or nylon brush. Rinse well and dry. The crock insert is also dishwasher safe for added convenience.
Note: Do not place the hot crock insert under cold water.
Wipe the exterior of the slow cooker with a damp cloth and polish dry. DO NOT use harsh abrasives, scourers or chemicals to clean any part of your slow cooker as these will damage the surfaces.
CAUTION: Do not immerse the base of the slow cooker in water or any other liquid.
6
 Loading...