


Ambrosi 200 W Jackson Suite 400 Chicago, IL 60606 1-888-Ambrosi
Client: Sunbeam |
Job#: 0020689 |
Title: 3964-099, 3965-099_0017109IM |
|
Size: Bleed: 8.75 x 11.25 |
Trim: 8.50 x 11.00 Safety: 8.25 x 10.75 |
Art: Bob Bach ♥ 23 May 2005 15.47 C.S.T.
Acct: Lisa Cody
©2005 Sunbeam Products, Inc. All rights reserved.
SUNBEAM,® MOTION SMART,® SHOT OF STEAM® and SPRAY MIST® are registered trademarks of Sunbeam Products, Inc. DRIP FREE™ is a trademark of Sunbeam Products, Inc.
In Canada, imported and distributed by Sunbeam Corporation, Limited.
In the United States, distributed by Sunbeam Products, Inc., Boca Raton, Florida 33431 AMB:052305
©2005 Sunbeam Products, Inc. Tous droits réservés.
SUNBEAM,® MOTION SMART,® SHOT OF STEAM® et SPRAY MIST® sont des marques déposées de Sunbeam Products, Inc. DRIP FREE™ est une marque déposée de Sunbeam Products, Inc.
Au Canada, importés et distribués par Sunbeam Corporation, Limited.
Aux États-Unis, distribués par Sunbeam Products, Inc., Boca Raton, Florida 33431
©2005 Sunbeam Products, Inc. Todos los derechos reservados.
SUNBEAM,® MOTION SMART,® SHOT OF STEAM® y SPRAY MIST® son marcas registradas de Sunbeam Products, Inc. DRIP FREE™ es una marca comercial de Sunbeam Products, Inc.
En Canadá, importada y distribuida por Sunbeam Corporation, Limitada.
En los Estados Unidos, distribuida por Sunbeam Products, Inc., Boca Ratón, Florida 33431
©2005 Sunbeam Products, Inc. Todos direitos reservados. .
SUNBEAM,® MOTION SMART,® SHOT OF STEAM® e SPRAY MIST® são marcas registradas da Sunbeam Products, Inc. DRIP FREE™ é uma marca registrada da Sunbeam Products, Inc..
No Canada, importado e distribuido por Sunbeam Corporation, Limited.
Nos Estados Unidos, distribuido por Sunbeam Products, Inc., Boca Raton, Florida 33431
www.sunbeamhospitality.com
Printed in China |
Imprimé en Chine |
Impreso en China |
Impresso na China |
Instruction Manual Classic Irons
Manuel d’Instructions Fers à Repasser Classiques
Manual de Instrucciones Planchas Clásicas
Manual de Instruçôes Ferros de Passar Clássicos
MODEL S/MODÈLES 3964-099, 3965-099
MODELOS
www.sunbeamhospitality.com |
P.N. 115497 |
|
|
IMPORTANT SAFEGUARDS
When using electrical appliances, basic safety precautions should always be followed including the following:
READ ALL INSTRUCTIONS BEFORE USE
•Use iron only for its intended use.
•To protect against risk of electric shock, do not immerse the iron in water or other liquids.
•The Fabric Select Dial and Steam Lever should always be turned to “O/Off” before plugging or unplugging from outlet. Never yank cord to disconnect from outlet; instead, grasp plug and pull to disconnect.
•Do not allow cord to touch hot surfaces. Let iron cool completely before putting away. Loop cord loosely around iron when storing.
•Always disconnect iron from electrical outlet when filling with water or emptying and when not in use.
•Do not operate iron with a damaged cord or if the iron has been dropped
or damaged. To avoid the risk of electric shock, do not disassemble the iron. Take it to an authorized service center for examination and/or repair. Incorrect reassembly can cause a risk of electric shock when the iron is used.
•Close supervision is necessary for any appliance being used by or near children. Do not leave iron unattended while plugged in or turned on or on an ironing board.
•Burns can occur from touching hot metal parts, hot water or steam. Use caution when you turn a steam iron upside down – there may be hot water in the reservoir.
•If the iron is not operating normally, disconnect from the power supply and call your nearest Sunbeam Hospitality Distributor at 1-888-878-6232, extension 66598.
•Your SUNBEAM® iron is designed to rest on the heel rest. Do not leave the iron unattended. Do not set the iron on an unprotected surface, even if it is on its heel rest.
SPECIAL INSTRUCTIONS
•This is a 1200-Watt appliance. To avoid a circuit overload, do not operate another high wattage appliance on the same circuit.
•If an extension cord is absolutely necessary, a 15-ampere cord should be used. Cords rated for less amperage may overheat. Care should be taken to arrange the extension cord so that it cannot be pulled or tripped over.
FOR PRODUCTS PURCHASED IN THE UNITED STATES AND CANADA
To reduce the risk of electrical shock, this appliance has a polarized plug (one blade is wider than the other). This plug fits a polarized outlet only one way; if the plug does not fit fully into the outlet, reverse the plug. If it still does not fit, contact a qualified electrician. Do not attempt to defeat this safety feature.
SAVE THESE INSTRUCTIONS
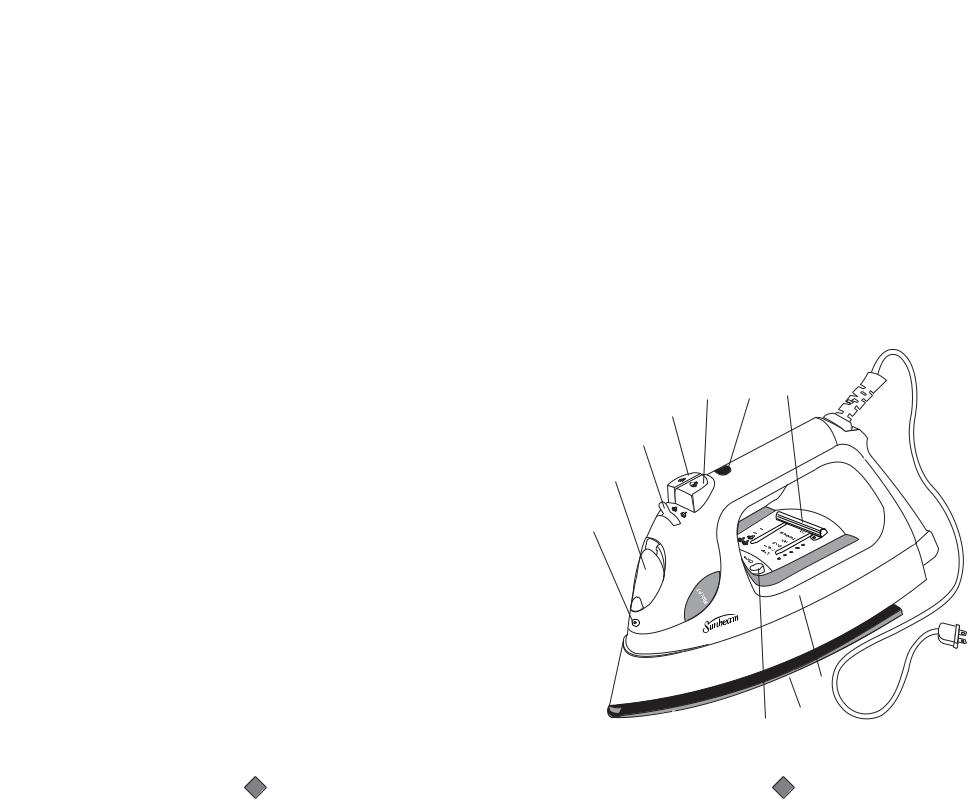
FEATURES OF YOUR CLASSIC IRON
1.SPRAY MIST® Release
2.Covered Water Fill Hole
3.Steam Lever
4.SPRAY MIST® Button
5.SHOT OF STEAM® / Vertical Steam Button (Select Models Only)
6.Power Indicator Light / MOTION SMART® Auto-Off Indicator
(Select Models Only)
7.Fabric Select Slide
8.See-Through Water Reservoir
9.Soleplate
10. Self Clean Button
5 6 7
4
3
2
1
|
L I |
T Y |
T A |
|
|
|
|
8
9
10
2

TO FILL THE WATER RESERVOIR
1.Make sure the iron is unplugged. Set the Steam Lever to O/Off (Dry) and the Fabric Select Slide to OFF.
2.Lift the Water Fill Hole Cover.
3.Fill water cup with water. Pour water into iron water reservoir. Do not fill water reservoir beyond maximum fill level.
WARNING: To prevent the risk of burns, be careful when filling a hot iron with water. Hot metal parts, hot water and steam can cause injuries.
DRY IRONING
1.Make sure the Steam Lever is turned to the O/Off (Dry) setting.
2.Plug the cord into a 120-Volt AC outlet.
3.Select the fabric setting you desire using the Fabric Select Slide (Silk or Synthetics). Allow the iron to heat for 2 minutes. While the iron is heating, make sure
it is sitting on its heel rest on a stable, protected surface.
NOTE: While the Steam Lever is turned to the O/Off (Dry) setting, you may still use the SHOT OF STEAM® or SPRAY MIST® feature. Please make sure the water reservoir is 1/4 full of water.
TIP: Refer to the Ironing Guide (on Page 8) for the recommended setting for your fabric.
STEAM IRONING
1.Make sure the Steam Lever is turned to the O/Off (Dry) setting.
(This Step is not necessary for Irons with the Drip Free™ feature)
2.Follow the instructions for “Filling the Water Reservoir”.
3.Plug the cord into a 120-Volt AC outlet.
4.Select the fabric setting you desire using the slide (Synthetic, Silk, Linen,
Cotton or Wool). Allow the iron to heat for 2 minutes. While the iron is heating, make sure it is sitting on its heel rest on a stable, protected surface.
5.Allow the iron to heat for 2 minutes, and then turn the Steam lever to the appropriate setting.
TIP: Refer to the Ironing Guide (on Page 8) for the recommended setting for your fabric. IMPORTANT: When not ironing, always set the Steam Lever to O/Off (Dry) and the Fabric Slide to OFF.
USING THE IRON’S SPECIAL FEATURES
SPRAY MIST® FEATURE
The SPRAY MIST® feature is a powerful water spray mist that dampens the fabric to aid in removing wrinkles from heavy fabrics and for setting creases.
To use the SPRAY MIST® Feature:
Press the SPRAY MIST® button firmly.
SHOT OF STEAM® FEATURE (Select Models Only)
The SHOT OF STEAM® feature provides an extra burst of steam for deep penetration of stubborn wrinkles. You can use this feature while Dry or Steam ironing, but the water reservoir must be at least 1/4 full of water.
4
To use the SHOT OF STEAM® Feature:
Place the iron on top of the wrinkle and press the SHOT OF STEAM® button each time you would like an extra burst of steam. The SHOT OF STEAM® feature may be used continuously with just a short pause between shots.
VERTICAL STEAM (Select Models Only)
The vertical steam feature allows your iron to function as a garment steamer.
TIP: When using the vertical steam on clothing, hang the clothing on a clothes hanger for best results. Hanging curtains and drapes may also be steamed.
To use Vertical Steam:
1.Make sure that the iron has heated up (2 minutes).
2.Hold the iron in a vertical position, with the iron close to but not touching the fabric you want to steam.
3.With your other hand, pull the fabric tight.
4.Press the SHOT OF STEAM® button for approximately 3-second intervals as you move the iron across the wrinkled area.
WARNING: To prevent the risk of burns, keep your hand away from the area being steamed.
WARNING: DO NOT steam garments while wearing them; this may result in injuries.
TIMED AUTO-OFF (Select Models Only)
After 30 minutes, the power indicator light will flash steadily. This indicates that the iron is no longer heating.
To restart the iron, push button to restart. If you do NOT want to iron any longer, unplug the iron. Then turn the small Steam dial to Dry/O and the large Fabric/Temperature dial to Off/O.
WARNING: Auto-Off is a safety feature and is not a recommended means for turning your iron off. See “Caring for Your Iron After Use”.
PATENTED MOTION SMART® AUTO-OFF FEATURE (Select Models Only)
When the iron is plugged in, the Power Indicator will light steadily, indicating that there is power to the iron.
If you leave the iron:
•in a horizontal position without moving it, or accidentally tip the iron over, it will automatically stop heating after 30 seconds. The Power Indicator will blink to let you know that the iron has stopped heating.
•in a vertical position (on its heel rest) without moving it, the iron will automatically turn off after 15 minutes. The Power Indicator will blink to let you know that the iron has stopped heating.
IMPORTANT: The Power Indicator will continue to blink until the iron is unplugged or reset.
To reset the iron:
Move the iron back and forth and allow it to reheat for 2 minutes. The indicator will stop blinking and the iron will start heating again.

WARNING: The patented MOTION SMART® Auto-Off is a safety feature, not a recommended means for turning your iron off. See “Caring for Your Iron After Use” for information on turning off your iron and storing it safely between use.
CARING FOR YOUR IRON AFTER USE
TURNING OFF YOUR IRON
1.Turn the Steam Lever to O/Off (Dry) and Fabric Select Slide to Off.
2.Unplug the iron from the power source.
WARNING: NEVER yank the power cord when unplugging the iron. This can damage the cord.
STORING YOUR IRON
1.Allow the iron to cool.
2.If you do not use your iron on a daily basis, empty the water reservoir after each use for a longer iron life. To do so, unplug the iron, turn the iron upside down, open the fill hole cover, and allow water to flow from the fill hole. Shake the iron gently to remove trapped water drops.
3.Loosely loop the power cord around the heel rest and store the iron on its heel rest.
IMPORTANT: Wrapping the cord around the iron too tightly can damage the cord. TIP: When not ironing, always set the Steam Lever to O/Off (Dry) and the Fabric Select Slide to Off.
MAINTAINING YOUR CLASSIC IRON
CLEANING THE SOLEPLATE
Clean the soleplate if starch or other residue accumulate.
To clean the Soleplate:
1.Allow the iron to cool and then wipe it with a soft, damp cloth. WARNING: DO NOT use abrasive cleansers, scouring pads or vinegar to clean the soleplate. This will damage the finish.
2.Run the iron over an all-cotton cloth to remove any residue.
USING THE SELF-CLEANING FEATURE
You should use the Self-Cleaning feature once a month to maintain the optimal performance of your iron.
To use the Self-Cleaning feature:
1.Move the Steam Lever back and forth from O/Off (Dry) several times to remove debris and minerals from the Steam Valve. This keeps water flowing into the steam chamber.
2.Fill the water reservoir with tap water to the MAX line. 3.Set the Fabric Select Slide to LINEN.
4.Plug the iron into a power outlet and allow the iron to heat for 2 minutes. 5.Turn the Fabric Select Slide to MIN and unplug the iron.
6.Hold the iron over a sink in a horizontal position.
6
WARNING: Be careful not to touch the iron’s hot surfaces.
7.Press the self-clean button and hold. Water will begin dripping from the steam vents. To make sure that all of the water is removed from the tank, slowly rock the iron side to side and front to back for 30 seconds. When rocking
the iron, dip the nose of the iron slightly below the rear of the iron to make certain the water circulates completely. Release self-clean button after
one minute.
8.Turn the iron upside down and allow the remaining water to flow out of the fill hole.
9.Dry the soleplate with a towel.
10.Plug in the iron and set the Fabric Select Slide to Linen. Let the iron heat for 2 minutes to dry out the iron completely.
11.Set the Fabric Select Slide to MIN, unplug the iron and allow it to cool.
IRONING TIPS
•Always read garment labels and follow the manufacturer’s ironing instructions.
•Sort the articles to be ironed according to the type of fabric.
•You should first iron garments requiring low temperature (e.g., silks and synthetics) to avoid damaging them with an iron that is too hot.
•If you are unsure of the fabric content of the garment, test a small area, such as a seam or facing, before ironing a visible area. Start with a low temperature and gradually increase the heat to find the best setting.
•When changing the temperature from a high setting to a low setting, allow approximately 5 minutes for the lower temperature to be reached.
•When steam ironing, use long, slow passes over the fabric. This will allow the steam to penetrate the fabric while allowing the heat of the soleplate to dry out the moisture.
•To iron linens, turn garment inside out. Be careful not to use an iron that is too hot because the lining may melt or stick to the soleplate.
•To iron zippers, use an ironing cloth or make sure the zipper is closed and iron over the flap. Never iron directly over an unprotected zipper.
•Use the Ironing Guide (on Page 8) to select the best setting and method for the fabric you plan to iron.

IRONING GUIDE
|
SUGGESTED |
FABRIC SELECT |
|
FABRIC |
STEAM SETTING |
DIAL SETTING |
IRONING RECOMMENDATIONS |
|
|
|
|
Acrylic |
O/Off (Dry) |
Synthetic |
Iron garment inside out |
|
|
|
|
Acetate |
O/Off (Dry) |
Synthetic |
Iron garment inside out while still damp. |
|
|
|
|
Polyester |
O/Off (Dry) |
Synthetic |
Iron garment inside out while still damp. |
|
|
|
|
Rayon |
O/Off (Dry) |
Synthetic |
Iron garment inside out. |
|
|
|
|
Silk |
O/Off (Dry) |
Silk |
Iron garment inside out. Use an ironing cloth* |
|
|
|
to prevent shine marks. |
|
|
|
|
Viscose |
O/Off (Dry) |
Silk |
Mainly dry iron; steam may be used under |
|
|
|
garment manufacturer’s instructions. |
|
|
|
|
Nylon |
O/Off (Dry) |
Silk |
Iron garment inside out while still damp. |
|
|
|
|
Wool |
Steam |
Wool |
Iron garment inside out or use an |
|
|
|
ironing cloth.* |
|
|
|
|
Wool Blends |
Steam |
Wool |
Iron garment inside out or use an |
|
|
|
ironing cloth.* |
|
|
|
|
Cotton Blends |
Steam |
Cotton |
Follow garment manufacturer’s instructions. |
|
|
|
Use setting for the fiber requiring the lowest |
|
|
|
setting. |
|
|
|
|
Corduroy |
Steam |
Cotton |
Iron garment inside out or use an ironing cloth* |
|
|
|
and then brush the garment with your hand |
|
|
|
to raise the texture of the fabric. |
|
|
|
|
Cotton |
Steam |
Cotton |
Iron dark fabrics inside out to prevent |
|
|
|
shine marks. |
|
|
|
|
Linen |
Steam |
Linen |
Iron garment inside out or use an |
|
|
|
ironing cloth* to prevent shine marks |
|
|
|
(especially on dark fabrics). |
|
|
|
|
Denim |
Steam |
Linen |
Use the SPRAY MIST® feature and/or the |
|
|
|
SHOT OF STEAM® for deeper penetration |
|
|
|
to remove wrinkles. |
*An ironing cloth is a cotton, dry-cleaned cloth that you place over the garment you are ironing to prevent the fabric from looking shiny.
Note: Some fabrics may require more steam than others. Your iron has the capability to adjust steam as needed.
8
2-YEAR LIMITED HOSPITALITY WARRANTY
Sunbeam Products, Inc. (“Sunbeam”) warrants that for a period of
2 years from the date of purchase, this product will be free from defects in material and workmanship. Sunbeam, at its option, will repair or replace this product or any component of the product found to be defective during the warranty period. Replacement will be made with
a new or remanufactured product or component. If the product is no longer available, replacement may be made with a similar product of equal or greater value. This is your exclusive warranty.
This warranty is valid for the original purchaser from the date of initial purchase and is not transferable. Sunbeam dealers, service centers, or stores selling Sunbeam products do not have the right to alter, modify or any way change the terms and conditions of this warranty.
This warranty does not cover normal wear of parts or damage resulting from any of the following: negligent use or misuse of the product, use on improper voltage or current, use contrary to the operating instructions, disassembly, repair or alteration by anyone other than Sunbeam or an authorized service center. Further, the warranty does not cover Acts of
God, such as fire, flood, hurricanes and tornadoes.
Sunbeam shall not be liable for any incidental or consequential damages caused by the breach of any express, implied or statutory warranty or condition. Except to the extent prohibited by applicable law, any implied warranty of merchantability or fitness for a particular purpose is limited in duration to the duration of the above warranty. Sunbeam disclaims all other warranties or conditions, express, implied statutory or otherwise. Some states, provinces or jurisdictions do not allow the exclusion or limitation of incidental or consequential damages or limitations on how long an implied warranty lasts, so the above limitations or exclusion may not apply to you. This warranty gives you specific legal rights,
and you may also have other rights that vary from state to state or province to province.
This warranty is only applicable to products purchased by members of the hospitality industry and not to consumer sales.
HOW TO OBTAIN WARRANTY SERVICE
Contact your Sunbeam authorized dealer.
www.sunbeamhospitality.com

PRÉCAUTIONS IMPORTANTES
Lors de l’utilisation du fer à repasser, veiller à toujours respecter des mesures de précaution élémentaires, notamment :
LISEZ TOUTES LES INSTRUCTIONS AVANT UTILISATION
•Utiliser ce fer uniquement à des tâches pour lesquelles il est conçu.
•Pour écarter les risques d’électrocution, ne pas immerger le fer dans l’eau ni dans aucun autre liquide.
•Placez le bouton de commande du tissu et de la vapeur en position O/OFF avant de le brancher ou de le débrancher. Ne jamais tirer sur le fil pour débrancher le cordon; saisir la fiche et l’extraire de la prise.
•Ne pas laisser le cordon d’alimentation venir au contact des surfaces chaudes. Laisser le fer refroidir complètement avant de le ranger. Pour le rangement, enrouler le cordon autour du fer sans serrer.
•Veiller à toujours débrancher le fer de la prise de courant avant de remplir ou vider le réservoir d’eau ou lorsque le fer n’est pas utilisé.
•Ne jamais faire fonctionner un fer a repasser qui est tombe ou a été endommages. Pour écarter les risques d’électrocution, ne pas démonter le fer. Envoyé l’appareil a un centre de réparation agréé. Un fer mal remonté présente un danger d’électrocution durant son utilisation.
•Faites particulièrement attention lorsque le fer est utilisé par, ou en présence d’enfants. Ne pas laisser le fer a repasser sans surveillance lorsqu’il est branche ou en position «ON» ou posé sur la table à repasser.
•Les brûlures se produisent en cas de contact avec des parties métalliques chaudes, de l’eau chaude ou de la vapeur. Attention avant de tourner un fer à repasser vapeur à l’envers: le réservoir peut contenir de l’eau bouillante.
•Si le fer à repasser ne fonctionne pas correctement, débrancher le cordon d’alimentation et appelez votre distributeur d’hospitalité de Sunbeam plus proche au 1-888-878-6232 ext. 66598.
•Ce fer à repasser SUNBEAM® est conçu pour reposer sur talon d’appui. Ne pas laisser le fer sans surveillance. Ne pas placer le fer sur une surface non protégée, même s’il repose sur son talon d’appui.
INSTRUCTIONS PARTICULIÈRES
•Ceci est un appareil de 1200 W*. Pour éviter toute surcharge du réseau électrique, ne pas utiliser un autre appareil de forte puissance sur le même circuit.
•S’il est absolument nécessaire de se servir d’une rallonge électrique, utiliser un cordon de 15 A. Les cordons de capacité moindre présentent des risques d’échauffement.
Veiller à placer le cordon de manière à ce qu’il ne risque pas d’être arraché ou de provoquer de trébuchement.
PRODUITS ACHETÉS AUX ÉTATS-UNIS ET AU CANADA UNIQUEMENT
Pour réduire le risque de choc électrique, cet appareil est doté d’une fiche polarisée (une broche est plus large que l’autre). Cette fiche ne va que dans un sens seulement sur une prise de courant polarisée. Si la fiche ne s’enfonce pas complètement dans la prise, la retourne et essayer de nouveau. Si elle ne s’adapte toujours pas à fond, consulter
un électricien qualifié. Veillez à respecter les mesures de sécurité de la prise polarisée.
CONSERVER CES INSTRUCTIONS
CARACTÉRISTIQUE DE VOTRE FER À REPASSER CLASSIQUE
1.Dégagement du SPRAY MIST®
2.Réservoir d’eau à remplir
3.Bouton de réglage de la vapeur
4.Bouton de réglage du SPRAY MIST®
5.SHOT OF STEAM® / Bouton de vapeur vertical (Certains Modèles Seulement)
6.Courant lumineux / MOTION SMART® indicateur de détachement automatique (Certains Modèles Seulement)
7.Coulisse de sélection pour tissu
8.Fenêtre de repère du niveau d’eau
9.Semelle
10.Bouton d’auto nettoyage
5 6 7
4
3
2
1
|
L I |
T Y |
T A |
|
|
|
|
8
9
10
10
 Loading...