


©2003 Sunbeam Products, Inc. All rights reserved.
 is a registered trademark of Sunbeam Products, Inc. used under license. Manufactured for Prestige Home Comfort, Montreal, Canada, H2N 2J2.
©2003 Sunbeam Products, Inc. Tous droits réservés.
 est une marque déposée de Sunbeam Products, Inc. utilisée en vertu d'une autorisation. Fabriqué pour Prestige Home Comfort, Montreal, Canada, H2N 2J2.
©2003 Sunbeam Products, Inc. Todos los derechos reservados.
 es una marca registrada de Sunbeam Products, Inc. uso bajo licencia. Fabricado por Prestige Home Comfort, Montreal, Canada, H2N 2J2.
USER MANUAL
MANUEL D’UTILISATION
MODO DE EMPLEO
• COLD
Enjoy a cold drink
•HOT
Great for a hot beverage or soup
• FROIDE
Savourez de l’eau froide
• CHAUDE
Parfaite pour une boisson chaude ou une soupe
• FRÍO
Para gozar de una bebida fría
• CALIENTE
Excelente para bebidas calientes o sopas
555 Chabanel St. West, Suite 700,
Montreal, Quebec,
Canada. H2N 2J2,
Toll Free Tel / Tél. sans frais / Tel sin cargo: 1-877-383-6399
E-mail / Correo elec: service@limagehomeproducts.com
Tips Sheet-0168/0169 8/31/05 5:28 PM Page 1
Congratulations on purchasing your new
S u n b e a m® Water Dispenser!
Warnings & Precautions:
1. Your water dispenser should be left upright for at least ten hours, unplugged.
2. This unit should be placed with at least 4 inches between the back of the unit and the wall. Keep a minimum distance of 2 inches on each side of your water dispenser free.
3. Press the buttons in to let the air out, until the water starts to flow. When this happens, release the buttons.
4. Plug in your water dispenser.
NOTE: Switch on the rear of the unit must be in the “ON” position.
5. You should have hot water in approximately 10 minutes and cold water in less than 30 minutes.
6. For questions, comments or service information, please call 1-877-383-6399
~
Félicitations pour l'achat de votre nouveau distributeur d'eau Sunbeam®!
Avertissements et précautions à prendre:
1. Le distributeur d'eau devrait être laissé débranché et en position verticale pendant au moins dix heures.
2. Laisser un espace d'au moins 10 cm entre l'appareil et le mur. Laisser un espace dégagé d'au moins 5 cm de chaque côté de l'appareil.
3. Enfoncez les boutons jusqu’à ce que l’eau commence à couler. Relâchez alors les boutons.
4. Brancher le distributeur d'eau.
REMARQUE : L’interrupteur situé au dos de l'appareil doit être en position « ON ».
5. L'eau chaude devrait être prête en environ 10 minutes, et l'eau froide, en moins de 30 minutes.
6. Pour poser des questions ou obtenir de l'information concernant le service, composer le 1-877 383-6399.
~
Felicidades por la compra de su nuevo distribuidor de agua Sunbeam®!
Advertencias y precauciones a tener en cuenta:
1.El distribuidor de agua debe permanecer desenchufado y en posición vertical al menos diez (10) horas.
2.Deje un espacio de 10 cm como mínimo entre el aparato y la pared. Deje un espacio libre de al menos 5 cm a cada lado del aparato.
3.Apriete los botones hasta que comience a fluir el agua. Cuando esto ocurra, suelte los botones.
4.Enchufe el distribuidor de agua.
NOTA : El interruptor en la parte tresara del aparato deben estar en posición «ON».
5.El agua caliente estará disponible en unos 10 minutos y la fría en menos de 30.
6.Para cualquier cuestión, observación o información respecto al servicio marque el 1 877 383-6399.
NOTES / NOTER / NOTAS
- 24 -
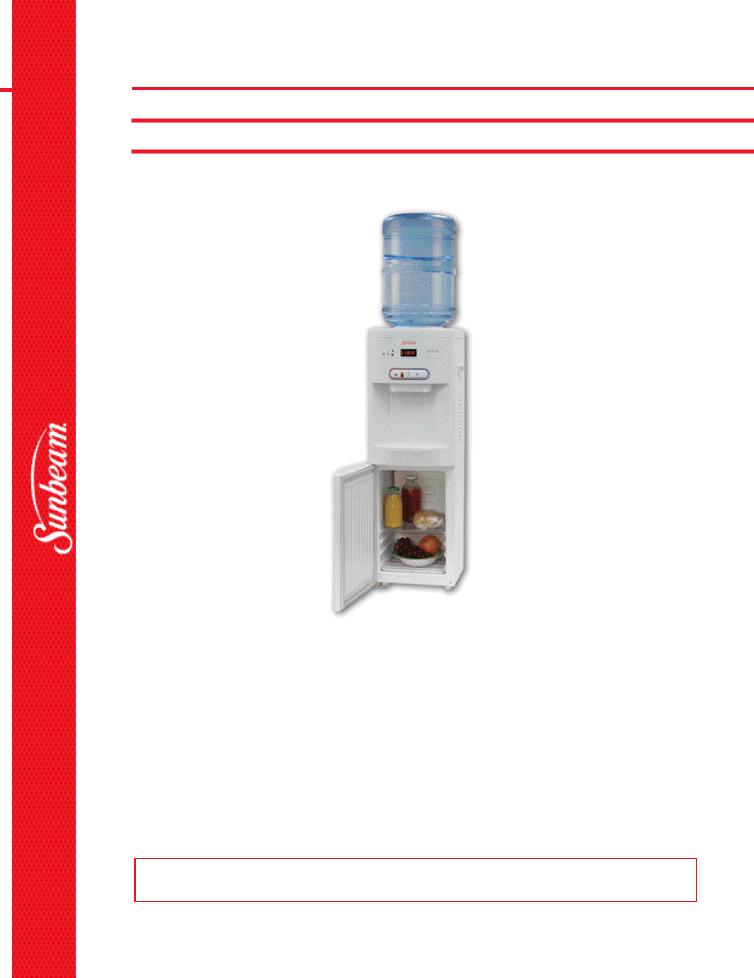
TABLE OF CONTENTS
TABLE DES MATIÈRES
ÍNDICE
0 1 6 8 / 0 1 6 9
ENGLISH |
|
|
|
|
|
|
|
|
|
~ |
|
|
|
|
|
FRANÇAIS |
|
|
|
|
|
||||
|
|
|
|
|
|
ESPANOL |
|
|||||
1. |
Electrical Safety |
2 |
|
1. |
Électricité et sécurité |
9 |
|
1. |
Electricidad y seguridad |
16 |
||
|
|
|||||||||||
2. |
Unpacking your water dispenser ............ |
3 |
|
2. |
Déballage de votre distributeur d’eau .. |
10 |
|
2. |
Desembalar su distribuidor de agua .... |
17 |
||
3. Preparing your water dispenser for use . . . . . . |
3 |
|
3. |
Préparation de votre distributeur d’eau |
|
|
3. |
Prepare su distribuidor de agua |
|
|||
4. |
Getting to know your water dispenser.... |
4 |
|
|
|
à des fins d’utilisation.......................... |
10 |
|
|
antes de usarlo.................................... |
17 |
|
5. |
Digital display ........................................ |
5 |
|
|
4 . C a ractéristiques de votre distributeur d’eau . . . . |
1 1 |
|
4 . C a racterîsticas de su distribuidor de agua . . . . . . |
1 8 |
|||
6. Water dispenser maintenance ................ |
6 |
|
|
5. Affichage numérique . . . . . . . . . . . . . . . . . . . . . . . . . . . . . . . . . . . . . . . . |
1 2 |
|
5. |
Indicador digital .................................. |
19 |
|||
7. Trouble-shooting guide .......................... |
7 |
|
6. |
Entretien du distributeur d’eau ............ |
13 |
|
6 . Mantenimiento del distribuidor de agua . . . . . . . . |
2 0 |
||||
8. |
Specifications ........................................ |
8 |
|
7. |
Directives en cas de problèmes ............ |
14 |
|
7. |
Qué hacer si tiene problemas .............. |
21 |
||
9. |
Electrical diagram .................................. |
8 |
|
8. |
Spécifications . . . . . . . . . . . . . . . . . . . . . . . . . . . . . . . . . . . . . . . . . . . . |
1 5 |
|
8. |
Características técnicas ........................ |
22 |
||
|
|
|
|
5. |
Schéma électrique .............................. |
15 |
|
9. |
Diagrama eléctrico .............................. |
22 |
||
May 20/2003 - 0168/0169 - Manual

ELECTRICAL SAFETY
When using electrical appliances, basic safety precautions should be followed to reduce the risk of f i re, electric shock, and injury to persons or property. Read all instructions before using any appliance.
•Do not let hot water touch bare skin. Keep combustible materials such as furniture, bedding, pillows, clothes, and/or papers away from the back of the unit.
•Do not operate this, or any other appliance with a damaged cord. No other appliance should be plugged into the same outlet. Be sure that the plug is fully inserted into the receptacle.
•Do not run cord over carpeting or other heat insulators. Do not cover the cord. Keep cord away from traffic areas, and do not submerge in water.
•We do not recommend the use of an extension cord as it may overheat and cause a risk of fire. If you must use an extension cord, use No. 14 AWG minimum size and rated not less than 1875 watts.
•Unplug the water dispenser before cleaning or making repairs.
•Do not plug your water dispenser into the power outlet or turn the power switches on, when the water dispenser is empty.
•Exercise caution and use reasonable supervision when the appliance is used by or near children.
•Do not use your water dispenser outdoors. Place the water dispenser away from direct sunlight and make sure that there is at least 4 inches of space between the back of your unit and the wall. Keep a minimum distance of 2 inches on each side of your unit free.
•Do not use this product to dispense anything other than water.
- 2 -
WARRANTY
Refrigeration system
and heating system: parts
and labor; two years warranty
from the date of original
purchase at retail (see enclosed
detailed warranty form).
GARANTIE
Système de refrigeration et
systeme de réchauffement: deux ans
de garantie sur pièces et main
d ’ o e u v re à partir de la date initiale
d’achat en magasin (voir la form u l e
de garantie detaillée ci-incluse).
GARANTÍA
Para el sistema de refrigeración y de
calentamiento: mano de obra y
piezas, dos años de garantía a part i r
de la fecha de compra original en
una tienda (ver el formulario de
garantía detallado que se adjunta).
If you are unable to locate the problem, please call our toll free number 1-877-383-6399 for assistance. For warranty repair, t ro u b l e - s h o o t i n g and maintenance tips p lease obtain the authorization for return and the address of the nearest service center, by calling the same toll free number.
S'il vous est impossible de localiser le problème, veuillez composer sans frais le 1 - 8 7 7 - 3 8 3 - 6 3 9 9 pour obtenir de l'assistance. Pour les réparations s o u s g a r a n t i e s , p o u r d e p l u s a m p l e s i n f o rmations concernant les problèmes et l'entretien veuillez vous procurerl'autorisation pour le retour du produit ainsi que s'adresse du c e n t re de service le plus près en téléphonant au même numéro sans frais.
Si no puede localizar el problema, llame sin cargo al 1-877-383-6399 para obtener asistencia. Para las reparaciones cubiertas por la garantía, para más información relativa a los problemas de funcionamiento y al mantenimientosírvase solicitar la autorización y la dirección del Centro de Servicio más cercano, para devolver el aparato, llamando al mismo n ú m e ro.
- 23 -
CARACTERÍSTICAS TÉCNICAS
No. 0168/0169
NO. 0168
Tensión |
C.A. 115V / 60 Hz / 7A |
||
Consumo de energía del sistema de |
4.5 A |
||
calentamiento de agua |
|||
|
|
||
Consumo de energía del compresor de |
2.5 A |
||
refrigeración |
|
|
|
Clase de fluído frigorígeno |
R-134a |
||
Cantidad de fluído frigorígeno |
65 (+/- 1g) / 2.3 oz. |
||
Capacidad de enfriamiento del agua |
2L / 67,6 fl.oz. / hora (a la tempera t u ra ambiente por debajo de 30°C/86°F enfría a 10°C/50°F) |
||
Capacidad de calentamiento del agua |
5L / 169,1fl.oz. / hora (a la tempera t u ra ambiante por encima de 20°C/68°F calienta a 90°C/194°F) |
||
Te m p e ra t u ra de enfriamiento del compartimento frío |
0°C - 10°C / 32°F - 50°F |
||
Volumen de almacenamiento del compartimiento frío |
0,60 pies cúbicos / 17 litros |
|
|
Peso neto |
51 lbs / 23.13 Kg |
|
|
Dimensiones |
13” x 16” x 37.5” (33.02 x 40.64 x 95.25 cm) |
|
|
N OTA : El número de modelo UL indicado en la parte tra s e ra del aparato hace re f e rencia al distribuidor de agua y compartimento frío Sunbeam.
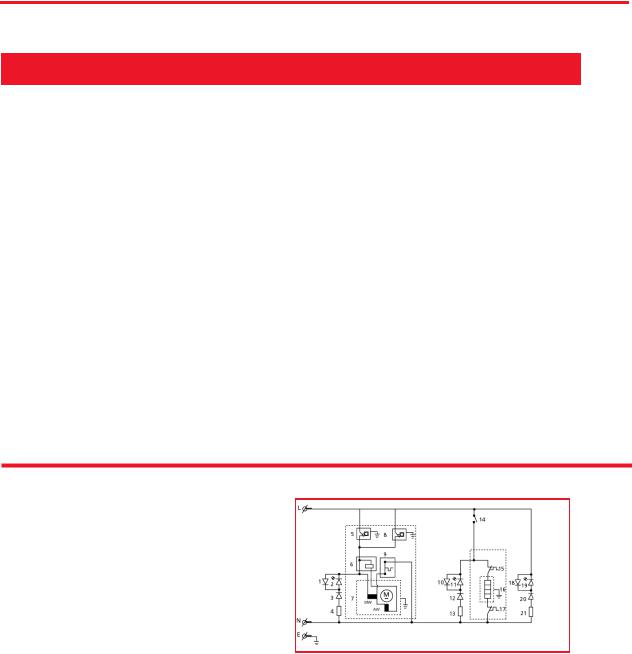
DIAGRAMA ELÉCTRICO
1.Diodo protector del indicador luminoso (LED)
2.Indicador luminoso (LED) de enfriamien to en marcha
3.Diodo del indicador luminoso (LED)
4 . Resistencia del indicador luminoso (LED)
5.Termostato de refrigeración de agua fría
6.Arranque PTC del compresor
7.Compresor de refrigeración
8.Termostato de refrigeración del refrigerador
9. Protector térmico del compresor de refrigera c i ó n
10. |
Diodo protector del indicador luminoso (LED) |
18. |
Diodo protector del indicador luminoso (LED) |
1 1 . |
Indicador luminoso (LED) de calentamiento en marcha |
1 9 . |
I n d i ca d o r l u m i n os o d e a pa ra t o encendido (LED) |
12. |
Diodo del indicador luminoso (LED) |
20. |
Diodo del indicador luminoso (LED) |
13. |
Resistencia del indicador luminoso (LED) |
21. |
Resistencia del indicador luminoso (LED) |
14.Interruptor digital del sistema de calentamiento
15.Termostato para el agua caliente (85 grados centígrados)
16.Sistema de calentamiento
17. Termostato automático para el agua caliente (95 grados centígrados)
- 22 -
UNPACKING YOUR WATER DISPENSER
No. 0168/0169
ongratulations, you have acquired a high quality SUNBEAM® Water Dispenser for bottled water. This unit is packed with
C many extra features, that you will find convenient to use. Multi-temperature capability allows you to enjoy a cool or hot drink. It will provide you with many years of trouble free use, by following the simple instruct i o n s c on tain ed in th is man ual. P lease take the time to read it c arefu lly.
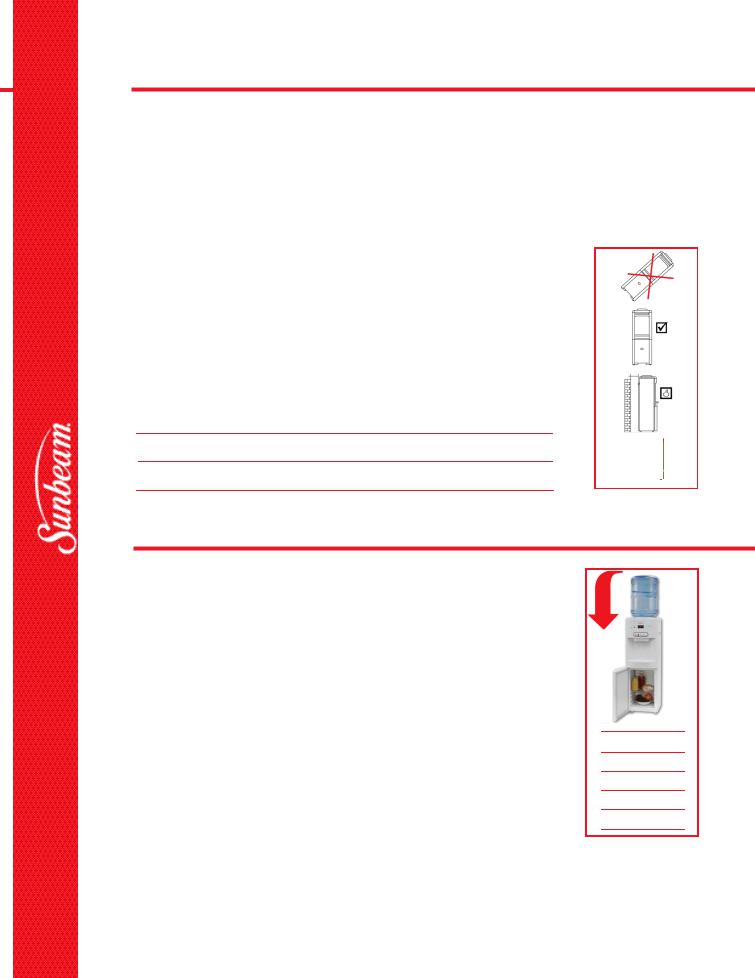
1 ) Remove the water dispenser from the cardboard box without turning it upside down, or laying it on its side.
a.Remove the strapping.
b.Open the box.
c . Remove the styrofoam packing inserts from the box .
d.Pull the water dispenser straight up from the box.
e.Remove the plastic bag.
The refrigeration compressor has very sensitive mounts inside of its welded shell in order to provide quiet running. Improper handling may damage the compressor.
2)Wipe it clean if necessary.
3)Find a location for your water dispenser that is protected from direct sunlight and other sources of heat. Place the water dispenser on a level surface. Make sure that there is at least 4 inches of space between the back of your water dispenser and the wall. Keep a minimum distance of 2 inches on each side of your water
dispenser free. |
4 in. |
4) Do not plug your water dispenser into the power |
min |
|
|
outlet yet! Read the instructions first. |
|
This water dispenser is for indoor use only.
Room temperature should not exceed 97°F / 36°C.
P R E PARING YOUR WATER DISPENSER FOR USE
1) Make sure that the water dispenser is not plugged into the electrical outlet.
2) |
Hold |
the water |
bottle |
vertically and upside down and place |
the water |
bottle |
into |
the no-spill |
|
bottle |
receptacle. |
Apply |
slight pressure in order to pierce the |
bottle cap |
with |
the |
spigot. It is |
|
not advisable to make any adjustments to the thermostat settings before the water dispenser and bottled water |
|||||||
|
are warmed up to normal room temperature. This unit accepts two, three or five gallon water bottles with with |
|||||||
|
piercable sealed caps. |
|
|
|
|
|
||
3 ) |
Press the buttons in to let the air out, until the water starts to flow. When this happens, release the buttons. |
|
||||||
4)Plug the water dispenser into a grounded power outlet and turn the power switch on.
5)If the water dispenser is brought in from outside in the winter time, give it a few hours to warm up to room
temperature before plugging it in. The thermostat setting may be affected by the coldness of the water dispenser itself or the bottled water.
•The refrigeration thermostat is factory set between 7ºC and 8ºC (44.6ºF and 46.4ºF).
•The hot water thermostat is factory set between 88ºC and 89ºC (190.4ºF and 192.2ºF).
• The hot and cold indicator lights will be on while the system is working. Once the desired temperatures have been reached, the lights will go off.
•If you choose to set the cold water thermostat to the lowest setting, it may take over one hour to cool the water down to the coldest setting.
•Before the water dispenser leaves the factory, the thermostat is set properly. It is not advisable to adjust the thermostat when using the water dispenser for the first time.
N OT E : When your water dispenser is in operation there is a small amount of water in the water passage between the water tanks and the taps. This water is not controlled by the cold, hot or room
t e m p e ra t u re settings. We recommend that in order to fully enjoy the desired water setting, you
should eliminate this small amount, 200ml - 400ml (6.76 fl.oz - 13.52 fl.oz) using a small glass container.
PLACE
BOTTLE
VERTICALLY
STRAIGHT
DOWN
- 3 -
 Loading...