


GAS COOKTOPS
USE & CARE INFORMATION
GUÍA DE USO Y MANTENIMIENTO
GUIDE D’UTILISATION ET D’ENTRETIEN
INFORMAZIONI SU USO E MANUTENZIONE
BEDIENUNGSUND PFLEGEANLEITUNG

E N G L I S H
Wolf Gas Cooktops |
5 |
Safety Instructions and Precautions |
6 |
Wolf Gas Cooktop Features |
10 |
Wolf Gas Cooktop Use & Care |
12 |
Wolf Troubleshooting Guide |
19 |
Wolf Service Information |
20 |
E S P Ã N O L
Placas de gas de Wolf |
22 |
Precauciones e instrucciones de seguridad |
23 |
Características de las placas de gas de Wolf |
27 |
Uso y mantenimiento de la placa de gas |
|
de Wolf |
29 |
Guía de localización y solución de problemas |
|
de Wolf |
36 |
Información de mantenimiento de Wolf |
37 |
F R A N Ç A I S
Plaques de cuisson au gaz Wolf |
39 |
Instructions et mesures de sécurité |
40 |
Caractéristiques des plaques de cuisson |
|
au gaz Wolf |
44 |
Utilisation et entretien de la plaque de |
|
cuisson au gaz Wolf |
46 |
Guide de dépistage des pannes Wolf |
53 |
Service après-vente Wolf |
54 |
I TA L I A N O
Piani cottura a gas Wolf |
56 |
Precauzioni e istruzioni di sicurezza |
57 |
Funzioni dei piani cottura a gas Wolf |
61 |
Uso e manutenzione dei piani cottura |
|
a gas Wolf |
63 |
Guida alla soluzione dei problemi Wolf |
70 |
Informazioni sull’assistenza Wolf |
71 |
I N H A LT
Gaskochmulden von Wolf |
77 |
Sicherheitshinweise und Vorsichtsmaßnahmen |
78 |
Leistungsmerkmale der Gaskochmulden von Wolf |
82 |
Bedienung und Pflege von Gaskochmulden |
|
von Wolf |
84 |
Anleitung zur Fehlersuche von Wolf |
91 |
Serviceinformationen von Wolf |
92 |
3
As you read this Use & Care Information, take particular note of the CAUTION and WARNING symbols when they appear.
This information is important for safe and efficient use of the Wolf equipment.
signals a situation where minor injury or product damage may occur if you do not follow instructions.
states a hazard that may cause serious injury or death if precautions are not followed.
In addition, this Use & Care Information may signal an IMPORTANT NOTE which highlights information that is especially important.
WOLF® is a registered trademark of Wolf Appliance, Inc.
W O L F G A S CO O K TO P S
T H A N K YO U
Your purchase of a Wolf gas cooktop attests to the importance you place upon the quality and performance of your cooking equipment. We understand this importance and have designed and built your cooktop with quality materials and workmanship to give you years of dependable service.
We know you are eager to start cooking, but before you do, please take some time to read this Use & Care Information. Whether you are a beginning cook or an expert chef, it will be to your benefit to familiarize yourself with the safety practices, features, operation and care recommendations of the Wolf gas cooktop.
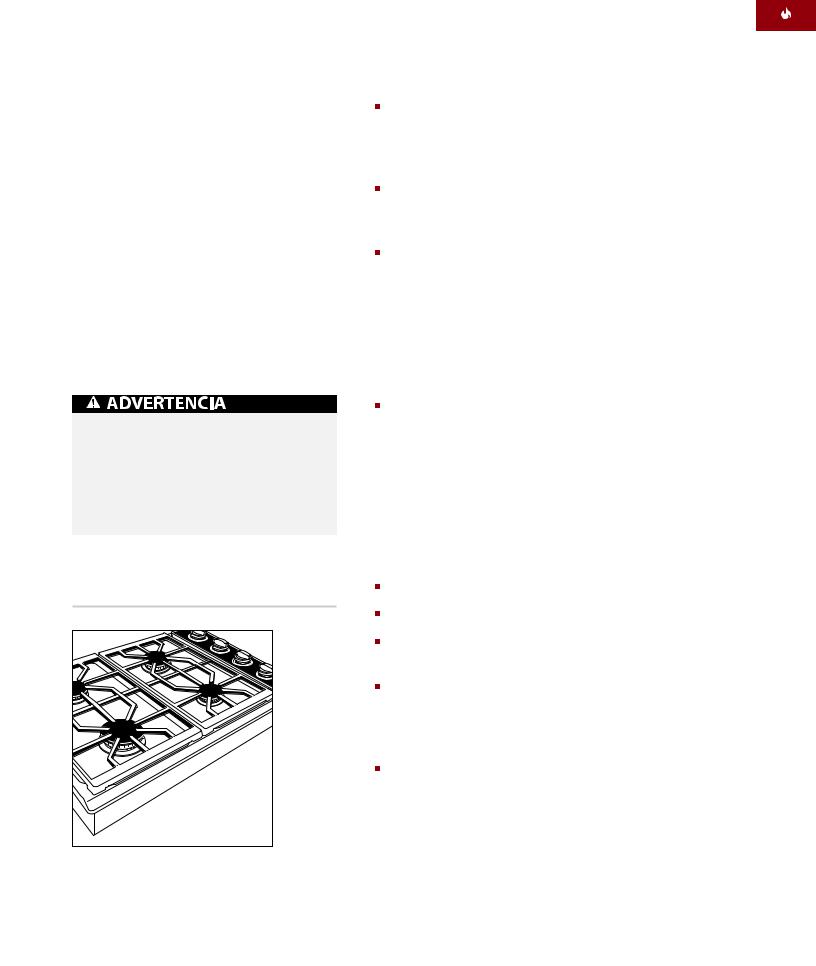
If service is necessary, refer to the model and serial number of the gas cooktop. Both
numbers are listed on the product rating plate located on the underside of the cooktop. Refer to the illustration below.
This appliance shall be installed in accordance with the regulations in force and only used in a well ventilated space. Read the instructions before installing or using this appliance.
Location of rating |
plate under cooktop |
Rating plate location
IMPORTANT NOTE:
Installation and service must be performed by a qualified installer, service agency or the gas supplier.
Do not store or use gasoline or other flammable vapors and liquids in the vicinity of this or any other appliance.
The use of a gas cooking appliance results in the production of heat and moisture in the room in which it is installed. Ensure that the kitchen is well ventilated; keep natural ventilation holes open or install a mechanical ventilation device (mechanical extractor hood).
Prolonged intensive use of the appliance may call for additional ventilation, for example opening of a window, or more effective ventilation, for example increasing the level of mechanical ventilation where present.
WHAT TO DO IF YOU SMELL GAS:
Do not try to light any appliance.
Do not touch any electrical switch.
Do not use any phone in your building.
Immediately call your gas supplier from a neighbor’s phone. Follow the gas supplier’s instructions.
If you cannot reach your gas supplier, call the fire department.
C O N TA C T
I N F O R M AT I O N
Website:
wolfappliance.com
5

S A F E T Y I N S T R U C T I O N S A N D P R E C A U T I O N S
W H AT TO D O
IMPORTANT NOTE: Read all instructions before using this appliance.
Read this Use & Care Information carefully before using your new cooktop to reduce the risk of fire, electric shock or injury to persons.
Ensure proper installation and servicing. This appliance must be properly installed and grounded by a qualified technician. Learn how and where to turn off the gas to the cooktop.
Before performing any service, turn off the gas supply and unplug the cooktop electrical power cord from the wall receptacle.
Keep igniters clean and dry for proper lighting and performance of the burners.
In the event that a burner goes out and gas escapes, open a window or a door. Wait at least five minutes before using the cooktop.
Adequate supply of air. Your kitchen must provide an adequate supply of fresh air to ensure proper combustion and ventilation.
Start the ventilation hood approximately five minutes before cooking on the cooktop; this establishes an air curtain, and improves the capture of vapor and moisture.
Wear proper apparel. Never let loose clothing or other flammable materials come in contact with the burners while in operation. Fabric may ignite and cause personal injury.
6

W H AT TO D O
Always use dry pot holders when removing pans from the cooktop.
Wet or damp pot holders can cause steam burns. Do not use a towel or bulky cloth in place of pot holders.
Choose pans with easily grasped handles that will stay cool while cooking. Refer to Cookware Selection on page 16.
When cooking, set burner controls so that the flame does not extend beyond the bottom of the pan.
Always turn panhandles inward so they do not extend over adjacent work areas, burners or the edge of the cooktop.
Always check the positions of the control knobs to make certain the cooktop is off when you are finished cooking.
When deep fat frying, be sure that the pan is large enough to accommodate the desired volume of food without overflow caused by bubbling of the fat. Never leave a deep fat fryer unattended. Avoid deep fat frying of moist or frostcovered foods, as foods with high water content may cause spattering or spilling of the hot fat. Heat fat slowly, and stir together any combinations of oils and fats prior to applying heat. Use a deep fat frying thermometer to avoid heating the fat to temperatures above the flash point.
Always light each burner prior to placing a pan on the burner grate.
Also, turn the control knob to the  position before removing a pan from the burner grate.
7

S A F E T Y I N S T R U C T I O N S A N D P R E C A U T I O N S
W H AT N OT TO D O
Do not repair or replace any part of the cooktop unless specifically recommended in literature accompanying this appliance. All service should be referred to a qualified technician.
Do not obstruct the flow of combustion and ventilation air.
Do not use aluminum foil to line any part of the cooktop.
Never use the cooktop to warm or heat the room.
Do not store flammable materials near burners or let grease or other flammable substances accumulate on the cooktop.
Do not use abrasive or caustic cleaners or detergents on this appliance as these may cause permanent damage. Do not use aerosol cleaners as these may be flammable or cause corrosion of metal parts.
Do not store or use gasoline or other flammable vapors and liquids in the vicinity of this or any other appliance.
Keep appliance area clear and free from combustible material.
Do not block or obstruct the holes in the cooktop surface below the control knobs. Blocking these holes may affect burner operation and may result in a hazard.
When using the cooktop, do not touch the grates, burner caps, burner bases or any other parts in proximity to the flame. These components may be hot enough to cause burns.
If the cooktop is near a window, do not use long curtains as a window treatment, as they could blow over the cooktop and create a fire hazard.
Do not leave children alone or unattended in the area where the cooktop is in use. Never allow children to sit or stand on the appliance. Do not let children play with the cooktop.
Do not store items of interest to children above or at the back of the cooktop, as they could climb on the appliance to reach items and be injured.
8

W H AT N OT TO D O
Do not use water on grease fires.
Smother the flame or use a dry chemical or foam-type extinguisher.
Never leave the appliance unattended when in use. Boilovers and greasy spills may smoke or ignite.
Do not cover the burners and grates with anything except properly selected utensils. Decorative covers should not be used.
Do not heat unopened food containers such as baby food jars and cans. Pressure buildup may cause the container to burst and cause injury.
Do not clean the cooktop while it is still hot. If using a damp sponge or cloth, wait until the cooktop has cooled sufficiently to prevent steam burns. Also, some cleaners can produce harmful or unpleasant fumes if applied to hot surfaces. Refer to Care Recommendations on page 17.
S A F E T Y P R E C A U T I O N S
TO REDUCE THE RISK OF INJURY TO PERSONS IN THE EVENT OF A COOKTOP GREASE FIRE, OBSERVE THE FOLLOWING:
Smother flames with a closefitting lid, baking sheet or other metal tray, then turn off the gas burner. Be careful to prevent burns. If the flames do not go out immediately, evacuate and call the fire department.
Do not use water on grease fires.
Never pick up a flaming pan— you may be burned.
9
Model ICBCT15G
Model ICBCT30G
Model ICBCT36G
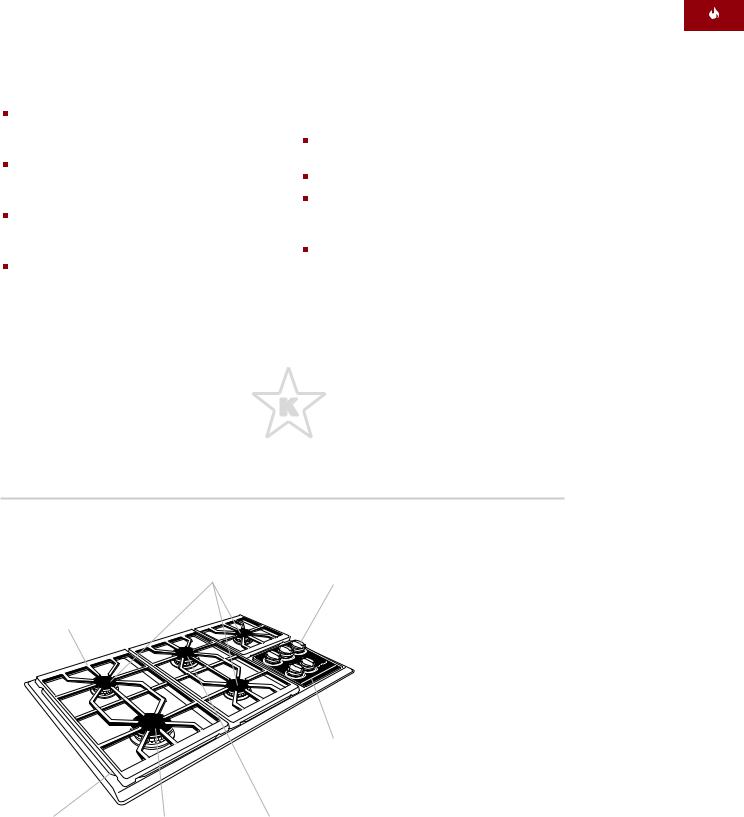
W O L F G A S CO O K TO P F E AT U R E S
G A S CO O K TO P F E AT U R E S
Available in natural (I2H, I2E and I2E+) and LP (I3P) gas
Stainless steel top construction
Dual-stacked, sealed burners with automatic reignition on all settings
Individual spark ignition system
Illuminated control panel with two-tiered control knobs
True Simmer setting on all burners
Low-profile, cast iron continuous burner grates with matte porcelain finish
Seamless drawn burner pan
CE certified as a Class 3 appliance
Certified for the following appliance category and adjusted to the gas type and pressure:
I3P – G31 at 37 mbar I2E – G20 at 20 mbar
I2E+ – G20/25 at 20/25 mbar I2H – G20 at 20 mbar
3 8 1 m m G A S C O O K T O P
One medium 3.8 kW (276 g/h) sealed burner with .2 kW (14.5 g/h) delivered at simmer
One small 3.0 kW (218 g/h) sealed burner with .1 kW (7.3 g/h) delivered at simmer
Gas rating: 6.8 kW (NAT) and 494 g/h (LP)
7 6 2 m m G A S C O O K T O P
One large 4.9 kW (356 g/h) sealed burner with .2 kW (14.5 g/h) delivered at simmer
One medium 3.8 kW (276 g/h) sealed burner with .2 kW (14.5 g/h) delivered at simmer
Two small 3.0 kW (218 g/h) sealed burners with .1 kW (7.3 g/h) delivered at simmer
Gas rating: 14.7 kW (NAT) and 1069 g/h (LP)
|
M O D E L I C B C T 1 5 G |
M O D E L I C B C T 3 0 G |
|
|
381 mm Gas Cooktop |
762 mm Gas Cooktop |
|
|
Medium 3.8 kW |
Small 3.0 kW |
Two-tiered |
|
(276 g/h) burner |
(218 g/h) burners |
control knobs |
Low-profile, |
Two-tiered |
Low-profile, |
|
continuous grates |
control knobs |
continuous grates |
|
|
Illuminated |
|
|
Illuminated |
|
control panel |
|
|
control panel |
Seamless drawn |
Small 3.0 kW |
Seamless drawn |
Large 4.9 kW |
Medium 3.8 kW |
burner pan |
(218 g/h) burner |
burner pan |
(356 g/h) burner |
(276 g/h) burner |
10
W O L F G A S CO O K TO P F E AT U R E S
G A S CO O K TO P F E AT U R E S
9 1 4 m m G A S C O O K T O P
One large 4.9 kW (356 g/h) sealed burner with .2 kW (14.5 g/h) delivered at simmer
One medium 3.8 kW (276 g/h) sealed burner with .2 kW (14.5 g/h) delivered at simmer
Three small 3.0 kW (218 g/h) sealed burners with .1 kW (7.3 g/h) delivered at simmer
Gas rating: 17.7 kW (NAT) and 1287 g/h (LP)
G A S CO O K TO P A C C E S S O R I E S
These optional accessories are available through your Wolf dealer.
One-piece wok and single burner grate (Models ICBCT30G and ICBCT36G)
Filler strip
Bracket supports for installation of two integrated modules with a downdraft ventilation system (Model ICBCT15G)
High altitude conversion kit
These appliances are certified by Star-K to meet strict religious regulations in conjunction with specific instructions found on www.star-k.org.
M O D E L I C B C T 3 6 G
914 mm Gas Cooktop
Small 3.0 kW |
Two-tiered |
(218 g/h) burners |
control knobs |
Low-profile, continuous grates
Illuminated control panel
Seamless drawn |
Large 4.9 kW |
Medium 3.8 kW |
burner pan |
(356 g/h) burner |
(276 g/h) burner |
A C C E S S O R I E S
Optional accessories are available through your Wolf dealer.
11
W O L F G A S CO O K TO P U S E & C A R E
|
I L L U M I N AT E D CON T R O L PA N E L |
C O N T I N U O U S G R AT E S |
|
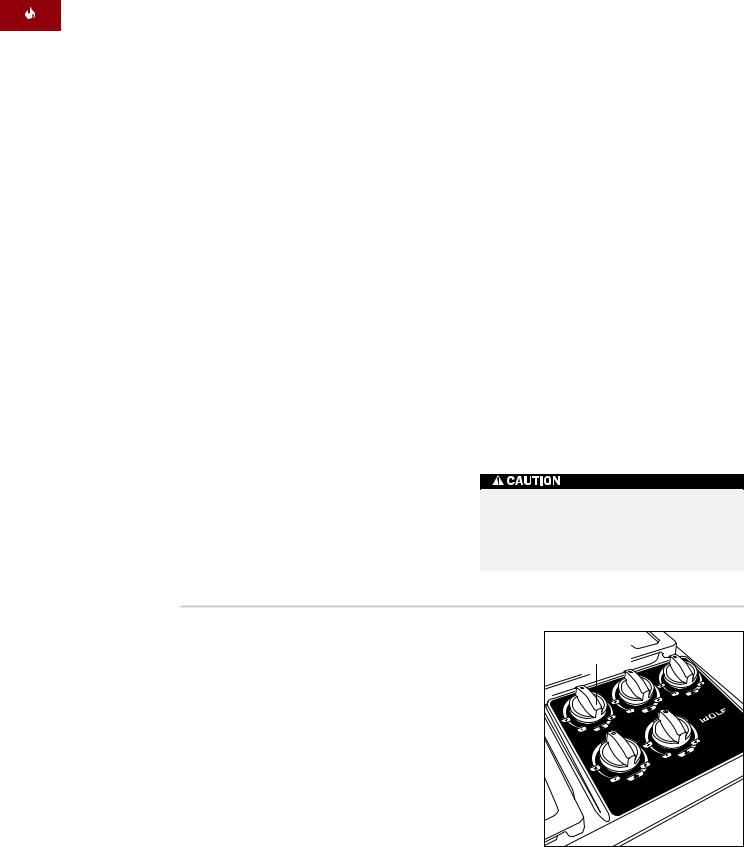
The control panel of your gas cooktop is illuminated for instant visual indication that any one or more burners are in use. It is a safety signal reminding you that a flame is on and active.
The illustration below shows the control panel of the 914 mm gas cooktop.
CON T R O L K N O B S
Each control knob is positioned to correspond to the burner regulated.
For the 381 mm and 914 mm cooktops, the knob on the lower left side regulates the lower left burner. Conversely, the knob on the upper right side regulates the upper right burner. The illustration below shows the configuration of the control knobs for the 914 mm gas cooktop.
Each knob on the 762 mm cooktop control panel has a diagram above it. The diagram shows which burner it regulates.
It is normal for the knobs to be slightly raised above the surface. This space is an air inlet necessary for good combustion of gas. Each knob rests on a valve stem with a rubber grommet at the base. This design prevents liquid spills from dripping into the controls below the burners.
The continuous low-profile cast iron grates of your gas cooktop are designed for a close fit. This enables you to move pans easily from one burner to another without having to lift the pan or have it tip over between the grates. Each grate sets securely on dimples on each corner of the burner pan. Refer to the illustration below.
For the 762 mm and 914 mm gas cooktops, the continuous grates are interchangeable with each other, with the exception of the single grate on the 914 mm cooktop.
Illuminated |
Control Panel |
Control panel for Model ICBCT36G
Continuous Grate |
Burner Pan |
Grate Feet |
Continuous grates
12
W O L F G A S CO O K TO P U S E & C A R E
S U R FAC E B U R N E R S
A spark electrode ignites each surface burner. This control eliminates the need for continuous open flame pilots. For added safety and convenience, each burner is designed with an electronic reignition system. This feature enables any burner to relight automatically in the event it is accidentally extinguished.
A distinguishing feature of Wolf’s low kW control is its constant, low heat output without continuous ignitions. The flame diameter remains full size; only the heat output is lowered. This patented dual-stacked burner design makes it possible to enjoy cooking at full flame as well as maintain control while simmering at the lowest flame setting.
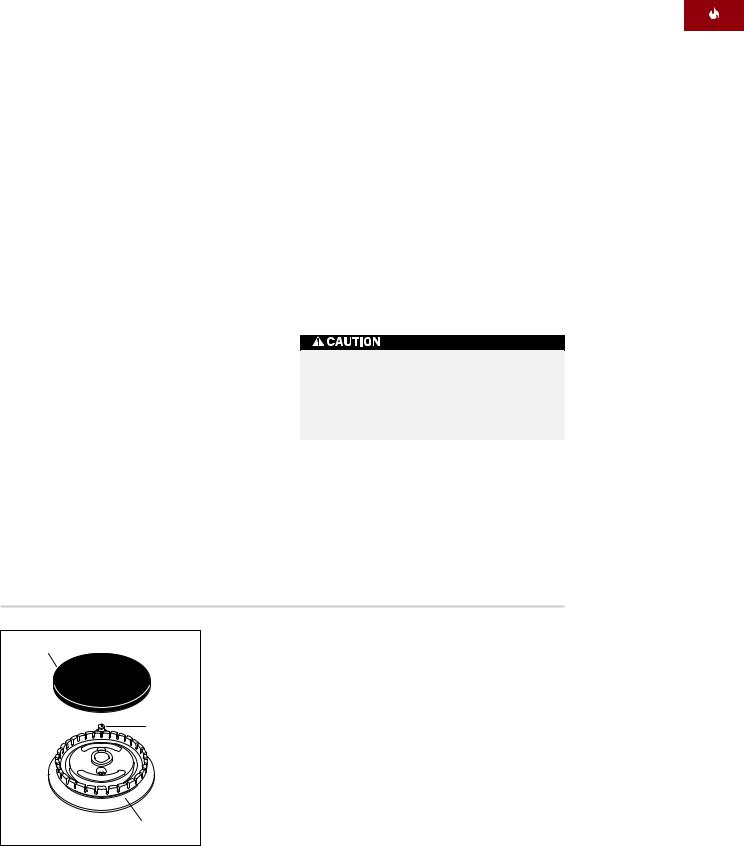
D U A L - S TA C K E D B U R N E R A S S E M B LY
The unique dual-stacked burner design of your gas cooktop combines all of the burner parts in one assembly.
After cleaning or removing burner parts for any reason, it is extremely important that you reassemble burners correctly.
The burner cap has a groove in the bottom, which allows the cap to fall into place when moved around the top of the burner. The cap should be flat relative to the burner when in the proper orientation. Failure to do this will result in a poor flame. Refer to the illustration below.
Failure to position the burner parts correctly could cause flames or gas to escape, causing heat damage to your cooktop, or burn between parts, resulting in poor combustion.
Burner Cap
Igniter
Sealed Burner
Dual-stacked burner assembly
13
W O L F G A S CO O K TO P U S E & C A R E
B E F O R E U S I N G YO U R C O O K T O P
Before using for the first time, you should clean your gas cooktop thoroughly with hot water and a mild detergent. Rinse and dry with a soft cloth. This removes any residual oil and grease left on the surface from the manufacturing process. Apply a stainless steel polish to protect the finish and add luster. Refer to Care Recommendations on page 17.
IMPORTANT NOTE: Before using your gas cooktop, check that the surface burner caps are positioned correctly.
CON T R O L K N O B O P E R AT I O N
Each burner has full flame and full simmer capabilities. Knobs are designed as two-tiered ”push-to-turn” knobs. One tier is used for  through
  flame settings; the second tier controls
  settings. Refer to the illustration below. Although this is a child-safe design, children should never be left unattended in the kitchen when the cooktop is in use.
To light a burner, push down and turn the corresponding control knob counterclockwise to the  setting. You will hear a clicking sound and see the burner ignite. Once the burner is lit, continue turning the knob counterclockwise to any one of the settings—
  through
  .
.
To select a SIMMER setting, turn the burner knob to the  setting; you will feel a stop detent in the knob rotation. Push down on the knob, continuing to turn it counterclockwise. This moves it to the second tier. Now, select any variation within the SIMMER flame settings—
 through
  .
.
Never leave pans on a  setting unattended. Be particularly cautious when cooking food in fat or grease. It can become hot enough to ignite.
Two-Tiered |
Control Knobs |
Two-tier burner control knobs
14

W O L F G A S CO O K TO P U S E & C A R E
F LA M E H E I G H T A N D A P P E A R A N C E
Select a flame that is just high enough to maintain the desired cooking speed and is sized to fit the base diameter of the pan. Never extend the flame beyond the base of the pan.
The flame on natural gas should be blue with a deeper blue core. There should be minimal trace of a yellow flame. A yellow flame indicates an improper mixture of air and gas or impurities in the gas supply to the range. If this occurs consistently, call a Wolf authorized service center to adjust the mixture. With LP gas, some yellow tipping to the flame is acceptable and may not require an adjustment. Refer to the illustration below.
Large burner on  setting
15

W O L F G A S CO O K TO P U S E & C A R E
CO O K WA R E S E L E C T I O N
For best results, we recommend mediumto heavy-weight pans that have a flat base, metal handle and a good-fitting cover.
Look for pans that are made of materials with good heat conductivity, such as aluminum and copper. These metals are sometimes found ”sandwiched” between the inner and outer layers of the pan. If present, whether visible from the outside or not, they aid in evenly conducting heat.
Use the following guidelines when selecting cookware:
Griddles or open roasters that span two burners are suitable, providing they are not warped.
When a large pan is centered over a burner, the diameter should not exceed 254 mm.
When using pans made of cast iron, enameled steel or glass ceramic, or coated with a nonstick finish, select lower flame settings. High heat applied to such materials will cause ”hot spots,” scorching and burning.
Cover pans while cooking; covers improve cooking efficiency. Water boils faster, using less fuel, and the kitchen stays cooler.
Select high-sided (deep) pans rather than ones with very wide bases and low sides. High sides will minimize liquids boiling over the pan.
Pans with oversize bases that extend beyond the cooktop frame should not be used. On  settings, heat may be trapped beneath the pan, causing permanent damage to the surface finish.
Use the front burners for larger pans. The pans are easier to handle, especially when hot.
Use a wok with a flat bottom.
16

W O L F G A S CO O K TO P U S E & C A R E
C A R E R E C O M M E N D AT I O N S
|
C O M P O N E N T |
C A R E R E C O M M E N D AT I O N |
||
|
|
|
|
|
|
Exterior Surface |
CAUTION: Make sure the gas cooktop is off and all surfaces are cool before |
||
|
Stainless steel |
cleaning any part of the cooktop. |
||
|
Burner Pan |
Although stainless steel is resistant to most stains, it is not totally |
||
|
Stainless steel |
impervious to damage. Salt and some cooking liquids may pit and stain the |
||
|
|
surface. Always remove these spills immediately. |
||
|
|
General care: Use a clean cloth or sponge; wipe with warm water and a mild |
||
|
|
dish detergent. Rinse and dry immediately. |
||
|
|
Exterior finish: To clean the exterior of a classic or platinum stainless steel |
||
|
|
model, use a soft, nonabrasive stainless steel cleaner and apply with a soft, |
||
|
|
lint-free cloth. |
||
|
|
Spray degreasers: Spray on a cloth and wipe surface to remove fingerprints |
||
|
|
and greasy spatters. Buff dry immediately to avoid streaking. |
||
|
|
Hard water stains: Use white vinegar and water. |
||
|
|
Do not use abrasive cleaners; they will permanently scratch the surface. |
||
|
|
Do not use steel wool pads. |
||
|
|
|
|
|
|
Burner Cap |
Cool first. Wash in warm water and liquid detergent or mild abrasive cleaner. |
||
|
Porcelain enamel |
Foods high in acid or sugar content, such as milk, tomatoes, sauerkraut, fruit |
||
|
|
|||
|
|
juices or pie filling, may pit or craze the surface. Remove as soon as possible |
||
|
|
before heating again. |
||
|
|
Never wipe a warm or hot porcelain surface with a damp sponge; it may |
||
|
|
cause chipping or crazing (tiny hairlike cracks). |
||
|
|
|
|
|
|
Burner Grates |
Remove from cooktop and place on a flat surface near the sink to clean. |
||
|
Porcelain-coated |
Nonabrasive cleaners: Hot water and liquid detergent or a paste of baking |
||
|
cast iron |
|||
|
soda and water; use a plastic pad or sponge. |
|||
|
|
|||
|
|
Mild abrasive and abrasive cleaners: Use sparingly. |
||
|
|
|
|
|
|
Control Knobs |
To remove, slip the edge of a dish towel under the knob; pull edges together. |
||
|
Chrome-plated |
Using the towel for leverage, lift up, pulling the knob off the valve stem. |
||
|
|
General care: Wipe each knob with damp cloth and mild soap and water; |
||
|
|
rinse and dry. Never soak or use abrasive cleaners; they will scratch the |
||
|
|
finish and remove the markings. |
||
|
|
|
|
|
|
Control Panel |
Spray cleaners: Removes fingerprints and greasy food soils. Spray first on |
||
|
Tempered glass |
a cloth before wiping panel. |
||
|
|
|
|
|
|
Spark Igniters |
Keep dry; never spray water or cleaner directly on the igniter. When cleaning |
||
|
Ceramic |
around the surface burner, be careful that the cloth does not catch on the |
||
|
|
igniter and damage it. |
||
|
|
|
|
|
17
W O L F G A S CO O K TO P U S E & C A R E
C O O K TO P C L E A N I N G T I P S
Wait until surfaces are cool before cleaning.
For best results, wipe up spills and spatters as they occur and immediately after the cooktop has cooled. If splatters are allowed to cook on, they may permanently damage or stain the finish.
If in doubt about using one of your cleaners, check the label. To check if it is safe to use on your cooktop, try a small amount on an inconspicuous area using very light pressure.
Use caution when spraying cleaners. Some contain caustic ingredients that can damage adjacent parts and finishes. Protect the adjacent parts by masking them off so that the overspray is contained to the finish being cleaned.
Do not spray cleaners on electrical controls, igniters, wires or knob valve stems.
S TA I N L E S S S T E E L F I N I S H
For the stainless steel exterior finish, use a soft, nonabrasive stainless steel cleaner and apply with a soft lint-free cloth.
To bring out the natural luster of both finishes, lightly wipe the surface with a water-dampened microfiber cloth, followed with a dry microfiber cloth. All work should follow the grain direction of the finish. Better results are obtained by keeping the cloth in continuous contact with the metal.
Under no circumstances should you use a metallic or highly abrasive cleaner or cloth, as this will permanently scratch the surface.
DO NOT use abrasive cleaners on your cooktop; they will permanently scratch the surface.
18
W O L F T R O U B L E S H O OT I N G G U I D E
T R O U B L E S H O OT I N G G U I D E
P R O B L E M |
P O S S I B L E S O L U T I O N |
|
|
Burner flame does not |
Reposition the burner cap of the stacked sealed burner assembly |
burn evenly |
as described on page 13. |
Food boils or burns in one area of the pan and not the other
Placement of pan on the grate is not centered above the burner.
Pan material does not conduct heat evenly.
Base of pan is warped and does not rest flat on the grate or handle of pan is too heavy and tips pan toward handle.
Countertop or cooktop cabinet is not level.
Burner fails to ignite |
Ceramic igniter is damp from a spillover or spray cleaner. Allow |
|
ceramic to dry out completely. |
|
Burner head ports are blocked. Use a straightened, metal paper |
|
clip to open the blockage. |
|
If a GFCI circuit is used, check to see if it has been tripped. |
Burners extinguish themselves when using more than one large roaster or griddle simultaneously
Good gas combustion requires the correct amount of airflow to maintain the flame. Using two oversize pans simultaneously restricts air movement.
Food boils out of the pan and overflows into the burner pan
Heat setting is too high or pan size is too small for its contents.
Water does not come to |
Water temperature is colder than usual. |
|
a boil fast enough |
Cover pan for most efficient use of the |
setting. |
|
||
|
Diameter of pan is too large or base of pan is warped. |
|
|
|
|
Food cooks too slowly |
Too much food is added at one time; reduce amount of food and |
|
when sautéing |
sauté in batches. |
|
|
Size of food pieces is too large or temperature of food is colder |
|
|
than usual. |
|
|
Pan does not conduct heat evenly. |
|
|
|
|
Simmer setting does not |
Delicate foods may need a lower simmer setting so that scorching |
|
maintain constant surface |
does not occur. |
|
bubbles |
|
|
|
|
|
19

C O N TA C T
I N F O R M AT I O N
Website:
wolfappliance.com
W O L F S E R V I C E I N F O R M AT I O N
S E R V I C E I N F O R M AT I O N
When requesting information, literature, replacement parts or service, always refer to the model and serial number of your cooktop. Both numbers are listed on the product rating plate located on the underside of the cooktop. Refer to the illustration on page 5. Record the rating plate information below for future reference.
Model Number
Serial Number
Installation Date
Wolf Dealer and Phone
B E F O R E C A L L I N G F O R S E RV I C E
Before calling your Wolf dealer or regional distributor, refer to the Troubleshooting Guide on page 19. Check the household fuse or circuit breaker to see if it has been blown or tripped and that the electrical connection to the appliance has not been disconnected. A power outage may also have caused a disruption in service.
The information and images in this book are the copyright property of Wolf Appliance, Inc., an affiliate of Sub-Zero, Inc. Neither this book nor any information or images contained herein may be copied or used in whole or in part without the express written permission of Wolf Appliance, Inc., an affiliate of Sub-Zero, Inc.
©Wolf Appliance, Inc. all rights reserved.
20

Cuando lea esta guía de uso y mantenimiento, deberá prestar especial atención cuando aparezcan los símbolos de PRECAUCIÓN y ADVERTENCIA. Esta información es importante para utilizar de forma segura y eficaz el equipo de Wolf.
 PRECAUCIÓN
indica una situación en la que se pueden sufrir heridas leves o provocar daños secundarios al producto si no se siguen las instrucciones.
indica peligro de que se produzcan heridas perso-nales graves o incluso puede provocar la muerte si no se siguen las precauciones especificadas.
Además, esta guía de uso y mantenimiento puede incluir una NOTA IMPORTANTE para resaltar información especialmente importante.
WOLF® es una marca comercial registrada de Wolf Appliance, Inc.
P LAC A S D E GA S D E W O L F
G R A C I A S
La compra de una placa de gas de Wolf confirma la importancia que usted da a la calidad y al rendimiento de su equipo de cocina. Entendemos esta importancia y hemos diseñado y creado la placa con materiales y mano de obra de primera calidad para proporcionarle un servicio seguro y eficaz durante muchos años.
Sabemos que está deseando empezar a cocinar pero, antes de hacerlo, debe leer esta guía de uso y mantenimiento. Tanto si es un cocinero novato como si es un chef experto, le resultará útil familiarizarse con las prácticas de seguridad, las características, el funcionamiento y las recomendaciones de mantenimiento de la placa de gas de Wolf.
Cuando necesite solicitar asistencia técnica, debe proporcionar la referencia del modelo y el número de serie de la placa. Esta información se muestra en la placa de datos de voltaje del producto situada en la parte inferior de la placa. Observe la siguiente ilustración.
Este aparato debe instalarse de acuerdo con las normativas vigentes y sólo puede ser utilizado en un lugar que esté bien ventilado. Lea las instrucciones antes de instalar o utilizar este aparato.
Ubicación de la placa de |
datos debajo de la placa |
Ubicación de la placa de datos
NOTA IMPORTANTE:
La instalación y el mantenimiento deben ser realizados por un instalador cualificado, por un centro de asistencia técnica o por el proveedor de gas.
No almacene ni utilice gasolina ni otros vapores ni líquidos inflamables cerca de éste o de otros aparatos.
La utilización de un aparato de cocción de gas produce calor y vaho en la habitación en la que está instalado. Asegúrese que la cocina está bien ventilada; mantenga despejados los agujeros de ventilación natural o instale un dispositivo de ventilación mecánico (campana extractora mecánica).
Si utiliza mucho el aparato y lo hace de manera prolongada, es posible que necesite ventilación adicional, por ejemplo, puede abrir una ventana,
o si quiere que la ventilación sea más eficaz, aumente el nivel de la ventilación mecánica, si dispone de ella.
I N F O R M A C I Ó N
D E C O N TA C T O
Página Web: www.subzero.eu.com
QUÉ SE DEBE HACER SI HUELE A GAS:
No encienda ningún aparato.
No toque ningún interruptor eléctrico.
No utilice ningún teléfono dentro del edificio.
Llame inmediatamente a su proveedor de gas desde el teléfono de un vecino. Siga las instrucciones que le proporcione el proveedor de gas.
Si no le es posible ponerse en contacto con el proveedor de gas, llame a los bomberos.
23

P R E C A U C I O N E S E I N S T R U C C I O N E S D E S E G U R I D A D
Q U É D E B E H AC E R
NOTA IMPORTANTE: Lea las instrucciones antes de utilizar este aparato.
Lea con detenimiento esta guía de uso y mantenimiento antes de utilizar la nueva placa para reducir el riesgo de que se produzca un incendio, una descarga eléctrica o de sufrir lesiones personales.
Asegúrese de que la instalación y el mantenimiento se llevan a cabo de manera correcta. Este aparato debe ser instalado y conectado a tierra de manera correcta por un técnico cualificado. Aprenda cómo y dónde debe apagar el gas de la placa.
Antes de llevar a cabo cualquier tarea de mantenimiento, corte el suministro de gas, desenchufe el cable de alimentación eléctrica de la placa del enchufe de pared.
Mantenga los encendedores limpios y secos para que el encendido y el rendimiento de los quemadores sea el adecuado.
En el caso de que el quemador se apague y se escape gas, abra una ventana o una puerta. Espere al menos cinco minutos antes de utilizar la placa.
Mantenga el suministro de aire adecuado. La cocina debe disponer de un suminis-tro de aire fresco adecuado para estar seguro de que la combustión y la ventilación se llevan a cabo de manera correcta.
Encienda la campana extractora aproximadamente cinco minutos antes de empezar a cocinar en la placa; de esta manera creará una cortina de aire que mejora la captura de vapor y humedad.
Lleve ropa adecuada. No deje nunca que las prendas sueltas y holgadas u otros materiales inflamables entren en contacto con los quemadores mientras están en funcionamiento.
El tejido puede incendiarse y provocar heridas graves.
24

Q U É D E B E H AC E R
Utilice siempre elementos aislantes secos para retirar las cazuelas de la placa. Si los elementos aislantes están húmedos o mojados pueden producirle quemaduras por vapor. No utilice un paño de cocina o un paño acolchado en lugar de un elemento aislante.
Utilice cacerolas con asas ergonómicas y que permanezcan frías al tacto mientras está cocinando. Consulte la sección Selección de utensilios de cocina en la página 33.
Cuando esté cocinando, ajuste los controles de los quemadores de manera que la llama caliente sólo la parte inferior de la cacerola.
Gire siempre hacia adentro las asas de los utensilios de cocina de manera que no sobresalgan por las áreas de trabajo próximas, no salgan de los quemador es ni del borde de la placa.
Cuando haya terminado de cocinar, compruebe siempre las posiciones del mando para asegurarse de que la placa está apagada.
Cuando esté friendo con abundante aceite, asegúrese de que la sartén es lo suficientemente grande como para que quepan todos los alimentos que desea cocinar sin que rebasen ya que esto puede hacer que el aceite se derrame. No deje nunca una sartén desatendida cuando esté friendo. Evite freír con abundante aceite alimentos húmedos o cubiertos de escarcha; los alimentos que contienen agua pueden hacer que el aceite caliente salpique o se derrame. Caliente el aceite lentamente, remueva y mezcle distintas clases de aceite y grasa antes de aplicar calor. Utilice un termómetro para aceite para evitar que el aceite alcance temperaturas que sobrepasen el punto de ignición.
Encienda siempre el quemador antes de colocar un recipiente en la rejilla del
quemador. También debe girar el mando hacia la posición  antes de quitar el recipiente de la rejilla del quemador.
25

P R E C A U C I O N E S E I N S T R U C C I O N E S D E S E G U R I D A D
Q U É N O D E B E H AC E R
No repare ni cambie ninguna pieza de la placa a menos que se recomiende específicamente en los documentos que se proporcionan con este aparato. Todas las tareas de mantenimiento deben ser realizadas por un técnico cualificado.
No obstruya el flujo de combustión ni el aire de ventilación.
No utilice papel de aluminio para forrar ninguna parte de la placa.
No utilice la placa para calentar la habitación.
No almacene materiales inflamables cerca de los quemadores ni deje que la grasa u otras sustancias se acumulen en la placa.
No utilice limpiadores ni detergentes abrasivos o cáusticos para limpiar este aparato ya que podrían dañarlo de manera permanente. No utilice pulverizadores para limpiar ya que podrían ser inflamables o podrían oxidar las piezas de metal.
No almacene ni utilice gasolina ni otros vapores ni líquidos inflamables cerca de este o de otros aparatos.
Mantenga el área del aparato despejada y procure no tener materiales combustibles cerca.
No bloquee ni obstruya los agujeros de la superficie de cocción debajo de los mandos. Bloquear estos agujeros puede afectar al funcionamiento del quemador y puede producir un incendio.
Cuando esté utilizando la placa de gas, no toque las rejillas, los cabezales del quemador, las bases de quemador ni otras partes que estén cerca de la llama. Estos componentes pueden estar calientes y podrían causar quemaduras.
Si la placa está cerca de una ventana, no utilice cortinas largas para decorar la ventana ya que podrían tocar la placa y provocar riesgo de que se produzca un incendio.
No debe dejar a los niños solos o desatendidos en el área en la que se esté utilizando la placa. No permita que los niños se sienten o estén de pie sobre la placa. No permita que los niños jueguen con la placa.
No almacene artículos que puedan gustar a los niños encima o detrás de la placa ya que pueden saltar sobre ella para alcanzarlos y podrían resultar heridos.
26
Q U É N O D E B E H AC E R |
P R E C A U C I O N E S D E S E G U R I DA D |
|
|
No utilice agua para apagar los incendios producidos por grasa. Baje la llama o utilice un agente químico seco o un extintor de espuma.
No deje nunca el aparato desatendido cuando esté encendido. Los derrames y las salpicaduras de grasa pueden producir humo o pueden incendiarse.
No cubra los quemadores ni las rejillas con ningún objeto excepto los utensilios seleccionados de manera adecuada.
No debe utilizar tapas decorativas.
No caliente recipientes con alimentos que estén cerrados, por ejemplo, envases de comida para bebés o latas. La formación de presión puede hacer que el recipiente explote y causar heridas personales.
No limpie la placa mientras está caliente. Si utiliza una esponja o un paño empapado, espere hasta que
la placa se haya enfriado lo suficiente para evitar sufrir quemaduras por vapor. Recuerde también que algunos limpiadores pueden producir vapores o gases perjudiciales o desagradables cuando se aplican sobre superficies calientes. Consulte la sección Recomendaciones de mantenimiento en la página 34.
PARA REDUCIR EL RIESGO DE QUE LAS PERSONAS SUFRAN QUEMADURAS EN EL CASO DE QUE SE PRODUZCA UN INCENDIO PROVOCADO POR GRASA EN LA PLACA, REALICE LAS SIGUIENTES INSTRUCCIONES:
Baje la llama con un tapa bien ajustada, una placa de horno u otro tipo de bandeja de metal y, a continuación, apague el quemador de gas. Tenga cuidado para evitar sufrir quemaduras. Si la llama no se apaga inmediatamente, desaloje el lugar y llame a los bomberos.
No utilice agua para apagar los incendios producidos por grasa.
No toque nunca un recipiente en llamas ya que podría quemarse.
27

Modelo ICBCT15G
Modelo ICBCT30G
Modelo ICBCT36G
C A R A C T E R Í S T I C A S D E L A S P LAC A S D E GA S
C A R A C T E R Í S T I C A S D E L A S P LAC A S
D E GA S
Disponible para gas natural (I2H, I2E y I2E+) y LP (I3P)
Fabricación en acero inoxidable
Quemadores herméticos con doble salida de gas y reencendido automático
Sistema de encendido de chispa individual
Panel de mandos iluminado con mandos en dos filas
Posición para hervir a fuego lento en todos los quemadores
Parrillas continuas de hierro fundido de poco grosor con acabado en porcelana mate
Superficie alrededor de los fuegos de una sola pieza
Certificado CE para aparatos de Clase 3
Certificado para la siguiente categoría de aparato ajustado al tipo de gas y presión: I3P – G31 a 37 mbar
I2E – G20 a 20 mbar
I2E+ – G20/25 a 20/25 mbar I2H – G20 a 20 mbar
D E W O L F
P L A C A D E G A S D E 3 8 1 m m
Quemador hermético medio de 3,8 kW (276 g/h) que puede proporcionar 0,2 kW (14,5 g/h) para hervir a fuego lento
Quemador hermético pequeño de 3,0 kW (218 g/h) que puede proporcionar 0,1 kW (7,3 g/h) para hervir a fuego lento
Suministro de gas: 6,8 kW (NAT) y 494 g/h (LP)
P L A C A D E G A S D E 7 6 2 m m
Quemador hermético grande de 4,9 kW (356 g/h) que puede proporcionar 0,2 kW (14,5 g/h) para hervir a fuego lento
Quemador hermético medio de 3,8 kW (276 g/h) que puede proporcionar 0,2 kW (14,5 g/h) para hervir a fuego lento
Dos quemadores herméticos pequeños de 3,0 kW (218 g/h) que pueden proporcionar 0,1 kW (7,3 g/h) para hervir a fuego lento
Suministro de gas: 14,7 kW (NAT) y 1069 g/h (LP)
M O D E L O I C B C T 1 5 G |
M O D E L O I C B C T 3 0 G |
Placa de gas de 381 mm |
Placa de gas de 762 mm |
Quemador medio de |
|
Quemadores pequeños de |
|
|
3,0 kW (218 g/h) |
Dos filas de mandos |
|
3,8 kW (276 g/h) |
|
||
|
|
||
Parrillas continuas |
Dos filas de mandos |
Parrillas continuas |
|
de perfil bajo |
de perfil bajo |
|
|
|
|
Panel de mandos |
Panel de mandos |
iluminado |
iluminado |
Superficie alrededor |
Quemador pequeño de |
de los fuegos de una |
3,0 kW (218 g/h) |
sola pieza |
|
Superficie alrededor de |
Quemador grande de |
Quemador medio de |
|
3,8 kW (276 g/h) |
|||
los fuegos de una sola |
4,9 kW (356 g/h) |
||
|
|||
pieza |
|
|
28
C A R A C T E R Í S T I C A S D E L A P LAC A D E GA S
C A R A C T E R Í S T I C A S D E L A P LAC A
D E GA S
P L A C A D E G A S D E 9 1 4 m m
Quemador hermético grande de 4,9 kW (356 g/h) que puede proporcionar 0,2 kW (14,5 g/h) para hervir a fuego lento
Quemador hermético medio de 3,8 kW (276 g/h) que puede proporcionar 0,2 kW (14,5 g/h) para hervir a fuego lento
Tres quemadores herméticos pequeños de 3,0 kW (218 g/h) que pueden proporcionar 0,1 kW (7,3 g/h) para hervir a fuego lento
Suministro de gas: 17,7 kW (NAT) y 1287 g/h (LP)
D E W O L F
A C C E S O R I O S D E L A P LAC A
D E GA S
Los accesorios opcionales están disponibles a través su distribuidor de Wolf.
Parrilla de una pieza con un quemador y wok (Modelos ICBCT30G y ICBCT36G)
Embellecedor
Soportes para la instalación de dos módulos integrables con extractor de tiro ascendente (Modelo ICBCT15G)
Kit de altitud adaptable a diferentes alturas
Estos aparatos llevan el certificado Star-K que indica que cumple rigurosas normas religiosas junto con instrucciones específicas que aparecen en la página www.star-k.org.
M O D E L O I C B C T 3 6 G
Placa de gas de 914 mm
Quemadores pequeños de |
|
3,0 kW (218 g/h) |
Dos filas de mandos |
Parrillas continuas de perfil bajo
Panel de mandos iluminado
Superficie alrededor |
Quemador grande de |
Quemador medio de |
|
4,9 kW (356 g/h) |
3,8 kW (276 g/h) |
||
de los fuegos de una |
|||
|
|
||
sola pieza |
|
|
A C C E S O R I O S
Podrá disponer de accesorios opcionales a través de su distribuidor de Wolf.
29
 Loading...