


RHK80U2
Table of contents
 Loading...
ES
2-556-312-01(1)
2003 Sony Corporation
USB Interface
Adaptor for Portable
HardDisk Media
RHCU2/RHK40U2/RHK80U2
FR
DE
GB
Operating Instructions
Mode d’emploi
Bedienungsanleitung
Guía de instrucciones
Appendix
2
English
For Customers in the U.S.A. and
Canada
WARNING
Keep away from children. If
swallowed, promptly see a doctor.
To prevent fire or shock hazard,
do not expose the unit to rain or
moisture.
To avoid electrical shock, do not
open the cabinet. Refer servicing
to qualified personnel only.
Note
Data is safe in the following environments:
In X-ray security systems at airports.
Owner’s Record
The model number and serial number are located on
the back of the product. Record the serial number in
the space provided here. Refer to the model and serial
number when you call the Sony Customer
Information Center.
Model No. RHCU2, RHK40U2, RHK80U2
Serial No. ________________________________
Regulatory Information
Declaration of Conformity
Trade Name: SONY
Model No.: RHCU2, RHM40, RHM80
Responsible Party: Sony Electronics Inc.
Address: 680 Kinderkamack Road,
Oradell, NJ 07649 U.S.A.
Telephone No.: 201-930-6972
This device complies with Part 15 of the FCC
Rules. Operation is subject to the following two
conditions: (1) This device may not cause harmful
interference, and (2) this device must accept any
interference received, including interference that
may cause undesired operation.
Caution
You are cautioned that any changes or modifications
not expressly approved in this manual could void
your authority to operate this equipment.
Note
This equipment has been tested and found to comply
with the limits for a Class B digital device, pursuant
to Part 15 of the FCC Rules. These limits are
designed to provide reasonable protection against
harmful interference in a residential installation. This
equipment generates, uses, and can radiate radio
frequency energy and, if not installed and used in
accordance with the instructions, may cause harmful
interference to radio communications. However, there
is no guarantee that interference will not occur in a
particular installation. If this equipment does cause
harmful interference to radio or television reception,
which can be determined by turning the equipment
off and on, the user is encouraged to try to correct the
interference by one or more of the following
measures:
– Reorient or relocate the receiving antenna.
– Increase the separation between the equipment and
receiver.
– Connect the equipment into an outlet on a circuit
different from that to which the receiver is connected.
– Consult the dealer or an experienced radio/TV
technician for help.
The supplied interface cable must be used with the
equipment in order to comply with the limits for a
digital device pursuant to Subpart B of Part 15 of the
FCC Rules.

3
GB
4
Features
The RHCU2 (hereafter “the unit”) is a USB 2.0 interface adaptor for the Portable
HardDisk Media. By connecting the unit, you can easily use the Portable HardDisk Media
as an external storage device. Because the unit is a USB device, you can connect and
disconnect it from your computer with ease. Further, connecting the unit to a USB 2.0-
compliant computer greatly improves the data transfer speed.
Package Contents
When you open the package, make sure that it contains the following. If any of the items
listed below are missing or damaged, call the Sony Customer Information Center.
• USB Interface Adaptor
• Portable HardDisk Media (included
only with the RHK40U2/RHK80U2.
Sold separately and necessary to use the
RHCU2)
• USB cable
• Stand (included only with the
RHK40U2/RHK80U2)
• AC adaptor
• Power cord
• CD-ROM
• Operating instructions (this document)
• Label (included only with the
RHK40U2/RHK80U2)
Connection
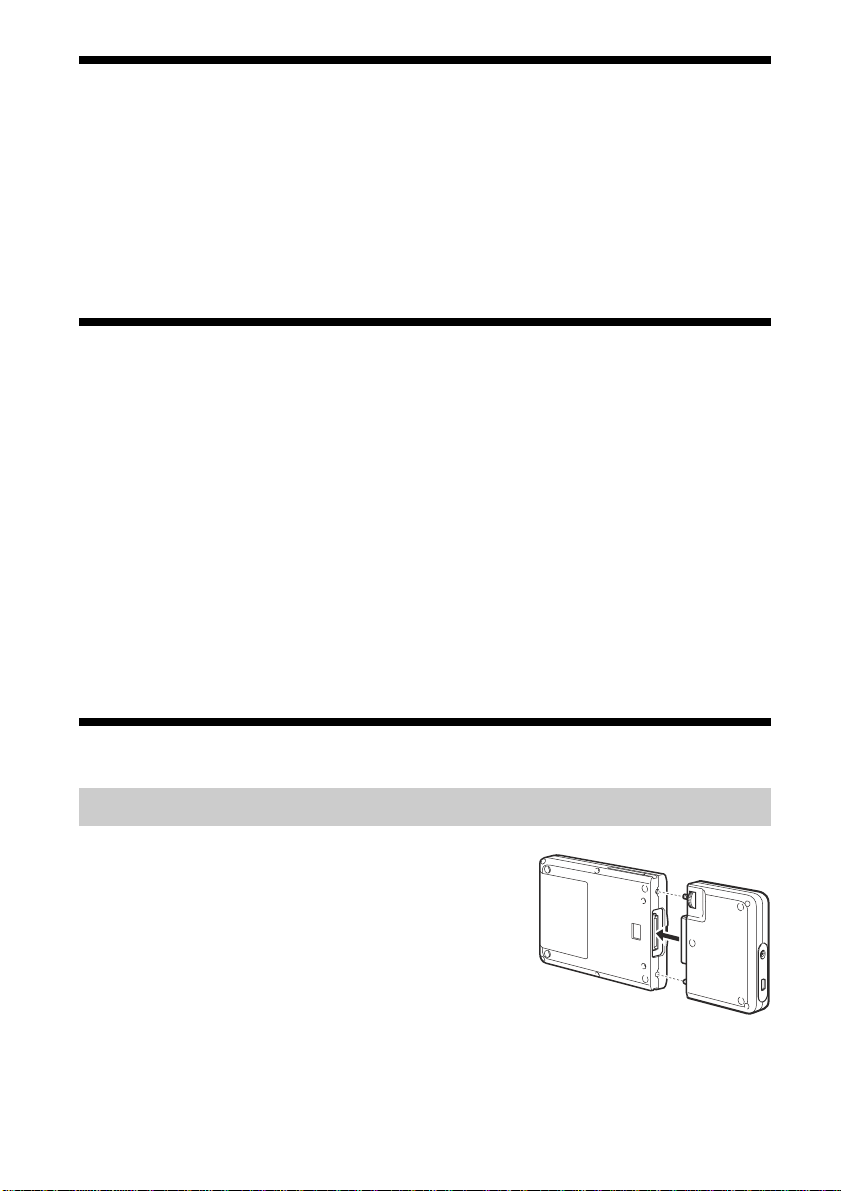
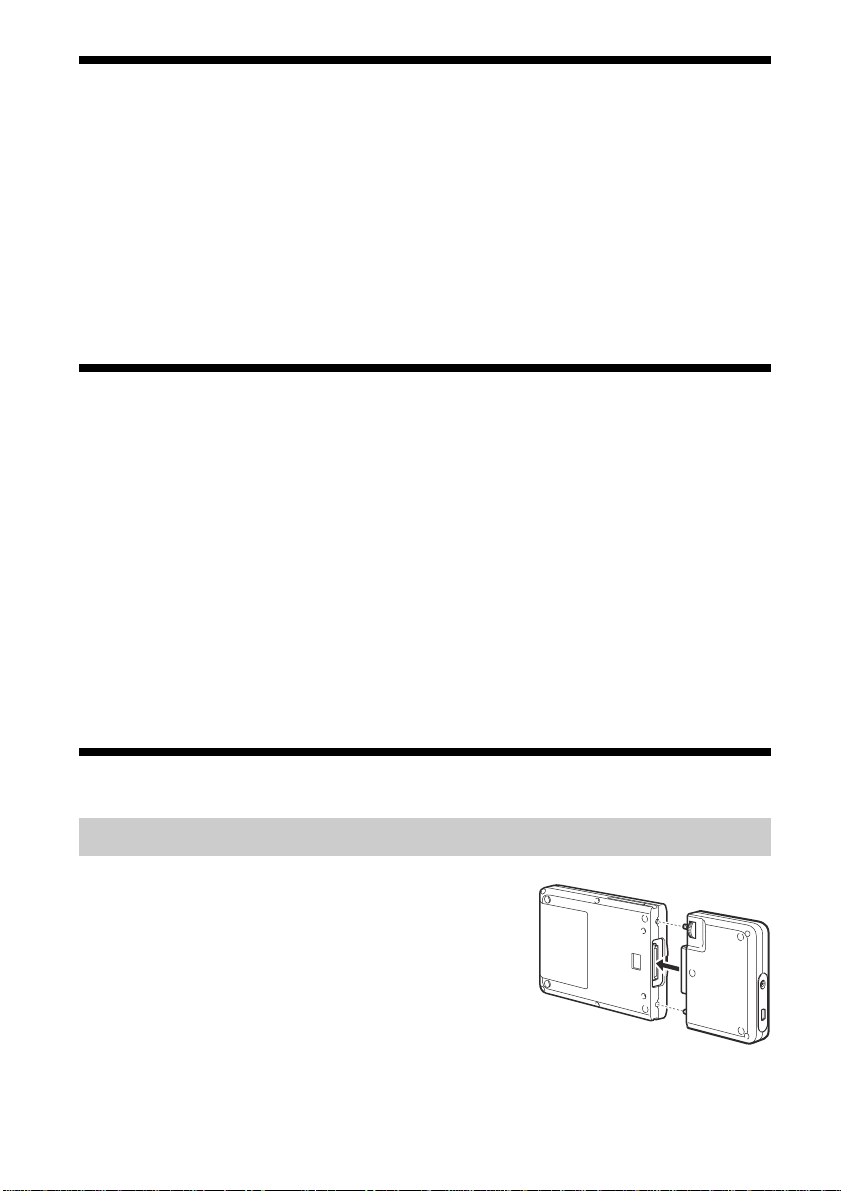
Connecting the Portable HardDisk Media
Before connecting the Portable HardDisk Media,
remove the protective cover from the Portable
HardDisk Media connector.
Align the unit and Portable HardDisk Media so that
the connectors mate correctly. Connect the Portable
HardDisk Media to the unit, then secure with the screw
at the back of the unit.
5
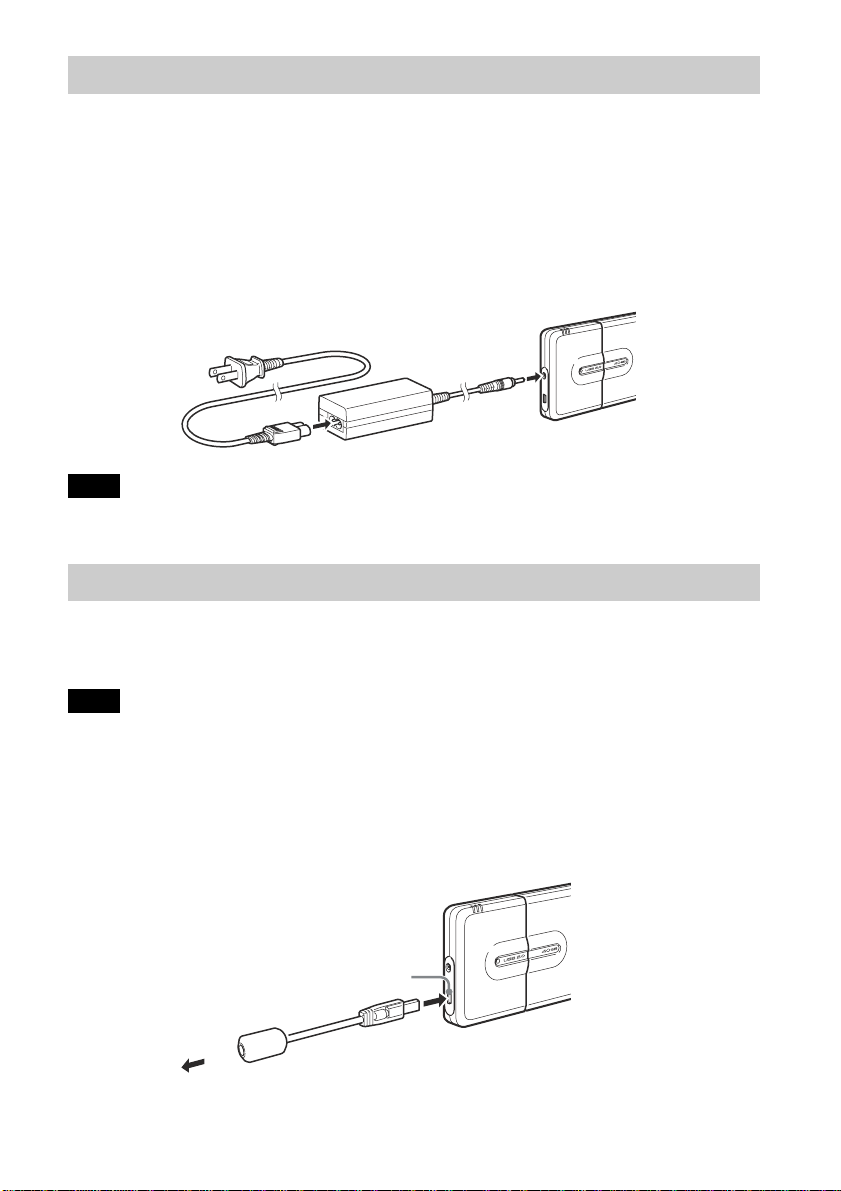
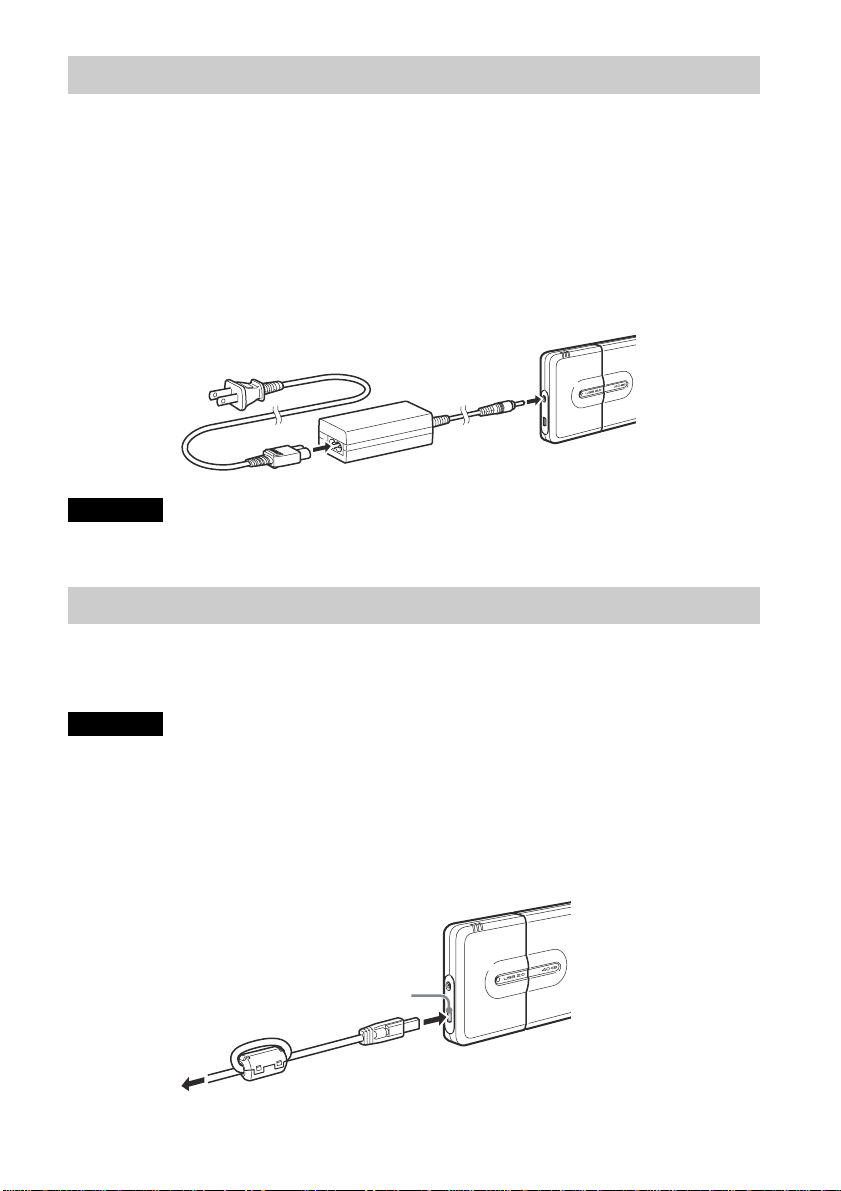
Connecting the Unit to the Power Outlet
When you use the unit for the first time, it is necessary to connect it to the power outlet
using the AC adaptor and power cord.
Connect the power cord to the AC adaptor. Next, connect the DC cable of the AC adaptor
to the DC connector of the unit. Finally, connect the power cord to the power outlet. When
you do so, the unit automatically begins charging its internal battery.
Make sure that the power outlet is close to the unit and readily accessible.
Note
The shape of the power cord varies depending on the country or region of purchase.
Connecting the Unit to your Computer
Connect the USB cable to the unit. Then, connect the cable to a USB port of your
computer.
Note
Supplied driver software is required for Windows 98 SE and highly recommended for Windows Me/2000/
XP users.
• With Windows 2000, Windows Me, Windows 98 SE, install the device driver before connecting the unit
to your computer.
• With Windows XP, install the device driver after connecting the unit to your computer.
For details about how to install the device driver, see “Installing the Device Driver”.
6
Using the Internal Battery
Every time that you connect the AC adaptor to the unit, the internal battery recharges. This
way, you can use the unit without the need of always connecting it to the AC adaptor. This
section contains information about the unit’s internal battery.
Internal Battery
To maintain a stable power input, the unit is equipped with an internal battery. When you
use the unit for the first time or when the internal battery charge is low, it is necessary to
recharge the internal battery. When the internal battery is recharged, you do not need to
connect the unit to the power outlet to use it.
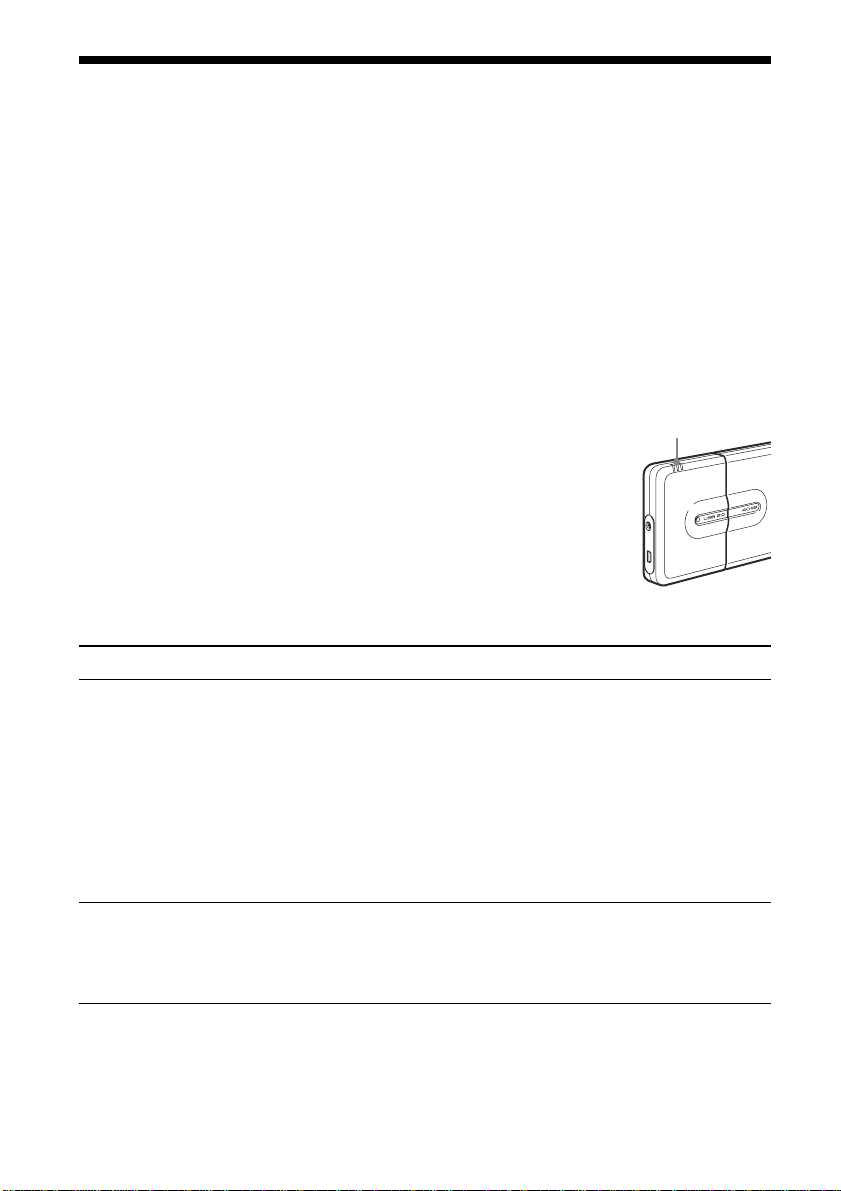
The battery indicators show the status of the internal battery.
• When using the unit at low temperatures (50˚F (10˚C) or less),
connect it to the AC adaptor as the battery life tends to shorten.
• Do not let the battery run out when reading or writing data, as this
may damage data and/or the hard disk.
• If the unit is not connected to the power outlet and it fails to start
even though the internal battery is not depleted, recharge the
internal battery or use the AC adaptor. Depending on the
operating conditions, starting the unit may demand more energy
than usual from the internal battery.
Status Indicator Meaning
During operation • Indicates the remaining charge as shown below when Giga Vault is used only
with the battery:
3 Lit Green: Full charge
2 Lit Green: Charge low (approx. 10 to 60% remains)
If you connect the unit to your computer when the internal
battery is at this level, it may not have enough remaining charge
to power the unit. If this is the case, connect the AC adaptor.
Blinking Red: Charge extremely low (less than 10%)
• When the AC adaptor is connected and used as the power source, the three
green indicators light only when the battery is fully charged.
Recharging The status of the battery charge is indicated as:
3 Lit Orange: Full charge
2 Lit Orange: Charge low (approx. 10 to 60%)
1 Lit Orange: Charge extremely low (less than 10%)
You can recharge the internal battery either when it is connected to or disconnected from
the Portable HardDisk Media.
Battery indicators

7
When the unit is not connected to your computer, the internal battery is recharged in
approximately five hours at normal ambient temperature. Depending on the status of the
computer, the recharge time can be over five hours if it is performed when the unit is
connected to your computer.
When the unit is connected to your computer and in use, an icon appears on the Windows
taskbar allowing you to monitor the remaining charge of the internal battery.
The remaining charge of the internal battery is high. (Two to three indicators on
the unit are lit.)
The remaining charge of the internal battery is low. (One indicator on the unit is
blinking red.)
Note
This icon does not appear if the device driver on the CD-ROM supplied with the unit is not installed.
Internal Battery Status Messages
The following messages appear on your computer screen depending on the status of the
internal battery. Follow the indications of the messages when they appear.
Note
The messages below do not appear if the device driver on the CD-ROM supplied with the unit is not
installed.
❑ When the battery charge is low
• Remaining charge approximately 20 minutes (this value varies depending on the
conditions of use).
“The battery power is low. Please use your AC adaptor for further usage.”
• Remaining charge extremely low
“The battery power is depleted. Please shut down all applications stored on the Giga
Vault.”
• No remaining charge
“Giga Vault is now inactive.”
(Giga Vault is automatically turned off approximately 10 seconds later.)
❑ When the ambient temperature is low (approx. 50˚F (10˚C) or less)
“Please use your AC adaptor for further usage.”
If this message appears, connect the AC adaptor to the unit.

8
Installing the Device Driver
Supplied driver software is required for Windows 98 SE and highly recommended for
Windows Me/2000/XP users. The installation procedure varies according to your
operating system.
Windows XP Installation Procedure
After connecting Giga Vault to the computer, do the procedure below with the provided
CD-ROM to install the device driver.
Note
It is possible to use the unit with the default Windows XP driver but we strongly recommend that you
install the device driver on the CD-ROM supplied with the unit. Failure to do so may cause the unit to
malfunction.
1 Insert the supplied CD-ROM into the CD-ROM drive of your computer.
Note
If you are using an external CD-ROM drive connected to the USB port of your computer and this is
the only available USB port, copy the contents of the CD-ROM to the C:\Gigavault folder on the hard
disk of your computer, remove the CD-ROM from the drive, and then disconnect the CD-ROM drive.
(You must create the C:\Gigavault folder beforehand.)
2 Using the USB cable, connect the unit to your computer.
Your operating system detects the unit and installs the default device driver. Wait
until the system informs you that the installation is complete.
Windows XP opens a selection dialog box at this point. Click [Cancel] to close it.
Note
Connect the unit directly to a USB port of your computer when you install the device driver. Avoid
connecting the unit to USB hubs or with extension cables.
3 Access the CD-ROM with Windows Explorer or other such application,
and then double-click Setup.exe. (If you copied the contents of the CD-
ROM to the C:\Gigavault folder on the hard disk of your computer as
indicated in step 1, double-click Setup.exe found there.)
An installation wizard starts.

9
4 Follow the instructions on the screen to complete the installation of the
device driver.
If a message appears indicating that the provided driver has not passed Windows
Logo testing, click [Continue Anyway] to continue.
Note
A device driver is necessary for each different unit that you connect to a computer. Follow the procedure
outlined above to install device drivers for the second unit onward.
Windows 2000, Windows Me, and Windows 98 SE
Installation Procedure
Perform the following procedure before connecting the unit to your computer.
Notes
• With Windows 98 SE, if you connect the unit to your computer before installing the device driver, the
Add New Hardware wizard starts automatically. Click [Cancel] and perform the procedure below.
• With Windows 2000 and Windows Me, if the unit is connected to your computer before installing the
device driver, disconnect the unit.
1 Insert the supplied CD-ROM into the CD-ROM drive of your computer.
2 Access the CD-ROM with Windows Explorer or other such application,
and then double-click Setup.exe.
An installation wizard starts.
3 Follow the instructions on the screen to complete the installation of the
device driver.
z Hint
Only one device driver is necessary for each different unit that you connect to a computer running
Windows 2000, Windows Me, or Windows 98 SE. In other words, you must only perform the procedure
outlined above the first time that you connect a unit to a computer. Every new unit that you connect to your
computer uses the same device driver.
10
Using the Unit
When you connect the unit to your computer with the USB cable, the Portable HardDisk
Media appears as “GIGA VAULT (D:)” (where “D” is the letter of the drive. This letter
may vary depending on your computer). The Portable HardDisk Media is recognized as an
external mass storage device, therefore you can use it as you would any other hard disk to
save files and/or folders.
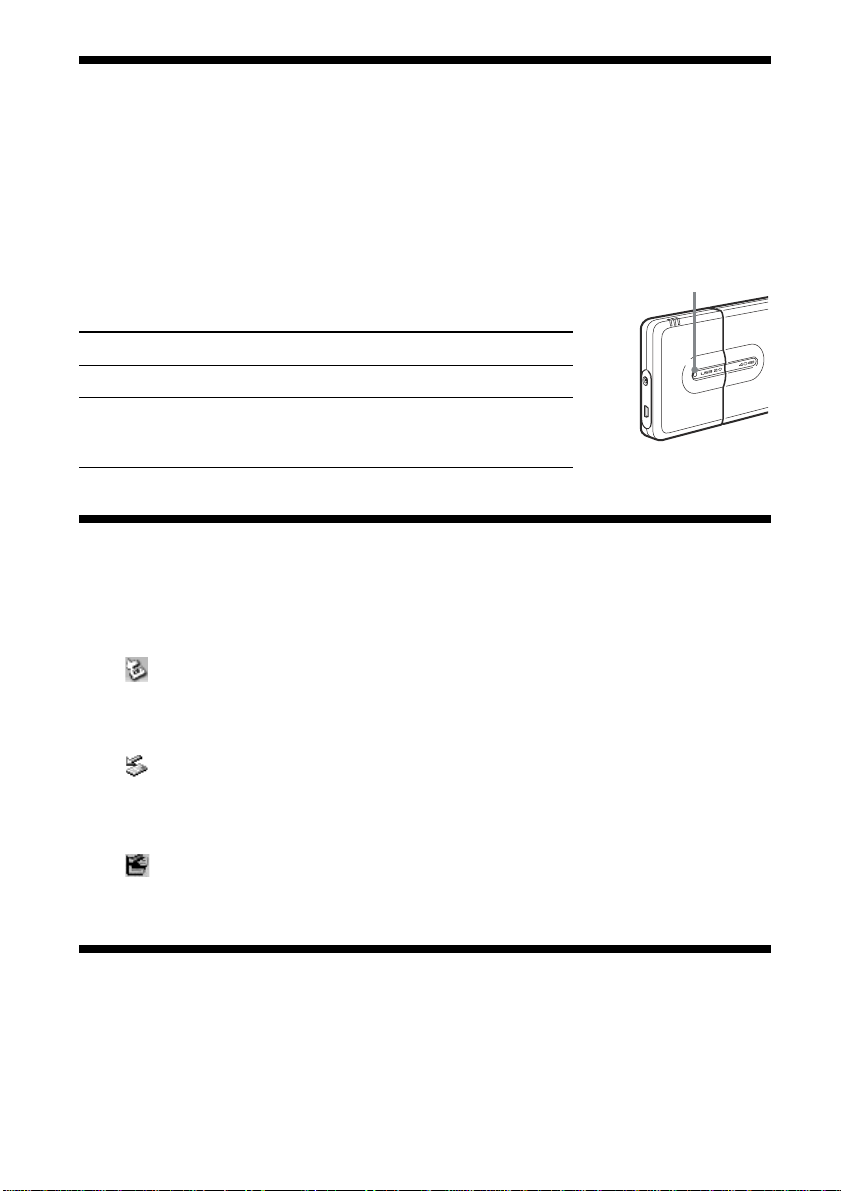
The access indicator on the Portable HardDisk Media allows you to
verify its status when you access it.
Indicator Status
Green, lit Portable HardDisk Media is on standby.
Orange, flashing Data transfer in progress. (Never disconnect the
unit or cable when the Portable HardDisk Media
is in this state.)
Disconnecting the Unit from your
Computer
With Windows XP
Click
on the Windows taskbar. Click the appropriate command on the shortcut menu.
When your computer prompts you, disconnect the unit.
With Windows Me and Windows 2000
Click
on the Windows taskbar. Click the appropriate command on the shortcut menu.
When your computer prompts you, click [OK] and disconnect the unit.
With Windows 98 SE
Click
on the Windows taskbar. Click the command on the shortcut menu. When your
computer prompts you, click [OK] and disconnect the unit.
About the Included Software
Detailed information about the included software is available on the Web sites of the
software manufacturers and software distributors. (Accessible from the links in each
software.)
Access indicator

11
Troubleshooting
Symptom Cause/Remedy
The computer does not detect the unit.
The unit does not function properly when
connected to a USB hub.
The unit does not function properly when
using it at the same time as other USB
devices.
You cannot disconnect the unit, because
a message indicating that the storage
device is in use appears.
The unit does not reach High Speed.
The internal battery takes an unusual
amount of time to recharge.
The unit rattles when it is shaken.
Windows does not start when you turn
on your computer.
c Make sure that you are using an operating system that
supports the unit. You cannot use the unit with operating
systems that do not support it.
c Depending on the status of your computer, it is possible
that it may not detect the unit. In this situation, visit the
unit's troubleshooting Web page at
http://www.sony.net/gigavault/ (English only).
c If you connect the unit to a USB hub, the unit may not
function properly, depending on your hub. We recommend
that you connect the unit directly to your computer.
c When using the unit at the same time as other USB
devices, the unit may respond more slowly than usual.
c One or several programs using the unit may still be
running. Quit any program using the unit before
attempting to disconnect it.
c Make sure that your computer supports this transfer rate.
However, some USB 2.0 boards and cards may prevent
the unit from reaching this transfer rate. For details,
consult the maker of your USB board or card.
c If you are attempting to charge the internal battery while
the unit is connected to your computer and the Portable
HardDisk Media is in use, it is possible for the unit's
internal temperature to exceed 113°F (45°C). If this is the
case, charging is interrupted. Disconnect the unit from the
computer. Once the internal temperature of the unit
reaches normal levels, charging resumes automatically.
(Note that even if charging is interrupted because of the
above, you can still continue using the unit normally.)
c This is not indicative of damage.
c Depending on your computer, turning it on while the unit
is still connected may prevent Windows from starting. If
so, press CTRL+ALT+DELETE to restart your computer.
If your computer encounters this problem, make sure that
you disconnect the unit before turning on your computer.

12
Usage Notes
• Affix the label accompanying the unit on the label area as
illustrated.
• Starting or shutting down your computer, or awakening it from
sleep mode while the unit is connected may cause it to function
erratically. Always disconnect the unit from your computer before
performing these operations.
• Never disconnect the USB cable and/or AC adaptor from your
computer or unit while the unit is in use.
• To avoid an accidental disconnection during use, make sure that the unit and Portable
HardDisk Media are firmly connected and secured with the screw at the back of the unit.
• Do not store the unit or Portable HardDisk Media in direct sunlight, humid locations,
hot locations, or locations subjected to strong vibrations.
• Avoid moving the unit and Portable HardDisk Media during use as this may cause them
to malfunction.
• Avoid sudden temperature changes. If you move the unit and Portable HardDisk Media
from a cold to a warm environment or the ambient temperature rises suddenly, do not
use them immediately as condensation may have formed inside them. If this occurs
while you are using the unit and Portable HardDisk Media, suspend use for an hour or
more, then deactivate them.
• In the unlikely event of a malfunction or defect, or if a foreign object penetrates the unit
or Portable HardDisk Media, disconnect the AC adaptor and/or USB cable. Then,
contact the Sony Customer Information Center.
Please Record Responsibly
Before copying anything onto the Portable HardDisk Media, please make sure that you are
not violating copyright laws. Most software companies allow you to make a backup or
archive copy of software. Check your software’s license agreement for details.
Label area
• Giga Vault is a trademark of Sony Corporation.
• Microsoft and Windows are registered trademarks of Microsoft Corporation in the
United States and other countries.
• Other system names and product names that appear in this manual are registered
trademarks or trademarks of their respective owners. Note that the ™ and ® symbols are
not used in this manual.

13
Français
RECYCLAGE DES ACCUMULATEURS
AUX IONS DE LITHIUM
Les accumulateurs aux ions de lithium sont
recyclables.
Vous pouvez contribuer à
préserver l’environnement en
rapportant les piles usées dans
un point de collection et
recyclage le plus proche.
Pour plus d’informations sur le recyclage des
accumulateurs, téléphonez le numéro gratuit
1-800-822-8837 (Etats-Units et Canada
uniquement), ou visitez http://www.rbrc.org/
Avertissement: Ne pas utiliser des
accumulateurs aux ions de
lithium qui sont endommagées
ou qui fuient.
Pour les utilisateurs au Canada
Cet appareil numérique de la classe B est conforme à
la norme NMB-003 du Canada.
Pour la clientèle en Europe:
Cet appareil a été testé et jugé conforme aux limites
établies par les directives CEM visant l’utilisation de
câbles de raccordement d’une longueur inférieure à
trois mètres.
Ce produit est conforme aux normes de classification
EN55022 Classe B et EN55024 pour une utilisation
dans les environnements suivants : zones
résidentielles, commerciales et d’industrie légère.
Cet appareil est conforme aux directives européennes
suivantes : 89/336/CEE et 92/31/CEE (directive CEM).
Table des matières
Caractéristiques .................................... 14
Contenu de l’emballage ........................ 14
Raccordement ....................................... 14
Raccordement du support de disque
dur portable ................................. 14
Utilisation de la batterie interne .... 15
Raccordement de l’appareil à votre
ordinateur .................................... 15
Utilisation de la batterie interne ........... 16
Installation du pilote de périphériques . 19
Procédure d’installation sous
Windows XP ............................... 19
Procédure d’installation sous
Windows 2000, Windows Me et
Windows 98 SE........................... 20
Utilisation de l’appareil ........................ 21
Déconnexion de l’appareil de votre
ordinateur .......................................... 22
A propos du logiciel fourni................... 22
Dépannage ............................................ 23
Remarques sur l’utilisation................... 24
FR
• Giga Vault est une marque de
commerce de Sony Corporation.
• Microsoft et Windows sont des marques
déposées de Microsoft Corporation aux
Etats-Unis et dans d’autres pays.
• Les autres noms de systèmes et de
produits apparaissant dans le présent
mode d’emploi sont des marques de
commerce ou des marques déposées de
leurs détenteurs respectifs. Les
symboles ™ et ® ont été omis
volontairement dans ce mode d’emploi.
14
Caractéristiques
Le RHCU2 (ci-après appelé « l’appareil ») est un adaptateur d’interface USB 2.0 pour le
support de disque dur portable. Le raccordement de l’appareil permet d’utiliser facilement
le support de disque dur portable en tant que support externe d’enregistrement de données.
Etant donné que l’appareil est un appareil USB, vous pouvez le connecter et le
déconnecter de votre ordinateur facilement. De plus, le raccordement de l’appareil à un
ordinateur compatible USB 2.0 permet d’améliorer de façon significative la vitesse de
transfert des données.
Contenu de l’emballage
En déballant l’appareil, vérifiez que les accessoires énumérés ci-dessous sont tous
présents. Si un accessoire est manquant ou endommagé, contactez votre revendeur.
• Adaptateur d’interface USB
• Support de disque dur portable (inclus
uniquement avec le RHK40U2/
RHK80U2. Vendu séparément et
nécessaire à l’utilisation du RHCU2)
• Câble USB
• Support de bureau (inclus uniquement
avec le RHK40U2/RHK80U2)
• Adaptateur secteur
• Cordon d’alimentation
• CD-ROM
• Mode d’emploi (ce document)
• Etiquette (inclus uniquement avec le
RHK40U2/RHK80U2)
Raccordement
Raccordement du support de disque dur portable
Avant de raccorder le support de disque dur portable,
retirez le capuchon protecteur du connecteur de
support de disque dur portable.
Alignez l’appareil et le support de disque dur portable
de manière à ce que les connecteurs s’assemblent
correctement. Raccordez le support de disque dur
portable à l’appareil, puis assurez le raccordement
avec la vis à l’arrière de l’appareil.
15
Utilisation de la batterie interne
Lors de la première utilisation de l’appareil, il est nécessaire de le raccorder à la prise
secteur à l’aide de l’adaptateur secteur et du cordon d’alimentation.
Raccordez le cordon d’alimentation à l’adaptateur secteur. Raccordez ensuite le câble CC
de l’adaptateur secteur au connecteur CC de l’appareil. Raccordez finalement le cordon
d’alimentation à la prise de courant. Une fois ce branchement effectué, l’appareil entame
automatiquement la charge de sa batterie interne.
Assurez-vous que la prise de courant est proche de l’appareil et facile d’accès.
Remarque
L’aspect du cordon d’alimentation varie selon le pays ou la région d’achat.
Raccordement de l’appareil à votre ordinateur
Raccordez le câble USB à l’appareil. Raccordez ensuite le câble à un port USB de votre
ordinateur.
Remarque
Le logiciel pilote fourni est requis pour Windows 98 SE et fortement recommandé pour les
utilisateurs de Windows Me/2000/XP.
• Avec Windows 2000, Windows Me, Windows 98 SE, installez le pilote de périphériques avant de
raccorder l’appareil à votre ordinateur.
• Avec Windows XP, installez le pilote de périphériques après avoir raccordé l’appareil à votre ordinateur.
Pour de plus amples informations concernant l’installation du pilote de périphériques, reportez-vous à la
section « Installation du pilote de périphériques ».
Adaptateur secteur
Connecteur CC
Vers la prise secteur
Vers votre ordinateur
Câble USB
Port USB
Loading...