


3-223-746-13(1)
Portable
MiniDisc Recorder
Operating Instructions
MZ-R500/R500PC/R500DPC
© 2000 Sony Corporation

WARNING
To prevent fire or shock hazard, do not expose the unit to rain or moisture.
To avoid electrical shock, do not open the cabinet. Refer servicing to qualified personnel only.
Do not install the appliance in a confined space, such as a bookcase or built-in cabinet.
Caution
The use of optical instruments with this product will increase eye hazard.
Listening for many hours at maximum volume may damage your hearing.
CAUTION — INVISIBLE LASER RADIATION WHEN OPEN
AVOID EXPOSURE TO BEAM
Information
IN NO EVENT SHALL SELLER BE LIABLE FOR ANY DIRECT, INCIDENTAL OR CONSEQUENTIAL DAMAGES OF ANY NATURE, OR LOSSES OR EXPENSES RESULTING FROM ANY DEFECTIVE PRODUCT OR THE USE OF ANY PRODUCT.
For customers in the USA
Owner’s Record
The serial number is located at the rear of the disc compartment lid and the model number is located at the top and bottom. Record the serial number in the space provided below. Refer to them whenever you call upon your Sony dealer regarding this product.
Model No.
Serial No.
2-GB
This equipment has been tested and found to comply with the limits for a Class B digital device, pursuant to Part 15 of the FCC Rules. These limits are designed to provide reasonable protection against harmful interference in a residential installation. This equipment generates, uses, and can radiate radio frequency energy and, if not installed and used in accordance with the instructions, may cause harmful interference to radio communications. However, there is no guarantee that interference will not occur in a particular installation. If this equipment does cause harmful interference to radio or television reception, which can be determined by turning the equipment off and on, the user is encouraged to try to correct the interference by one or more of the following measures:
—Reorient or relocate the receiving antenna.
—Increase the separation between the equipment and receiver.
—Connect the equipment into an outlet on a circuit different from that to which the receiver is connected.
—Consult the dealer or an experienced radio/TV technician for help.
This device complies with Part 15 of the FCC Rules. Operation is subject to the following two conditions: (1) This device may not cause harmful interference, and
(2) this device must accept any interference received, including interference that may cause undesired operation.
You are cautioned that any changes or modifications not expressly approved in this manual could void your authority to operate this equipment.

For customers in Canada
To prevent electric shock, do not use this polarized AC plug with an extension cord, receptacle or other outlet unless the blades can be fully inserted to prevent blade exposure.
The CE mark on the unit is valid only for products marketed in the European Union.
Certain countries may regulate disposal of battery used to power this product. Please consult with your local authority.
WALKMAN and |
are trademarks |
|
of Sony Corporation. |
|
|
|
GB |
|
|
|
|
|
|
|
3-GB

Table of contents |
|
Looking at the controls .................................... |
6 |
Getting started ................................................. |
8 |
Recording an MD right away! ......................... |
10 |
Playing an MD right away! .............................. |
13 |
Various ways of recording .............................. |
15 |
Two ways of connecting to a sound source .......................................... |
15 |
Recording with analog input (line cable required) ............................... |
16 |
Recording for long times ...................................................................... |
16 |
To start/stop recording in sync with the source player |
|
(Synchro-recording) ........................................................................ |
17 |
Recording without overwriting existing material ................................. |
18 |
Adjusting the recording level manually |
|
(Manual recording) .......................................................................... |
19 |
Checking the remaining time or the recording position ....................... |
20 |
Various ways of playback .............................. |
21 |
Playing tracks repeatedly ...................................................................... |
21 |
Emphasizing bass (DIGITAL MEGA BASS) ...................................... |
22 |
Protecting your hearing (AVLS) ........................................................... |
22 |
Checking the remaining time or the playing position ........................... |
23 |
Locking the controls (HOLD) ............................................................... |
23 |
Connecting to a stereo system .............................................................. |
24 |
4-GB

Editing recorded tracks .................................. |
25 |
Erasing tracks ....................................................................................... |
25 |
To erase a track .............................................................................. |
25 |
To erase the whole disc .................................................................. |
25 |
Adding a track mark ............................................................................. |
26 |
Erasing a track mark ............................................................................ |
26 |
Moving recorded tracks ....................................................................... |
27 |
Labeling recordings .............................................................................. |
28 |
Additional information .................................... |
30 |
Precautions ........................................................................................... |
30 |
Troubleshooting ................................................................................... |
32 |
System limitations ................................................................................ |
34 |
Messages .............................................................................................. |
35 |
Specifications ....................................................................................... |
37 |
What is an MD? ................................................................................... |
38 |
5-GB

Looking at the controls
See pages in ( ) for more details.
The recorder
A
B
C
D
E
F
G
A Nbutton (11) (13) (17) (24)
B VOL +/– buttons (13) (28)
C xbutton (11) (13) (25) (28)
D Xbutton (11) (13) (19) (26) (28)
E HOLD switch (at the rear) (9) (23)
F >MENU.buttons (16) (21)
H
I
J
K
L
 M
M
N
O
H OPEN switch (9)
I Display window (18) (21)
J END SEARCH button (11) (28)
KT MARK button (26)
REC (record) button (11) (17)
L i (headphones) jack (9) (24)
(25)M Battery compartment (at the rear) (8)
./>(search /AMS) buttons |
N LINE IN (OPTICAL) jack (10) (16) |
|
(11) (13) (19) (27) (28) |
||
O DC IN 3V jack (10) (30) |
||
G ENTER button (16) (21) (25) |
||
|
6-GB
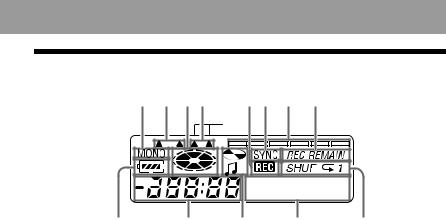
The display window
A B CD |
EF G H |
L P 2 . 4 Digital MEGA BASS |
|
I J K L M
A MONO (monaural) indication
B LP mode indication (17)
CDisc indication
Shows that the disc is rotating for recording, playing or editing an MD
D Mega bass indication (22).
EREC indication
Lights up while recording. When flashing, the recorder is in record standby mode.
FSYNC (synchro-recording) indication (18)
GLevel meter (19)
Shows the volume of the MD being played or recorded.
HREC REMAIN/REMAIN (remaining time/tracks) indication (20) (23) Lights up along with the remaining time of the track, the remaining time of the MD, or the remaining number of tracks.
IBattery indication (9)
Shows approximate battery condition.
J Time display
KDisc name/track name indication Lights up when labeling a disc or a track.
LCharacter information display (20) (23)
Displays the disc and track names, error messages, track numbers, etc.
MPlay mode indication (21) Shows the play mode of the MD.
7-GB

Getting started
1Insert an alkaline dry battery.
 E e
E e
Slide to open the battery compartment lid.
Insert an LR6 (size AA) |
Close the lid. |
alkaline dry battery minus |
|
end first. |
|
Using on a house current.
Connect the supplied AC power adaptor* or the optional AC-E30HG (when an AC power adaptor is not supplied).
Supplied with the European, Chinese and Argentine models only.
To DC IN 3V
Battery life1)
(Unit: Approx. hours) (JEITA2))
LR6 (SG) alkaline dry battery3) |
Normal |
LP2 |
LP4 |
Recording4) |
7.5 |
10 |
13.5 |
Playback |
36 |
42 |
48 |
|
|
|
|
1)The battery life may be shorter due to operating conditions, the temperature of the location, and varieties of batteries.
2)Measured value by the standard of JEITA (Japan Electronics and Information Technology Industries Association).
3)When using a Sony LR6 (SG) “STAMINA” alkaline dry battery (produced in Japan).
4)To prevent interrupted recording due to drained battery, use new battey for recording operations.
8-GB
When to replace the battery
When the dry battery is weak, flashing r or “LoBATT” appears in the display. Replace the dry battery.
Note that the battery level indicated by the battery indication is only approximate and varies with the recorder condition.
Note
Stop the recorder before replacing battery.
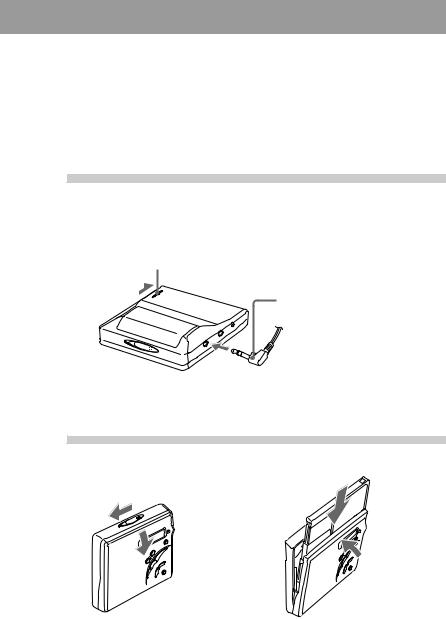
2Connect the headphones/ earphones and unlock the control.
HOLD
headphones/earphones
(supplied)
Connect firmly
To i
3Insert an MD.
Insert an recordable MD when recording.
1 Slide OPEN to open the lid.
2Insert an MD with the label side facing front, and press the lid down to close.
9-GB
Recording an MD right away!
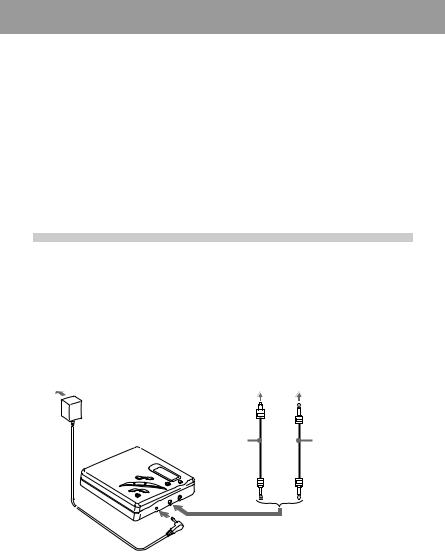
Connect to a digital source using an optical cable (supplied with the European, Chinese and Argentine models only) to make digital recordings. Digital recording is possible even from digital equipment with different sampling rates, such as a DAT deck or a BS tuner, using the built-in sampling rate converter. To record from an analog source, see “Recording with analog input (line cable required)” (page 16). To record from an MD, see “Note on digital recording” (page 31).
1Make connections. (Insert the cables
firmly and completely into the appropriate jacks.)
CD player, MD |
|
Portable CD |
player, digital |
|
player, etc. |
amplifier, etc. |
|
|
|
|
|
AC power adaptor1) |
to DIGITAL OUT (OPTICAL) |
|
to a wall |
Optical plug |
Optical mini-plug |
outlet |
|
|
|
Optical cable2) |
Optical cable3) |
to LINE IN (OPTICAL)
to DC IN 3V
1)Supplied with the European, Chinese and Argentine models only. 2)Supplied with the European and Argentine models only. 3)Supplied with the Chinese model only.
10-GB
2Record an MD.
xN
REC
Notes
1Press Nwhile pressing REC.
Recording starts.
2 Play the source you want to record.
To stop recording, press x.
After you press xand “Edit” stops flashing in the display, the recorder will automatically turn off after:
—about 10 seconds when using a battery.
—about 5 minutes when using the supplied AC power adaptor or the optional AC-E30HG (when an AC power adaptor is not supplied).
•“Saving” or “Edit” flashes while data of the recording (the track’s start and end points, etc.) is being recorded. Do not move or jog the recorder or disconnect the power source while the indication is flashing in the display.
•The lid does not open until “Edit” disappears in the display.
To |
Press |
|
|
Record from the end of the |
END SEARCH and press Nwhile pressing REC. |
previous recording1) |
|
Record partway through the |
N, >or .to find the start point of |
previous recording1) |
recording and press xto stop. Then press N |
|
while pressing REC. |
|
|
Pause |
X2) |
|
Press Xagain to resume recording. |
|
|
Remove the MD |
xand open the lid.3) (The lid does not open while |
|
“Edit” flashing in the display.) |
|
|
1)By setting “R-Posi” to “Fr End”, recording operations will always start from the end of the previousely recorded material (page 18).
2)A track mark is added at the point where you press Xagain to resume recording while pausing; thus the remainder of the track will be counted as a new track.
3)If you open the lid while “R-Posi” is set to “FrHere,” recording will begin with the first track the next time you record (page 18).
11-GB

If the recording does not start
•Make sure the recorder is not locked (page 23).
•Make sure the MD is not record-protected (page 31).
•Premastered MDs cannot be recorded over.
For models supplied with the AC plug adaptor
If the AC power adaptor (supplied with the European, Chinese and Argentine models only) does not fit the wall outlet, use the AC plug adaptor.
Notes
•If the power supply is disrupted (i.e. the battery is removed or becomes exhausted or the AC power adaptor is disconnected) during a recording or editing operation, or while “Edit” appears in the display, then it will not be possible to open the lid until power is restored.
•You can make a digital recording only from an optical type output.
•When recording from a portable CD player, set the CD player to pause, and then do the recording procedure on the recorder.
•Note the following when recording from a portable CD player:
—Some portable CD players may not be capable of digital out unless powered by the AC power.
—Connect the AC power adaptor to the portable CD player and use it on AC power as the power source.
—Disable any anti-skip function (such as ESP*) on the portable CD player.
Electronic Shock Protection
z
•LINE IN (OPTICAL) jack is for both digital and analog input. The recorder automatically recognizes the type of line cable and switches to digital or analog input.
•The level of the recorded sound is adjusted automatically.
•You can monitor the sound during recording. Connect the supplied headphones/earphones to i and adjust the volume by pressing VOL +/–. This does not affect the recording level.
12-GB
 Loading...