


4-204-616-67
R
420461667
Trinitron Colour
Television
Instruction Manual |
GB |
KV-28DS60U
KV-28DS65U
KV-32DS60U
KV-32DS65U
©1999 by Sony Corporation Printed in UK

NOTICE FOR CUSTOMERS IN THE UNITED KINGDOM
A molded plug complying with BS1363 is fitted to this equipment for your safety and convenience.
Should the fuse in the plug supplied need to be replaced, a 5 AMP fuse approved by ASTA or BSI to BS 1362 (i.e. marked with ASAT or  ) must be used.
When an alternative type of plug is used it should be fitted with a 5 AMP FUSE, otherwise the circuit should be protected by a 5 AMP FUSE at the distribution board.
If the plug supplied with this equipment has a detachable fuse cover, be sure to attach the fuse cover after you change the fuse. Never use the plug without the fuse cover. If you should lose the fuse cover, please contact your nearest Sony service station.
How to replace the Fuse
Open the fuse compartment with a blade screwdriver, and replace the fuse.
•IMPORTANT
If the plug supplied is not suitable for the socket outlet in your home, it should be cut off and an appropriate plug fitted in accordance with the following instructions:
The wires in this mains lead are coloured in accordance with the following code: Blue Neutral
Brown Live
As the colours of the wires in the mains lead of this apparatus may not correspond with the coloured markings identifying the terminals in your plug, proceed as follows:
The wire which is coloured blue must be connected to the terminal which is marked with the letter N or coloured black. The wire which is coloured brown must be connected to the terminal which is marked with the letter L or coloured red. Do not connect either wire to the earth terminal in the plug which is marked by the letter E or by the safety earth
symbol |
|
|
or coloured green or green and yellow. |
WARNING
•To prevent shock hazard, do not insert the plug cut off from the mains lead into a socket outlet. This plug cannot be used and should be destroyed.
•To prevent fire or shock hazard, do not expose the unit to rain or moisture.
•Dangerously high voltages are present inside the set. Do not open the cabinet. Refer servicing to qualified personnel only.

Instruction Manual GB
1
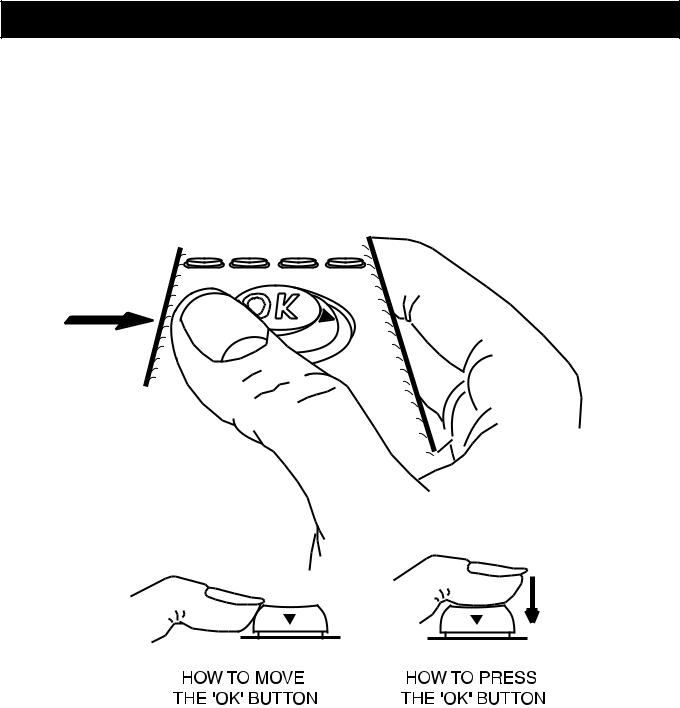
General operation of your remote control
2

Table of contents
Safety First |
4 |
|
|
Quick Start Guide |
5 |
Checking the accessories supplied |
5 |
Inserting batteries into the remote control |
5 |
Connecting the speakers |
6 |
Connecting the aerial |
8 |
Switching on the TV |
8 |
Automatically tuning the TV |
9 |
Viewing digital or analogue channels |
10 |
|
|
Overview |
11 |
Overview of the TV set buttons |
11 |
Overview of the remote control buttons |
12 |
|
|
Additional TV Features |
13 |
Adjusting the picture |
13 |
Changing picture and sound modes quickly |
13 |
Adjusting the sound |
14 |
Setting up Dolby ProLogic |
15 |
Changing the screen mode |
16 |
Exchanging programme positions |
17 |
Using the parental lock |
18 |
Using Further Programme Preset |
19 |
Adjusting the picture rotation |
20 |
Displaying subtitles for digital channels |
21 |
Using the sleep timer |
22 |
Manually tuning the TV |
23 |
Skipping programme positions |
24 |
Adjusting the TV picture for an RGB source |
25 |
|
|
Teletext |
26 |
Viewing standard teletext |
26 |
Viewing digital teletext |
28 |
|
|
Electronic Programme Guide (EPG) |
29 |
Displaying the EPG |
29 |
Viewing information on the EPG |
29 |
Recording programmes |
30 |
Setting the manual timer |
31 |
|
|
Optional Equipment |
32 |
Connecting equipment to the TV |
32 |
Additional information when connecting equipment |
33 |
Selecting the output source for the scart socket F |
33 |
Using Smartlink |
34 |
|
|
Additional Information |
35 |
Specifications |
35 |
Troubleshooting |
36 |
|
|
3

Safety First
Safety Information
Televisions operate on extremely high voltages. To prevent fire or electric shock, please follow the safety procedures indicated below. For your own safety, never open the cabinet. Refer servicing to qualified personnel only.
For General Safety
•Do not expose the TV set to rain or moisture.
•Do not remove the rear cover.
For Safe Installation
•Do not install the TV in hot, humid or excessively dusty places.
•Do not block or cover the ventilation openings. For ventilation, leave a space of at least 10 cm all around the set.
•Do not install the TV where it may be exposed to mechanical vibrations.
For Safe Operation
•Do not operate the TV set on anything other than a 220-240V AC, 50Hz supply.
•Unplug the TV if any liquid or solid objects fall in through the ventilation slots. Have it checked immediately.
•Do not disconnect the TV by pulling on the power cable. Disconnect by removing the mains plug.
Caution
Do not knock or rub on the tube face with sharp or hard objects. Remove finger prints only with a soft cloth dampened with glass cleaner. Do not use any abrasive cleaners!
4
Quick Start Guide
Follow steps 1-7 to: Check the accessories supplied
Insert batteries into your remote control
Connect the speakers to your TV
Connect the aerial to your TV
Plug in and switch on the TV
View programmes on your TV
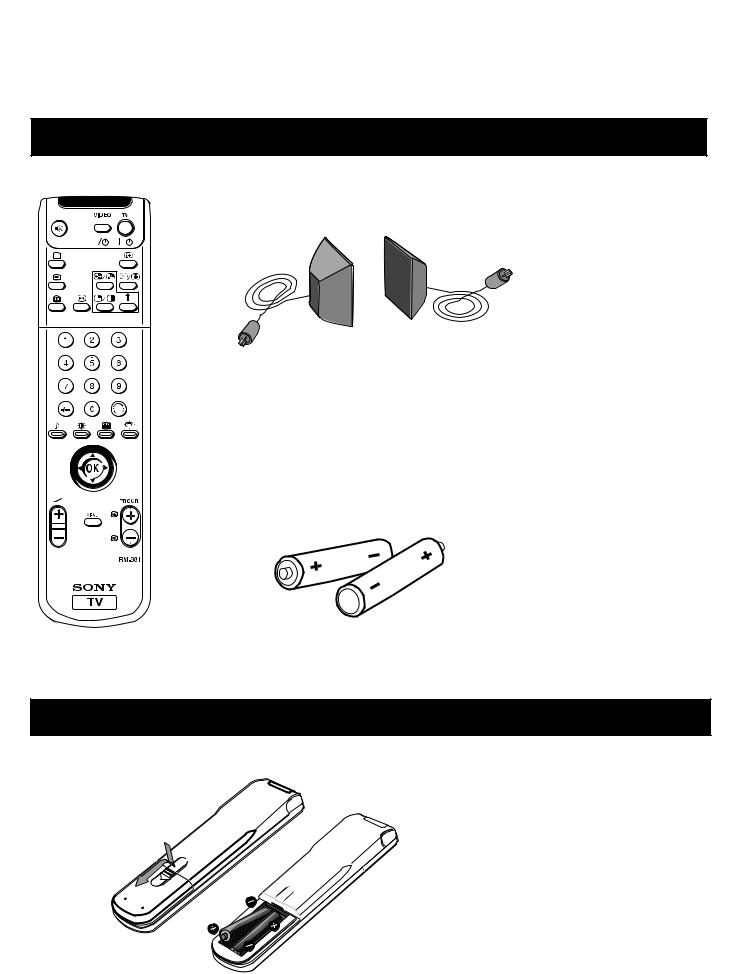
1. Checking the accessories supplied
Surround Speakers
Batteries
Remote Control
Note: The remote control supplied may be type RM-892.
However, the operating function of each button will be the same.
2. Inserting batteries into the remote control
Always remember to dispose of used batteries in an environmental friendly way.
5
Quick Start Guide
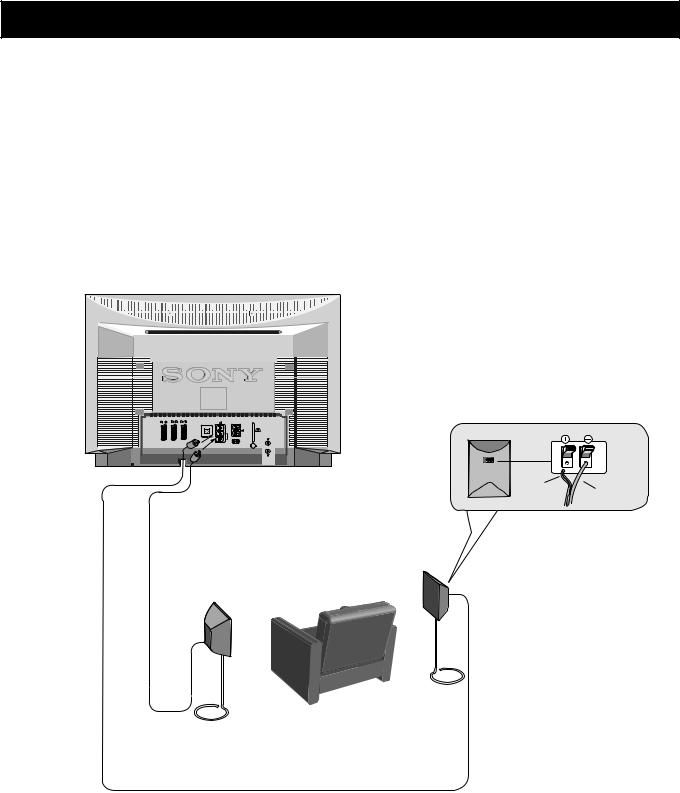
3.1.Connecting the speakers
!Before switching on the TV, you need to connect the speakers to the TV using the leads provided. The striped lead is for the red terminal of the speaker; the black lead for the black terminal.
Dolby* ProLogic Surround normally requires 5 speakers:
Centre Speaker (incorporated in the TV) - to anchor the stable sound image, like dialogues, to the TV screen.
Left and Right Front Speakers (incorporated in the TV) - for the normal two channel stereo or bilingual broadcasts.
Surround Speakers - for the special effects created by the surround channels.
a) To connect the speakers provided:
1/ |
1 |
2 |
2 |
4 |
4 |
C |
L/G/ |
.... |
|
S/I |
|
S |
R/D/ |
|
|
D/D |
|
S |
|
|
|
|
MODEM |
striped |
black |
|
lead |
||
lead |
||
|
Your |
sitting |
|
|
position |
|
Surround Speakers**
*Manufactured under licence from Dolby Laboratories Licensing Corporation. “Dolby”, “ProLogic” and the double-D symbol are trademarks of Dolby Laboratories Licensing Corporation.
**For the best sound effect place the surround speakers one meter above your listening position.
6
Quick Start Guide
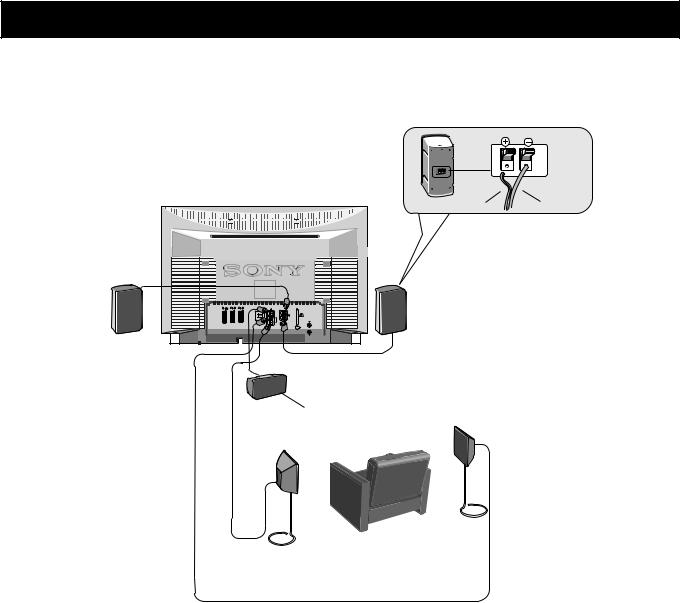
3.2.Connecting the speakers
b)To connect your own speakers (when using your own speakers, make sure they are at least 4 ohms impedance and magnetically shielded):
striped |
black |
lead |
lead |
....
|
|
|
|
|
|
|
|
|
|
|
|
|
|
|
|
|
|
Centre |
Speaker |
||||
|
|
|
|
|
|||
|
position |
Your |
sitting |
|
Surround Speakers
7
Quick Start Guide
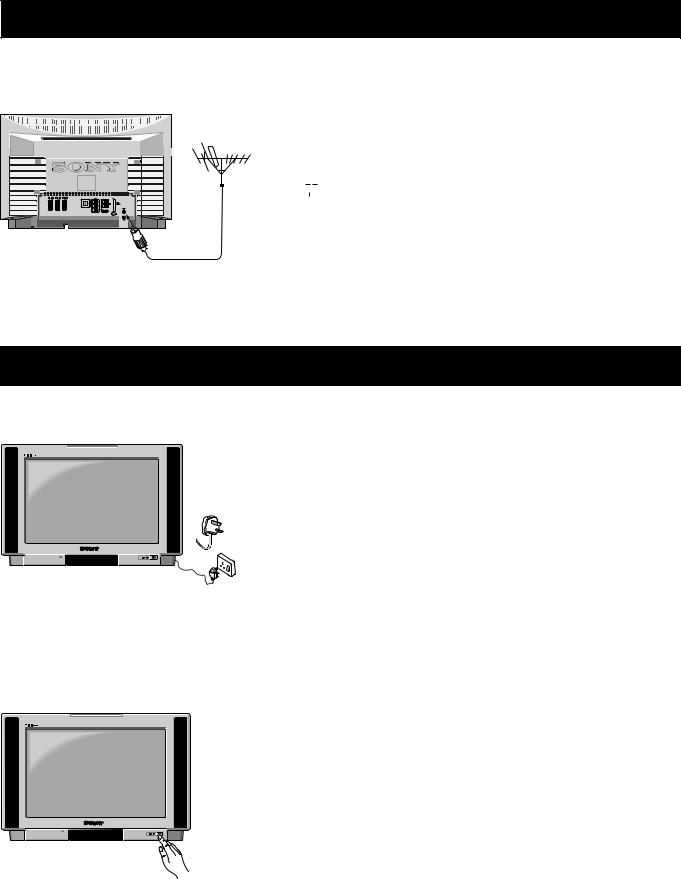
4. Connecting the aerial
Connect a conventional aerial to the socket
marked 
 on the rear of the TV.
....
5. Switching on the TV
Connect the TV plug to the mains socket (220240V AC, 50Hz) and switch on.
Push in the on/off switch on the front of the
TV.
8

Quick Start Guide
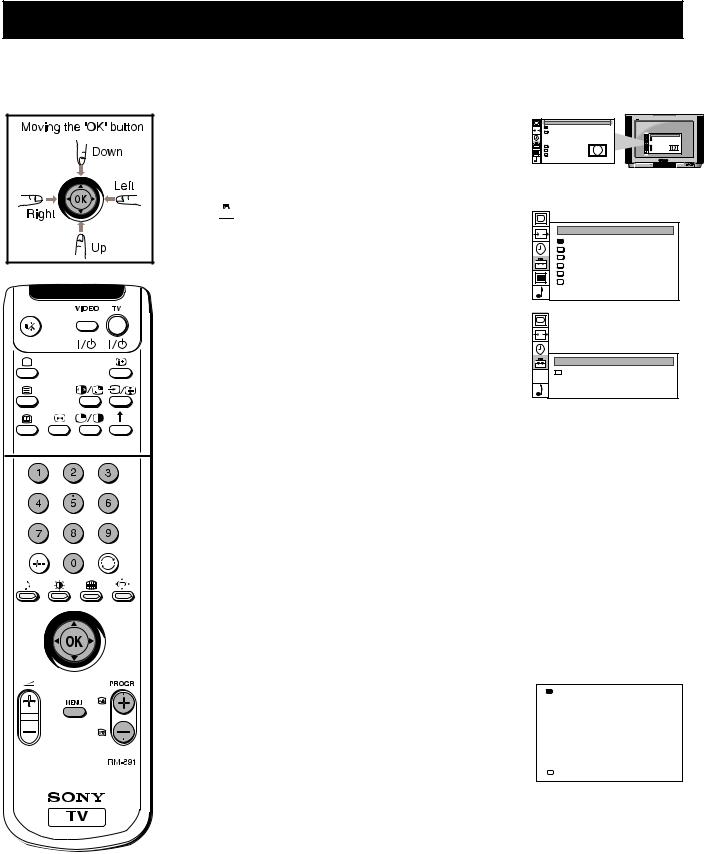
6. Automatically tuning the TV
You can tune the TV to receive the new digital channels and/or the traditional analogue channels. If at any time during this procedure you want to return to the normal TV picture, press the MENU button.
1Press the MENU button on the remote control to display the menu on the TV screen.
2 Move the OK button on the remote control DOWN to select the  symbol on the menu screen then move RIGHT to enter the ‘PRESET’ menu.
SCREEN MODE
|
Screen Mode |
[zoom |
] |
|
Screen Position |
[ 0 |
] |
SCREEN MODE
Screen Mode |
[zoom |
] |
Screen Position |
[ 0 |
] |
Strobe |
|
Strobe |
|
[on] |
Auto 16:9 |
[on] |
|
Auto 16:9 |
Correction |
[off] |
|
|
|
||
Correction |
[off] |
|
|
PRESET
Auto Programme
Programme Setup
Manual Programme Preset
Programme Sorting
Parental Lock
Installation
3Move the OK button DOWN to select “Programme Setup” then move RIGHT to enter the ‘PROGRAMME SETUP’ menu.
4Move the OK button RIGHT to highlight the brackets then move repeatedly DOWN to select ‘Digital’ if you wish to view digital channels or ‘Analogue’ if you wish to view analogue channels.
5Press the OK button to confirm then move LEFT to display the PRESET menu.
6Move the OK button UP to select ‘Auto Programme’ then move the OK button RIGHT to display the “AUTO PROGRAMME” menu.
7Press the OK button to start the automatic tuning process. The word ‘searching’ now flashes on the menu screen and the TV starts to store all available channels. When tuning digital channels, please be patient and do not press any buttons as the tuning process takes approximately twenty minutes depending on the number of channels.
8When the autotune procedure is complete, the PRESET menu appears on the screen and the channel currently being broadcast on programme 1 is displayed.
9If you wish to tune in both the digital channels and the analogue channels, repeat steps 3-8, remembering to change your selection in step 4.
10Press the MENU button to remove the ‘PRESET’ menu from the TV screen.
Notes: • If you wish to stop the “autotune” procedure, press the OK button then the MENU button on the remote control.
•If, after tuning is complete, no digital programme is displayed on the TV, repeat steps 1-10 but select ‘Analogue’ in the Programme Setup menu screen. When digital programmes become available in your area, repeat steps 1-10 above and select ‘Digital’ in the Programme Setup menu screen.
PROGRAMME SETUP
|
|
|
|
|
|
Programme Type |
[Digital] |
|
|
|
|
|
|
||
|
|
|
|
|
|
|
|
|
|
|
|
|
|
|
|
|
|
|
|
|
|
|
|
|
|
|
|
|
|
|
|
|
|
|
|
|
|
|
|
PRESET
Auto Programme
Programme Setup
Manual Programme Preset
Programme Sorting
Parental Lock
Installation
AUTO PROGRAMME
START
|
|
|
PROG |
CH |
SERVICE |
|
|
|
|
||||
|
|
|
- - |
63 |
S- - |
|
|
|
|
|
|
|
|
|
|
|
|
|
|
|
|
|
Searching |
|
26% complete |
||
|
|
|||||
|
|
|
|
|
|
|
|
|
|
|
|
|
|
PRESET
Auto Programme
Programme Setup
Manual Programme Preset
Programme Sorting
Parental Lock
Installation
PROGRAMME SETUP
|
|
|
Programme Type |
[Analogue] |
|
|
|
||
|
|
|
|
|
|
|
|
|
|
9
Quick Start Guide
7. Viewing digital or analogue channels
Once you have tuned in the new digital channels and/or the traditional analogue channels, you have the option to view the digital or analogue channels using the TV menu system or the channel table.
Using the TV menu system
1 Press the MENU button on the remote control to display the menu on the TV screen.
2 Move the OK button on the remote control DOWN to select
the  symbol on the menu screen then move RIGHT to enter the ‘PRESET’ menu.
3 Move the OK button DOWN to select ‘Programme Setup’ then move RIGHT to enter the ‘PROGRAMME SETUP’ menu.
4 Move the OK button RIGHT to highlight the brackets then move repeatedly DOWN to select ‘Digital’ if you wish to view digital channels or ‘Analogue’ if you wish to view analogue channels.
5 Press the OK button to confirm your selection.
6 Press the MENU button to remove the menu from the TV screen.
7You can now change channel using one of the following methods:
a) Using the PROGR+/- button
Press the PROGR+/- buttons on your remote control to change channels up or down, one at a time.
b) Using the channel number
If you know the channel number, you can use the numbered buttons on your remote control to key in the number.
Using the channel table
1 Press the OK button on the remote control to display the channel table on the TV screen.
2 Move the joystick UP or DOWN to select ‘View’ then move RIGHT to highlight the brackets.
3 Move the OK button UP or DOWN to select “Analogue’ if you wish to view analogue channels or ‘Digital’ if you wish to view digital channels.
4 Press the OK button to confirm your choice.
5Move the OK button UP to select ‘Programme Index’ then move RIGHT to enter the channel table.
6Move the OK button UP or DOWN to select the channel you wish to view then press the OK button. The channel you selected appears on screen.
SCREEN MODE
|
|
Screen Mode |
[zoom |
] |
|
|
Screen Position |
[ 0 |
] |
SCREEN MODE
Screen Mode |
[zoom |
] |
Screen Position |
[ 0 |
] |
Strobe |
|
Strobe |
|
Auto 16:9 |
[on] |
Correction |
[off] |
|
|
||
Correction |
[off] |
|
|
PRESET
Auto Programme
Programme Setup
Manual Programme Preset
Programme Sorting
Parental Lock
Installation
PROGRAMME SETUP
|
|
|
Programme Type |
[Digital] |
|
|
|
||
|
|
|
|
|
Programme Index
|
|
|
|
|
1 |
BBC1 |
|
|
2 |
BBC2 |
|
|
3 |
ITV |
|
|
4 |
S4C |
|
|
5 |
CH4 |
|
|
6 |
C22 |
|
|
7 |
C29 |
|
|
8 |
AV1 |
|
View |
[Analogue] |
||
10
 Loading...