SONY KV-29FX30K, KV-25FX30K User Manual [ru]

4-206-060-31(1)
R
FD Trinitron
Colour Television
Instruction Manual |
GB |
|
Инструкции за експлоатация |
|
|
BG |
||
|
|
|
Návod k obsluze |
|
CZ |
Kezelési útmutató |
|
|
|
HU |
|
Instrukcja obsługi |
|
|
PL |
||
|
|
|
Инструкция пo эксплyатации |
|
RU |
KV-25FX30K
KV-29FX30K
© 2001 by Sony Corporation


Introduction
Thank you for choosing this Sony FD Trinitron Colour Television.
Before operating the TV, please read this manual thoroughly and retain it for future
reference.
•Symbols used in the manual:
• Informs you of possible hazards.
• Important information
• Information on a feature.
•1,2... Sequence of instructions.
• K
K  Shaded buttons on the remote control
 show you the buttons you have to press to follow the sequence of the instructions.
• Informs you of the result of instructions.
Table of Contents
Introduction.............................................................................................................................................. |
3 |
|
|
Safety Information................................................................................................................................... |
4 |
|
|
Overview |
|
|
|
Overview of Remote Control Buttons .................................................................................................. |
5 |
|
|
Overview of TV Buttons ........................................................................................................................ |
6 |
|
|
Installation |
|
|
|
Inserting Batteries into the Remote Control ........................................................................................ |
6 |
|
|
GB |
|||
Connecting the Aerial and VCR ........................................................................................................... |
6 |
||
|
|||
First Time Operation |
|
|
|
Switching On the TV and Automatically Tuning .............................................................................. |
7 |
|
|
Menu system |
|
|
|
Introducing and Using the Menu System............................................................................................ |
9 |
|
|
Menu Guide: |
|
|
|
Picture Adjustment ............................................................................................................................. |
9 |
|
|
Sound Adjustment............................................................................................................................. |
10 |
|
|
Sleep Timer......................................................................................................................................... |
11 |
|
|
Language/Country ........................................................................................................................... |
11 |
|
|
Auto Tuning ....................................................................................................................................... |
11 |
|
|
Programme Sorting ........................................................................................................................... |
12 |
|
|
Programme Labels............................................................................................................................. |
12 |
|
|
AV Preset ............................................................................................................................................ |
12 |
|
|
Manual Programme Preset............................................................................................................... |
13 |
|
|
Noise Reduction................................................................................................................................. |
15 |
|
|
AV2 Output ........................................................................................................................................ |
15 |
|
|
RGB Centring ..................................................................................................................................... |
16 |
|
|
Picture Rotation ................................................................................................................................. |
16 |
|
|
Teletext............................................................................................................................................... |
17 |
|
|
Additional Information |
|
|
|
Connecting Optional Equipment ........................................................................................................ |
18 |
|
|
Using Optional Equipment .................................................................................................................. |
19 |
|
|
Specifications.......................................................................................................................................... |
20 |
|
|
Troubleshooting..................................................................................................................................... |
21 |
|
Table of Contents |
3 |
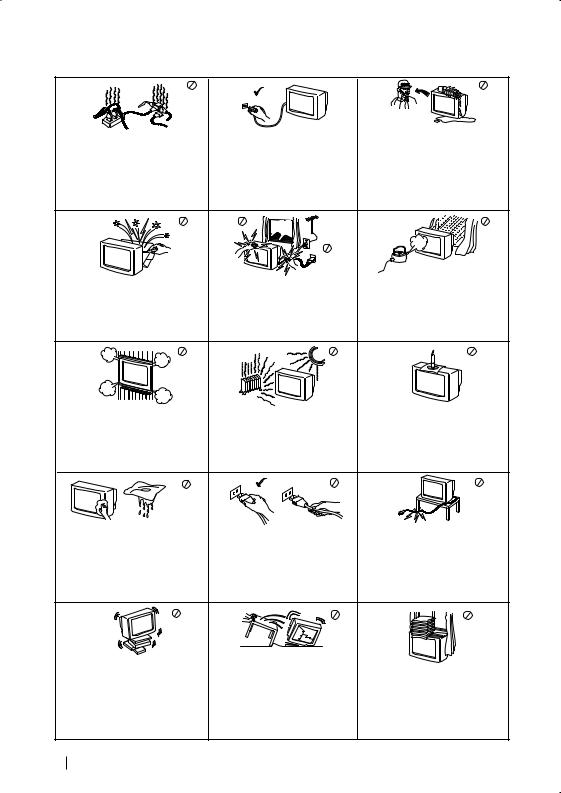
Safety Information
|
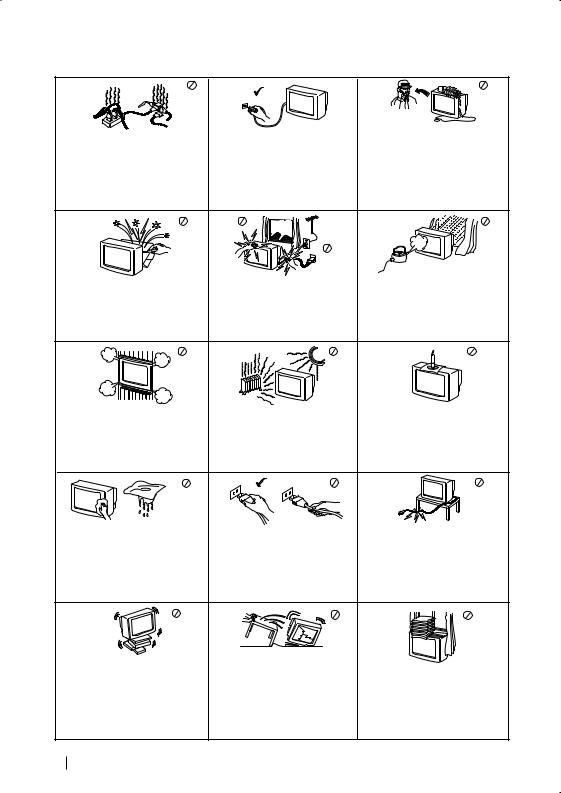
For environmental and safety |
Never push objects of any kind into |
|||||
This set is to operate on a 220- |
the set as this could result in a fire |
||||||
240V AC supply only. Take care |
reasons, it is recommended that |
or electric shock. Never spill liquid |
|||||
not to connect too many |
the TV set is not left in standby |
of any kind on the set. If any liquid |
|||||
appliances to the same power |
mode when not in use. Disconnect |
or solid object does fall through, do |
|||||
socket as this could result in fire |
from the mains. |
not operate the TV. Have it checked |
|||||
immediately by qualified |
|||||||
or electric shock. |
|
|
|
||||
|
|
|
personnel. |
||||
|
|
|
|
||||
|
|
|
|
|
|
|
|
|
|
|
|
|
|
|
|
|
|
|
|
|
|
|
|
|
|
|
|
|
|
|
|
Do not open the cabinet and the rear |
For your own safety, do not touch |
To prevent fire or shock |
cover of the TV. Refer to qualified |
any part of the TV, power lead or |
hazard, do not expose the TV |
service personnel only. |
aerial lead during lightning |
to rain or moisture. |
|
storms. |
|
Do not cover the |
Never place |
To prevent fire, keep inflammable |
|
ventilation openings of the TV For |
|||
the TV in hot, humid or |
objects or naked lights (eg |
||
ventilation, leave a space of at |
|||
excessively dusty places. Do not |
candles) away from the TV. |
||
least 10cm all around the set. |
|||
install the TV where it may be |
|
||
|
|
||
|
exposed to mechanical vibrations. |
|
Clean the TV with a soft, lightly |
Pull out the power lead by the |
Take care not to place heavy |
|
objects on the power lead as this |
|||
dampened cloth. Do not use |
plug. Do not pull on the power |
could result in damage. |
|
benzine, thinner or any other |
|||
lead itself. |
We recommend you wind any |
||
chemicals to clean the TV. Do not |
|||
scratch the TV screen. As a safety |
|
excess lead around the holders |
|
precaution, unplug the TV before |
|
provided on the rear of the TV. |
|
cleaning it. |
|
|
Place the TV on a secure stable |
Unplug the power lead before |
|
|
moving the TV. Avoid uneven |
Do not cover the ventilation |
||
stand. Do not allow children to |
|||
surfaces, quick steps or excessive |
openings of the TV with items |
||
climb on to it. Do not place the TV |
|||
force. If the set has been dropped |
such as curtains or newspapers |
||
on its side or face up. |
|||
or damaged, have it checked |
etc. |
||
|
|||
|
immediately by qualified service |
|
|
|
personnel. |
|
4 Safety Information
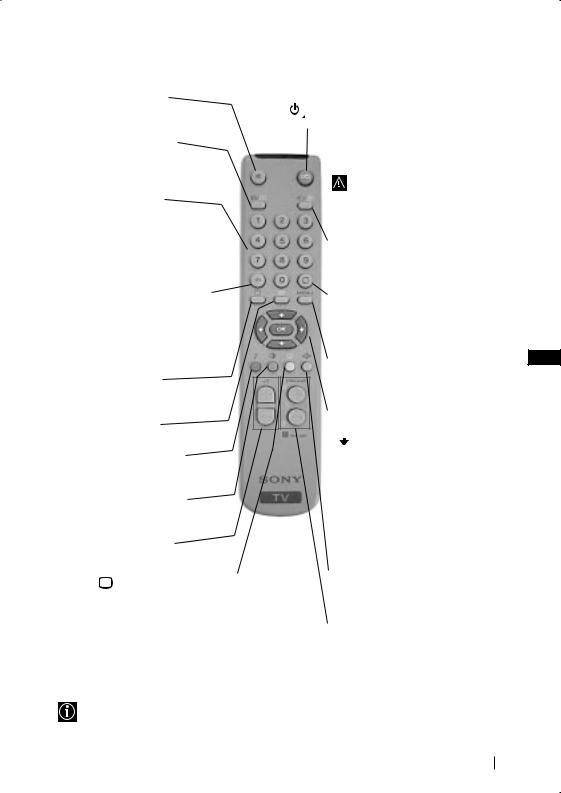
Overview of Remote Control Buttons
Muting the Sound
Press to mute TV sound. Press again to restore the sound.
Displaying on Screen information
Press to display all on-screen indications. Press again to cancel.
Selecting channels
Press to select channels.
For double-digit programme numbers, enter the second digit within 2.5 seconds.
or
Press -/-- and then the first and second digit.
If you enter an incorrect first digit, this should be corrected by entering another digit (0-9) and then selecting -/-- button again to enter the programme number of your choice.
Selecting TV mode
Press to switch off teletext or video input.
Selecting Teletext
Press to switch on teletext.
Selecting sound mode
Press repeatedly to change the sound mode.
Selecting Picture mode
Press repeatedly to change the picture mode.
Adjusting TV volume
Press to adjust the volume of the TV.
This button only works in Teletext mode. Function  associated to this button does not work with this TV.
To Temporarily Switch Off TV |
|
||||||||
Press to temporarily switch off TV (the standby |
|
||||||||
indicator |
|
on TV lights up). Press again to switch on |
|
||||||
|
|
|
|
||||||
TV from standby mode. |
|
||||||||
|
|
|
|
|
|
|
|
To save energy we recommend |
|
|
|
|
|
|
|
|
|
switching off completely when TV is not |
|
|
|
|
|
|
|
|
|
in use. |
|
|
|
|
|
|
|
|
|
After 15 minutes without a |
|
|
|
|
|
|
|
|
|
signal and without any button |
|
|
|
|
|
|
|
|
|
being pressed, the TV switches |
|
|
|
|
|
|
|
|
|
automatically into standby |
|
|
|
|
|
|
|
|
|
mode. |
|
|
|
|
|
|
|
|
|
Selecting input source |
|
|
|
|
|
|
|
|
|
Press repeatedly until the desired |
|
|
|
|
|
|
|
|
|
input symbol of the source appears |
|
|
|
|
|
|
|
|
|
on the TV screen. |
|
|
|
|
|
|
|
|
|
Back to the channel last |
|
|
|
|
|
|
|
|
|
|
|
|
|
|
|
|
|
|
|
watched |
|
|
|
|
|
|
|
|
|
Press to watch the last channel |
|
|
|
|
|
|
|
|
|
selected (watched for at least 5 |
|
|
|
|
|
|
|
|
|
seconds). |
|
|
|
|
|
|
|
|
|
Displaying the menu system |
|
|
|
|
|
|
|
|
|
GB |
|
Press to display the menu on the TV screen. Press again to remove the menu display from the TV screen.
Menu selection
•When MENU is switched on:
 Scroll Up
Scroll Down
 Previous menu or selection
  Next menu or selection
OK confirms your selection
•When MENU is switched off:
OK Shows a channel overview. Press  or
or  to select the channel and then, press again the OK button to watch the selected channel.
Selecting Screen format
Press to view programmes in 16:9 mode. Press again to return to 4:3 mode.
Selecting channels
Press to select the next or previous channel.
Besides TV functions, all coloured buttons as well as green symbols are also used for Teletext operation. For more details, please refer to “Teletext” section of this instruction manual.
Overview 5
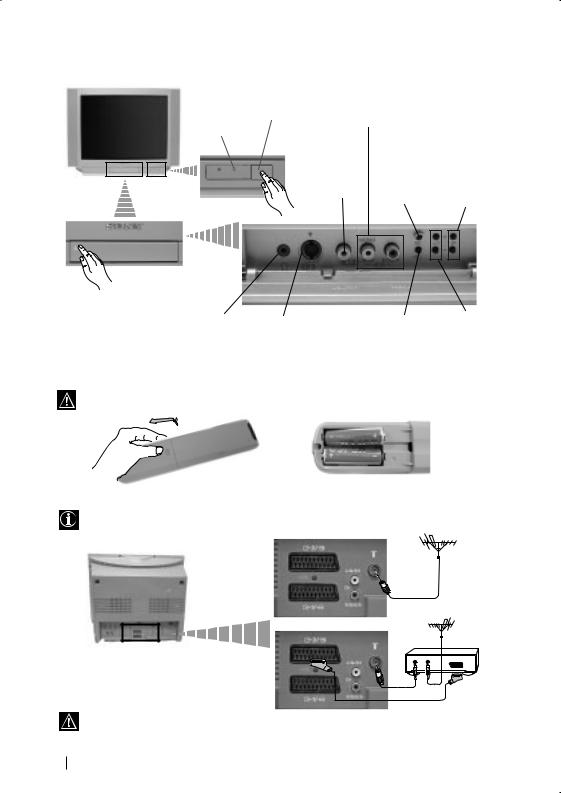
Overview of TV Buttons
Standby indicator
Press on the mark on the door flap to reveal the control panel.
Headphones jack
On/Off switch |
Audio |
|
||
Input jacks |
|
|||
|
|
|||
|
|
|
Programme Up |
|
Video |
|
Auto Start |
or Down But- |
|
Input jack |
tons (Selects TV |
|||
Up Button |
||||
|
|
channels) |
||
S video Input jack |
Selecting |
Volume control |
|
Input source |
buttons |
||
|
Inserting Batteries into the Remote Control
Make sure you insert the supplied batteries using the correct polarities.
Always remember to dispose of used batteries in an environmental friendly way.
Connecting the Aerial and VCR
Connecting cables are not supplied.
or
VCR
OUT |
IN |
For more details of VCR connection, please |
Scart lead is optional. |
refer to the section “Connecting Optional |
|
Equipment” of this instruction manual. |
|
6 Overview-Installation
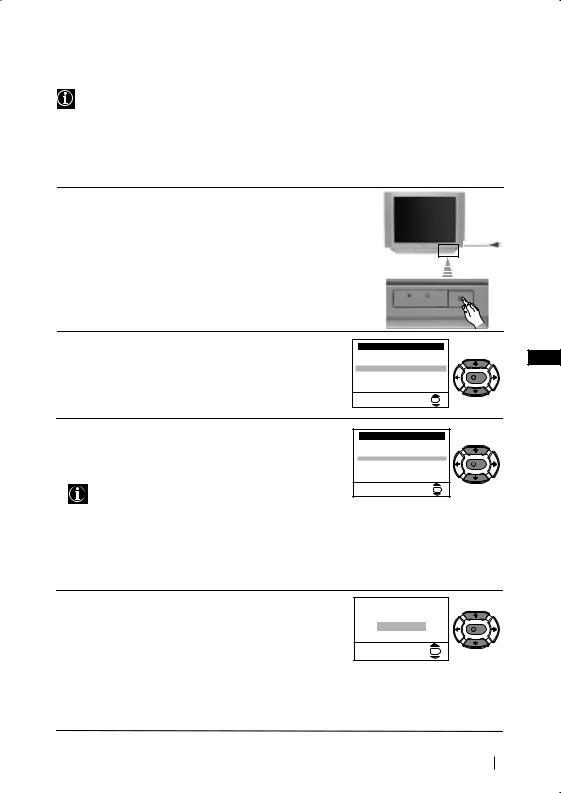
Switching On the TV and Automatically Tuning
The first time you switch on your TV, a sequence of menu screens appear on the TV enabling you to: 1) choose the language of the menu screen, 2) choose the country in which you wish to operate the TV, 3) adjust the picture slant 4) search and store all available channels (TV Broadcast) and 5) change the order in which the channels (TV Broadcast) appear on the screen.
However, if you need to change any of these settings at a later date, you can do that by selecting the appropriate option in the  (Set Up menu) or by pressing the Auto Start Up Button
  on the TV set.
1 Connect the TV plug to the mains socket (220-240V AC, 50Hz)
Press the on/off button on the TV set to turn on the TV. The first time you press this button, a Language menu displays automatically on the TV screen.
2 Press the  or
or  button on the remote control to select the language, then press the OK button to confirm your selection. From now on all the menus will appear in the selected language.
Language |
|
i4 |
|
Svenska |
|
Norsk |
|
English |
|
Nederlands |
K |
Français |
|
Italiano |
|
i$ |
|
Select Language: |
OK |
3 The Country menu appears automatically on the TV screen. Press the  or
or  button to select the country in which you will operate the TV set, then press the OK button to confirm your selection.
• If the country in which you want to use the TV set does not appear in the list, select “-” instead of a country.
•In order to avoid wrong teletext characters for Cyrillic languages we recommend to select Russia country in the case that your own country does not appear in the list.
Country |
|
i4 |
|
Sverige |
|
Norge |
|
- |
|
Italia |
K |
Deutschland |
|
Österreich |
|
i$ |
|
Select country: |
OK |
GB
4 Because of the earth’s magnetism, the picture might slant. The Picture Rotation menu allows you to correct the picture slants if it is necessary.
a)If it is not necessary, press  or
or  to select Not necessary and press OK.
b)If it is necessary, press  or
or  to select Adjust now, then press OK and correct any slant of the picture
between –5 and +5 by pressing  or
or  . Finally press OK to store.
If picture slants, please |
|
|
adjust picture rotation |
|
|
Not necessary |
K |
|
Adjust now |
||
|
||
OK |
|
continued...
First Time Operation 7
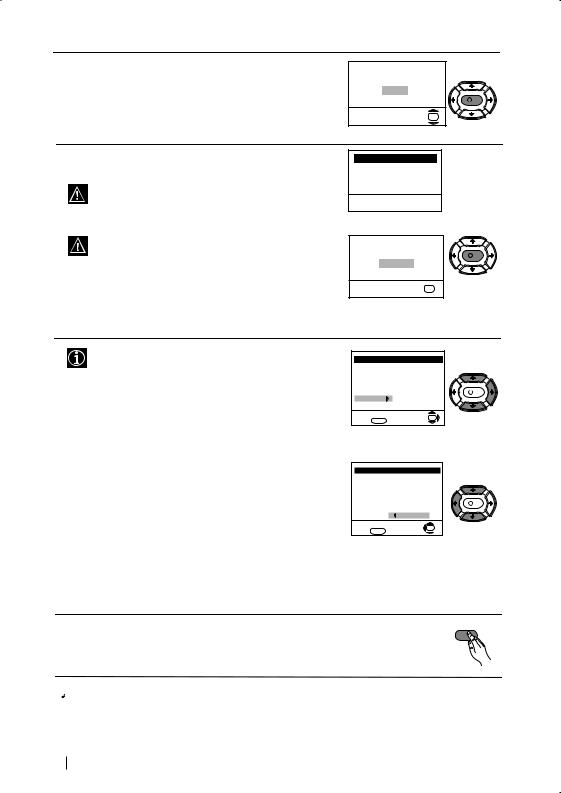
5 The Auto Tuning menu appears on the screen. Press the OK button to select Yes.
Do you want to start automatic tuning?
Yes |
|
No |
K |
|
|
|
OK |
6The TV starts to automatically search and store all available broadcast channels for you.
This procedure could take some minutes. Please be patient and do not press any button, otherwise the automatic tuning will not be completed.
If no channels were found during the auto tuning process then a new menu appears automatically on the screen asking you to connect the aerial. Please connect the aerial (see page 6) and press OK. The auto tuning process will start again.
Auto Tuning
Programme: 01
System: B/G
Channel: C21
Searching...
No channel found |
|
Please connect aerial |
K |
|
|
Confirm |
|
OK |
|
7 After all available channels are captioned and stored, the Programme Sorting menu appears automatically on the screen enabling you to change the order in which the channels appear on the screen.
a)If you wish to keep the broadcast channels in the tuned order, go to step 8.
b)If you wish to store the channels in a different order:
1Press the  or
or  button to select the programme number with the channel (TV Broadcast) you wish to rearrange, then press the
  button.
2Press the  or
or  button to select the new programme number position for your selected channel (TV Broadcast), then press
  .
.
3Repeat steps b)1 and b)2 if you wish to change the order of the other channels.
Programme Sorting |
|
||
Programme: |
|
|
|
01 |
TVE |
|
|
02 |
TVE2 |
|
|
03 |
TV3 |
|
K |
04 |
C33 |
|
|
05 |
C27 |
|
|
06 |
C58 |
|
|
Select channel: |
|
OK |
|
Exit: |
MENU |
|
|
|
|
||
Programme Sorting |
|
||
Programme: |
|
|
|
01 |
TVE |
|
|
02 |
TVE2 |
|
|
03 |
TV3 |
|
K |
04 |
C33 |
|
|
05 |
C27 |
|
|
06 |
C58 |
05 |
C27 |
Select new position: |
OK |
||
Exit: |
MENU |
|
|
|
|
||
8 Press the MENU button to remove the menu from the |
MENU |
|
|
screen. |
|
 Your TV is now ready for use
8 First Time Operation
Introducing and Using the Menu System
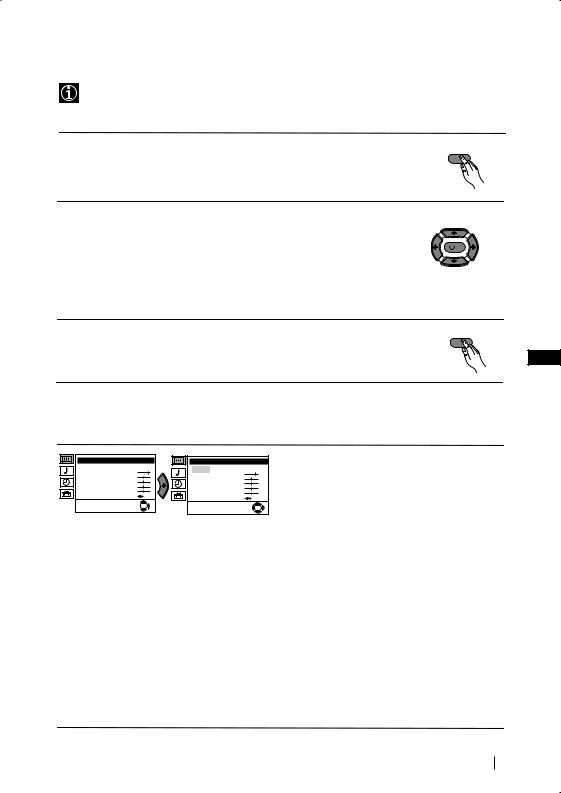
Your TV uses an on-screen menu system to guide you through the operations. Use the following buttons on the Remote Control to operate the menu system:
1 Press the MENU button to switch the first level menu on. |
|
MENU |
|
|
|
2 • To highlight the desired menu or option, press  or
or  .
.
•To enter to the selected menu or option, press  .
.
•To return to the last menu or option, press  .
.
•To alter settings of your selected option, press  /
/  /
/  or
or  .
.
•To confirm and store your selection, press OK.
K
3 Press the MENU button to remove the menu from the screen. |
MENU |
|
|
GB
Menu Guide
Level 1 |
Level 2 |
Level 3 / Function |
Picture Adjustment |
Mode: Personal |
Contrast |
Brightness |
Colour |
Sharpness |
Hue |
Reset |
OK |
Picture Adjustment |
Mode: Personal |
Contrast |
Brightness |
Colour |
Sharpness |
Hue |
Reset |
OK |
PICTURE ADJUSTMENT
The “Picture Adjustment” menu allows you to alter the picture adjustments.
To do this: after selecting the item you want to alter press  , then press repeatedly
  /
/  /
/  or
or  to adjust it and finally press OK to store the new adjustment.
This menu also allows you to customise the picture mode based on the programme you are watching:
 Personal (for individual settings).
  Live (for live broadcast programmes).
  Movie (for films).
•Brightness, Colour and Sharpness can only be altered if “Personal” mode is selected.
•Hue is only available for NTSC colour signal (e.g: USA video tapes).
•Select Reset and press OK to reset the picture to the factory preset levels.
continued...
Menu System 9
Level 1 |
Level 2 |
Level 3 / Function |
Picture Adjustment |
Mode: Personal |
Contrast |
Brightness |
Colour |
Sharpness |
Hue |
Reset |
OK |
Sound Adjustment |
||
Mode: |
Personal |
|
Treble |
|
|
Bass |
|
|
Balance |
|
|
Reset |
|
|
Dual Sound: |
Mono |
|
Detail Adjustment |
||
|
|
OK |
Sound Adjustment |
||
Mode: |
Personal |
|
Treble |
|
|
Bass |
|
|
Balance |
|
|
Reset |
|
|
Dual Sound: |
Mono |
|
Detail Adjustment |
||
|
|
OK |
SOUND ADJUSTMENT
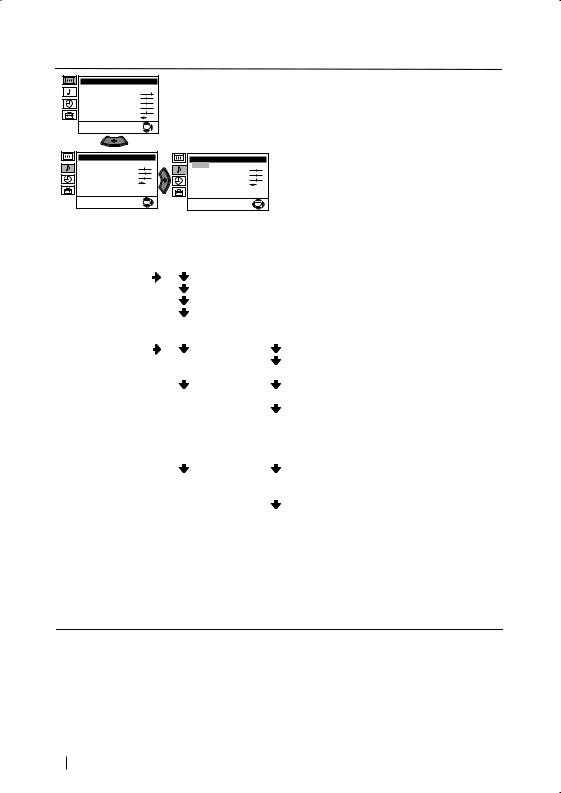
The “Sound Adjustment” menu allows you to alter the sound adjustments.
To do this: after selecting the item you want to alter, press  . then press repeatedly
  /
/  /
/  or
or  to adjust it and finally press OK to store the new adjustment.
This menu also contains two submenus as following:
Mode |
|
Personal (for individual settings) |
|||
|
|
Rock |
|
|
|
|
|
Pop |
|
|
|
|
|
|
|
|
|
|
|
Jazz |
|
|
Normal. |
|
|
|
|
||
Detail Adjustment |
|
Sound Effect: |
|
Off: |
|
|
|
|
|
Spatial: |
Acoustic sound effect. |
|
|
Auto volume: |
|
Off: |
Volume level changes according |
|
|
|
|
|
to the broadcast signal. |
|
|
|
|
On: |
Volume level of the channels will |
|
|
|
|
|
stay the same, independent of the |
|
|
|
|
|
broadcast signal (e.g. in the case of |
|
|
|
|
|
advertisements). |
|
|
TV Speakers: |
|
Off: |
Sound from external amplifier |
|
|
|
|
|
connected to the audio outputs on |
|
|
|
|
|
the rear of the TV set. |
|
|
|
|
On: |
Sound from the TV set. |
•Treble and Bass can only be altered if “Personal” mode is selected.
•Select Reset and press OK to reset the sound to the factory preset levels.
•In case of a bilingual broadcast select Dual Sound and set A for sound channel 1, B for sound channel 2 or Mono for mono channel if available. For a stereo broadcast you can choose Stereo or Mono.
continued...
10 Menu System
Level 1 |
Level 2 |
Level 3 / Function |
Picture Adjustment |
Mode: Personal |
Contrast |
Brightness |
Colour |
Sharpness |
Hue |
Reset |
OK |
Timer |
|
Sleep Timer: |
Off |
|
OK |
Timer |
|
Sleep Timer: |
Off |
|
OK |
SLEEP TIMER
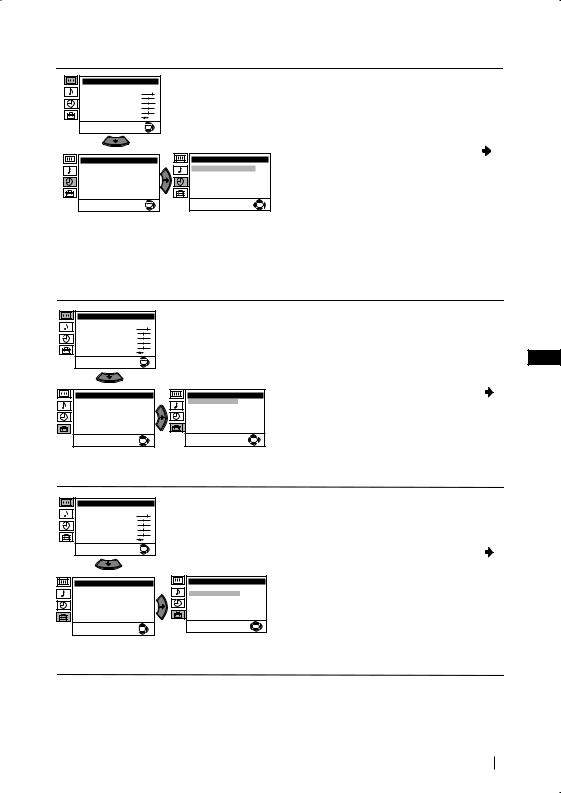
The “Sleep Timer” option in the “Timer” menu allows you to select a time period for the TV to switch itself automatically into the standby mode.
To do this: after selecting the option press , then press  or
or  to set the time period delay (max. of 4 hours) and finally press OK to store.
•While watching the TV, you can press the  button on the remote control to display the time remaining.
•One minute before the TV switches itself into standby mode, the time remaining is displayed on the TV screen automatically.
Picture Adjustment |
Mode: Personal |
Contrast |
Brightness |
Colour |
Sharpness |
Hue |
Reset |
OK |
Set Up |
Language/Country |
Auto Tuning |
Programme Sorting |
Progamme Labels |
AV Preset |
Manual Programme Preset |
Detail Set Up |
OK |
Set Up |
Language/Country |
Auto Tuning |
Programme Sorting |
Progamme Labels |
AV Preset |
Manual Programme Preset |
Detail Set Up |
OK |
LANGUAGE / COUNTRY
The “Language/Country” option in the “Set Up” menu allows you to select the language that the menus are displayed in. It also allows
you to select the country in which you wish to GB operate the TV set.
To do this: after selecting the option, press and then proceed in the same way as in the steps 2 and 3 of the section “Switching On the TV and Automatically Tuning”.
AUTO TUNING
The “Auto Tuning” option in the “Set Up” menu allows you to automatically search for and store all available TV channels.
To do this: after selecting the option, press and then proceed in the same way as in TV steps 5 and 6 of the section “Switching On the TV and Automatically Tuning”.
continued...
Menu System 11
Level 1 |
Level 2 |
Level 3 / Function |
Picture Adjustment |
Mode: Personal |
Contrast |
Brightness |
Colour |
Sharpness |
Hue |
Reset |
OK |
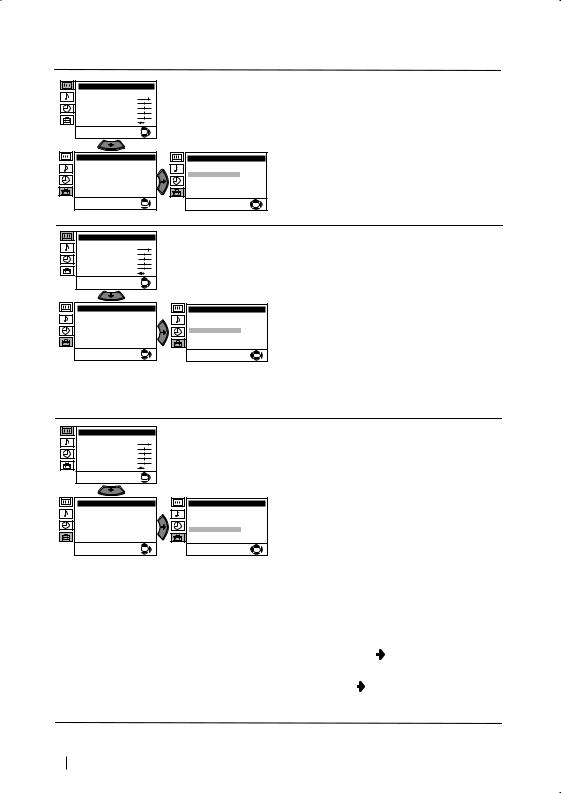
PROGRAMME SORTING
The “Programme Sorting” option in the “Set Up” menu allows you to change the order in which the channels (TV Broadcast) appear on the screen.
Set Up |
Language/Country |
Auto Tuning |
Programme Sorting |
Progamme Labels |
AV Preset |
Manual Programme Preset |
Detail Set Up |
OK |
Picture Adjustment |
Mode: Personal |
Contrast |
Brightness |
Colour |
Sharpness |
Hue |
Reset |
OK |
Set Up |
Language/Country |
Auto Tuning |
Programme Sorting |
Progamme Labels |
AV Preset |
Manual Programme Preset |
Detail Set Up |
OK |
Set Up |
Language/Country |
Auto Tuning |
Programme Sorting |
Progamme Labels |
AV Preset |
Manual Programme Preset |
Detail Set Up |
OK |
Set Up |
Language/Country |
Auto Tuning |
Programme Sorting |
Progamme Labels |
AV Preset |
Manual Programme Preset |
Detail Set Up |
OK |
To do this: after selecting the option, press  and then proceed in the same way as in step 7 b) of the section “Switching On the TV and Automatically Tuning”.
PROGRAMME LABELS
The “Programme Labels” option in the “Set Up” menu allows you to name a channel using up to five characters (letters or numbers).
To do this:
1 After selecting the option, press  , then press
  or
or  to select the programme number with the channel you wish to name.
2 Press  . With the first element of the Label column highlighted, press
  or
or  to select a letter or number (select “-“ for a blank), then press
  to confirm this character. Select the other four characters in the same way. Finally press OK to store.
Picture Adjustment |
Mode: Personal |
Contrast |
Brightness |
Colour |
Sharpness |
Hue |
Reset |
OK |
Set Up |
Language/Country |
Auto Tuning |
Programme Sorting |
Progamme Labels |
AV Preset |
Manual Programme Preset |
Detail Set Up |
OK |
Set Up |
Language/Country |
Auto Tuning |
Programme Sorting |
Progamme Labels |
AV Preset |
Manual Programme Preset |
Detail Set Up |
OK |
AV PRESET
The “AV Preset” option in the “Set Up” menu allows you to designate a name to the external equipment you have connected to the sockets of this TV.
To do this:
1After selecting the option, press  , then press
  or
or  to select the input source you wish to name (AV1 and AV2 are for the rear
Scarts and AV3 for front connectors). Then press  .
.
2In the label column automatically appears a label:
a)If you want to use one of the 6 predefined labels (CABLE, GAME, CAM, DVD,
VIDEO or SAT), press  or
or  to select the desired label and finally press OK to store.
b)If you want to set a different label, select
Edit and press . Then with the first element highlighted, press  or
or  to select a letter, number or “-“ for a blank, then press to confirm this character. Select the other four characters in the same way and finally press OK to store.
continued...
12 Menu System
Level 1 |
Level 2 |
Level 3 / Function |
Picture Adjustment |
Mode: Personal |
Contrast |
Brightness |
Colour |
Sharpness |
Hue |
Reset |
OK |
Set Up |
Language/Country |
Auto Tuning |
Programme Sorting |
Progamme Labels |
AV Preset |
Manual Programme Preset |
Detail Set Up |
OK |
Set Up |
Language/Country |
Auto Tuning |
Programme Sorting |
Progamme Labels |
AV Preset |
Manual Programme Preset |
Detail Set Up |
OK |
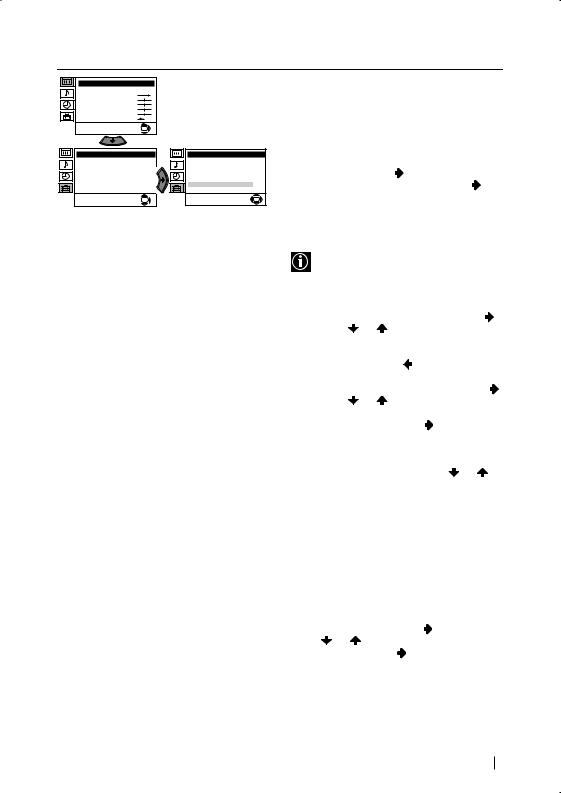
MANUAL PROGRAMME PRESET
The “Manual Programme Preset” option in the “Set Up” menu allows you to:
a)Preset channels or a video input source one by one to the programme order of your choice. To do this:
1 After selecting the ”Manual Programme Preset” option, press then with Programme option highlighted press . Press  or
or  to select on which programme number you want to preset the channel (for VCR, select programme number “0”). Then press
  .
.
2The following option is only available depending on the country you have selected in the “Language/Country” menu.
After selecting the System option, press .
Then press |
or |
to select the TV |
|
|
||
Broadcast system (B/G for western European |
||||||
countries or D/K for eastern European |
|
|
||||
|
GB |
|||||
countries). Then press |
. |
|
|
|||
|
|
|
||||
3 After selecting the Channel option, press . |
||||||
Then press |
or |
to select the channel |
|
|
||
tuning (“C” for terrestrial channels or “S” for |
||||||
cable channels). Next press . After that, |
|
|
||||
press the number buttons to enter directly the |
||||||
channel number of the TV Broadcast or the |
||||||
channel of the VCR signal. If you do not |
|
|
||||
know the channel number, press |
or |
to |
||||
search for it. When you tune the desired channel, press OK twice to store.
Repeat all the above steps to tune and store more channels.
b) Label a channel using up to five characters.
To do this: Highlighting the Programme option, press the PROGR +/- button to select the programme number with the channel you wish to name. When the programme you want to name appears on the screen, select the Label option and press . Next
press |
or |
to select a letter, number or |
|
“-“ for a blank. Press |
to confirm this |
||
character. Select the other four characters in the same way. After selecting all the characters, press OK twice to store.
continued...
Menu System 13
Level 1 |
Level 2 |
Level 3 / Function |
Picture Adjustment |
Mode: Personal |
Contrast |
Brightness |
Colour |
Sharpness |
Hue |
Reset |
OK |
Set Up |
Language/Country |
Auto Tuning |
Programme Sorting |
Progamme Labels |
AV Preset |
Manual Programme Preset |
Detail Set Up |
OK |
Set Up |
Language/Country |
Auto Tuning |
Programme Sorting |
Progamme Labels |
AV Preset |
Manual Programme Preset |
Detail Set Up |
OK |
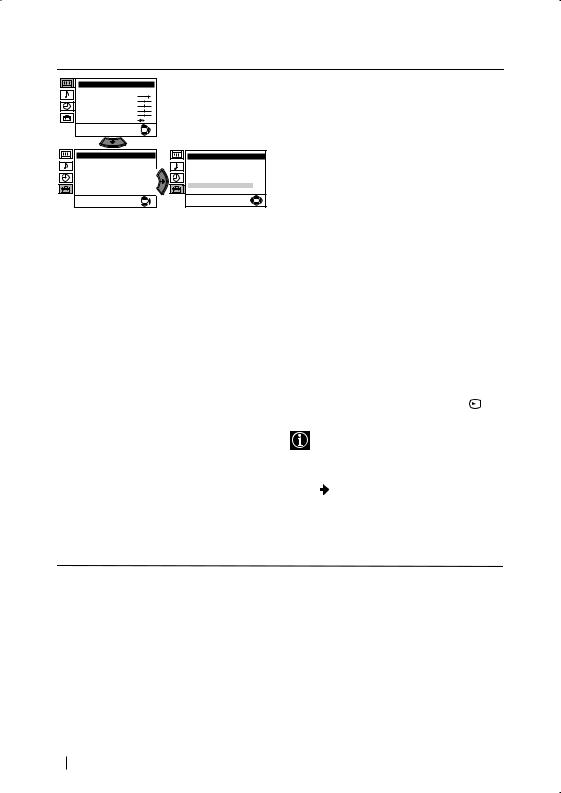
c)Normally the automatic fine tuning (AFT) is operating, however you can manually fine tune the TV to obtain a better picture
if the picture is distorted.
To do this: while watching the channel (TV
Broadcast) you wish to fine tune, select the
AFT option and press  . Next press
  or
or  to adjust the fine tuning between -15 and +15. Finally press OK twice to store.
d)Skip any unwanted programme numbers when they are selected with the PROGR +/- buttons.
To do this: Highlighting the Programme option, press the PROGR +/- button to select the programme number you want to skip. When the programme you want to skip appears on the screen, select the Skip option and press  . Next press
  or
or  to select Yes. Finally press OK twice to confirm and store.
To cancel this function afterwards, select “No” instead of “Yes” in the step above.
e) This option allows you to view and record correctly scrambling channels when using a decoder connected to the Scart :2/ S directly or through a VCR.
This option is only available depending on the country you have selected in the “Language/Country” menu.
To do this: select the Decoder option and press . Next press  or
or  to select On. Finally press OK twice to confirm and store.
To cancel this function afterwards, select “Off” instead of “On” in the step above.
continued...
14 Menu System
Level 1 |
Level 2 |
Level 3 / Function |
Picture Adjustment |
Mode: Personal |
Contrast |
Brightness |
Colour |
Sharpness |
Hue |
Reset |
OK |
Set Up
Language/Country |
Auto Tuning |
Programme Sorting |
Progamme Labels |
AV Preset |
Manual Programme Preset |
Detail Set Up |
OK |
Detail Set Up |
|
Noise Reduction: |
Auto |
AV2 Output: |
TV |
RGB Centring: |
0 |
Picture Rotation: |
0 |
|
OK |
Picture Adjustment |
Mode: Personal |
Contrast |
Brightness |
Colour |
Sharpness |
Hue |
Reset |
OK |
Set Up |
Detail Set Up |
|
Language/Country |
Noise Reduction: |
Auto |
Auto Tuning |
AV2 Output: |
TV |
Programme Sorting |
RGB Centring: |
0 |
Progamme Labels |
Picture Rotation: |
0 |
AV Preset |
|
|
Manual Programme Preset |
|
|
Detail Set Up |
|
|
|
OK |
OK |
|
|
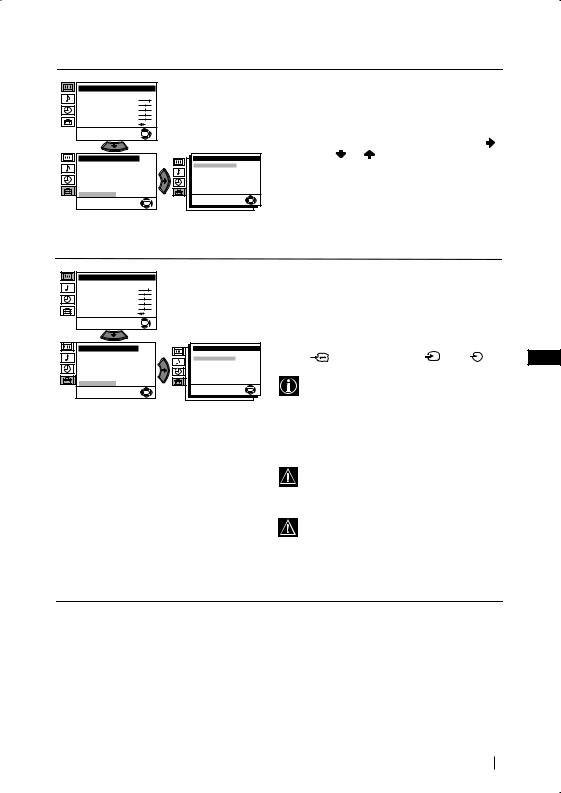
NOISE REDUCTION
The “Noise Reduction” option in the “Detail Set Up” menu allows you to automatically reduce the picture noise visible in the broadcast.
To do this: after selecting the option, press |
. |
||
Then press |
or |
to select Auto. Finally |
|
press OK to confirm and store. |
|
||
To cancel this function afterwards, select “Off” instead of “Auto” in the step above.
AV2 OUTPUT |
|
|
|
The “AV2 Output” option in the “Detail Set |
|
||
Up” menu allows you to select the source to be |
|
||
output from the Scart connector :2/qin |
|
||
order you can record from this Scart any signal |
|
||
coming from the TV or from external |
|
||
equipment connected to the Scart connector |
|
||
:1/ |
or front connectors |
3 and 3. |
GB |
If your VCR supports Smartlink, this procedure is not necessary.
To do this: after selecting the option, press  . Then press
  or
or  to select the desired output signal: TV, AV1, AV3, YC3 or AUTO.
If you select “AUTO”, the output signal will always be the same one that is displayed on the screen.
If you have connected a decoder to the Scart :2/qor to a VCR connected to this Scart, please remember to change back the “AV2 Output” to “AUTO” or “TV” for correct unscrambling.
continued...
Menu System 15
Level 1 |
Level 2 |
Level 3 / Function |
Picture Adjustment |
Mode: Personal |
Contrast |
Brightness |
Colour |
Sharpness |
Hue |
Reset |
OK |
Set Up
Language/Country |
Auto Tuning |
Programme Sorting |
Progamme Labels |
AV Preset |
Manual Programme Preset |
Detail Set Up |
 OK
OK 
Detail Set Up |
|
Noise Reduction: |
Auto |
AV2 Output: |
TV |
RGB Centring: |
0 |
Picture Rotation: |
0 |
|
OK |
Picture Adjustment |
Mode: Personal |
Contrast |
Brightness |
Colour |
Sharpness |
Hue |
Reset |
OK |
Set Up |
Language/Country |
Auto Tuning |
Programme Sorting |
Progamme Labels |
AV Preset |
Manual Programme Preset |
Detail Set Up |
OK |
Detail Set Up |
|
Noise Reduction: |
Auto |
AV2 Output: |
TV |
RGB Centring: |
0 |
Picture Rotation: |
0 |
|
OK |
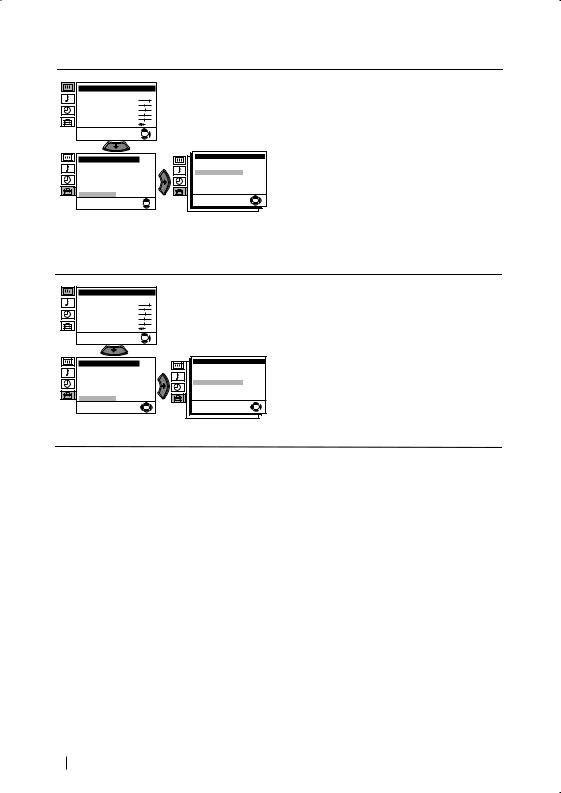
RGB CENTRING
When connecting an RGB source, such as a “PlayStation”, you may need to readjust the horizontal position of the picture. In that case, you can readjust it through the “RGB Centring” option in the “Detail Set Up”.
To do this: while watching an RGB source select the “RGB Centring” option and press  . Then press
  or
or  to adjust the centre of the picture between –10 and +10. Finally press OK to confirm and store.
PICTURE ROTATION
Because of the earth’s magnetism, the picture might slant. In this case, you can correct the picture slant by using the option “Picture Rotation” in the “Detail Set Up” menu.
To do this: after selecting the option, press  . Then press
  or
or  to correct any slant of the picture between -5 and +5 and finally press OK to store.
16 Menu System
Teletext
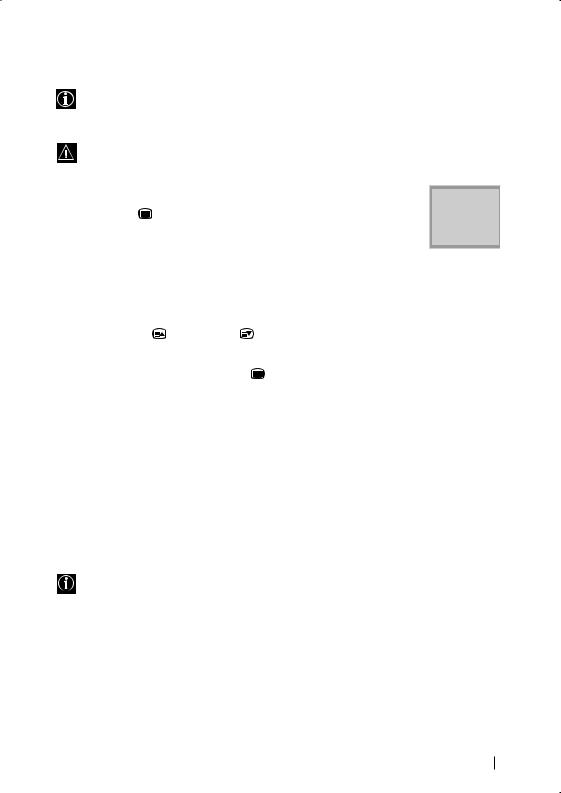
Teletext is an information service transmitted by most TV stations. The index page of the teletext service (usually page 100) gives you information on how to use the service. To operate teletext, use the remote control buttons as indicated below.
Make sure to use a channel (TV Broadcast) with a strong signal, otherwise teletext errors may occur.
To Switch On Teletext : |
|
|
|
|
|
|
|
|
|
|
|
|
|
|
|
|
|
||
After selecting the TV channel which carries the teletext service you wish |
|
TELETEXT |
|||||||
to view, press |
. |
|
Programme |
25 |
|||||
|
|
|
Index |
|
|
|
|||
|
|
|
News |
|
|
|
153 |
||
|
|
|
|
|
|
||||
|
|
|
Sport |
|
|
|
|
101 |
|
To Select a Teletext page: |
|
Weather |
|
|
98 |
||||
|
|
|
|||||||
|
|
|
|
|
|
|
|
||
Input 3 digits for the page number, using the numbered buttons.
•If you have made a mistake, retype the correct page number.
•If the counter on the screen continues searching, it is because this page is not available. In that case, input another page number
To access the next or preceding page: |
|
|
Press PROGR + ( ) or PROGR - ( |
). |
|
|
|
|
To superimpose teletext on to the TV: |
|
GB |
Whilst you are viewing teletext, press |
. Press it again to cancel teletext mode. |
|
To freeze a teletext page:
Some teletext pages have sub-pages which follow on automatically. To stop them, press  /
/ . Press it again to cancel the freeze.
To reveal concealed information (e.g: answer to a quiz):
Press  /
/ . Press it again to conceal the information.
To Switch Off Teletext:
Press  .
.
Fastext
Fastext service lets you access pages with one button push.
While you are in Teletext mode and Fastext is broadcast, a colour coded menu appears at the bottom of the teletext page. Press the colour button (red, green, yellow or blue) to access the corresponding page.
Teletext 17
Connecting Optional Equipment
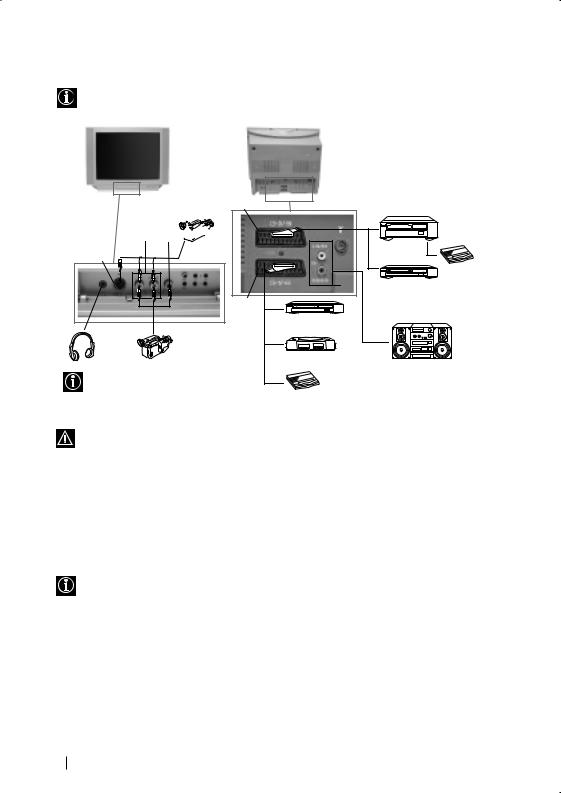
Using the following instruction, you can connect a wide range of optional equipment to your TV set. (Connecting cables are not supplied).
S VHS/Hi8 DVC F camcorder
B C 
A |
D |
8mm/Hi8/ DVC camcorder
When you connect the headphones, the TV speakers will automatically be muted
VCR
Decoder |
EDVDVCR
VCRDVD
1 |
2 |
Hi-fi |
“PlayStation”* |
|
|
* “PlayStation” is a product of Sony Computer Entertainment, Inc.
Decoder * “PlayStation” is a trademark of Sony Computer Entertainment, Inc.
To avoid picture distorsion, do not connect external equipment to connectors Aand Cat the same time.
Connecting a VCR:
To connect a VCR, please refer to the section “Connecting the aerial and VCR” of this instruction manual. We recommend you connect your VCR using a scart lead. If you do not have a scart lead, tune in the VCR test signal to the TV programme number “0” by using the “Manual Programme Preset” option. (for details of how to manually programme these presets, see page 13, step a).
Refer to your VCR instruction manual to find out how to find the output channel of your VCR.
Connecting a VCR that supports Smartlink:
Smartlink is a direct link between the TV set and the VCR. For more information on Smartlink, please refer to the instruction manual of your VCR.
If you use a VCR that supports Smartlink, please connect the VCR by using a Scart lead to the Scart :2/qF.
If you have connected a decoder to the Scart :2/q or through a VCR connected to this Scart:
Select the “Manual Programme Preset” option in the “Set Up” menu and after entering in the “Decoder**” option, select “On” (by using  or
or  ). Repeat this option for each scrambling signal.
**This option is only available depending on the country you have selected in the “Language/Country” menu.
continued...
18 Additional Information

Connecting to external Audio Equipment:
Plug in your Hi-Fi equipment to the audio output sockets E if you wish to amplify the audio output from TV. Next ,using the menu system, select the “Sound Adjustment” menu. Enter the “Detail Adjustment” option and set “TV Speakers” to “Off”.
The audio level of the external speakers can be modified by pressing the volume buttons on the remote control. Also treble and bass settings can be modified through the “Sound Adjustment” menu.
Using Optional Equipment
1
2
Connect your equipment to the designated TV socket, as indicated in the previous page.
Switch on the connected equipment.
3 To watch the picture of the connected equipment, press the  button repeatedly until the correct input symbol appears on the screen.
Symbol Input Signals |
GB |
|
 1 • Audio / video input signal through the Scart connector D
• RGB input signal through the Scart connector D. This symbol appears only if a RGB source has been connected.
 2 • Audio / video input signal through the Scart connector F.
|
S 2 |
• S Video input signal through the Scart connector F. |
|
 3 • Video input signal through the phono socket C and Audio input signal through B.
|
S 3 |
• S Video Input signal through the front S Video input jack A and Audio |
|
||
|
|
signal through B. |
4 Press  button on the remote control to return to the normal TV picture.
For Mono Equipment
Connect the phono plug to the MONO (L/G/S/I) socket on the front of the TV and select  3 or
3 or  S 3 input signal using the instructions above. Finally, refer to the “Sound Adjustment” section of this manual and select “Dual Sound” “A” on the sound menu screen.
Additional Information 19

Specifications
TV system:
Depending on your country selection: B/G/H, D/K
Colour system:
PAL, SECAM
NTSC 3.58, 4.43 (only Video In)
Channel Coverage:
VHF: |
E2-E12 |
UHF: |
E21-E69 |
CATV: |
S1-S20 |
HYPER: |
S21-S41 |
D/K: |
R1-R12, R21-R69 |
Picture Tube:
Flat Display FD Trinitron:
•KV-25FX30K: 25” (approx. 63 cm. measured diagonally)
•KV-29FX30K: 29” (approx. 73 cm. measured diagonally)
Rear Terminals
:1/ |
21-pin scart connector |
|
(CENELEC standard) |
|
including audio/video |
|
input, RGB input, TV |
|
audio/video output. |
:2/q 21-pin Scart connector (CENELEC standard) including audio / video input, S video input, selectable audio / video output and Smartlink interface.
audio outputs (Left/ Right) - phono jacks
Front Terminals
q3 S Video input – 4 pin DIN …3 video input – phono jack  3 audio input – phono jacks
headphones jack
Sound Output:
2 x 14 W (music power)
2 x 7 W (RMS)
Power Consumption:
KV-25FX30K: 87 W
KV-29FX30K: 94 W
Standby Power Consumption:
0.5 W
Dimensions (w x h x d) :
KV-25FX30K: Approx. 655 x 509 x 476 mm. KV-29FX30K: Approx. 746 x 569 x 516 mm.
Weight:
KV-25FX30K: Approx. 36 Kg.
KV-29FX30K: Approx. 46,5 Kg.
Accessories supplied:
1 Remote Control (RM-887)
2 Batteries (IEC designated)
Other features:
•Teletext, Fastext, TOPtext •Sleep Timer
•Smartlink (direct link between your TV set and a compatible VCR. For more information on Smartlink, please refer to the Instruction Manual of your VCR).
•TV system Autodetection.
Design and specifications are subject to change without notice.
Ecological PaperTotally Chlorine Free
20 Additional Information

Troubleshooting
Here are some simple solutions to the problems which may affect the picture and sound.
Problem
No picture (screen is dark) and no sound.
Poor or no picture (screen is dark), but good sound.
No picture or no menu information from equipment connected to the Scart connector.
Good picture, no sound.
Solution
•Check the aerial connection.
• Plug the TV in and press the button on the front of the TV.
•If the standby indicator  is on, press
 button on the remote control.
•Using the menu system, select the “Picture Adjustment” menu and select “Reset” to return to the factory settings.
•Check that the optional equipment is on and press the  button repeatedly on the remote control until the
correct input symbol is displayed on the screen.
•Press the  +/- button on the remote control.
•Check that “TV Speakers” is “On” on the “Sound Adjustment” menu.
•Check that headphones are not connected.
No colour on colour programmes.
Distorted picture when changing programmes or selecting teletext.
Wrong characters appear when viewing teletext.
• Using the menu system, select the “Picture |
GB |
Adjustment” menu and select “Reset” to return to |
|
factory settings. |
|
•Turn off any equipment connected to the Scart connector on the rear of the TV.
•Using the menu system, enter to the “Language/ Country” menu and select the country in which you operate the TV set. For Cyrillic languages, we agreement to select Russia country in the case that your own country does not appear in the list.
Picture slanted
Noisy picture when viewing a TV channel.
•Using the menu system, select the “Picture Rotation” option in the “Detail Set Up” menu to correct the picture slant.
•Using the menu system, select the “Manual Programme Preset” menu and adjust Fine Tuning (AFT) to obtain better picture reception.
•Using the menu system, select the “Noise Reduction” option in the “Detail Set Up” menu and select “Auto” to reduce the noise in the picture.
No unscrambling or unstable picture whilst viewing a scrambling channel with a decoder connected through the Scart connector :2/q.
•Using the menu system, select the “Set Up” menu. Then enter to “Detail Set Up” option and set “AV2 Output” to “TV”.
Remote control does not function. |
• Replace the batteries. |
|
The standby indicator |
on the TV |
• Contact your nearest Sony service centre. |
flashes. |
|
|
If you continue to experience problems, have your TV serviced by qualified personnel.
Never open the casing yourself.
Additional Information 21

22

У‚Ó‰
Б·„Ó‰‡ ËÏ ВË Á‡ ËÁ·Ó ‡ ̇ ÚÓÁË ˆ‚ÂÚÂÌ ÚÂ΂ËÁÓ Sony Ò ÔÎÓÒ˙Í ÂÍ ‡Ì FD Trinitron.
П В‰Л ЛБФУОБ‚‡МВ М‡ ЪВОВ‚ЛБУ ‡ Ф У˜ВЪВЪВ ‚МЛП‡ЪВОМУ ЪУ‚‡ ˙НУ‚У‰ТЪ‚У Б‡ ВНТФОУ‡Ъ‡ˆЛя Л „У Б‡Ф‡БВЪВ Б‡ ·˙‰В˘Л ЛБяТМВМЛя.
•СЛП‚УОЛ ЛБФУОБ‚‡МЛ ‚ ЪУ‚‡ ˙НУ‚У‰ТЪ‚У:
• ПУЪВМˆЛ‡ОМ‡ УФ‡ТМУТЪ.
• В‡Ê̇ ËÌÙÓ Ï‡ˆËя.
• ИÌÙÓ Ï‡ˆËя Á‡ ÙÛÌ͈ËяÚ‡.
•1,2...ПУТОВ‰У‚‡ЪВОМУТЪ Б‡ ТОВ‰‚‡МВ М‡ ЛМТЪ ЫНˆЛЛЪВ.
С˙‰˙ ʇÌËÂ
• K
K  ПУЪ˙ПМВМЛЪВ ·ЫЪУМЛ М‡ ‰ЛТЪ‡МˆЛУММУЪУ ЫФ ‡‚ОВМЛВ ФУН‡Б‚‡Ъ НУЛ ·ЫЪУМЛ Ъ я·‚‡ ‰‡ ТВ М‡ЪЛТН‡Ъ Б‡ ЛБФ˙ОМВМЛВЪУ М‡‡БОЛ˜МЛЪВ УФВ ‡ˆЛЛ.
• ИМЩУ П‡ˆЛя Б‡ ВБЫОЪ‡Ъ‡ УЪ ЛМТЪ ЫНˆЛЛЪВ.
У‚Ó‰ .......................................................................................................................................................... |
3 |
ТВıМЛН‡ М‡ ·ВБУФ‡ТМУТЪ ...................................................................................................................... |
4 |
ОÒÌÓ‚ÌÓ ÓÔËÒ‡ÌË |
|
ОТМУ‚МУ УФЛТ‡МЛВ М‡ ·ЫЪУМЛЪВ М‡ ‰ЛТЪ‡МˆЛУММУЪУ ЫФ ‡‚ОВМЛВ............................................. |
5 |
ОТМУ‚МУ УФЛТ‡МЛВ М‡ ·ЫЪУМЛЪВ М‡ ЪВОВ‚ЛБУ ‡ ............................................................................ |
6 |
ИÌÒÚ‡ÎË ‡Ì |
|
ИМТЪ‡ОЛ ‡МВ М‡ ·‡ЪВ ЛЛЪВ ‚ ЫТЪ УИТЪ‚УЪУ Б‡ ‰ЛТЪ‡МˆЛУММУ ЫФ ‡‚ОВМЛВ ........................... |
6 |
С‚˙ Á‚‡Ì ̇ ‡ÌÚÂ̇ڇ Ë ‚ˉÂÓÚÓ .................................................................................................. |
6 |
|
BG |
П˙ ‚Ó̇˜‡ÎÌÓ ‚Íβ˜‚‡Ì |
|
ВÍβ˜‚‡ÌÂ Ë ‡‚ÚÓχÚ˘ÌÓ Ì‡ÒÚ ÓÈ‚‡Ì ̇ ÚÂ΂ËÁÓ ‡ ........................................................... |
7 |
СËÚÂχ ÓÚ ÏÂÌ˛Ú‡ ̇ ÂÍ ‡Ì‡ |
|
У‚У‰ Л ·У ‡‚ВМВ Т˙Т ТЛТЪВП‡Ъ‡ УЪ ПВМ˛Ъ‡ ................................................................................... |
9 |
ВÓ‰‡˜ ̇ ÏÂÌ˛Ú‡Ú‡: |
|
Н‡ÒÚ ÓÈ͇ ̇ К‡ ÚË̇ڇ................................................................................................................. |
9 |
HacÚpoÈÍa Ìa ÁÇyÍa......................................................................................................................... |
10 |
А‚ÚÓχÚ˘ÌÓ ИÁÍβ˜‚ ................................................................................................................... |
11 |
ЕÁËÍ / Д˙ ʇ‚‡ ................................................................................................................................ |
11 |
А‚ÚÓχÚ˘ÌÓ З‡ı‚‡˘‡Ì ............................................................................................................... |
11 |
ПÓ‰ Âʉ‡Ì ̇ П Ó„ ‡ÏË............................................................................................................. |
12 |
Ha‰ÔËcÇaÌe Ìa ÔpoÖpaÏË............................................................................................................... |
12 |
ÂaÔaÏeÚeÌË AV ÌacÚpoÈÍË ............................................................................................................ |
12 |
П Ó„ ‡Ï‡ Р˙˜ÂÌ ИÁ·Ó .................................................................................................................. |
13 |
ПУЪЛТН‡МВ М‡ ¯ЫП‡ ......................................................................................................................... |
15 |
AV2 ËÁxo‰........................................................................................................................................... |
15 |
RGB ЦÂÌÚ˙ ...................................................................................................................................... |
16 |
В˙ ÚÂÌ ̇ К‡ ÚË̇ڇ ................................................................................................................... |
16 |
ТВОВЪВНТЪ ........................................................................................................................................ |
17 |
ДУФ˙ОМЛЪВОМ‡ ЛМЩУ П‡ˆЛя |
|
С‚˙ Б‚‡МВ М‡ ‰УФ˙ОМЛЪВОМЛ ‡Ф‡ ‡ЪЛ ........................................................................................... |
18 |
БУ ‡‚ВМВ Т ‰УФ˙ОМЛЪВОМЛ ‡Ф‡ ‡ЪЛ ................................................................................................ |
19 |
Х‡ ‡НЪВ ЛТЪЛНЛ ................................................................................................................................... |
20 |
ОЪТЪ ‡Мя‚‡МВ М‡ МВЛБФ ‡‚МУТЪЛ ................................................................................................... |
21 |
С˙‰˙ ʇÌË 3
ТВıМЛН‡ М‡ ·ВБУФ‡ТМУТЪ
|
|
|
|
HËÍÓ„a Ì Ô˙ıaÈÚ ÍaÍ‚ËÚÓ Ë ‰‡ |
|||
|
|
|
|
·ËÎÓ Ô e‰ÏÂÚË ‚ ÚÂÎe‚ËÁÓ a, Ú¸È |
|||
TÓÁË ÚeÎe‚ËÁÓ ÏÓÊ ‰‡ ‡·ÓÚË |
Пo Ф Л˜ЛМЛ Б‡ ·ВБoФ‡ТЪМУТЪ УЪ |
͇ÚÓ ÚÓ‚a ÏÓÊ ‰a Ô Ë˜ËÌË ÔÓʇ |
|||||
Ò‡ÏÓ Ì‡ Á‡ı ‡Ì‚‡˘Ó |
‚˙Á‰ÂÈÒÚ‚Ë ̇ Ô Ë Ó‰ÌË |
ËÎË ÚÓÍÓ‚ Û‰‡ . HËÍÓ„‡ Ì |
|||||
М‡Ф ВКВМЛВ 220-240 V. |
‡БОЛ‚aИЪВ ЪВ˜МУТЪЛ ФУ |
||||||
я‚ОВМЛя e Ф ВФУ ˙˜ЛЪВОМУ ‰‡ |
ÚÂ΂ËÁÓ ‡. B ÒÎÛ˜‡È, ˜e Ú˜ÌÓÒÚ |
||||||
BÌËχ‚‡ÈÚ ‰‡ Ì ‚Íβ˜‚‡Ú |
|||||||
Ì ÓÒÚ‡‚яÚ ÚÂ΂ËÁÓ ‡ ‚ |
ËÎË Ú‚˙ ‰ Ô e‰ÏÂÚ ÔÓÔa‰Ì‡Ú ‚ |
||||||
Ú‚˙ ‰Â ÏÌÓ„Ó Û Â‰Ë ‚ ‰ËÌ |
|||||||
ÚÂ΂ËÁÓ ‡ „Ó ËÁÍβ˜ÂÚÂ. |
|||||||
ÍÓÌÚ‡ÍÚ, Ú¸È Í‡ÚÓ ÚÓ‚‡ ÏÓÊ ‰‡ |
ÂÊËÏ “stand by”, a ‰‡ „o |
||||||
C‚˙ ÊÂÚÂ Òe ÌeÁa·a‚ÌÓ c |
|||||||
Ô Ë˜ËÌË ÚÓÍÓ‚ Û‰‡ . |
ËÁÍβ˜‚‡Úe ˆÂÌÚ ‡ÎÌÓ. |
Н‚‡ОЛЩЛˆЛ ‡МЛ ТОЫКЛЪВОЛ Мa CoМЛ. |
|||||
|
|
|
|
|
|
|
|
|
|
|
|
|
|
|
|
|
|
|
|
|
|
|
|
|
|
|
|
|
|
|
|
He oÚ‚a яÈÚ ÍÛÚËяÚa Ë Á‡‰ÌËя |
Зa Ba¯a co·cÚ‚eÌa ·eÁoÔacÌocÚ |
Зa ‰a Ô e‰oÚ‚ aÚËÚe ËcÍa |
|
ÍaÔaÍ Ìa ÚeËe‚ËÁÓ a. |
|||
Ìe ÔËÔaÈÚe ÚeÎe‚ËÁÓ a, Ía·eÎa |
oÚ ÚoÍo‚ y‰a , Ìe ËÁÎa„aÈÚe |
||
O· ˙˘‡ÈÚ Ò ҇ÏÓ Í˙Ï |
|||
ËÎË aÌÚeÌaÚa ÏÛ ÔÓ ‚ eÏe Ìa |
ÚeÎe‚ËÁÓ a Ìa ‰˙ʉ ËÎË |
||
Í‚aÎËÙËˆË ‡Ì Ò ‚ËÁÂÌ |
|||
„ ˙ÏÓÚe‚˘ÌË ·Û Ë. |
‚Îa„a. |
||
ÔÂ coÌaÎ. |
|||
|
|
He ÔoÍ Ë‚aÈÚe |
HËÍo„a Ìe ÔoÒÚa‚яÈÚe |
|
ÚeÎe‚ËÁo a Ìa „o e˘Ë, ‚ÎaÊÌË |
Зa ‰a ËÁ·Â„ÌeÚe ÔoÊa , ‰ ˙ÊÚe |
|
‚eÌÚËÎaˆËoÌÌËÚe ÓÚ‚o Ë Ìa |
ËÎË ËÁÍβ˜ËÚeÎÌo Ô a¯ÌË |
|
ÚeÎe‚ËÁo a. |
ÏecÚa. He ËÌÒÚaÎË aÈÚe |
ÌacÚ aÌa oÚ ÚeÎe‚ËÁÓ a |
OcÚa‚eÚe ÌaÈ-ÏaÎÍÓ 10 ÒÏ. |
ÚeÎe‚ËÁÓ a Ìa ÏecÚa ͸‰ÂÚÓ |
‚˙ÁÔ·ÏeÌËÏË Ë oÚÍ ËÚË |
aÁÚoяÌËe oÍoÎo ÚeÎe‚ËÁo a Áa |
ПУКe ‰a ·˙‰В ЛБОУКeМ Мa |
ЛБЪУ˜МЛˆЛ Мa Т‚ВЪОЛМ‡/ |
‚eÌÚË·ˆËя. |
ÏÂxaÌ˘ÌË ‚Ë· aˆËË. |
Ì‡Ô ËÏe c‚e˘Ë/. |
Пo˜ËÒÚ‚aÈÚe ÚeÎe‚ËÁÓ ‡ c ÏeÍa, |
|
He ÔocÚa‚яÈÚe ÚeÊÍË Ôpe‰ÏÂÚË |
|
ОeНo ‚О‡КМ‡ Н˙ Ф‡. He ЛБФУОБ‚aИЪe |
Ko„aÚo ËÁÍβ˜‚aÚe ÚeÎe‚ËÁopa, |
‚˙pxy Ía·eÎa, Ú˙È ÍaÚo Úo‚a |
|
·eÌÁËÌ, aÁ e‰ËÚeÎ ËÎË ‰ y„Ë |
‰˙pÔaÈÚe ˘eÔceÎa, a Ìe Ía·ÂÎa. |
ÏoÊe ‰a „o Ôo‚pe‰Ë. |
|
xЛПЛНaОЛ, Бa ‰a ФУ˜ЛТЪЛЪe |
|||
|
ПpeÔop˙˜‚aÏe ‚Ë ‰a Ìa‚ËeÚe |
||
Úe΂ËÁo a. He ‰pacÍaÈÚe Ôo eÍpaÌa |
|
||
|
ËÁÎ˯ÌËя ÁaxpaÌ‚a˘ Ía·eÎ |
||
Ìa ÚeÎe‚ËÁopa. Зa Ôo-„oÎяÏa |
|
||
|
oÍoÎo Ôpe‰ÌaÁÌa˜eÌËÚe Áa ˆeÎÚa |
||
·eÁoÔacÚÌocÚ ËÁÍβ˜‚aÈÚe |
|
||
|
ÔpËcÔoco·ÎeÌËя Ìa Áa‰ÌaÚa |
||
Úe΂ËÁopa oÚ ÍoÌÚaÍÚa, Ío„aÚo „Ó |
|
||
Ôo˜ËcÚ‚aÚe. |
|
cÚpaÌa Ìa ÚeÎe‚ËÁopa. |
|
|
ИÁβ˜‚aÈÚe Ía·eÎa Ìa |
|
|
|
ÚeÎe‚ËÁopa Ôpe‰Ë ‰a „o |
|
|
|
ÏecÚËÚe. ПpË ÔpeÏecÚ‚aÌeÚo |
|
|
ПocÚa‚яÈÚe ÚeÎe‚ËÁopa Ìa |
ËÁ·я„‚aÈÚe Ìepa‚ÌË |
He ÔoÍpË‚aÈÚe |
|
cË„ypÌa, cÚa·ËÎÌa ÔocÚa‚Ía. |
Ôo‚˙pxÌocÚË Ë Ìe Ôpa‚eÚe ·˙pÁË |
||
‚eÌÚËÎaˆÍoÌÌËÚe oÚ‚opË Ìa |
|||
He ÔoÁ‚oÎя‚aÈÚe Ìa ‰eˆa ‰a ce |
Ípa˜ÍË. AÍo ËÁÔycÌeÚe ËÎË |
||
ÍaÚepяÚ Ôo Ìe„o. He „o |
ÌapaÌËÚe ÚeÎe‚ËÁopa, |
ÚeÎe‚ËÁopa |
|
ÌeÁa·a‚Ìo ce ÍoÌcyÎpaÈÚe c |
c Ôpe‰ÏeÚË ÍaÚo Ôep‰eÚa, |
||
o·p˙˘aÈÚe Ìa cÚpaÌË ËÎË Ôo |
|||
Í‚aÎËÙˈËpaÌË cep‚ËÁÌË |
‚ecÚÌËˆË Ë ‰p. |
||
“„p˙Б”. |
|||
cÎyÊËÚeÎË Ìa CoÌË. |
|
||
|
|
4 ТВıМЛН‡ М‡ ·ВБУФ‡ТМУТЪ
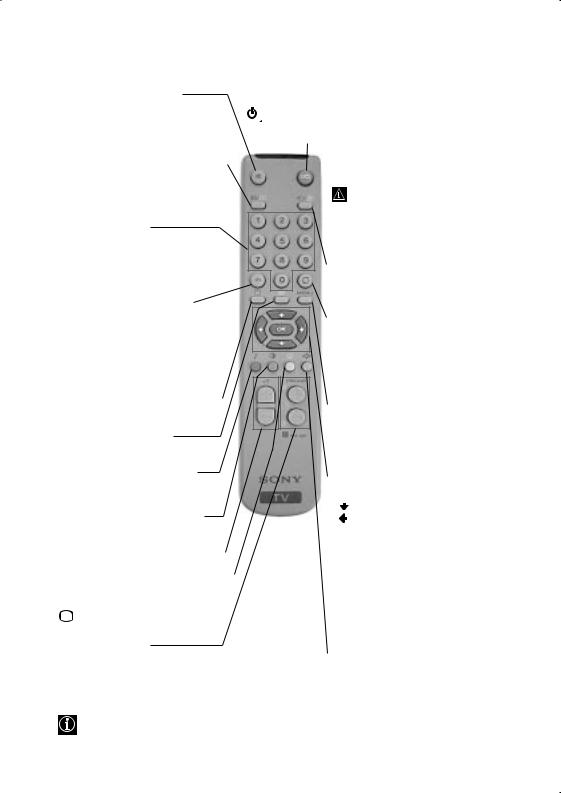
ОТМУ‚МУ УФЛТ‡МЛВ М‡ ·ЫЪУМЛЪВ М‡ ‰ЛТЪ‡МˆЛУММУЪУ ЫФ ‡‚ОВМЛВ
ЕОЛПЛМЛ ‡МВ М‡ Б‚ЫН‡
Н‡ЪЛТМВЪВ „У Б‡ Ф ВП‡ı‚‡МВ М‡ Б‚ЫН‡.
Н‡ЪЛТМВЪВ „У УЪМУ‚У Б‡ ‚˙Б‚ ˙˘‡МВ М‡ Б‚ЫН‡.
ИÁÓ· ‡Áя‚‡Ì ̇ ËÌÙÓ Ï‡ˆËя ̇ ÂÍ ‡Ì‡
Н‡ЪЛТМВЪВ „У Б‡ ЛБУ· ‡Бя‚‡МВ М‡ ‚ТЛ˜НЛ ЛМ‰ЛН‡ˆЛЛ М‡ ВН ‡М‡. Н‡ЪЛТМВЪВ „У УЪМУ‚У Б‡ Ф ВП‡ı‚‡МВ.
ИÁ·Ó ̇ ͇̇ÎË
Н‡ЪЛТМВЪВ „Л Б‡ ЛБ·У М‡ Н‡М‡ОЛ.
З‡ ‰‚ЫˆЛЩ ВМЛ ФУ„ ‡ПМЛ МУПВ ‡ М‡ЪЛТМВЪВ ‚ЪУ ‡Ъ‡ ˆЛЩ ‡ Б‡ ‚ ВПВЪ ‡ВМВ ФУ-П‡ОНУ УЪ 2.5 ТВН.
ËÎË
Н‡ЪЛТМВЪВ -/-- Л ТОВ‰ ЪУ‚‡ ‚Н‡ ‡ИЪВ Ф˙ ‚‡Ъ‡ Л ‚ЪУ ‡Ъ‡ ˆЛЩ ‡.
АНУ Т·˙ Н‡ЪВ Ф Л ‚Н‡ ‚‡МВЪУ М‡ Ф˙ ‚‡Ъ‡ ˆЛЩ ‡, Ф У‰˙ОКВЪВ ‚Н‡ ‚‡ИНЛ Л ‚ЪУ ‡Ъ‡ (УЪ 0 ‰У 9) Л ‚В‰М‡„‡ ТОВ‰ ЪУ‚‡ ФУ‚ЪУ ВЪВ УФВ ‡ˆЛяЪ‡.
ИÁ·Ó ̇ ÂÊËÏ Ì‡ ÚÂ΂ËÁËя
Н‡ЪЛТМВЪВ „У Б‡ ‰‡ ЛБНО˛˜ЛЪВ ЪВОВЪВНТЪ‡ ЛОЛ ‚ıУ‰‡ Б‡ ‚Л‰ВУ.
ИБ·У М‡ ЪВОВЪВНТЪ‡
Н‡ЪЛТМВЪВ „У Б‡ ЛБУ· ‡Бя‚‡МВ М‡ ЪВОВЪВНТЪ‡.
ИÁ·Ó ̇ ÂÊËÏ Á‡ Á‚Û͇.
Н‡ЪЛТМВЪВ МяНУОНУ Ф˙ЪЛ Б‡ Ф УПяМ‡ М‡ ВКЛП‡ М‡ Б‚ЫН‡.
ИÁ·Ó ̇ ÂÊËÏ Ì‡ Ó· ‡Á‡
Н‡ЪЛТМВЪВ „У МяНУОНУ Ф˙ЪЛ Б‡ ТПяМ‡ М‡ ВКЛП‡ М‡ У· ‡Б‡.
Н‡ÒÚ ÓÈ‚‡Ì ̇ ÒË·ڇ ̇ Á‚Û͇
Н‡ЪЛТМВЪВ „У Б‡ М‡ТЪ УИ‚‡МВ М‡ ТЛО‡Ъ‡ М‡ Б‚ЫН‡.
ТУБЛ ·ЫЪУМ ЩЫМНˆЛУМЛ ‡ Т‡ПУ ‚ВКЛП М‡ ЪВОВЪВНТЪ. ФЫМНˆЛяЪ‡  , Ò‚˙ Á‡Ì‡ Ò ÚÓÁË ·ÛÚÓÌ Ì ÙÛÌ͈ËÓÌË ‡ Ò ÚÓÁË ÚÂ΂ËÁÓ .
ИÁ·Ó ̇ ͇̇ÎË
Н‡ЪЛТМВЪВ „У Б‡ ЛБ·У М‡ Ф В‰ВМ ЛОЛ ТОВ‰‚‡˘ Н‡М‡О.
В ВПВММУ ЛБНО˛˜‚‡МВ М‡ ЪВОВ‚ЛБУ ‡
Н‡ЪЛТМВЪВ „У Б‡ ‚ ВПВММУ ЛБНО˛˜‚‡МВ М‡ ЪВОВ‚ЛБУ ‡ (ЛМ‰ЛН‡ЪУ ˙Ъ Б‡ ВКЛП М‡ У˜‡Н‚‡МВ
˘В Т‚ВЪМВ). Н‡ЪЛТМВЪВ „У УЪМУ‚У Б‡ ‰‡ ‚НО˛˜ЛЪВ ЪВОВ‚ЛБУ ‡ УЪ ВКЛП‡ М‡ ‚ ВПВММУ ЛБНО˛˜‚‡МВ (standby).
З‡ ЛНУМУПЛя М‡ ВО. ВМВ „Ля ТВ Ф ВФУ ˙˜‚‡ ˆяОУТЪМУЪУ ЛБНО˛˜‚‡МВ М‡ ЪВОВ‚ЛБУ ‡ НУ„‡ЪУ МВ ТВ ЛБФУОБ‚‡.
АНУ ‚ Ф У‰˙ОКВМЛВ М‡ 15 ПЛМ. МяП‡ ТВ ТЛ„М‡О Л МВ ТВ М‡ЪЛТН‡Ъ ·ЫЪУМЛЪВ, ЪВОВ‚ЛБУ ‡ ˘В ПЛМВ ‡‚ЪУП‡ЪЛ˜МУ ‚ ВКЛП М‡ ‚ ВПВММУ ЛБНО˛˜‚‡МВ (standby).
ИÁ·Ó ̇ ‚ıÓ‰ÂÌ Ò˄̇Î
Н‡ЪЛТМВЪВ „У МяНУОНУ Ф˙ЪЛ, ‰УН‡ЪУ ТЛП‚УО‡ М‡ КВО‡МЛя ‚ıУ‰ВМ ТЛ„М‡О ТВ ФУя‚Л М‡ ВН ‡М‡.
В ˙˘‡МВ М‡ ФУТОВ‰МЛя ЛБ· ‡М Н‡М‡О
Н‡ЪЛТМВЪВ „У Б‡ ‰‡ ‚˙ МВЪВ ФУТОВ‰МЛя ЛБ· ‡М Н‡М‡О (Ф В‰МЛяЪ Н‡М‡О Ъ я·‚‡ ‰‡ В ·ЛО ЛБУ· ‡БВМ ‚ Ф У‰˙ОКВМЛВ М‡
̇È-χÎÍÓ 5 ÒÂÍ.). |
BG |
АНЪЛ‚Л ‡МВ М‡ ТЛТЪВП‡Ъ‡ УЪ ПВМ˛Ъ‡
Н‡ЪЛТМВЪВ „У Б‡ ‰‡ ‚Л‰ЛЪВ ПВМ˛ЪУ М‡ ВН ‡М‡. Н‡ЪЛТМВЪВ „У УЪМУ‚У Б‡ Ф ВП‡ı‚‡МВ Л ‚ ˙˘‡МВ М‡ МУ П‡ОМЛя ТВ ВН ‡М.
БЫЪУМЛ Б‡ ЛБ·У ‡ М‡ ПВМ˛ЪУ
•КÓ„‡ÚÓ MENU  ‡ÍÚË‚Ë ‡ÌÓ:
 К‡˜‚‡ÌÂ Ò Â‰ÌÓ ÌË‚Ó.
СÎËÁ‡ÌÂ Ò Â‰ÌÓ ÌË‚Ó.
ОÚË‚‡Ì ‚ Ô Â‰ÌÓ ÏÂÌ˛ ËÎË ËÁ·Ó .
 ОÚË‚‡Ì ‚ ÒΉ‚‡˘Ó ÏÂÌ˛ ËÎË ËÁ·Ó .
OK УÚ‚˙ ʉ‡‚‡Ì ̇ ËÁ·Ó ‡.
•КÓ„‡ÚÓ MENU Ì  ‡ÍÚË‚Ë ‡ÌÓ:
OK ПÓ͇Á‚‡ ‰ËÌ ÓÒÌÓ‚ÂÌ ÒÔËÒ˙Í Ì‡ ͇̇ÎËÚÂ. ИÁ·Â ÂÚ ͇̇·, ̇ÚËÒ͇ÈÍË  ËÎË
ËÎË  , ТОВ‰ НУВЪУ М‡ЪЛТМВЪВ ОК Á‡ ‰‡ ‚ˉËÚ ËÁ· ‡ÌËя ͇̇Î.
ИÁ·Ó ̇ ÙÓ Ï‡Ú Ì‡ ÂÍ ‡Ì‡
Н‡ЪЛТМВЪВ „У МяНУОНУ Ф˙ЪЛ Б‡ ТПяМ‡ М‡ ЩУ П‡Ъ М‡ ВН ‡М‡: 4:3 Б‡ У·ЛНМУ‚ВМВМ У· ‡Б ЛОЛ 16:9 Б‡ ЛПЛЪ‡ˆЛя М‡ Ф‡МУ ‡ПВМ ВН ‡М.
ОТ‚ВМ ЪВОВ‚ЛБЛУММЛЪВ ЩЫМНˆЛЛ, ‚ТЛ˜НЛ ˆ‚ВЪМЛ ·ЫЪУМЛ ТВ ЛБФУОБ‚‡Ъ Т˙˘У Ъ‡Н‡ Л Б‡ УФВ ‡ˆЛЛЪВ М‡ ЪВОВЪВНТЪ‡. З‡ ФУ‚В˜В ЛМЩУ П‡ˆЛя ‚ЛКЪВ ‚ „О‡‚‡Ъ‡ «ТВОВЪВНТЪ», ‚ ЪУ‚‡ ˙НУ‚У‰ТЪ‚У Б‡ ВНТФОУ‡Ъ‡ˆЛя.
ОÒÌÓ‚ÌÓ ÓÔËÒ‡ÌË |
5 |
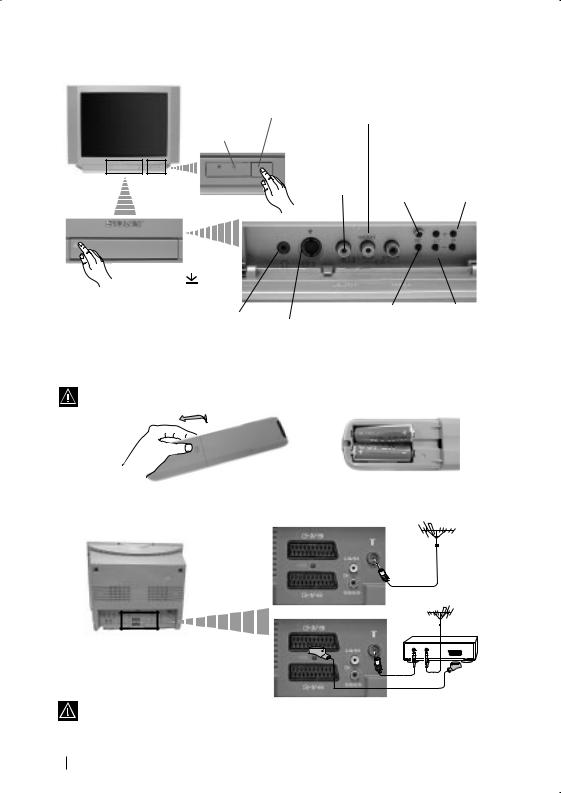
ОТМУ‚МУ УФЛТ‡МЛВ М‡ ·ЫЪУМЛЪВ М‡ ЪВОВ‚ЛБУ ‡
ИМ‰ЛН‡ЪУ Б‡ВКЛП М‡ ‚ ВПВММУ ЛБНО˛˜‚‡МВ (standby).
Н‡ЪЛТМВЪВ ‚˙ ıЫ П‡ НЛ У‚Н‡Ъ‡  М‡ Н‡Ф‡˜ВЪУ Б‡ УЪН Л‚‡МВ М‡ ·ЫНТЛЪВ
БÛÍÒ‡ Á‡ ÒÎÛ¯‡ÎÍË
БÛÚÓÌ Á‡ |
|
ВıÓ‰ Á‡ |
|
|
||||
‚Íβ˜‚‡Ì / |
|
‚ˉÂÓ |
|
|
||||
ËÁÍβ˜‚‡Ì |
|
|
|
|
|
|
|
|
|
|
|
|
|
|
БÛÚÓÌ 3‡ |
||
|
|
|
|
|
|
|
||
|
|
|
|
|
|
|
ËÁ·Ó ̇ |
|
|
|
|
БÛÚÓÌ 3‡ |
|
||||
|
|
|
|
Ô Â‰Ì‡ / |
||||
|
|
|
‚p˙˘‡Ì Í˙Ï |
|
ÒΉ‚‡˘‡ |
|||
БÛÍÒ‡ Á‡ |
|
Ù‡· ˘̇ڇ |
|
Ô Ó„ ‡Ï‡ |
||||
|
̇ÒÚ ÓÈ͇ Ìa |
|
(ËÁ·Ó ̇ ТВ |
|||||
‚ˉÂÓ ‚ıÓ‰ |
|
|||||||
ÚÂ΂ËÁÓ ‡ |
|
Ô Â‰‡‚‡ÌËя) |
||||||
|
|
|
|
|||||
|
|
|
|
|
|
|
|
|
|
|
|
|
|
|
|
|
|
|
|
|
|
|
|
|
|
|
|
|
|
|
|
|
|
|
|
|
|
|
|
|
|
|
|
|
|
|
БÛÚÓÌ Á‡ ËÁ·Ó |
|
БЫЪУМЛ Б‡ |
|
̇ ‚ıÓ‰ÂÌ |
|
ÍÓÌÚ ÓΠ̇ |
|
ВıÓ‰ Á‡ S video |
|
|
||
|
|
Ò˄̇Π|
|
ÒË·ڇ ̇ Á‚Û͇ |
|
|
|
|
|
|
|
|
|
|
ИМТЪ‡ОЛ ‡МВ М‡ ·‡ЪВ ЛЛЪВ ‚ ЫТЪ УИТЪ‚УЪУ Б‡ ‰ЛТЪ‡МˆЛУММУ ЫФ ‡‚ОВМЛВ
ПУТЪ‡‚ВЪВ Ф ЛОУКВМЛЪВ ·‡ЪВ ЛЛ Т Ф ‡‚ЛОМУ ‡БФУОУКВМЛ ФУО˛ТЛ.
ОФ‡Б‚‡ИЪВ УНУОМ‡Ъ‡ Т В‰‡ Л ЛБı‚˙ ОяИЪВ ЛБФУОБ‚‡МЛЪВ ·‡ЪВ ЛЛ ‚ НУМЪВИМВ ЛЪВ Б‡ Ъ‡БЛ ˆВО.
С‚˙ Á‚‡Ì ̇ ‡ÌÚÂ̇ڇ Ë ‚ˉÂÓÚÓ
 К‡·ВОЛЪВ Б‡ Т‚˙ Б‚‡МВ МВ Т‡ Ф ЛОУКВМЛ ТВ ЛИМУ.
ËÎË
‚ˉÂÓ
OUT |
IN |
З‡ Ôӂ˜ ‰ÂÚ‡ÈÎË Á‡ Ò‚˙ Á‚‡ÌÂÚÓ Ì‡ ‚ˉÂÓÚÓ |
С‚˙ Á‚‡ÌÂÚÓ ˜ ÂÁ |
‚ЛКЪВ ‚ „О‡‚‡Ъ‡ «С‚˙ Б‚‡МВ М‡ ‰УФ˙ОМЛЪВОМЛ |
Е‚ УНУМВНЪУ ‡ В УФˆЛя |
‡Ф‡ ‡ЪЛ», ‚ ЪУ‚‡ ˙НУ‚У‰ТЪ‚У Б‡ ВНТФОУ‡Ъ‡ˆЛя. |
|
6 ОÒÌÓ‚ÌÓ ÓÔËÒ‡ÌË - ИÌÒÚ‡ÎË ‡ÌÂ
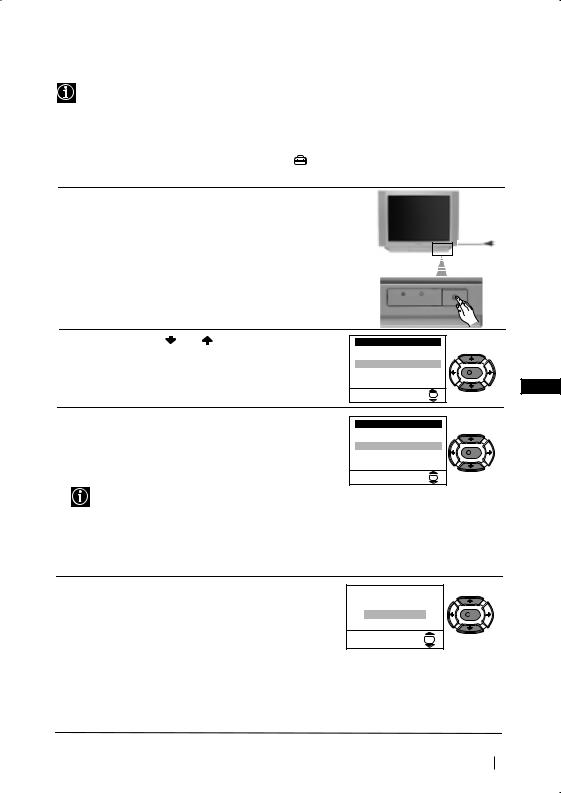
ВÍβ˜‚‡ÌÂ Ë ‡‚ÚÓχÚ˘ÌÓ Ì‡ÒÚ ÓÈ‚‡Ì ̇ ÚÂ΂ËÁÓ ‡
КУ„‡ЪУ ‚НО˛˜ЛЪВ Б‡ Ф˙ ‚Л Ф˙Ъ ЪВОВ‚ЛБУ ‡, М‡ ВН ‡М‡ ˘В ТВ ФУя‚Л ФУТОВ‰У‚‡ЪВОМУТЪ УЪ ПВМ˛Ъ‡ ˜ ВБ НУЛЪУ ˘В ПУКВЪВ ‰‡: 1) ЛБ·В ВЪВ ВБЛН‡ М‡ ПВМ˛Ъ‡Ъ‡, 2) ЛБ·В ВЪВ ‰˙ К‡‚‡Ъ‡ ‚ НУяЪУ КВО‡ВЪВ ‰‡ ЛБФУОБ‚‡ЪВ ‡Ф‡ ‡Ъ‡, 3) М‡ТЪ УЛЪВ М‡НОУМ‡ М‡ Н‡ ЪЛМ‡Ъ‡, 4) Ъ˙ ТЛЪВ Л Б‡Ф‡ПВЪЛЪВ ‡‚ЪУП‡ЪЛ˜МУ ‚ТЛ˜НЛ Н‡М‡ОЛ М‡ ‡БФУОУКВМЛВ (ТВ Ф В‰‡‚‡МЛя) Л 5) ТПВМЛЪВ В‰‡ М‡ ФУя‚я‚‡МВ М‡ Н‡М‡ОЛЪВ (ТВ Ф В‰‡‚‡МЛя).
АНУ Б‡ ‚ ·˙‰В˘В КВО‡ВЪВ ‰‡ ЛБПВМЛЪВ МяНУЛ УЪ ЪВБЛ М‡„О‡ТЛ, ЪУ‚‡ ПУКВ ‰‡ ТВ ЛБ‚˙ ¯Л ЛБ·Л ‡ИНЛ Т˙УЪ‚ВЪМ‡Ъ‡ УФˆЛя ‚ (ПВМ˛ ИМcЪaОЛpaМe) ЛОЛ М‡ЪЛТН‡ИНЛ ·ЫЪУМ‡  Á‡ Ù‡· ˘ÌÓ Ô Ó„ ‡ÏË ‡Ì‡Ú‡ ̇ÒÚ ÓÈ͇.
1 ВÍβ˜ÂÚ ͇·Â· Á‡ Á‡ı ‡Ì‚‡ÌÂÚÓ (220-240V AC, 50Hz)
Н‡ЪЛТМВЪВ ·ЫЪУМ‡ Б‡ ‚НО./ ЛБНО. ÓÚ Îˈ‚‡Ú‡ ÒÚ ‡Ì‡ ̇ ÚÂ΂ËÁÓ ‡, Á‡ ‰‡ „Ó ‚Íβ˜ËÚÂ.
КÓ„‡ÚÓ ‚Íβ˜ËÚ Á‡ Ô˙ ‚Ë Ô˙Ú ÚÓÁË ·ÛÚÓÌ, ÏÂÌ˛ÚÓ Language (ЕÁËÍ) ˘Â Ò ÔÓя‚Ë ‡‚ÚÓχÚ˘ÌÓ Ì‡ ÂÍ ‡Ì‡.
2Н‡ЪЛТМВЪВ ·ЫЪУМ‡ |
ËÎË |
УЪ ‰ЛТЪ‡МˆЛУММУЪУ |
Language |
|
ЫФ ‡‚ОВМЛВ Б‡ ‰‡ ЛБ·В ВЪВ ВБЛН‡ Л ФУТОВ М‡ЪЛТМВЪВ |
i4 |
|
||
Svenska |
|
|||
·ÛÚÓ̇ ОК Б‡ ‰‡ ФoЪ‚˙ ‰ЛЪВ ЛБ·У ‡. ОЪ ЪУБЛ ПУПВМЪ |
Norsk |
|
||
Nederlands |
|
|||
|
|
|
English |
|
‚Ò˘ÍË ÏÂÌ˛Ú‡ ˘Â Ò ÔÓя‚я‚‡Ú ̇ ËÁ· ‡ÌËя ÂÁËÍ. |
Français |
K |
||
Italiano |
BG |
|||
|
|
|
i$ |
|
|
|
|
|
|
|
|
|
Select Language: |
OK |
3 Н‡ ÂÍ ‡Ì‡ ‡‚ÚÓχÚ˘ÌÓ ˘Â Ò ÔÓя‚Ë ÏÂÌ˛ÚÓ Д˙ ʇ‚‡. Н‡ЪЛТМВЪВ ·ЫЪУМ‡  ËÎË
ËÎË  Б‡ ЛБ·У М‡ ‰˙ К‡‚‡Ъ‡, Н˙‰ВЪУ КВО‡ВЪВ ‰‡ ЛБФУОБ‚‡ЪВ ЪВОВ‚ЛБУ ‡, ТОВ‰ НУВЪУ М‡ЪЛТМВЪВ ОК Á‡ ÔoÚ‚˙ ʉ‡‚‡Ì ̇ ËÁ·Ó ‡.
•АНУ ‚ ТФЛТ˙Н‡ МВ ЩЛ„Ы Л ‡ ‰˙ К‡‚‡Ъ‡ ‚ НУяЪУ ˘В ЛБФУОБ‚‡ЪВ ЪВОВ‚ЛБУ ‡ ЛБ·В ВЪВ “-” Мa ПяТЪУЪУ М‡ ‰˙ К‡‚‡.
•Зa ‰a ·˙‰aÚ Ôpa‚ËÎÌË ÁÌaˆËÚe Ìa KËpËÎˈa ‚ TeÎeÚeÍcÚa ‚Ë ÔpeÔop˙˜‚aÏe ‰a ËÁ·epete PycËя, ‚ cÎy˜aËÚe Ío„aÚo Ba¯aÚa cÚpaÌa Ìe ÙË„ypËpa ‚ cÔËc˙Ía.
4 В˙БПУКМУ В, ‚ ВБЫОЪ‡Ъ М‡ БВПМЛя П‡„МВЪЛБ˙П, У· ‡Б‡ ‰‡ ТВ ФУя‚Л М‡НОУМВМ.
МÌ˛ÚÓ BépÚeÌe Ìa ÍapÚ. ФУБ‚УОя‚‡ М‡ТЪ УИ‚‡МВЪУ М‡ У· ‡Б‡, Ф Л МВУ·ıУ‰ЛПУТЪ.
a) АНУ МВ В МВУ·ıУ‰ЛПУ, М‡ЪЛТМВЪВ  ËÎË
ËÎË  Á‡ ËÁ·Ó ̇ He e ÌeoÄxoÀËÏo Л М‡ЪЛТМВЪВ ОК.
·) АНУ В МВУ·ıУ‰ЛПУ, М‡ЪЛТМВЪВ  ËÎË
ËÎË  Á‡ ËÁ·Ó ̇ PeÖyÎpaÈ ceÖa Л М‡ЪЛТМВЪВ ОК. В ФУТОВ‰ТЪ‚ЛВ М‡ТЪ УИЪВ М‡НОУМ‡ М‡ Н‡ ЪЛМ‡Ъ‡ М‡„О‡ТяИНЛ ПВК‰Ы -5 Л +5 М‡ЪЛТН‡ИНЛ
  ËÎË
ËÎË  . Н‡ЪЛТМВЪВ
Д˙pÊa‚a |
|
i4 |
|
Sverige |
|
Norge |
|
- |
|
Italia |
K |
Deutschland |
|
Österreich |
|
i$ |
|
ИÁ·epË ‰˙pÊa‚a: |
OK |
AÍo ÍapÚ. Ìe e xopËÁoÌÚ.
PeÖyÎ. ÇépÚ. Ìa ÍapÚ.
He e ÌeoÄxo‰ËÏo |
K |
PeÖyÎpaÈ ceÖa
OK
Ô Ó‰˙Îʇ‚‡...
П˙ ‚Ó̇˜‡ÎÌÓ ‚Íβ˜‚‡Ì 7
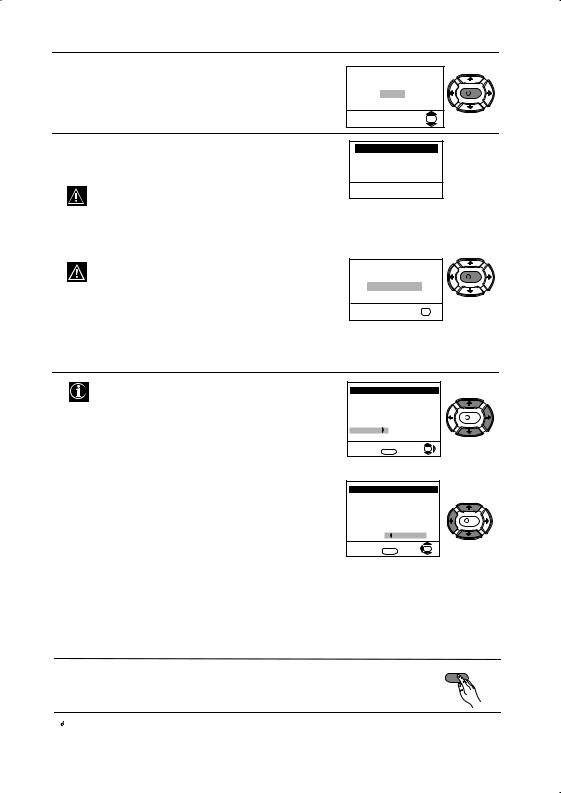
5 МÂÌ˛ÚÓ А‚ÚÓÏaÚ˘Ìo З‡ı‚‡˘‡Ì Ò ÔÓя‚я‚‡ ̇
ВН ‡М‡. Н‡ЪЛТМВЪВ ОК Á‡ ‰‡ ËÁ·Â ÂÚÂ Д‡.
6 ТВОВ‚ЛБУ ‡ Б‡ФУ˜‚‡ ‡‚ЪУП‡ЪЛ˜МУ ‰‡ Ъ˙ ТЛ Л Б‡Ф‡ПВЪя‚‡ ‚ТЛ˜НЛ Н‡М‡ОЛ (ТВ Ф В‰‡‚‡МЛя) М‡‡БФУОУКВМЛВ.
ТУБЛ Ф УˆВТ ПУКВ ‰‡ Ф У‰˙ОКЛ МяНУОНУ ПЛМЫЪЛ. Б˙‰ВЪВ Ъ˙ ФВОЛ‚Л Л МВ М‡ЪЛТН‡ИЪВ МЛЪУ В‰ЛМ ·ЫЪУМ, ‰УН‡ЪУ Ф У‰˙ОК‡‚‡ Ф УˆВТ‡ М‡ М‡ТЪ УИ‚‡МВ, ‚ Ф УЪЛ‚МВМ ТОЫ˜‡И Ф УˆВТ‡ МяП‡ ‰‡ ТВ Б‡‚˙ ¯Л.
ЖeÎaeÚe ÎË ‰a cÚapÚËpaÚe a‚ÚoÏaÚ˘Ìa ÌacÚpoÈÍa?
Дa |
K |
He |
|
|
OK |
A‚ÚoÏ. Зax‚a˘aÌe
Пpo„paÏa: 01 CËcÚÂÏa: B/G KaÌaÎ: C21
T˙pcË...
АНУ ЪВОВ‚ЛБУ ‡ МВ УЪН ЛВ МЛЪУ В‰ЛМ Н‡М‡О (ЪВОВ‚ЛБЛУММУ Ф В‰‡‚‡МВ) ТОВ‰ Б‡‚˙ ¯‚‡МВ М‡ ‡‚ЪУП‡ЪЛ˜М‡Ъ‡ М‡ТЪ УИН‡, М‡ ВН ‡М‡ ˘В ТВ ФУя‚Л Т˙У·˘ВМЛВ ЛТН‡ИНЛ ‰‡ ‚НО˛˜ЛЪВ ‡МЪВМ‡Ъ‡. МУОя ‚НО˛˜ВЪВ я Ъ‡Н‡ Н‡НЪУ В УФЛТ‡МУ М‡ ТЪ . 6 ‚ ЪУ‚‡ ˙НУ‚У‰ТЪ‚У Л М‡ЪЛТМВЪВ ОК. П УˆВТ‡ М‡ ‡‚ЪУП‡ЪЛ˜М‡ М‡ТЪ УИН‡ Б‡ФУ˜‚‡ УЪМУ‚У.
èpoÖpaÏa Ìe e ÌaÏepeÌa |
|
èoÎÓ cÇépÊeÚe aÌÚeÌa |
K |
ПoÚ‚˙pʉeÌËe |
|
OK |
|
7 СΉ ͇ÚÓ ÚÂ΂ËÁÓ ‡ Ò ̇ÒÚ ÓË Ë Á‡Ô‡ÏÂÚË ‚Ò˘ÍË Í‡Ì‡ÎË (ТВ Ô Â‰‡‚‡ÌËя), ̇ ÂÍ ‡Ì‡ ‡‚ÚÓχÚ˘ÌÓ ˘Â Ò ÔÓя‚Ë ÏÂÌ˛ÚÓ ПÓ‰ Âʉ‡Ì ̇ Ô Ó„ ‡ÏË, Б‡ ‰‡ ПУКВЪВ ‰‡ ТПВМЛЪВ В‰‡ М‡ ФУя‚я‚‡МВ М‡ Ф У„ ‡ПЛЪВ М‡ ВН ‡М‡.
a)АНУ МВ КВО‡ВЪВ ‰‡ ТПВМЛЪВ В‰‡ М‡ Н‡М‡ОЛЪВ, УЪЛ‰ВЪВ ‚ ТЪ˙ФН‡ 8.
Пo‰peʉaÌe Ìa Пpo„paÏË |
|
|||
Пpo„paÏa: |
|
|
||
01 |
TVE |
|
|
|
02 |
TVE2 |
|
K |
|
03 |
TV3 |
|
||
04 |
C33 |
|
|
|
05 |
C27 |
|
|
|
06 |
C58 |
|
|
|
ИÁ·epË ÍaÌaÎ: |
OK |
|||
ИÁÔËÁaÌe: |
MENU |
|||
|
||||
·) АНУ КВО‡ВЪВ ‰‡ ТПВМЛЪВ В‰‡ М‡ Н‡М‡ОЛЪВ:
1Н‡ЪЛТМВЪВ ·ЫЪУМ‡  ËÎË
ËÎË  Á‡ ‰‡ ËÁ·Â ÂÚ ÌÓÏ ‡ ̇ Ô Ó„ ‡Ï‡ ̇ Ò˙ÓÚ‚ÂÚÌËя ͇̇Π(ТВ
Ф В‰‡‚‡МВ), ˜ЛяЪУ ФУБЛˆЛя КВО‡ВЪВ ‰‡ ТПВМЛЪВ Л ТОВ‰ ЪУ‚‡ М‡ЪЛТМВЪВ  .
.
Пo‰peʉaÌe Ìa Пpo„paÏË |
||||
Пpo„paÏa: |
|
|
||
01 |
TVE |
|
|
|
02 |
TVE2 |
|
|
|
03 |
TV3 |
|
K |
|
04 |
C33 |
|
||
05 |
C27 |
|
|
|
06 |
C58 |
05 |
C27 |
|
ИÁ·op Ìa ÌoÏep: |
OK |
|||
ИÁÔËÁaÌe: |
MENU |
|||
|
||||
2 Н‡ЪЛТМВЪВ  ËÎË
ËÎË  Б‡ ЛБ·У М‡ МУ‚Ля МУПВ М‡ Ф У„ ‡П‡Ъ‡, М‡ НУяЪУ КВО‡ВЪВ ‰‡ Б‡Ф‡ПВЪЛЪВ ЛБ· ‡МЛя Н‡М‡О (ТВ Ф В‰‡‚‡МВ), ТОВ‰ НУВЪУ М‡ЪЛТМВЪВ
  .
.
3 ПУ‚ЪУ ВЪВ ТЪ˙ФНЛЪВ ·)1 Л ·)2 ‡НУ КВО‡ВЪВ ‰‡ Ф ВФУ‰ В‰ЛЪВ ‰ Ы„Л ТВ Н‡М‡ОЛ.
8 |
Н‡ЪЛТМВЪВ ·ЫЪУМ‡ MENU, Á‡ ‚ ˙˘‡Ì Í˙Ï ÌÓ Ï‡ÎÂÌ ТВ ÂÊËÏ. |
MENU |
|
 ТÂ΂ËÁÓ ‡  „ÓÚÓ‚ Á‡ ‡·ÓÚ‡
8 |
П˙ ‚Ó̇˜‡ÎÌÓ ‚Íβ˜‚‡Ì |
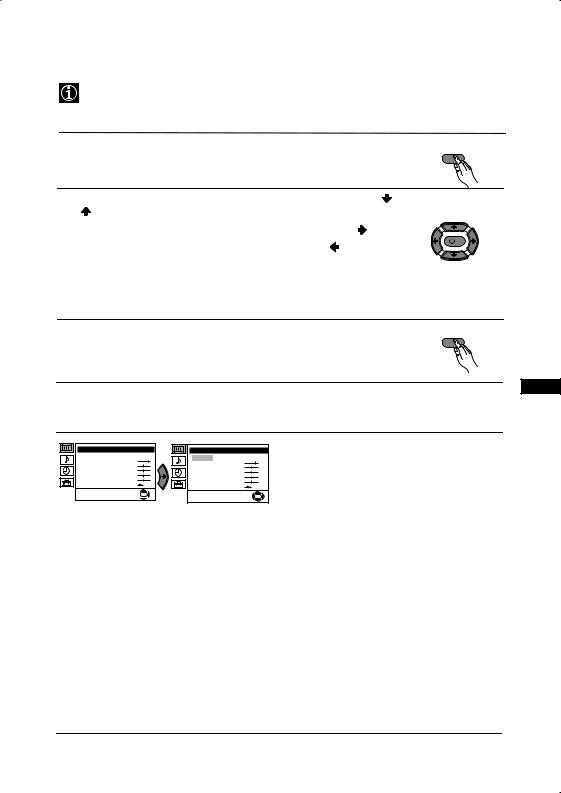
У‚У‰ Л ·У ‡‚ВМВ Т˙Т ТЛТЪВП‡Ъ‡ УЪ ПВМ˛Ъ‡
TУБЛ ЪВОВ‚ЛБУ ЛБФУОБ‚‡ ТЛТЪВП‡ УЪ ПВМ˛Ъ‡ М‡ ВН ‡М‡ Б‡ ‰‡ ВЛ ‚У‰Л Ф Л‡БОЛ˜МЛЪВ УФВ ‡ˆЛЛ. ИБФУОБ‚‡ИЪВ ТОВ‰МЛЪВ ·ЫЪУМЛ УЪ ‰ЛТЪ‡МˆЛУММУЪУ ЫФ ‡‚ОВМЛВ, Б‡ ‰‡ ТВ ‰‚ЛКЛЪВ Ф ВБ ПВМ˛Ъ‡Ъ‡:
1 Н‡ЪЛТМВЪВ ·ЫЪУМ‡ MENU Á‡ ÔÓя‚‡ ̇ Ô˙ ‚ÓÚÓ ÌË‚Ó oÚ ÏÂÌ˛ÚÓ Ì‡ |
MENU |
ÂÍ ‡Ì‡. |
|
2 • З‡ ФУ‰˜В Ъ‡‚‡МВ М‡ КВО‡МУЪУ ПВМ˛ ЛОЛ ЛБ·У , М‡ЪЛТМВЪВ ЛОЛ |
|
. |
|
• З‡ ‰‡ ‚ОВБВЪВ ‚ ЛБ· ‡МУЪУ ПВМ˛ ЛОЛ ЛБ·У , М‡ЪЛТМВЪВ . |
|
• З‡ ‚ ˙˘‡МВ ‚ Ф В‰МУ ПВМ˛ ЛОЛ ЛБ·У , М‡ЪЛТМВЪВ . |
K |
|
•З‡ Ф УПяМ‡ М‡ М‡ТЪ УИН‡Ъ‡ М‡ КВО‡МЛя ЛБ·У М‡ЪЛТМВЪВ
 /
/  /
/  ËÎË
ËÎË  .
.
•З‡ o‰У· я‚‡МВ Л Б‡Ф‡ПВЪя‚‡МВ М‡ В‡¯ЛяЪ ЛБ·У , М‡ЪЛТМВЪВ ОК.
3 Н‡ЪЛТМВЪВ ·ЫЪУМ‡ MENU, Á‡ ‚ ˙˘‡Ì Í˙Ï ÌÓ Ï‡ÎÂÌ ТВ ÂÊËÏ. |
|
MENU |
|
|
|
BG
ВÓ‰‡˜ ̇ ÏÂÌ˛Ú‡Ú‡
НË‚Ó 1 |
НË‚Ó 2 |
НË‚Ó 3 / ФÛÌ͈Ëя |
HacÚpoÈÍa Ìa KapÚËÌaÚa |
PeÊËÏ: ãËäeÌ |
KoÌÚpacÚ |
üpÍÌocÚ |
ñÇeÚÌocÚ |
OcÚpoÚa |
ToÌaÎÌocÚ |
HyÎËpaÌe |
OK |
HacÚpoÈÍa Ìa ÁÇyÍa |
PeÊËÏ: ãËäeÌ |
KoÌÚpacÚ |
üpÍÌocÚ |
ñÇeÚÌocÚ |
OcÚpoÚa |
ToÌaÎÌocÚ |
HyÎËpaÌe |
OK |
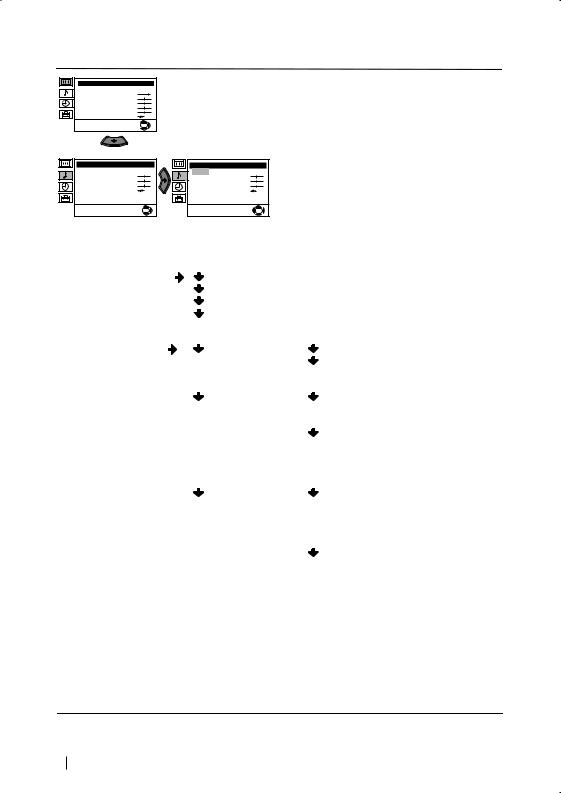
НАСТРОЙКА НА КАРТИНАТА
МВМ˛ЪУ «Н‡ТЪ УИН‡ М‡ К‡ ЪЛМ‡Ъ‡» ВЛ ФУБ‚УОя‚‡ ‰‡ Ф УПВМЛЪВ М‡ТЪ УИН‡Ъ‡ М‡ У· ‡Б‡.
З‡ ˆВОЪ‡: ТОВ‰ Н‡ЪУ ЛБ·В ВЪВ УФˆЛяЪ‡, НУяЪУ КВО‡ВЪВ ‰‡ Ф УПВМЛЪВ, М‡ЪЛТМВЪВ  . СОВ‰ НУВЪУ М‡ЪЛТМВЪВ МяНУОНУ Ф˙ЪЛ
  /
/  /
/  ËÎË
ËÎË  Á‡
Á‡
Ф УПяМ‡ М‡ М‡ТЪ УИН‡Ъ‡ Л ФУТОВ М‡ЪЛТМВЪВ ОК Á‡ Á‡Ô‡ÏÂÚя‚‡ÌÂ.
ТУ‚‡ ПВМ˛ Т˙˘У ВЛ ФУБ‚УОя‚‡ ‰‡ Ф УПВМЛЪВ ВКЛП‡ М‡ У· ‡Б‡ ‚ Б‡‚ЛТЛПУТЪ УЪ ЪЛФ‡ М‡ Ф У„ ‡П‡Ъ‡ НУяЪУ „ОВ‰‡ЪВ:
 Л˘ÂÌ (Á‡ Ë̉˂ˉۇÎÌË Ô Â‰ÔÓ˜ËÚ‡ÌËя).
 Н‡ÊË‚Ó (Б‡ ‰Л ВНЪМЛ Ф В‰‡‚‡МЛя).
  ФËÎÏË (Б‡ ЩЛОПЛ).
•Я НУТЪ ,Ц‚ВЪМУТЪ ,ОТЪ УЪ‡ ПУ„‡Ъ ‰‡ ТВ ТВ ЛБПВМяЪ Т‡ПУ Ф Л ЛБ·У М‡ ВКЛП М‡ У· ‡Б «ЛЛ˜ВМ».
•ТУМ‡ОМУТЪ В Т‡ПУ М‡ ‡БФУОУКВМЛВ Б‡ ˆ‚ВЪМ‡Ъ‡ ТЛТЪВП‡ NTSC (М‡Ф . ‡ПВ ЛН‡МТНЛ ‚Л‰ВУ Н‡ТВЪЛ).
•З‡ ‰‡ ‚˙Á‚˙ ÌÂÚ ه· ˘ÌÓ Ì‡„·ÒÂ̇ڇ ̇ÒÚ ÓÈ͇ ̇ Ó· ‡Á‡, ËÁ·Â ÂÚ НÛÎË ‡ÌÂ Л М‡ЪЛТМВЪВ ОК.
Ô Ó‰˙Îʇ‚‡...
СЛТЪВП‡ УЪ ПВМ˛Ъ‡ М‡ ВН ‡М‡ |
9 |
НË‚Ó 1 |
НË‚Ó 2 |
НË‚Ó 3 / ФÛÌ͈Ëя |
HacÚpoÈÍa Ìa KapÚËÌaÚa |
PeÊËÏ: ãËäeÌ |
KoÌÚpacÚ |
üpÍÌocÚ |
ñÇeÚÌocÚ |
OcÚpoÚa |
ToÌaÎÌocÚ |
HyÎËpaÌe |
OK |
HacÚpoÈÍa Ìa ÁÇyÍa |
||
PeÊËÏ: |
ãËäeÌ |
|
BËcoÍË |
|
|
HËcÍË |
|
|
ÅaÎaÌc |
|
|
HyÎËpaÌe |
|
|
CÚepeoeÙeÍÚ: |
MoÌo |
|
ÑeÚaÈÎÌa HacÚpoÈÍa |
||
|
|
OK |
HacÚpoÈÍa Ìa ÁÇyÍa |
||
PeÊËÏ: |
ãËäeÌ |
|
BËcoÍË |
|
|
HËcÍË |
|
|
ÅaÎaÌc |
|
|
HyÎËpaÌe |
|
|
CÚepeoeÙeÍÚ: |
MoÌo |
|
ÑeÚaÈÎÌa HacÚpoÈÍa |
||
|
|
OK |
HACTPOâKA HA ÂBìKA
МÂÌ˛ÚÓ «HacÚpoÈÍa Ìa ÁÇyÍa» ÔÓÁ‚ÓÎя‚‡ Ô ÓÏя̇ ̇ ̇„·҇ڇ ̇ Á‚Û͇.
З‡ ˆВОЪ‡: ТОВ‰ ЛБ·У ‡ М‡ УФˆЛяЪ‡, НУяЪУ КВО‡ВЪВ ‰‡ ЛБПВМЛЪВ, М‡ЪЛТМВЪВ  . В ФУТОВ‰ТЪ‚ЛВ М‡ЪЛТМВЪВ МяНУОНУ Ф˙ЪЛ
  /
/  /
/  ËÎË
ËÎË  Б‡ Ф УПВМЛ Л М‡Н ‡я М‡ЪЛТМВЪВ ОК Á‡ Á‡Ô‡ÏÂÚя‚‡ÌÂ.
ТÓ‚‡ ÏÂÌ˛ Ëχ ‰‚ ÔÓ‰ÏÂÌ˛Ú‡:
PeÊËÏ: |
ãËäeÌ (Á‡ Ë̉˂ˉۇÎÌË Ô Â‰ÔÓ˜ËÚ‡ÌËя) |
||
|
PoÍ |
|
|
|
ПoÔ |
|
|
|
ДÊaÁ |
|
|
ÑeÚaÈÎÌa ÌacÚpoÈÍa: |
ÂÇyÍoÇ eÙeÍÚ: |
àÁÍÎ: |
НÓ Ï‡ÎÌÓ. |
|
|
ПpocÚp:СФВˆЛ‡ОМЛ ‡НЫТЪЛ˜МЛ |
|
|
|
|
ВЩВНЪЛ. |
|
AÇÚ. ÌËÇo ÁÇyÍ: |
àÁÍÎ: |
СË·ڇ̇Á‚Û͇‚‡ Ë ‡‚ |
|
|
|
Б‡‚ЛТЛПУТЪ УЪ ЛБО˙˜ВМЛя |
|
|
|
Ò˄̇Î. |
|
|
BkÎ: СË·ڇ ̇ Á‚Û͇ Ò |
|
|
|
|
Б‡Ф‡Б‚‡ МВБ‡‚ЛТЛПУ УЪ |
|
|
|
ËÁÎ˙˜ÂÌËя Ò˄̇Π(Ì‡Ô . |
|
|
|
ÂÍ·ÏË). |
|
TeÎeÇ. ÖoÇopËÚeÎ: |
àÁÍÎ: |
З‚Û͇ Ô ÓËÁıÓʉ‡ ÓÚ |
|
|
|
‚˙̯ÂÌ ÛÒË΂‡ÚÂÎ |
|
|
|
Ò‚˙ Á‡Ì Í˙Ï ‡Û‰ËÓ ËÁıÓ‰‡ |
|
|
|
ÓÚ Á‡‰Ì‡Ú‡ ÒÚ ‡Ì‡ ̇ |
|
|
BkÎ: |
ÚÂ΂ËÁÓ ‡. |
|
|
З‚Û͇ Ô ÓËÁıÓʉ‡ ÓÚ |
|
|
|
|
„У‚У ЛЪВОЛЪВ М‡ |
|
|
|
ÚÂ΂ËÁÓ ‡. |
•BËcoÍË Ë HËcÍË ÏÓ„‡Ú ‰‡ ÒÂ Ô ÓÏÂÌяÚ ‡ÍÓ Á‡ ÂÊËÏ Ì‡ Á‚Û͇ ÒÚ ËÁ· ‡ÎË «Л˘eÌ».
•З‡ ‚˙Á‚ ˙˘‡Ì Í˙Ï Ù‡· ˘ÌÓ Ô Ó„ ‡ÏË ‡Ì‡Ú‡ Ô Â‰Ì‡„·҇ ̇ Á‚Û͇ ËÁ·Â ÂÚ HyÎËpaÌe Л М‡ЪЛТМВЪВ ОК.
•П Ë ËÁÎ˙˜‚‡Ì ̇ ‰‚‡ ÂÁË͇ ËÁ·Â ÂÚ ÓÔˆËяÚ‡ CÚepeo-eÙeÍÚ Ë я ̇„·ÒÂÚ ‚ A Á‡ Á‚ÛÍÓ‚Ëя ͇̇Π1, B Á‡ Á‚ÛÍÓ‚Ëя ͇̇Π2 ËÎË MoÌo Б‡ Н‡М‡О ПУМУ,‡НУ В М‡‡БФУОУКВМЛВ. П Л ТЪВ ВУ ЛБО˙˜‚‡МВ, ПУКВ ‰‡ ТВ ЛБ·В В ПВК‰Ы CÚepeo Ë MoÌo.
Ô Ó‰˙Îʇ‚‡...
10 СЛТЪВП‡ УЪ ПВМ˛Ъ‡ М‡ ВН ‡М‡
 Loading...