


3-279-638-13(1)
Digital HD Video
Camera Recorder
Operating Guide
Before operating the unit, please read this manual thoroughly, and retain it for future reference
The supplied CD-ROM includes Operating Guide for the HVR-HD1000 series. (English, French, German, Italian, Spanish, and Simplified Chinese versions). For more details, see “Using the CD-ROM Manual” on page 17.
HVR-HD1000E/HD1000P
© 2007 Sony Corporation
Read this first
English
Before operating the unit, please read this manual thoroughly, and retain it for future reference.
WARNING
To reduce fire or shock hazard, do not expose the unit to rain or moisture.
CAUTION
Replace the battery with the specified type only. Otherwise, fire or injury may result.
Excessive sound pressure from earphones and headphones can cause hearing loss.
Do not expose the batteries to excessive heat such as sunshine, fire or the like.
Notice for customers in the United Kingdom
A moulded plug complying with BS 1363 is fitted to this equipment for your safety and convenience.
Should the fuse in the plug supplied need to be replaced, a fuse of the same rating as the supplied one and approved by ASTA or BSI to BS 1362 (i.e., marked with an  or mark) must be used.
If the plug supplied with this equipment has a detachable fuse cover, be sure to attach the fuse cover after you change the fuse. Never use the plug without the fuse cover. If you should lose the fuse cover, please contact your nearest Sony service station.
FOR CUSTOMERS IN EUROPE
ATTENTION
The electromagnetic fields at the specific frequencies may influence the picture and sound of this unit.
This product has been tested and found compliant with the limits set out in the EMC Directive forusing connection cables shorter than 3 meters (9.8 feet).
Notice
If static electricity or electromagnetism causes data transfer to discontinue midway (fail), restart the application or disconnect and connect the communication cable (USB, etc.) again.
Notice for the customers in the countries applying EU Directives
The manufacturer of this product is Sony Corporation, 1-7-1 Konan Minato-ku Tokyo, 1080075 Japan. The Authorized Representative for EMC and product safety is Sony Deutschland GmbH, Hedelfinger Strasse 61,70327 Stuttgart, Germany. For any service or guarantee matters, please refer to the addresses given in separate service or guarantee documents.
Disposal of Waste Electrical and Electronic Equipment for business use (Applicable in the European Union and other European countries with separate collection systems)
This symbol on the product or on its packaging indicates that this product shall not be treated as household waste. Instead it shall be handed over to the applicable take-back scheme for the recycling of electrical and electronic equipment. By ensuring this product is disposed of correctly, you will help prevent potential negative consequences for the environment and human health, which could otherwise be caused by inappropriate waste handling of this product. The recycling of materials will help to conserve natural resources. For more detailed information
2

about recycling of this product, please contact your local Sony office or visit Sony Europe’s web site for business customers: http://www.sonybiz.net/environment
Disposal of waste batteries (applicable in the European Union and other European countries with separate collection systems)
This symbol on the battery or on the packaging indicates that the battery provided with this product shall not be treated as household waste. By ensuring these batteries are disposed of correctly, you will help prevent potentially negative consequences for the environment and human health which could otherwise be caused by inappropriate waste handling of the battery. The recycling of the materials will help to conserve natural resources.
In case of products that for safety, performance or data integrity reasons require a permanent connection with an incorporated battery, this battery should be replaced by qualified service staff only.
To ensure that the battery will be treated properly, hand over the product at end-of-life to the applicable collection point for the recycling of electrical and electronic equipment.
For all other batteries, please view the section on how to remove the battery from the product safely. Hand the battery over to the applicable collection point for the recycling of waste batteries.
For more detailed information about recycling of this product or battery, please contact your local Civic Office, your household waste disposal service or the shop where you purchased the product.
For the customers in the Nederland
Voor de klanten in Nederland
Verwijdering van oude batterijen (in de Europese Unie en andere Europese landen met afzonderlijke inzamelingssystemen)
Dit symbool op de batterij of verpakking wijst erop dat de meegeleverde batterij van dit product niet als huishoudelijk afval behandeld mag worden.
Door deze batterijen op juiste wijze af te voeren, voorkomt u voor mens en milieu negatieve gevolgen die zich zouden kunnen voordoen in geval van verkeerde afvalbehandeling. Het recycleren van materialen draagt bij tot het vrijwaren van natuurlijke bronnen.
In het geval dat de producten om redenen van veiligheid, prestaties dan wel in verband met dataintegriteit een permanente verbinding met batterij vereisen, dient deze batterij enkel door gekwalificeerd servicepersoneel vervangen te worden. Om ervoor te zorgen dat de batterij op een juiste wijze zal worden behandeld, dient het product aan het eind van zijn levenscyclus overhandigd te worden aan het desbetreffende inzamelingspunt voor de recyclage van elektrisch en elektronisch materiaal.
Voor alle andere batterijen verwijzen we u naar het gedeelte over hoe de batterij veilig uit het product te verwijderen. Overhandig de batterij bij het desbetreffende inzamelingspunt voor de recyclage van batterijen.
Voor meer details in verband met het recyclen van dit product of batterij, neemt u contact op met de gemeentelijke instanties, het bedrijf of de dienst belast met de verwijdering van huishoudafval of de winkel waar u het product hebt gekocht.
3

For customers in the U.S.A.
If you have any questions about this product, you may call:
Sony Customer Information Center 1-800-686 SONY (7669).
The number below is for the FCC related matters only.
Regulatory Information
Declaration of Conformity
Trade Name: SONY Model No.: HVR-HD1000P
Responsible Party: Sony Electronics Inc. Address: 16530 Via Esprillo, San Diego, CA 92127 U.S.A
Telephone number: 858-942-2230
This device complies with Part 15 of the FCC Rules.
Operation is subject to the following two conditions:
(1) This device may not cause harmful interference, and (2) this device must accept any interference received, including interference that may cause undesired operation.
CAUTION
You are cautioned that any changes or modifications not expressly approved in this manual could void your authority to operate this equipment.
Notes
This equipment has been tested and found to comply with the limits for a Class B digital device, pursuant to Part 15 of the FCC Rules. These limits are designed to provide reasonable protection against harmful interference in a residential installation. This equipment generates, uses, and can radiate radio frequency energy and, if not installed and used in accordance with the instructions, may cause harmful interference to radio communications.
However, there is no guarantee that interference will not occur in a particular installation. If this equipment does cause harmful interference to radio or television reception, which can be determined by turning the equipment off and on, the user is encouraged to try to correct the interference by one or more of the following measures:
– Reorient or relocate the receiving antenna.
–Increase the separation between the equipment and receiver.
–Connect the equipment into an outlet on a circuit different from that to which the receiver is connected.
–Consult the dealer or an experienced radio/TV technician for help.
The supplied interface cable must be used with the equipment in order to comply with the limits for a digital device pursuant to Subpart B of Part 15 of FCC Rules.
Battery pack
This device complies with Part 15 of the FCC Rules. Operation is subject to the following two conditions:
(1) This device may not cause harmful interference, and (2) this device must accept any interference received, including interference that may cause undesired operation.
4
Dieses Produkt wurde geprüft und erfüllt die EMV-Richtlinie, sofern Verbindungskabel mit einer Länge von weniger als 3 Metern verwendet werden.
Hinweis
Wenn eine Datenübertragung aufgrund statischer oder elektromagnetischer Störeinflüsse abbricht (fehlschlägt), starten Sie die entsprechende Anwendung neu, oder entfernen Sie das USBKabel, und schließen Sie es wieder an.
•Verwenden Sie das Netzteil nicht, wenn nur wenig Platz vorhanden ist, z.B. zwischen einer Wand und Möbelstücken.
Continued , 5
Read this first (Continued)
Entsorgen gefährdet. Materialrecycling hilft, den Verbrauch von Rohstoffen zu verringern.
Bei Produkten, die auf Grund ihrer Sicherheit, der Funktionalität oder als Sicherung vor Datenverlust eine ständige Verbindung zur eingebauten Batterie benötigen, sollte die Batterie nur durch qualifiziertes Servicepersonal ausgetauscht werden.
Um sicherzustellen, dass die Batterie korrekt entsorgt wird, geben Sie das Produkt zwecks
Entsorgung an einer Annahmestelle für das Recycling von elektrischen und elektronischen
Geräten ab.
Für alle anderen Batterien entnehmen Sie die Batterie bitte entsprechend dem Kapitel über die sichere Entfernung der Batterie. Geben Sie die Batterie an einer Annahmestelle für das Recycling von Batterien/Akkus ab.
Weitere Informationen über das Recycling dieses Produkts oder der Batterie erhalten Sie von Ihrer Gemeinde, den kommunalen Entsorgungsbetrieben oder dem Geschäft, in dem Sie das Produkt gekauft haben.
Entsorgung von gebrauchten Batterien und Akkus (anzuwenden in den Ländern der Europäischen Union und anderen europäischen Ländern mit einem separaten Sammelsystem für diese Produkte)
Das Symbol auf der Batterie/dem Akku oder der Verpackung weist darauf hin, dass diese nicht als normaler Haushaltsabfall zu behandeln sind.
Durch Ihren Beitrag zum korrekten Entsorgen dieser Batterien/Akkus schützen Sie die Umwelt und die Gesundheit Ihrer Mitmenschen. Umwelt und Gesundheit werden durch falsches
6
Este producto se ha probado y cumple con la normativa que establece la Directiva EMC si se utiliza un cable de conexión de menos de 3 metros de longitud.
Aviso
Si la electricidad estática o el electromagnetismo interrumpen la transmisión de datos (fallo), reinicie la aplicación o desconecte el cable de comunicación (USB, etc.) y vuelva a conectarlo.
Continued , 7
Read this first (Continued)
vida útil en un punto de recogida para el reciclado de aparatos eléctricos y electrónicos.
Para las demás baterías,vea la sección donde se indica cómo quitar la batería del producto de forma segura. Deposite la batería en el correspondiente punto de recogida para el reciclado.
Para recibir información detallada sobre el reciclaje de este producto o de la batería, póngase en contacto con el ayuntamiento, el punto de recogida más cercano o el establecimiento donde ha adquirido el producto.
Tratamiento de las baterías al final de su vida útil (aplicable en la Unión Europea y en países europeos con sistemas de recogida selectiva de residuos)
Este símbolo en la batería o en el embalaje indica que la batería proporcionada con este producto no puede ser tratada como un residuo doméstico normal.
Al asegurarse de que estas baterías se desechan correctamente, Ud. ayuda a prevenir las consecuencias negativas para el medio ambiente y la salud humana que podrían derivarse de la incorrecta manipulación en el momento de deshacerse de la batería. El reciclaje de materiales ayuda a conservar los recursos naturales.
En el caso de productos que por razones de seguridad, rendimiento o mantenimiento de datos, sea necesaria una conexión permanente con la batería incorporada, esta batería solo deberá ser reemplazada por personal técnico cualificado para ello.
Para asegurarse de que la batería será tratada correctamente,entregue el producto al final de su
8

Cet appareil a été testé et jugé conforme aux limites établies par la directive EMC visant l’utilisation de câbles de connexion de moins de 3 mètres.
Avis
Si l’électricité statique ou les champs électrostatiques entraînent une interruption lors du transfert des données (échec), redémarrez l’application ou débranchez, puis rebranchez le câble de connexion (USB, etc.).
•N’utilisez pas un adaptateur secteur suité dans un espace restreint, par exemple un mur et un meuble.
Elimination des piles et accumulateurs usagés (Applicable dans les pays de l’Union Européenne et aux autres pays européens disposant de systèmes de collecte sélective)
Ce symbole, apposé sur les piles et accumulateurs ou sur les emballages, indique que les piles et accumulateurs fournis avec ce produit ne doivent pas être traités comme de simples déchets
Continued , 9
Read this first (Continued)
ménagers. En vous assurant que ces piles et accumulateurs sont mis au rebut de façon appropriée, vous participez activement à la prévention des conséquences négatives que leur mauvais traitement pourrait provoquer sur l’environnement et sur la santé humaine. Le recyclage des matériaux contribue par ailleurs à la préservation des ressources naturelles.
Pour les produits qui pour des raisons de sécurité, de performance ou d’intégrité de données nécessitent une connexion permanente à une pile ou à un accumulateur, il conviendra de vous rapprocher d’un service technique qualifié pour effectuer son remplacement.
En rapportant votre appareil électrique en fin de vie à un point de collecte approprié vous vous assurez que la pile ou l'accumulateur incorporé sera traitée correctement.
Pour tous les autres cas de figure et afin d’enlever les piles ou accumulateurs en toute sécurité de votre appareil, reportez-vous au manuel d’utilisation. Rapporter les piles ou accumulateurs usagés au point de collecte approprié pour le recyclage.
Pour toute information complémentaire au sujet du recyclage de ce produit ou des piles et accumulateurs, vous pouvez contacter votre municipalité, votre déchetterie locale ou le point de vente où vous avez acheté ce produit.
Il presente prodotto è stato testato ed è risultato conforme ai limiti stabiliti dalla Direttiva EMC relativa all’uso dei cavi di collegamento di lunghezza inferiore a 3 metri.
Nota
Se l’elettricità statica o interferenze magnetiche causano l’interruzione del trasferimento dei dati, che pertanto non avviene, è necessario riavviare l’applicazione oppure scollegare, quindi ricollegare il cavo.
10
Trattamento delle pile esauste (applicabile in tutti i paesi dell’Unione Europea e in altri paesi Europei con sistema di raccolta differenziata)
Questo simbolo sul prodotto o sulla confezione indica che la pila non deve essere considerata un normale rifiuto domestico.
Assicurandovi che le pile siano smaltite correttamente, contribuirete a prevenire potenziali conseguenze negative per l’ambiente e per la salute che potrebbero altrimenti essere causate dal loro inadeguato smaltimento.
Il riciclaggio dei materiali aiuta a conservare le risorse naturali.
In caso di prodotti che per motivi di sicurezza, prestazione o protezione dei dati richiedano un collegamento fisso ad una pila interna, la stessa dovrà essere sostituita solo da personale di assistenza qualificato.
Consegnare il prodotto a fine vita al punto di raccolta idoneo allo smaltimento di apparecchiature elettriche ed elettroniche; questo assicura che anche la pila al suo interno venga trattata correttamente.
Per le altre pile consultate la sezione relativa alla rimozione sicura delle pile. Conferire le pile esauste presso i punti di raccolta indicati per il riciclo.
Per informazioni più dettagliate circa lo smaltimento della pila esausta o del prodotto, potete contattare il Comune, il servizio locale di smaltimento rifiuti oppure il negozio dove l’avete acquistato.
Continued , 11
Read this first (Continued)
Notes on use
Type of cassette you can use in your camcorder
You can use mini DV cassettes marked with 

 . Your camcorder is not compatible with the Cassette Memory function (p. 95).
The HDV standards
•Digital high-definition (HD) video signals are recorded and played back on a DV format cassette.
•HDV signals are compressed in MPEG2 format, which is adopted in BS (broadcast satellite) digital and terrestrial digital HDTV broadcastings and in Blu-ray disc recorders.
Types of “Memory Stick” you can use in your camcorder
You can use “Memory Stick” marked with the following (p. 96).
–


 (“Memory Stick Duo”)
–


 (“Memory Stick PRO Duo”)
–


 (“Memory Stick PRO-HG Duo”).
“Memory Stick Duo”
(This size can be used with your camcorder.)
“Memory Stick”
(You cannot use with your camcorder.)
•You cannot use any type of memory card except “Memory Stick Duo.”
•“Memory Stick PRO Duo” can be used only with “Memory Stick PRO” compatible equipment.
•Do not attach a label or the like on a “Memory Stick Duo” or a Memory Stick Duo adaptor.
When using a “Memory Stick Duo” with “Memory Stick” compatible equipment
Be sure to insert the “Memory Stick Duo” into the Memory Stick Duo Adaptor.
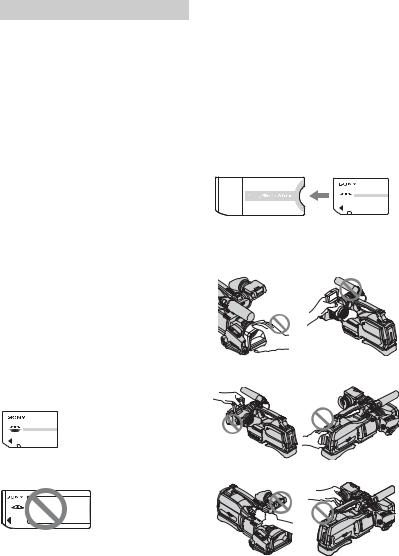
Memory Stick Duo Adaptor
Using the camcorder
•Do not hold the camcorder by the following parts.
Lens hood |
panel EVF block |
LCD panel |
Battery pack |
Microphone Viewfinder
12
•The camcorder is not dustproof, dripproof or waterproof.
See “On using your camcorder” (p. 100).
•When connecting your camcorder to another device with communication cables, be sure to insert the connector plug in the correct way. Pushing the plug forcibly into the terminal will damage the terminal and may result in a malfunction of your camcorder.
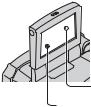
About menu items, LCD panel, viewfinder, and lens
•A menu item that is grayed out is not available under the current recording or playback conditions.
•The LCD screen and the viewfinder are manufactured using extremely highprecision technology, so over 99.99% of the pixels are operational for effective use. However, there may be some tiny black points and/or bright points (white, red, blue, or green in color) that appear constantly on the LCD screen and the viewfinder. These points are normal results of the manufacturing process and do not affect the recording in any way.
Black point
White, red, blue or green point
•Exposing the LCD screen, the viewfinder, or the lens to direct sunlight for long periods of time may cause malfunctions.
•Do not aim at the sun. Doing so might cause your camcorder to malfunction. Take pictures of the sun only in low light conditions, such as at dusk.
About changing the language setting
The on-screen displays in each local language are used for illustrating the operating procedures. Change the screen language before using your camcorder if necessary (p. 24).
On recording
•Before starting to record, test the recording function to make sure the picture and sound are recorded without any problems.
•Compensation for the contents of recordings cannot be provided, even if recording or playback is not possible due to a malfunction of the camcorder, storage media, etc.
•TV color systems differ depending on the country/region. To view your recordings on a TV, you need a PAL system-based TV.
•Television programs, films, video tapes, and other materials may be copyrighted. Unauthorized recording of such materials may be contrary to the copyright laws.
On playing back HDV tapes on other devices
You cannot play back a tape recorded in the HDV format on DV format video cameras or on mini DV players (The screen appears blue).
Check the contents of tapes by playing them back on this camcorder prior to playing them back on other devices.
Notes on the icons used in this manual


 Features available for the HDV format only.
 Features available for the DV format only.
About this manual
•The images of the LCD screen and the viewfinder used in this manual for
Continued , 13
Read this first (Continued)
illustration purposes are captured using a digital still camera, and therefore may appear different.
•Design and specifications of recording media and other accessories are subject to change without notice.
About the Carl Zeiss lens
Your camcorder is equipped with a Carl Zeiss lens, which was developed jointly by Carl Zeiss, in Germany, and Sony Corporation, and produces superior images. It adopts the MTF measurement system for video cameras and offers a quality typical of a Carl Zeiss lens. Also, the lens for your camcorder is T -coated to suppress unwanted reflections and faithfully reproduce colors.
MTF= Modulation Transfer Function The number value indicates the amount of light from a subject coming into the lens.
14
Table of Contents |
|
Read this first .................................. |
2 |
Notes on use ................................. |
12 |
Using the CD-ROM Manual .......... |
17 |
Getting Started |
|
Step 1: Checking supplied items ... |
18 |
Step 2: Attaching the supplied |
|
microphone, eyecup and the lens |
|
hood ............................................ |
19 |
Step 3: Charging the battery pack |
|
..................................................... |
21 |
Step 4: Turning the power on and |
|
setting the date and time ............ |
24 |
Changing the language setting .... |
24 |
Step 5: Making setting adjustments |
|
before recording .......................... |
25 |
Step 6: Inserting a tape or a “Memory |
|
Stick Duo” ................................... |
26 |
Recording/Playback |
|
Recording ..................................... |
28 |
Zooming ...................................... |
30 |
Recording high quality still images |
|
during tape recording (Dual Rec) |
|
................................................... |
30 |
Controlling the image settings |
|
manually with the RING ............ |
31 |
Recording in dark places |
|
(NightShot) ............................... |
31 |
Adjusting the exposure for backlit |
|
subjects .................................... |
32 |
Recording in mirror mode ........... |
32 |
Playback ....................................... |
33 |
Using PB zoom ........................... |
35 |
Searching for the starting point ..... |
36 |
Searching for the last scene of the |
|
most recent recording (END |
|
SEARCH) .................................. |
36 |
Reviewing the most recently |
|
recorded scenes (Rec review) |
|
................................................... |
36 |
Playing the picture on a TV ........... |
37 |
Connecting to a high definition TV |
|
................................................... |
38 |
Connecting to a 16:9 (wide) or 4:3 TV |
|
................................................... |
39 |
Using the Menu |
|
Using the menu items .......... |
42 |
Menu items ................................... |
43 |
CAMERA SET menu ............... |
45 |
Settings to adjust your camcorder to |
|
the recording conditions |
|
MEMORY SET menu ............. |
52 |
Settings for the “Memory Stick Duo” |
|
PICT.APPLI. menu ................ |
55 |
Special effects on pictures or |
|
additional functions on recording/ |
|
playback |
|
EDIT/PLAY menu .................. |
58 |
Settings for editing or playing back in |
|
various modes |
|
STANDARD SET menu ......... |
59 |
Settings while recording on a tape or |
|
other basic settings |
|
TIME/LANGU. menu .............. |
65 |
Customizing Personal Menu ......... |
66 |
Dubbing/Editing |
|
Dubbing to VCR or DVD/HDD |
|
recorders ..................................... |
68 |
Recording pictures from a VCR .... |
71 |
Dubbing pictures from a tape to a |
|
“Memory Stick Duo” .................... |
73 |
Deleting recorded pictures from the |
|
“Memory Stick Duo” .................... |
73 |
Marking images on the “Memory Stick |
|
Duo” with specific information (Print |
|
mark/Image protection) ............... |
74 |
Printing recorded images (PictBridge |
|
compliant printer) ........................ |
75 |
Continued , 15 |
|

Using a Computer |
|
Connecting to a computer ............ |
77 |
Copying still images to a computer |
|
.................................................... |
77 |
Copying movies on a tape to a |
|
computer .................................... |
80 |
Troubleshooting |
|
Troubleshooting ........................... |
83 |
Warning indicators and messages |
|
.................................................... |
91 |
Self-diagnosis display/Warning |
|
indicators .................................. |
91 |
Additional Information |
|
Using your camcorder abroad ...... |
94 |
Maintenance and precautions ...... |
95 |
Usable cassette tapes ................ |
95 |
About the “Memory Stick” ........... |
96 |
About the “InfoLITHIUM” battery |
|
pack .......................................... |
98 |
About i.LINK ................................ |
99 |
About x.v.Color .......................... |
100 |
On using your camcorder ......... |
100 |
Specifications ............................. |
104 |
Quick Reference |
|
Identifying parts and controls ..... |
107 |
Indicators displayed during recording/ |
|
playback ................................... |
110 |
Index .......................................... |
114 |
16

Using the CD-ROM Manual
The supplied CD-ROM includes versions of the Operating Guide for the HVRHD1000E/HD1000P series in English, French, German, Italian, Spanish, and Simplified Chinese in PDF format.
z Tips
•The files may not be displayed properly, depending on the version of Acrobat Reader. In such a case, install the latest version you can download from the URL mentioned in “Preparation” above.
Preparation
The following program must be installed on your computer in order to read the Operating Guide contained on the CDROM.
• Adobe Reader Version 7.0 or higher
z Tips
•If Adobe Reader is not installed, you can download it from the following URL: http://www.adobe.com/
Adobe and Adobe Reader are trademarks of Adobe Systems Incorporated in the United States and/or other countries.
Reading the CD-ROM Manual
To read the Operating Guide contained on the CD-ROM, do the following.
1 Insert the CD-ROM in your CDROM drive.
A cover page appears automatically in your browser.
If it does not appear automatically in the browser, double-click on the index.htm file on the CD-ROM.
2 Select and click on the Operating Guide that you want to read.
This opens the PDF file of the Operating Guide.
17
Getting Started
Step 1: Checking supplied items
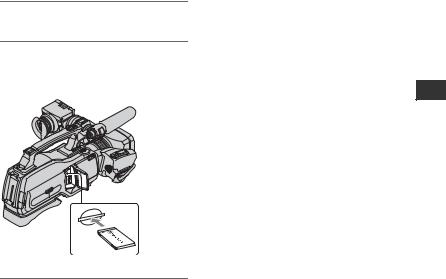
Make sure that you have following items supplied with your camcorder.
The number in the parentheses indicates the number of that item supplied.
AC Adaptor (1) (p. 21)
Power cord (mains lead) (1) (p. 21)
A/V connecting cable (1) (p. 37, 68)
Eye cup (1)
Rechargeable battery pack NP-F570 (1) (p. 21, 98)
Lens hood (1)
Lens cap (1)
Wind screen (1) (p. 19)
Microphone (1) (p. 19)
CD-ROM
“Manuals for Digital HD Video Camera Recorder”(1)
Operating Guide (This manual) (1)
To attach the lens cap to the grip belt
Remove the grip belt and attach the lens cap by leading the grip belt through the attachment on the lens cap string. Then attach the grip belt to the camcorder again.
18
Step 2: Attaching the supplied microphone, eyecup and the lens hood
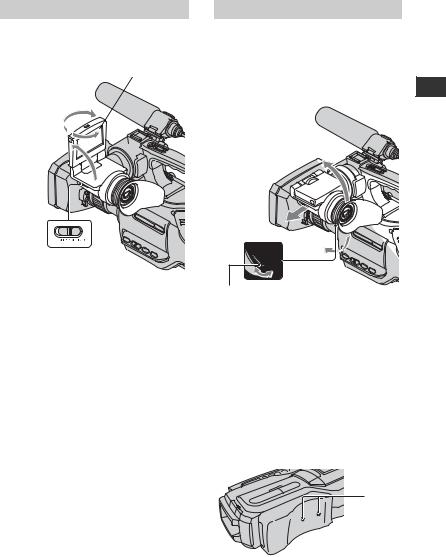
Attaching the supplied microphone
1
2
4 Turn the plug of the microphone counter-clockwise to 180 degrees in the direction of the arrow 5, and connect it to the Mic jack 4.
|
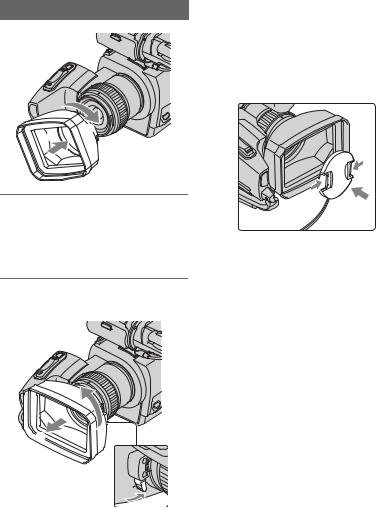
Attaching the eyecup |
|
|
Attach the eyecup aligned with the eyecup |
|
|
groove in the viewfinder. You can attach |
|
|
the eyecup facing either the right or left |
|
|
side. |
|
|
3 |
|
|
Attach the |
|
4 |
eyecup securely |
|
until it fits the |
||
|
||
5 |
corresponding |
|
|
part properly. |
Started Getting
1 Attach the wind screen 1 to the microphone 2.
2 Unlock the stopper of the microphone holder 3 and open the cover.
3 Align the convex part of the microphone with the concave part of the holder, then place the microphone into the holder. Close the cover and lock the stopper securely.
Be sure to align the v mark on the microphone and the | mark on the holder facing each other.
Continued , 19
Step 2: Attaching the supplied microphone and the lens hood (Continued)
Attaching the lens hood
2
1
Align the marks on the lens hood to those on the camcorder, and turn the lens hood in the direction of the arrow.
z Tips
•If you attach, remove or adjust an 37mm
(2 1/2in.) PL filter or MC protector, remove the lens hood.
Attaching the lens cap
Attach the lens cap by pressing both knobs on its sides.
To remove the Lens hood
1
2
Turn the lens hood cover in the direction of the arrow as illustrated above while pressing the lever on the lens hood cover.
20
Step 3: Charging the battery pack
1
Battery pack
 3
3
|
DC plug |
To the wall outlet |
4 |
|
|
(wall socket) |
AC Adaptor |
|
Power cord |
|
(Mains lead) |
You can charge the “InfoLITHIUM” battery pack (L series) (p. 98) after attaching it to your camcorder.
b Notes
•You cannot attach any “InfoLITHIUM” battery pack other than the L series to your camcorder.
1 Attach the battery pack to your camcorder.
Attach the battery pack by sliding it in the direction of the arrow while pressing it until it clicks.
2 Slide the POWER switch to OFF (CHG).
3 Connect the AC Adaptor to the DC IN jack of your camcorder. Be sure that the v mark on the DC
2 |
|
POWER |
|
switch |
|
CHG |
DC IN |
(charge) |
lamp |
|
jack |
|
plug is facing to the v mark on your camcorder.
4 Connect the power cord (mains lead) to the AC Adaptor and the wall outlet (wall socket).
The CHG (charge) lamp lights up and charging starts. The CHG (charge) lamp turns off when the battery is fully charged.
b Notes
•Disconnect the AC Adaptor from the DC IN jack holding both the camcorder and the DC plug.
z Tips
•You can operate your camcorder connected to a power source such as a wall outlet (wall socket) as shown in the illustration. The battery pack will not lose its charge in this case.
Started Getting
Continued , 21
Step 3: Charging the battery pack (Continued)
To remove the battery pack
Slide the POWER switch to OFF (CHG). Push the [BATT (battery) RELEASE] button and remove the battery pack.
[BATT (battery) RELEASE]
When storing the battery pack
Fully discharge the battery before storing it for an extended period (p. 98).
pressing DISPLAY/BATT INFO again while the information is displayed.
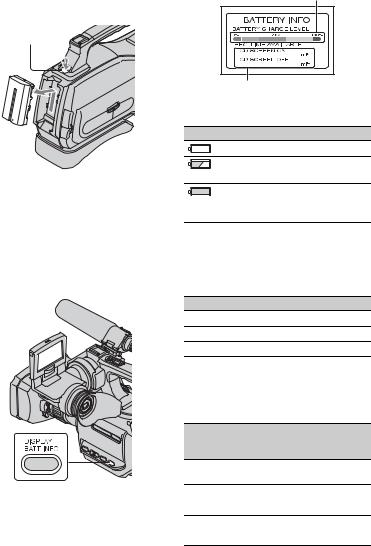
Remaining battery (approx.)
60 |
65 |
Recording capacity (approx.)
You can check the remaining battery charge on the LCD screen.
Indicator Status
Sufficient power remaining
Battery low, recording/ playback will stop soon.
Replace the battery with a fully charged one, or charge the battery.
To check the remaining battery (Battery Info)
Set the POWER switch to OFF (CHG), then press DISPLAY/BATT INFO.
After a while, the approximate recordable time and battery information appear for about 7 seconds. You can view the battery information for up to 20 seconds by
Charging time
Approximate time (min.) required when you fully charge a fully discharged battery pack.
Battery pack |
Charging time |
NP-F570 (supplied) |
260 |
NP-F770 |
450 |
NP-F970 |
630 |
Recording time
Approximate time (min.) available when you use a fully charged battery pack.
|
Continuous |
Typical |
|
||
Battery pack |
recording |
recording |
|||
|
time |
|
time* |
|
|
Recording |
HDV |
DV |
HDV |
DV |
|
Format |
|||||
|
|
|
|
||
NP-F570 |
190 |
200 |
100 |
110 |
|
(supplied) |
205 |
220 |
110 |
125 |
|
|
|||||
NP-F770 |
390 |
410 |
210 |
230 |
|
|
425 |
445 |
225 |
250 |
|
22

Battery pack |
Continuous |
Typical |
|
||
recording |
recording |
||||
|
time |
|
time* |
|
|
Recording |
HDV |
DV |
HDV |
DV |
|
Format |
|||||
|
|
|
|
||
NP-F970 |
580 |
605 |
310 |
340 |
|
|
630 |
660 |
340 |
375 |
|
|
|
|
|
|
|
*Typical recording time shows the time when you repeat recording start/stop, turning the power on/off and zooming.
b Notes
•All times measured under the following conditions:
Top: When the LCD turns on.
Bottom: Recording with the viewfinder while the LCD turns off.
•You cannot turn off the viewfinder.
Playing time
Approximate time (min.) available when you use a fully charged battery pack.
Battery pack |
LCD panel |
LCD panel |
|||
on |
|
off |
|
||
|
|
|
|||
Recorded |
HDV |
DV |
HDV |
DV |
|
Format |
|||||
|
|
|
|
||
NP-F570 |
260 |
280 |
295 |
315 |
|
(supplied) |
|
|
|
|
|
|
|
|
|
|
|
NP-F770 |
540 |
570 |
605 |
650 |
|
|
|
|
|
|
|
NP-F970 |
780 |
830 |
890 |
950 |
|
|
|
|
|
|
|
On the battery pack
•Before changing the battery pack, slide the POWER switch to OFF (CHG).
•The CHG (charge) lamp flashes during charging, or Battery Info (p. 22) will not be correctly displayed under the following conditions.
–The battery pack is not attached correctly.
–The battery pack is damaged.
–The battery pack is worn-out (for Battery Info only).
•The power will not be supplied from the battery as long as the AC Adaptor is connected to the DC IN jack of your camcorder, even when the
power cord (mains lead) is disconnected from the wall outlet (wall socket).
On the charging/recording/playback time
•Times measured with the camcorder at 25 °C (77 °F) (10 to 30 °C (50 °F to 86 °F) is recommended).
•The recording and playback time will be shorter when you use your camcorder in low temperatures.
•The recording and playback time will be shorter depending on the conditions under which you use your camcorder.
On the AC Adaptor
•Use the nearby wall outlet when using the AC Adaptor. Disconnect the AC Adaptor from the wall outlet immediately if any malfunction occurs while using your camcorder.
•Do not use the AC Adaptor placed in a narrow space, such as between a wall and furniture.
•Do not short-circuit the DC plug of the AC Adaptor or battery terminal with any metallic objects. This may cause a malfunction.
•Even if your camcorder is turned off, AC power (house current) is still supplied to it while connected to the wall outlet via the AC Adaptor.
Started Getting
23
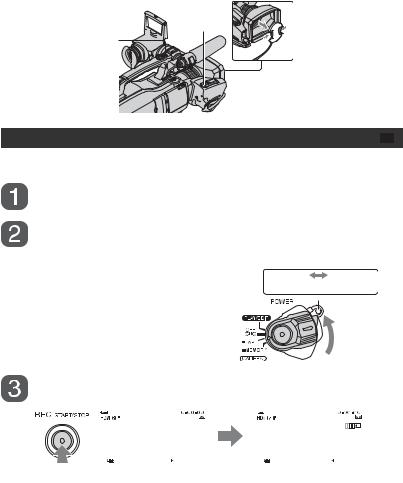
Step 4: Turning the power on and setting the date and time
Set the date and time when using this camcorder for the first time. If you do not set the date and time, the [CLOCK SET] screen appears every time you turn on your camcorder or change the POWER switch position.
Touch the button on the LCD screen.
POWER switch
1 Slide the POWER switch to TAPE or MEMORY while pressing the green button.
TAPE: To record on a tape. MEMORY: To record on a “Memory Stick Duo.”
PLAY/EDIT: To play or edit pictures.
The [CLOCK SET] screen appears.
CLOCK SET |
|
DATE |
1M 1D 0: 00 |
2007 Y |
OK
2 Set [Y] (year) with 

 /
/

 , then touch

 .
.
You can set any year up to the year 2079.
3 Set [M] (month), then touch 

 and repeat for [D] (day), hour and minute.
The clock starts.
To turn off the power
Slide the POWER switch to OFF (CHG).
To reset the date and time
You can set the desired date and time by touching  t [MENU] t
 (TIME/LANGU.) t [CLOCK SET] (p. 42).
b Notes
•If you do not use your camcorder for about 3 months, the built-in rechargeable battery gets discharged and the date and time settings may be cleared from the memory. In that case, charge the rechargeable battery and then set the date and time again (p. 103).
z Tips
•The date and time are not displayed while recording, but they are automatically recorded on the tape, and can be displayed during playback (see page 64 for [DATA CODE]).
•If the buttons on the touch panel do not work correctly, adjust the touch panel (CALIBRATION) (p. 102).
Changing the language setting
You can change the on-screen displays to show messages in a specified language. Touch 


 t [MENU] t
  (TIME/ LANGU.) t [LANGUAGE], then select the desired language.
24
Step 5: Making setting adjustments before recording
The LCD panel
Open the LCD panel (1), then rotate it to the best angle to record or play (2).
 90 degrees (max.)
180 degrees 2 (max.)
1


180 degrees (max.)
To turn off the LCD screen
Set the LCD ON/OFF switch to OFF. This helps to make the battery last longer. The recorded picture will not be affected by the setting. To turn on the LCD screen, set the LCD ON/OFF switch to ON.
b Notes
•When the LCD ON/OFF switch is set to OFF, you cannot operate the touch panel.
The viewfinder
Pull out the LCD panel block to adjust the position (1), and rotate the viewfinder to the best angle (2).
You can view pictures using the viewfinder to avoid wearing down the battery, or when the picture seen on the LCD screen is poor.
2
1
Viewfinder lens adjustment lever
Move it until the picture is clear.
z Tips
•You can adjust the brightness of the viewfinder backlight by selecting [LCD/VF SET] - [VF B.LIGHT] (p. 61).
z Tips |
The shoulder pad |
|
•If you rotate the LCD panel 180 degrees to the lens side, you can close the LCD panel with the LCD screen facing out. This is convenient during playback operations.
•See [LCD/VF SET] - [LCD BRIGHT] (p. 61) to adjust the brightness of the LCD screen.
•Press DISPLAY/BATT INFO to toggle the screen indicators (such as Battery Info) on or off.
You can adjust the position of the shoulder pad by loosen the screws illustrated below. Tighten the screws again after adjustment.
Screws
Started Getting
25
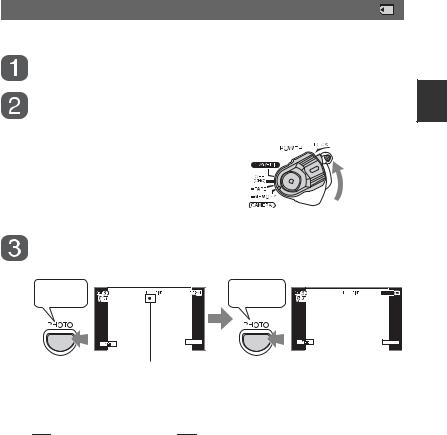
Step 6: Inserting a tape or a “Memory Stick Duo”
Cassette tape
You can use mini DV 

 cassettes only (p. 95).
b Notes
•The recordable time varies depending on [  REC MODE] (p. 60).
1 Slide and hold the  OPEN/ EJECT lever in the direction of the arrow and open the lid.
 OPEN/EJECT lever
Lid
The cassette compartment automatically comes out and opens up.
2 Insert a cassette with its window facing outwards, then press

 .
.
Push the center of the back of the cassette lightly.
Cassette
Window
compartment
The cassette compartment automatically slides back in.
3 Close the lid.
To eject the cassette
Open the lid following the same procedure as described in step 1 and remove the cassette.
b Notes
•Do not force the cassette compartment closed by pressing the portion marked {DO NOT PUSH} while it is sliding in. It may cause a malfunction.
“Memory Stick Duo”
You can use only a “Memory Stick Duo” marked with 


 or
or


 (p. 96).
z Tips
•The number and time of recordable pictures vary depending on the image quality or the image size. For details, see page 52.
26
1 Open the jack cover.
2 Insert the “Memory Stick Duo” into the “Memory Stick Duo” slot in the right direction until it clicks.
Started Getting

 Access
lamp
To eject a “Memory Stick Duo”
Lightly push the “Memory Stick Duo” in once.
b Notes
•When the access lamp is lit or flashing, your camcorder is reading/writing data. Do not shake or knock your camcorder, turn the power off, eject the “Memory Stick Duo,” or remove the battery pack. Otherwise, image data may be damaged.
•If you force the “Memory Stick Duo” into the slot in the wrong direction, the “Memory Stick Duo,” the “Memory Stick Duo” slot, or image data may be damaged.
•When inserting or ejecting the “Memory Stick Duo,” be careful that the “Memory Stick Duo” does not pop out and drop.
27
Recording/Playback
Recording
PHOTO
START/STOP B 

 START/STOP A
Recording movies
Movies are recorded on a tape.
Remove the lens cap by pressing both knobs on its sides.
Slide the POWER switch to TAPE while pressing the green
button.
Note on the LOCK switch
When you slide the LOCK switch to the lock position (the POWER switch side), the POWER switch can no longer be set to MEMORY accidentally. (The LOCK switch is set to the unlock position at the time of purchase.)
LOCK  UNLOCK


 LOCK
LOCK  switch
Press START/STOP A (or B).
|
60min |
|
|
|
60min |
|
|
60min |
|
|
|
60min |
||||||||||
|
|
|
|
|
|
|
|
|
|
|
|
|
|
|
|
|
|
|
|
|
|
|
|
|
|
|
|
|
|
|
|
|
|
|
|
|
|
|
|
|
|
|
|
|
|
|
|
|
|
|
|
|
|
P-MENU |
|
|
|
|
|
|
|
|
|
|
P-MENU |
|
||
|
|
|
|
|
|
|
|
|
|
|
|
|
|
|
|
|
|
|
|
|
|
|
|
|
|
|
|
|
|
|
|
|
|
|
|
|
|
|
|||||||
|
|
|
[STBY] |
|
|
|
|
[REC] |
||||||||||||||
To stop recording, press START/STOP again.
z Tips
• The pictures are recorded in the HDV format in the default setting (p. 60).
28
To record high quality still images during tape recording (Dual Rec)
See page 30 for details.
Recording still images
Still images are recorded on the “Memory Stick Duo.”
Remove the lens cap by pressing both knobs on its sides.
Slide the POWER switch to MEMORY while pressing the green button.
Recording/Playback
Press and hold PHOTO lightly to adjust the focus, then press it fully to record.
Beep |
min |
6.1M |
|
|
P-MENU |
Flashing bLights up
Shutter click |
min |
6.1M |
|
||
|
|
P-MENU |
A shutter sound is heard. When 


 disappears, the image has been recorded.
To check the latest recording on a “Memory Stick Duo”
Touch  . To delete the picture, touch

 t [YES].
z Tips
• See page 52 for the image quality, image size and the number of recordable pictures.
Continued , 29
Recording (Continued)
Zooming
You can magnify images to 10 times the original size with the power zoom lever.
A
 B
B
Power zoom lever
Close view: (Telephoto)
Wider range of view:
(Wide angle)
Move the power zoom lever B slightly for a slower zoom. Move it further for a faster zoom.
b Notes
•Be sure to keep your finger on the power zoom lever. If you move your finger off the power zoom lever, the operation sound of the power zoom lever may also be recorded.
•You can not change the zoom speed of the zoom lever A on the handdle.
•The minimum possible distance between camcorder and subject while maintaining sharp focus is about 1 cm (about 13/32 in.) for wide angle and about 80 cm (about 2 5/8 feet) for telephoto.
z Tips
•You can set [DIGITAL ZOOM] (p. 50) if you want to zoom to a level greater than 10 ×.
•You can also adjust the setting manually using the RING (p. 31).
Recording high quality still images during tape recording (Dual Rec)
You can record high quality still images on the “Memory Stick Duo” during tape recording.
1Slide the POWER switch to TAPE, then press START/STOP to start tape recording.
2Press PHOTO fully.
For each separate time tape recording, up to 3 still images can be recorded.
Orange color 


 boxes indicate
  the number of
recorded images. When recording is finished, the color changes to orange.
3Press START/STOP to stop tape recording. Stored still images appear one by one, and the images are stored onto the “Memory
Stick Duo.” When 


 disappears, the image has been recorded.
b Notes
•Do not eject the “Memory Stick Duo” before tape recording is finished and the still images are stored on the “Memory Stick Duo.”
30
 Loading...