


Compact FM/MW/LW
Player Disc
3-236-849-14 (1)
FM/MW/LW
Compact Disc Player
Operating Instructions |
|
GB |
||||
|
|
|
|
|||
Bedienungsanleitung |
|
|
DE |
|||
|
|
|
|
|
|
|
Mode d’emploi |
|
|
|
|
|
FR |
|
|
|
|
|
||
Istruzioni per l’uso |
|
|
|
|
IT |
|
|
|
|
|
|
||
Gebruiksaanwijzing |
|
|
|
NL |
||
Wichtig!
Bitte nehmen Sie sich etwas Zeit, um den Geräte-Pass vollständig auszufüllen. Dieser befindet sich auf der hinteren Umschlagseite dieser Bedienungsanleitung.
Si dichiara che l’apparecchio è stato fabbricato in conformità all’art. 2, Comma 1 del D.M. 28.08.1995 n. 548.
For installation and connections, see the supplied installation/connections manual.
Zur Installation und zum Anschluß siehe die mitgelieferte Installations-/ Anschlußanleitung.
En ce qui concerne l’installation et les connexions, consulter le manuel d’installation/connexions fourni.
Per l’installazione e i collegamenti, fare riferimento al manuale di istruzioni di installazione/collegamenti in dotazione.
Zie voor het monteren en aansluiten van het apparaat de bijgeleverde handleiding “Installatie en aansluitingen”.
CDX-L380X CDX-L400X
CDX-L410 CDX-L420V
2002 Sony Corporation

Welcome !
Thank you for purchasing this Sony Compact Disc Player. You can enjoy its various features even more with:
•CD TEXT information (displayed when a CD TEXT disc* is played).
•Optional controller accessory (CDX-L410/L420V only)
Rotary commander RM-X4S
*A CD TEXT disc is an audio CD that includes information such as the disc name, artist name and track names. This information is recorded on the disc.
This label is located on the bottom of the chassis.
CAUTION INVISIBLE LASER RADIATION WHEN OPEN DO NOT STARE INTO BEAM OR
VIEW DIRECTLY WITH OPTICAL INSTRUMENTS
This label is located on the drive unit’s internal chassis.
2

Table of Contents |
|
Location of controls .................................................. |
4 |
Precautions ................................................................ |
5 |
Notes on discs ........................................................... |
5 |
Getting Started |
|
Resetting the unit ................................................. |
6 |
Detaching the front panel ................................... |
7 |
Setting the clock ................................................... |
8 |
CD Player |
|
Playing a disc ........................................................ |
8 |
Display items ........................................................ |
9 |
Automatically scrolling a disc name |
|
— Auto Scroll .................................................. |
9 |
Playing tracks repeatedly |
|
— Repeat Play ................................................. |
9 |
Playing tracks in random order |
|
— Shuffle Play ................................................. |
9 |
Radio |
|
Storing stations automatically |
|
— Best Tuning Memory (BTM) ................... |
10 |
Receiving the stored stations ............................ |
10 |
Storing only the desired stations ..................... |
11 |
RDS |
|
Overview of RDS ............................................... |
11 |
Automatic retuning for best reception results |
|
— AF function ............................................... |
12 |
Receiving traffic announcements |
|
— TA/TP ........................................................ |
13 |
Presetting RDS stations with AF and TA |
|
setting ............................................................. |
13 |
Tuning in stations by programme type |
|
— PTY ............................................................. |
14 |
Setting the clock automatically |
|
— CT ............................................................... |
15 |
Other Functions |
|
Using the rotary commander |
|
(CDX-L410/L420V only) ............................. |
16 |
Adjusting the sound characteristics ................ |
17 |
Quickly attenuating the sound ........................ |
17 |
Changing the sound and display settings ...... |
17 |
Selecting the sound position |
|
— My Best sound Position (MBP) .............. |
18 |
Boosting the bass sound |
|
— D-bass ........................................................ |
18 |
Additional Information |
|
Maintenance ........................................................ |
19 |
Removing the unit ............................................. |
20 |
Specifications ...................................................... |
21 |
Troubleshooting .................................................. |
22 |
Error displays/Messages .................................. |
23 |
3
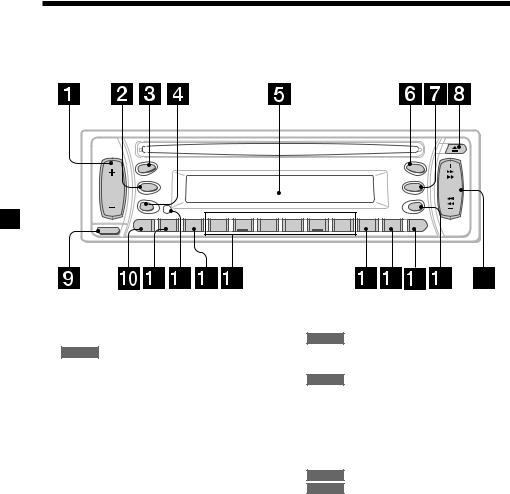
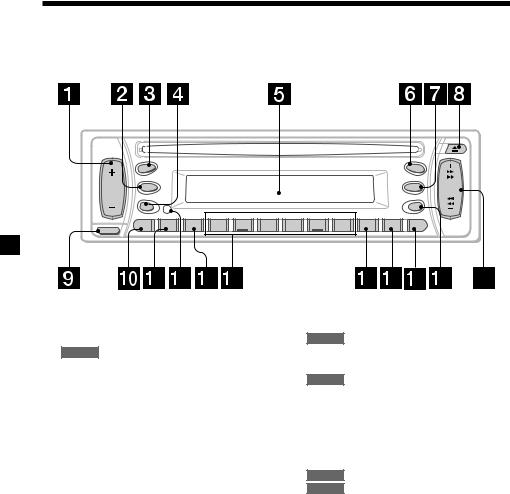
Location of controls
Refer to the pages listed for details.
CD |
: During playback |
RADIO |
: During radio reception |
|
SOURCE |
|
|
|
|
|
|
|
|
|
|
|
SRC |
|
|
|
|
|
|
|
|
|
|
MBP |
|
|
|
|
|
|
|
|
|
|
|
|
D-BASS |
SEEK |
MODE |
|
|
|
|
|
|
|
|
|
|
D |
|
|
|
|
|
|
|
|
|
|
|
AMS |
||
SEL |
|
|
|
|
|
|
|
|
|
|
OFF |
|
|
BTM |
|
|
|
REP |
SHUF |
|
|
|
|
|
|
ATT |
SENS |
AF |
1 |
2 |
3 |
4 |
5 |
6 |
TA |
PTY |
DSPL |
|
RELEASE
CDX-L380X/CDX-L400X
CDX-L410/CDX-L420V
1 Volume +/– button 8, 13, 17
2MODE button RADIO 10, 11, 13
3SRC (SOURCE) (TUNER/CD) button 8, 10, 11, 13
4 SEL (select) button 8, 15, 17, 18
5 Display window
6 MBP (My Best sound Position) button 18
7 D (D-BASS) button 18
8 Z(eject) button 8
9 RELEASE (front panel release) button 7 q; ATT (attenuate) button 17
qa SENS/BTM button 10, 11, 13
qs RESET button (located on the front side of the unit, behind the front panel) 6
qd AF button 12, 13
qf Number buttons 17
CD
(3)REP 9
(4)SHUF 9
RADIO 10, 11, 12, 13, 15 qg TA button 13
qh PTY (programme type) button 14 qj DSPL (display mode change) button
8, 9, 11
qk OFF button* 7, 8
ql SEEK/AMS +/– button
CD 8
RADIO 10, 11, 12, 14
*Warning when installing in a car without an ACC (accessory) position on the ignition key switch
Be sure to press (OFF) on the unit for 2 seconds to turn off the clock display after turning off the engine.
Otherwise, the clock display does not turn off and this causes battery drain.
4
Precautions
•If your car was parked in direct sunlight, allow the unit to cool off before operating it.
•Power aerials will extend automatically while the unit is operating.
If you have any questions or problems concerning your unit that are not covered in this manual, please consult your nearest Sony dealer.
Moisture condensation
On a rainy day or in a very damp area, moisture condensation may occur inside the lenses and display of the unit. Should this occur, the unit will not operate properly. In such a case, remove the disc and wait for about an hour until the moisture has evaporated.
To maintain high sound quality
Be careful not to splash juice or other soft drinks onto the unit or discs.
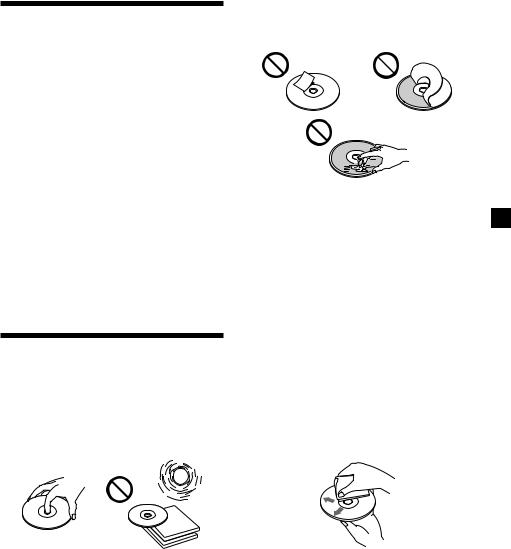
Notes on discs
•To keep the disc clean, do not touch the surface. Handle the disc by its edge.
•Keep your discs in their cases or disc magazines when not in use. Do not subject the discs to heat/high temperature. Avoid leaving them in parked cars or on dashboards/rear trays.
•Do not attach labels, or use discs with sticky ink/residue. Such discs may stop spinning when used, causing a malfunction, or may ruin the disc.
•Do not use any discs with labels or stickers attached.
The following malfunctions may result from using such discs:
—Inability to eject a disc (due to a label or sticker peeling off and jamming the eject mechanism).
—Inability to read audio data correctly (e.g., playback skipping, or no playback) due to heat shrinking of a sticker or label causing a disc to warp.
•Discs with non-standard shapes (e.g., heart, square, star) cannot be played on this unit. Attempting to do so may damage the unit. Do not use such discs.
•You cannot play 8 cm CDs.
•Before playing, clean the discs with a commercially available cleaning cloth. Wipe each disc from the centre out. Do not use solvents such as benzine, thinner, commercially available cleaners, or antistatic spray intended for analog discs.
continue to next page t
5
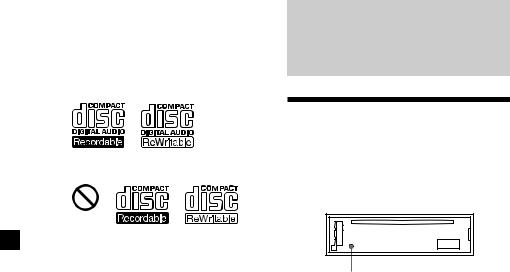
Notes on CD-R/CD-RW discs
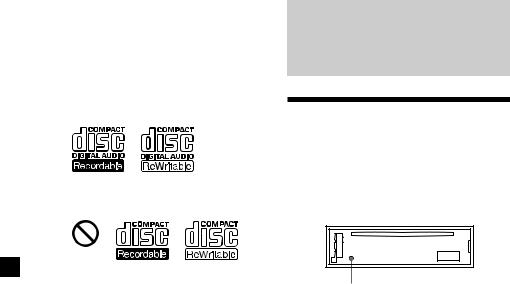
•You can play CD-Rs (recordable CDs)/CDRWs (rewritable CDs) designed for audio use on this unit.
Look for these marks to distinguish CD-Rs/ CD-RWs for audio use.
These marks denote that a disc is not for audio use.
•Some CD-Rs/CD-RWs (depending on the equipment used for its recording or the condition of the disc) may not play on this unit.
•You cannot play a CD-R/CD-RW that is not finalized*.
*A process necessary for a recorded CD-R/CD-RW disc to be played on the audio CD player.
Getting Started
Resetting the unit
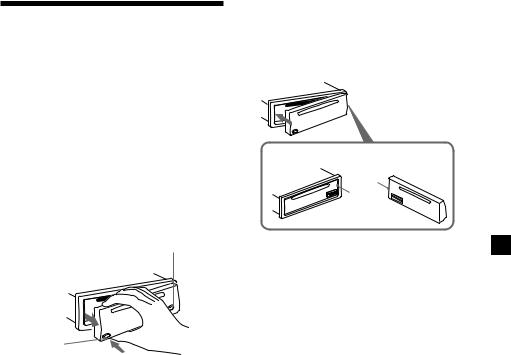
Before operating the unit for the first time or after replacing the car battery, you must reset the unit.
Remove the front panel and press the RESET button with a pointed object, such as a ballpoint pen.
RESET button
Note
Pressing the RESET button will erase the clock setting and some stored contents.
6
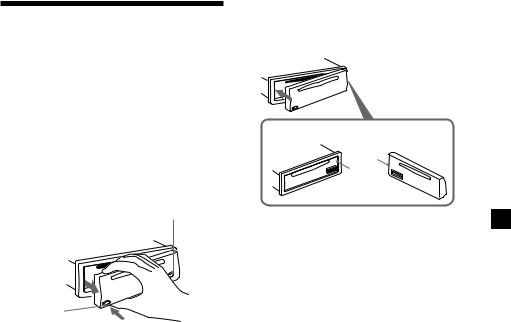
Detaching the front panel
You can detach the front panel of this unit to protect the unit from being stolen.
1 Press (OFF)*.
CD playback or radio reception stops (the key illumination and display remain on).
*If your car has no ACC position on the ignition switch, be sure to turn the unit off by pressing (OFF) for 2 seconds to avoid car battery drain.
2 Press (RELEASE), then pull it off towards you.
(OFF)
(RELEASE)
Notes
•If you detach the panel while the unit is still turned on, the power will turn off automatically to prevent the speakers from being damaged.
•Do not drop or put excessive pressure on the front panel and its display window.
•Do not subject the front panel to heat/high temperature or moisture. Avoid leaving it in parked cars or on dashboards/rear trays.
Tip
When carrying the front panel with you, use the supplied front panel case.
Attaching the front panel
Attach part A of the front panel to part B of the unit as illustrated and push the left side into position until it clicks.
A
B
Note
Do not put anything on the inner surface of the front panel.
7
Setting the clock
The clock uses a 24-hour digital indication.
Example: To set the clock to 10:08
1 Press (DSPL) for 2 seconds.
The hour indication flashes.
1Press either side of the volume +/– button to set the hour.
2Press (SEL).
The minute indication flashes.
3Press either side of the volume +/– button to set the minute.
2 Press (DSPL).
The clock starts. After the clock setting is completed, the display returns to normal play mode.
Tip
You can set the clock automatically with the RDS feature (page 15).
CD Player
Playing a disc
Insert the disc (labelled side up).
Playback starts automatically.
If a disc is already inserted, press (SRC) repeatedly until “CD” appears to start playback.
To |
Press |
Stop playback |
Zor (OFF) |
Eject the disc |
Z |
Skip tracks |
(SEEK/AMS) (./>) |
– Automatic |
[once for each track] |
Music Sensor |
|
Fast-forward/ |
(SEEK/AMS) (m/M) |
reverse |
[hold to desired point] |
– Manual Search |
|
Note
When the last track on the disc is over, playback restarts from the first track of the disc.
8
Display items
When the disc/track changes, any prerecorded title of the new disc/track is automatically displayed.
Source
Displayable items
•Track number/Elapsed playing time
•Disc name*1/Artist name*2
•Track title*1
To |
Press |
Switch display |
(DSPL) |
item |
|
*1 “NO NAME” indicates there is no prerecorded name to display.
*2 Only for CD TEXT discs with the artist name.
Notes
•Disc name, artist name, and track title can be displayed with up to 8 characters.
•Some characters cannot be displayed.
•This unit cannot display the artist name for each track of a CD TEXT disc.
Selecting “A.SCRL-ON”
During playback, press (SEL) and (3) simultaneously.
In 2 seconds the normal display automatically appears.
To select “A.SCRL-OFF”, press (SEL) and (3) simultaneously again.
Note
For some discs with very many characters, the following cases may happen:
—Some of the characters are not displayed.
—Auto Scroll does not work.
Playing tracks repeatedly
— Repeat Play
The current track will repeat itself when it reaches the end.
During playback, press (3) (REP) repeatedly until “REP-1” appears in the display.
Repeat Play starts.
To return to normal play mode, select “REPOFF.”
Automatically scrolling a
disc name — Auto Scroll
If the disc name, artist name, or track name on a CD TEXT disc exceeds 8 characters and the Auto Scroll function is on, information automatically scrolls across the display as follows:
•The disc name appears when the disc has changed (if the disc name is selected).
•The track name appears when the track has changed (if the track name is selected).
If you press (DSPL) to change the display item, the disc or track name of the disc is scrolled automatically whether you set the function on or off.
Playing tracks in random
order — Shuffle Play
You can select to play the tracks on the current disc in random order.
During playback, press (4) (SHUF) repeatedly until “SHUF-1” appears in the display.
Shuffle Play starts.
To return to normal play mode, select “SHUFOFF.”
9

Radio
The unit can store up to 6 stations per band (FM1, FM2, FM3, MW, and LW).
Caution
When tuning in stations while driving, use Best Tuning Memory to prevent accidents.
Storing stations automatically
— Best Tuning Memory (BTM)
The unit selects the stations with the strongest signals within the selected band, and stores them in the order of their frequency.
1 Press (SRC) repeatedly to select the radio.
2 Press (MODE) repeatedly to select the band.
3 Press (SENS/BTM) for 2 seconds.
The unit stores stations in the order of their frequencies on the number buttons. A beep sounds when the setting is stored.
Notes
•If only a few stations can be received due to weak signals, some number buttons will retain their former settings.
•When a number is indicated in the display, the unit starts storing stations from the one currently displayed.
Receiving the stored stations
1 Press (SRC) repeatedly to select the radio.
2 Press (MODE) repeatedly to select the band.
3 Press the number button ((1) to (6)) on which the desired station is stored.
If preset tuning does not work
— Automatic tuning/ Local Seek Mode
Automatic tuning:
Press either side of (SEEK/AMS) to search for the station.
Scanning stops when the unit receives a station. Press either side of (SEEK/AMS) repeatedly until the desired station is received.
Local Seek Mode:
If the automatic tuning stops too frequently, press (SENS/BTM) repeatedly until “LOCAL-ON” appears.
“LCL” indicator is displayed.
Only the stations with relatively strong signals will be tuned in.
Tip
If you know the frequency of the station you want to listen to, press either side of (SEEK/AMS) until the desired frequency appears (manual tuning).
10
If FM stereo reception is poor
—Monaural Mode
During radio reception, press (SENS/BTM) repeatedly until “MONO-ON” appears.
“MONO” indicator is displayed.
The sound improves, but becomes monaural (“ST” disappears).
To return to normal mode, select “MONOOFF.”
RDS
Overview of RDS
FM stations servicing Radio Data System (RDS) sends inaudible digital information along with the regular radio programme signal. For example, one of the following will be displayed upon receiving a station with RDS capability.
Source
Storing only the desired stations
You can manually preset the desired stations on any chosen number button.
1 Press (SRC) repeatedly to select the radio.
2 Press (MODE) repeatedly to select the band.
3 Press either side of (SEEK/AMS) to tune in the station that you want to store.
4 Press the desired number button ((1) to
(6)) until “MEM” appears.
The number button indication appears in the display.
Note
If you try to store another station on the same number button, the previously stored station will be erased.
Displayable items
•Station name (frequency)
•Programme type
To |
Press |
Switch display |
(DSPL) |
item |
|
RDS services
RDS data offers you other conveniences, such as:
•Automatic retuning of a programme, helpful during long-distance drives. — AF tpage 12
•Receiving traffic announcements, even when enjoying another programme/source.
— TA tpage 13
•Selecting stations by the type of programme it broadcasts. — PTY tpage 14
•Automatic clock time setting. — CT tpage 15
Notes
•Depending on the country or region, not all of the RDS functions are available.
•RDS may not work properly if the signal strength is weak or if the station you are tuned to is not transmitting RDS data.
11
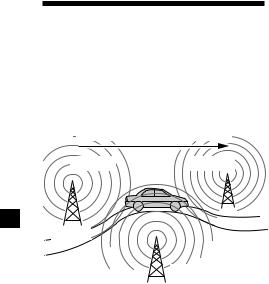
Automatic retuning for best reception results
— AF function
The alternative frequencies (AF) function allows the radio to always tune into the area’s strongest signal for the station you are listening to.
Frequencies change automatically.
98.5MHz |
96.0MHz |
Station
102.5MHz
1 Select an FM station (page 10).
2 Press (AF) repeatedly until “AF-ON” appears.
The unit starts searching for an alternative station with a stronger signal in the same network.
If “NO AF” flashes, the currently tuned into station does not have an alternative frequency.
Notes
•If you want to change the on/off setting while playing a CD, press (AF).
•When there is no alternative frequency in the area or when you do not need to search for one, turn the AF function off by selecting “AF-OFF.”
For stations without alternative frequencies
Press either side of (SEEK/AMS) while the station name is flashing (within
8 seconds).
The unit starts searching for another frequency with the same PI (Programme Identification) data (“PI SEEK” appears). If the unit cannot find the same PI, the unit returns to the previously selected frequency.
Staying with one regional programme
When AF function is on: this unit’s factory-set setting restricts reception to a specific region, so you won’t be switched to another regional station with a stronger frequency.
If you leave this regional programme’s reception area or would like to take advantage of the whole AF function, press (AF) for
2 seconds until “REG-OFF” appears.
Note
This function does not work in the United Kingdom and in some other areas.
Local Link function (United Kingdom only)
This function enables you to select other local stations in the area, even if they are not stored on your number buttons.
1 Press a number button ((1) to (6)) that has a local station stored on it.
2 Within 5 seconds, press the number button of the local station again.
3 Repeat this procedure until the desired local station is received.
12

Receiving traffic announcements — TA/TP
By activating the Traffic Announcement (TA) and Traffic Programme (TP). You can automatically tune in an FM station broadcasting traffic announcements. These settings function regardless of the current FM programme/source, CD; the unit switches back to the original source when the bulletin is over.
Press (TA) repeatedly until “TA-ON” appears.
The unit starts searching for traffic information stations.
“TP” indicates reception of such stations, and “TA” flashes during an actual traffic announcement. The unit will continue searching for stations available with TP if “NO TP” is indicated.
To cancel all traffic announcements, select “TA-OFF” .
To |
Press |
Cancel current |
(TA) |
announcement |
|
Tip
You can also cancel the current announcement by pressing (SRC) or (MODE).
Presetting the volume of traffic announcements
You can preset the volume level of the traffic announcements so you won’t miss hearing them.
1 Press either side of the volume +/– button to adjust the desired volume level.
2 Press (TA) for 2 seconds.
“TA” appears and the setting is stored.
Receiving emergency announcements
If either AF or TA is on, the unit will switch to emergency announcements, if one comes in while listening to an FM station or CD.
Presetting RDS stations with AF and TA setting
When you preset RDS stations, the unit stores each station’s AF/TA setting (on/off) as well as its frequency. You can select a different setting (for AF, TA, or both) for individual preset stations, or the same setting for all preset stations. If you preset stations with “AF on” the unit automatically stores stations with the strongest radio signal.
Presetting the same setting for all preset stations
1 Select an FM band (page 10).
2 Press (AF) and/or (TA) to select “AF-ON” and/or “TA-ON.”
Note that selecting “AF-OFF” or “TA-OFF” stores not only RDS stations, but also nonRDS stations.
3 Press (SENS/BTM) until “BTM” flashes.
Presetting different settings for each preset station
1 Select an FM band, and tune in the desired station.
2 Press (AF) and/or (TA) to select “AF-ON” and/or “TA-ON.”
3 Press the desired number button until “MEM” appears.
Repeat from step 1 to preset other stations.
Note
If you want to change the AF/TA setting while you are playing a CD, press (AF) or (TA).
13

Tuning in stations by programme type — PTY
You can tune in a station by selecting the type of programme you would like to listen to.
|
|
Programme types |
Display |
|
|
News |
NEWS |
|
|
Current Affairs |
AFFAIRS |
|
|
Information |
INFO |
|
|
Sports |
SPORT |
|
|
Education |
EDUCATE |
|
|
Drama |
DRAMA |
|
|
Culture |
CULTURE |
|
|||
|
|
Science |
SCIENCE |
|
|||
|
|
Varied |
VARIED |
|
|
Popular Music |
POP M |
|
|
Rock Music |
ROCK M |
|
|
Easy Listening |
EASY M |
|
|
Light Classical |
LIGHT M |
|
|
Classical |
CLASSICS |
|
|
Other Music Type |
OTHER M |
|
|
Weather |
WEATHER |
|
|
Finance |
FINANCE |
|
|
Children’s Programmes |
CHILDREN |
|
|
Social Affairs |
SOCIAL A |
|
|
Religion |
RELIGION |
|
|
Phone In |
PHONE IN |
|
|
Travel |
TRAVEL |
|
|
Leisure |
LEISURE |
|
|
Jazz Music |
JAZZ |
|
|
Country Music |
COUNTRY |
|
|
National Music |
NATION M |
|
|
Oldies Music |
OLDIES |
|
|
Folk Music |
FOLK M |
|
|
Documentary |
DOCUMENT |
Note
You cannot use this function in some countries where no PTY (Programme Type selection) data is available.
1 Press (PTY) during FM reception.
The current programme type name appears if the station is transmitting the PTY data. “--------” appears if the received station is not an RDS station, or if the RDS data is not received.
2 Press (PTY) repeatedly until the desired programme type appears.
The programme types appear in the order shown in the above table. “--------” appears if the programme type is not specified if the RDS data.
3 Press either side of (SEEK/AMS).
The unit starts searching for a station broadcasting the selected programme type.
14

Setting the clock automatically — CT
The CT (Clock Time) data from the RDS transmission sets the clock automatically.
Selecting “CT-ON”
During radio reception, press (SEL) and
(2) simultaneously.
The clock is set.
In one second the normal display automatically appears.
To select “CT-OFF”, press (SEL) and (2) simultaneously again.
Notes
•The CT function may not work even though an RDS station is being received.
•There might be a difference between the time set by the CT function and the actual time.
15

Other Functions
You can also control the unit with a rotary commander (optional) (CDX-L410/L420V only).
Using the rotary
commander (CDX-L410/L420V only)
First, attach the appropriate label depending on how you want to mount the rotary commander.
The rotary commander works by pressing buttons and/or rotating controls.
By rotating the control
SEEK/AMS control
Rotate and release to:
–Skip tracks.
–Tune in stations automatically.
Rotate, hold, and release to:
–Fast-forward/reverse a track.
–find a station manually.
By pushing in and rotating the control
SEL |
DSPL |
MODE |
MODE |
DSPL |
SEL |
By pressing buttons
|
(ATT) |
|
|
(SEL) |
|
|
|
(MODE) |
(SOURCE) |
|
OFF |
|
|
|
|
(DSPL) |
(OFF) |
|
|
|
Rotate the VOL control |
|
|
to adjust the volume. |
|
|
Press |
To |
|
(SOURCE) |
Change source |
|
|
(radio/CD) |
|
(MODE) |
Change radio band |
|
(ATT) |
Attenuate sound |
|
(OFF)* |
Stop playback or radio |
|
|
reception |
|
(SEL) |
Adjust the sound menu |
|
(DSPL) |
Change the display item |
|
*If your car has no ACC (accessory) position on the ignition key switch, be sure to press (OFF) for
2 seconds to turn off the clock indication after turning off the ignition.
PRESET control
Push in and rotate the control to:
– Receive preset stations.
16
Changing the operative direction
The operative direction of controls is factoryset as shown below.
To increase
To decrease
If you need to mount the rotary commander on the right hand side of the steering column, you can reverse the operative direction.
Press (SEL) for 2 seconds while pushing the VOL control.
Adjusting the sound characteristics
You can adjust the bass, treble, balance, and fader.
The bass and treble levels can be stored independently for each source.
1 Select the item you want to adjust by pressing (SEL) repeatedly.
Each time you press (SEL), the item changes as follows:
BAS (bass) tTRE (treble) t
BAL (left-right) tFAD (front-rear)
2 Adjust the selected item by pressing either side of the volume +/– button.
When adjusting with the rotary commander, press (SEL) and rotate the VOL control.
Note
Adjust within 3 seconds after selecting the item.
Quickly attenuating the sound
Press (ATT).
After “ATT-ON” momentarily flashes, the “ATT” indication appears in the display.
To restore the previous volume level, press (ATT) again.
“ATT-OFF” flashes momentarily.
Tip
When the interface cable of a car telephone is connected to the ATT lead, the unit decreases the volume automatically when a telephone call comes in (Telephone ATT function).
Changing the sound and display settings
The following items can be set:
•CT (Clock Time) (page 15).
•A.SCRL (Auto Scroll)* (page 9).
•M.DSPL (Motion Display)
— the demonstration mode which appears when no source is selected (e.g., tuner is turned off).
•BEEP — to turn the beep sound on or off.
Selecting the desired item
Press (SEL) and the desired preset number button simultaneously.
(SEL) + (2): CT (SEL) + (3): A.SCRL*
(SEL) + (4): M.DSPL (SEL) + (6): BEEP
* When no CD is playing, this item will not appear.
After the mode setting completed, the display returns to normal play mode.
Note
The displayed item will differ depending on the source.
To cancel the item, press (SEL) and the preset number button simultaneously again.
17
Selecting the sound position
— My Best sound Position (MBP)
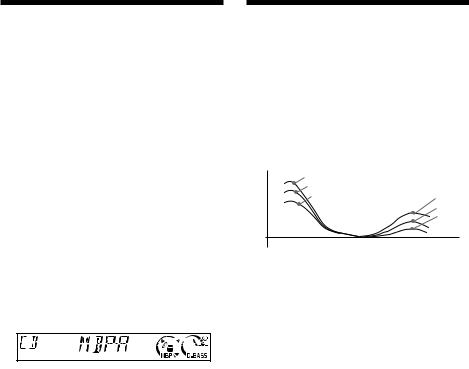
When you drive without passengers, you can enjoy the most comfortable sound environment with “My Best sound Position.” “My Best sound Position” has two presets, which adjust the sound level of balance and fader. You can select one very easily with the MBP button.
|
|
Display |
Balance Level |
Fader Level |
||
|
|
window |
Right |
Left |
Front |
Rear |
|
|
|
|
|
|
|
|
|
MBP-A |
– 4dB |
0 |
0 |
– 4dB |
|
|
|
|
|
|
|
|
|
MBP-B |
0 |
– 4dB |
0 |
– 4dB |
|
||||||
|
|
|
|
|
|
|
|
|
MBP-OFF |
0 |
0 |
0 |
0 |
|
|
|
|
|
|
|
Press (MBP) repeatedly for the desired listening position.
The mode of “My Best sound Position” is shown in the display in order of the table.
After one second, the display goes back to the normal playback mode.
If you want to adjust the sound level of balance and fader more precisely, you can do it using the (SEL) button. (page 17)
Notes
•When the BAL (balance) or FAD (fader) in “Adjusting the sound characteristics” (page 17) is adjusted, the MBP setting returns OFF.
•When MBP is set to OFF, the BAL and FAD setting is activated.
Boosting the bass sound
— D-bass
You can enjoy a clear and powerful bass sound. The D-bass function boosts the low frequency signal and high frequency signal with a sharper curve than conventional bass boost.
You can hear the bass line more clearly even while the vocal volume remains the same. You can emphasize and adjust the bass sound easily with the (D) (D-BASS) button.
Level |
D.BASS-3 |
|
D.BASS-2 |
|
|
D.BASS-1 |
D.BASS-3 |
|
|
|
D.BASS-2 |
|
|
D.BASS-1 |
0dB |
|
|
|
|
Frequency (Hz) |
Adjusting the bass curve |
|
|
Press (D) (D-BASS) repeatedly to select the desired bass curve.
As the D-BASS number increases so does the effect.
Note
The bass sound may distort at same volume. If the bass sound distorts, select less effective bass curve.
18

Additional
Information
Maintenance
Fuse replacement
When replacing the fuse, be sure to use one matching the amperage rating stated on the original fuse. If the fuse blows, check the power connection and replace the fuse. If the fuse blows again after replacement, there may be an internal malfunction. In such a case, consult your nearest Sony dealer.
Fuse (10 A)
Warning
Never use a fuse with an amperage rating exceeding the one supplied with the unit as this could damage the unit.
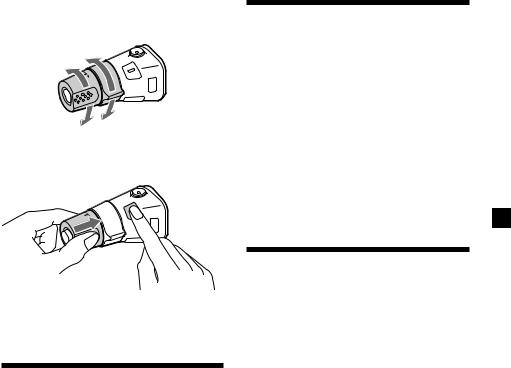
Cleaning the connectors
The unit may not function properly if the connectors between the unit and the front panel are not clean. In order to prevent this, detach the front panel (page 7) and clean the connectors with a cotton swab dipped in alcohol. Do not apply too much force. Otherwise, the connectors may be damaged.
Main unit
Back of the front panel
Notes
•For safety, turn off the ignition before cleaning the connectors, and remove the key from the ignition switch.
•Never touch the connectors directly with your fingers or with any metal device.
19
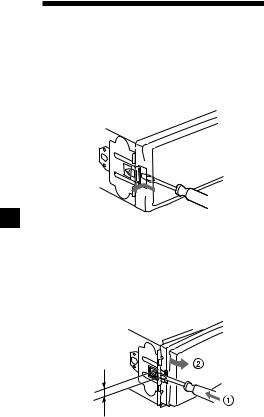
Removing the unit
1 Remove the front cover
1 Detach the front panel (page 7).
2Press the clip inside the front cover with a thin screwdriver.
3 Repeat step 2 for the other side.
2 Remove the unit
1Use a thin screwdriver to push in the clip on the left side of the unit, then pull out the left side of the unit until the catch clears the mounting.
4 mm
2 Repeat step 1 for the right side.
3 Slide the unit out of its mounting.
20
Specifications
CD player section
Signal-to-noise ratio |
90 dB |
Frequency response |
10 – 20,000 Hz |
Wow and flutter |
Below measurable limit |
Tuner section
FM
Tuning range |
87.5 – 108.0 MHz |
Aerial terminal |
External aerial connector |
Intermediate frequency |
10.7 MHz/450 kHz |
Usable sensitivity |
8 dBf |
Selectivity |
75 dB at 400 kHz |
Signal-to-noise ratio |
66 dB (stereo), |
|
72 dB (mono) |
Harmonic distortion at 1 kHz |
|
|
0.6 % (stereo), |
|
0.3 % (mono) |
Separation |
35 dB at 1 kHz |
Frequency response |
30 – 15,000 Hz |
MW/LW
Tuning range |
MW: 531 – 1,602 kHz |
|
LW: 153 – 279 kHz |
Aerial terminal |
External aerial connector |
Intermediate frequency |
10.7 MHz/450 kHz |
Sensitivity |
MW: 30 µV |
|
LW: 40 µV |
Power amplifier section
Outputs |
Speaker outputs |
|
(sure seal connectors) |
Speaker impedance |
4 – 8 ohms |
Maximum power output |
45 W × 4 (at 4 ohms) |
General
Outputs |
Audio outputs (CDX- |
|
||
|
L380X/L400X only) |
|
||
|
Power aerial relay control |
|
||
|
lead |
|
|
|
Inputs |
Telephone ATT control |
|
||
|
lead |
|
|
|
Tone controls |
Bass ±9 dB at 100 Hz |
|
||
|
Treble ±9 dB at 10 kHz |
|
||
Power requirements |
12 V DC car battery |
|
||
|
||||
|
(negative earth) |
|
|
|
Dimensions |
Approx. 178 × |
50 × |
177 mm |
|
|
(w/h/d) |
|
|
|
Mounting dimensions |
Approx. 182 × |
53 × |
162 mm |
|
|
(w/h/d) |
|
|
|
Mass |
Approx. 1.2 kg |
|
|
|
Supplied accessories |
Parts for installation and |
|
||
|
connections (1 set) |
|
|
|
|
Front panel case (1) |
|
||
Optional accessories |
Rotary commander |
|
||
|
RM-X4S (CDX-L410/ |
|
||
|
L420V only) |
|
|
|
Design and specifications are subject to change without notice.
21

Troubleshooting
The following checklist will help you remedy problems you may encounter with your unit. Before going through the checklist below, check the connection and operating procedures.
General
No sound.
•Adjust the volume with volume + button.
•Cancel the ATT function.
•Set the fader control to the centre position for a 2-speaker system.
The contents of the memory have been erased.
•The RESET button has been pressed. tStore again into the memory.
•The power cord or battery has been disconnected.
•The power connecting cord is not connected properly.
No beep sound.
•The beep sound is cancelled (page 17).
•An optional power amplifier is connected and you are not using the built-in amplifier (CDX-L380X/L400X only).
Indications disappear from/do not appear in the display.
•The clock display disappears if you press (OFF) for 2 seconds.
tPress (OFF) again for 2 seconds to display the clock.
•Remove the front panel and clean the connectors. See “Cleaning the connectors” (page 19) for details.
When stopping playback or radio reception, the clock is not displayed.
M.DSPL is displayed. (M.DSPL mode was set to 1 or 2.)
tSet the M.DSPL mode to “off” (page 17).
Stored stations and correct time are erased. The fuse has blown.
Makes noise when the ignition key is in the ON, ACC, or OFF position.
The leads are not matched correctly with the car’s accessory power connector.
No power is being supplied to the unit.
•Check the connection. If everything is in order, check the fuse.
•The car does not have an ACC position. tPress (SRC) (or insert a disc) to turn on
the unit.
The power is continuously supplied to the unit.
The car does not have an ACC position.
The power aerial does not extend.
The power aerial does not have a relay box.
CD playback
A disc cannot be loaded.
•Another CD is already loaded.
•The CD is forcibly inserted upside down or in the wrong way.
Playback does not begin.
•Dirty or defective disc.
•CD-R/CD-RW that is not finalized.
•You tried to playback a CD-R/CD-RW not designed for audio use.
•Some CD-Rs/CD-RWs may not play due to its recording equipment or the disc condition.
A disc is automatically ejected.
The ambient temperature exceeds 50°C.
CD will not be ejected.
The operation buttons do not function.
Press the RESET button.
The sound skips from vibration.
•The unit is installed at an angle of more than 60°.
•The unit is not installed in a sturdy part of the car.
The sound skips.
Dirty or defective disc.
22

Radio reception
Preset tuning is not possible.
•Store the correct frequency in the memory.
•The broadcast signal is too weak.
The stations cannot be received. The sound is hampered by noises.
•Connect a power aerial control lead (blue) or accessory power supply lead (red) to the power supply lead of a car’s aerial booster. (Only when your car has built-in FM/ MW/LW aerial in the rear/side glass.)
•Check the connection of the car aerial.
•The auto aerial will not go up.
tCheck the connection of the power aerial control lead.
•Check the frequency.
Automatic tuning is not possible.
•The local seek mode is set to “ON.”
tSet the local seek mode to “OFF” (page 10).
•The broadcast signal is too weak. tPerform manual tuning.
The “ST” indication flashes.
•Tune in the frequency accurately.
•The broadcast signal is too weak.
tSet to the monaural reception mode (page 10).
A programme broadcast in stereo is heard in monaural.
The unit is in monaural reception mode. tCancel monaural reception mode (page
10).
RDS
The SEEK starts after a few seconds of listening.
The station is non-TP or has weak signal. tPress (AF) or (TA) repeatedly until “AF-
OFF” or “TA-OFF” appears.
No traffic announcements.
•Activate “TA.”
•The station does not broadcast any traffic announcements despite being TP.
tTune in another station.
PTY displays “-------- |
.” |
•The current station is not an RDS station.
•RDS data has not been received.
•The station does not specify the programme type.
Error displays/Messages
Error displays
The following indications will flash for about 5 seconds, and an alarm sound will be heard.
ERROR*1
•A CD is dirty or inserted upside down. tClean or insert the CD correctly*2.
•A CD cannot play because of some problem. tInsert another CD*2.
HI TEMP
The ambient temperature is more than 50°C. tWait until the temperature goes down
below 50°C.
NO DISC
No disc is inserted in the CD unit. tInsert discs in the CD unit.
RESET
The CD unit cannot be operated because of some problem.
tPress the RESET button on the unit.
If these solutions do not help improve the situation, consult your nearest Sony dealer.
Messages
L.SEEK +/–
The Local Seek mode is on during automatic tuning (page 10).
NO AF
There is no alternative frequency for the current station.
“ |
” or “ |
” |
You have reached the beginning or the end of the disc and you cannot go any further.
*1 When an error occurs during playback of a CD, the disc number of the CD does not appear in the display.
*2 The disc number of the disc causing the error appears in the display.
23

Willkommen!
Danke, daß Sie sich für diesen CD-Player von Sony entschieden haben. Dieses Gerät bietet eine Vielzahl von Merkmalen, die Sie dank der folgenden Funktionen und des folgenden Zubehörs noch besser nutzen können:
•CD TEXT-Informationen (werden angezeigt, wenn Sie eine CD mit CD TEXT* abspielen).
•Zusätzliche Fernbedienung (nur CDX-L410/L420V)
Joystick RM-X4S
*Eine CD mit CD TEXT ist eine Audio-CD, die Informationen wie den Namen der CD, den Namen des Interpreten und die Namen der Titel enthält. Diese Daten sind auf der CD aufgezeichnet.
Dieses Etikett befindet sich an der Unterseite des Gehäuses.
CAUTION INVISIBLE LASER RADIATION WHEN OPEN DO NOT STARE INTO BEAM OR
VIEW DIRECTLY WITH OPTICAL INSTRUMENTS
Dieses Etikett befindet sich am internen Chassis der Laufwerkseinheit.
2

Inhalt |
|
Lage und Funktion der Teile und |
|
Bedienelemente ................................................... |
4 |
Sicherheitsmaßnahmen ............................................ |
5 |
Hinweise zu CDs ...................................................... |
5 |
Vorbereitungen |
|
Zurücksetzen des Geräts ..................................... |
6 |
Abnehmen der Frontplatte ................................. |
7 |
Einstellen der Uhr ................................................ |
8 |
CD-Player |
|
Wiedergeben einer CD ........................................ |
8 |
Anzeigen im Display ........................................... |
9 |
Automatisches Verschieben des Namens |
|
einer CD |
|
— Auto Scroll .................................................. |
9 |
Wiederholtes Wiedergeben von Titeln |
|
— Repeat Play ................................................. |
9 |
Wiedergeben von Titeln in willkürlicher |
|
Reihenfolge |
|
— Shuffle Play ................................................. |
9 |
Radio |
|
Automatisches Speichern von Radiosendern |
|
— Speicherbelegungsautomatik |
|
(BTM-Funktion) ............................................ |
10 |
Einstellen gespeicherter Sender ....................... |
10 |
Speichern bestimmter Radiosender ................ |
11 |
RDS |
|
Übersicht über RDS ........................................... |
11 |
Automatisches Neueinstellen von Sendern |
|
— AF-Funktion ............................................. |
12 |
Empfang von Verkehrsdurchsagen |
|
— TA/TP ........................................................ |
13 |
Speichern von RDS-Sendern zusammen mit |
|
der AFund TA-Einstellung ........................ |
13 |
Einstellen von Sendern nach Programmtyp |
|
— PTY ............................................................. |
14 |
Automatisches Einstellen der Uhr |
|
— CT ............................................................... |
15 |
Weitere Funktionen |
|
Der Joystick (nur CDX-L410/L420V) .............. |
16 |
Einstellen der Klangeigenschaften .................. |
17 |
Schnelles Dämpfen des Tons ............................ |
17 |
Wechseln der Klangund |
|
Anzeigeeinstellungen ................................... |
17 |
Auswählen der Klangposition |
|
— Beste Klangposition (MBP) ..................... |
18 |
Betonen der Bässe |
|
— D-bass ........................................................ |
18 |
Weitere Informationen |
|
Wartung ............................................................... |
19 |
Ausbauen des Geräts ......................................... |
20 |
Technische Daten ............................................... |
21 |
Störungsbehebung ............................................. |
22 |
Fehlermeldungen/Meldungen ........................ |
23 |
3
Lage und Funktion der Teile und Bedienelemente
Näheres finden Sie auf den angegebenen Seiten.
CD |
: Während der Wiedergabe |
RADIO |
: Beim Radioempfang |
|
SOURCE |
|
|
|
|
|
|
|
|
|
|
|
SRC |
|
|
|
|
|
|
|
|
|
|
MBP |
|
|
|
|
|
|
|
|
|
|
|
|
D-BASS |
SEEK |
MODE |
|
|
|
|
|
|
|
|
|
|
D |
|
|
|
|
|
|
|
|
|
|
|
AMS |
||
SEL |
|
|
|
|
|
|
|
|
|
|
OFF |
|
|
BTM |
|
|
|
REP |
SHUF |
|
|
|
|
|
|
ATT |
SENS |
AF |
1 |
2 |
3 |
4 |
5 |
6 |
TA |
PTY |
DSPL |
|
RELEASE
CDX-L380X/CDX-L400X
CDX-L410/CDX-L420V
1 Lautstärketaste +/– 8, 13, 17
2Taste MODE RADIO 10, 11, 13
3Taste SRC (SOURCE) (TUNER/CD) 8, 10, 11, 13
4 Taste SEL (Wählen) 8, 15, 17, 18
5 Display
6 Taste MBP (Beste Klangposition) 18
7 Taste D (D-BASS) 18
8 Taste Z(Auswerfen) 8
9Taste RELEASE (Entriegelung der Frontplatte) 7
q; Taste ATT (Dämpfen) 17 qa Taste SENS/BTM 10, 11, 13
qs Taste RESET (befindet sich an der Vorderseite des Geräts hinter der Frontplatte) 6
qd Taste AF 12, 13
qf Zahlentasten 17
CD
(3)REP 9
(4)SHUF 9
RADIO 10, 11, 12, 13, 15 qg Taste TA 13
qh Taste PTY (Programmtypauswahl) 14 qj Taste DSPL (Ändern des Anzeigemodus)
8, 9, 11
qk Taste OFF* 7, 8
ql Taste SEEK/AMS +/–
CD 8
RADIO 10, 11, 12, 14
*Warnhinweis zur Installation des Geräts in einem Auto mit Zündschloß ohne Zubehörposition ACC oder I
Drücken Sie am Gerät unbedingt 2 Sekunden lang (OFF), um die
Uhrzeitanzeige auszuschalten, nachdem Sie den Motor ausgeschaltet haben.
Andernfalls wird die Uhrzeitanzeige nicht ausgeschaltet, und der Autobatterie wird Strom entzogen.
4

Sicherheitsmaßnahmen
•Wenn das Auto in direktem Sonnenlicht geparkt war, warten Sie, bis sich das Gerät abgekühlt hat, bevor Sie es wieder benutzen.
•Motorantennen werden beim Betrieb des Geräts automatisch ausgefahren.
Wenn Sie Fragen haben oder an Ihrem Gerät Probleme auftauchen, die in dieser Bedienungsanleitung nicht behandelt werden, wenden Sie sich bitte an Ihren Sony-Händler.
Feuchtigkeitskondensation
Bei Regen oder bei sehr hoher Luftfeuchtigkeit kann sich in den Linsen und im Display des Geräts Feuchtigkeit niederschlagen. In diesem Fall funktioniert das Gerät nicht mehr richtig. Nehmen Sie die CD heraus, und warten Sie etwa eine Stunde, bis die Feuchtigkeit verdunstet ist.
So bewahren Sie die hohe Tonqualität
Achten Sie darauf, daß keine Säfte oder anderen zuckerhaltigen Getränke auf das Gerät oder die CDs spritzen.
Hinweise zu CDs
•Berühren Sie nicht die Oberfläche, damit die CD nicht verschmutzt. Fassen Sie die CD nur am Rand an.
•Bewahren Sie CDs in ihrer Hülle oder in den CD-Magazinen auf, wenn sie nicht abgespielt werden. Schützen Sie die CDs vor Hitze und hohen Temperaturen. Lassen Sie sie nicht in einem geparkten Auto, auf dem Armaturenbrett oder der Hutablage liegen.
•Bringen Sie auf CDs keine Aufkleber an. Verwenden Sie keine CDs mit Resten von Kleber oder anderen klebrigen Rückständen. Solche CDs können im Gerät hängenbleiben und sich nicht weiterdrehen, was zu Schäden am Gerät und der CD selbst führen kann.
•Verwenden Sie keine CDs, an denen Etiketten oder Aufkleber angebracht sind. Bei Verwendung solcher CDs kann es zu folgenden Fehlfunktionen kommen:
—Die CD läßt sich nicht auswerfen, weil sich ein Etikett oder Aufkleber gelöst hat und den Auswurfmechanismus blockiert.
—Die Audiodaten werden nicht korrekt gelesen (z. B. Tonsprünge bei der Wiedergabe, keine Wiedergabe), weil ein Etikett oder Aufkleber durch Wärmeeinwirkung geschrumpft ist und die CD sich verzogen hat.
•CDs mit außergewöhnlichen Formen (z. B. herzförmige, quadratische oder sternförmige CDs) können mit diesem Gerät nicht wiedergegeben werden. Falls Sie es doch versuchen, kann das Gerät beschädigt werden. Verwenden Sie solche CDs nicht.
•Single-CDs (8-cm-CDs) können nicht wiedergegeben werden.
•Reinigen Sie die CDs vor dem Abspielen mit einem handelsüblichen Reinigungstuch. Wischen Sie dabei von der Mitte nach außen. Lösungsmittel wie Benzin, Verdünner oder handelsübliche, für Schallplatten bestimmte Reiniger und Antistatiksprays dürfen nicht verwendet werden.
Fortsetzung siehe nächste Seite t
5
Hinweise zu CD-Rs/CD-RWs
•Mit diesem Gerät können Sie CD-Rs (beschreibbare CDs)/CD-RWs (wiederbeschreibbare CDs), die als AudioCDs konzipiert sind, wiedergeben lassen. An dieser Markierung können Sie CD-Rs/ CD-RWs, die als Audio-CDs konzipiert sind, erkennen.
Diese Markierungen kennzeichnen Datenträger, die nicht für die Audiowiedergabe geeignet sind.
•Je nach dem Gerät, mit dem die CD-R/CD- RW bespielt wurde, oder dem Zustand der CD-R/CD-RW selbst ist eine Wiedergabe mit diesem Gerät jedoch nicht in jedem Fall möglich.
•Eine noch nicht abgeschlossene CD-R/CD- RW kann nicht wiedergegeben werden*.
*Dieser Vorgang ist notwendig, damit eine bespielte CD-R/CD-RW auf einem Audio-CD- Player abgespielt werden kann.
Vorbereitungen
Zurücksetzen des Geräts
Bevor Sie das Gerät zum ersten Mal benutzen oder nachdem Sie die Autobatterie ausgetauscht haben, müssen Sie das Gerät zurücksetzen.
Nehmen Sie die Frontplatte ab, und drücken Sie die Taste RESET mit einem spitzen Gegenstand, wie z. B. einem Kugelschreiber.
Taste RESET
Hinweis
Wenn Sie die Taste RESET drücken, werden die eingestellte Uhrzeit und einige weitere gespeicherte Einstellungen gelöscht.
6
Abnehmen der Frontplatte
Um einem Diebstahl des Geräts vorzubeugen, kann die Frontplatte abgenommen werden.
1 Drücken Sie (OFF)*.
Die CD-Wiedergabe oder der Radioempfang enden. Die Tastenbeleuchtung und das Display bleiben eingeschaltet.
*Wenn Ihr Fahrzeug nicht über ein Zündschloß mit Zubehörposition (ACC oder I) verfügt, halten Sie am Gerät unbedingt 2 Sekunden lang (OFF) gedrückt, um das Gerät vollständig auszuschalten. Andernfalls wird der Autobatterie weiterhin Strom entzogen.
2 Drücken Sie auf (RELEASE), und ziehen Sie die Frontplatte dann auf sich zu.
(OFF)
(RELEASE)
Hinweise
•Wenn Sie die Frontplatte bei eingeschaltetem Gerät abnehmen, schaltet sich das Gerät automatisch aus, um eine Beschädigung der Lautsprecher zu vermeiden.
•Lassen Sie die Frontplatte nicht fallen. Drücken Sie nicht zu fest gegen die Frontplatte oder das Display.
•Schützen Sie die Frontplatte vor Hitze, hohen Temperaturen und Feuchtigkeit. Lassen Sie sie nicht in einem geparkten Auto, auf dem Armaturenbrett oder der Hutablage liegen.
Tip
Bewahren Sie die Frontplatte im mitgelieferten Behälter auf, wenn Sie sie bei sich tragen.
Anbringen der Frontplatte
Bringen Sie Teil A der Frontplatte wie auf der Abbildung zu sehen an Teil B des Geräts an, und drücken Sie das linke Ende der Frontplatte an, bis diese mit einem Klicken einrastet.
A
B
Hinweis
Legen Sie auf der Innenseite der Frontplatte nichts ab.
7
Einstellen der Uhr
Die Uhr zeigt die Zeit digital im 24-Stunden- Format an.
Beispiel: Einstellen der Uhr auf 10:08
1 Drücken Sie (DSPL) 2 Sekunden lang.
Die Stundenanzeige blinkt.
1Stellen Sie mit einer der Seiten der Lautstärketaste +/– die Stunden ein.
2Drücken Sie (SEL).
Die Minutenanzeige blinkt.
3Stellen Sie mit einer der Seiten der Lautstärketaste +/– die Minuten ein.
2 Drücken Sie (DSPL).
Die Uhr beginnt zu laufen. Wenn Sie die Uhreinstellung vorgenommen haben, erscheint im Display wieder die Anzeige für den normalen Wiedergabemodus.
Tip
Mit Hilfe der RDS-Funktion können Sie die Uhr auch automatisch einstellen lassen (Seite 15).
CD-Player
Wiedergeben einer CD
Legen Sie die CD mit der beschrifteten Seite nach oben ein.
Die Wiedergabe beginnt automatisch.
Wenn bereits eine CD eingelegt ist, drücken Sie zum Starten der Wiedergabe (SRC) so oft, bis „CD“ erscheint.
Zum |
Drücken Sie |
Beenden der |
Zoder (OFF) |
Wiedergabe |
|
Auswerfen der CD |
Z |
Überspringen von |
(SEEK/AMS) (./>) |
Titeln |
[einmal pro Titel] |
– Automatischer |
|
Musiksensor |
|
Vorwärtsspulen/ |
(SEEK/AMS) (m/M) |
Zurückspulen |
[gedrückt halten bis |
– Manuelle Suche |
zur gewünschten Stelle] |
Hinweis
Wenn der letzte Titel auf der CD abgespielt ist, beginnt die Wiedergabe wieder mit dem ersten Titel.
8
 Loading...