


Congratulations on your purchase of the Sony Ericsson K858c. Capture and share quality moments. For additional phone content, go to www.sonyericsson.com/fun.
Register now to get a suite of tools, free online storage, special offers, news and competitions at www.sonyericsson.com/myphone.
For product support, go to www.sonyericsson.com/cn.
This is the Internet version of the User's guide. © Print only for private use.

Accessories – More for your phone
Camera Phone Kit IPK-100
Premium protection for your phone.
Bluetooth™ Headset HBH-IV835
Stylish discretion with excellent sound.
Desk Stand CDS-65 
Your phone’s best assistant: connect a USB cable, charger and portable handsfree.
These accessories can be purchased separately but may not be available in
every market. To view the full range go to www.sonyericsson.com/accessories.
This is the Internet version of the User's guide. © Print only for private use.
Contents
Getting started ................... |
5 |
Assembly ........................................ |
5 |
Turning on the phone ..................... |
5 |
Help in your phone ........................ |
7 |
Charge the battery .......................... |
7 |
Using the USB charger ................... |
8 |
Note: ............................................... |
9 |
Phone overview ........................... |
10 |
Menu overview ............................. |
12 |
Navigation .................................... |
14 |
File manager ................................ |
15 |
Phone language ........................... |
17 |
Entering text ................................. |
17 |
Chinese input ................................ |
18 |
Stroke input .................................. |
19 |
Pinyin input ................................... |
21 |
Calling ............................... |
22 |
Making and receiving calls ........... |
22 |
Contacts ....................................... |
23 |
Call list .......................................... |
27 |
Speed dial ..................................... |
28 |
Voicemail ...................................... |
28 |
Voice control ................................ |
28 |
Diverting calls ............................... |
30 |
More than one call ........................ |
31 |
My numbers .................................. |
32 |
Accept calls ................................. |
32 |
Restricted dialling ......................... |
33 |
Fixed dialling ................................ |
33 |
Call time and cost ......................... |
34 |
Messaging ........................ |
34 |
Text messages .............................. |
35 |
Picture messages ......................... |
35 |
Message options .......................... |
36 |
Templates ..................................... |
37 |
Voice messages ............................ |
37 |
Email ............................................ |
38 |
My friends ..................................... |
39 |
Area and cell information .............. |
41 |
Imaging ............................ |
42 |
Camera and video recorder ......... |
42 |
Viewfinder and camera keys ........ |
42 |
Using the camera .......................... |
43 |
Getting more from the camera ..... |
44 |
Camera icons and settings ........... |
44 |
Camera shortcuts ......................... |
45 |
Transferring pictures ..................... |
45 |
Camera printing ............................ |
46 |
Contents 1
This is the Internet version of the User's guide. © Print only for private use.
Pictures ......................................... |
46 |
PhotoDJ™ and VideoDJ™ ........... |
47 |
Themes ......................................... |
48 |
Entertainment .................. |
48 |
Stereo portable handsfree ............ |
48 |
Music and video players ............... |
48 |
Transferring music from |
|
a computer ................................... |
49 |
TrackID™ ...................................... |
51 |
Radio ........................................... |
52 |
PlayNow™ .................................... |
52 |
Ringtones and melodies ............... |
53 |
MusicDJ™ .................................... |
54 |
Sound recorder ............................. |
54 |
Games .......................................... |
54 |
Applications .................................. |
55 |
Connectivity ...................... |
56 |
Settings ........................................ |
56 |
Phone name .................................. |
56 |
Using the Internet ......................... |
57 |
Web feeds ..................................... |
58 |
Bluetooth™ wireless |
|
technology ................................... |
58 |
Using the USB cable .................... |
60 |
Synchronizing .............................. |
62 |
Update service ............................. |
64 |
More features ................... |
65 |
Alarms ........................................... |
65 |
Calendar ....................................... |
65 |
Tasks ............................................ |
67 |
Notes ............................................ |
67 |
Timer, stopwatch and |
|
calculator ...................................... |
68 |
Code memo .................................. |
68 |
Profiles .......................................... |
69 |
Time and date ............................... |
70 |
Locks ............................................ |
70 |
Troubleshooting ............... |
72 |
Common questions ...................... |
72 |
Error messages ............................. |
73 |
Important information ...... |
75 |
Guidelines for Safe and |
|
Efficient Use .................................. |
75 |
End User Licence Agreement ....... |
80 |
Limited Warranty .......................... |
80 |
FCC Statement ............................. |
82 |
Declaration of Conformity |
|
for K858c ...................................... |
82 |
Index ................................. |
83 |
2Contents
This is the Internet version of the User's guide. © Print only for private use.
Sony Ericsson K858c
GSM 850/900/1800/1900
This User guide is published by Sony Ericsson Mobile Communications AB or its local affiliated company, without any warranty. Improvements and changes to this User guide necessitated by typographical errors, inaccuracies of current information, or improvements to programs and/or equipment, may be made by Sony Ericsson Mobile Communications AB at any time and without notice. Such changes will, however, be incorporated into new editions of this User guide.
All rights reserved.
©Sony Ericsson Mobile Communications AB, 2007
Publication number: 1202-2149.1 Please note:
Some of the services in this User guide are not supported by all networks. This also applies to the GSM International Emergency Number 112. Please contact your network operator or service provider if you are in doubt whether you can use a particular service or not.
Please read the Guidelines for safe and efficient use and the Limited warranty chapters before you use your mobile phone.
Your mobile phone has the capability to download, store and forward additional content, e.g. ringtones. The use of such content may be restricted or prohibited by rights of third parties, including but not limited to restriction under applicable copyright laws. You, and not Sony Ericsson, are entirely responsible for additional content that you download to or forward from your mobile phone. Prior to your use of any additional content, please verify that your intended use is properly licensed or is otherwise authorized. Sony Ericsson does not guarantee the accuracy, integrity or quality of any additional content or any other third party content. Under no circumstances will Sony Ericsson be liable in any way for your improper use of additional content or other third party content.
Bluetooth™ is a trademark or registered trademark of Bluetooth SIG Inc.
The marble logo, BestPic, PlayNow, MusicDJ, PhotoDJ, TrackID and VideoDJ are trademarks or registered trademarks of Sony Ericsson Mobile Communications AB.
Sony and Cyber-shot are trademarks of Sony Corporation.
Memory Stick Micro™ and M2™ are trademarks of Sony Corporation.
Ericsson is a trademark or registered trademark of Telefonaktiebolaget LM Ericsson.
Adobe® Photoshop® Album Starter Edition is a trademark or registered trademark of Adobe
Systems Incorporated in the United States and/or other countries/regions.
Microsoft, Windows, PowerPoint, Outlook and Vista are trademarks or registered trademarks of Microsoft Corporation in the US and other countries/regions.
MicroSD is a trademark or registered trademark of SanDisk Corporation.
T9™ Text Input is a trademark or a registered trademark of Tegic Communications. T9™ Text Input is licensed under one or more of the following: U.S. Pat. Nos. 5,818,437, 5,953,541, 5,187,480, 5,945,928, and 6,011,554; Canadian Pat. No. 1,331,057, United Kingdom Pat. No. 2238414B; Hong Kong Standard Pat. No. HK0940329; Republic of Singapore Pat. No. 51383; Euro.Pat. No. 0 842 463(96927260.8) DE/DK, FI, FR, IT, NL, PT, ES, SE, GB; and additional patents are pending worldwide. Java and all Java based trademarks and logos
are trademarks or registered trademarks of Sun Microsystems, Inc. in the U.S. and other countries/ regions.
End-user license agreement for Sun™ Java™ J2ME™.
3
This is the Internet version of the User's guide. © Print only for private use.

Restrictions: Software is confidential copyrighted information of Sun and title to all copies is retained by Sun and/or its licensors. Customer shall not modify, decompile, disassemble, decrypt, extract, or otherwise reverse engineer Software. Software may not be leased, assigned, or sublicensed, in whole or in part.
Export Regulations: Software, including technical data, is subject to U.S. export control laws, including the U.S. Export Administration Act and its associated regulations, and may be subject to export or import regulations in other countries/ regions. Customer agrees to comply strictly with all such regulations and acknowledges that it has the responsibility to obtain licenses to export, reexport, or import Software. Software may not be downloaded, or otherwise exported or re-exported
(i) into, or to a national or resident of, Cuba, Iraq, Iran, North Korea, Libya, Sudan, Syria (as such listing may be revised from time to time) or any country/region to which the U.S. has embargoed goods; or (ii) to anyone on the U.S. Treasury Department's list of Specially Designated Nations or the U.S. Commerce Department's Table of Denial Orders.
Restricted Rights: Use, duplication or disclosure by the United States government is subject to the restrictions as set forth in the Rights in Technical Data and Computer Software Clauses in DFARS 252.227-7013(c) (1) (ii) and FAR 52.227-19(c) (2) as applicable.
Other product and company names mentioned herein may be the trademarks of their respective owners.
Any rights not expressly granted herein are reserved.
Note: Sony Ericsson advises users to backup their personal data information.
All illustrations are for illustration only and may not accurately depict the actual phone. Some products may display a 17-digit number when you press *#06#. The first
15 digits are the IMEI number, and the last
2 digits are software update number.
Instruction symbols
These symbols appear in the User guide.
Note
Tip
Warning
A service or function is networkor subscription-dependent. Contact your network operator for details.
>Use a touch option or navigation key to scroll and select. See
Navigation on page 14.
4
This is the Internet version of the User's guide. © Print only for private use.
Getting started
Assembly
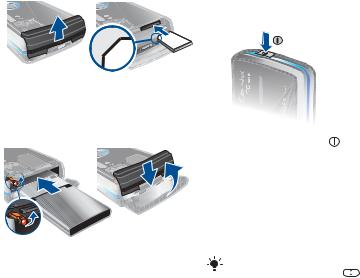
Before you start using your phone, you need to insert a SIM card and the battery.
To insert the SIM card
1Insert the battery with the label side down and the connectors facing each other.
2Close and slide the battery cover into place.
Turning on the phone
To turn on the phone
1 Remove the battery cover.
2 Slide the SIM card into its holder with
the golden contacts facing down. |
|
|
|
|
To insert the battery |
Press and hold down . |
|
|
|
1 |
|
|
||
2 |
Select a mode: |
|
|
|
|
• |
Normal mode – full functionality. |
|
|
|
• |
Flight mode – limited functionality. |
|
|
3 |
Enter your SIM card PIN, if requested |
|||
|
and select OK. |
|
|
|
4 |
Select a language. |
|
|
|
5 |
Select Cont. > Yes to use the setup |
|
||
|
wizard while settings are downloaded. |
|||
|
If you want to correct a mistake when |
|
||
|
you enter your PIN, press |
. |
|
|
|
|
Getting started |
5 |
|
This is the Internet version of the User's guide. © Print only for private use.

SIM card
The SIM (Subscriber Identity Module) card, which you get from your network operator, contains information about your subscription. Always turn off your phone and detach the charger before you insert or remove the SIM card.
 You can save contacts on the SIM card
  before you remove it from your phone. See To copy names and numbers to the SIM card on page 25.
PIN
You may need a PIN (Personal Identification Number) to activate the services in your phone. Your PIN is supplied by your network operator. Each PIN digit appears as *, unless it starts with emergency number digits, for example, 112 or 911. You can see and call an emergency number without entering a PIN.
If you enter the wrong PIN three times in a row, the SIM card is blocked. See SIM card lock on page 70.
Flight mode
In Flight mode the network and radio transceivers are turned off to prevent disturbance to sensitive equipment.
 You can use the Bluetooth™ function
  in Flight mode.
Startup screen
The startup screen appears when you turn your phone on. See Using pictures on page 46.
Standby
After you have turned your phone on and entered your PIN, the name of the network operator appears. This view is called standby.
6Getting started
This is the Internet version of the User's guide. © Print only for private use.
Help in your phone
Help and information are available in your phone. See Navigation on page 14.
To use the setup wizard
1From standby select Menu > Settings
> the General tab > Setup wizard.
2 Select an option.
To view information about functions
•Scroll to a function and select Info, if available. In some cases, Info appears under Options.
To view the phone demonstration
•From standby select Menu
> Entertainment > Demo tour.
To view status information
• From standby press the volume key up.
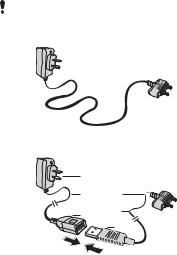
Charge the battery
Your phone battery is partly charged when you buy it.
It may take 30 minutes for the battery icon to appear on the screen.
Non-USB Charger (old type)
USB Charger (new type)
A1
A B1
B
A2
B2
A AC adapter
A1 AC adapter connector
A2 AC adapter USB socket
B USB cable
B1 USB cable connector
B2 USB cable plug
Getting started |
7 |
This is the Internet version of the User's guide. © Print only for private use.
Using the USB charger
To connect the charger and charge the battery
1Connect the USB cable plug to the AC adapter USB socket, as shown in the above illustration. The USB cable is supplied with your phone.
≈ 2.5 h
2Connect the USB cable connector to your phone. Press a key to view the charging status on the screen. It takes approximately 2.5 hours to fully charge the battery.
To remove the charger
1Charge your battery until the battery icon indicates a full charge.
2Tilt the USB charger connector upwards to remove it.
8Getting started
This is the Internet version of the User's guide. © Print only for private use.
Note:
1The USB cable for the new USB charger shown in the illustration (Part. B in the new-type charger illustration) on page 7 is only intended for charging your phone. Do not use it for transferring data.
2The USB cable for the USB charger shown in the illustration (Part. B in the new-type charger illustration) is only intended for connection to the AC adapter (Part. A in the new-type charger illustration) to charge your phone. It must not be used for connection to a PC. It can only be used for charging your phone. Never use it for charging accessories.
3Sony Ericsson strongly recommends that you use only Sony Ericsson branded original batteries, the part of power supply device in accordance with YD/T 1591-2006 specifications of Communications Industry Standards of P. R. China (Part A in the new-type charger illustration) and the USB cable supplied with your phone to charge the phone. The use of thirdparty products may decrease the performance of your phone and/or pose a risk to your health or safety.
4Sony Ericsson recommends that you never mix the use the new USB charger and the old non-USB charger. The phone with new-type charger in box cannot be charged with the oldtype charger, and vice versa. The use of both the chargers may decrease the performance of your phone and/or pose a risk to your health or safety.
 You can use the phone during charging.
  You can charge the battery for more or less than 2.5 hours. Interrupted charging will not damage the battery.
Use only Sony Ericsson branded original batteries intended for use with your mobile phone. If you use other batteries you may not be able to charge your phone.
Getting started |
9 |
This is the Internet version of the User's guide. © Print only for private use.
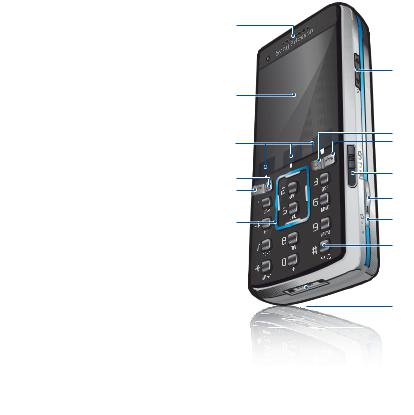
Phone overview
1Ear speaker
2 |
Screen |
1 |
|
||
3 |
Touch options |
|
4 |
Activity menu key |
|
5Call key
6 |
Navigation key |
2 |
7Volume, digital zoom keys
8C key (Clear)
9 |
End key |
3 |
|
10 |
Camera switch mode key |
|
|
11 |
Camera key |
4 |
|
12 |
Camera on/off key |
5 |
|
|
|||
13 |
Silent key |
6 |
|
14 |
Connector for charger, |
||
|
handsfree and USB cable
7
8 |
9 |
10
11
12
13
 14
14
10 Getting started
This is the Internet version of the User's guide. © Print only for private use.
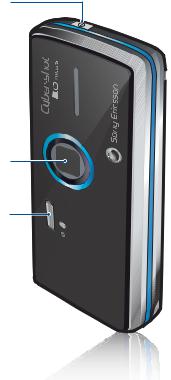
15
15 On/off key
16Camera lens cover
17Flash
16
17
Getting started |
11 |
This is the Internet version of the User's guide. © Print only for private use.
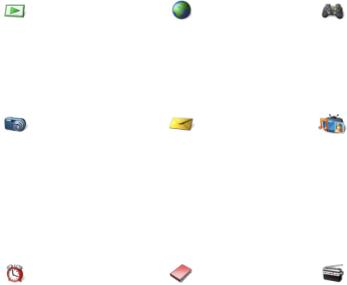
Menu overview
PlayNow™* |
Monternet* |
Cyber-shot™ |
Messaging |
Write new
Inbox
Web feeds
Drafts
Outbox
Sent messages
Saved messages
My friends*
Call voicemail
Templates
Manage messages
Settings
Alarms |
Contacts |
Myself
New contact
Entertainment
Online services*
Games
TrackID™
VideoDJ™
PhotoDJ™
MusicDJ™
Remote control
Record sound
Demo tour
Media
Radio
12 Getting started
This is the Internet version of the User's guide. © Print only for private use.

Calls** |
|
|
|
Organizer |
|
|
|
|
|
File manager** |
|
All |
Answered |
Dialled |
Missed |
Applications |
|
Calendar |
|||||
|
|
|
|
||
|
|
|
|
Tasks |
|
|
|
|
|
Notes |
|
|
|
|
|
Synchronization |
|
|
|
|
|
Timer |
|
|
|
|
|
Stopwatch |
|
|
|
|
|
Calculator |
|
|
|
|
|
Code memo |
|
Settings** |
|
|
|
|
|
General |
Sounds & alerts |
Display |
Calls |
Connectivity* |
|
Profiles |
Ring volume |
Wallpaper |
Speed dial |
Bluetooth |
|
Time & date |
Ringtone |
Themes |
Smart search |
USB |
|
Language |
Silent mode |
Startup screen |
Divert calls |
Phone name |
|
Update service |
Increasing ring |
Screen saver |
Switch to line 2* |
Network sharing |
|
Voice control |
Vibrating alert |
Clock size |
Manage calls |
Synchronization |
|
New events |
Message alert |
Brightness |
Video share* |
Device management |
|
Shortcuts |
Key sound |
Edit line names* |
Time & cost* |
Mobile networks |
|
Flight mode |
|
|
Show/hide my no. |
Internet settings |
|
Security |
|
|
Handsfree |
Streaming settings |
|
Setup wizard |
|
|
|
Message settings* |
|
Accessibility |
|
|
|
Accessories |
|
Phone status |
|
|
|
|
|
Master reset |
|
|
|
|
* Some menus are operator-, networkand subscription-dependent.
** You can use the navigation key to scroll between tabs in submenus. For more information, see Navigation on page 14.
Getting started |
13 |
This is the Internet version of the User's guide. © Print only for private use.
Navigation
The main menus are shown as icons. Some submenus include tabs.
To navigate the phone menus
1 From standby select Menu.
2Use the navigation key to move through the menus.
To scroll between the tabs
•Scroll to a tab by pressing the navigation key left or right.
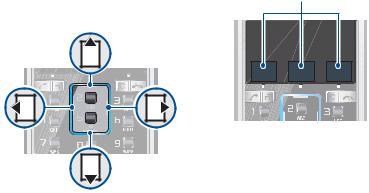
To use the touch options
Touch options
•Select an action shown at the bottom of the screen by pressing the left, centre or right touch option.
To view options for an item
•Select Options to, for example, edit.
To return to standby
•Press  .
.
To end a function
•Press  .
.
To navigate your media
1 From standby select Media.
2Use the navigation key to move up, down, left and right through the menus.
14 Getting started
This is the Internet version of the User's guide. © Print only for private use.

To delete items
•Press  to delete items such as numbers, letters, pictures and sounds.
Shortcuts
You can use keypad shortcuts to go directly to a menu. Menu numbering starts from the top left icon and moves across and then down row by row.
To go directly to a main menu
•From standby select Menu and press
 –
–  ,
,  ,
,  or
or  .
.
To use navigation key shortcuts
•From standby press  ,
, 
 ,
, 
 or
or 
 to go directly to a function.
To edit a navigation key shortcut
1From standby select Menu > Settings
> the General tab > Shortcuts.
2 Scroll to an option and select Edit.
3Scroll to a menu option and select
Shortc.
Activity menu
The activity menu gives you quick access to certain functions.
To open the activity menu
• Press  .
.
Activity menu tabs
•New events – missed calls and new messages.
•Running apps – applications that are running in the background.
•My shortcuts – add your favourite functions to access them quickly.
•Internet – quick access to the Internet.
File manager
You can use the file manager to handle files saved in the phone memory or on a memory card.
You may have to purchase a memory card separately.
Memory card
Your phone supports Memory Stick Micro™ (M2™) or MicroSD™ memory card adding more storage space to your phone. It can also be used as a portable memory card with other compatible devices.
Getting started |
15 |
This is the Internet version of the User's guide. © Print only for private use.
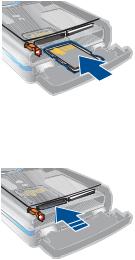
To insert a memory card
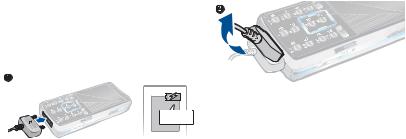
•Open the battery cover and insert the memory card with the golden contacts facing up.
To remove a memory card
•Open the battery cover and press the edge of the memory card to release and remove it.
To view memory card options
1From standby select Menu > Organizer
> File manager > the On memory card tab.
2 Select Options.
16 Getting started
Handling files
You can move and copy files between your phone, a computer and a memory card. Files are saved on the memory card first and then in the phone memory. Unrecognized files are saved in the Other folder.
You can create subfolders to move or copy files to. You can select more than one or all the files in a folder at the same time for all folders except
Games and Applications.
If the memory is full, delete some content to create space.
File manager tabs
The file manager is divided into three tabs, and icons indicate where the files are saved.
•All files – all content in the phone memory and on a memory card
•In phone – all content in the phone memory
•On memory card – all content on a memory card
To view information about files
1From standby select Menu > Organizer
> File manager.
2Find a file and select Options
> Information.
This is the Internet version of the User's guide. © Print only for private use.
To move a file in the file manager
1From standby select Menu > Organizer
> File manager.
2Find a file and select Options
> Manage file > Move.
3 Select an option.
To select more than one file in a folder
1From standby select Menu > Organizer
> File manager.
2 Scroll to a folder and select Open.
3 Select Options > Mark > Mark several.
4For each file you want to mark, scroll to the file and select Mark.
To delete a file from the file manager
1From standby select Menu > Organizer
> File manager.
2 Find the file and press  .
.
Phone language
You can select a language to use in your phone.
To change the phone language
1From standby select Menu > Settings
> the General tab > Language > Phone language.
2 Select an option.
Entering text
You can use multitap text input or T9™ Text Input  to enter text. The T9 Text Input method uses a built-in dictionary.
To change text input method
•When you enter text, press and hold down  .
.
To shift between capitals and lowercase letters
•When you enter text, press  .
.
To enter numbers
•When you enter text, press and hold down  –
–  .
.
To enter full stops and commas
•When you enter text, press  .
.
To enter text using T9™ Text Input
1From standby select, for example,
Menu > Messaging > Write new > Text message.
2If  is not displayed, press and hold down
  to change to T9 Text Input.
3Press each key only once, even if the letter you want is not the first letter on the key. For example, to write the
word “Jane”, press  ,
,  ,
,  ,
,
 . Write the whole word before looking at the suggestions.
Getting started |
17 |
This is the Internet version of the User's guide. © Print only for private use.

4 |
Use or |
to view suggestions. |
5 |
Press |
to accept a suggestion. |
To enter text using multitap
1From standby select, for example,
Menu > Messaging > Write new > Text message.
2If is displayed, press and hold down
 to change to multitap text input.
3 Press  –
–  repeatedly until the desired letter appears.
4When a word is written, press  to add a space.
Multitap input only applies when Latin characters are selected as writing language.
To add words to the built-in dictionary
1When you enter text using T9 Text Input, select Options > Spell word.
2Write the word using multitap input and select Insert.
Chinese input
This mobile phone has different input methods for entering Chinese characters:
•Stroke input
•Pinyin input
You can use these methods, for example, to enter Chinese names and Chinese short messages.
Switching between Chinese input methods
In the Chinese editing mode, you can select and switch quickly to another input method by pressing and holding  .
.
General instructions
Regardless of which input method you choose, your phone has a function
to speed up the entry of Chinese characters. Whenever you enter a stroke or a Pinyin letter, a candidate row of the most frequently used characters containing that stroke or relating to that letter appears at the bottom of the screen.
If the character you want is not displayed in the candidate row, press 
 to present another candidate row. Continue pressing
 until the character you want is displayed. Alternatively, you can enter the next stroke or Pinyin letter and a new set of characters will immediately be displayed in the candidate row. To go back to the previous row, press
 . To select a character in the candidate row, press the navigation key or press and hold the key corresponding to the number above the character you want to enter.
18 Getting started
This is the Internet version of the User's guide. © Print only for private use.
Stroke input
A Chinese character is built up of strokes. There are more than 30 basic strokes, which are grouped into 5 stroke categories. Each category is represented on the keypad by one of the keys  -
-  . The Wild Card key
  , is used when you are not sure of which stroke to use.
Stroke categories
The 5 stroke categories are defined in the table below:
Number |
Stroke |
Basic |
Stroke |
Character |
Key |
Category |
Stroke |
Name |
|
|
|
|
|
|
|
|
|
Over |
|
|
|
|
|
|
|
|
|
|
|
|
|
|
Lift |
|
|
|
|
|
|
|
|
|
|
|
|
|
|
Down |
|
|
|
|
|
|
|
|
|
|
|
|
|
|
Down-Hook |
|
|
|
|
|
|
|
|
|
|
|
|
|
|
Short |
|
|
|
|
Slope Down |
|
|
|
|
Long |
|
|
|
|
Left Slope |
|
|
|
|
Over Slope |
|
|
|
|
|
|
|
|
|
|
|
|
|
|
Short |
|
|
|
|
left Slope |
|
Number |
Stroke |
Basic |
Stroke |
Character |
Key |
Category |
Stroke |
Name |
|
|
|
|
|
|
|
|
|
Dot |
|
|
|
|
|
|
|
|
|
|
|
|
|
|
Right Slope |
|
|
|
|
|
|
|
|
|
|
|
|
|
|
Down- |
|
|
|
|
Curved- |
|
|
|
|
Over |
|
|
|
|
|
|
|
|
|
Down-Over |
|
|
|
|
|
|
|
|
|
|
|
|
|
|
Left Slope- |
|
|
|
|
Over |
|
|
|
|
|
|
|
|
|
Left Slope- |
|
|
|
|
Dot |
|
|
|
|
|
|
|
|
|
Down-Lift |
|
|
|
|
|
|
|
|
|
|
|
|
|
|
Right Slope- |
|
|
|
|
Hook |
|
|
|
|
|
|
|
|
|
Down-Over- |
|
|
|
|
Hook |
|
|
|
|
|
|
|
|
|
Down-Over- |
|
|
|
|
Curved- |
|
|
|
|
Hook |
|
|
|
|
|
|
|
|
|
Down-Over- |
|
|
|
|
Left Slope |
|
|
|
|
|
|
|
|
|
Down-Over- |
|
|
|
|
Down-Hook |
|
|
|
|
|
|
|
|
|
Down-Over- |
|
|
|
|
Down |
|
|
|
|
|
|
|
|
|
Over-Hook |
|
|
|
|
|
|
|
|
|
|
|
Getting started |
19 |
This is the Internet version of the User's guide. © Print only for private use.
Number |
Stroke |
Basic |
Stroke |
Character |
Key |
Category |
Stroke |
Name |
|
|
|
|
|
|
|
|
|
Over-Down |
|
|
|
|
|
|
|
|
|
|
|
|
|
|
Over-Down- |
|
|
|
|
Hook |
|
|
|
|
Over- |
|
|
|
|
Left Slope |
|
|
|
|
Over-Down- |
|
|
|
|
Over- |
|
|
|
|
Left Slope |
|
|
|
|
|
|
|
|
|
Over- |
|
|
|
|
Left Slope- |
|
|
|
|
Curved- |
|
|
|
|
Hook |
|
|
|
|
|
|
|
|
|
Over-Down- |
|
|
|
|
Over-Hook |
|
|
|
|
Over-Down- |
|
|
|
|
Over-Down |
|
|
|
|
Curved- |
|
|
|
|
Hook |
|
|
|
|
Over-Down- |
|
|
|
|
Curved- |
|
|
|
|
Hook |
|
|
|
|
|
|
|
|
|
Over-Down- |
|
|
|
|
Over |
|
|
|
|
|
|
|
|
|
Over-Down- |
|
|
|
|
Lift |
|
|
|
|
|
|
|
? (Wild card key) |
|
||
|
|
|
|
|
20 Getting started
Components
The basic building units of Chinese characters are components that are made up of strokes. After entering the first two strokes of the desired character, the component and character candidates that started with that stroke are displayed in the candidate row.
Using components is a fast method for entering complex characters.
 The smaller candidates surrounded by
  dotted frames are components, and the bigger candidates without dotted frames are characters.
For example, to enter “ ”
1Enter “  ”, “
”, “  ” and “
 ”.
”.
2Move the cursor to “ ”, press  .
.
Move the cursor to “ ”, press  again to select “ ”.
Example of using the wild card key
The wild card key  , is used to supplement unclear strokes in entering characters. If you want to enter “ ”, but you only know that “ ” is the first and the last stroke of the character and that the total number of strokes
is four, enter  ,
,  ,
,  ,
,  . The character is displayed in the candidate row.
This is the Internet version of the User's guide. © Print only for private use.

Pinyin input
Press the keys containing the required Pinyin letters, and the phone will make various proposals on the screen, according to the pronunciation rules of Mandarin.
Below is the key mapping of Pinyin letters on the keypad.
Number Key |
Pinyin Letter |
|
a b c |
|
d e f |
|
g h i |
|
j k l |
|
m n o |
|
p q r s |
|
t u ü |
|
w x y z |
 On the keypad, the letter ü is replaced
  by v.
by v.
For example, to enter “ ”
1 Press  ,
,  ,
,  .
.
2When “xin” is highlighted, press 
 or
or

 and select “ ”, then press
  . (If you want to enter any of the other
suggested Pinyin combinations, scroll up or down to the desired combination, then press  ).
).
3Press  again to select “ ”, when “ ” is highlighted.
Fuzzy Pinyin
Fuzzy Pinyin is an option for the Pinyin input method, which contains additional spelling alternatives. When in Pinyin input mode, press More > Writing options > Fuzzy Pinyin > On.
Input punctuation, symbols and smilies
Under any Chinese input mode, press
 , to see the table of punctuation marks, symbols and smilies. Use the navigation key to make a selection.
Press  to enter a space into the text.
Getting started |
21 |
This is the Internet version of the User's guide. © Print only for private use.

Calling
Making and receiving calls
You need to turn on your phone and be within range of a network.
To make a call
1From standby enter a phone number (with international country/region code and area code, if applicable).
2 Press .
 You can call numbers from your contacts
  and call list. See Contacts on page 23, and Call list on page 27. You can also use your voice to make calls. See Voice control on page 28.
To make international calls
1From standby press  until a “+” sign appears.
2Enter the country/region code, area code (without the first zero) and phone number.
3 Press  .
.
To re-dial a number
• When Retry? appears select Yes.
Do not hold your phone to your ear when waiting. When the call connects, your phone gives a loud signal.
To answer a call
•Press  .
.
To reject a call
•Press  .
.
To change the ear speaker volume during a call
•Press the volume key up or down.
To mute the microphone during a call
1 Press and hold down  .
.
2 Press and hold down  again to resume.
To turn the loudspeaker on during
a call
•Select SpkrOn.
Do not hold your phone to your ear when using the loudspeaker. This could damage your hearing.
To view missed calls from standby
•Press  and scroll to the New events tab and select a number.
•Press  to open the call list.
22 Calling
This is the Internet version of the User's guide. © Print only for private use.

Emergency calls
Your phone supports international emergency numbers, for example, 112 and 911. These numbers can normally be used to make emergency calls in any country/region, with or without the SIM card inserted, if a GSM network is within range.
In some countries/regions, other emergency numbers may also be promoted. Your network operator may therefore have saved additional local emergency numbers on the SIM card.
To make an emergency call
•From standby enter 112 (the international emergency number) and press  .
.
To view your local emergency numbers
1 From standby select Menu > Contacts.
2Scroll to New contact and select
Options > Special numbers > Emergency nos.
Contacts
You can save names, phone numbers and personal information in Contacts. Information can be saved in the phone memory or on the SIM card.
Default contact
You can choose which contact information is shown as default. If Phone contacts is selected as default, your contacts show all the information saved in Contacts. If you select SIM contacts as default, your contacts show names and numbers saved
on the SIM card.
To select default contacts
1 From standby select Menu > Contacts.
2Scroll to New contact and select
Options > Advanced > Default contacts.
3Select an option.
Phone contacts
Phone contacts can contain names, phone numbers and personal information. They are saved in the phone memory.
To add a phone contact
1 From standby select Menu > Contacts.
2 Scroll to New contact and select Add.
3 Enter the name and select OK.
4 Enter the number and select OK.
5 Select a number option.
6Scroll between tabs and select the fields to add information.
7 Select Save.
Calling 23
This is the Internet version of the User's guide. © Print only for private use.
Calling contacts
To call a phone contact
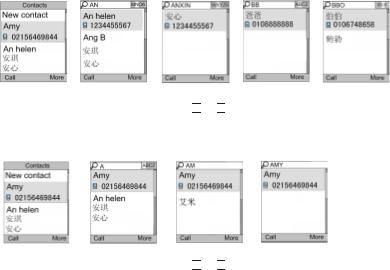
To call a contact written in Chinese characters
1> Contacts. Then enter the entire multi-letter name, pure initial or mixed initial pinyin of Chinese contacts you want to call. For example:
Initial status |
Full name search |
Pure initial search Mixed initial search |
2When the contact is highlighted, press 
 or
or 
 to select a number and press
  .
.
To call a contact written in Latin characters
1> Contacts. Scroll to, or enter the first letters or all letters of the contact you want to call (a maximum of 10 letters).
Initial |
Input 'A' |
input 'AM' |
input 'AMY' |
2When the contact is highlighted, press 
 or
or 
 to select a number and press
  .
.
Note: Phone supports Chinese and English contacts mixed search. When a contact is written in Latin characters, the entered letter can reach the Latin contact you want to call; when a contact is written in Chinese characters, the entered letter can reach the pinyin of Chinese contact you want to call.
24 Calling
This is the Internet version of the User's guide. © Print only for private use.
|
To call with Smart search |
|
|
To automatically save names and |
|
1 |
From standby press |
– |
to |
|
phone numbers on the SIM card |
|
enter a contact name or a phone |
|
1 |
From standby select Menu > Contacts. |
|
|
number. All entries which match the |
2 |
Scroll to New contact and select |
||
|
sequence of digits or letters are shown |
|
Options > Advanced > Auto save on |
||
|
in a list. |
|
|
|
SIM. |
2 |
Scroll to a contact or a phone number |
3 |
Select an option. |
||
|
and press . |
|
|
|
To save contacts on a memory card |
|
To turn Smart search on or off |
|
|
||
|
|
1 |
From standby select Menu > Contacts. |
||
1 |
From standby select Menu > Settings |
2 |
Scroll to New contact and select |
||
|
> the Calls tab > Smart search. |
|
|
Options > Advanced > Back up to m. |
|
2 |
Select an option. |
|
|
|
card. |
|
Editing contacts |
|
|
|
SIM contacts |
|
To add information to a phone contact |
|
SIM contacts can contain names and |
||
1 |
From standby select Menu > Contacts. |
|
numbers only. They are saved on the |
||
|
SIM card. |
||||
2 |
Scroll to a contact and select Options |
|
|||
|
|
||||
|
> Edit contact. |
|
|
|
To add a SIM contact |
3 |
Scroll between the tabs and select Add. |
1 |
From standby select Menu > Contacts. |
||
4 |
Select an option and an item to add. |
2 |
Scroll to New contact and select Add. |
||
5 |
Select Save. |
|
|
3 |
Enter the name and select OK. |
|
If your subscription supports Calling Line |
4 |
Enter the number and select OK. |
||
|
Identification (CLI) service, you can assign |
5 |
Select a number option and add more |
||
|
personal ringtones to contacts. |
|
|
information, if available. |
|
|
To copy names and numbers to the |
6 |
Select Save. |
||
|
|
|
|||
|
SIM card |
|
|
|
When you copy all contacts from your |
1 |
From standby select Menu > Contacts. |
|
phone to the SIM card, all existing SIM |
||
2 |
Scroll to New contact and select |
|
|
card information is replaced. |
|
|
|
|
|||
|
Options > Advanced > Copy to SIM. |
|
|
||
3 |
Select an option. |
|
|
|
|
Calling |
25 |
This is the Internet version of the User's guide. © Print only for private use.
 Loading...