


Contents
Getting started . . . . . . . . . . . . . . . . . . 4
Assemble the phone, SIM card, battery, make a call.
Getting to know your phone . . . . . . . . 8
Phone overview, use the menus, enter letters,
activity menu, file manager, Memory Stick Duo.
Calling . . . . . . . . . . . . . . . . . . . . . . . . 17
Calls, contacts, voice control, call options.
Messaging . . . . . . . . . . . . . . . . . . . . . 32
Text messaging, picture messaging, voice messaging, email, My friends.
Imaging . . . . . . . . . . . . . . . . . . . . . . . 41
Camera, video recorder, pictures, PhotoDJ™.
Entertainment . . . . . . . . . . . . . . . . . . 46
Media player, radio, PlayNow™, ringtones, MusicDJ™, VideoDJ™, sound recorder, themes, games.
Sony Ericsson K750i
Connectivity . . . . . . . . . . . . . . . . . . . . 56
Internet and email settings, synchronizing, Bluetooth, infrared, USB cable, update service.
More features . . . . . . . . . . . . . . . . . . . 65
Time and date, alarm clock, calendar, tasks, Java™ applications, SIM card lock, etc.
Troubleshooting . . . . . . . . . . . . . . . . . 73
Why doesn’t the phone work the way I want?
Additional information . . . . . . . . . . . . 78
Sony Ericsson Consumer Web site, safe and efficient use, warranty, declaration of conformity.
Icons . . . . . . . . . . . . . . . . . . . . . . . . . 86
Icon descriptions
Index . . . . . . . . . . . . . . . . . . . . . . . . . 88
This is the Internet version of the user's guide. © Print only for private use. |
1 |
Sony Ericsson
GSM 900/1800/1900
First edition (February 2005)
This user guide is published by Sony Ericsson Mobile Communications AB, without any warranty. Improvements and changes to this user guide necessitated by typographical errors, inaccuracies of current information, or improvements to programs and/or equipment, may be made by Sony Ericsson Mobile Communications AB at any time and without notice. Such changes will, however, be incorporated into new editions of this user guide.
All rights reserved.
©Sony Ericsson Mobile Communications AB, 2005
Publication number: EN/LZT 108 7528 R2B Please note:
Some of the services in this user guide are not supported by all networks. This also applies to the GSM International Emergency Number 112.
Please contact your network operator or service provider if you are in doubt whether you can use a particular service or not.
Please read the Guidelines for safe and efficient use and the Limited warranty chapters before you use your mobile phone.
Your mobile phone has the capability to download, store and forward additional content, e.g. ringtones. The use of such content may be restricted or prohibited by rights of third parties, including but not limited to restriction under applicable copyright laws. You, and not Sony Ericsson, are entirely responsible for additional content that you download to or forward from your mobile phone. Prior to your use of any additional content, please verify that your intended use is properly licensed or is otherwise authorized. Sony Ericsson does not guarantee the accuracy, integrity or quality of any additional content or any other third party content. Under no circumstances will Sony Ericsson be liable in any way for your improper use of additional content or other third party content.
The Bluetooth word mark and logos are owned
by the Bluetooth SIG, Inc. and any use of such marks by Sony Ericsson is under license.
Memory Stick™ and Memory Stick Duo™ are trademarks or registered trademarks of Sony Corporation.
QuickShare™, PlayNow™, MusicDJ™ and VideoDJ™ are trademarks or registered trademarks of Sony Ericsson Mobile Communications AB.
Microsoft, Windows and PowerPoint are either registered trademarks or trademarks of Microsoft Corporation in the U.S and other countries.
2
This is the Internet version of the user's guide. © Print only for private use.
Mac OS is a trademark of Apple Computer, Inc., registered in the U.S. and other countries.
T9™ Text Input is a trademark or a registered trademark of Tegic Communications.
T9™ Text Input is licensed under one or more of the following: U.S. Pat. Nos. 5,818,437, 5,953,541, 5,187,480, 5,945,928, and 6,011,554;
Canadian Pat. No. 1,331,057, United Kingdom Pat. No. 2238414B;
Hong Kong Standard Pat. No. HK0940329; Republic of Singapore Pat. No. 51383; Euro.Pat. No. 0 842 463(96927260.8) DE/DK, FI,
FR, IT, NL, PT, ES, SE, GB; and additional patents are pending worldwide.
Java and all Java based trademarks and logos are trademarks or registered trademarks of Sun Microsystems, Inc. in the U.S. and other countries.
End-user license agreement for Sun™ Java™ J2ME™.
1Restrictions: Software is confidential copyrighted information of Sun and title to all copies is retained by Sun and/or its licensors. Customer shall not modify, decompile, disassemble, decrypt, extract, or otherwise reverse engineer Software. Software may not be leased, assigned, or sublicensed, in whole or in part.
2Export Regulations: Software, including technical data, is subject to U.S. export control laws, including the U.S. Export Administration Act and its associated
regulations, and may be subject to export or import regulations in other countries. Customer agrees to comply strictly with all such regulations and acknowledges that it has the responsibility to obtain licenses to export, re-export, or import Software. Software may not be downloaded, or otherwise exported or re-exported (i) into, or to a national or resident of, Cuba, Iraq, Iran, North Korea, Libya, Sudan, Syria (as such listing may be revised from time to time) or any country to which the U.S. has embargoed goods; or (ii) to anyone on the U.S. Treasury Department's list of Specially Designated Nations or the U.S. Commerce Department's Table of Denial Orders.
3Restricted Rights: Use, duplication or disclosure by the United States government is subject to the restrictions as set forth in the Rights in Technical Data and Computer Software Clauses in DFARS 252.227-7013(c) (1) (ii) and FAR 52.227-19(c) (2) as applicable.
Part of the software in this product is copyright © SyncML initiative Ltd. (1999-2002). All rights reserved.
Other product and company names mentioned herein may be the trademarks of their respective owners.
Any rights not expressly granted herein are reserved.
3
This is the Internet version of the user's guide. © Print only for private use.

Getting started
Getting started
Assemble the phone, SIM card, battery, make a call.
More information and downloads are available at www.SonyEricsson.com/support.
Instruction symbols
The following instruction symbols appear in this user guide:
Note
Indicates that a service or function is networkor subscription-dependent. Contact your network operator for details.
%See also page ...
}Use the selection keys or the navigation key to scroll and select, % 10 Keys and navigation.
Press the navigation key centre.
Press the navigation key up.
Press the navigation key down.
Press the navigation key to the left.
Press the navigation key to the right.
Assembling the phone
Before you can use your phone you need to:
•Insert the SIM card.
•Attach and charge the battery.
•Insert the Memory Stick Duo.
SIM card
When you register as a subscriber with a network operator, you get a SIM (Subscriber Identity Module) card. The SIM card contains a computer chip that keeps track of your phone number, the services included in your subscription, and names and numbers in your contacts, among other things.


 If you have been using a SIM card in another phone,
  make sure that your information is saved to the SIM card before you remove it from the other phone. For example, contacts may have been saved in the phone memory.
4
This is the Internet version of the user's guide. © Print only for private use.
SIM card and battery information
Always turn off the phone and detach the charger before you insert or remove a SIM card.


 It may take up to 30 minutes before the battery icon
  appears when charging.
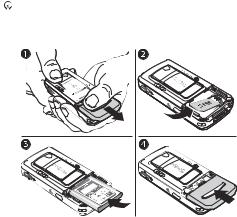
To insert SIM card and battery
Getting started
1Remove the battery cover by sliding it as shown in the picture.
2Slide the SIM card into its holder. Make sure that the gold contacts of the SIM card are facing down, and the cut off corner is correctly aligned.
3Place the battery on the back of the phone with the label side up and the connectors facing each other.
4Place the battery cover as shown in the picture and slide it into place.
5
This is the Internet version of the user's guide. © Print only for private use.

Getting started
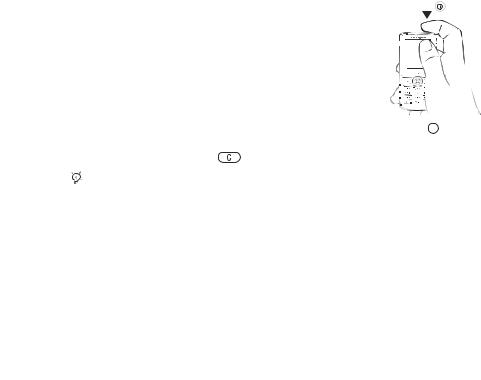
To charge the battery
Memory Stick Duo™
|
The Memory Stick Duo™ gives you extra storage |
|
capacity for content such as pictures, music and |
|
video clips. |
|
With the Memory Stick Duo you can share your |
|
saved information by moving or copying it to other |
|
Memory Stick Duo compatible devices, see also |
|
% 15 File manager. |
|
You can also use it as a portable memory for office |
|
documents, and move documents between the phone |
|
and a computer, % 64 Transferring files using the |
|
USB cable. |
|
To insert and remove the Memory |
|
Stick Duo™ |
1 Connect the charger to the phone. The symbol |
|
on the charger plug must face upwards. |
|
2 It may take up to 30 minutes before the battery |
|
icon appears on the screen. |
|
3 Wait approximately 4 hours or until the battery |
|
icon indicates that the battery is fully charged. |
|
If you do not see the battery icon after this time, |
1 Insert the Memory Stick Duo in the slot. |
press a key to activate the screen. |
|
4 Remove the charger by tilting the plug upwards. |
2 Press the edge of the Memory Stick Duo |
|
to release it from the slot. |
6
This is the Internet version of the user's guide. © Print only for private use.
|
|
|
|
|
|
|
|
Getting started |
|
For more information about Sony Memory Stick, |
To turn on the phone |
||||||||
visit www.memorystick.com. |
|
|
|
|
|
|
|
|
|
|
|
|
|
|
|
|
|
||
|
|
|
|
|
|
|
|
||
PIN (Personal Identity Number) |
|
|
|
|
|
|
|
||
|
|
|
|
|
|
|
|||
You may need a PIN (Personal Identity Number) |
|
|
|
|
|
|
|
||
to activate the services in your phone. The PIN is |
|
|
|
|
|
|
|
||
associated with your SIM card, and not with the |
|
|
|
|
|
|
|
||
phone. Your PIN is provided by your network |
|
|
|
|
|
|
|
||
|
|
|
|
|
|
|
|||
operator. When you enter your PIN, each digit |
|
|
|
|
|
|
|
||
|
|
|
|
|
|
|
|||
appears as *, unless your PIN starts with the same |
|
|
|
|
|
|
|
||
|
|
|
|
|
|
|
|||
digits as an emergency number, for example 112. |
|
|
|
|
|
|
|
||
This is so that you can see and call an emergency |
1 Press and hold |
|
. |
||||||
number without entering a PIN. |
|
|
|||||||
|
2 Enter your SIM card PIN, if requested. |
||||||||
If you make a mistake while entering your PIN, |
|||||||||
3 At first start-up, select the language you want |
|||||||||
delete the number by pressing |
. |
||||||||
If you enter the wrong PIN three times in a row, the |
for your phone menus. |
||||||||
4 } Yes if you want the setup wizard to help you |
|||||||||
SIM card is blocked and the message PIN blocked |
get started, and follow the instructions that |
||||||||
appears. To unblock it, you need to enter your PUK |
|||||||||
appear. You can start the wizard from the menu |
|||||||||
(Personal Unblocking Key), %70 SIM card lock. |
|||||||||
system at any time, } Settings }the General tab |
|||||||||
|
|
||||||||
Turning on the phone and |
} Setup wizard. |
|
|
||||||
|
|
|
|
|
|
|
|||
making calls |
|
To make and receive calls |
|||||||
Make sure that the phone is charged and your SIM |
Enter the phone number (with international prefix and |
||||||||
card is inserted before you turn it on. When you have |
area code if applicable) } Call to make the call. |
||||||||
turned the phone on, you can use the setup wizard |
} End call to end the call. When the phone rings |
||||||||
to quickly and easily prepare your phone for use. |
} Answer. |
|
|
||||||
|
|
|
|
|
|
|
7 |
||
This is the Internet version of the user's guide. © Print only for private use.
Getting to know your phone
|
Getting to know your |
1 |
Infrared port |
||||
|
phone |
|
|
|
2 |
Music button |
|
|
Phone overview, use the menus, enter letters, |
3 |
Screen |
||||
|
activity menu, file manager, Memory Stick Duo. |
4 |
Selection keys |
||||
|
|
|
|
|
|||
|
Phone overview |
|
|
5 |
Activity menu key |
||
1 |
10 |
12 |
7 |
15 |
6 |
Back key |
|
7 |
Light |
||||||
|
|||||||
11 |
|
|
|
|
|||
|
|
|
|
8 |
Memory Stick Duo slot |
||
|
|
|
|
|
|||
3 |
|
|
|
|
9 |
Microphone |
|
|
|
|
|
10 |
Power on/off button |
||
4 |
|
|
|
|
11 |
Ear speaker |
|
|
|
|
|
12 |
Camera zoom, volume buttons and picture zoom |
||
5 |
|
|
|
|
|||
13 |
2 |
|
8 |
13 |
Navigation key |
||
|
|
||||||
|
|
14 |
|
||||
6 |
14 |
|
|
|
Clear key |
||
|
|
|
|
|
15 |
Camera button |
|
8 |
|
|
|
|
16 |
Silent key |
|
|
|
|
|
17 |
Stereo headset and charger connector |
||
|
|
|
|
|
|||
|
16 |
|
9 |
17 |
For more information on keys and navigation, |
||
|
|
|
|
|
%10 Keys and navigation. |
||
8
This is the Internet version of the user's guide. © Print only for private use.
Overview, menu
1.PlayNow*
2.Internet services*
3.Entertainment
Online services* Games VideoDJ™ PhotoDJ™ MusicDJ™ Remote control Record sound Demo tour
4.Camera
5.Messaging
Write new Inbox
My friends* Email
Call voicemail Drafts Outbox
Sent messages Saved messages Templates Settings
6.Media player
7.File manager
Pictures Videos Sounds Themes Web pages Games Applications Other
8.Contacts**
Contacts**
Options: Speed dial
My business card Groups** Contacts** Special numbers Advanced
New contact
9.Radio
10.Calls*
11.Organizer
Alarms Applications Calendar Tasks Notes
Synchronization Timer Stopwatch Light Calculator Code memo
12.Settings
General
Profiles Time & date Language Voice control New events Phone status Shortcuts Music button Locks
Setup wizard Tips and tricks Master reset
Getting to know your phone
Sounds & alerts
Ring volume Ringtone Silent mode Increasing ring Vibrating alert Message alert Key sound
Display
Wallpaper
Themes Start-up screen Screen saver Brightness
Sleep mode clock Edit line names*
Calls
Divert calls Manage calls Time & cost Show or hide no. Handsfree Switch to line 2*
Connectivity
Bluetooth
Infrared port
Synchronization
Device mgmt.
Mobile networks
Data comm.
Internet settings
Streaming settings
Settings for Java™
Accessories
* Please note that some menus are operator-, networkand subscription-dependent. **The menu depends on which contacts application is selected as default.
9
This is the Internet version of the user's guide. © Print only for private use.
Getting to know your phone
Keys and navigation
Standby screen and main menu and status bar
The standby screen is displayed when you are not calling or using the menus. This is where you can see, for example, the name of your operator, the time and the date.
From standby, press  to enter the main menu, where the menus are shown as icons. Some submenus include tabs. Scroll to a tab using the navigation key and select an option.
The status bar at the top of the screen contains icons, which give information related to the phone and its activities, % 86 Icons.
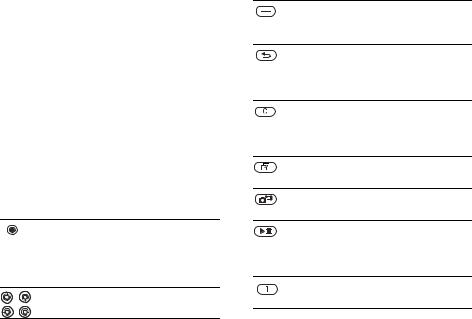
Keys and buttons
Press to select the options shown immediately above these keys on the screen.
Press to go back one level in the menus.
Press and hold to return to standby or end a function.
Press to delete items, such as pictures, sounds and contacts. During a call, press and hold to mute the microphone.
Press to open the activity menu,
% 14 Activity menu.
Press to take a picture or to record a video clip.
Press to enter the main menu from standby.
Press to select highlighted items. During a call, press to view a list of options.
Move through menus and tabs.
Press to launch the media player or radio in a minimized mode and press again to close the media player or radio.
Press and hold to call your voicemail service (if set).
10
This is the Internet version of the user's guide. © Print only for private use.
|
|
|
|
|
|
Getting to know your phone |
|
|
|
|
|
|
|
- |
Press and hold any of these keys |
|
|
|
|
To reject a call, quickly press twice |
|
|
|
|
|||
|
to reach a contact beginning with |
|
|
|
|
when receiving a call. |
|
a specific letter. |
|
|
|
|
Press once to turn off the ringtone |
|
|
|
|
|
|
when receiving a call. |
- |
Press any of these keys and press |
|
|
|
|
|
|
|
|
|
During a call, press to decrease |
||
|
Call to speed dial. |
|
|
|
|
|
|
|
|
|
|
the volume. |
|
|
In standby, press to view status |
|
|
|
|
When using the media player |
|
|
|
|
|
(also when minimized), press |
|
|
information. |
|
|
|
|
|
|
|
|
|
|
to decrease the volume. Press |
|
|
To reject a call, quickly press twice |
|
|
|
|
|
|
|
|
|
|
and hold to go forward one track. |
|
|
when receiving a call. |
|
|
|
|
|
|
|
|
|
|
When using the camera, press |
|
|
Press once to turn off the ringtone |
|
|
|
|
|
|
|
|
|
|
to zoom out. |
|
|
when receiving a call. |
|
|
|
|
|
|
During a call, press to increase |
|
|
|
|
Press and hold to set the phone |
|
the volume. |
|
|
|
|
|
|
|
|
|
|
to silent. The alarm signal rings |
|
|
When using the media player |
|
|
|
|
|
|
|
|
|
|
even if the phone is set to silent. |
|
|
(also when minimized), press |
|
|
|
|
|
|
|
|
|
|
Press once to turn off the ringtone |
|
|
to increase the volume. Press |
|
|
|
|
|
|
|
|
|
|
when receiving a call. |
|
|
and hold to go back one track. |
|
|
|
|
|
|
|
|
|
|
|
|
|
|
} Info |
|
|||
|
When using the camera, press |
|
Get more information, explanations |
|||
|
to zoom in. |
|
|
|
|
or tips about selected features, menus |
|
Press and hold to voice dial, |
|
|
|
|
or functions available in your phone. |
|
alternatively say your magic word |
|
|
|
|
Scroll to a menu item } Info. |
|
(if set), % 25 Voice dialling. |
|
|
|
|
|
|
|
|
|
|
11 |
|
|
|
|
|
|
|
|
|
|
|
|
|
|
|
This is the Internet version of the user's guide. © Print only for private use.

Getting to know your phone |
|
|
|
|
|
|
|
|
|
||
|
|
|
You can edit the navigation key shortcuts to suit |
|
|||||||
|
} More |
Enter a list of options. There are |
|
||||||||
|
your own needs. |
|
|
|
|
|
|
||||
|
|
different alternatives in the list of |
|
|
|
|
|
|
|||
|
|
|
|
|
|
|
|
|
|
|
|
|
|
options depending on where you |
Using keypad shortcuts |
|
|
||||||
|
|
are in the menus. |
Enter the menus by pressing |
and then enter the |
|||||||
|
Phone language |
number of the menu to which you want to go. For |
|
||||||||
|
example, to reach the fifth menu item, press |
. |
|||||||||
|
Most SIM cards automatically set the language used |
To reach the tenth, eleventh and twelfth menu items, |
|||||||||
|
in the menu to the language of the country where |
press |
, |
and |
respectively. |
|
|
||||
|
you bought your SIM card. If this is not the case, |
To go back to standby, press and hold |
|
|
. |
|
|||||
|
|
|
|||||||||
|
the predefined language is English. |
Using navigation key shortcuts |
|
|
|||||||
|
You can always choose language according to SIM |
|
|
||||||||
|
In standby, press |
to go to a shortcuts menu, |
|
||||||||
|
by pressing |
8888 in standby. |
|
||||||||
|
or |
, |
or to go directly to a function. |
|
|
||||||
|
You can always choose English by pressing 0000 |
|
|
||||||||
|
|
|
|
|
|
|
|
|
|
||
|
in standby. |
|
To edit a navigation key shortcut |
|
|||||||
|
|
|
|
||||||||
|
|
|
} Settings } the General tab } Shortcuts and select |
||||||||
|
To change the phone language |
which shortcut you want to edit } Edit. |
|
|
|||||||
|
1 } Settings } the General tab } Language |
Entering letters |
|
|
|
|
|
||||
|
} Phone language. |
|
|
|
|
|
|||||
|
2 Select a language. |
There are two ways of entering letters, for example, |
|||||||||
|
Shortcuts |
when writing a message or writing a name in contacts: |
|||||||||
|
• |
Multitap text input |
|
|
|
|
|
||||
|
A quicker way to move through the menus is to use |
You press each key as many times as needed to show |
|||||||||
|
shortcuts. You can use keypad shortcuts to quickly go |
the letter you want. |
|
|
|
|
|
||||
|
to a menu, and you can use predefined navigation |
• |
T9™ Text Input |
|
|
|
|
|
|||
|
key shortcuts to quickly reach certain functions. |
|
|
|
|
|
|
|
|
|
|
12
This is the Internet version of the user's guide. © Print only for private use.
The T9 Text Input method uses a built-in dictionary to recognize the most commonly used word for each sequence of key presses. This way, you press each key only once, even if the letter you want is not the first letter on the key.
Writing languages
Before you start entering letters, you need to select the languages that you want to use when writing.
When writing, you can switch to one of your selected languages by pressing and holding  .
.
To select writing language
1} Settings } the General tab } Language } Writing language.
2Scroll to each language that you want to use and mark it. } Save to exit the menu.
To enter letters using multitap text input
1To enter text, you have to be in a function where text input is possible, for example }Messaging
} Write new } Text message.
2Press the appropriate key, –
–  ,
, or
or  , repeatedly until the character you want appears on the screen. You can see which characters you can choose in the box in the top right corner of the screen.
Getting to know your phone
Example:
•To enter an ‘A’, press once.
once.
•To enter a ‘B’, quickly press  twice.
•To shift between capital and lower-case letters, press  , then enter the letter.
•You can use the volume buttons as a shortcut to certain letters. To enter a ‘B’, press and hold
the  volume button and press
  . To enter a ‘C’, press and hold the
  volume button and press
  .
.
To enter letters using T9™ Text Input
1To enter text, you have to be in a function where text input is possible, for example }Messaging
} Write new } Text message.
2For example, if you want to write the word “Jane”, press  ,
,  ,
,  ,
,  .
.
3If the word shown is the one you want,
press  to accept and add a space. To accept a word without adding a space, press
  . If the word shown is not the one you want, press
  ,
,  ,
,  or
or  to view alternative words. Accept a word and add a space by pressing

 .
.
4Continue writing your message. To enter a full
stop or other punctuation marks, press  and then
  or
or  repeatedly. Accept by pressing
  .
.
13
This is the Internet version of the user's guide. © Print only for private use.

Getting to know your phone |
|
|
||
To add words to the T9 Text Input |
• Writing language – a list of available languages |
|||
dictionary |
|
|
is shown. |
|
1 While entering letters } More } Spell word. |
• Writing method – a list of methods available |
|||
2 Edit the word by using multitap input. |
for the current language is shown. |
|||
Navigate between the letters with |
and . |
• Dictionary (T9) – turn T9 Text Input dictionary |
||
To delete a character, press |
. To delete |
on or off. |
||
the entire word, press and hold |
. |
• Word suggestions – select to view, or not, word |
||
3 When you have edited the word } Insert. |
suggestions when writing a word. |
|||
The word is added to the T9 Text Input |
• My words – manage the words that you have added |
|||
dictionary. Next time you enter this word |
to the dictionary. |
|||
using T9 Text Input, it will appear as one |
• National chars. – turn off language-specific |
|||
of the alternative words. |
|
|
characters to save space. This option appears |
|
To select another writing method |
only for some writing languages. |
|||
Activity menu |
||||
Before, or while entering letters, press and hold |
||||
to select another writing method. |
|
You can open the activity menu almost anywhere |
||
Options list |
|
|
in the phone to view and handle new events, and |
|
|
|
access bookmarks and shortcuts. |
||
}More to view a list of options. The list may contain |
||||
|
||||
some or all of the following: |
|
|
Activity menu tabs |
|
• Add symbol – symbols and punctuation marks |
• New events – this shows new events such as |
|||
such as ? and , are shown. Move between the |
||||
missed calls and messages. When a new event |
||||
symbols by using , , |
and . |
|
||
|
occurs, the tab appears on the screen. Press |
|||
• |
Add item – pictures, melodies, sounds, etc. |
to dismiss or delete an event from the event tab. |
|
• |
Spell word – for T9 Text Input only. Edit the |
||
|
|||
|
suggested word by using multitap text input. |
|
14
This is the Internet version of the user's guide. © Print only for private use.

|
|
Getting to know your phone |
|
• My shortcuts – this shows your shortcuts and |
copy files between the Memory Stick Duo and the |
||
applications that are running in the background. |
phone. Icons indicate where the files are saved. |
||
You can add, delete and change the order of |
All files, except some copyright-protected files, |
||
shortcuts. When you select a shortcut and the |
are automatically saved on the Memory Stick Duo. |
||
application opens, other programs are closed |
If the memory stick is full, you cannot save anything |
||
or minimized. |
on the Memory Stick Duo until you have deleted |
||
• Bookmarks – this shows your own Internet |
some of the content from it or moved the content |
||
bookmarks. When you select a bookmark and |
to the phone memory. If the Memory Stick Duo is |
||
the browser opens, other programs are closed |
not inserted in the phone, files will be saved to the |
||
or minimized. |
phone if there is enough memory left. |
||
To open and close the activity menu |
To use a file from the file manager |
||
Press |
. |
1 Highlight a file in the Pictures or Sounds folder. |
|
File manager |
2 } More } Use as. Select what you want to use |
||
the file for. |
|||
Use the file manager to handle files (for example, |
To move a file to a folder |
||
pictures, video clips and sounds) saved in the phone |
|||
1 } File manager and open a folder. |
|||
memory and on the Memory Stick Duo. Items such |
|||
2 Scroll to a file, for example, a picture that |
|||
as Pictures, Videos, Sounds, Themes, Games and |
|||
Applications are saved as files in folders. All files that |
you want to move } More } Manage files |
||
the phone cannot recognize are saved in the Other |
} Move to folder. |
||
folder. You can create your own subfolders in some |
3 Select the folder you want to move the file to, |
||
predefined folders, to which you can move your |
or select New folder and name the folder } OK. |
||
saved files.
When handling files, you can select several or all files in a folder at the same time. You can move and
15
This is the Internet version of the user's guide. © Print only for private use.

|
Now you have two files with the same name, |
view information for the file. |
|
|
but different icons in front of them, telling you |
|
|
|
where the file is saved. |
|
|
Getting to know your phone |
|
|
|
To create a subfolder |
To move or copy files to a computer |
||
1 |
} File manager and open a folder. |
% 64 Transferring files using the USB cable. |
|
2 } More } New folder and enter a name for |
To delete a file from the Memory |
||
|
the folder. |
||
3 |
} OK to save the folder. |
Stick Duo |
|
|
|
Scroll to the file you want to delete from the |
|
To select several files |
Memory Stick Duo and press |
. |
|
1 } File manager and select a file } More |
Formatting a Memory Stick Duo |
||
2 |
} Mark } Mark several. |
You can format a Memory Stick Duo if you want |
|
Scroll and select more files by pressing |
to delete all information from it, or if it has been |
||
|
Mark or Unmark. |
corrupted. |
|
To select all files in a folder |
To format the Memory Stick Duo |
||
} File manager and select a file } More } Mark |
} File manager and highlight a folder } More |
||
press Mark all or Unm. all to remove the selection. |
} Format ext. mem.. |
|
|
To copy a file to the phone or the |
File information |
|
|
Memory Stick Duo |
Items that are downloaded, or received using one |
||
1 |
Scroll to the file, for example, a sound, that |
of the available transfer methods, may be copyright- |
|
|
you want to copy } More } Manage files. |
protected. If a file is protected, you may not be |
|
2 |
Select Copy to phone or Copy to ext. mem. |
able to copy or send that file. You can select to |
|
|
|
||
16
This is the Internet version of the user's guide. © Print only for private use.

|
|
|
|
|
|
Calling |
||
Calling |
To make a call |
|
|
|||||
Calls, contacts, voice control, call options. |
1 |
Enter the phone number (with international |
||||||
|
country code and area code if applicable). |
|||||||
Making calls |
2 |
} Call to make the call. |
|
|||||
3 |
} End call to end the call. |
|
||||||
Before you can make or receive any calls, you must |
|
|
|
|
|
|
|
|
turn on the phone and be within range of a network. |
To change the ear speaker volume |
|||||||
% 7 Turning on the phone and making calls. |
Press |
or |
|
|
to increase or decrease |
|
||
|
|
|||||||
Networks |
the ear speaker volume during a call. |
|
||||||
|
|
|
|
|
|
|
||
When you turn on the phone, it automatically selects |
To use the loudspeaker during |
|
||||||
your home network if this is within range. If it is not |
a voice call |
|
|
|||||
within range, you may use another network, provided |
1 |
Press |
and select Turn on speaker |
|
||||
your network operator has an agreement that allows |
|
to turn on the loudspeaker. |
|
|||||
you to do so. This is called roaming. |
2 |
Press |
and select Turn off speaker |
|
||||
You can select the network you want to use, |
|
to turn off the loudspeaker. |
|
|||||
or you can add a network to your list of preferred |
Do not hold the phone to your ear while using the |
|||||||
networks. You can also change the order in which |
||||||||
loudspeaker. This could damage your hearing. |
|
|||||||
networks are selected during an automatic search. |
|
|||||||
|
|
|
|
|
|
|
||
For all such options }Settings }the Connectivity tab |
To turn off the microphone |
|
||||||
} Mobile networks. |
|
|||||||
1 |
Press and hold |
. |
|
|||||
|
|
|||||||
You can call numbers from the call list and contacts, |
2 |
To resume the conversation, press |
again. |
|||||
%23 Call list, and %19 Contacts. You can also use |
|
|
|
|
|
|
|
|
your voice to make calls, % 24 Voice control. |
|
|
|
|
|
|
|
|
|
|
|
|
|
|
|
17 |
|
This is the Internet version of the user's guide. © Print only for private use.

Calling
Receiving calls
When you receive a call, the phone rings and the caller’s number is displayed (if your subscription includes the Calling Line Identification service and the caller’s number is identified).
If the number is in your contacts, the name, number and picture (if assigned) are displayed. If the number is a restricted number, Withheld is displayed.
Automatic redialling
To re-dial a number
If the connection of the call failed and Retry? is displayed } Yes.


 Do not hold the phone to your ear while waiting. When
the call is connected, the phone gives a loud signal.
The phone redials the number up to ten times or until:
To answer a call |
• The call is connected |
|
||||
} Answer. |
|
|
• |
You press Cancel |
|
|
|
|
|
• You receive a call |
|
||
To reject a call |
Automatic redialling is not available for data calls. |
|||||
} Busy or quickly press a volume button twice. |
Making international calls |
|||||
Missed calls |
|
|||||
|
When you make an international call, the + sign |
|||||
If you have missed a call, and the activity menu is set |
||||||
replaces the international prefix number of the |
||||||
to off, Missed calls: appears in standby, indicating |
||||||
country from which you are calling. You can make |
||||||
the number of missed calls. To view the missed calls |
||||||
a call from abroad, using another network, provided |
||||||
in the call list }Yes. If you want to view the missed |
your network operator has an agreement with that |
|||||
calls later } No. |
|
network. |
|
|||
To check your missed calls |
To make international calls |
|||||
1 From standby } Calls and scroll to the missed |
1 |
Press and hold |
until a + sign appears |
|||
calls tab. Use |
or to scroll between the tabs. |
|
on the screen. |
|
||
2 Use |
or |
to scroll to a number and } Call |
2 Enter the country code, area code (without |
|||
to call a number. |
|
the leading zero) and phone number } Call. |
||||
18
This is the Internet version of the user's guide. © Print only for private use.

|
Calling |
|
Emergency calls |
Default contact |
|
Your phone supports the international emergency |
If you select to use Phone contacts as default, your |
|
numbers, for example, 112 and 911. This means that |
contacts will show all information saved in Contacts. |
|
these numbers can normally be used to make an |
If you select SIM contacts as default, the contacts will |
|
emergency call in any country, with or without a |
only show names and numbers saved on the SIM card. |
|
SIM card inserted, if a GSM network is within range. |
To select default contacts |
|
In some countries, other emergency numbers may also |
||
1 } Contacts } Options } Advanced |
||
be promoted. Your network operator may therefore |
||
} Default contacts. |
||
have saved additional local emergency numbers on |
||
the SIM card. |
2 Select Phone contacts or SIM contacts. |
|
To make an emergency call |
Contacts |
|
Enter, for example, 112 (the international emergency |
Contacts is like an address book, in which you can |
|
store names, phone numbers and email addresses. |
||
number) } Call. |
||
|
You can also add pictures, ringtones and personal |
|
To view your local emergency |
information, such as birthday, email, Web and street |
|
numbers |
addresses, to the contacts. |
|
} Contacts } Options } Special numbers |
When you add information to a contact, the |
|
} Emergency nos. |
information is organized under five tabs. Use , |
|
Contacts |
, and to scroll between the tabs and their |
|
information fields. |
||
You can save your contact information in the phone |
SIM contacts |
|
memory as contacts, or on the SIM card as names |
||
On your SIM card, you can save entries as a name |
||
and numbers. You can choose which contacts |
||
with a single number. The number of entries you can |
||
information – Phone contacts or SIM contacts – is |
||
shown as default. |
save depends on the amount of memory available |
|
For useful information and settings } Contacts |
on the SIM card, see Contacts }Options }Advanced |
|
} Options. |
} Memory status. |
|
|
19 |
This is the Internet version of the user's guide. © Print only for private use.

Calling
 Contact your network operator for more information.
To add a phone contact
1} Contacts } New contact } Add.
2Enter the name directly or press Add and enter the name } OK.
3Enter the number directly or press Add and enter the number } OK.
4Select a number type.
5Scroll between the tabs and select fields to enter more information. To enter symbols, for example, @ in an email address } Symbols and select a symbol } Insert.
6When you have entered the information }Save.
To add a SIM contact
If SIM contacts are default contacts, follow the same steps as for adding a phone contact. You can add only name and number to SIM contacts.
Pictures and personal ringtones
You can add a picture and a personal ringtone to a phone contact. When that person calls, the picture is displayed (provided your subscription supports the Calling Line Identification service) and the ringtone is played.
To add a picture or a ringtone to a phone contact
1} Contacts and select the contact you want to add a picture or ringtone to }More }Edit contact.
2Use  ,
,  ,
,  and
and  to scroll to the relevant tab. } Picture: or Ringtone } Add.
3Select a picture or sound. } Save to save the contact.
Calling contacts
You can call one of the numbers saved for one of your contacts, or a number on your SIM card.
If phone contacts are set as default, you can choose to call from contacts or from the SIM card.
If SIM contacts are set as default, you can only call the numbers on the SIM card.
To call a phone contact
1} Contacts. Scroll to, or enter the first letter or letters of the contact you want to call.
2When the contact is highlighted, press  or
or  to select a number } Call.
20
This is the Internet version of the user's guide. © Print only for private use.
|
|
|
Calling |
To call a SIM contact |
To edit a SIM contact |
||
1 } Contacts. If SIM contacts are set as default, |
1 |
If SIM contacts are set as default } Contacts |
|
select the name and number you want to call |
|
and select the name and number you want to edit. |
|
from the list } Call. |
|
If phone contacts are set as default } Contacts |
|
2 If phone contacts are set as default } Contacts |
|
} Options } SIM contacts. Select the name and |
|
} Options } SIM contacts and select the name |
|
number you want to edit. |
|
and number you want to call from the list }Call. |
2 |
} More } Edit and edit the name and number. |
|
Ask to save |
To delete a contact |
||
When you end a call or receive a message, the phone |
} Contacts and scroll to the contact you want |
||
can prompt you to add a phone number or email |
to delete, press |
. |
|
address to your contacts. |
To delete all contacts |
||
|
|||
To activate ask to save |
1 |
} Contacts } Options } Advanced |
|
}Contacts }Options }Advanced }Ask to save }On. |
|
} Delete all contacts. |
|
Updating contacts |
2 |
} Yes and enter the phone lock code } OK. |
|
|
The default phone lock code is 0000. Names |
||
You can easily update and edit any information |
|
and numbers that are saved on the SIM card |
|
in your contacts. |
|
are not deleted. |
|
To edit a phone contact |
Default items for phone contacts |
||
A default item is displayed in the first position for a |
|||
1 |
} Contacts and select a contact } More } Edit |
||
phone contact, and is therefore quicker to access.You |
|||
|
contact. |
||
2 |
can set the default item – a phone number, email |
||
Use , , and to scroll to the relevant |
|||
address or a Web address – to be displayed first for |
|||
tab and edit the information you want to edit |
each contact. If you do not set your own default item, |
|
} Save. |
||
the mobile phone number is the default item. |
||
|
||
|
21 |
This is the Internet version of the user's guide. © Print only for private use.

Calling
To set the default item for a contact
1} Contacts and scroll to a contact } More
} Default number.
2Select the phone number, email address or Web address that you want as default item.
Synchronizing contacts
You can back up and synchronize your contacts with a contacts application on the Web. For more information, please contact your service provider. You can also synchronize your contacts with
a computer application, % 59 Synchronizing.
Sending contacts |
To synchronize contacts |
|
You can send contacts using one of the available |
1 } Contacts } Options } Sync. contacts. |
|
transfer methods. |
2 If you have more than one account, select which |
|
|
account to use } Select. If you do not have an |
|
To send a contact |
account in the phone, % 59 To enter the remote |
|
} Contacts and select a contact } More |
synchronization settings. |
|
} Send contact and select a transfer method. |
Copying contacts |
|
To send all contacts |
||
You can copy names and numbers to and from your |
||
}Contacts }Options }Advanced }Send all contacts |
phone contacts and the SIM card. Choose if you want |
|
and select a transfer method. |
to copy all numbers, or a single number. |
|
Checking the memory |
When you select to copy all contacts from the phone to |
|
With the memory status function, you can check how |
the SIM card, all existing information on the SIM card |
|
will be replaced. |
||
many positions you have left in the phone memory |
||
You can also set the phone to save entries |
||
and SIM memory. |
||
|
automatically to the SIM card. With this setting, |
|
To check the memory |
names and phone numbers that you add to or edit |
|
} Contacts } Options } Advanced } Memory status. |
in your phone contacts in the phone memory are also |
|
|
saved on the SIM card. The number of phone numbers |
|
|
that can be saved depends on the type of SIM card. |
22
This is the Internet version of the user's guide. © Print only for private use.

|
|
Calling |
|
To copy names and numbers |
To add a number from the call list |
||
to the SIM card |
to contacts |
||
1 |
}Contacts }Options }Advanced }Copy to SIM. |
1 } Calls from standby and select a tab. |
|
2 |
Select Copy all or Copy a number. |
2 Scroll to the number you want to add } More |
|
To copy names and numbers |
} Save number. |
||
3 }New contact to create a new contact, or select |
|||
to phone contacts |
an existing contact to add the number to. |
||
1 |
} Contacts } Options } Advanced |
||
|
|||
|
} Copy from SIM. |
To clear the call list |
|
2 |
Select Copy all or Copy a number. |
} Calls and scroll to the tab with all calls } More |
|
To automatically save names and |
} Delete all. |
||
|
|||
phone numbers to the SIM card |
Speed dialling |
||
1 |
} Contacts } Options } Advanced |
||
You can save the phone numbers that you want |
|||
|
} Auto save on SIM. |
||
2 |
Select On. |
to reach easily in positions 1-9 in your phone. |
|
|
|||
Call list |
To speed dial |
||
From standby, enter the position number and }Call. |
|||
The numbers of the most recent calls are saved in the |
|
||
call list. Dialled, answered and missed calls are listed |
To set or replace speed dialling |
||
under separate tabs. |
numbers |
||
To call a number from the call list |
1 } Contacts } Options } Speed dial. |
||
2 Scroll to the position in the list } Add |
|||
1 |
} Calls from standby and select a tab. |
or } Replace. |
|
2Use  ,
,  ,
,  and
and  to scroll to the name or number you want to call } Call.
23
This is the Internet version of the user's guide. © Print only for private use.

Calling |
|
|
|
Voicemail |
|
Before voice dialling |
|
If your subscription includes an answering service, |
You must first activate the voice dialling function |
||
callers can leave a voicemail message when you |
and record your voice commands. An icon appears |
||
cannot answer a call. |
|
next to a phone number that has a voice command. |
|
Calling your voicemail service |
To activate voice dialling and |
||
You can easily call your voicemail service by |
record names |
||
1 } Settings } the General tab } Voice control |
|||
pressing and holding |
. If you have not set your |
||
} Voice dialling } Activate } Yes } New voice |
|||
voicemail number, you will be asked if you want to |
|||
and select a contact. |
|||
enter the number. }Yes to enter the number. You get |
|||
the number from your network operator. |
2 If the contact has more than one number, use |
||
|
|
and to view the numbers. Select the phone |
|
To enter your voicemail number |
number to which you want to add the voice |
||
} Messaging } Settings } Voicemail number. |
command. Now you are going to record a voice |
||
|
|
command such as “John mobile” for the phone |
|
Voice control |
|
number you selected. |
|
With your phone, you can use your voice to: |
3 Instructions appear. Wait for the tone and say |
||
the command that you want to record. The voice |
|||
• Voice dial – call someone by saying the name. |
|||
command is played back to you. |
|||
• Activate voice control by saying a “magic word”. |
|||
4 If the recording sounds ok }Yes. If not }No and |
|||
• Answer and reject calls when using a handsfree kit. |
|||
Voice commands can only be saved in the internal |
repeat step 3. |
||
phone memory, not on the SIM card. When recording, |
5 To record another voice command for a contact |
||
make sure that you are in a quiet environment and |
} New voice } Add again and repeat steps 2-4 |
||
try to use names that are distinct from each other, |
above. |
||
% 26 Tips when recording and using voice commands.
24
This is the Internet version of the user's guide. © Print only for private use.

|
Calling |
|
Caller name |
The magic word |
|
You can choose whether you want to hear the |
You can record a magic word and use it as a voice |
|
recorded contact name when you receive a call |
command to allow totally handsfree access to voice |
|
from that contact. |
dialling. Instead of pressing and holding a volume |
|
To turn the caller name on or off |
button to voice dial, you say the magic word and |
|
then one of your recorded voice commands. The |
||
} Settings } the General tab } Voice control |
magic word is especially suitable when using a car |
|
} Play caller name. |
handsfree kit. |
|
Voice dialling |
Choose a long, unusual word or phrase that can easily |
|
be distinguished from ordinary background speech. |
||
You can voice dial by saying a pre-recorded voice |
|
|
command. Start voice dialling from standby using |
To activate and record the magic |
|
the phone, a portable handsfree, a Bluetooth headset |
word |
|
or by saying your magic word. |
1 } Settings } the General tab } Voice control |
|
To make a call from the phone |
} Magic word } Activate. |
|
2 Instructions appear. }Continue. Wait for the tone |
||
1 From standby, press and hold one of the |
and say the magic word. |
|
volume buttons. |
||
3 Instructions appear. } Continue and select the |
||
2 Wait for the tone and say the name you recorded |
||
environments in which you want your magic |
||
earlier, for example “John mobile”. The name |
||
word to be activated. You can select several |
||
is played back to you and the call is connected. |
||
alternatives. |
||
|
||
To make a call with a handsfree |
|
|
From standby, press the handsfree button, or the |
|
|
Bluetooth headset button. |
|
25
This is the Internet version of the user's guide. © Print only for private use.

Calling
Voice answering
You can answer or reject incoming calls by using your voice, when using a portable or car handsfree kit.


 You can only use a MIDI, WAV, EMY or IMY file
  as a ringtone with voice answering.
To activate voice answering and record voice answer commands
1 } Settings } the General tab } Voice control
2} Voice answer } Activate.
3Instructions appear. }Continue. Wait for the tone and say “Answer”, or another word. If the recording sounds ok } Yes. If not } No and repeat step 2.
4Say “Busy”, or another word } Yes.
5Instructions appear. } Continue and select the environments in which you want voice answering to be activated. You can select several alternatives.
To answer a call using voice commands
When the phone rings, say “Answer” and the call is connected.
To reject a call using voice commands
When the phone rings, say “Busy”. The call is rejected. The caller is diverted to voicemail, if activated, or hears a busy tone.
Editing your voice commands
You can edit all your voice commands saved in Contacts. Select the contact you want to edit a voice command for } More } Edit contact. Scroll to the relevant tab and edit your voice command.
To re-record a voice command
1} Settings } the General tab } Voice control } Voice dialling } Edit names.
2 Select a voice command }More }Replace voice.
3Wait for the tone and say the command.
Tips when recording and using voice commands
If your phone cannot detect your voice command, one of the following might have happened:
•You spoke too softly – try speaking louder.
•You held the phone too far away – hold it as you do during a call.
•The voice command was too short – it should be around one second long and more than one syllable.
26
This is the Internet version of the user's guide. © Print only for private use.

|
Calling |
|
• You spoke too late or too soon – speak immediately |
To activate a call divert |
|
after the tone. |
1 } Settings } the Calls tab } Divert calls. |
|
• You did not record the voice command when the |
2 Select a call type and then one of the divert |
|
handsfree was attached – for voice control with |
options } Activate. |
|
a handsfree kit, record when the handsfree is |
3 Enter the phone number to which you want your |
|
attached. |
calls to be diverted, or press Look up to find the |
|
• You used another intonation – use the same |
contact } OK. |
|
intonation as in the recorded voice command. |
To deactivate a call divert |
|
Diverting calls |
||
Scroll to the divert option } Deactivate. |
||
If you cannot answer incoming calls, you can divert |
To check all divert options |
|
them to another number, for example, your answering |
||
} Settings } the Calls tab } Divert calls } Check all. |
||
service. |
||
|
||
When the Restrict calls function is activated, some |
More than one call |
|
Divert calls options are not available. |
You can handle more than one call simultaneously. |
|
You can choose between the following divert options: |
||
|
||
• Divert always – divert all calls. |
Call waiting service |
|
• When busy – divert calls if you are already |
When the service is activated, you hear a beep if you |
|
on the phone. |
receive a second call. |
|
• Not reachable – divert calls if your phone |
To activate or deactivate the call |
|
is turned off or if you are unreachable. |
||
• No reply – divert calls that you do not answer |
waiting service |
|
within a specified time limit. |
} Settings } the Calls tab } Manage calls |
|
|
} Call waiting. |
|
|
27 |
This is the Internet version of the user's guide. © Print only for private use.

Calling |
|
|
||
To make a second call |
• You cannot answer a third call without ending |
|||
1 } More } Hold call to put the ongoing call |
|
one of the first two calls or joining them into |
||
|
on hold. |
|
a conference call. |
|
2 Enter the number you want to call }More }Call. |
Conference calls |
|||
Receiving a second voice call |
||||
In a conference call, you can have a joint conversation |
||||
When you receive a second call, you can do the |
||||
with up to five other people. You can also put |
||||
following: |
||||
a conference call on hold and make another call. |
||||
• } Answer and put the ongoing call on hold. |
||||
There may be additional charges for calls involving |
||||
• } Busy to reject the second call and continue |
||||
|
the ongoing call. |
multiple parties, contact your network operator for |
||
• } Replace active call to answer the second |
more information. |
|||
|
call and end the ongoing call. |
To join the two calls into |
||
|
|
|||
Handling two voice calls |
a conference call |
|||
When you have one ongoing call and one call on hold, |
Press } Join calls. |
|||
you can do the following: |
To add a new participant |
|||
• } Switch calls to switch between the two calls. |
||||
1 } Hold call to put the joined calls on hold. |
||||
• |
Press } Join calls to join the two calls into |
|||
2 |
Press } Add call and call the next person |
|||
|
a conference call. |
|||
• |
Press }Transfer call, to connect the two calls. |
|
you want to include in the conference call. |
|
|
You are disconnected from both calls. |
3 |
Press } Join calls. |
|
• }End call to end the ongoing call, then press Yes |
4 Repeat steps 1-3 to include more participants. |
|||
|
to retrieve the held call. |
To release a participant |
||
• } End call twice to end both calls (operator |
||||
|
dependent). |
Press } Release part and select the participant |
||
that you want to release from the conference call.
28
This is the Internet version of the user's guide. © Print only for private use.
 Loading...