


Wall Mounted Mini Split
Heat Pump
Air Conditioner
OPERATING AND INSTALLATION MANUAL
Model: KFHHP-22-ID / KFHHP-22-OD
Indoor Unit.
Outdoor Unit.
Thank you for selecting Soleus Air. To ensure proper operation, please read this manual and keep it for future reference.
TABLE OF CONTENTS
OPERATION AND MAINTENANCE…………..………..…………………………………….....1-12 Instructions before Use ……………………………………………………………………………1-2 Description of Air Conditioner Components………………………………………………...………3 Remote Control Operation…………………………………………………………………………4-6 How to Insert Batteries…………………………………………………….…………………………6 User Notices…………………………………………………….………………….…………………7 Care and Maintenance………………………………………………….......……………...….……8-9 Trouble-Shooting…………………………………………………….…...……..…………..…….9-10 Specifications and Technical Data………………………………...…….…....………...……..…….11
INSTALLATION………………………………………………...………..……...………….……12-21 Installation Diagram……………………………………………………………………..………….12 Installation Location………………………………….……………………………..………………13 Installation………………………………...……...……………………………………...………14-20 Test Operation and Check after Installation…………………………………………….………..…21
ELECTRICAL SCHEMATIC DIAGRAM…………………………………...………..…………22-23 Electrical Schematic Diagram (Indoor Unit)…………………………...……………......………….22
Electrical Schematic Diagram (Outdoor Unit)………..……………………….……………………23
WARRANTY…………………………………………………………………………………………24
Danger Caution. |
This mark indicates a direction/procedure that |
|
must be followed! |
||
|
Thank you for selecting Soleus Air. To ensure proper operation, please read this manual and keep it for future reference.
Operation and Maintenance
Instructions before Use
Carefully read the following instructions before use
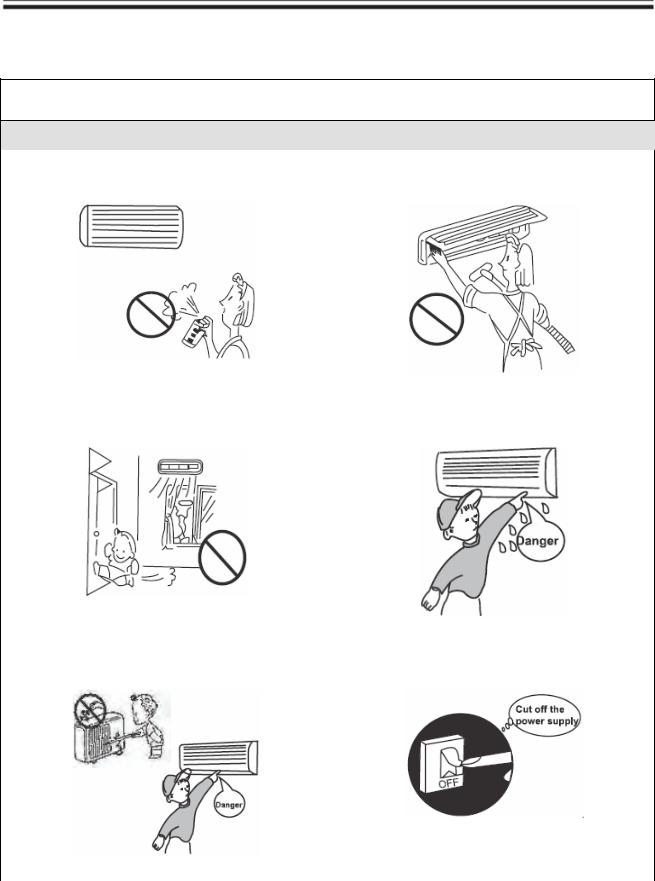
Warning
Do not use flammable liquids on or near this air |
|
Touching metal parts after removing filter can |
conditioner. |
|
cause an electric shock. |
|
|
|
Do not use for long periods of time if the |
|
Don’t operate the air conditioner with web |
humidity is high. Condensation may be present. |
|
hands. It can cause an electric shock. |
|
|
|
Do not insert your hands or any other object into |
|
If your air conditioner malfunctions, |
the air intake or outlets. |
|
discontinue use and call your authorized dealer. |
|
|
|
- 1 - |
|
|

Instructions before Use
Don’t attempt to repair the air conditioner by yourself. There are no user replaceable parts. Please contact your authorized dealer.
Always use new batteries in your remote. Never mix batteries.
Be sure to turn the power off when not using the air conditioner for a long time.
Never store flammable liquids near your air conditioner.
The condensing unit should be securely mounted to avoid damage.
Don’t step on the top of the outdoor unit.
Don’t block the air intake or outlet vents of both the outdoor and indoor unit. It can decrease the air conditioning capacity or cause a malfunction.
- 2 -

Description of Air Conditioner Components
Air intake
On/Off Switch
Air outlet
On/Off Switch
Signal Sensor
Connecting Pipe /
Line set
- 3 -
Remote Control Operation
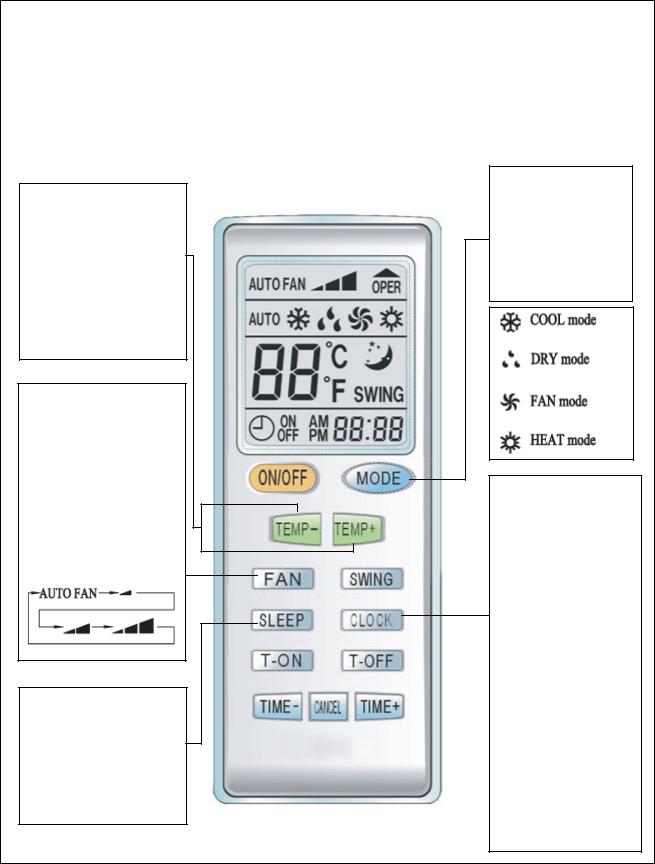
Function-Remote control
Note:
•Don't drop the remote control.
•Don't place the remote control in a location exposed to direct sunlight.
•When the unit is restarted after stopped, it will automatically resume its last running mode, and the outdoor unit will start there after.
TEMP+ TEMPButton:
Under the COOL, DRY, FAN or HEAT mode, press these two buttons could set the temperature, the temp. setting range is 60.8°F -86°F, the temp. can be memorized under each mode.
FAN SPEED Button:
When the unit starts up, under the AUTO, COOL, FAN or HEAT mode, press this button and select Auto fan, Low fan, Middle fan, High fan. At DRY mode, the fan speed runs at Low fan speed. The FAN SPEED can be memorized under various modes.
SLEEP Button:
Under COOL, DRY & HEAT mode, press the button once to start the SLEEP function, when pressed again, it will stop.
MODE Button:
When the unit is turned on, press this button. The AUTO, COOL, DRY, FAN or HEAT mode can then be selected.
CLOCK Button:
When pressing this button once, the icon of CLOCK will flash, and can be adjusted. At CLOCK adjustment, press the TIME+ once, the ones placed on the minute will be increased 1, and continuously press 1 sec above, the tens place on the minute will be increased 1 in every half second. When pressing the TIME-, the ones placed on the minute will be decreased 1, and continuously press 1 sec above, the tens place will be decreased 1 in every half second. After adjusting please press the CLOCK button again for confirming.
- 4 -

Remote Control Operation (Continued)
Liquid Crystal Display.
It shows all set contents.
ON/OFF Button
Press ON.
Press OFF.
T-ON Button.
When pressing this button once, enter into T-ON setting, the icon of T-ON flash, every press of TIME+, the time of T-ON will be increased 1min. When continuously press 1 sec above, the tens placed on minute will be increased 1, every press of TIMEwill be decreased 1 minute, when continuously press 1 sec above, the tens placed on minute will be decrease 1 in every half second, and it goes round with 12 hours.
TIME+ TIMEButton
Function instruction please refer to T-ON button, T-OFF button, CLOCK button.
SWING Button:
Press once to have louvers swing [oscillate]. Press twice in one second the panel light will turn on. Press twice again and the light will turn off.
T-OFF Button
Press this button once to enter into T-OFF setting, the icon of T-OFF will flash, the T-OFF button is available in ON or OFF mode, the setting method is the same with T-ON.
CANCEL Button
Pressing this button will cancel timer.
- 5 -
Remote Control Operation (Continued)
The General Procedure:
1.Press ON/OFF button to start the unit.
2.Press MODE button to select the suitable operation mode.
3.Press SWING button to swing. It will stop when pressed again.
4.Press FAN button to set desired fan speed.
5.Press +/- button to set desired temperature.
The Selected Procedure:
6.Press SLEEP button to set timer.
7.Press ON/OFF button to set desired temperature.
Note:
In AUTO mode, the unit will automatically adjust its running modes according to the room temperature.
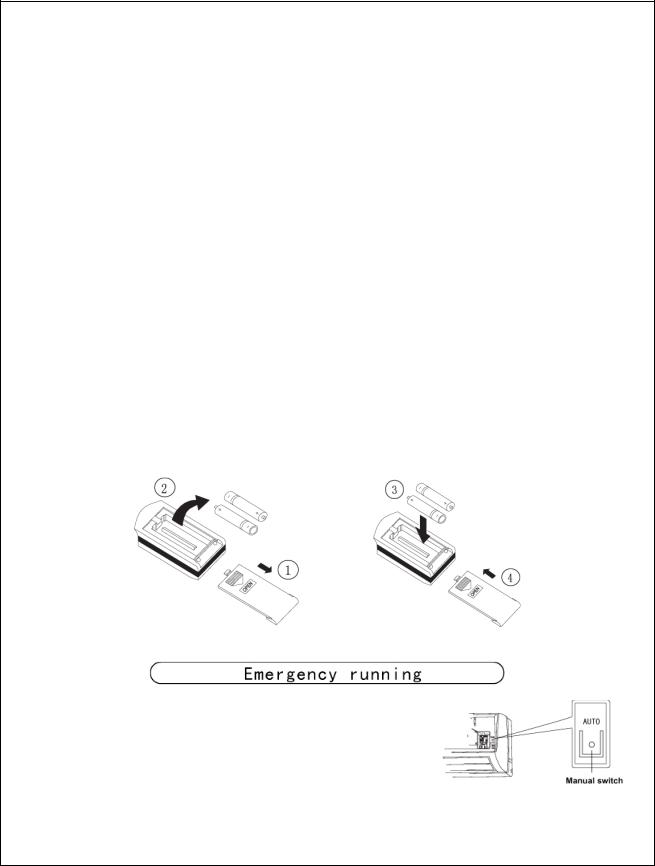
How to Insert Batteries
The remote control uses two AAA batteries.
1.Remove the cover from the back of the remote control and insert two new batteries.
2.Re-attach the cover.
Note:
•Don’t mix new and used or different types of batteries.
•Remove batteries when the remote control is not in use for a long time.
•Keep remote at least 3.28 feet from TV’s and other electronic devices.
When the wireless remote control is lost or broken, please use the manual switch, It will start in AUTO mode, the temperature setting and fan speed cannot
be changed. Please use a ball point pen or similar device to operate switch.
Turn on the unit: By pressing the Manual Switch the unit will start in AUTO automatically.
The microcomputer will adjust to the indoor temperature by selecting (COOL, HEAT, FAN), in order to achieve a comfortable condition.
•Turn off the unit: When unit is running, press the manual switch STOP button, the unit will stop running.
-6 -
 Loading...