


Safety Instructions & Operator’s Manual for
INTERMEDIATE
REAR TINE TILLER
SERIES 3
MODEL
IR5003B
NIR5003B
MODEL NUMBER EXPLANATION
|
|
|
|
I |
R |
50 |
03 |
|
B |
|
|
|
|
|
|||||
MODEL DESIGNATION |
|
|
|
|
|
|
|
|
|
|
|
|
|
ENGINE MODEL |
|||||
REAR TINE MODEL |
|
|
|
|
|
|
|
|
|
|
|
|
|
|
|
SERIES DESIGNATION |
|||
|
|
|
|
|
|
|
|
|
|
|
|
|
|
|
|||||
|
|
|
|
|
|
|
|
|
|
|
|
|
|
|
|
|
|
ENGINE HP |
|
|
|
|
|
|
|
|
|
|
|
|
|
|
|
|
|
|
|
||
|
|
|
|
|
|
|
|
|
|
|
|
|
|
|
|||||
I – Intermediate Size Model |
50 – 5 HP Engine (Horse Power) |
|
3 - Series Designation |
B – Briggs Engine |
|||||||||||||||
R – Rear Tine Type Model |
|
|
|
|
|
|
|
|
|
|
|
|
|
|
|
|
|
|
|
Thank you for buying a SNAPPER product! Your Tiller was designed and built to provide long and satisfactory service. Study this manual carefully before operating the Tiller and pay particular attention to the Important Safety Instructions found herein. Keep in mind that a Tiller, like any other mechanical device, can be potentially dangerous if used improperly. Following the instructions in this and the engine manual will help you continue to enjoy the trouble-free operation expected of a SNAPPER.
COPYRIGHT © 1999
SNAPPER INC.
ALL RIGHTS RESERVED
MANUAL No. 2-8701 (REV. 2, 5/18/99)
IMPORTANT SAFETY INSTRUCTIONS
WARNING: This powerful machine is capable of amputating hands and feet and can throw objects that can cause injury and damage! Failure to comply with the following instructions may result in serious injury to the operator or other persons. The owner of the tiller must understand these instructions and, furthermore, must allow only persons who understand these instructions to operate tiller. Each person operating the tiller must be of sound mind and body and must not be under the influence of any substance, which might impair vision, dexterity, or judgment. If you have any questions pertaining to your tiller which your dealer cannot answer to your satisfaction, call or write the Customer Service Department at SNAPPER, McDonough, Georgia, 30253. Phone: (1-800-935-2967).
PROTECTION FOR CHILDREN
1.DO NOT allow children in area when tiller is being operated.
2.DO NOT allow pre-teenage children to operate tiller.
3.Allow only responsible teenagers or adults with mature judgment to operate tiller and only under close supervision.
4.Keep the area clear of all persons, particularly small children, and pets.
5.Know how to STOP the tiller and disengage the controls quickly.
PREPARATION
1.Read this manual, get to know where all controls are located and practice how to use them before starting for the first time, and at the beginning of each season. Be thoroughly familiar with the controls and proper use of the equipment. Pay attention to Warning and Instructional Decals on engine and tiller.
2.Never operate tiller without proper guards, drag shield, plates, safety switches, or other safety protective devices in place and properly connected. Inspect to determine that these safety devices are installed properly, are in good repair, and operate properly. If the condition or operation of these devices are questionable, they must be repaired or replaced before using the tiller.
3.Thoroughly inspect the area where the tiller is to be used and remove all stones, sticks, wire, bones and other foreign objects. Also, note the location of holes, stumps, and other possible hazards.
4.DO NOT operate tiller when barefoot or wearing open sandals. Always wear long pants and substantial footwear with good traction.
5.Fill fuel tank outdoors and replace fuel cap before starting engine. Use approved fuel container. DO NOT smoke near open fuel container. DO NOT fill fuel tank indoors or when engine is running. Allow engine to cool for at least ten minutes before refilling. Wipe off any spilled fuel before starting engine. DO NOT run engine indoors.
6.Make sure that clutch is disengaged and transmission is in neutral (if so equipped) before starting engine.
OPERATIONAL PRECAUTIONS
1.DO NOT change engine governor settings or over speed engine.
2.DO NOT put hands or feet near or under rotating parts.
3.Exercise CAUTION when crossing gravel drives, walks, or roads, and under any conditions when tiller is transported. Look behind and use care when backing.
4.After striking a foreign object or if tiller vibrates abnormally, STOP the engine, disconnect and secure spark plug wire away from plug. Inspect the tiller for any damage and repair the damage.
5.When leaving tiller unattended, disengage clutch, shift transmission to neutral (if so equipped) and stop the engine.
6.Before removing debris or cleaning tines, repairing or inspecting make certain engine, tines and all moving parts have STOPPED. Disconnect and secure spark plug wire away from plug to prevent accidental starting.
7.Exercise CAUTION when changing directions while operating tiller. DO NOT till in areas where stability or traction is in doubt.
8.DO NOT overload the machine capacity by attempting to till too deep at too fast a rate.
9.Be extra careful when tilling hard ground. Use less tine engagement to maintain control of tiller.
10.Till only in daylight or in good artificial light.
11.Never operate tiller in wet areas. Always be sure of your footing; keep a firm hold on the handle.
12.Do not operate on slopes
MAINTENANCE AND STORAGE
1.Keep all nuts, bolts, and screws tight and be sure tiller is in safe operating condition.
2.Never store tiller with fuel in tank inside of a building where fumes may reach an open flame or spark. Allow engine to cool before storing in any enclosure.
3.To reduce fire hazard, keep engine free of spilled fuel, debris and excessive grease.
4.Have your tiller inspected and serviced each year by an authorized Snapper dealer. Determine if any additional devices are available which might upgrade the safety of your tiller.
5.Factory specified Snapper replacement parts must be used to assure adequate protection against injury.
2
TABLE OF CONTENTS |
|
IMPORTANT SAFETY INSTRUCTIONS................................................... |
2 |
TABLE OF CONTENTS ............................................................................ |
3 |
SECTION 1 - FAMILIARIZATION.............................................................. |
4 |
SECTION 2 - OPERATING INSTRUCTIONS......................................... |
5-7 |
Transmission Positions ............................................................... |
5 |
Pre-Start Checklist........................................................................ |
5 |
Starting & Stopping ................................................................... |
5-6 |
Handlebar Adjustment .................................................................. |
6 |
Transporting.................................................................................. |
6 |
Tilling Procedure........................................................................ |
6-7 |
SECTION 3 - ADJUSTMENTS & REPAIR ........................................... |
8-10 |
Service Parts & Assistance.......................................................... |
8 |
Standing Tiller On End ................................................................. |
8 |
Tiller Lubrication........................................................................... |
8 |
Tiller Tines ..................................................................................... |
9 |
Belt Adjustment & Replacement.................................................. |
9 |
Off Season Storage..................................................................... |
10 |
WARRANTY ............................................................................................ |
11 |
PRIMARY MAINTENANCE ................................................................ |
12-15 |
NOTES ............................................................................................... |
16-17 |
3

Section 1 - FAMILIARIZATION
CLUTCH
CABLE
COVER
DASH
PANEL
HANDLE
BRACKET
DEPTH
BAR
TINE
COVER
DRAG
SHIELD
MAIN CASE
FILL PLUG
TINE
STARTER ROPE
TIRE & WHEEL
HANDLEBAR
WHEEL & TINE
CONTROL BAIL
WHEEL & TINE
SHIFT LEVER
SHIFT COVER
THROTTLE CONTROL
LEFT SIDE SHOWN TO VIEW CHECK PLUG
ENGINE AIR FILTER
CHOKE CONTROL
MAIN CASE GREASE
CHECK PLUG
ENGINE
DRIVE
BELT
GUARD
ENGINE OIL
CHECK/FILL
PLUG
OIL DRAIN
PLUG
WEIGHT
BOX
TRANSMISSION |
STAND-UP |
CHAIN CASE |
BAR |
FIGURE 1
1.1INTRODUCTION: This manual covers the recommended operating procedure and routine service requirements on SNAPPER Intermediate Rear Tine Tiller Model IR5003B. It is recommended that all operator’s of this Tiller become thoroughly familiar with the controls and proper operation of the unit before operating. Specific details involving the engine are found in the separate engine owner’s manual. Study these manuals before operating and keep both handy for future reference. Refer to Figure 1 above for location of controls and other essential components.
4
Section 2 - OPERATING INSTRUCTIONS
2.1BEFORE OPERATING:
Be thoroughly familiar with the operation of ALL controls and how to use them BEFORE operating your Tiller. Transmission shifting is done by shifting the WHEEL and TINE SHIFT LEVER into the desired position.
Refer to Figure 3.
2.1.1TRANSMISSION POSITIONS
The Tiller has four transmission positions:
NOTE: The four different transmission positions shown on the cover are close to actual positions of shift lever but are not exact. Use positions as a reference.
1.FWD & TIL - (FORWARD and TILL) (Wheels and Tines
are engaged).
2.FWD - (FORWARD) (Only the Wheels are engaged).
3.NEU - (NEUTRAL) (Wheels and Tines are disengaged).
4.REV - (REVERSE) (Rearward Wheel rotation).
2.2PRE-START CHECKLIST
Make the following checks and perform services as required before each start up. NOTE: Before checking oil level place 2x4 piece of wood under both wheels to level engine.
2.2.1CHECK ENGINE OIL and bring level up to full. (Refer to engine manual for oil specifications).
2.2.2CHECK AIR CLEANER and service according to instructions in engine manual.
2.2.3CHECK EXTERNAL SURFACES and remove dirt and dust accumulation and clean tines as needed.
2.2.4CHECK GUARDS to make sure all are in proper position and securely tightened.
2.2.5FILL FUEL TANK where fumes will be safely dissipated. Refer to engine manual for fuel specifications.
2.3STARTING - STOPPING
Know beforehand how to stop the tines, wheel drive and engine in preparation for possible emergencies. The engine is stopped by pulling the engine. THROTTLE CONTROL to the rear to STOP. See Figure 2.
STOP
FIGURE 2
When activated, the tines rotate in a rearward (Reverse) direction ONLY. With the engine running, shift into the desired transmission position and pull the WHEEL and TINE CONTROL BAIL against the handle bar to start wheel or wheel and tine rotation.
Wheel or wheel and tine rotation is STOPPED by releasing the WHEEL and TINE CONTROL BAIL. When the bail is released, rotation should STOP even with the WHEEL and TINE SHIFT LEVER in an engaged position. See Figures 3 and 4.
WHEEL & TINE |
NEUTRAL |
|
POSITION |
||
SHIFT LEVER |
||
|
||
|
|
FIGURE 3
TO STOP WHEEL & TINE DRIVE RELEASE WHEEL & TINE CONTROL BAIL
FIGURE 4
THROTTLE
CONTROL
5
Section 2 - OPERATING INSTRUCTIONS
2.4ENGINE STARTING PROCEDURE
Step 1: Place the WHEEL and TINE SHIFT LEVER in the NEUTRAL position and make sure the WHEEL and TINE CONTROL BAIL is in the released position.
Step 2: For cold starts, move the CHOKE CONTROL on the engine forward into CHOKE position.
See Figure 5.
PUSH FORWARD
TO CHOKE
CHOKE
LEVER
FIGURE 5
Step 3: Move THROTTLE CONTROL to RUN position.
Step 4: Move to the right side of Tiller and place your foot on top of the right wheel (See starting procedure decal located on top of the tine cover), hold handle bar, then pull the ROPE STARTER HANDLE in smooth, steady motion until the engine starts. To prolong the life of the rope, guide the handle back to the engine rather than allowing it to snap back.
Step 5: Allow a brief warm-up period, then move the CHOKE CONTROL rearward and the THROTTLE CONTROL to the desired speed setting. Refer to the tilling procedure column on this page.
Step 6: To STOP the engine, pull the THROTTLE CONTROL on engine rearward into STOP position.
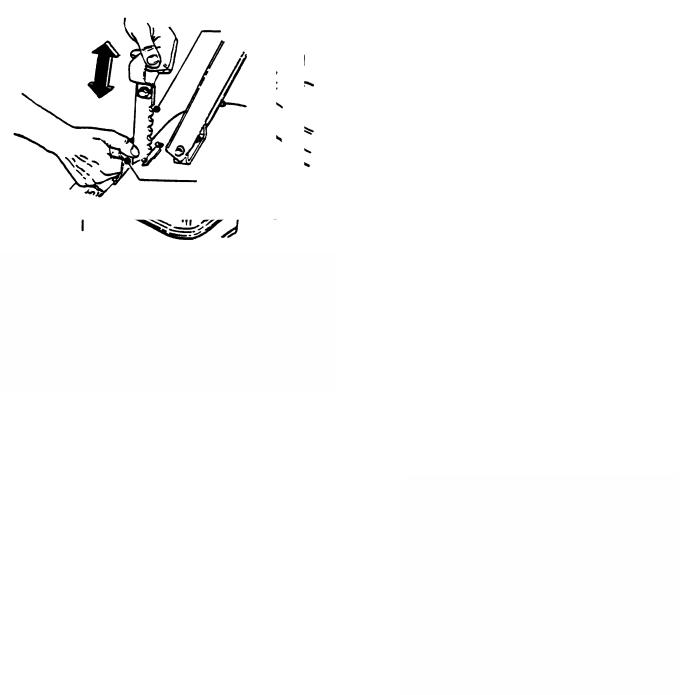
2.5HANDLE BAR ADJUSTMENT
Remove retaining screw and nut from handle bar bracket. Adjust handle bar “UP” or “DOWN” as required. Reinstall screw and nut. See Figure 6.
|
|
LOW |
|
|
MEDIUM |
|
REMOVE |
HIGH |
|
SCREW TO |
|
|
ADJUST |
|
|
HANDLEBAR |
|
|
HANDLE |
|
|
BRACKET |
|
|
|
|
FIGURE 6
2.6TRANSPORTING
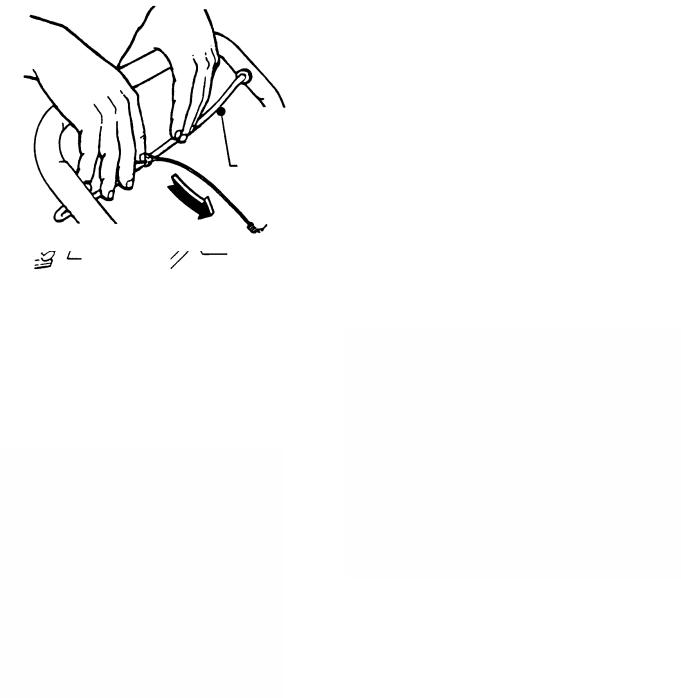
2.6.1FORWARD/REVERSE: To transport the Tiller to a new tilling site using its own power, raise the tines to clear lawn and paved surfaces to prevent gouging. Release the WHEEL and TINE CONTROL BAIL and lift the rear of the Tiller to take the weight off the DEPTH BAR (see Figure 7), then push the DEPTH BAR downward into notch setting that allows the tines to clear the ground surface. Place the WHEEL and TINE SHIFT LEVER in FWD or REV. Pull the WHEEL and TINE CONTROL BAIL back against the handlebar to engage the wheel drive and transport the unit.
2.6.2To transport the Tiller to a new tilling site by pushing it, place the WHEEL and TINE SHIFT LEVER in the NEUTRAL position, and with the bail released, push the unit with the handle bar. The Tiller may be pushed with the engine running or shut off.
DEEP |
DEPTH |
TILL |
BAR |
ADJUST UP OR
DOWN TO
DESIRED
TILLING DEPTH
SHALLOW
TILL
PULL SPRING
BACK TO
RELEASE
TENSION
FIGURE 7
2.7TILLING PROCEDURE
Tines are engaged ONLY when the WHEEL and TINE SHIFT LEVER is in the FWD & TIL position and the WHEEL and TINE CONTROL BAIL is held against the handle bar.
1.Set HANDLE BAR in desired position before beginning operation.
2.Set DEPTH BAR in highest position for deepest tilling depth or in intermediate notches for lesser depth. See Figure 7.
6
 Loading...