


 Loading...
USER GUIDE
SMCNAS04/ |
TigerStore™ |
SMCNAS24 |
SMB Network Attached Storage Server |
|
|
SMCNAS04 / SMCNAS24
User’s Guide
March 2007
TRADEMARKS
all brand and product names are trademarks or registered trademarks of their respective companies.
NOTE
the information in this manual is subject to change without notice.

SMC Networks, Inc. Warranty Statement
This SMC Networks, Inc. product comes with a 2-year limited warranty from the date of purchase. SMC Networks, Inc. warrants in good operating condition for the warranty period. This warranty does not include non-SMC Networks, Inc. installed components. If SMC Networks, Inc. product malfunctions during the warranty period, SMC Networks, Inc. will, at its discretion, repair or replace the product at no charge, provided the product has not been subjected to misuse, abuse or non-SMC Networks, Inc. authorized alterations, modifications or repairs. When returning a product, include your original proof of purchase. Return requests cannot be processed without proof of purchase. Shipment of returned product to SMC Networks, Inc. is the responsibility of the purchaser. All expressed and implied warranties for the SMC Networks, Inc. product line including, but not limited to, the warranties of merchantability and fitness for a particular purpose, are limited in duration to the above period.
Under no circumstances shall SMC Networks, Inc. Be liable in any way to the user for damages, including any lost profits, lost savings or other incidental or consequential damages arising out of the use of, or inability to use, the SMC Networks, Inc. products. SMC Networks, Inc. reserves the right to revise or update its products, software, or documentation without obligation to notify any individual or entity.
Important Notice
Please have your proof of purchase receipt to get warranty support. All defective products shall be returned with a copy of proof of purchase. In no event shall SMC Networks, Inc. 's liability exceed the price paid for the product from direct, indirect, special, incidental, or consequential damages resulting from the use of the product, its accompanying software, or its documentation. SMC Networks, Inc. does not offer refunds for any product.
All rights reserved. SMC Networks, Inc. devices are designed for home or office use. SMC Networks, Inc. cannot be made liable for any damages, loss of data or damage following thereof (including, without limitation, damages for loss of business profits, business interruption, loss of business information, or other pecuniary loss) arising out of the use of or inability to use this SMC Networks, Inc. product, even if SMC Networks, Inc. has been advised of the possibility of such damages.
We reserve the right to upgrade our products in keeping with technological advances.
SMC Networks, Inc. warrants your product against any defect in material and workmanship, under normal use, for the designated warranty period. The warranty becomes effective from the date of shipment. In the event this product is found to be defective within the warranty period, SMC Networks, Inc. will, at its discretion, repair or replace the defective product.
i

This warranty is void if:
•The product was operated/stored in abnormal use or maintenance conditions
•The product is repaired, modified or altered
•The product was subjected to abuse, neglect, electrical fault, improper packaging, accident or acts of nature
•The product was installed improperly
•The serial number of the product is defaced or missing
For storage products: Under various circumstances, such as damage from extreme conditions like floods, power fluctuations, damage caused during the installation of the drive, damage caused by improper or improperly used packaging, or physical misuse or abuse, the data on a disk drive may be inaccessible through normal operations. However, the data may be recoverable through extraordinary means offered through a specialized data recovery service.
SMC Networks, Inc. does not perform any data recovery services. If you are unable to access data on your drive due to damage such as that mentioned above, you may wish to consider contacting an independent data recovery service. The disk drives used in this product are covered under the original manufacturer’s warranty.
SMC Networks, Inc. cannot be made liable for any damages or loss of data as a result of improper use or damage to the disk drives. The disk drives used in this product are covered under the original manufacturer’s warranty.
ii

Safety Information
z WARNING: Before connecting to power, set the Voltage
Switch on the rear of your system to the voltage matching your area – voltage rating 100~127 / 200~240 Vac. Device could be damaged when the Voltage Switch is at the wrong position.
zMaximum operating ambient temperature 40 oC degree
iii

Model Information
Before accessing SMCNAS04 / SMCNAS24, please download JAVA Runtime Environment (JRE) 6 “jre-6-windows-i586.exe” (click the link
http://java.sun.com/javase/downloads/index.jsp) and install through your computer first. Otherwise, the NASDiscovery tool will not work.
z SMCNAS04
NAS system without hard disk drives installed.
NOTE: Please follow SMCNAS04 / SMCNAS24 User’s Guide to do software/hardware installations and start SMCNAS04 storage system management.
z SMCNAS24
NAS system with 4 hard disk drives installed with RAID configuration 5.
NOTE: Please skip software/hardware installations and go directly to Storage System Management (3.2 of Chapter 3), or if you wish to change the preferred RAID configuration click on “Back to Zero Disk” on the “Advanced” page of the NAS Discovery Tool and follow the instructions (3.7 of Chapter 3).
iv

Table of Contents |
|
|
Safety Information............................................................................. |
iii |
|
Model Information ............................................................................. |
iv |
|
Chapter 1 Introduction....................................................................... |
1 |
|
1.1 |
Package Contents........................................................................... |
2 |
1.2 |
Specifications .................................................................................. |
3 |
|
Hardware......................................................................................... |
3 |
|
Software .......................................................................................... |
3 |
1.3 |
System View ................................................................................... |
4 |
|
Front Components .......................................................................... |
4 |
|
Front Components (Compartment Door Open) .............................. |
6 |
|
Right-Side Components.................................................................. |
7 |
|
Left-Side Components .................................................................... |
8 |
|
Rear Components ........................................................................... |
9 |
Chapter 2 |
Setting Up........................................................................ |
11 |
Step 1. Install the Hard Disks.................................................................... |
11 |
|
Step 2. Connect to the Network ................................................................ |
14 |
|
Step 3. Connect to Power ......................................................................... |
15 |
|
Step 4. Configure Your Storage System................................................... |
16 |
|
Chapter 3 Configuring Your Storage System................................. |
17 |
|
3.1 |
Installing the Storage System Management ................................. |
18 |
3.2 |
Starting Storage System Management ......................................... |
25 |
3.3 |
My NAS Page................................................................................ |
27 |
|
System Setting .............................................................................. |
28 |
|
Network Setting............................................................................. |
30 |
3.4 |
Users & Groups Page ................................................................... |
32 |
|
Users............................................................................................. |
32 |
|
Groups .......................................................................................... |
36 |
|
Quota Management ...................................................................... |
38 |
3.5 |
Shared Folders Page .................................................................... |
40 |
|
Add Shared Folder ........................................................................ |
41 |
|
Assign Access............................................................................... |
42 |
3.6 |
Disk Page...................................................................................... |
43 |
3.7 |
Advanced Page............................................................................. |
44 |
|
Alerts ............................................................................................. |
45 |
|
Firmware ....................................................................................... |
47 |
v

iTunes Server............................................................................... |
49 |
Media Server................................................................................ |
50 |
Printer Server ............................................................................... |
52 |
UPS (Uninterruptible Power Supply)............................................ |
53 |
USB Backup................................................................................. |
55 |
System Log .................................................................................. |
56 |
Shut Down.................................................................................... |
57 |
Reboot.......................................................................................... |
59 |
Back to Zero Disk......................................................................... |
61 |
3.8 Logging Out of Storage System Management............................. |
63 |
Chapter 4 MAPPING SHARED FOLDER........................................... |
65 |
4.1 The Input Limitation...................................................................... |
66 |
Administrator Name ..................................................................... |
66 |
Administrator Password ............................................................... |
66 |
Host Name *................................................................................. |
66 |
Workgroup Name *....................................................................... |
67 |
CIFS User Name.......................................................................... |
67 |
CIFS Group Name ....................................................................... |
67 |
NFS Computer Description .......................................................... |
67 |
NFS Computer Name (IP or Domain Name) ............................... |
68 |
Shared Name ............................................................................... |
68 |
SMTP Server Name ..................................................................... |
68 |
Email Address .............................................................................. |
68 |
IP, Subnet Mask, Gateway, DNS Address................................... |
69 |
NTP Server Name........................................................................ |
69 |
SMTP User Name ........................................................................ |
69 |
vi

Chapter 1 Introduction
Your SMCNAS04 / SMCNAS24 is a storage solution for small and medium business and home network environments. With its high-speed networked storage, network users can easily access and share music, pictures, and video files. Also, it has a program for discovering the storage system automatic assigned IP address.
Your SMCNAS04 / SMCNAS24 storage system can accommodate up to four hard disks with standard RAID 0, 1, 4, 5, and JBOD (future option) in BIG configurations, providing up to 3 TB (terabytes) of shared network storage. Supporting industry-standard protocols, you can easily add your storage device into your existing network. In addition, network management and security are extremely simplified through the Web-based User Interface (UI).
Additional features include:
zRAID Mode
zRAID Degrade
zRAID Rebuild
zQuota Management
zHW (hardware) Health Monitor
zUPS (uninterruptible power supply)
zReset to Factory Default Setting
zBackup
zEvent Log
zMedia Server
zMulti-language (future option)
zSoftware Shutdown by using Storage System Management
zFunction as a FTP server and printer server
zDHCP client support
1
1.1 Package Contents
Includes the following:
zSMCNAS04 / SMCNAS24 Storage System with Key
zPower Cord
zRJ-45 Ethernet Cable
zUtility Disc
zQuick Installation Guide
zWarranty Card
2

1.2 Specifications
NOTE: Specifications are subject to change without notice.
Hardware
Cabinet Form Factor
Small Tower
Processor
Agere NAS401
System Memory
128 MB of DDR2 SDRAM
Flash Memory
8 MB
Hard Disk Drive Bay/Type
Up to four 3.5-inch SATA (Serial ATA)
Storage Capacity
Using 750 GB drives provides up to 3.0 TB
Software
Network Client Support
•Microsoft Windows
•UNIX/Linux (future option)
•Macintosh (future option)
Network Protocol
•TCP/IP
•HTTP
•FTP
•SMB/CIFS
•NFS (future option)
RAID Migration (future option) RAID Expansion (future option)
File Backup (under Microsoft Windows only)
•USB storage device to SMCNAS04 / SMCNAS24
•PC to SMCNAS04 / SMCNAS24 (and vice versa)
Hardware Monitor
Temperature Sensor
Disk Configuration
JBOD in BIG (future option), RAID 0/1/4/5
USB-UPS Support
HID power device standard
Network
Auto MDIX Ethernet Port (10/100/1000 Mbps)
Power Supply
100~127/200~240 V 50/60 Hz 128 W
Dimension
(H)230 x (W)187 x (D)288 mm
Weight
6.3 kg (without HDD installed)
Environment
•Operating temperature:
0 0C (32 0F) to 40 0C (104 0F)
•Storage relative humidity:
5 % to 95 % non-condensing
Application for NAS Management
•Data Sharing, Protection
•Data Backup and Recovery (optional)
•Web User Interface
Support Browser :
•Internet Explorer 6.0
•Firefox 2.0
Others
•English language support
•Simplified Chinese / Traditional Chinese / Japanese / German / French / Italian / Spanish language support (future option)
•Real Time Clock (RTC)
•Programmable system clock
•Network time protocol support
•Software power off
•Firmware upgradeable
•FTP server and printer server support
•Event logs and email alerts
3
1.3 System View
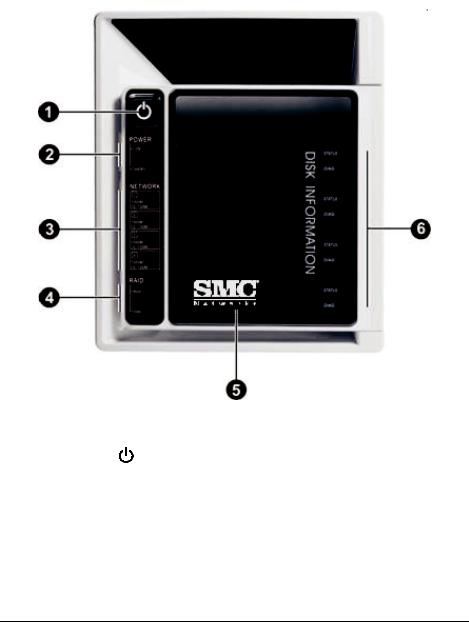
Front Components
|
Ref |
Component |
Description |
|
|
n Power Button |
Turns the power on and off. |
||
|
o Power Indicator |
Shows the current power status. |
||
|
|
|
POWER |
Glows blue when the power is on. |
|
|
|
ON |
|
|
|
|
STANDBY |
Glows red when the system is in Standby mode |
|
|
|
|
(power cord is connected to the outlet but storage system |
|
|
|
|
is at standby situation). |
4

|
Ref |
Component |
Description |
|
|
p Network Indicator |
Shows the current network status. |
||
|
|
|
|
Glows green at 10/100 Mbps or blue at 1000 Mbps when |
|
|
|
|
system is connected to the network. |
|
|
|
|
Blinks green or blue to indicate system is trying to |
|
|
|
|
establish a network connection. |
|
q RAID Indicator |
Shows the current RAID status. |
||
|
|
|
RAID |
Glows blue to indicate RAID function is implemented. |
|
|
|
|
|
|
|
|
|
Blinks blue to indicate RAID function is rebuilding the |
|
|
|
|
hard disk drive. |
|
|
|
DIAG |
Glows red to indicate RAID function is inactive or |
|
|
|
|
malfunctioning. |
rHard Disk Drive Contains four hard disk drive slots.
Compartment
sDisk Information Shows the current hard disk drive status.
Indicator
STATUS Glows blue to indicate hard disk drive/s is standby.
Blinks blue to indicate hard disk drive/s read/write function.
DIAG Glows red to indicate hard disk drive is inactive or malfunctioning.
5
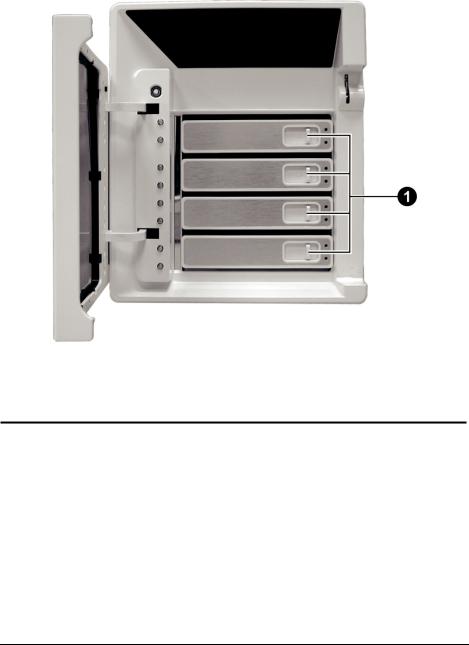
Front Components (Compartment Door Open)
Ref |
Component |
Description |
nHard Disk Tray Opens the hard disk tray.
Door Handle
6
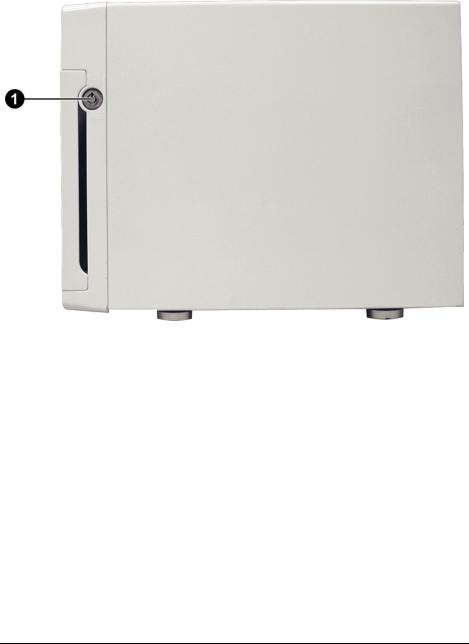
Right-Side Components
Ref |
Component |
Description |
n Door Lock |
Locks the hard disk drive compartment door for security. |
|
7
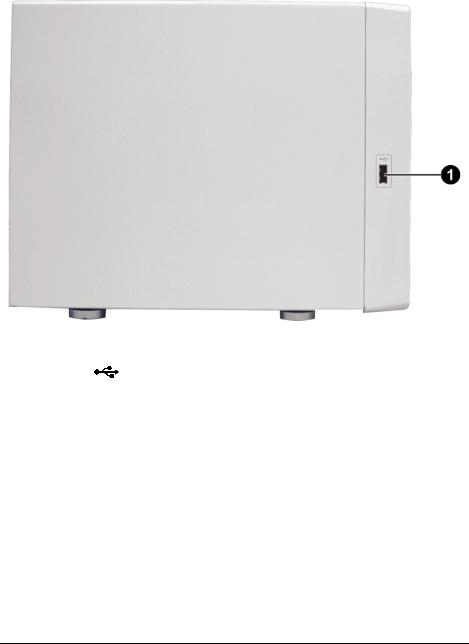
Left-Side Components
Ref |
Component |
Description |
n USB Port |
Connects a USB device, such as a USB disk, printer, or |
|
|
|
USB-UPS. |
8

Rear Components
Ref |
Component |
Description |
n Power Connector |
Connects to the power cord. |
|
o Voltage Switch |
Select the voltage matching your local standard setting. |
|
p |
Ventilation |
Maintain proper operating temperature. Do not cover or |
|
Opening |
block the openings. |
q Reset Switch |
Allows you to reset the system to the factory default |
|
|
|
username, password, and HDCP |
rRJ-45 Connectors Connects the LAN cable to any of the four connectors.
0/1/2/3 
s USB Ports |
Connects USB devices, such as a USB disk, printer, |
|
and/or USB-UPS. |
9
Chapter 2 Setting Up
Step 1. Install the Hard Disks
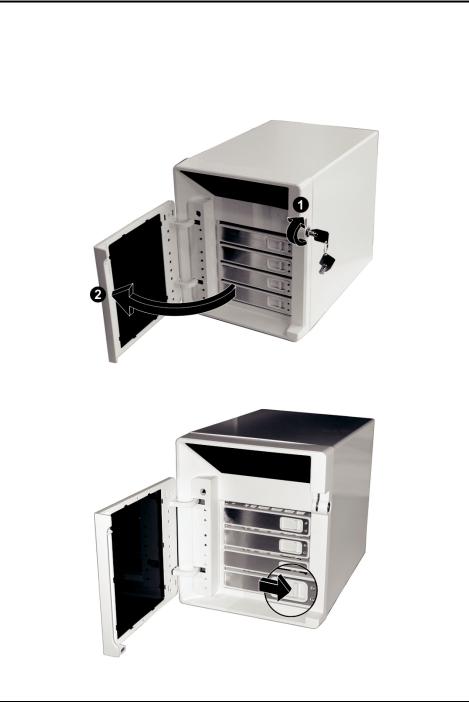
1. Insert the key and turn clockwise (n) to unlock and open the door (o).
2. Slide the latch toward the right to release the handle.
11
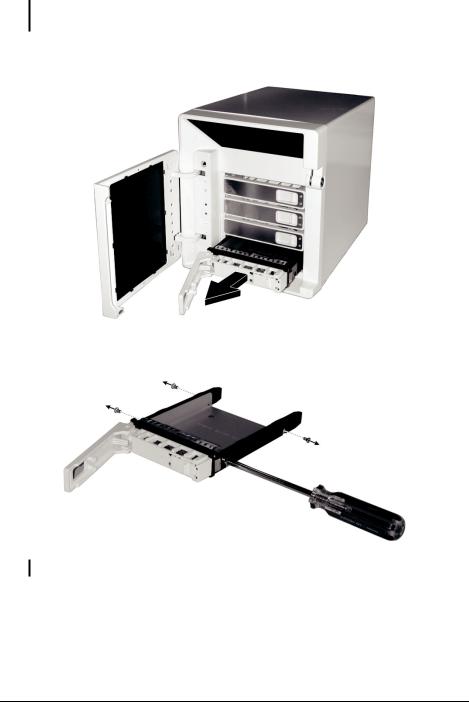
NOTE: Install the first hard disk on the lowest level tray first, the second hard disk on the second lowest level tray, and so forth.
3.Pull the handle to slide the hard disk tray forward. Then, pull the hard disk tray out of the device.
4.Unfasten four screws from each side of the hard disk tray and remove the metal bracket.
NOTE: Store the metal bracket well in a safe place for future use.
12
5.Fit the hard disk into the tray where the connectors facing toward the rear. Then align and fasten four screws for fixing the hard disk in the tray.
6.Keeping the handle in its full-open state, slide the hard disk tray all the way into the device until the hinge of the handle is inside the device. Then, close the handle. The latch should be clicked into place.
7.Repeat the procedures above for installing another hard disk(s) in the other compartment(s).
13
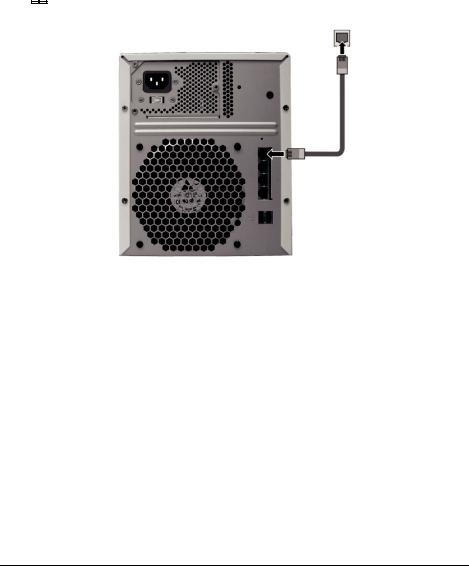
Step 2. Connect to the Network
1.Make sure that the computer, which you will install and perform Storage System Management, is powered off and connected to the network hub.
2.Make sure that the network hub is powered off.
3.Connect one end of the Ethernet cable to any of the four network connector
( ) on the back of your storage system and the other end to the network hub.
14
Step 3. Connect to Power
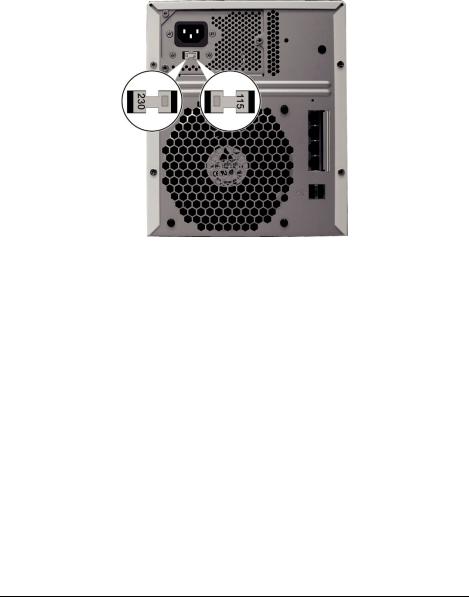
1.Make sure that your storage system is turned off.
2.Before connecting to power, set the Voltage Switch to the voltage matching your local standard setting.
15
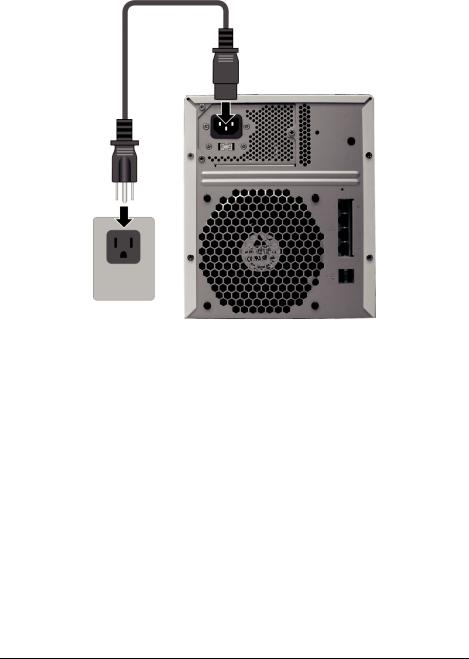
3.Connect one end of the power cord to your storage system and the other end to a standard electrical outlet.
4.Power on your network hub.
5.Power on your computer.
Step 4. Configure Your Storage System
See the next chapter for software configuration instructions.
16
Loading...