


 Loading...
User Guide
Copyright
Information furnished by SMC Networks, Inc. (SMC) is believed to be accurate and reliable. However, no responsibility is assumed by SMC for its use, nor for any infringements of patents or other rights of third parties which may result from its use. No license is granted by implication or otherwise under any patent or patent rights of SMC. SMC reserves the right to change specifications at any time without notice.
Copyright © 2005 by
SMC Networks, Inc.
38 Tesla Irvine,
California 92618
Trademarks
SMC® is a registered trademark; and EZ-Stream, EZ Connect, Barricade and EZ Hub are trademarks of SMC Networks, Inc. Other product and company names are trademarks or registered trademarks of their respective holders.
Rhapsody is a registered trademark of Listen.com, Inc.
Musicmatch is a registered trademark of Yahoo! Inc.
Microsoft, Windows, and Windows Media are trademarks or registered trademark of Microsoft Corp. in the United States and/ or other countries.
Warranty Limitations
The information provided herein may change with product qualification.
SMC Networks, Inc. assumes no responsibility for inaccuracies, errors, or omissions.
SMC Networks, Inc. assumes no responsibility for the use of this information, and all use of such information shall be entirely at the user’s own risk. Specifications are subject to change without notice.
Please register this product and upgrade the product warranty at SMC’s website: http://www.smc.com.
ii

SMCWAA-G EZ-Stream™ 802.11g
Wireless Audio Adapter
Table of Contents
About the SMCWAA-G EZ-Stream™ 802.11g Wireless Audio Adapter |
.....................1 |
Before You Start .................................................................................................... |
1 |
PC Requirements ........................................................................................................... |
1 |
Audio System Requirements ............................................................................................ |
1 |
Network Requirements ................................................................................................... |
2 |
Contents of the Box ....................................................................................................... |
3 |
Using the Remote Control ...................................................................................... |
4 |
Understanding the Operating Modes and Screen Displays ..................................... |
5 |
Operating Modes ............................................................................................................ |
5 |
Browse Mode (Home Menu) .......................................................................................... |
5 |
Play Mode .................................................................................................................. |
5 |
Configuration Mode ..................................................................................................... |
5 |
Screen Layouts .............................................................................................................. |
5 |
Select Screens (Home Menu) ........................................................................................ |
5 |
Play Screens ............................................................................................................... |
6 |
Configuration Screens .................................................................................................. |
7 |
Edit Screens ............................................................................................................... |
8 |
Other Screens ............................................................................................................. |
8 |
Installing the SMCWAA-G ...................................................................................... |
8 |
Essential Information and System Setup ........................................................................... |
8 |
Connecting the SMCWAA-G to the Network ....................................................................... |
9 |
Installing the Music Library Software ................................................................................ |
9 |
Installing Musicmatch .................................................................................................. |
9 |
Installing Rhapsody ................................................................................................... |
10 |
Music Server Connection Problems .............................................................................. |
10 |
Configuring the SMCWAA-G ........................................................................................... |
10 |
Language Selection ................................................................................................... |
10 |
Using the Configuration Wizard (basic setup only) ......................................................... |
11 |
Standby and Restart .................................................................................................... |
11 |
Using the SMCWAA-G ........................................................................................... |
11 |
Listening to Music ........................................................................................................ |
12 |
Selecting and Playing Music ........................................................................................ |
12 |
Setting up a Musicmatch Library on your PC ................................................................. |
12 |
Listening to Internet Radio Stations ................................................................................ |
12 |
Using Presets and Favorites ........................................................................................... |
13 |
Saving a Track to a Preset Number .............................................................................. |
13 |
Playing a Preset Item ................................................................................................. |
13 |
Saving a Track to the Dynamic Playlist ......................................................................... |
13 |
Selecting and Playing Favorites from the Dynamic Playlist ............................................... |
13 |
Replacing Favorites on the Dynamic Playlist .................................................................. |
13 |
iii

User Guide
Advanced Configuration Management .................................................................. |
14 |
Method 1: Using the Remote Control ............................................................................... |
14 |
Select Language ........................................................................................................ |
14 |
Advanced Settings ..................................................................................................... |
14 |
Configure Date/Time .................................................................................................. |
15 |
Select Profile ............................................................................................................. |
15 |
Device Status ............................................................................................................ |
15 |
Internet Radio ........................................................................................................... |
15 |
Configuration Wizard .................................................................................................. |
15 |
Network Information Needed by the Configuration Wizard ............................................... |
15 |
Configuration Wizard Menu ......................................................................................... |
15 |
Changing Network Settings ......................................................................................... |
16 |
Method 2: Using the SMCWAA-G PC Utility ....................................................................... |
17 |
Installing the Utility ................................................................................................... |
17 |
Starting the SMCWAA-G PC Utility ................................................................................ |
17 |
Managing Profiles Using the SMCWAA-G PC Utility .......................................................... |
17 |
Uploading New Software to the SMCWAA-G ..................................................................... |
18 |
Performing a Hard Reset to Factory Settings .................................................................... |
19 |
Firewall Settings .................................................................................................. |
19 |
Troubleshooting ................................................................................................... |
20 |
Troubleshooting Chart ................................................................................................... |
20 |
Error Codes ................................................................................................................. |
21 |
Menu Tree Diagrams ............................................................................................ |
22 |
Top Level Menus .......................................................................................................... |
22 |
Configuration Mode Menus ......................................................................................... |
23 |
Configuration Wizard Menus .......................................................................................... |
24 |
Wireless LAN Configuration Wizard ............................................................................... |
24 |
Wired Ethernet Configuration Wizard ............................................................................ |
25 |
Music Track Menus ....................................................................................................... |
26 |
Internet Radio Menus ................................................................................................... |
27 |
Technical Specifications ....................................................................................... |
28 |
Standards Compliance ......................................................................................... |
30 |
FCC - Class B ............................................................................................................... |
30 |
Caution Statement ....................................................................................................... |
30 |
FCC Radiation Exposure Statement .............................................................................. |
30 |
Industry Canada – Class B .......................................................................................... |
31 |
EC Conformance Declaration ...................................................................................... |
31 |
Safety Compliance ..................................................................................................... |
31 |
Glossary of Terms ................................................................................................ |
33 |
iv

SMCWAA-G EZ-Stream™ 802.11g
Wireless Audio Adapter
About the SMCWAA-G EZ-Stream™ 802.11g Wireless Audio Adapter
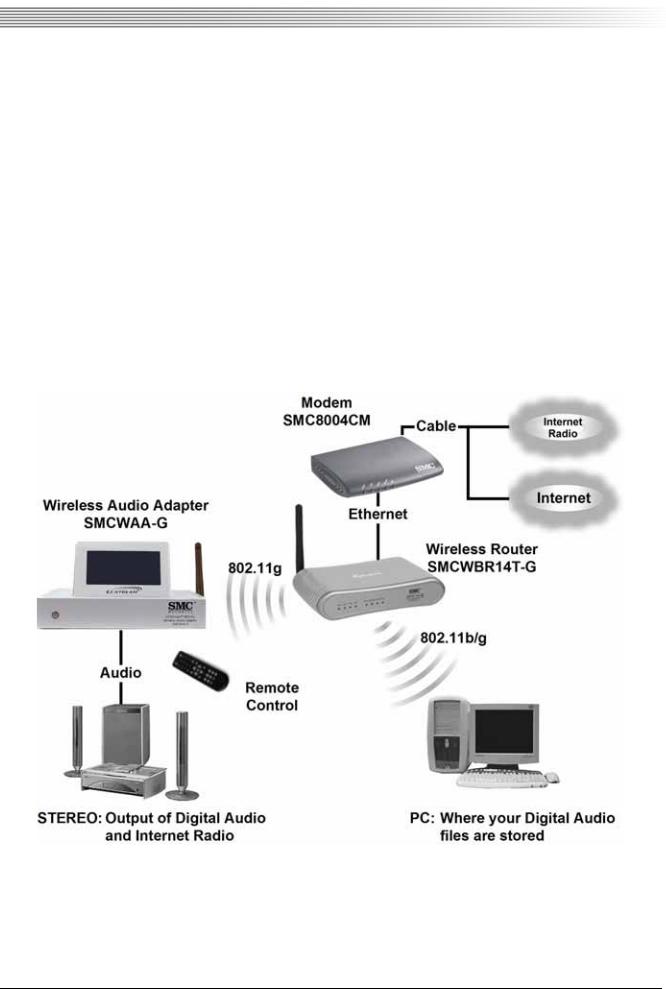
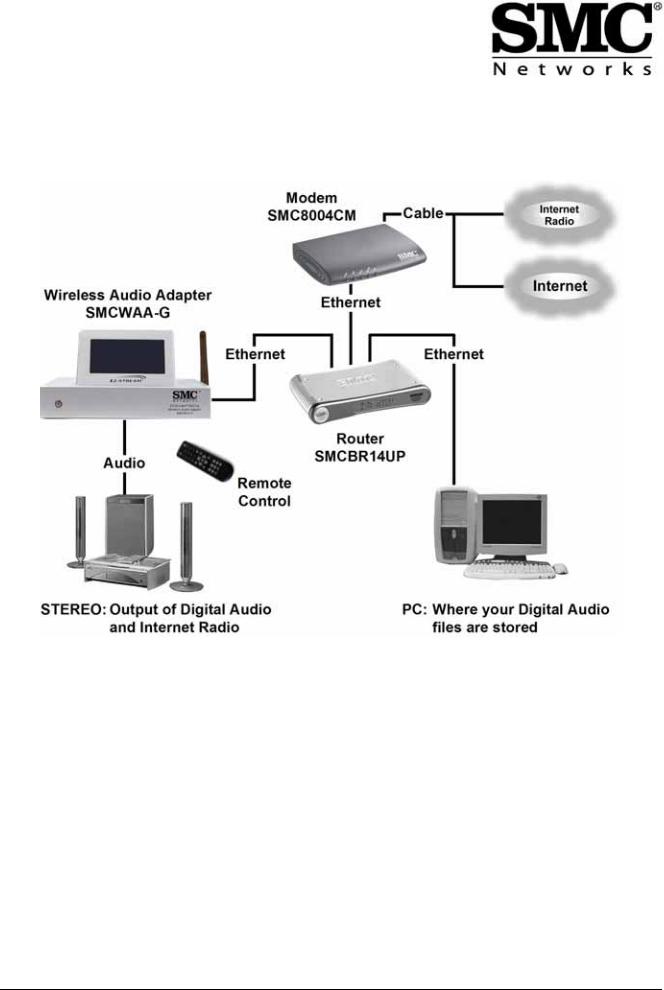
With the SMCWAA-G EZ-Stream™ 802.11g Wireless Audio Adapter (SMCWAA-G) you are able to break away from your computer and enjoy digital music anywhere in your home. The SMCWAA-G plugs into an audio system and connects, using a wireless or wired Ethernet link to a personal computer (PC), or directly to the Internet via an Access Point (AP) or wireless router.
Using the SMCWAA-G’s remote control and LCD display,you can browse and play tracks stored on your PC, or listen to Internet Radio stations or music tracks available online.
The SMCWAA-G is easy to set up on a wireless or wired Ethernet network. The Musicmatch Jukebox program, running on any PC on the network, enables the SMCWAA-G to browse audio files on the PC and play them back over the audio system.
The SMCWAA-G is a complete package that allows you to enjoy the digital music experience within minutes, out-of the box.
Key Features
You can:
•Connect your SMCWAA-G to an audio system, then use its Remote Control to browse and play:
•thousands of Internet radio stations
•any audio tracks you have stored on any PC on your network
•thousands of music tracks available on the Internet, through services such as Rhapsody
•Store up to 10 of your favorite radio stations or albums/tracks on shortcut buttons
•Keep 20 more favorites in your own dynamic playlist
•Create your own Internet radio station database online
•Browse music tracks by Song, Album, Artist, Genre, Playlist or All Tracks
•Configure the SMCWAA-G for your home network, using the remote control and LCD display
•Maintain up to three different customized configurations.
•Use the SMCWAA-G PC Utility to install firmware upgrades.
Before You Start
The SMCWAA-G is designed to operate with your PC and a local area network(LAN) or wireless local area network (WLAN), with a connection to the Internet. Please check the following before you start the installation:
PC Requirements
The minimum PC specification is:
•A Pentium Class processor 300MHz, with 128 MB RAM, 150 MB hard drive space
•A 4x CD-ROM drive
•Windows 98SE, ME, 2000 or XP
•Microsoft Internet Explorer 5.0 or later, Netscape Navigator, or other windows compatible Internet browser application
•SVGA or higher resolution monitor (minimum resolution 800 x 600).
Audio System Requirements
Any audio system (amplifier, VCR, DVD, etc.) with an auxiliary (AUX) input.
1
User Guide
Network Requirements
The SMCWAA-G can communicate with your home network using TCP-IP over either an IEEE802.11b/g wireless link or a hard-wired Ethernet link. The network must provide:
•Internet access
(used to listen to Internet radio stations and online music tracks) and
•Communication between the SMCWAA-G and at least one PC, running a UPnP server application, such as Musicmatch (used to play music from the PC’s hard disk).
If one PC provides both Musicmatch and Internet connectivity, it will be necessary to enable Internet Connection Sharing (see Windows Help for instructions) or to install a local Proxy Server on the PC.
Two typical network configurations are shown below:
Wireless LAN Connection
Notes:
1.In the wireless mode, the SMCWAA-G must communicate with an Access Point (AP) or wireless router in Infrastructure Mode.
Please consult your AP/Router documentation for information on system setup.
2.The AP may also integrate Network Router and/or DSL/Cable Modem functions.
2
SMCWAA-G EZ-Stream™ 802.11g
Wireless Audio Adapter
Wired Ethernet Connection
Contents of the Box
Check that the box contains all the following items:
•1 SMCWAA-G wireless audio adapter
•1 SMCWAA-G EZ-Stream™ 802.11g Wireless Audio Adapter Quick Install Guide
•1 audio connector cable (twin RCA connectors at both ends)
•1 Ethernet cable
•1 power supply unit with integrated cable
•1 infra-red remote control, plus two AAA batteries
•An installation CD, which you can use to install:
•the Musicmatch PC jukebox
•the Rhapsody online music service
•Acrobat Reader (needed to view the User Guide on-screen)
•the SMCWAA-G PC Utility and
•this User Guide, in PDF format.
3

User Guide
Using the Remote Control
The table below describes the functions of all the keys on the remote control in all three operating modes:-
Key |
Select and Play Modes |
Configuration & Edit Modes |
|
|
|
Standby on/off (short press). Restart SMCWAA-G (press and hold)
|
Information button (see Note 1): switch between Play and Select screens |
||
|
|
Enter numbers and text: |
|
|
Hotkeys for selecting stored favorites 0 - 9 |
Repeated presses of the ‘2’ key |
|
|
will scroll through ‘2’,’a’, ‘b’, ‘c’, |
||
|
|
||
|
|
‘A’, ‘B’ and ‘C’. |
|
|
Store current station/track as a PRESET. |
Inactive |
|
|
Press, then press required number key |
||
|
|
||
+ |
Increase Volume |
Toggle upper/lower case |
|
|
PLAYLIST: Open Select Menu for Dynamic Favorites list |
||
- |
Decrease Volume |
Toggle Insert/Replace modes |
|
and |
Scroll Up / Down (see Note 2) to highlight previous/next menu item |
||
Press and hold for fast scroll |
|||
|
|||
|
Return to previous, higher level menu |
||
|
Go to Home Menu |
||
|
Select highlighted menu item |
||
|
Add or remove current station/track to/from the Dynamic Playlist) |
||
|
JUMP TO function - see page 6 |
||
|
Skip back through track, album or playlist |
Backspace (delete last character) |
|
|
Play selected station/track, or Pause currently playing station/track |
||
|
Skip forward through track (press and hold), or |
||
|
skip tracks in album or playlist (press and release) |
||
|
Switch off sound. Press again to switch sound on again |
||
|
Stop Play |
|
|
|
REPEAT track (press once) |
||
|
Repeat all tracks in album or playlist (press twice) |
||
O K |
Used to select an item (same function as ) |
||
|
1Open Configuration Menu |
||
The SMCWAA-G Remote Control |
SHUFFLE-play current album/playlist |
||
|
Note: Gray shading denotes key is inactive in Configuration Mode |
||
Note 1) If pressed while editing, a screen appears asking if you want to Discard Changes. ‘No’ returns to Edit mode,‘Yes’ performs the normal function of the button.
Note 2) These keys can be used to scroll through all characters in Edit mode, but the keypad is usually a quicker method.
4

SMCWAA-G EZ-Stream™ 802.11g
Wireless Audio Adapter
Understanding the Operating Modes and Screen Displays
Your SMCWAA-G has three operating modes and four main LCD screen layouts, as follows:
Operating Modes
Browse Mode (Home Menu)
Browse Mode is the normal startup mode of the SMCWAA-G. Here, you can browse your locally stored tracks, as well as tracks and radio stations on the Internet, and select what you want to hear.
Note: the SMCWAA-G will start in Configuration Mode (Configuration Wizard) if it has problems in connecting to the network.
Play Mode
The Play Mode has its own screen display, but the SMCWAA-G can carry on playing while you work in Browse Mode or Configuration Mode, to select your next track or to change system settings.
Configuration Mode
This mode must be used when you first install your SMCWAA-G, but you will only ever need it again if you want to change any of the stored system settings.
Basic use of the Configuration Mode is described in Configuring the SMCWAA-G on page 10. For the full range of configuration capabilities, see Configuration Mode Menus on page 23.
Screen Layouts
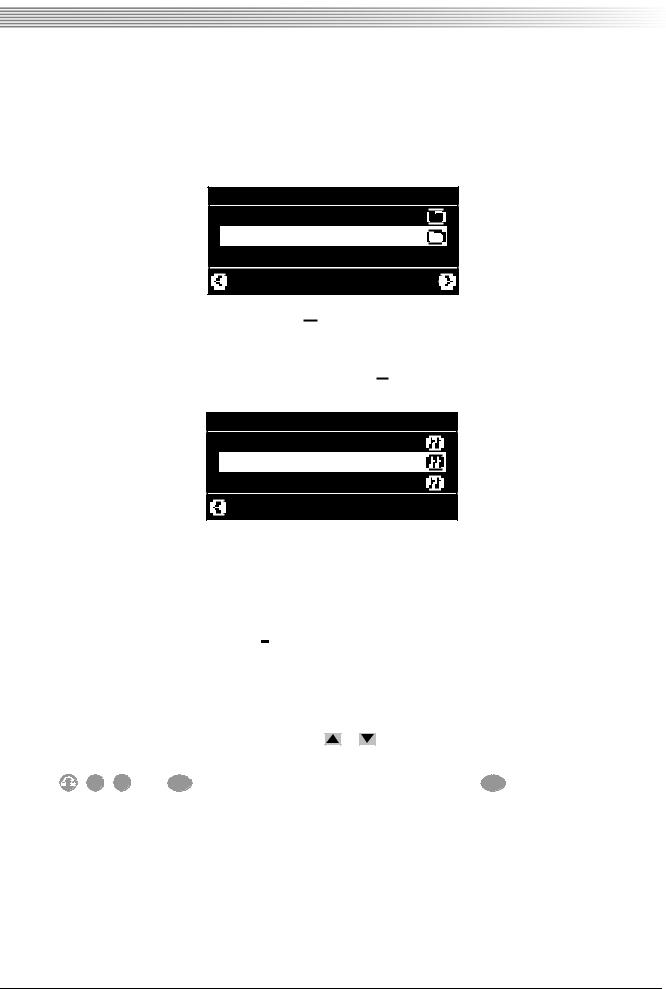
Select Screens (Home Menu)
The SMCWAA-G normally starts in Browse Mode, showing the Home Menu, which is a Select Screen. To return to the
Browse Mode at any time, simply press the HOME key ( ) once. A typical Home Menu may look like this:
S M C W A A - G
M u s i c m a t c h ( M y P C )
D y n a m i c P l a y l i s t
I n t e r n e t R a d i o
2 / 5
At the top is the Screen Title. For the Home Menu, this is the Device Name, in this case SMCWAA-G. You can change this name in the Configuration Mode.
Beneath the top line is a number of menu items. In the Home Menu, each item represents a different audio source. The Type
Icons on the right, in this case  , represent folders, each containing further items. If there are more than three menu items, you can scroll up or down to see the full list. The numbers in the center bottom of the display (2 / 5 in the example above) show the number of the highlighted item and the total number of items in the current menu.
Note: Some item types, such as Musicmatch, Rhapsody and Windows Media Connect, may be available from more than one PC on the network. To avoid confusion, the Network Name of the PC is included with the item name. In this example, Musicmatch (MyPC) is a Musicmatch library stored the machine called MyPC.
Note: The computer name can be changed using the Windows Control Panel.
To select from any menu, press the 
 or
or 
 key to highlight the item you want. The

 icon at the bottom right of the screen means you can now press O K or
  to select the item.
5
User Guide
The name of the selected folder (in this case, Internet Radio) becomes the Screen Title of the next screen, which may look like this:
I n t e r n e t R a d i o
M y F a v o r i t e s
G e n r e s
2 / 2
This is almost the same as the Home Menu, but now the 
 icon appears on the left, which means you can use the
  key to go back to the previous (in this case, Home) menu screen.
From this screen, if you choose Genre, then choose Big Band from the next screen, all the available Big Band stations will be
listed and the Type Icon will change to the Radio Station/Playlist icon, 

 , like this:
B i g B a n d
K C E A
R a d i o N o s t a l g i a
S t a y T u n e d A m e r i c a
2 / 3
The new screen title is Big Band, there are now three stations to choose from and Radio Nostalgia is highlighted.
If you now press the  (Play/Pause) button, Radio Nostalgia will start playing.
You can use the same method to browse albums and tracks in Musicmatch, Rhapsody or Windows Media Connect.
Notes:
1.The Type Icon for a single track is like this: 

 .
.
2.If the 

 Type Icon appears, this means you are not allowed to use this audio source, and you will need a password to unlock it.
FINDING ITEMS IN LONG MENUS |
|
|
For faster scrolling through a long menu, press-and-hold the |
or |
key. |
To search for items by initial letter, use the JUMP TO function. For example, to jump to the first item beginning with a ‘b’ (or
‘B’), press |
, 2 , 2 , then O K . Part or whole words can be entered before pressing O K , to narrow the search. |
Play Screens
While playing music, the screen shows the current date and time at the top, plus information about the music being played.
Note: The Date, Time, Time Zone and Date/Time display formats can all be set in the Configuration Mode)
When listening to an album track, the screen shows how long the track has been playing and its total length, both in minutes and seconds (e.g. 02:17 / 03:45).
When listening to Internet Radio, only the connect time is displayed, in hours, minutes and seconds (e.g. 1:23:15).
6
SMCWAA-G EZ-Stream™ 802.11g
Wireless Audio Adapter
Here is a typical Play Screen display:
0 8 - J u l - 2 0 0 5 1 5 : 0 2
D i g i t a l ly I m p o r t e d M os t ly V i v a l d i – 4 S e a s o n s
0 7 : 2 1
The icons to left and right of the display provide information about the network connection and the audio buffer level respectively. The left-hand icon shows the signal strength as a vertical bar, when using a wireless LAN connection, or is just the word LAN, if the SMCWAA-G is using wired ethernet. The buffer icon normally shows a full-height bar, indicating a full buffer. The height of the bar may vary, but if it falls to zero, the connection will be lost, and you will have to connect again. This should never happen with local sources (networked PCs), but some Internet Radio stations can be unreliable.
Notes:
1.Any station, album or track information that will not fit in the display width will scroll horizontally.
2.If scrolling stops, you can start it again by pressing the INFO key ( ) twice.
While the station is playing, the play icon ( ) is displayed, At any time, you can press the
  button to pause a track, or mute a radio station. The pause icon (||) is then shown, until you press the
  button again or stop the track/station. To stop a track, or disconnect a radio station, either press the stop key (
 ) or select a new track/station.
You can adjust the playback volume with the increase ( + ) and decrease ( - ) keys. A horizontal bar display shows the volume level as you are changing it, and returns a few seconds later to the Play Screen. You can switch the sound off, without
pausing a track or disconnecting a radio station, by pressing the Mute ( ) button. Press the Mute button again to switch the sound on again.
Press the INFO key ( ) to return to last Select Screen, where you can prepare your next track or station, or press
  to start again at the Home Menu. The current track/station will continue to play until the end, or until you select something else
(or change the active Profile). Press  at any time to return to the Play Screen.
Note: For more features you can use while playing music, see Listening to Music on page 12.
Configuration Screens
When first powered up, and whenever you press the SYSTEM key ( ), the SMCWAA-G enters the Configuration Mode. The top level Configuration Menu looks like this:
C o n f i g u r a t i o n
D e v i c e S t a t u s
I n t e r n e t R a d i o
C o n f i g u r a t i o n W i z a r d
2 / 7
This mode uses Select screens in the same way as the Browse Mode. When an item is selected for reconfiguration, its
name becomes the title of the next menu screen and the 

 icon appears on the left, to show that you can return to the previous menu by pressing the
  key.
key.
7
User Guide
In Configuration Mode, Type Icons are only used after an item to show whether it is enabled ([*]) or disabled ([ ]). If you select such an item (by pressing O K or  ), you will be able to change its status and make any other settings required by the new status. Sometimes you will have to select Yes or No from another menu screen, then return by pressing
  .
.
Edit Screens
The Edit Screen is used seen in the Configuration Mode.
The keypad on the remote control is used to enter text and numbers, and an icon under the text shows where the next character will be inserted.
Editing is rather like sending a text message on a mobile phone. For example, repeated presses of the ‘2’ key, will scroll through ‘2’, ‘a’, ‘b’, ‘c’, ‘A’, ‘B’ and ‘C’, so you will need to press three times to enter a ‘b’ (or six times for ‘B’). After a pause of about 1 second, the icon moves right for you to enter the next character.
Special characters can be entered by repeated presses of the ‘0’ and ‘1’ keys, as follows:
0 |
0 |
* |
# |
_ (underscore) |
~ |
1 |
1 . |
, |
? ! |
- (hyphen) & |
<SPACE> |
The  key moves the icon left, one character at a time, so you can go back and insert characters. If you make a mistake, use the
  key to delete the character before the icon.
If you press  when the icon is at the beginning of the line, this will cancel the edit, and return you to the previous screen.
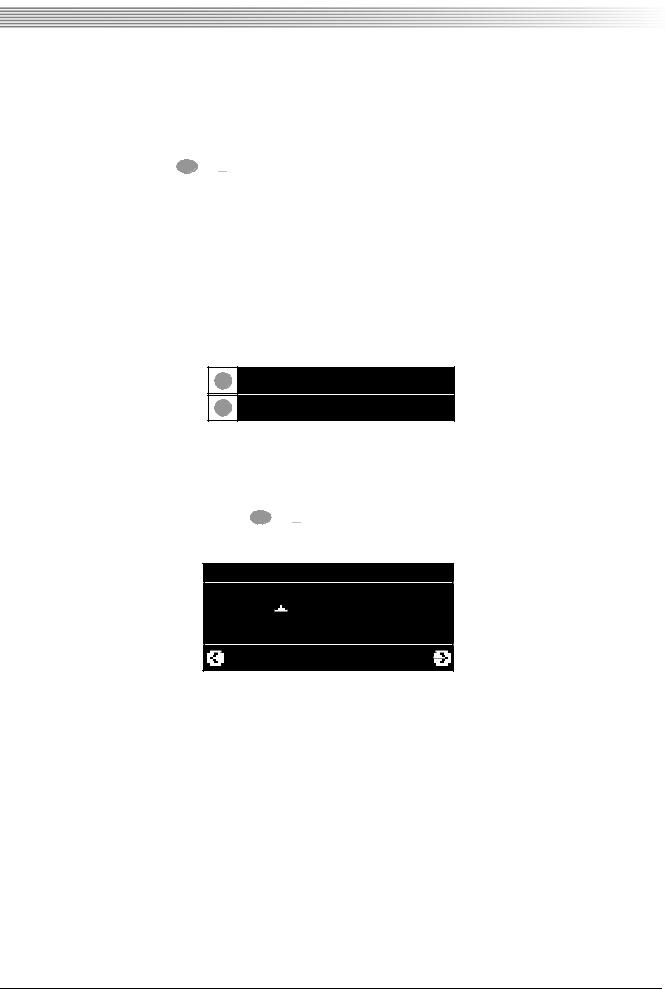
When you have finished editing the line, press O K or  , to accept the entry and move to the next screen. This is a typical Edit Screen, where the Device Name is being edited.
C h a n g e
S M C W A
C a n c e l |
O K |
Other Screens
Other screens may appear sometimes, to tell you what is happening. Some examples are actions that may take a few seconds, such as saving settings, connecting to a radio station or restarting the device.
If an action is taking some time to complete, a rotating wheel icon ( ) will appear at the bottom of the screen.
Note: These displays are all temporary and are not interactive.
Installing the SMCWAA-G
Essential Information and System Setup
Check the following before you start installing the SMCWAA-G:
•If your wireless network uses encryption, you will need to know the WEP or WPA encryption key
•If you use a firewall, check it is correctly configured for the SMCWAA-G (see Firewall Settings on page 19)
8
Loading...