


s
mobile
Issued by
Information and Communication mobile
Haidenauplatz 1
D-81667 Munich
Gigaset SL 740
© Siemens AG 2004
All rights reserved. Subject to availability.
Rights of modification reserved.
Siemens Aktiengesellschaft
www.siemens-mobile.com
COMMUNICATION FOR LIVING.
Handset at a glance
16 |
|
|
|
|
1 |
||
|
|
|
|
||||
|
|
|
|
|
|
||
|
|
|
|
|
|
||
Ð |
V |
2 |
|||||
|
|||||||
INT 1
20.07.04 09:45
§§Camera§§ §§§§§MMS§§§§
15 |
|
|
|
|
|
|
|
|
|
|
|
|
|
|
3 |
|||||
|
|
|
|
|
|
|
|
|
|
|
|
|
|
|
|
|
||||
|
|
|
|
|
|
|
|
|
|
|
|
|
|
|
|
|
|
|
|
|
|
|
|
|
|
|
|
|
|
|
|
|
|
|
|
|
|
|
|
|
|
|
|
|
|
|
|
|
|
|
|
|
|
|
|
|
|
|
|
|
|
|
14 |
|
|
|
|
|
|
|
|
|
|
|
|
|
|
|
|
4 |
|||
|
|
|
|
|
|
|
|
|
|
|
|
|
|
|
|
|||||
|
|
|
|
|
|
|
|
|
|
|
|
|
|
|
||||||
13 |
|
|
|
|
|
|
|
|
|
|
|
|
|
|
|
5 |
||||
|
|
|
|
|
|
|
|
|
|
|
|
|
|
|
||||||
12 |
|
|
|
|
|
|
|
|
|
|
|
|
|
|
|
|
|
|
|
|
|
|
|
|
|
|
|
|
|
|
|
|
|
|
|
|
|
|
|
|
|
11 |
|
|
|
|
|
|
|
|
|
|
|
|
|
|
|
|
6 |
|||
|
|
|
|
|
|
|
|
|
|
|
|
|
|
|
|
|
|
|
||
10 |
|
|
|
|
|
|
|
|
|
|
|
|
|
|
|
|
7 |
|||
|
|
|
|
|
|
|
|
|
|
|
|
|
|
|
|
|||||
9 |
|
|
|
|
|
|
|
|
|
|
|
|
|
|
|
|
|
|
|
|
|
|
|
|
|
|
|
|
|
|
|
|
|
|
|
|
|
|
|
|
|
8
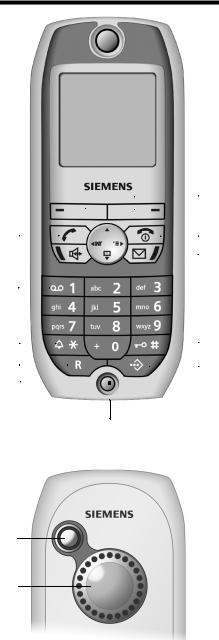
Back panel
1
2
Handset at a glance
1.Display (screen) in idle status (depending on the base station)
2.Charge status of the battery
=eVU(flat to full)
=flashes: battery is almost flat/is charging
3.Display keys (see page 8)
4.End call key, On/Off key
End call, cancel function, one menu level back (short press), back to idle status (long press), handset on/off (long press in idle status)
5.Message key
Access to calls and messages lists, flashes: new message or call
6.Hash key
Keypad lock on/off (hold down)
7.Speed dial list key
Open speed dial list
8.Socket for headset and PC interface
9.Microphone
10.Recall key
Initiate enquiry call (short press), Insert a dial pause (long press)
11.Star key
Ringer on/off (long press),
Toggle between upper/lower case and digits
12.Key 1
Select network mailbox (the answering machine in your network) (press and hold in idle status)
13.Handsfree key
Switch from "earpiece" to handsfree mode; Lights up: handsfree is activated; Flashes: incoming call, automatic last number redial
14.Talk key
Answer a call, switch from handsfree to earpiece mode, open last number redial list (short press), start dialling (long press)
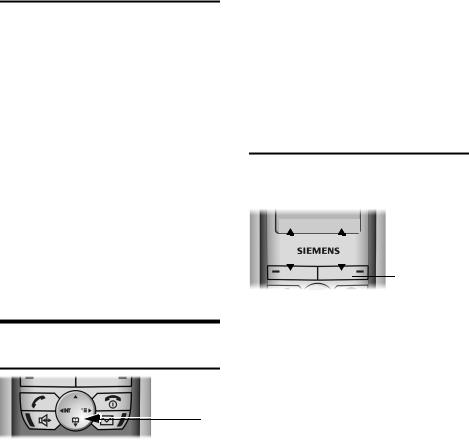
15.Control key (see page 8)
16.Signal strength
ÐiÑÒ(high to low) |flashes: no reception
Back panel:
1.Camera lens
2.Loudspeaker
1
Contents
Contents
Handset at a glance . . . . . . . . . . . 1 Safety precautions . . . . . . . . . . . . 4
Gigaset SL740 –
More than just a telephone . . . . . 5
Preparing to use the
telephone . . . . . . . . . . . . . . . . . . . 5
Installing the base station
and charger . . . . . . . . . . . . . . . . . . . . . 5 Range and signal strength . . . . . . . . . . 5 Connecting the base station . . . . . . . . 5 Preparing to use the handset . . . . . . . . 6 Activating/deactivating the handset . . 7 Activating/deactivating keypad protection . . . . . . . . . . . . . . . . . . . . . . . 7 Setting the date and time . . . . . . . . . . 8
Operating the telephone . . . . . . . 8
Control key . . . . . . . . . . . . . . . . . . . . . . 8 Display keys . . . . . . . . . . . . . . . . . . . . . 8 Return to idle status . . . . . . . . . . . . . . . 9 Notes on the operating instructions . . 9
Making calls . . . . . . . . . . . . . . . . 10
Making an external call . . . . . . . . . . . 10 Ending calls . . . . . . . . . . . . . . . . . . . . 10 Accepting a call . . . . . . . . . . . . . . . . . 10 Calling Line Identification . . . . . . . . . 10 Handsfree . . . . . . . . . . . . . . . . . . . . . . 11 Muting . . . . . . . . . . . . . . . . . . . . . . . . 11
Using the directory and lists . . 12
Directory and speed dial list . . . . . . . . 12 Email directory . . . . . . . . . . . . . . . . . . 15 Display available memory . . . . . . . . . 15 Last number redial list . . . . . . . . . . . . 16 Opening lists with the
message key . . . . . . . . . . . . . . . . . . . . 16
Making cost-effective calls . . . . 19
Linking a call-by-call number with a phone number . . . . . . . . . . . . . . . . . . 19 Automatic network provider
preselection . . . . . . . . . . . . . . . . . . . . 19 Viewing the duration of a call
and call charges . . . . . . . . . . . . . . . . . 20
SMS (text messages) . . . . . . . . . 21
Writing/sending text messages |
. . . . . 21 |
Receiving an SMS . . . . . . . . . . . |
. . . . . 23 |
Notification by SMS . . . . . . . . . |
. . . . . 25 |
SMS mailboxes . . . . . . . . . . . . . |
. . . . . 25 |
Using data in the attachment . . |
. . . . . 26 |
SMS info services . . . . . . . . . . . |
. . . . . 27 |
Text messages to PABXs . . . . . . . |
. . . . 28 |
SMS error handling . . . . . . . . . . . |
. . . . 28 |
MMS . . . . . . . . . . . . . . . . . . . . . . . 30
Writing/sending MMS messages . . . . . 30 Lists . . . . . . . . . . . . . . . . . . . . . . . . . . . 32 Receiving and viewing MMS
messages . . . . . . . . . . . . . . . . . . . . . . 33 Activating/setting up an
MMS centre . . . . . . . . . . . . . . . . . . . . . 34
File Manager . . . . . . . . . . . . . . . . 36
Editing entries . . . . . . . . . . . . . . . . . . . 36 Pictures . . . . . . . . . . . . . . . . . . . . . . . . 37 Sounds . . . . . . . . . . . . . . . . . . . . . . . . 37 Texts . . . . . . . . . . . . . . . . . . . . . . . . . . 38 Memory . . . . . . . . . . . . . . . . . . . . . . . . 38
Using the integrated camera . . . 39
Taking photographs . . . . . . . . . . . . . . 39 Changing settings . . . . . . . . . . . . . . . . 39
Operating more than
one handset . . . . . . . . . . . . . . . . . 40
Registering handsets . . . . . . . . . . . . . . 40 De-registering handsets . . . . . . . . . . . 40 Looking for a handset ("Paging") . . . . 40 Changing the base station . . . . . . . . . 41 Making an internal call . . . . . . . . . . . . 41 Internal listening in on an
external call . . . . . . . . . . . . . . . . . . . . . 42 Changing the name of a handset . . . 42 Changing a handset's internal
number . . . . . . . . . . . . . . . . . . . . . . . . 42 Using a handset as a room monitor . . 43 Setting the Walk and Talk mode . . . . . 44
2
Handset settings . . . . . . . . . . . . . 46
Changing the display language . . . . . 46 Setting the display . . . . . . . . . . . . . . . 46 Displaying a logo . . . . . . . . . . . . . . . . 46 Setting night mode . . . . . . . . . . . . . . 46 Activating/ deactivating
Auto Answer . . . . . . . . . . . . . . . . . . . . 47 Adjusting the loudspeaker volume . . 47 Changing the ringer tone . . . . . . . . . . 47 First ring muting off/on . . . . . . . . . . . 49 Recording sounds . . . . . . . . . . . . . . . . 49 Activating/deactivating
advisory tones . . . . . . . . . . . . . . . . . . 49 Setting the alarm clock . . . . . . . . . . . 50 Setting appointments . . . . . . . . . . . . 50 Displaying missed appointments,
and anniversaries . . . . . . . . . . . . . . . . 51 Restoring the handset to
factory settings . . . . . . . . . . . . . . . . . . 51
Base station settings . . . . . . . . . 51
Protection against unauthorised
access . . . . . . . . . . . . . . . . . . . . . . . . . 51 Emergency numbers . . . . . . . . . . . . . 52 Changing the name of the base
station . . . . . . . . . . . . . . . . . . . . . . . . 53 Repeater support . . . . . . . . . . . . . . . . 53 Restoring the base station to
factory settings . . . . . . . . . . . . . . . . . . 53
Connecting the base station
to a PABX . . . . . . . . . . . . . . . . . . . 54
Dialling modes and flash times . . . . . 54 Storing the access code
(outside line code) . . . . . . . . . . . . . . . 54 Setting pauses . . . . . . . . . . . . . . . . . . 55 Switching temporarily to tone
dialling (DTMF) . . . . . . . . . . . . . . . . . . 55
Appendix . . . . . . . . . . . . . . . . . . . 56
Care . . . . . . . . . . . . . . . . . . . . . . . . . . 56 Contact with liquid . . . . . . . . . . . . . . . 56 Questions and Answers . . . . . . . . . . . 56 Service (Customer Care) . . . . . . . . . . 57 Specifications . . . . . . . . . . . . . . . . . . . 58 Factory settings . . . . . . . . . . . . . . . . . 58 PC Interface . . . . . . . . . . . . . . . . . . . . 59 "Balloon Shooter" game . . . . . . . . . . . 59 Writing and editing text . . . . . . . . . . . 60
Contents
Menu Tree . . . . . . . . . . . . . . . . . . 62
Main menu . . . . . . . . . . . . . . . . . . . . . |
62 |
Accessories . . . . . . . . . . . . . . . . . 66
Index . . . . . . . . . . . . . . . . . . . . . . 69
3
Safety precautions
Safety precautions
Caution:
Before use, please read the safety precautions and operating instructions.
Explain their contents and the risks involved in using the telephone to your children.
$
‹ Œ
ƒ
Only use the power supply unit supplied as indicated on the underside of the base station/charger.
Use only the rechargeable battery recommended (p. 58) ! Never use conventional batteries (non-rechargeable) or other rechargeable battery types as this may cause significant damage to health and property.
Insert the rechargeable battery in accordance with the polarity symbols and use the battery type recommended in these operating instructions.
The operation of medical appliances may be affected. Be aware of the technical conditions within the particular environment (e.g. doctor's practice).
The handset may cause an intrusive hum in hearing aids.
Do not install the base station in bathrooms or shower rooms. The handset and base station are not watertight (p. 56).
Drivers must not use their phones while driving without a handsfree car kit (Walk and Talk function). Make sure it cannot be switched on accidentally.
Switch off your phone while on board an aircraft (Walk and Talk function). Ensure that it cannot be switched on again accidentally.
Do not use the phone in environments subject to explosion hazard (e.g. auto paint shops).
If you give your Gigaset to someone else, make sure you also give them the operating manual.
Dispose of the batteries and phone in accordance with environmental regulations.
Note: Not all of the functions described in these instructions are available in all countries.
4
Gigaset SL740 –
More than just a telephone
With your Gigaset SL740 you not only have an integrated digital camera and the ability to send and receive MMS messages via the fixed network (p. 30); your telephone can do much, much more:
uLink photographs and directory entries
– and put a face to the caller (p. 14).
uRecord your favourite melody with the handset and design your own personal ringer tone (p. 49).
uYou can mark the directory entries of particularly important callers as VIP – then you can tell by the melody who is phoning (p. 13).
uSave appointments (p. 50) and birthdays (p. 14) in your telephone – it will remind you in good time.
Have fun with your new telephone!
Preparing to use the telephone
The pack contains:
u one Gigaset SL740 base station, u one handset Gigaset SL74,
u one power supply unit, u one data cable,
u one telephone cord,
u one rechargeable battery, u one battery cover,
u one charger (incl. power supply unit), u one set of operating instructions.
Gigaset SL740 – More than just a telephone
Installing the base station and charger
The base station and charger are designed to be operated in enclosed, dry areas at temperatures ranging from +5 °C to
+45 °C. Install the base station in a central location in your home.
Please note:
uNever expose the telephone to: heat sources, direct sunlight or other electrical appliances.
uProtect your Gigaset from moisture, dust, corrosive liquids and vapours.
Range and signal strength
Range:
u outdoors: approx. 300 m u indoors: approx. 50 m
Signal strength:
The signal strength display shows the quality of the radio contact between the base station and the handset
u good to low: Ð i Ñ Ò u no reception: |flashes
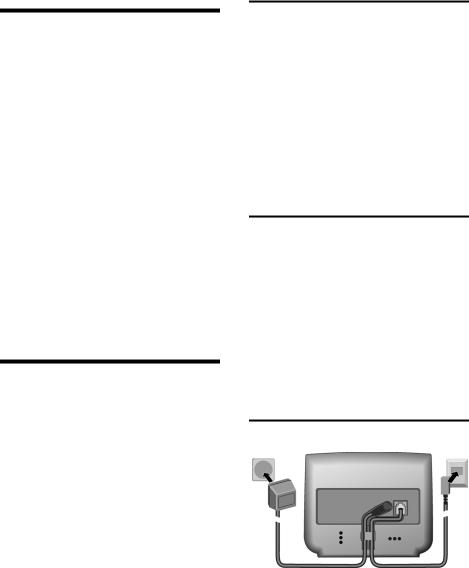
Connecting the base station
Back of the base station Gigaset SL740
2 |
1 |
1.Phone jack with phone cord
2.Power supply unit 230 V
Connect both as shown above and place cord in the cable recess.
5
Preparing to use the telephone
Please remember:
uKeep the power supply unit plugged in at all times to ensure your phone is ready for use whenever you need it.
uIf ever you purchase a phone cord from a store, ensure that the phone conductors are correctly connected (3-4 connection).
Internal phone jack connections:
3 |
|
|
|
|
4 |
1 |
unassigned |
||||
|
|
|
|
|
|
|
|||||
2 |
|
|
|
|
|
|
|
|
5 |
2 |
unassigned |
1 |
|
|
|
|
|
|
|
|
6 |
3 |
a |
|
|
|
|
|
|
|
|
||||
|
|
|
|
|
|
|
|
|
|
4 |
b |
|
|
|
|
|
|
|
|
|
|
5 |
unassigned |
|
|
|
|
|
|
|
|
|
|
||
|
|
|
|
|
|
|
|
|
|
6 |
unassigned |
|
|
|
|
|
|
|
|
|
|
||
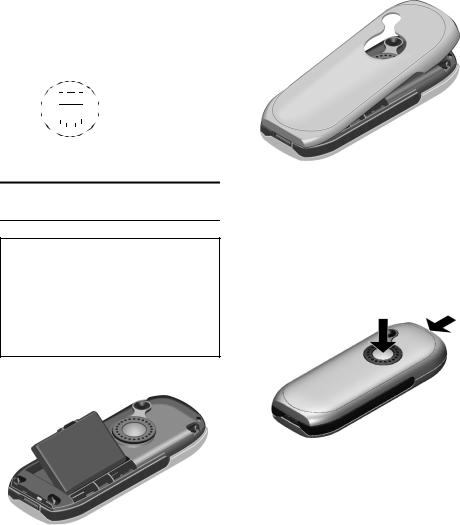
Preparing to use the handset
Inserting the battery
Caution:
Use only the rechargeable battery recommended by Siemens on page 58! Never use conventional batteries (nonrechargeable) or other types of rechargeable battery as this may cause significant damage to health and property. For example, the jacket of the battery could be destroyed or the battery could explode. The phone could also malfunction or be damaged.
1.Insert the battery the right way round and make sure it sits properly.
2.Position the battery cover at a slight angle and slide it with the two lower lugs into the case. Then push the cover towards the camera until it closes with a click.
Opening the battery cover
1.Hold the handset with the keypad facing down.
2.Place the thumb of the other hand on the mirror near the loudspeaker (a) and with the index finger of the same hand press the grooved area on the handset (b).
a b
3. Lift the cover.
6

Placing the handset in the charger to charge the battery
1.Plug the power supply unit into your power socket.
2.Place the handset in the charger unit with the display up.
The handset is already registered with the base station. The screen shows INT 1. It has internal number 1 and internal name INT 1. You can change the name (p. 42).
If Base Search or Please Register appears in the display, you will have to register the handset manually (page 40). You can get help from the table on page 56.
Now leave the handset in the charger for the battery to charge.
Battery charging is indicated in the top right of the display by changes in the level indicator on the battery icon =. During use, the battery symbol shows the battery level (see page 1).
First charging and discharging of the battery:
The battery charging status is correctly displayed only after uninterrupted charging and discharging.
For the initial charge we recommend leaving the handset in the charger continuously for five hours. Then remove the handset from the charger and do not recharge it until the battery is completely flat.
After initial charging and discharging, you can replace your handset in the charger after each call.
Please note:
uYou must always repeat this procedure when you remove the battery from the handset and replace it again.
uThe battery heats up during charging. This is normal and not dangerous.
uAfter a while the charge capacity of the battery will decrease for technical reasons.
Preparing to use the telephone
Your telephone is now ready for use.
To correctly record the time of incoming for example, you must now set the date and time (p. 8).
To register additional handsets, refer to page 40.
To ensure your Gigaset is always completely up to date…
You can download firmware updates from the Internet.
Do the following:
uUse the data cable supplied with the pack to connect the PC to the handset.
uOn the Internet, go to http://www.sie- mens-mobile.com/gigasetsl740 and click on the link "Service downloads".
uThen load the firmware update to your handset.
Activating/deactivating the handset
aHold down the end call key to switch the handset on or off. You will hear the confirmation tone.
The handset activates automatically when placed in the charger.
The display is illuminated. You can switch off display illumination, page 46.
Activating/deactivating keypad protection
Activating the keypad lock:
# Press the hash key and hold down.
You will hear the confirmation tone and the symbol Øwill appear in the display.
Caution:
When the keypad lock is active, you cannot call emergency numbers.
7
Operating the telephone
Deactivating the keypad lock:
#Hold down again.
The key lock deactivates automatically if someone calls you. It re-activates when the call is finished.
Setting the date and time
You will find information on operating the telephone and the keys from page 8.
v¢Ð ¢Date/Time
~In the Date: line, enter the day/ month/year (6-digit format).
s |
Scroll to the Time: line. |
~Enter the hours/mintues (4-digit format), e.g. Q M15for 7:15 am.
s |
Scroll to the Time Mode: line. |
rChoose between 12-hour - and 24-hour mode. In 12-hour mode you can scroll to the Time: line and then use the display key am/pm to switch between am and pm.
Save |
Press the display key. |
Operating the telephone
Control key
In these operating instructions, the side (top, bottom, right, left) of the control key you have to press in each situation is shown in black (vfor right).
The control key has the following functions:
In handset idle status:
s |
Open directory. |
v |
Open menu. |
u |
Open list of handsets. |
In lists and menus:
t/ s Scroll up/down.
vConfirm the selected entry (same as OK).
uGo back one menu level, or cancel.
In an input field:
Use the control key to move the cursor up t, downs, right vor leftu.
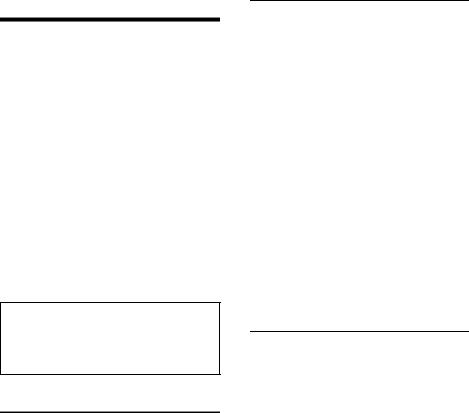
Display keys
The functions of the display keys change depending on the operating situation. Example:
§Camera§ |
§§MMS§ |
|
1 |
||
|
|||||
|
|
|
|
|
|
|
|
|
|
|
|
|
|
|
|
|
|
2
1.Current display key functions are shown in the bottom display line.
2.Display keys
The most important display icons are:
•Open the last number redial list.
¨Open the main menu or a context-sensitive menu.
WDelete key: Delete input from right to left.
ÎGo back one menu level, or cancel.
ΠOpen email directory.
ÒOpen directory.
ÓCopy a number to the directory.
8

Return to idle status
Reverting to idle status from anywhere in the menu:
uPress the end call key aand hold down or
uPress no key: The display automatically reverts to the idle status after 2 minutes.
Changes which you have not confirmed/ stored by pressing OK, Yes, Save, Send or Save Entry OK will be rejected.
The display in idle status is shown on page 1.
Notes on the operating instructions
The following symbols are used in these operating instructions:
Copy Entry/Copy List
Choose one of the two menu functions (the slash / means "or").
~Enter numbers or letters.
Save |
The current functions for the |
|
display keys are shown reverse |
|
highlighted and are offered in |
|
the bottom display line. Press |
|
the display key underneath to |
|
launch the function. |
qPress the top or bottom of the control key (scroll up or down).
rPress the right or left side of the control key (e. g. select setting).
c/Q/ *etc.
Press the handset key shown.
Operating the telephone
The operating instructions show the steps you have to take in abbreviated form. This is shown below using "Handsfree Volume setting" as an example:
|
|
|
v¢ï |
|
(1.) |
Handset Volume |
(2.) |
|
|
Select and press OK . |
|
r |
Select volume. |
(3.) |
Save |
Press the display key. |
(4.) |
aLong press (idle status). (5.)
1.With the handset in idle status, press on the right of the control key to open the main menu.
Use the control key to move to the ï icon. This is done by pressing the appropriate arrow on the control key.
Audio Settings appears on the top line of the screen. Confirm the selection by pressing the display key OK. You will see the Audio Settings menu.
2.Press the bottom of the control key repeatedly until the menu function Handset Volume is selected, and confirm the selection with OK.
3.Press the left (quieter) or right (louder) side of the control key to select the required volume.
4.Press the display key under Save to apply the change.
5.Press and hold the end call key to return to the idle status.
9
Making calls
Making calls
Making an external call
External calls are calls using the public telephone network.
~c Enter the phone number and press the talk key.
or
c~ Hold down the talk key c and then enter the phone number.
You can cancel the dialling operation with the end call key a.
Ending calls
a Press the end call key.
Accepting a call
An incoming call is indicated in three ways on the handset: by ringing, a display on the screen and the flashing handsfree key d.
You can accept the call by:
u pressing the talk key cor
upressing display key Accept (external call) or
u pressing the handsfree key d.
If the handset is in the charger and the Auto Answer function has been activated (page 47), you can accept a call by removing the handset from the charger.
If the ringer is disturbing, press the display key Silence. You can take the call so long as it is displayed on the screen.
Calling Line Identification
When you get a call, you will see the caller's number and/or name displayed on the screen, if the following conditions have been met:
uYour network provider supports CLIP, CLI and CNIP.
CLI (Calling Line Identification): The caller's telephone number is transmitted
CLIP (Calling Line Identification Presentation): The caller's telephone number is displayed
CNIP (Calling Name Identification Presentation): The caller's name is displayed
uYou have requested CLIP, CLI or CNIP from your network provider.
uThe caller has requested CLI from his or her network provider.
Screen display with CLIP/CLI
When you get a call, you will see the caller's number displayed on the screen. If you have stored this number in your directory, then the name of that entry will be displayed. If a picture is stored for the name in the directory, this is also shown (p. 14). The ringer symbol is no longer visible.
Å1
1234567890 |
|
2 |
|
Accept Silence
1.Ringer symbol
2.Telephone number or name
Instead of the number you will see:
uExternal if the telephone number is not identified.
uWithheld if the caller withholds his or her number (p. 13).
uUnavailable if he or she has not requested CLI.
10

Screen display with CNIP
If you have CNIP, then the name (town) that is registered with your network provider for the calling number will also be displayed on your handset.
Anna Lechner, Berlin |
|
1 |
||
|
||||
1234567890 |
|
|
2 |
|
|
|
|||
Accept Silence
1 Name and town
2 Telephone number
The screen displays External if the number is not identified.
The screen displays Withheld if the caller withholds his or her number, (p. 13) or Unavailable, if CLI has not been requested.
Handsfree
You should inform your caller that you intend to use the handsfree function before you activate it.
Activating/deactivating handsfree
Activate while dialling:
~d Enter the number and press the handsfree key.
Activate during a call:
Press d (the handsfree key).
Deactivate during a call:
cPress talk key. This switches to "earpiece mode".
If you wish to place the handset in the charger during a call you have to press the handsfree key dand hold it down as you do so.
Making calls
Adjusting the volume while in handsfree mode
d |
Press handsfree key again. |
r |
Select volume. |
Save |
Press the display key. |
Muting
You can switch the handset microphone off. Your caller on the telephone will then hear a wait melody.
During an external call:
u |
Mute the handset. |
”Reactivate the microphone.
11
Using the directory and lists
Using the directory and lists
You can choose from the: u Directory,
u Speed dial list, u Email directory,
u Last number redial list, u SMS list,
u MMS list, u Caller list,
u Answering machine list.
You can save a total of up to 200 entries in the directory, speed dial list and email directory (number depends on the size of the individual entries).
You create the directory, email directory, and speed dial list for your individual handset. You can however send the lists/ entries to other handsets (p. 13).
Note:
–For how to enter names, refer to page 60.
–The EATONI predictive text function helps you to write names and email addresses see page 61.
Directory and speed dial list
You can use the telephone directory to store numbers and the corresponding names. You open the directory in idle status using the skey.
You can use the speed dial list to manage your call-by-call numbers of network providers and other important numbers. You can assign speed dial digits to entries in the list (p. 12). You can open the speed dial list with the Ckey.
Size of entries:
Number: |
up to 32 digits |
Name: |
up to 16 characters |
Storing a telephone number in the directory
s¢New Entry
~Enter number.
s |
Scroll to the Name line. |
~Enter name.
sScroll to the Annivers.: line if you want to enter an anniversary (see page 14).
sScroll to the Picture line: if you want to assign a picture
(see page 14).
© |
Press the display key. |
Save Entry |
Select and press OK. |
a |
Long press (idle status). |
If the cursor is in the Annivers.: line, you can save the entry with Save.
If your phone is connected to a PABX, please turn to page 54.
Storing a telephone number in the speed dial list
You can assign speed dial digits (digits
0, 2–9) to up to nine entries in your speed dial list. If you hold down the speed dial key and then press then talk key c, the assigned number is dialled immediately. Entries with speed dial digits are at the beginning of the list.
C¢New Entry
~ |
Enter number. |
s |
Scroll to the PublicKey: line. |
~ |
Enter name. |
s |
Scroll to the Enter key: line. |
r |
Select speed dial digit. |
Save |
Press the display key |
a |
Long press (idle status). |
12

Selecting entries in the directory and speed dial list
s/ COpen directory or speed dial list.
You have the following options:
uScroll to the entry, i. e. press the skey until the name you want is selected.
uEnter the first character of the name and then scroll to the name with the s key.
uEnter the first characters of the name until it is selected.
Dialling with the directory/speed dial list
s/ C ¢s(Select entry)
Press the talk key c. The number is dialled.
Managing entries in the directory and speed dial list
s/ C ¢s(Select entry)
Viewing and changing entries:
View |
Press the display key. The |
|
entry is displayed. |
|
Back with OK or: |
Edit |
Press the display key if you |
|
want to change the entry. |
|
Make any changes you want |
|
and save them with © |
a |
¢Save Entry. |
Long press (idle status). |
Using other menu functions: v Open menu.
You can now select the following functions with s:
Display Number
You can change or add to a saved number and then dial or use other functions by pressing ©.
Edit Entry
Change selected entry.
Using the directory and lists
Delete Entry
Delete selected entry.
VIP Entry (directory only)
Mark directory entry as VIP (Very Important Person) and assign it a particular sound (p. 37) as ringer melody. You can then tell who is calling you from the ringer melody.
Precondition: Calling Line Identification.
Copy and Edit (directory only)
So that you do not have to enter a similar entry twice, you can create a copy and then edit the copied entry.
Copy Entry
Send an entry to a handset. See the following section.
Delete List
Delete all entries in the directory and speed dial list.
Copy List
Send a complete list to a handset. See the following section.
Available Memory
Display the number of free entries in the directory, speed dial list and email directory.
Transferring a directory or speed dial list call to another handset
Precondition: Both handsets have been registered to the same base station. The other handset must be able to send and receive directory entries.
s/ C¢
s(Select entry; page 13) ¢v(Open menu)
Copy Entry/Copy List
Select and press OK.
~Enter the internal number of the receiving handset and press OK.
Yes/ No To Copy Entry: Confirm whether you want to send another entry.
13

Using the directory and lists
The successful transfer is confirmed with a message and with the confirmation tone at the receiving handset.
Please remember:
uAssigned pictures and speed dial digits are not transferred.
uEntries with identical numbers are not overwritten.
uThe transfer is cancelled if the phone rings or if the memory of the receiving handset is full.
Adding a displayed number to the directory
You can add numbers to the directory that are displayed in a list, e.g. the calls list, in an SMS or MMS text module, or during a call.
If you have CNIP, the first 16 characters of the name are also added to the Name line.
A number is displayed: v¢Copy to Directory
Complete the entry. See page 12.
Adding a number from the directory
Open the directory with sor ©
¢Directory. Select an entry and press OK.
Storing an anniversary in the directory
You can store an anniversary for every number in the telephone directory. You can enter a time for the reminder call for that anniversary.
s ¢s(Select entry; page 13)
View |
Press the display key. |
Edit |
Press the display key. |
s |
Scroll to the Annivers.: line. |
Edit |
Press the display key. |
~In the Date: line, enter the day/ month (4-digit).
s |
Scroll to the Time: line. |
~Enter the hours/minutes (4-digit) for the reminder call.
s |
Scroll to the Prompt: line. |
rSelect the type of indication. For sounds from the File Manager you have to enter the time for the reminder call. For optical indication, the time entry is optional.
OK |
Press the display key. |
Save |
Press the display key. |
a |
Long press (idle status). |
Deleting anniversaries:
Open the directory entry and scroll to the Annivers.: line. Then press the following display keys: Edit, Delete and Save.
Anniversary reminder call:
A reminder call with the selected ringer melody is signalled on the handset.
Stop the reminder call with the Silence key.
Linking a picture to a directory entry
Precondition: Calling Line Identification. s ¢s(Select entry; page 13)
View |
Press the display key. |
Edit |
Press the display key. |
s |
Scroll to the Picture line. |
Insert |
Press the display key. |
MyPictures /Images
Select and press OK.
qSelect the picture. When you press View, the picture appears in the display. When you press OK, the picture is applied.
© Press the display key. Save Entry Select and press OK.
The picture is displayed on the screen when that person calls.
14

Deleting picture assignments
Open the directory entry you want to change (p. 13). Scroll to the line Picture .
©Open menu.
Clear Picture
Select and press OK.
The picture is not deleted from the File Manager.
Changing picture assignments
Delete the old picture assignment and assign a new one.
Email directory
You store email addresses in the email directory (e.g. for sending SMS messages to email addresses).
Storing a new email address
s |
Open directory. |
<E-Mail Directory>
Select and press OK.
New Entry
Select and press OK.
~Enter email address.
© |
Press the display key. |
Save Entry |
Select and press OK. |
a |
Long press (idle status). |
During entry you can open the menu with ©and use the following functions:
Insert '.'/Insert '@'
Select and press OK.
Predictive Text
Select and press OK to activate or deactivate the predictive text function (p. 61).
Using the directory and lists
Viewing and changing an email address
s¢<E-Mail Directory>
s |
Select entry. |
View |
Press the display key. The |
|
entry is displayed. |
|
Back with OK or: |
Edit |
Press the display key if you |
|
want to change the entry. |
|
Make any changes you want |
|
and save them with ©Save |
|
Entry OK. |
a |
Long press (idle status). |
Managing entries in the email directory
¢
s¢<E-Mail Directory>
s(Select entry; page 13) ¢v(Open menu)
You can now select the following functions with s:
Edit Entry
Change selected entry.
Delete Entry
Delete selected entry.
Copy and Edit
So that you do not have to enter a similar entry twice, you can create a copy and then edit that entry. Save the changes with © ¢Save Entry.
Delete List
Delete all email address.
Display available memory
s¢s(Select entry) ¢v(Open menu; page 13)
Available Memory
Select and press OK. a Long press (idle status).
Display the number of free entries in the directory, speed dial list and (p. 12) email directory (p. 15).
15

Using the directory and lists
Last number redial list
The last number redial list contains the ten last numbers dialled using the handset. If one of the numbers is in the directory, then the caller's name is displayed.
Manual last number redial
Press the talk key cbriefly.
sc Select entry and press the talk key again.
The number is dialled.
When displaying a name, you can have the respective phone number displayed by using the display key View.
Managing entries in the last number redial list
Press the talk key cbriefly.
s |
Select entry. |
v |
Open menu. |
You can now select the following functions with s:
Automatic Redial
The number is dialled automatically every 20 seconds. The handsfree key flashes. The loudspeaker is activated. If the party answers, press the talk key c. If the call is not answered, ringing stops after about 30 seconds. The function is cancelled after ten failed attempts or if a call is received.
Display Number
You can change or add to a stored number in the last number redial list. Then you dial it or use other functions by pressing ©.
Copy to Directory
Add telephone number to the directory (p. 14).
Delete Entry
Delete selected entry.
Delete List
Delete all entries.
Opening lists with the message key
You can use the message key fto open the following lists:
u MMS list u SMS list
If several mailboxes have been set up, the corresponding lists are displayed.
uNetwork mailbox messages
If your network provider supports this function and the network mailbox is configured for fast access (p. 44).
u Caller list
As soon as there is a new entry in a list, you will hear an advisory tone. The f key flashes.
If there are new entries in several lists and you open at least one of them, the f key no longer flashes when you close the menu.
If there are other new messages/entries, you can reset the message key to "flashing" (p. 17), e. g. to let other users know about the new messages/entries.
Depending on the situation, you can open the following lists using the fkey:
uIf there are no new messages in any of the lists, then all the lists, apart from the MMS list, are offered for your selection.
uIf only one list has new entries, you will see the first new entry in that list.
If the entries are in a personal SMS mailbox, the mailbox is displayed.
uIf several lists have new entries, those lists are offered for your selection.
uIf calls are stored in the network mailbox, you will see a message if the correct setting has been made (refer to the network mailbox operating instructions).
16
Setting the message key to "flashing"
Precondition: There is still at least one new entry in one of the lists.
f Open caller list.
Mark as new
Select and press OK. a Long press (idle status).
Caller list
The numbers of the last 30 incoming calls are stored. Depending on the Calls Settings set, either All Calls or only Missed Calls are stored (page 17).
Several calls from the same number are stored
u more than once when All Calls is set.
uonce (the last call) when Missed Calls is set.
Here is an example of how the calls list appears in the display:
 Number of new entries
Calls List: 01+02 |
|
Number of the old, |
|
|
|
|
|
|
|
|
read entries |
Caller list settings
f¢Calls List: 01+02 ¢v¢Calls
Settings
Missed Calls/All Calls
Select and press OK.
The current setting is marked with ‰.
a Long press (idle status).
Changing the list type does not affect the existing entries in the list.
Using the directory and lists
Opening the callerlist
f Press.
<More Messages>
Select if necessary and
press OK.
Calls List: 01+02
Select and press OK.
q |
Select the entry. |
The last call received is displayed in the calls list.
Example of a list entry:
____ Missed Calls___
New Call |
01/02 |
1234567890
12.07.0309:45
Delete Call
The list entry shows:
u The list type (in the header)
uThe status of the entry New Call : New missed call. Old Call: Already read entry.
Answ. : Call was taken (only with All Calls).
u Serial number of the entry
Example: 01/02 means the first entry of a total of two entries.
u Caller's number or name
How to add the caller's number to the directory is described on page 14.
u Date and time of call
17

Using the directory and lists
Calling back a caller
Precondition: The caller's number has been identified (p. 10).
f¢ Calls List: s
Call
Callback begins at once. The telephone number is entered in the last number redial list.
Deleting an entry
f¢ Calls List:
s Select entry.
Delete Press the display key. a Long press (idle status).
Deleting the caller list
Caution: All old and new entries will be deleted.
f¢ Calls List: ¢v(Open menu)
Delete Calls List
Select and press OK. a Long press (idle status).
18

Making cost-effective calls
Sign up with a network provider who offers particularly low-cost call rates (call- by-call) or view the call charges on the handset after you make a call. You can use the speed dial list (p. 12) to manage your call-by-call numbers.
Linking a call-by-call number with a phone number
This function can be used to put a network provider's prefix in front of the telephone number ("linking").
C |
Open the network access list. |
s |
Select entry. |
©Press the display key.
Display Number
Select and press OK.
~Enter number.
You can also dial a number from the directory (p. 13).
cPress the talk key. The number is dialled.
Automatic network provider preselection
You can use two lists to specify a call-by- call number (preselection number) that will be automatically placed in front of certain numbers when you dial them:
uList with preselection: In this list you specify the prefixes or the first digits of prefixes with which you wish the preselection number to be used.
uList without preselection: In this list you specify the "exception to the rule". The "rule" is what you specified in the "list with preselection".
Making cost-effective calls
Example:
You have entered "08" in the preselection list. All numbers beginning with 08 will be dialled automatically with the preselection number.
Entering "081" in the list without preselection restricts the above rule. Numbers with 081 are now a specific subgroup of the 08 numbers. All 081 numbers will be dialled without preselection.
Storing a preselection number
¢ ¢ ¢
¢Preselect. No.
~Enter or change the preselection number.v Ð Base Preselection
©Press the display key.
Save Entry Select and press OK. The entry is stored.
a Long press (idle status).
Saving/changing entries in the preselection lists
Each of the two lists can hold 11 entries: u 5 entries with up to 6 digits, and
u 6 entries with up to 2 digits.
Depending on the particular country, the list "with preselection" may already contain preset numbers. This means, for example, that all national calls or calls into the mobile phone network will be automatically linked to the call-by-call number which you have previously stored.
v¢Ð¢Base ¢Preselection
With Preselect/Without Presel.
Select and press OK.
s |
Select entry. |
Edit |
Press the display key. |
~Enter or change first digits of the number.
©Press the display key.
19
Making cost-effective calls
Save Entry Select and press OK. The entry is stored.
a Long press (idle status).
Dialling with and without preselection (automatic call-by-call number)
When you press the talk/handsfree key the first digits of the number you have dialled are compared with both lists:
uIf they match none of the entries on either list or if they match an entry on the list "without preselection", no call- by-call number will be placed in front of them. Not even if the first digits of the number also match an entry in the list "with preselection".
uIf the first digits only match an entry in the list "with preselection", the call-by- call number will be placed in front of the number you are dialling.
Temporarily cancelling preselection
c(long press) ¢v¢Aut Preselct off
If you want to permanently deactivate the preselection function, delete the number saved.
Viewing the duration of a call and call charges
The call duration and charges display depends on whether you have requested call metering pulses to be sent to your phone:
uYou have not requested call metering pulses to be sent: The duration of a call is displayed automatically.
uYou have requested call metering pulses to be sent: The units of a call is displayed. The call charge is displayed if you have set the charge per unit and the currency.
Setting the charge per unit and the currency
v¢í¢Call Charges ¢Settings
~In the Cost per Unit: line, enter
the charge per unit.
Example: QQQL for 6 cents.
s |
Scroll to the Currency: line. |
~Enter the currency.
Example: Press the display key 1three times for â
(p. 60).
Save |
Press the display key. |
a |
Long press (idle status). |
Previously stored call charges are deleted if the cost per unit is changed.
Viewing/deleting call charges
v¢í¢Call Charges
q Select entry and press OK. You have the following options:
Last Call
View the charges for the last call.
All Calls
View the charges for calls on all handsets.
Per Handset
View the charges for calls per handset.
20

SMS (text messages)
Your telephone is supplied ready for sending text messages.
Requirements:
uCalling Line Identification is enabled for your phone line.
uYour network supplier supports SMS text messaging within the fixed network (your network provider can give you information about this).
uYou are registered with your service provider for sending/receiving text messages.
Text messages are exchanged between SMS centres that are operated by service providers. You have to enter the SMS centre for sending and receiving text messages in your telephone. You can receive text messages from all of the SMS centres entered if you are registered with your service provider.
Your text message is sent through the SMS centre that is entered as the Service Centr.1 (send service centre). However, you can activate any other SMS centre as the active send service centre to send a current message (p. 27). Note that the next text message you write will be sent automatically through SMS Centre No. 1 again.
How to enter text is described from page 60. The EATONI (p. 60) predictive
text feature helps you write your message
Rules
uA text message can be up to 612 characters long.
uIf your text is longer than 160 characters or you send large picture data, it will be sent as a linked message (up to four messages with 153 characters each).
Please remember:
uWhen the SMS function is active the first ring is suppressed.
SMS (text messages)
u No network blocks must be set.
uIf your phone is connected to a PABX, please turn to page 28.
uTo receive text messages you must be registered with your service provider.
Writing/sending text messages
Writing/sending text messages v¢î¢SMS
¢(Mailbox, mailbox-PIN)
Mailbox 1 If necessary, select a mailbox and press OK.
~If required, enter the PIN and press OK.
Write Message
Select and press OK.
~Write text message.
© |
Press the display key. |
Send |
Select and press OK. |
SMS Select and press OK.
s/ ~ Enter or select number from the directory. Enter the number with prefix (even in the same area). Sending a text message to an SMS mailbox: Add mailbox ID to the end of the telephone number.
©Press the display key.
Send Select and press OK. The message is sent.
Note:
If a call arrives while you are writing a message, then the message is automatically saved to the draft message list.
21

SMS (text messages)
Selecting the input language v¢î¢SMS
Write Message
Select and press OK.
©Press the display key.
Select Language
Select and press OK.
sSelect an input language that uses the Roman character set (e.g. Deutsch or English) and press OK.
Press the end call key abriefly to return to the text area.
The setting of the input language only applies to the current text message.
Inserting standard text, pictures, sounds or email address in a text message
There are:
u3 Text templates: I am late, Let's meet, Congratulations,
u 15 pictures (icons) u 10 sounds,
uemail addresses from your email directory (p. 15).
You are writing a text message (p. 21).
©Press the display key.
Insert Template/Insert Icon /Insert Sound/
Insert e-mail Adr.
Select and press OK.
sSelect standard text, picture, sound or e-mail address and press OK.
Draft message list
You can save a text message in the draft message list so that you can edit and send it later on.
Saving a text message in the draft messages list
You are writing a text message (p. 21). © Press the display key.
Save Entry Select and press OK.
Opening the draft message list, reading or deleting text message
v¢î¢SMS
¢(Mailbox, mailbox-PIN)
Outgoing Select and press OK. The first entry in the list is displayed, for example
|
_____Outgoing ____ |
|
|
Saved |
01/02 |
|
1234567890 |
|
|
12.07.03 |
09:45 |
|
Delete |
Read |
01/02: Serial number/total number of SMS |
||
q |
Select text message in the list. |
|
Read Press the display key. The text is displayed. Press sto scroll line by line.
or:
Delete Press the display key. The text message is deleted.
Writing/editing text messages
You are writing a text message. v Open menu.
You can choose one of the following:
Write Message
Write new text message and then send (p. 21) or save it.
Use Text
You can edit the text of the saved message and then send it (p. 21).
Deleting the draft message list
¢ ¢
¢(Mailbox, mailbox-PIN)
¢Outgoing
vOpen menu.v î SMS
Delete Calls List
Select, press OK and confirm with Yes. The list is deleted.
a Long press (idle status).
22
 Loading...