


28.10.96 |
1054TIT.FM |
Gigaset 1054: A30852-X954-B101-1-7619 |
s
Operating Instructions
Note:
Please read these instructions, with their safety precautions, before using this equipment!
Gigaset 1054
Cordless Digital DECT Telephone System
8 mobile units can be connected
2 non-cordless terminals can be connected

28.10.96 |
1054TIT.FM |
Gigaset 1054: A30852-X954-B101-1-7619 |
|
|
|
|
|
|
|
|
|
|
|
|
|
|
|
|
|
U5

28.10.96 |
1054K10.IVZ |
Gigaset 1054, GBR.: A30852-X954-B101-1-7619 |
Table of Contents |
|
Introduction |
|
Overview Figures |
|
Important Tips |
|
Safety Precautions ...................................................................................................................... |
6 |
CE Mark of Approval and Certification for the Main Connection and Telephone Systems ......... |
6 |
Putting Into Service |
|
Important Information ................................................................................................................. |
7 |
New Features for Telephone Service .......................................................................................... |
7 |
Step by Step Instructions ............................................................................................................ |
8 |
System Code ............................................................................................................................... |
8 |
Base Station Gigaset 1054 |
|
Contents of Package ................................................................................................................... |
9 |
Special Accessories ..................................................................................................................... |
9 |
Tips for the Most Advantageous Installation of the Base Station ............................................. |
10 |
Mounting / Connecting the Base Station .................................................................................. |
11 |
Connection Options at the Base Station ................................................................................... |
13 |
Status of the Base Station Upon Delivery ................................................................................. |
13 |
Mobile Unit |
|
Tips for Individuals with Hearing Aids ....................................................................................... |
14 |
Installing and Charging the Rechargeable Batteries .................................................................. |
14 |
Mounting the Carrying Clip on the Mobile Unit ......................................................................... |
15 |
Important Tips for Using the Rechargeable Batteries ............................................................... |
15 |
Standard Mobile Unit |
|
Displays ..................................................................................................................................... |
16 |
ON OFF, LOCK Status .............................................................................................................. |
17 |
Switching the Status ................................................................................................................. |
18 |
Registering a Standard Mobile Unit at the Base Station ........................................................... |
19 |
Viewing and Setting the Dialing Mode ...................................................................................... |
20 |
Comfort Mobile Unit |
|
Display ....................................................................................................................................... |
21 |
ON, OFF, LOCK Status .............................................................................................................. |
22 |
Switching the Status ................................................................................................................. |
23 |
Registering the Comfort Mobile Unit at a Base Station ............................................................ |
24 |
Viewing Your Own Internal Number ........................................................................................ |
25 |
Viewing and Setting the Dialing Mode ...................................................................................... |
26 |
Non-Cordless Devices |
|
Connection Jacks ...................................................................................................................... |
27 |
Connecting Telephones ............................................................................................................. |
27 |
Connecting Non-Cordless Devices (other than telephones) ...................................................... |
27 |
Examples of Connections for Door Interphones via TFE (entrance telephone) ......................... |
28 |
1

28.10.96 |
1054K10.IVZ |
Gigaset 1054, GBR.: A30852-X954-B101-1-7619 |
Table of Contents |
|
Operation with Standard Mobile Unit |
|
Standard Settings |
|
Saving / Changing the System Code ......................................................................................... |
30 |
Enter / Change Mobile Unit PIN ................................................................................................ |
31 |
Setting Tone Ring of the Mobile Unit ........................................................................................ |
32 |
Activate / Deactivate Automatic Line Seizure ............................................................................ |
33 |
Activate / Deactivate Automatic Call Pickup .............................................................................. |
33 |
Activate / Deactivate Call Pickup ............................................................................................... |
34 |
Incoming Calls |
|
Accept/Terminate Calls .............................................................................................................. |
35 |
Call Pickup ................................................................................................................................. |
36 |
Answer Call Waiting During an Internal Call .............................................................................. |
37 |
Answer Call Waiting During an External Call ............................................................................. |
37 |
Outgoing Calls |
|
External Dialing, Using Dialpad .................................................................................................. |
38 |
Using the Dialpad for External Dialing as En-Bloc Dialing .......................................................... |
39 |
Number Redial ........................................................................................................................... |
40 |
Number Redial as En-Bloc Dialing ............................................................................................. |
40 |
Internal Call to Another Mobile Unit or Auxiliary Device ............................................................ |
41 |
Internal Dialing with Collective Call ........................................................................................... |
41 |
Dialing Speed Dial Numbers ...................................................................................................... |
42 |
During the Call |
|
Placing a Call on Hold ................................................................................................................ |
43 |
Setting the Handset Volume ...................................................................................................... |
44 |
Mute Feature ............................................................................................................................. |
44 |
Temporary Switch to Tone Dialing ............................................................................................ |
45 |
Speed Dial |
|
Speed Dial Numbers: Storing, Viewing or Changing ................................................................. |
46 |
Delete Speed Dial Numbers ...................................................................................................... |
47 |
Switching Features |
|
Consultation / Transfer Call ........................................................................................................ |
48 |
Internal Consultation ................................................................................................................. |
48 |
External Consultation ................................................................................................................ |
49 |
Toggle ........................................................................................................................................ |
50 |
3-Way Conference ..................................................................................................................... |
51 |
Activate Internal Call Forwarding ............................................................................................... |
52 |
Deactivate Internal Call Forwarding ........................................................................................... |
52 |
Connection with the Door Interphone ....................................................................................... |
53 |
Call Charges, Call Length |
|
Display of Call Length: Activate / Deactivate ............................................................................. |
54 |
Activate / Deactivate Display of Call Charge or Call Charge Unit ............................................... |
55 |
Call Charge Display of Previous Call: Activate / Deactivate ....................................................... |
56 |
Call Charge Factor: Viewing or Setting ...................................................................................... |
56 |
Call Charge Totals per Internal Station: View / Delete ............................................................... |
57 |
Call Charge Totals per Telephone Line: View / Delete ............................................................... |
58 |
2

28.10.96 |
1054K10.IVZ |
Gigaset 1054, GBR.: A30852-X954-B101-1-7619 |
Table of Contents |
|
Lock |
|
Lock for Outgoing Calls (System Lock): Activate / Deactivate ................................................... |
59 |
Emergency Numbers: Store / View ........................................................................................... |
60 |
Delete Emergency Numbers ..................................................................................................... |
60 |
Barred Numbers: Store .............................................................................................................. |
61 |
Activate / Deactivate Barred Numbers ...................................................................................... |
62 |
Delete Barred Numbers ............................................................................................................. |
62 |
Set Class of Service for the Internal Stations ............................................................................ |
63 |
Locking the Mobile Unit / Activate Hotline ................................................................................ |
64 |
Hotline Number: View / Delete / Store ...................................................................................... |
65 |
Dial Hotline Number .................................................................................................................. |
66 |
Unlock Mobile Unit .................................................................................................................... |
66 |
System Settings |
|
Set the Connection Configuration for Internal Stations ............................................................. |
67 |
Ring Allocation for External Calls ............................................................................................... |
68 |
Ring Allocation: Enter or Change Collective Call Group ............................................................. |
69 |
Ring Allocation: Enter or Change Group Call ............................................................................. |
70 |
Ring Allocation: Enter or Change Number of Ring Cycles for Group Call ................................... |
71 |
Ring Allocation for the Door Interphone .................................................................................... |
72 |
Cancel registration Mobile Unit ................................................................................................. |
72 |
Resetting the Base Station to the Status at Initialization ........................................................... |
73 |
Mobile Unit Settings |
|
Advisory and Alarm Tones: Activate / Deactivate ....................................................................... |
74 |
Resetting the Mobile Unit to Initialization Status ...................................................................... |
76 |
Operation with Comfort Mobile Unit |
|
Using the Menu |
|
Using the Dialog Keys ................................................................................................................ |
77 |
Using the Menu .......................................................................................................................... |
77 |
The Entire Menu ......................................................................................................................... |
77 |
Menu Structure for System Settings ......................................................................................... |
78 |
Status-Dependent Menus ......................................................................................................... |
79 |
Standard Settings |
|
Enter / Change System Code .................................................................................................... |
80 |
Set Dialog Language ................................................................................................................. |
81 |
Set Tone Ringing for Mobile Unit ............................................................................................... |
81 |
Enter / Change Mobile Unit PIN ................................................................................................ |
82 |
Activate / Deactivate Call Pickup ............................................................................................... |
83 |
Activate / Deactivate Automatic Line Seizure ............................................................................ |
84 |
Mobile Unit Settings .................................................................................................................. |
85 |
Incoming Calls |
|
Accept / Terminate Call .............................................................................................................. |
86 |
Call Pickup ................................................................................................................................. |
87 |
Answer Call Waiting During an Internal Call .............................................................................. |
88 |
Answer a Call Waiting During an External Call .......................................................................... |
88 |
3

28.10.96 |
1054K10.IVZ |
Gigaset 1054, GBR.: A30852-X954-B101-1-7619 |
Table of Contents |
|
Outgoing Calls |
|
External Dialing with Dialpad ..................................................................................................... |
89 |
External En-Bloc Dialing with Dialpad ........................................................................................ |
91 |
Number Redial ........................................................................................................................... |
92 |
Number Redial as En-Bloc Dialing ............................................................................................. |
92 |
Internal Dialing to Another Mobile Unit or Auxiliary Device ....................................................... |
93 |
Dialing from the Telephone Book .............................................................................................. |
94 |
During the Call |
|
Call on Hold ............................................................................................................................... |
95 |
Temporary Switchover to Tone Dialing ..................................................................................... |
96 |
Change Handset Volume ........................................................................................................... |
97 |
Mute Function ........................................................................................................................... |
97 |
Telephone Book |
|
Entering Names and Characters ................................................................................................ |
98 |
Dialing Convenience with the Telephone Book ......................................................................... |
99 |
Switching Functions |
|
Internal Consultation / Transfer of Call .................................................................................... |
101 |
External Consultation / Transfer Call ....................................................................................... |
102 |
Toggle ...................................................................................................................................... |
103 |
3-Way Conference ................................................................................................................... |
104 |
Activate/ Deactivate Internal Call Forwarding ........................................................................... |
105 |
Connection to the Door Interphone .......................................................................................... |
106 |
Charges, Call Length |
|
Display of Charges / Display of Call Length .............................................................................. |
107 |
Activate and Deactivate Call Length and Call Charge Display / Set the Unit Cost .................... |
108 |
Lock |
|
Lock to Prevent Outgoing Calls / Emergency Numbers ........................................................... |
110 |
Enter, View, Delete Restricted Numbers / Activate or Deactivate Lock ................................... |
111 |
Delete All Barred Numbers ....................................................................................................... |
112 |
Set the COS for Internal Stations ............................................................................................. |
113 |
Lock Mobile Unit /Change Hotline Number / Mobile Unit PIN ................................................ |
114 |
Cancel Registration of Mobile Unit Lock (Unlock) ................................................................... |
114 |
System Settings |
|
First Steps for System Settings ................................................................................................ |
115 |
Set Connection Configuration for Internal Stations .................................................................. |
116 |
Resetting the Base Station to the Status at Initialization .......................................................... |
117 |
Ring Allocation for External Calls .............................................................................................. |
118 |
Set / Change Ring Allocation and Ring Cycles .......................................................................... |
119 |
Ring Allocation for the Door Interphone ................................................................................... |
120 |
Cancel Registration for Mobile Unit .......................................................................................... |
121 |
Mobile Unit Settings |
|
Activate / Deactivate Advisory and Alarm Tones ...................................................................... |
122 |
Operation with Auxiliary Device |
|
Outgoing Calls |
|
General ..................................................................................................................................... |
123 |
External Dialing with Digit Dialpad ........................................................................................... |
123 |
Internal Dialing to Another Mobile Unit or Auxiliary Device ...................................................... |
123 |
Temporary Switchover to Tone Dialing ..................................................................................... |
124 |
4

28.10.96 |
1054K10.IVZ |
Gigaset 1054, GBR.: A30852-X954-B101-1-7619 |
Table of Contents |
|
Incoming Calls |
|
Call Pickup ................................................................................................................................ |
125 |
Answer Call Waiting ................................................................................................................. |
125 |
Switching Functions |
|
Set Internal Call Forwarding ..................................................................................................... |
126 |
Deactivate Internal Call Forwarding .......................................................................................... |
126 |
Placing a Call on Hold ............................................................................................................... |
126 |
Consultation / Transferring a Call .............................................................................................. |
127 |
Toggle ....................................................................................................................................... |
128 |
3-Way Conference .................................................................................................................... |
128 |
Connection with the Door Interphone ...................................................................................... |
129 |
Multicell System |
|
General Information .................................................................................................................. |
130 |
Standard Mobile Unit |
|
Registering the Standard Mobile Unit on Multiple Base Stations ............................................ |
131 |
Base Station Selection, Automatic / Manual / Combined ......................................................... |
132 |
Activate / Deactivate the Base Station Number ....................................................................... |
133 |
Comfort Mobile Unit |
|
Register Comfort Mobile Unit on Multiple Base Stations ........................................................ |
134 |
Base Stations Selection: Automatic / Manual / Combined ....................................................... |
136 |
Operation on Telephone Systems |
|
Standard Mobile Unit |
|
General Information .................................................................................................................. |
137 |
Enter Trunk Code (AKZ) ........................................................................................................... |
137 |
Enter Main Trunk Code (HAKZ) ................................................................................................ |
138 |
Change Length of Timeout after AKZ / HAKZ .......................................................................... |
139 |
Deleting AKZ and HAKZ ........................................................................................................... |
140 |
Set / Change Time for Flash ..................................................................................................... |
141 |
Comfort Mobile Unit |
|
General Information .................................................................................................................. |
142 |
Enter the Trunk Code (AKZ) ..................................................................................................... |
142 |
Using the Features |
|
Activating Features of the Telephone System .......................................................................... |
143 |
Acoustic Signalling |
|
Signal Tones ............................................................................................................................. |
145 |
General Information |
|
Taking Care of the System ....................................................................................................... |
146 |
Technical Data .......................................................................................................................... |
146 |
Leaving the Radio Range ......................................................................................................... |
146 |
Tips for Troubleshooting ........................................................................................................... |
147 |
Warranty ................................................................................................................................... |
148 |
Contact Partners ...................................................................................................................... |
148 |
Connection Configuration ......................................................................................................... |
149 |
Glossary .................................................................................................................................. |
150 |
Quick Reference Operating Instructions - Standard Mobile Unit ..................................... |
155 |
Quick Reference Operating Instructions - Comfort Mobile Unit ...................................... |
158 |
Quick Reference Operating Instructions - Auxiliary Device .............................................. |
161 |
5

28.10.96 |
1054K10.IVZ |
Gigaset 1054, GBR.: A30852-X954-B101-1-7619 |
Table of Contents
6

28.10.96 |
1054K01.FM |
Gigaset 1054,GBR: A30852-X954-B101-1-7619 |
Introduction
About this Device
With the purchase of Gigaset 1054, you have selected a cordless system which combines the advantages of “unrestricted freedom of telephoning” with the convenience of a first rate telecommunications system.
This device is equipped with modern digital technology based on the latest European standards for cordless telephones (DECT and GAP). The DECT technology offers, among other things, a high level of security against unauthorized eavesdropping within the radio cell as well as good digital voice quality. In addition, it enables the simple expansion of the Gigaset 1054 basic configuration -- for example one base station, two mobile units -- to a telephone system which can be used to place external and internal calls. Mobile units of the Gigaset 1000 series and upward can be operated on Gigaset 1054.
Gigaset 1054 can be used for both private and professional purposes, for example in office buildings and small companies. In addition to the usual telephone functions, it offers, among other things:
●Direct dial to the mobile units or auxiliary devices
●2 simultaneous external calls
●Operation of 8 mobile units and 2 non-cordless auxiliary devices on one base station
●No-charge internal calls among 6 mobile units
●Simultaneous use of a maximum of 6 cordless devices
●Coding of transmissions between mobile unit and base station
●Operation of a mobile unit on up to 4 base stations, thus expanding the radio range within which you can place and receive calls.
About the Operating Instructions
You can install and connect your Gigaset 1054 yourself. To do so, please read the chapter “Putting Into Service.”
The device is pre-set in the factory so that, after putting the base station and mobile unit into service, you can begin using the telephone without making any additional settings.
Information about operation of the telephone can be found in the sections:
–Operation with Gigaset 1000 S standard mobile unit
–Operation with Gigaset 1000 C comfort mobile unit
–Operation with non-cordless auxiliary devices.
The other chapters of the operating instructions deal with the special functions and the expansion of Gigaset 1054.
We recommend that you read these additional chapters in order to acquaint yourself fully with the capabilities of your Gigaset 1054.
At the end of the operating instructions, you will find a capsulated version of the instructions, including the most important functions. The table of contents and index are provided to help you find functions, system settings and other information expeditiously.
3
U2
28.10.96 |
1054K01.FM |
Gigaset 1054, GBR: A30852-X954-B101-1-7619 |
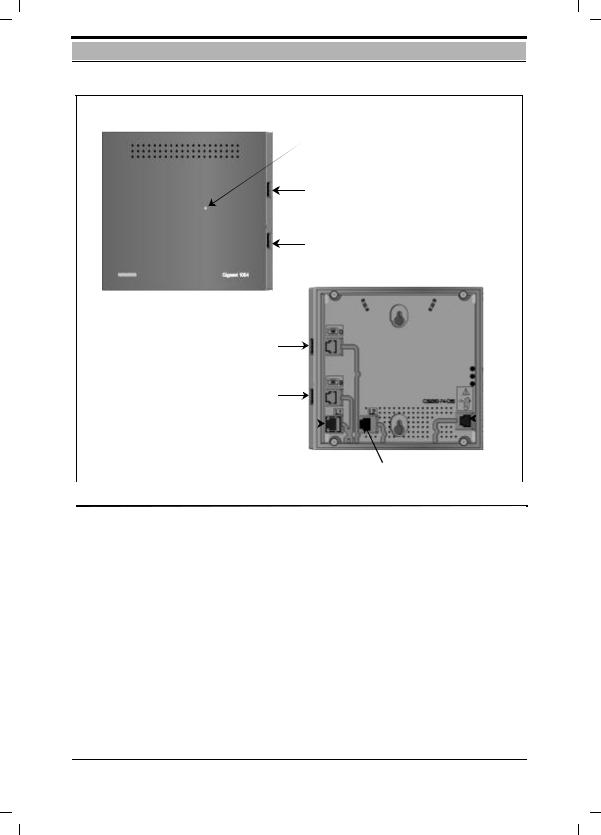
Overview Figures
Front of Gigaset 1054
 A
A
B
C
Rear of Gigaset 1054
B
C
|
|
|
|
|
|
F |
|
|
|
|
|
|
|
|
D |
|
|
|
||
|
|
|
|
|
||
|
|
|
|
E |
||
|
|
|
|
|
||
Front |
|
|
|
Rear |
||
|
|
|
||||
A Registration Key: |
|
B |
Non-cordless auxiliary device |
|||
to register the |
|
|
with the telephone number 0 |
|||
mobile units |
|
|
|
|
|
|
- blinks during registration |
|
C |
Non-cordless auxiliary device |
|||
|
|
|
with the telephone number 9 |
|||
-is lit when plug-in power |
|
D Connection jack for |
||||
supply is connected |
|
|
telephone line 1 |
|||
Lamp is identical to the |
|
E |
Connection jack for |
|||
the registration key! |
|
|
telephone line 2 |
|||
|
|
F |
Connection jack for plug-in power |
|||
|
|
|
supply C39280-Z4-C65 |
|||
|
|
|
|
|
|
|
4
U4
28.10.96 |
1054K01.FM |
Gigaset 1054,GBR: A30852-X954-B101-1-7619 |
Overview Figures
Standard Mobile Unit 1000S
Front View |
Rear |
14
15
Carry clip
11
Comfort Mobile Unit 1000C
Front View |
Rear |
14
15
Carry clip
Legend
1Handset
2Screen
3Repeat dial key
4Memory key
5Speed dial key
6Dialpad
7Internal key
8Signal key
9ON/OFF/LOCK key
10Seize key
11Microphone
12Star key
13Pound key
14Tone ringing loudspeaker
15Battery compartment / cover
Legend
1Handset
2Screen (illuminated)
3Dialog key
4Dialog key
5Menu key
6Dialpad (alphanumeric)
7Internal key
8Signal key
9ON/OFF/LOCK key
10Seize key
11Microphone
12Star key
13Pound key
14Tone ringing loudspeaker
15Battery compartment/ cover
5
U3
28.10.96 |
1054K01.FM |
Gigaset 1054, GBR: A30852-X954-B101-1-7619 |
Important Tips
Safety Precautions
For your safety and protection, do not use the base station or mobile units in bathrooms or showers (damp areas); the telephones are not waterproof.
Warning
●Use only approved rechargeable Nickel Cadmium batteries (NiCd) (See “Important Information about Using the Battery Cells,” page 15).
Never use other rechargeable battery cells or normal (non-rechargeable) batteries. These might short circuit or destroy the battery casing (dangerous). Follow the instruc-
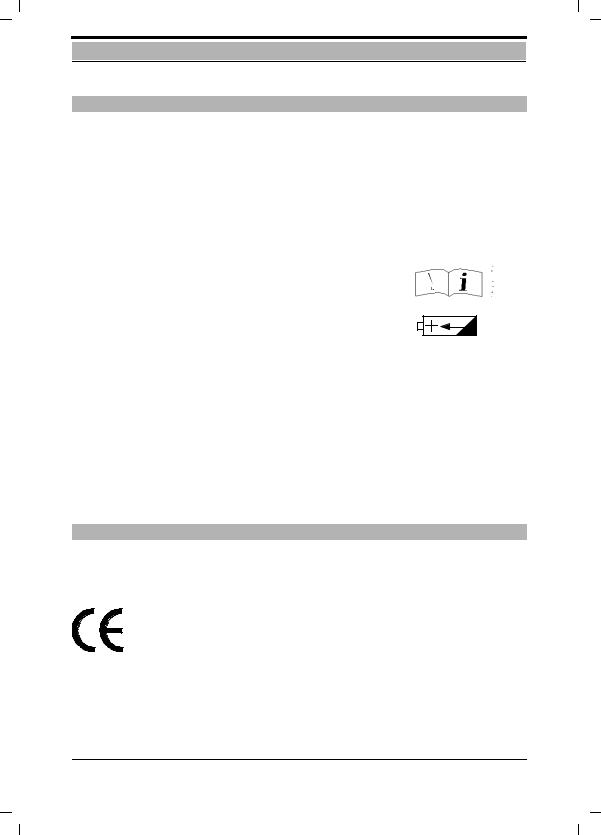
tions found on the labels in the battery compartments of mobile units and charging units. The symbols on these labels state :
– Use only the type listed in the operating instructions
(See chapter “Inserting and Loading the Batteries“, page 14)
+ _
–Use only rechargeable batteries and in the polarity shown.
●Do not immerse batteries in water, and do not expose them to fire.
●Do not dispose of old defective batteries in your normal household trash.
●Batteries become warm while charging; this is normal and does not represent a danger.
●Do not use charging units from other manufacturers, since these could damage the batteries.Supplemental charging units can be ordered from Siemens.
●Use only the AC adapter delivered with your device, bearing the number C 39280-Z4-C65.
●Connected non-cordless auxiliary devices (telephone, fax, door interphone...) which have exposed metal parts might temporarily conduct abnormally high voltage, for instance during an electrical storm, and should not be touched.
●The mobile unit must not be operated in environments where there is danger of explosion.
●CE Mark of Approval and Certification for the Main Connection and Telephone Systems
The Federal Agency for Telecommunication Certification (”Bundesamt für Zulassungen in der Telekommunikation“) has issued the BZT certification for this telephone system. It has been approved in line with the EU Guidelines 91/263/EWG, Telecommunication Devices.
This telephone system fulfills the requirements set forth in the EU Guidelines:
89/336/EWG “Electromagnetic Compatibility“
73/23/EWG “Electrical Resources for Use within Certain Voltage Limitations“
The CE identification mark certifies the device’s conformity with these guidelines.
6

28.10.96 |
1054K01.FM |
Gigaset 1054,GBR: A30852-X954-B101-1-7619 |
Putting Into Service
Important Information
Dialing Mode
The factory setting on your telephone system is for “tone dialing.” In some cases, it might be necessary to change the setting to the old dialing mode of “pulse dialing.”
Instructions on how to determine and set the dialing mode are found on page 20 and on page 25.
Connection Cable
The connection cable included with the device is equipped with the TAE connection plug (TAE = Telephone Adaptor).
If the proper telephone adaptor jack (TAE) is not available at the installation site, it can be ordered from the German Telekom AG.
Use only original Siemens connection cables. Other cables may have a different configuration.
Power Supply Unit
The power supply unit included with the device is necessary for operation of your telephone system.
Telephone Systems
The telephone system is suitable for connection to telephone systems with signal key functions (consultation) “Flash” and “Ground.”
.New Features for Telephone Service
Systems connected to a digital switching exchange of the German Telekom AG have access to a number of new features such as call waiting, call forwarding, lock and others.
If you want to take advantage of these features, please consult the German Telekom AG. Your Gigaset 1054 is equipped to accommodate these features.
7
28.11.96 1054K02.FM Gigaset 1054, GBR: A30852-X954-B101-1-7619
Putting Into Service
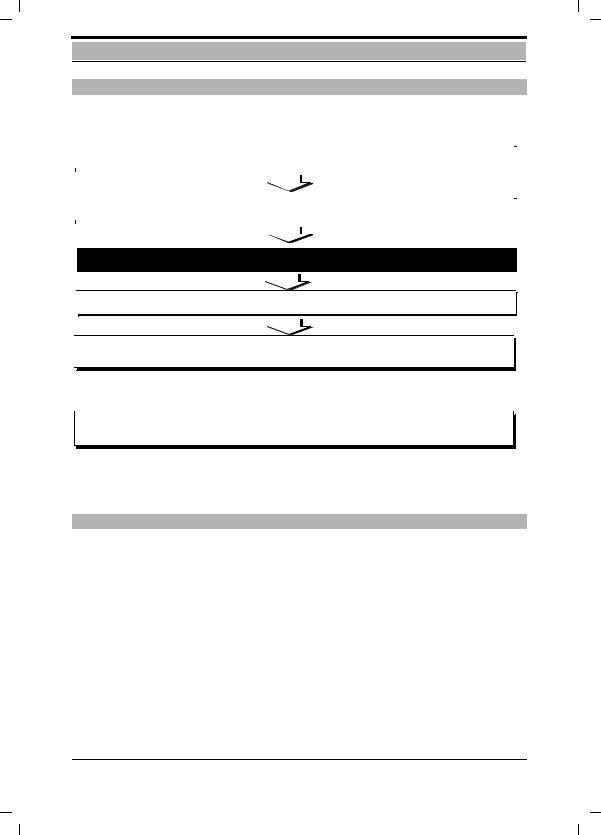
Step by Step Instructions
In order to put the Gigaset 1054 telephone system into service, follow the simple step by step procedure illustrated below :
|
1 |
Read the safety precautions! |
Page 6 |
|
|
||||||
|
|
|
|||||||||
|
|
|
|
|
|
|
|
|
|
|
|
|
|
|
|
|
|
|
|
|
|
|
|
|
|
|
|
|
|
|
|
|
|
|
|
|
|
|
|
|
|
|
|
|
|
|
|
|
2 |
Assemble charging unit and put into service |
Instructions for charging unit |
|
|
||||||
|
|
|
|
|
|
|
|
|
|
|
|
|
|
|
|
|
|
|
|
|
|
|
|
|
|
|
|
|
|
|
|
|
|
|
|
|
|
|
|
|
|
|
|
|
|
|
|
|
3 |
Prepare mobile units for putting into service |
Pages 14 - 15 |
|
|
||||||
|
|
|
|
|
|
|
|
|
|
|
|
|
|
|
|
|
|
|
|
|
|
|
|
|
|
|
|
|
|
|
|
|
|
|
|
|
|
|
|
|
|
|
|
|
|
|
|
|
|
4 |
Assemble base station and put into service |
Pages 9 - 13 |
|
|
|||||
|
|
|
|
||||||||
|
|
|
|
|
|
|
|
|
|
|
|
|
|
|
|
|
|
|
|
|
|
|
|
|
|
|
|
|
|
|
|
|
|
||
|
|
|
|
|
|
|
|
|
|||
|
5 |
Put the mobile units into service |
|
|
|
Std. mobile unit P. 16 - 20 |
|
|
|||
|
|
|
|
|
|
|
|
|
Comf. mobile unit P. 21 - 26 |
|
|
|
Base station and mobile unit are ready for operation, you can place/receive calls |
|
|
||||||||
|
|
|
|||||||||
|
6 |
Set the ring allocation |
Standard mobile unit P.69 |
|
|||||||
|
|
|
|
|
|
|
|
|
|
|
|
|
|
|
|
|
|
|
|
|
Comfort mobile unit P.118 |
|
|
You can now use the phone in a target-specific manner.
System Code
In order to put your base station into service and to change your settings, you must first enter a four-digit code, the system code. The procedure for doing this is described in the operating instructions. At the time of delivery, "0000" is set as the system code. You must use this pre-set "0000" system code to register the first mobile unit. A separate mobile unit PIN is available for the disabling of an individual mobile unit.
Recommendation:
We recommend that the system code be changed after registration of the first mobile unit (see page 30). The system code "blocks" your system from being accessed by any unauthorized individuals. Registration of additional mobile units as well as system settings can only be carried out after entering this system code.
8
28.11.96 1054K02.FM Gigaset 1054, GBR: A30852-X954-B101-1-7619
|
.Putting Into Service |
|
|
Base Station Gigaset 1054 |
|
|||
|
|
|
|
|
|
|
|
|
|
|
|
|
|
|
|
|
|
|
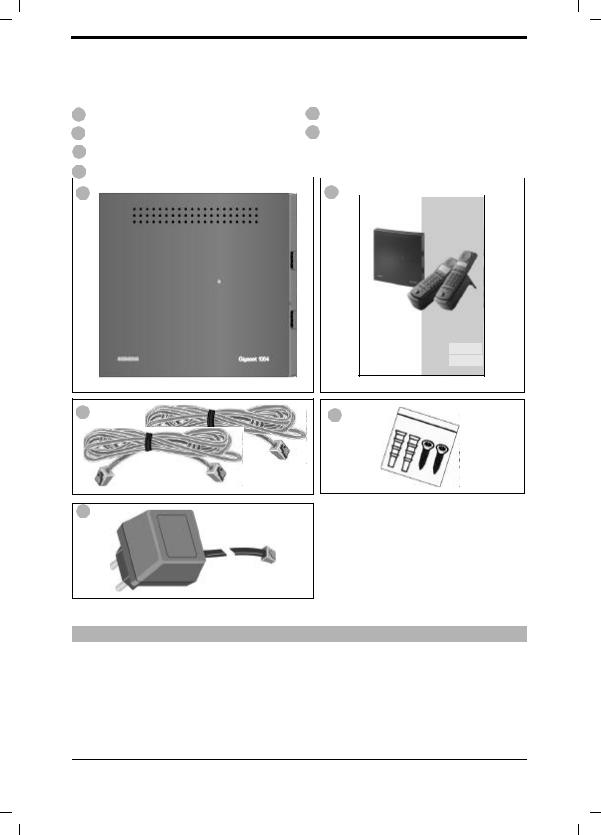
Contents of Package |
|
|
|
|
|
|
|
|
1 |
Base station |
4 Operating instructions |
|
||||
|
2 |
TAE connection cables (2) |
5 2 screws and plugs |
|
||||
|
3 |
Plug-in power supply unit |
|
|
|
|
|
|
|
|
|
|
|
|
|
|
|
|
4 |
|
|
|
|
|
|
|
|
|
|
4 |
|
|
|
||
|
1 |
|
|
|
|
|||
|
|
s |
|
|||||
|
|
|
|
|
|
|
||
|
|
|
|
|
|
Gigaset 1054 |
|
|
|
|
|
|
|
|
Schnurloses digitales DECT-Telefonsystem |
|
|
Operating Instructions
8 Mobile units can be connected
2 non-cordless devices can be connected
2 |
5 |
|
3
Special Accessories
●Gigaset 1000S mobile units
●Gigaset 1000C comfort mobile units
●Rechargeable batteries for mobile units
●Gigaset 1000L charging units
●Cordless telephone connectors Gigaset 1000TAE
9

28.11.96 1054K02.FM Gigaset 1054, GBR: A30852-X954-B101-1-7619
Putting Into Service Base Station Gigaset 1054
Tips for the Most Advantageous Installation of the Base Station
If you are using non-cordless telephones along with this cordless telephone, we recommend that you keep as great a distance as possible between the telephone and the base station in order to prevent humming (technical source) noises on the telephone.
Place the base station at the most central site possible within the range in which you want to be able to use the phone. For example:
in the hallway of your apartment,
in a centrally-located room of your house, office or apartment,
not in the basement,
not in the attic.
The base station should, if possible, be installed at an easily accessible site. For example:
in an open space in the room,
not in alcoves,
not behind metal doors, heavy furniture, metal cabinets,
not in places which are especially heavily shielded from radio waves by thick (steel) concrete walls or metal walls.
If you also want to be able to use the phone outside of the building, install the base station:
as near to window level as possible,
in a room facing your grounds.
Installation Site / Selection of the Mounting Site
In selecting the installation site, the following criteria should be taken into consideration:
1.The telephone connection cable must be long enough to reach the jack of your TAE connector.
2.A 220/230 V electrical outlet must be available at the installation site for supply of power to the base station.
3.In order to prevent mutual interference, the installation site should not be in direct proximity to other devices such as, for example, a HiFi, office equipment or microwave appliances.
The base station is designed for operation in protected rooms with a temperature range of
0 to +50 °C. It should not, for example, be installed in the bathroom, laundry room, damp basement rooms or near heat sources, such as, for example, radiators. It should also not be installed at a site exposed to direct sunlight.
10

28.11.96 1054K02.FM Gigaset 1054, GBR: A30852-X954-B101-1-7619
Putting Into Service Base Station Gigaset 1054
Range
Depending on the surroundings, the outdoor range can be up to about 300 m. Within buildings, depending on spatial and structural conditions, a range of up to 50 m is possible.
If you should leave the range, you will lose the radio contact to the base station and the
symbol on the screen will blink. If you have activated the range alarm (delivery status = deactivated), a supplemental warning tone will sound before you leave the radio range.
Mounting / Connecting the Base Station
The device can be installed on a flat surface (for example, on a desk or shelf) or mounted on the wall.
1.First plug the mini western plug of your telephone cord into the jack labeled "L1" or "L2" (bottom of base station).
If only one external telephone line is to be connected to Gigaset 1054, the "L1" should be used.
2.Plug the mini western plug of the cable into the plug-in power supply, using the jack labeled „  “ (bottom of base station).
3.Place the cable inside the molded channel.
If you want to mount the device on the wall, follow the steps below after carrying out those above; if it is not to be wall mounted, proceed to step 8:
4.Drill two holes (Ø 5mm), 69 mm apart.
5.Insert two plugs.
6.Screw the screws into the wall, leaving 2 mm between the head of the screw and the wall.
7.Hang the base station on the wall by lining up the heads of the screws with the holes in the base station and pushing down briefly on the base station until it is firmly mounted.
8.Insert the TAE plug of the telephone connection cable into the telephone jack.
9.Insert the plug-in power supply into the 220/2230V electrical outlet.
Note:
●In the case of loss of power, it is still possible to place a call using a supplemental non-cord- less telephone connected to the “0” jack.
●Use the plug-in power supply delivered with your unit, C 39280-Z4-C65.
●Be careful not to mix up the connections for the telephone cable and the plug-in power supply on the base station. If these are plugged incorrectly, the base station will not function; damage to the base station could also result.
11

28.11.96 1054K02.FM Gigaset 1054, GBR: A30852-X954-B101-1-7619
Putting Into Service Base Station Gigaset 1054
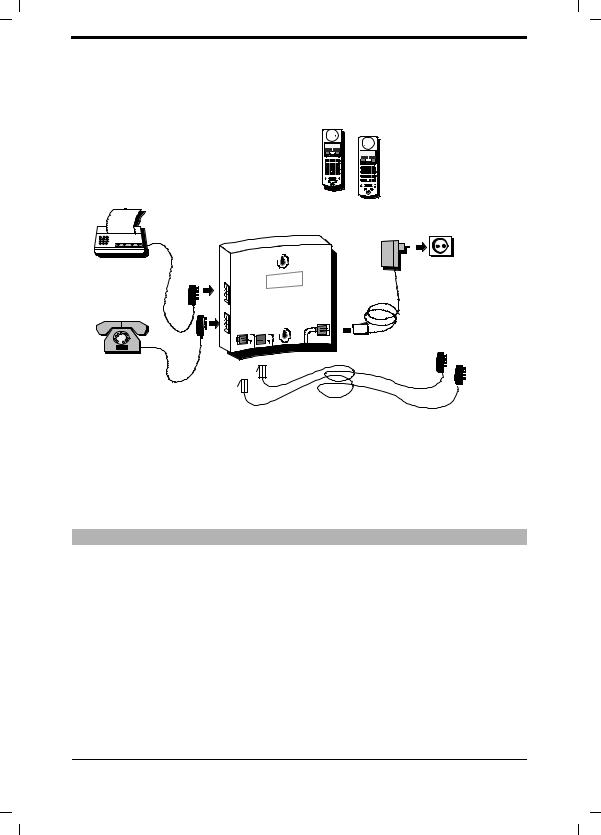
Connections for Gigaset 1054
Telephone |
|
connection cable |
Plug-in power supply |
|
Specifications for Wall Mounting
 5 mm
5 mm
170 mm |
120 mm |
|
5 mm
180 m m
12
28.11.96 1054K02.FM Gigaset 1054, GBR: A30852-X954-B101-1-7619
Putting Into Service |
Base Station Gigaset 1054 |
|
|
|
|
Connection Options at the Base Station |
|
|
|
Rear view of Gigaset 1054
E e n |
|
|
|
|
|
|
0221731550 |
|
|
|
|
||
S um m |
Rü ck |
|
|
|
|
|
|
|
|
E e n |
|
|
|
1 |
F |
|
0221731550 |
Mobile units |
||
2 3 |
S um m |
F |
|
|||
|
|
|
Rück |
|
||
4 |
5 6 |
1 |
2 3 |
|
||
7 |
8 |
9 |
|
|||
* |
0 # |
4 |
5 6 |
|
||
|
INT |
|
7 |
8 |
9 |
|
|
|
* |
0 # |
|
||
INT
Plug-in |
230V socket |
|
power supply |
||
|
TAE
faxmachine connec- tion cables
Telephone |
|
|
Non-cordless device: |
TAE connection cables |
|
if present |
||
|
Status of the Base Station Upon Delivery
The system is delivered with the following factory settings:
Direct trunk access |
Fully trunk authorized |
Automatic line seizure |
ON |
Call charge recording |
OFF |
Unit charge rate |
0.00 |
Display duration of call |
ON |
Configuration auxiliary device |
Telephone |
Ring allocation |
Collective call |
System code |
0000 |
Dialing mode |
DTMF |
Signal key |
Flash/250 msec |
13
28.10.96 |
1054K03.FM |
Gigaset 1054, GBR: A30852-X954-B101-1-7619 |
Putting Into Service |
Mobile Unit |
|
|
The Standard mobile unit can be used in temperature ranges between 10° C and 55° C, the Comfort mobile unit in ranges between 0° C and 45° C . Do not expose to water.
Tips for Individuals with Hearing Aids
Individuals with hearing aids should be aware that radio signals are projected into the hearing aid and, if strong enough, can result in a very disturbing humming tone.
Installing and Charging the Rechargeable Batteries
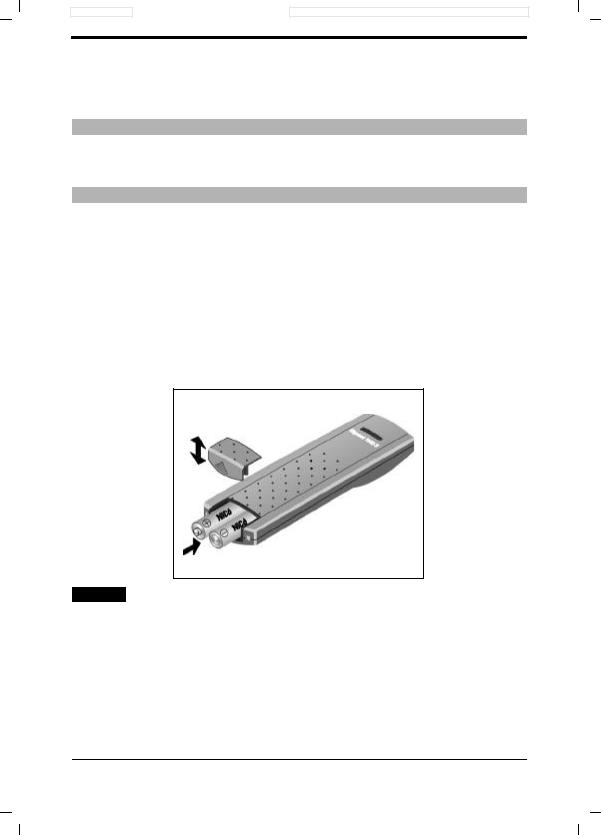
The mobile unit receives its power via 2 rechargeable batteries. In order for the mobile unit to function, these batteries must be installed in the battery compartment and the compartment cover must be closed.
1. Installing the batteries in the mobile unit
●Hold the mobile unit with the dialpad facing down. The compartment for the two rechargeable batteries is in the lower part of the mobile unit.
●Slide the rechargeable batteries (included with your unit) into the compartment, as shown in the figure below. Be sure that the polarity orientation of the batteries is correct. The plus and minus signs are labeled in the battery compartment (see figure below).
●From the top, slide the battery compartment cover into the slots (see figure) of the mobile unit and snap into place.
Note:
If the rechargeable batteries are not correctly installed, the mobile unit will not function.
2. Charging the rechargeable batteries
The batteries are not charged at the time of delivery. To charge the batteries, place the mobile unit in the charging unit (not included). The dialpad can be facing either up or down. However, the charging contacts on the bottom of the mobile unit must be in contact with those on the bottom of the charging unit.
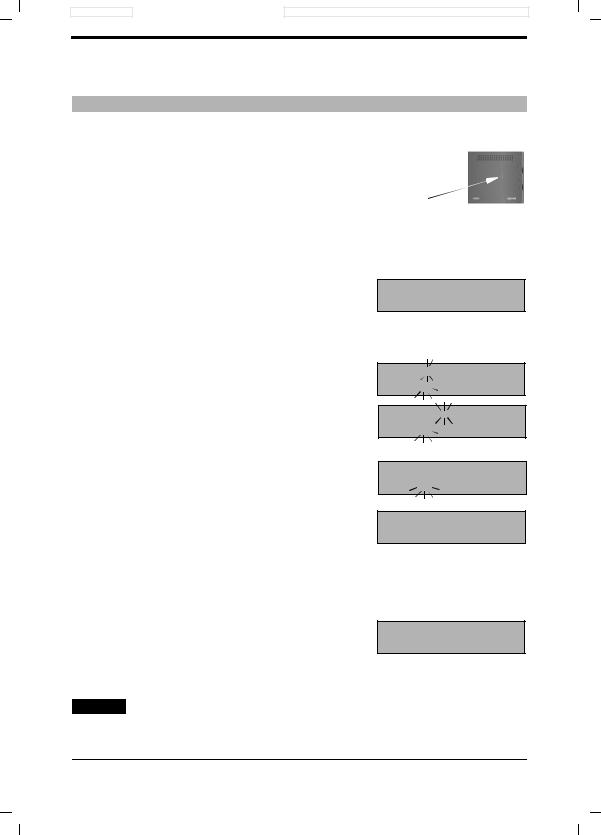
If the mobile unit is properly inserted for charging, the LED (light-emitting diode ( lit, signalling that the battery is charging.
The charging time can vary greatly, depending on the age and the manufacturer/type of rechargeable battery. The charging logic of the mobile unit always guarantees, however, an optimum charge of the rechargeable batteries.
14
28.10.96 |
1054K03.FM |
Gigaset 1054, GBR: A30852-X954-B101-1-7619 |
Putting Into Service |
Mobile Unit |
|
|
Mounting the Carrying Clip on the Mobile Unit
The carrying clip can be mounted if desired. Grasp the mobile unit, holding the dialpad in the palm of your hand. You will see small holes parallel to the screen. Insert the clip first into the hole on one side and then snap it into the hole on the other side.
Important Tips for Using the Rechargeable Batteries
The mobile unit comes with two rechargeable AA Nickel Cadmium batteries (Mignon cells)
●Use only the batteries which come with the product.
●If replacement is necessary, use only approved batteries of the following types: Panasonic
P-60 AA, Philips R6 NC-P, Saft RC6, UCAR RC6, DAIMON ACCU 1000, Varta 751 RS, Sanyo N-3UN, Sanyo N-3UC.
●The use of other battery types or of non-rechargeable batteries can cause problems with operation, and may even damage the device.
●The manufacturer does not accept any responsibility in such cases.
Do not use normal batteries! Use only approved rechargeable batteries!
When putting into service and using the rechargeable batteries, please observe the following basic principles:
●Before use, be sure that the batteries are adequately charged.
We recommend that they be charged without interruption for about 16 hours -- for example overnight -- and that, during the first week of use, the mobile unit always be replaced in the charging unit after use.
●New rechargeable batteries generally do not attain their full operating capacity (i.e. length of time that the charge is held for calls and standby status) until they have been in normal use for several days. Even ifthe charging LED signals that the batteries in the mobile unit are charged -- LED off -- , it is nevertheless possible that, during the first few days, the normal call and standby time has not yet been fully reached.
●After complete initial charging, the batteries attain their normal operating status. We recommend that, after this initial charging, the mobile unit not be replaced in the charging unit each time it is used. The rechargeable batteries function best if they are completely discharged periodically.
Warning: Limited operating time when batteries are partially discharged
●Be sure that the battery contacts do not come into contact with metallic or greasy parts.
●Replacement battery packs (reserve) can be charged in the charging unit; these should be exchanged periodically with those in the mobile unit.
3. Rechargeable BatteryOperating and Charging Times |
|
|
|
Mobile Unit |
Gigaset 1000S |
Gigaset 1000C |
|
|
|
|
|
Continuous call |
up to 7 hours |
up to 5 hours |
|
Standby status |
up to 50 hours |
up to 40 hours |
|
Charging times in mobile unit, in the charging unit |
|
about 5 hours |
|
Charging times in reserve compartment, in the charging unit |
about 24 hours |
||
15

28.10.96 |
1054K03.FM |
Gigaset 1054, GBR: A30852-X954-B101-1-7619 |
|
Putting Into Service |
Standard Mobile Unit |
||
|
|
|
|
|
|
|
|
|
|
|
Displays |
|
|
|
|
|
|
|
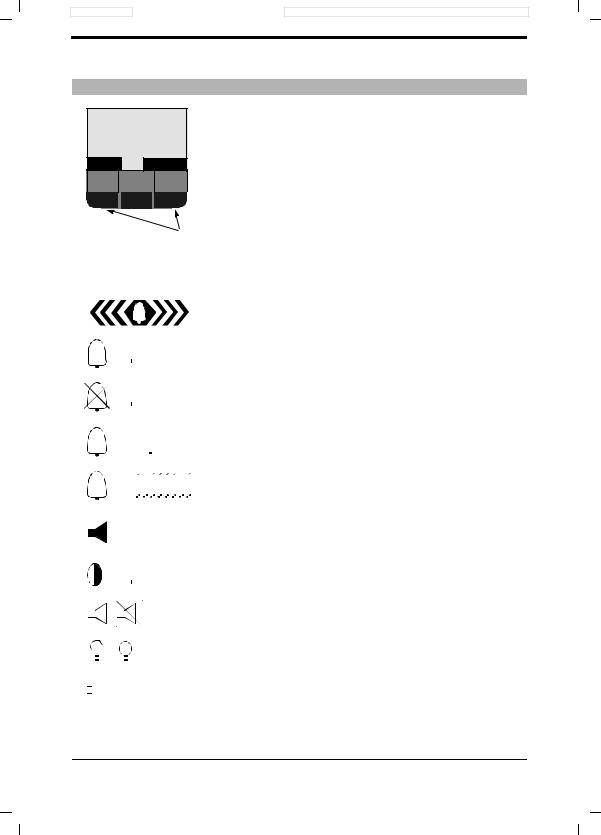
The top lines display all numbers and symbols, |
|
|
n |
|
|
|
uUPzAH -88888888 |
|
the bottom lines display the symbols for different |
|
|
A BCD EFG H |
|
operating statuses. |
|
|
Symbol |
Explanation |
|
|
|
|
|
||
|
u |
Display after pushing the signal key, ekey. |
||
|
U |
Display of call forwarding, if programmed. |
||
|
P |
Manual dial pause |
|
|
|
z |
Memory empty. |
|
|
|
A |
AKZ discriminating digit (only significant if behind telephone system) |
||
|
H |
HAKZ (only significant if behind telephone system) |
||
|
n |
Display of the star key, |
key. |
|
|
|
|
|
* |
-Display of the pound key, #key.
Symbols |
Explanation |
|
A |
Shows that the mobile unit is in save status and is not ready to dial. |
|
B |
Can be activated using the wkey. |
|
Battery symbol blinks about 5 - 10 minutes before the batteries are empty. |
||
C |
If the mobile unit is in the charging unit and is charging, then this symbol appears. |
|
ON symbol. Can be activated using the u key. |
||
D |
Connect symbol shows that a radio channel to the base station exists. |
|
|
||
E |
Can be activated using the gkey. |
|
Shows that the signalling method has been temporarily switched from |
||
pulse to tone dialing. |
||
F |
Shows that an external connection exists via the base station. |
|
G |
Shows that an internal connection exists via the base station. |
|
H |
Shows that the mobile unit is locked. |
|
|
|
|
|
|
|
16
28.10.96 |
1054K03.FM |
Gigaset 1054, GBR: A30852-X954-B101-1-7619 |
Putting Into Service |
Standard Mobile Unit |
|
|
ON OFF, LOCK Status
The mobile unit can be set to three different statuses.
•OFF
No calls can be placed and no incoming calls are signalled.
•ON
Calls can be placed and received.
In order to pick up a call, simply remove the mobile unit from the charging unit.
or
If the mobile unit was not in the charging unit, then press the g key.
•LOCK
This protects the dialpad of the mobile unit against unintentional use, for example when
it is being carried in your pocket. Incoming calls can be accepted just as in ON status. For the call, the mobile unit switches automatically to the ON status. Outgoing calls are not possible.
C
C
zzzz
C
Note:
● If the mobile unit is not within the radio range of the base station, the Csymbol blinks on the screen. It is not possible to place or receive calls.
●Procedures can be interrupted by pressing the gkey once or, if necessary, twice.
17
28.10.96 |
1054K03.FM |
Gigaset 1054, GBR: A30852-X954-B101-1-7619 |
Putting Into Service |
Standard Mobile Unit |
|
|
Switching the Status
Switching from ON status:
u ● to OFF status:
Push the key until the display on the screen goes off.
You will hear the key acknowledgment tone.
●to LOCK status:
Push key briefly, until the display is updated.
You will hear the key acknowledgment tone.
Switching from OFF status:
C
zzzz
C
u ● to ON status:
Push the key until the
display appears on the screen.
You will hear the key acknowledgment tone.
or
Simply place the mobile unit in the charging unit.
You will hear the key acknowledgment tone.
Switching from LOCK status:
u ● to ON status:
Push key briefly, until the display is updated.
You will hear the key acknowledgment tone.
u ● to OFF status:
Push the key until the display on the screen goes off.
You will hear the key acknowledgment tone.
Note:
C
C
zzzz
C
C
The mobile unit must be in ON status in order to dial or to to use the memory.
18
28.10.96 |
1054K03.FM |
Gigaset 1054, GBR: A30852-X954-B101-1-7619 |
Putting Into Service |
Standard Mobile Unit |
|
|
Registering a Standard Mobile Unit at the Base Station
Every additional mobile unit acquired must first be registered at the base station.
For this, follow these steps:
1.The mobile unit must be switched off
If necessary, turn it off by pushing the
u key until the display on the screen goes off.
2. |
Push the registration key on the base station. |
Registration key |
|
Please use an object with a |
|
|
sharp point (e.g. pencil, ballpoint pen). |
|
|
The registration key will blink. |
|
3. |
Next (within 1 minute) on the mobile unit: |
|
The mobile unit must be switched off.
Press the 1 and
ohold it down.
(This is done to stipulate the base station number)
uIn addition, push the ON key until the display appears on the screen.
Enter the system code.
oAt the time of delivery, the system code is set as 0000.
Complete entry of the system code.
#
Please wait until the connection to the base station is established.
All of the non-assigned internal station numbers appear on the screen; shown here, 1 to 8.
!... ( Enter the desired internal station number for the mobile unit, i.e. push one of the number keys between 1 and 8; here, for example, 2 is pushed.
The mobile unit is registered.
If the display of the base number is activated, you will now see the base number.
1-
 C
C
1---
 C
C
1
 C
C
12345678
ACD
C
Note:
●Up to 8 mobile units can be registered on one base station.
●If 8 mobile units are already registered, three dashes appear when the system code is entered during the registration procedure; a negative acknowledgment tone sounds.
●To deactivate mobile unit, see page 72.
19
28.10.96 |
1054K03.FM |
Gigaset 1054, GBR: A30852-X954-B101-1-7619 |
Putting Into Service |
Standard Mobile Unit |
|
|
Viewing and Setting the Dialing Mode
The German Telekom AG offers two different dialing modes for telephone connections:
●Dial pulsing system (Dial Pulsing System = DPS)
●Dual-tone (multifrequency system = DTMF)
A the time of initialization, your new telephone is set for tone dialing.
Tone dialing (DTMF) is, however, only possible if your telephone lines are connected to a new digital switching exchange. The German Telekom AG has, however, not yet completely finished converting all telephone lines in Germany to digital switching exchanges.
Determining the Dialing Mode of Your Telephone:
Push the connect key and then dial any digit (for example, 2).
If you then still hear the same dial tone, you will have to switch the dialing mode.
w# Push the memory key followed by the # key.
This opens the memory.
1Push the 1 key.
This activates the procedure.
oEnter the system code.
Every digit entered replaces one dash.
1“ Select external telephone line 1 or 2.
z Push the repeat dial key.
-
ACD
1____
ACD
1 _
A CD
012
A CD
A CD
DPS
0§§ Push the keys 0, 3, 3..
03 3
A CD
Tone Dialing, Signal Key Flash for Telephone Systems (Setting the Flash, see page 141)
0§/ Push the keys 0, 3, 7.
03 7
A CD
Tone Dialing, Signal Key Flash (length/250 ms) for Telephone Service on
Main Connection (status upon delivery)
03 8
0§( Push the keys 0, 3 , 8. |
A CD |
wPush the memory key.
The dialing mode is now programmed.
C
20
8.11.96 |
1054K04.FM |
Gigaset 1054, GBR: A30852-X954-B101-1-7619 |
Putting Into Service |
Comfort Mobile Unit |
|
|
Display
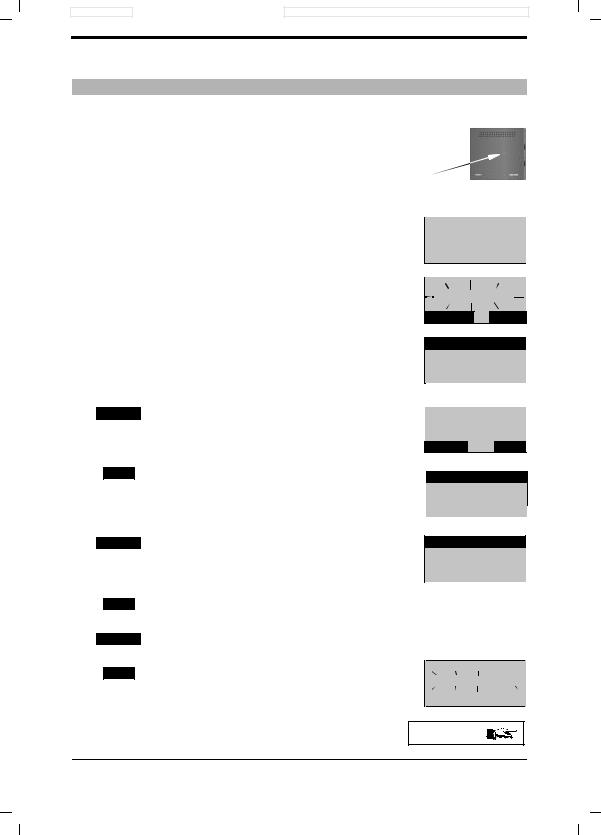
External 1
0123456
MUTE CONSLT.
F
Dialog keys
There are four lines on the graphics screen of your Comfort mobile unit.
During dialing, the number which is being dialed is enlarged and displayed across two lines.
The bottom lines contain the display fields for the dialog keys. All displays are shown in clear text.
Some displays are illustrated with graphics; these are explained in the tables below.
Graphic |
|
|
|
|
Explanation |
||
|
|
|
|
|
|
|
|
|
|
|
|
|
|
|
You are being called |
|
|
|
|
|
|
|
Set the ringer volume (6 levels) |
|
|
|
|
|
|
|
Tone ringer off |
|
|
|
|
|
|
|
|
|
|
|
|
|
|
|
Set tone ringer pitch (10 levels) |
|
|
|
|
|
|
|
|
|
|
|
|
|
|
|
Set tone ringer melody (10 levels) |
|
|
|
|
|
|
|
|
|
|
|
|
|
|
|
|
|
|
|
|
|
|
|
Set handset volume (3 levels) |
|
|
|
|
|
|
|
Set contrast (6 levels) |
|
|
|
|
|
|
|
|
|
|
|
|
|
|
|
|
|
|
|
|
|
|
|
Switch signal tone on or off |
|
|
|
|
|
|
|
|
|
|
|
|
|
|
|
Locked or unlocked status |
|
|
|
|||||
|
|
|
|||||
|
|
|
|
|
|
|
If the charge of the rechargeable batteries goes below a |
|
|
|
|
|
|
|
certain level, this symbol appears periodically for 2 |
|
|
|
|
|
|||
|
|
|
|
|
|
|
seconds. |
|
|
|
|
|
|
|
|
21

8.11.96 |
1054K04.FM |
Gigaset 1054, GBR: A30852-X954-B101-1-7619 |
Putting Into Service |
Comfort Mobile Unit |
|
|
ON, OFF, LOCK Status
The mobile unit can be set to three different statuses.
1.OFF
No calls can be placed and no incoming calls are signalled.
2.ON
Calls can be placed and received.
In order to answer a call, simply remove the mobile unit from the charging unit.
or
If the mobile unit was not in the charging unit,
then press the g key.
3.LOCK
This protects the dialpad of the mobile unit from unintentional use, for example, when it is being carried in your pocket. Incoming calls can be accepted just as in ON status. The mobile unit switches automatically to ON status for the call.
Outgoing calls are not possible.
Station 1
TEL.BOOK 
 REDIAL
Keyboard protected
Note:
●If the mobile unit is not within the radio range of the base station,, then the text “Srch.station X” blinks on the screen, whereby X is the stipulated base station number.
●A procedure can be interrupted by pushing the gkey once, or if necessary, twice.
Srch.station 1
TEL.BOOK 
 REDIAL
22

8.11.96 |
1054K04.FM |
Gigaset 1054, GBR: A30852-X954-B101-1-7619 |
Putting Into Service |
Comfort Mobile Unit |
|
|
Switching the Status
Switching from ON Status:
u ● to OFF status:
Push the key until the display on the screen goes off..
You will hear the key acknowledgment tone.
u ● to LOCK status:
Push the key briefly, until the display is updated.
You will hear the key acknowledgment tone.
Switching from OFF Status:
u ● to ON status:
Push the key until the display appears.
You will hear the key acknowledgment tone.
or
●Simply place the mobile unit in the charging unit.
You will hear the key acknowledgment tone.
Switching from LOCK Status:
u ● to ON status:
Push the key briefly, until the display is updated.
You will hear the key acknowledgment tone.
u ● to OFF status:
Push the key until the display goes off.
You will hear the key acknowledgment tone.
Station 1
TEL.BOOK 
 REDIAL
Keyboard protected
Srch.station 1
TEL.BOOK 
 REDIAL
Station 1
TEL.BOOK 
 REDIAL
Keyboard protected
Station 1
TEL.BOOK 
 REDIAL
Note:
●The mobile unit must be in ON status in order to dial or to use the memory.
23
8.11.96 |
1054K04.FM |
Gigaset 1054, GBR: A30852-X954-B101-1-7619 |
Putting Into Service |
Comfort Mobile Unit |
|
|
Registering the Comfort Mobile Unit at a Base Station
Every additional mobile unit acquired must first be registered at the base station.
For this, follow these steps:
1. Push the registration key on the base station.
Please use an object with a sharp point (e.g. pencil, pen). The registration key begins to blink.
2. Then, on the mobile unit (within 1 minute):
u
Registration key
Register !
ß
ß
NEXT
OK
NEXT
OK
NEXT
OK
Srch.station |
|
TEL.BOOK |
REDIAL |
Telephone book
Redial Telephone lock
NEXT |
|
OK |
Settings |
|||
Station |
selection |
||
Service |
|
|
|
|
|
|
|
NEXT |
OK |
Handset volume
Tone ringing Display contrast
NEXT |
|
OK |
|
Register
Language
Autom.backlight
NEXT |
|
OK |
|
||
|
|
|
Station 1 |
|
|
Station 2 |
|
|
Station 3 |
|
|
NEXT |
|
OK |
Registration
Srch.station 1
Continued
24
 Loading...